
Casio W-756 / линейка Collection / модуль 3100 / год 2008
Инструкция к модулю Casio 3100
- Смотреть онлайн → (без скачивания, удобно на мобильных и планшетах);
- Скачать русскую инструкцию → (типичная “как у всех”, не всегда понятные картинки);
- Скачать английскую инструкцию → (детальная, много фото, более понятная).
Сложно настроить? Спрашивай на форуме Casio →
Читайте новости о любимых часах W-756 на блоге
[display-posts tag=”W-756″ posts_per_page=”4″]
Все новости о W-756 →
Побывайте на заводе Casio, изучайте последние новинки часов на Casioblog.RU


CASIO
часы W-756
Модуль 3100
Руководство пользователя
Прежде всего прочтите эту важную информацию
Батарея
• В приобретенных вами часах батарея питания устанавливается на фабрике и должна
быть немедленно заменена при первых признаках недостаточности питания (не
включается подсветка, тусклый дисплей) у ближайшего к вам дилера или
дистрибьютора фирмы «CASIO».
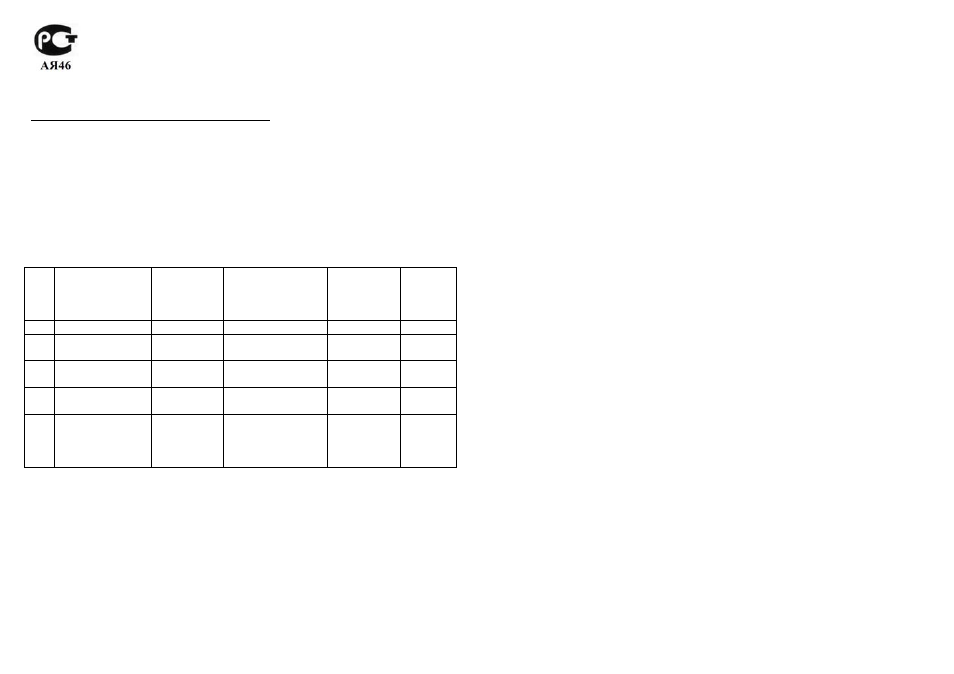
Защита от воды
• Часы классифицируются по разрядам (с I по V) в соответствии со степенью их
защищенности от воды. Уточните разряд ваших часов с помощью приведенной ниже
таблицы, для правильной эксплуатации ваших часов.
Раз
ряд
Маркировка на
корпусе
Брызги,
дождь и т.п.
Плавание, мытье
машины и т.п.
Подводное
плавание,
ныряние и
т.п.
Ныряние
с
акваланг
ом
I —
Нет
Нет
Нет
Нет
II WATER
RESISTANT
Да
Нет
Нет
Нет
III 50M
WATER
RESISTANT
Да
Да
Нет
Нет
IV 100M
WATER
RESISTANT
Да
Да
Да
Нет
V 200M
WATER
RESISTANT
300M WATER
RESISTANT
Да
Да
Да
Да
Примечания для соответствующих разделов:
I. Часы не защищены от воды. Избегайте попадания любой влаги.
II. Не вытаскивайте коронку, если часы мокрые.
III. Не нажимайте кнопки часов под водой.
IV. Если часы подверглись воздействию соленой воды, то тщательно промойте их и
вытрите насухо.
V. Часы могут использоваться при погружении с аквалангом (за исключением таких
глубин, при которых требуется гелиево-кислородная смесь).
• Особенностью некоторых защищенных от воды часов является наличие у них
кожаных ремешков. Не надевайте эти часы во время плавания или какой-либо другой
деятельности, при которой ремешок погружается в воду.
Уход за вашими часами
• Никогда не пытайтесь вскрывать корпус и снимать заднюю крышку.
• Замена резиновой прокладки, защищающей часы от попадания воды и пыли, должна
осуществляться через каждые 2-3 года.
• Если внутрь часов попадет влага, то немедленно проверьте их у ближайшего к вам
дилера или дистрибьютора фирмы CASIO.
• Не подвергайте часы воздействию предельных температур.
• Хотя часы рассчитаны на использование их в обычных условиях, тем не менее вы
должны избегать грубого обращения с ними и не допускать их падения.
• Не пристегивайте ремешок слишком сильно. Между вашим запястьем и ремешком
должен проходить палец.
• Для очистки часов и ремешка используйте сухую мягкую ткань, либо мягкую ткань,
смоченную в водном растворе мягкого нейтрального моющего средства. Никогда не
используйтесь легко испаряющимися средствами (например такими, как бензин,
растворители, распыляющиеся чистящие средства и т.п.).
• Когда вы не пользуетесь вашими часами, храните их в сухом месте.
• Избегайте попадания на часы бензина, чистящих растворителей, аэрозолей из
распылителей, клеящих веществ, краски и т.п. Химические реакции, вызываемые
этими материалами, приводят к повреждению прокладок, корпуса и полировки
часов.
• Особенностью некоторых моделей часов является наличие на их ремешке
изображений, выполненных шелкографией. Будьте осторожны при чистке таких
ремешков, чтобы не испортить эти рисунки.
Для часов с пластмассовыми ремешками…
• Вы можете обнаружить белесое порошкообразное вещество на ремешке. Это
вещество не вредно для вашей кожи или одежды и может быть легко удалено путем
простого протирания куском ткани.
• Попадание на пластмассовый ремешок пота или влаги, а также хранение его в
условиях высокой влажности может привести к повреждению, разрыву или
растрескиванию ремешка. Для того, чтобы обеспечить длительный срок службы
пластмассового ремешка, при первой возможности протирайте его от грязи и воды с
помощью мягкой ткани.
Для часов с флуоресцентными корпусами и ремешками…
• Длительное облучение прямыми солнечным светом может привести к постепенному
исчезновению флуоресцентной окраски.
• Длительный контакт с влагой может вызвать постепенное исчезновение
флуоресцентной окраски. В случае попадания на поверхность часов любой влаги,
как можно скорее сотрите ее.
• Длительный контакт с любой другой намоченной поверхностью может привести к
обесцвечиванию флуоресцентной окраски. Следите за отсутствием влаги на
флуоресцентной поверхности и избегайте ее контакта с другими поверхностями.
| Language | Type | Pages | |
|---|---|---|---|
| English | User Manual | 1 | > Go to the manual |
| English | User Manual | 3 | > Go to the manual |
| German | User Manual | 3 | Go to the manual |
| Dutch | User Manual | 3 | Go to the manual |
50814
Report abuse
Libble takes abuse of its services very seriously. We’re committed to dealing with such abuse according to the laws in your country of residence. When you submit a report, we’ll investigate it and take the appropriate action. We’ll get back to you only if we require additional details or have more information to share.
Product: Casio w-756
Forumrules
To achieve meaningful questions, we apply the following rules:
- First, read the manual;
- Check if your question has been asked previously;
- Try to ask your question as clearly as possible;
- Did you already try to solve the problem? Please mention this;
- Is your problem solved by a visitor then let him/her know in this forum;
- To give a response to a question or answer, do not use this form but click on the button ‘reply to this question’;
- Your question will be posted here and emailed to our subscribers. Therefore, avoid filling in personal details.
Your question has been posted on this page
Would you like to receive an email when new answers and questions are posted? Please enter your email address.
Have a look at the manual Casio W 756 Owners Manual online for free. It’s possible to download the document as PDF or print. UserManuals.tech offer 338 Casio manuals and user’s guides for free. Share the user manual or guide on Facebook, Twitter or Google+.
![]()
							1
Operation Guide 3100
MA0801-EA
About This Manual•Depending on the model of your watch, display text
appears either as dark figures on a light background or
light figures on a dark background. All sample displays
in this manual are shown using dark figures on a light
background.
• Button operations are indicated using the letters shown
in the illustration.
• Each section of this manual provides you with the
information you need to perform operations in each
mode. Further details and technical information can be
found in the “Reference” section.(Light)
(Light)
Timekeeping Mode Stopwatch Mode Preset Timer Mode Alarm ModeWorld Time ModeCountdown Timer Mode
Press     .
General Guide•Press  B to change from mode to mode.
• In any mode (except when a setting screen is on the display), press  L to illuminate
the display.
T o  set the time and date1. In the Timekeeping Mode, hold down  A until the
seconds start to flash, which indicates the setting
screen.
2. Press  B to move the flashing in the sequence shown
below to select other settings.
Seconds City Code  Hour
Year MinutesDay
DST
Month
3. When the setting you want to change is flashing, use  D and  C to change it as
described below.
TimekeepingUse the Timekeeping Mode to set and view the current
time and date.
Read This Before You Set the Time and Date !The times displayed in the Timekeeping Mode and World
Time Mode are linked. Because of this, make sure you
select a Home City code before you set the time and date.
PM indicator  Hour : Minutes : Seconds
Month – Day Day o
f week
Screen         50OFF
6-30 To do this:
Reset the seconds to 00Toggle between Daylight Saving Time (O\b)
and Standard Time (OFF)Change the city codeChange the hour or minutesChange the yearChange the month or day Do this:
Press
D.Press  D.
Use  D (east) and  C (west).Use  D (+) and  C (–).
• For details about city codes, see the  “City Code Table ”.
• See  “Daylight Saving Time (DST) ” for details about DST setting.
4. Press  A to exit the setting screen.
Daylight Saving Time (DST)Daylight Saving Time (summer time) advances the time setting by one hour from
Standard Time. Remember that not all countries or even local areas use Daylight
Saving Time.
To  toggle the T imekeeping Mode time between DST and Standard T ime1. In the Timekeeping Mode, hold down  A until the
seconds start to flash, which indicates the setting
screen.
2. Press  B to display the DST setting screen.
3. Press  D to toggle between Daylight Saving Time
(
O\b  displayed) and Standard Time (OFF displayed).
4. Press  A to exit the setting screen.
• The  DST indicator appears on the display to indicate
that Daylight Saving Time is turned on.
DST indicator
T o  toggle between 12-hour and 24-hour timekeepingIn the Timekeeping Mode, press  D to toggle between 12-hour timekeeping and
24-hour timekeeping.
• With the 12-hour format, the  P (PM) indicator appears on the display for times in the
range of noon to 11:59 p.m. and the  A (AM) indicator appears for times in the range
of midnight to 11:59 a.m.
• With the 24-hour format, times are displayed in the range of 0:00 to 23:\
59, without
any indicator.
• The 12-hour/24-hour timekeeping format you select in the Timekeeping Mode is
applied in all other modes.
• The  A and  P indicators are not displayed when the current time is displayed in othe\
r
modes.
StopwatchThe Stopwatch Mode lets you time a game or event. The
upper display shows non-stop total elapsed time, while
the lower display shows event elapsed time, which can be
paused as required for time outs, half time, etc.
• The measurement limit of the upper display (total time)
is 99 minutes 59 seconds.
• The measurement limit of the lower display (event time)
is 59 minutes 59 seconds.
• A stopwatch measurement operation continues to run
until you stop it. If either time reaches its measurement
limit, it will restart from zero.
• A stopwatch measurement operation continues even if
you exit the Stopwatch Mode.
• Starting event timing will cause the display to change to
the Elapsed Time Screen from the initial screen shown
on this page.
• All of the operations in this section are performed in the Stopwatch Mod\
e, which you
enter by pressing  B.
Event time minutes, seconds
* The time measurement in this
display can be paused and
restarted by pressing     .
Total time minutes, seconds,
1/100 second
* Once started, this time
measurement cannot be
paused. It shows total time
since the stopwatch
measurement operation
started.
Elapsed Time Screen
Basic Event Timing Operation
Start Stop
* Re-start Stop *Clear
Hold down
* Total time measurement in upper display continues.
Using the Stopwatch Mode to Time a Sporting EventYou can time a sporting event with the Stopwatch Mode either with or with\
out
presetting the duration of the event. If you do, the watch will beep whe\
n the total time
in the upper display reaches the preset event duration.
If the event is interrupted for timeouts or some other reason, press  D to pause and
restart event time measurement in the lower display. Since total time measurement
continues in the upper display, you can calculate the time that play was interrupted
(lost time) by subtracting the time in the lower display from the time\
 in the upper
display.
Current
Timekeeping Mode time
![]()
							2
Operation Guide 3100
To preset the duration of the event1.In the Stopwatch Mode, hold down A until the current
event duration setting starts flashing in the upper
display. This is the setting screen.
•If the current event duration setting does not appear
when you hold down A, it means that an ongoing
elapsed time operation is in progress. Use the
procedure under “To stop an elapsed time operation
and reset the stopwatch” to reset.
2. Use D (+) and C (–) to change the current event
duration setting.
•You can set a duration in the range of 1 to 60
minutes, in one-minute units.
3. After setting the duration, press A to exit the setting
screen.
To start timing of an eventPress D to start event timing.
•Initially, the same elapsed time will appear in both the upper and lower displays.
To pause timing1. Press D.
•This will stop event time measurement in the lower display, but total time
measurement in the upper display will continue.
2. To restart event time measurement in the lower display, press D again.
When the preset event duration is reached•The watch will beep for 10 seconds when the total elapsed time in the upper display
reaches the preset event duration.
•Event timing continues even after the preset event duration is reached.
To stop an elapsed time operation and reset the stopwatch1. Press D to stop event time measurement in the lower display.
•Total time measurement in the upper display continues.
2. Hold down C until the initial Stopwatch Mode screen appears.
Preset timer time
Current time
Preset TimerThe watch includes a number of different preset times
that you can select for the countdown start times.
An alarm sounds when the countdown reaches zero.
•The following are the preset start times, all in minutes:
10, 12, 15, 20, 25, 30, 35, 40, 45.
•You also can turn on auto-repeat, which automatically
will restart the timer from the currently selected preset
time whenever it reaches zero.
•All of the operations in this section are performed in the
Preset Timer Mode, which you enter by pressing B.
To perform a preset timer operation1. In the Preset Timer Mode, use C to scroll through the
preset times until the one you want to use is displayed.
Number of repeats  Auto-repeat on indicator
10 minutes 12 minutes 15 minutes 20 minutes
25 minutes
30 minutes 45 minutes 40 minutes 35 minutes
•To turn on auto-repeat, hold down A while a start
time selection screen is displayed. The number of
repeats will appear near the timer time.
•Frequent use of auto-repeat and the alarm can run
down battery power.
2. Press D to start the countdown.
•Press D while a countdown operation is in progress to
pause it. Press D again to resume the countdown.
•When the end of the countdown is reached (regardless
of whether auto-repeat is on or off), the alarm sounds for
10 seconds or until you stop it by pressing any button.
•Auto-repeat off: When the end of the countdown is
reached, an elapsed time operation starts and the upper
display shows how much time has elapsed since the
end of the countdown. The elapsed time operation will
stop automatically when it reaches 60 minutes. At that
time the countdown timer start time selection screen will
appear.
•Auto-repeat on: When the end of the countdown is reached, a new countdown starts
from the preset start time. The number of repeats is displayed next to the timer time.
The number of repeats display changes to “
xx” when the count reaches 100.
•To stop a countdown operation completely, first pause it (by pressing D), and then
press C. This will display the initial Preset Timer Mode screen.
Countdown TimerWith the countdown timer, you can set up to nine start
times, which are counted down in sequence one after the
other.
Example 1: Interval Training
3-minute run (
), 1-minute rest (), 5-minute run
()
Example 2: Game Timing
45-minute period (
), 15-minute halftime (),
45-minute period ()
•The watch beeps when any countdown timer reaches
zero.
•An alarm sounds for about five seconds when the last
countdown timer reaches zero.
•You can turn on an auto-repeat feature that restarts the timer sequence from the
beginning when the end of the last countdown timer is reached.
•All of the operations in this section are performed in the Countdown Timer Mode,
which you enter by pressing B.
To configure countdown timer settings1. In the Countdown Timer Mode, hold down A until the
countdown timer number starts to flash.
This is the setting screen.
2. Use D and C to scroll through the countdown timer
numbers until the one you want to set is displayed.
Current time  Start time
(Minutes Seconds)
Countdown timer number
Screen
03'00''03'00''
To do this:Change the countdown timer numberChange the minutesChange the seconds (5-second units)Toggle auto-repeat off and on ()
Do this:Use D (+) and C (–).Use D (+) and C (–).Use D (+) and C (–).Press D.
3. Press B to move the flashing in the sequence shown below to select other
settings.
Minutes Countdown Timer number Seconds Auto-repeat
4. While a setting is flashing, use D and C to change it as described below.
•Any timer whose start time is 00'00'' will not be used during countdown timer
operation.
•There is no auto-repeat for individual countdown timers. In the Countdown Timer
Mode, auto-repeat repeats the entire set of timers.
5. Set the times of all of the countdown timers that you
want.
6. Press A to exit the setting screen.
•When auto-repeat is turned on, the number of repeats
will appear next to the timer time.
•Frequent use of auto-repeat and the alarm can run
down battery power.
Number of repeats  Auto-repeat on indicator
To perform a countdown timer operationIn the Countdown Timer Mode, press D to start the countdown timer.
•To pause a countdown timer operation, press D. Press D again to restart.
•While auto-repeat is turned off, the watch beeps when each countdown timer
reaches zero. An alarm will sound for about five seconds when the final countdown
timer reaches zero.
•While auto-repeat is turned on, the watch beeps when each countdown timer
reaches zero. An alarm will sound for about five seconds when the final countdown
timer reaches zero. The timing restarts from the first timer when the final countdown
timer reaches zero. The number of repeats is displayed next to the timer time. The
number of repeats display changes to “
xx” when the count reaches 100.
•An ongoing countdown timer operation continues to be performed even if you exit
the Countdown Timer Mode.
•To stop the countdown timer, first press D to pause it, and then press C. This
returns the countdown time to its starting value.
Timekeeping Mode time  Current time in the zone
of the selected city code
City code
World TimeWorld Time shows the current time in 48 cities (29 time
zones) around the world.
•When you enter the World Time Mode, the data you
were viewing when you last exited the mode appears
first.
•All of the operations in this section are performed in the
World Time Mode, which you enter by pressing B.
To view the time for another city codeIn the World Time Mode, press D to scroll eastward
through city codes or C to scroll westward.
•For full information about city codes, see the “City Code
Table”.
•If the current time for a city is wrong, check your
Timekeeping Mode time and city code settings and
make necessary changes.
![]()
							3
Operation Guide 3100
To toggle a city code time between Standard Time and Daylight Saving Time1. In the World Time Mode, use D and C to display the
city code whose Standard Time/Daylight Saving Time
setting you want to change.
2. Hold down A for about one second to toggle Daylight
Saving Time (DST displayed) and Standard Time (DST
not displayed).
•The DST indicator appears on the display whenever you
display a city code for which Daylight Saving Time is
turned on.
•Note that the DST/Standard Time setting affects only the
currently displayed city code. Other city codes are not
affected.DST indicator
AlarmWhen the Daily Alarm is turned on, the alarm sounds for
10 seconds at the preset time each day. When the Hourly
Time Signal is turned on, the watch beeps every hour on
the hour.
•All of the operations in this section are performed in the
Alarm Mode, which you enter by pressing B.
To set the alarm time1. Hold down A while in the Alarm Mode until the hour
digits start to flash on the display. The hour digits flash
because they are selected.
•This operation turns on the alarm automatically.
Current time  Alarm on indicator Hourly time signal
on indicator
Alarm time
(Hour : Minutes) 2. Press B to change the selection in the following sequence.
HourMinutes
3. While a setting is flashing, use D and C to change it as described below.
4. After you set the alarm time, press A to return to the Alarm Mode.
To stop the alarmPress any button to stop the alarm after it starts to sound.
To switch the Daily Alarm and Hourly Time Signal on and offPress D while in the Alarm Mode to change the status of the Daily Alarm and Hourly
Time Signal in the following sequence.
Hourly Time
Signal only Daily Alarm
only Both off Both on
To test the alarmHold down D while in the Alarm Mode to sound the alarm.
Screen12:00To do this:Change the hour and minutesDo this:Use D (+) and C (–).
•With the 12-hour format, set the time
correctly as a.m. (A indicator) or p.m.
(P indicator).
ReferenceThis section contains more detailed and technical information about watch operation.
It also contains important precautions and notes about the various features and
functions of this watch.
Button Operation ToneThe button operation tone sounds any time you press one
of the watch’s buttons. You can turn the button operation
tone on or off as desired.
•Even if you turn off the button operation tone, the
alarms, the Hourly Time Signal, the countdown alarm,
and the event timer alarm all operate normally.
To toggle the button operation tone on and offIn any mode (except when a setting screen is on the
display), hold down B to toggle the button operation tone
on (
 not displayed) and off ( displayed).
•Holding down B to toggle the button operation tone on or off also causes the
watch’s current mode to change.
•
 is displayed in all modes when the button operation tone is turned off.
ScrollingThe C and D buttons are used in various modes and setting screens to scroll
through data on the display. In most cases, holding down these buttons during a scroll
operation scrolls at high speed. This is true except when the countdown timer number
is flashing on the Countdown Timer Mode screen.
Auto Return Features•If you leave the watch in the Alarm Mode for two or three minutes without performing
   any operation, it changes to the Timekeeping Mode automatically.
•If you leave a screen with flashing digits on the display for two or three minutes
   without performing any operation, the watch exits the setting screen automatically.
Timekeeping•Resetting the seconds to 00 while the current count is in the range of 30 to 59
causes the minutes to be increased by 1. In the range of 00 to 29, the seconds are
reset to
00 without changing the minutes.
•The year can be set in the range of 2000 to 2099.
•The watch’s built-in full automatic calendar makes allowances for different month
lengths and leap years. Once you set the date, there should be no reason to change
it except after you have the watch’s battery replaced.
World Time•The seconds count of the World Time is synchronized with the seconds count of the
Timekeeping Mode.
•All World Time Mode times are calculated from the current Home City time in the
Timekeeping Mode using UTC time differential values.
•The UTC differential is a value that indicates the time difference between a
reference point in Greenwich, England and the time zone where a city is located.
•The letters “UTC” is the abbreviation for “Universal Time Coordinated”, which is the
world-wide scientific standard of timekeeping. It is based upon carefully maintained
atomic (cesium) clocks that keep time accurately to within microseconds. Leap
seconds are added or subtracted as necessary to keep UTC in sync with the Earth’s
rotation.
Illumination PrecautionsAn LED (light-emitting diode) illuminates the display for easy reading in the dark. In
any mode (except when a setting screen is on the display), press L to turn on
illumination for about two seconds.
•Illumination may be hard to see when viewed under direct sunlight.
•Illumination turns off automatically whenever an alarm sounds.
•Frequent use of illumination runs down the battery.
City
CityUTC
Other major cities in same time zoneCode DifferentialPago PagoHonoluluAnchorageVancouverSan FranciscoLos AngelesDenverMexico CityChicagoMiamiNew YorkCaracasSt. JohnsRio De JaneiroPraiaLisbonLondonBarcelonaParisMilanRomeBerlinAthensJohannesburgIstanbulCairoJerusalemMoscowJeddahTehranDubaiKabulKarachiMaleDelhiDhakaYangonBangkokSingaporeHong KongBeijingSeoulTokyoAdelaideGuamSydneyNoumea
Wellington
–11.0–10.0–09.0
–08.0
–07.0
–06.0
–05.0
–04.0–03.5–03.0–01.0
+00.0
+01.0
+02.0
+03.0
+03.5+04.0+04.5
+05.0
+05.5+06.0+06.5+07.0
+08.0
+09.0
+09.5
+10.0
+11.0
+12.0
PapeeteNome
Las Vegas, Seattle/Tacoma, Dawson City
El Paso, Edmonton
Winnipeg, Houston, Dallas/Fort Worth, New Orleans
Montreal, Detroit, Boston, Panama City, Havana, Lima,BogotaLa Paz, Santiago, Port Of Spain
Sao Paulo, Buenos Aires, Brasilia, Montevideo
Dublin, Casablanca, Dakar, Abidjan
Amsterdam, Algiers, Hamburg, Frankfurt, Vienna,
Stockholm, Madrid
Helsinki, Beirut, Damascus, Cape Town
Kuwait, Riyadh, Aden, Addis Ababa, Nairobi
ShirazAbu Dhabi, Muscat
Mumbai, Kolkata, Colombo
Jakarta, Phnom Penh, Hanoi, Vientiane
Kuala Lumpur, Taipei, Manila, Perth, Ulaanbaatar
Pyongyang
Darwin
Melbourne, Rabaul
Port Vila
Christchurch, Nadi, Nauru Island
PPGHNLANCYVRSFOLAXDENMEXCHIMIANYCCCSYYTRIORAILISLONBCNPA RMILROMBERAT HJNBISTCAIJRSMOWJEDTHRDXBKBLKHIMLEDELDACRGNBKKSINHKGBJSSELTYOADLGUMSYDNOU
WLG
City Code Table
*Based on data as of December 2006.
All Casio manuals
Comments (0)