-
Contents
-
Table of Contents
-
Troubleshooting
-
Bookmarks
Quick Links
Axiolab A
Reflected-Light
Microscope
Operating Manual
Related Manuals for Zeiss Axiolab A
Summary of Contents for Zeiss Axiolab A
-
Page 1
Axiolab A Reflected-Light Microscope Operating Manual… -
Page 2
Carl Zeiss Axiolab A Knowledge of this instruction manual is necessary for device operation. Please get familiar with its contents and especially the precautions for safe device operation. Changes due to further technical development are reserved; this manual is not covered by an update service. -
Page 3: Table Of Contents
Copyright ……………………… II Contents ……………………..III List of Illustrations…………………..V Notes ……………………..VI Hints on Instrument Safety………………..VII Overall View of the Axiolab A Reflected-Light Microscope…………X DESCRIPTION ……………………. 1-1 Name; Intended Application,……………….. 1-2 Instrument Description………………… 1-2 Microscope Configurations and Modules…………….1-5 Function Elements (see Fig. 1-5, after this table) …………. 1-12 Objectives……………………
-
Page 4
Carl Zeiss Axiolab A Page OPERATION ……………………3-1 Switch on the Instrument ………………..3-3 Illumination and Contrasting Techniques…………….3-4 3.2.1 Setting of Reflected-Light Brightfield…………….3-4 3.2.2 Setting of Reflected-Light Polarization…………….3-5 3.2.3 Setting of Transmitted-Light Polarization with extended Polarization Equipment ….3-5 3.2.4… -
Page 5: List Of Illustrations
Pol rotary stage- setting of specimen mount and stop ………… 3-16 Fig. 3-14 Use of polished section attachment…………….3-17 Fig. 3-15 Attach various camera systems to the Axiolab A phototube ……….3-18 Fig. 3-16 Attachment of SLR camera, e.g. CONTAX 167 MT …………3-19 Fig. 3-17 Attachment of MC 80 ………………..
-
Page 6: Notes
(2-7/1)” signifies: in Figure 7 of Section 2, the mains cable is marked with the item number 1. Refer to the annex for explanations of the abbreviations. This instruction manual refers to the Axiolab A microscope equipment including accessories (see page 1-5 following).
-
Page 7: Hints On Instrument Safety
Carl Zeiss Notes on Instrument Safety The Axiolab A reflected-light microscope was designed, produced and tested in compliance with DIN 61010-1 (IEC 1010-1), Safety requirements for electrical measuring, control and laboratory instruments, and meets the requirements of appendix I of directive 73/23/EC and the relevant CSA and UL directives.
-
Page 8
Please contact your local Carl Zeiss service agency or the Carl Zeiss microscopy service for the repair of the instrument. The wide range power unit which is integrated in the stand of the microscope permits the use of line voltages in the range between 100 and 240 V AC ±… -
Page 9
This forfeits all the claims against warranty. With the exception of the work specified in this manual, no maintenance or repair of the Axiolab A may be performed. Repairs may only be performed by Carl Zeiss service staff or specially authorized personnel. -
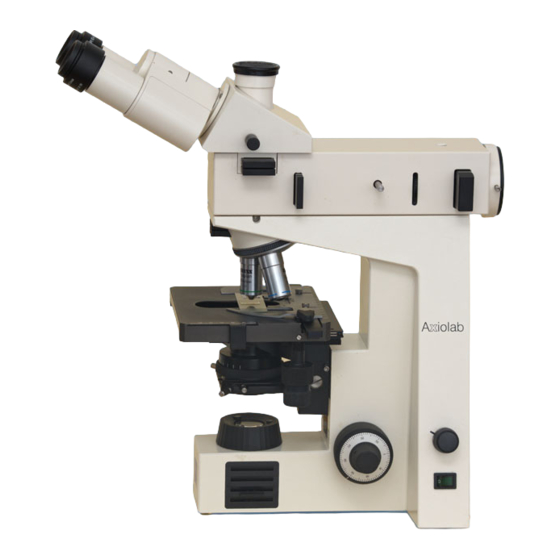
Page 10: Overall View Of The Axiolab A Reflected-Light Microscope
Carl Zeiss Axiolab A Overall View of the Axiolab A Reflected-Light Microscope B 40-015 e 06/99…
-
Page 11: Description
Axiolab A Carl Zeiss DESCRIPTION Contents DESCRIPTION …………………….1-2 Name; Intended Application,………………..1-2 Instrument Description…………………1-2 Microscope Configurations and Modules…………….1-5 Function Elements (see Fig. 1-5, after this table) …………. 1-12 Objectives……………………1-18 Eyepieces……………………1-19 Stage Micrometers and Eyepiece Reticles……………. 1-20 Technical Data ………………….. 1-22…
-
Page 12: Name; Intended Application
Axiotron 2 / Axiotron DUV Axioskop 2 FS / Axioskop 2 FS The Axiolab A reflected-light microscope is a light microscope suitable for use in all areas of research and industry involving opaque material, e.g. in metallography (metallic and compound materials)
-
Page 13: Fig. 1-1 Axiolab A Main Modules
Both the fixed stage and the glide stage can be locked in a top or a bottom stop. The maximum specimen height is 45 mm. The mechanical stage is a component of the transmitted-light version of the Axiolab A and permits the particularly sensitive moving of transparent objects. For opaque specimens, this mechanical stage can be equipped with a special specimen holder, permitting the maximum specimen height of 18 mm.
-
Page 14: Fig. 1-2 Optical Design Of The Axiolab A With Transmitted-Light Equipment
(3200 K) is automatically reached in the end stop. The XBO 75 or HBO 50 illuminators can also be attached to the Axiolab A for examinations requiring a high illuminance. Other features: adjustable aperture diaphragm and homogeneous illumination of object fields of up to dia.
-
Page 15: Microscope Configurations And Modules
Axiolab A Carl Zeiss The optical performance of the Axiolab A can be ideally matched to the relevant requirements by using various objectives which are inserted into a 5-position nosepiece (1-1/6). The camera port (1-1/9) attached to the binocular reflected-light tube (1-1/8) is available for the documentation of microscope images.
-
Page 16: Fig. 1-3 Axiolab A Microscope Configurations
Carl Zeiss Axiolab A Fig. 1-3 Axiolab A microscope configurations 06/99 B 40-015 e…
-
Page 17
Cat. No. Fixed Glide Mechani- stage stage cal stage Configurations Microscope Axiolab A with fixed mechanical stage 490960-9804-000 Microscope Axiolab A with glide stage 490962-9804-000 Microscope Axiolab A with mechanical stage and 490961-9804-000 additional transmitted-light equipment Selected modules for configuration 1… -
Page 18: Fig. 1-4 Axiolab A Accessories
Carl Zeiss Axiolab A Fig. 1-4 Axiolab A accessories (1 of 2) 06/99 B 40-015 e…
-
Page 19
Axiolab A Carl Zeiss Axiolab A accessories Cat. No. Fixed Glide Mechani- stage stage cal stage STAGES ! ! ! ! Glide stage with stage carrier 453509-0000-000 453517-9901-000 Mechanical stage 75 35 R/A with ceramic surface and short drive, plus: 1.2.1… -
Page 20
Carl Zeiss Axiolab A Fig. 1-4 Axiolab A accessories (2 of 2) 1-10 06/99 B 40-015 e… -
Page 21
Axiolab A Carl Zeiss Axiolab A accessories Cat. No. Fixed Glide Mechani- stage stage cal stage ! ! ! ! ! ! ! ! Retrofit package for transmitted-light illumination (can only be fitted by service personnel), consisting of: 453517-9901-000 — Mechanical stage 75… -
Page 22: Function Elements (See Fig. 1-5, After This Table)
Dust protection slider These two dust protection sliders should always remain in the (2 pcs.) Axiolab A microscope; technique sliders can also be inserted only if transmitted-light equipment is available Objective nosepiece Carrier for the maximum of 5 objectives which are swung into the…
-
Page 23
Axiolab A Carl Zeiss Item Designation Purpose/description Fuse holder Holder for two fuse inserts Fuse insert T 0.8 A; 250 V; 5 20 mm Mains cable To apply the supply voltage Pushrod Pushrod to change the beam path between — observation through the binocular tube (pushrod pushed in) -
Page 24
Carl Zeiss Axiolab A Item Designation Purpose/description ”Luminous intensity” control Continuous control of the illuminance of the light source by changing the lamp voltage in the range from > 1.5…6 V. At 6 V (right stop) the 3200 K color temperature for color photography is reached. -
Page 25
Axiolab A Carl Zeiss Stand 6 V, 30 W halogen illuminator Reflected-light illuminator H Camera port Binocular tube Eyepiece, fixed Focusing eyepiece Dust protection slider 5-position objective nosepiece Specimen stage, fixed Coaxial coarse and fine drive (left, also see item 29) Connecting cable for halogen illuminator ”A/D”… -
Page 26: Fig. 1-5 Axiolab A Function Elements
Carl Zeiss Axiolab A Fig. 1-5 Axiolab A function elements (1 of 2) 1-16 06/99 B 40-015 e…
-
Page 27
Axiolab A Carl Zeiss Fig. 1-5 Axiolab A function elements (2 of 2) B 40-015 e 06/99 1-17… -
Page 28: Objectives
Epiplan 10 /0.20 /- where objective magnification, with a defined color ring on the objective being allocated to each magnification step (Carl Zeiss color ring code) 0.20 numerical aperture infinite tube length can be used with cover slip thickness D = 0 or 0.17 mm can only be used without cover slip, that means D = 0 0.17…
-
Page 29: Eyepieces
Axiolab A Carl Zeiss The following objectives are available for the Axiolab A: Microscopy Objective Magnification/ Free working Cover slip Cat. No. technique Num. Aperture distance thickness in mm D in mm Reflected-light Epiplan brightfield Epiplan 19.8 442920-0000-000 5 /0.13 Epiplan 18.4…
-
Page 30: Stage Micrometers And Eyepiece Reticles
Carl Zeiss Axiolab A Stage Micrometers and Eyepiece Reticles Measuring and counting using the microscope requires stage micrometers and eyepiece reticles, a small selection of which is listed below: Illustration Description, Technical data Cat. No. stage micrometer, positive 5 + 100/100 y 474026-0000- D = 0.17 mm…
-
Page 31
Axiolab A Carl Zeiss 474068-0000- net micrometer 12.5 12.5 / 5 ; 10, d = 26 mm area 12.5 12.5 mm, divided in fields of 454075-0000- photo reticle MC 2.5 / d = 26 mm for 35 mm photography with an additional magnification of 2.5… -
Page 32: Technical Data
Carl Zeiss Axiolab A Technical Data Dimensions and weight Dimensions (width depth height) …………..180 430 mm Footprint (recommended with mat)……………….440 310 mm Weight……………………..approx. 10 kg Ambient conditions for storage and transport (in packaging) Permissible ambient temperature ………………-40 to +50 °C Permissible relative humidity ………………..max.
-
Page 33
Axiolab A Carl Zeiss Mechanical data of specimen stages Stage models…………….fixed stage/glide stage/mechanical stage Maximum specimen height: stage at bottom stop (not possible for mechanical stage)……….. 45 mm stage at top stop ………………….20 mm Light source 6 V, 30 W halogen illuminator: halogen lamp with square flat-core filament ………. -
Page 34
Carl Zeiss Axiolab A 1-24 06/99 B 40-015 e… -
Page 35: Start-Up
Axiolab A Carl Zeiss START-UP Contents Start-Up …………………….2-3 Unpacking the Instrument………………..2-3 Screw in Objectives………………….2-3 Insertion of Eyepieces ………………….2-4 2.3.1 Insertion of Eyepiece Reticle …………………2-4 2.3.2 Compensation of Ametropia when Eyepiece Reticles are used ………..2-5 Setting of Interpupillary Distance………………2-5 Attachment of Reflected-Light Halogen Illuminator…………2-6 Retrofit the Transmitted-Light Halogen Illumination …………2-6…
-
Page 36
Carl Zeiss Axiolab A B 40-015 e 06/99… -
Page 37: Unpacking The Instrument
Axiolab A Carl Zeiss START-UP The three versions of the Axiolab A reflected-light microscope, including accessories, are supplied in standard packaging. We would recommend you to keep the transport cases for storage or return of the instrument to the manufacturer.
-
Page 38: Insertion Of Eyepieces
Carl Zeiss Axiolab A Insertion of Eyepieces Remove both protection caps from the binocular tube. Insert the fixed eyepiece, e.g. E-PL 10 /20 Br., in one tube and the focusing eyepiece E-PL 10 /20 Br. foc. in the other tube.
-
Page 39: Compensation Of Ametropia When Eyepiece Reticles Are Used
Axiolab A Carl Zeiss 2.3.2 Compensation of Ametropia when Eyepiece Reticles are used The correct use of an eyepiece reticle requires two focusing eyepieces, e.g. PL 10 /20 Br. foc., to enable compensation of ametropia. Use the eyelens of the focusing eyepiece to focus on the line figure of the eyepiece reticle; focus on the edge of the field of view if no eyepiece reticle is used.
-
Page 40: Attachment Of Reflected-Light Halogen Illuminator
”Retrofit package for transmitted light” (1-4/7). The transmitted-light illumination equipment can be subsequently mounted to the Axiolab A only by Carl Zeiss service personnel. The transmitted-light illumination package consists of: — mechanical stage 75…
-
Page 41: Switch On The Transmitted-Light Halogen Illuminator
To change to transmitted-light operation, press the A/D converter (1-5/13) at the rear of the Axiolab A into the lower position. The functions of the on/off switch (1-5/28) and the «illuminance» control (1-5/27) are retained, regardless of the position of the AD converter A/D (1-5/13) (see section 1.5).
-
Page 42: Set The Luminous-Field Diaphragm
Carl Zeiss Axiolab A Set the Luminous-Field Diaphragm The pushrod (2-6/1) for the luminous-field diaphragm has two positions: pushed in: the full field of view is visible without restriction. pulled out: the visible field of view is reduced to approx. 1/3 of the overall diameter. This can be useful as an aid to find the object plane, i.e.
-
Page 43: Operation
Axiolab A Carl Zeiss OPERATION Contents Operation ……………………3-3 Switch on the Instrument………………..3-3 Illumination and Contrasting Techniques …………….3-4 3.2.1 Setting of Reflected-Light Brightfield …………….3-4 3.2.2 Setting of Reflected-Light Polarization …………….3-5 3.2.3 Setting of Transmitted-Light Polarization with extended Polarization Equipment….3-5 3.2.4 Setting of Epi-Fluorescence ……………….. 3-13 3.2.5…
-
Page 44
Carl Zeiss Axiolab A B 40-015 e 06/99… -
Page 45: Switch On The Instrument
Axiolab A Carl Zeiss OPERATION Switch on the Instrument Switch on the instrument via the on/off switch (3-1/6). The green line control lamp in the switch (3- 1/6) must light up. The halogen lamp 6 V, 30 W in the reflected-light illuminator (3-1/2) must light The “I”…
-
Page 46: Illumination And Contrasting Techniques
The description of the illumination and contrasting techniques is based on the following microscope settings: The Axiolab A microscope is ready for operation as described in chapter 2 and switched on as described in section 3.1. The pushrod (3-2/3) has been pushed in to direct 100% of the light to the observation port of the binocular tube.
-
Page 47: Setting Of Reflected-Light Polarization
Carl Zeiss 3.2.2 Setting Reflected-Light Polarization The Axiolab A microscope is ready for operation as described in chapter 2, and switched on as described in section 3.1. Pull out the plane glass pushrod (3-3/1). Pull out the dust protection sliders (3-3/2+6) from the reflected-light illuminator H.
-
Page 48: Fig. 3-4 Centering Of Objectives
Carl Zeiss Axiolab A Centering of Objectives (only for Axiolab Pol catalogue No. 450910-0000-000) Fig. 3-4 Centering of objectives When the Pol stage (3-4/3) and uncentered objectives are turned, object details above the center of the eyepiece cross migrate to circular paths (3-4/1 — dashed line). The following procedure is required to center the objectives: Unlock the stage stop by turning screw (3-4/6) by approx.
-
Page 49: Fig. 3-5 Setting Of Transmitted-Light Polarization
Axiolab A Carl Zeiss Transmitted-Light Polarization — Detection of Birefringence This technique is used for the examination of transparent, birefringent objects. Birefringence can be recognized, with crossed polarizer and analyzer, by the otherwise dark field of view being brightened 4 times when the specimen stage is rotated about 360°.
-
Page 50: Fig. 3-7 Schematic Diagram Of The Color Chart In Addition And Subtraction Position
Carl Zeiss Axiolab A Transmitted-Light Polarization — Determination of the n Vibration Direction and Determination of the Path Difference -400 Fig. 3-6 Determine the n vibration direction using the example of an artificial fiber Application The position of the two directions with the relatively highest (n…
-
Page 51
Axiolab A Carl Zeiss Conclusions The n -direction of the -compensator is NE-SW oriented. The environment of the fiber exhibits a dark, first-order red (path difference is one ; approx. 550 nm). The fiber itself appears greenish blue (path difference approx. 700 nm). The higher interference color (700 nm) can only have been created by addition of the path differences of the object (approx. -
Page 52
Carl Zeiss Axiolab A Transmitted-Light Polarization — Determination of the Optical Character of Crystals Application The optical character of transparent and weakly absorbing crystals must be determined for the diagnosis of crystals. The determination is made in conoscopic observation. The main field of application is classical petrography. -
Page 53: Fig. 3-8 Determine The Optical Character Of Crystals
Axiolab A Carl Zeiss Uniaxial Crystals If the optical axis of a uniaxial crystal is oriented parallel to the observation direction, a dark cross which can be surrounded by concentric interference rings (depending on birefringence and specimen thickness) becomes visible in the conoscopic observation mode. These interference rings are also called isochromats (from the Greek isos = equal and chroma = color).
-
Page 54
Carl Zeiss Axiolab A Reflected-Light Polarization — Detection of Bireflection and Reflection Pleochroism Application Polished sections of ores, coals, ceramic products, certain metals and metal alloys display a different reflection behavior, depending on the orientation of the crystals or the object details. Therefore, this technique also represents a further contrasting method. -
Page 55: Setting Of Epi-Fluorescence
The examined material can be autofluorescent or may have been mixed with fluorescent substances (fluorochromes). The epi-fluorescence technique can be performed using equipment for simple fluorescence examinations with the Axiolab A, together with the 6 V, 30 W halogen illuminator (3-9/1) and the standard brightfield beam splitter. The equipment consists of:…
-
Page 56: Setting Of Transmitted-Light Brightfield (Köhler Illumination)
(3-10/4), which should be open by approx. 2/3 of its size (marking on condenser positioned to 0.5). For further information on the use of the Axiolab A for transmitted-light examinations and the relevant accessories please see the manual Fig. 3-10 Setting of transmitted-light…
-
Page 57: Attachment Of Microscope Stages And Specimen Holders
Axiolab A Carl Zeiss Attachment of Microscope Stages and Specimen Holders The Axiolab A microscope is available with three different stages: — fixed stage (3-11/1), — gliding stage (3-11/2) or — mechanical stage (3-11/3). The retaining clips (3-11/4) are used to hold…
-
Page 58: Attachment Of Pol Rotary Stage
Carl Zeiss Axiolab A 3.3.1 Attachment of Pol Rotary Stage Fig. 3-13 Pol rotary stage- setting of specimen mount and stop The stage clips (3-13/3) are used to mount the specimen on the Pol rotary stage (3-13/8). They are inserted into two of the three drilled holes (3-13/9) and, depending on the size of the specimen carrier or the search area, used diagonally, opposite to each other or parallel.
-
Page 59: Use Of Polished Section Attachment
Axiolab A Carl Zeiss Use of Polished Section Attachment The polished section attachment from the line of accessories provides another possibility of holding objects for examinations in incident light. It has been intended for use with the gliding stage. Basically, the polished section attachment can also be used with the fixed stage. Use a screwdriver to remove the two bolts (3-14/5) on the underside and place the attachment on the fixed stage without any securing elements.
-
Page 60: Photomicrography And Videomicroscopy
100% changeover, simultaneous observation and photography is not possible. Special adapters allow commercially available 35 mm cameras or microscope cameras (e.g. MC 80 ) to be attached to the camera port of the Axiolab A. For the use of photomicrography equipment please see the relevant manuals. Fig. 3-15…
-
Page 61: Attachment Of Photomicrography Equipment
Axiolab A Carl Zeiss 3.5.1 Attachment of Photomicrography Equipment Attachment of SLR Camera, e.g. CONTAX 167 MT Screw T2 adapter for the CONTAX bayonet (3- 16/3) on the 2.5 connector for T2 (3-16/4) (456005-0000-000). Attach the camera housing (3-16/2) and the cable release (3-16/1), if required.
-
Page 62
T2 adapter for NIKON (F bayonet) 416009-0000-000 T2 adapter for PENTAX (KA bayonet) 416011-0000-000 For detailed information on SLR cameras please see operating manual from Carl Zeiss B 40- 046 e entitled «Photomicrography with 35 mm SLR Cameras». 3-20 B 40-015 e 06/99… -
Page 63: Fig. 3-17 Attachment Of Mc 80 Dx
For daylight color reversal film, the CB 12 conversion filter must also be used. detailed information MC 80 please operating manual from Carl Zeiss B 40-036 e, «MC 80 Microscope Camera». Fig. 3-17 Attachment of MC 80 B 40-015 e 06/99 3-21…
-
Page 64: Attachment Of Adapters For Video Cameras
3.5.2 Attachment of Adapters for Video Cameras The following video adapters with 60 mm interface permit the attachment of one-chip b/w and color CCD cameras and 3-chip color CCD cameras to the camera port of the Axiolab A Tube Adapter…
-
Page 65
Carl Zeiss Attachment of video cameras: Loosen three hexagonal screws and remove dust cover from the Axiolab A camera tube. Screw video adapter or video zoom adapter with C-mount thread into the video camera. Insert video adapter or video zoom adapter in ENG 2/3“ or ENG ½“ bayonet of the video camera and clamp it tight. -
Page 66: Insertion Of 8 Drawing Eyepiece
The 8 drawing eyepiece (444126-0000-000) is an accessory for microscopic drawing and can only be used in combination with the binocular reflected-light tube 30°/20 H on the Axiolab A. It contains a beam splitter which allows the simultaneous observation of the microscope image and the drawing area.
-
Page 67: Care, Troubleshooting And Service
Axiolab A Carl Zeiss CARE, TROUBLESHOOTING AND SERVICE Contents CARE, TROUBLESHOOTING AND SERVICE…………..4-3 Maintenance of the Instrument ………………4-3 Troubleshooting ………………….4-4 Requesting Service………………….4-6 B 40-015 e 06/99…
-
Page 68
Carl Zeiss Axiolab A B 40-015 e 06/99… -
Page 69: Maintenance Of The Instrument
When using the Axiolab A in humid climatic zones, proceed as follows: Store the Axiolab A in bright, dry and well ventilated rooms with a humidity of less than 85%; store particularly sensitive components and accessories, such as objectives and eyepieces, in a dry closet.
-
Page 70: Troubleshooting
Carl Zeiss Axiolab A Troubleshooting Troubleshooting on the Axiolab A microscope is limited to only a few actions: Checking the line cable Checking the set instrument voltage and changing the fuses Checking the illumination and changing the lamp Defective fuse(s)
-
Page 71
Axiolab A Carl Zeiss Changing the 6 V, 30 W Reflected-Light Halogen Lamp The following procedure is required to change the lamp of the 6 V, 30 W reflected-light halogen illuminator: Switch off the lamp supply; if required, allow the illuminator to cool down for approx. 15 minutes. -
Page 72: Requesting Service
Requesting Service All repairs of mechanical, optical or electronic components inside the instrument and of the electrical components of the Axiolab A may only be performed by Carl Zeiss service staff or specially authorized personnel. To ensure the optimum setting and trouble-free function of your microscope even for a longer period of time, we would recommend you to conclude a service/maintenance contract with Carl Zeiss.
-
Page 73: Annex
Axiolab A Carl Zeiss Annex List of Abbreviation ……………………A-3 Certification in Accordance with DIN EN ISO 9001 / DIN EN 46001……….A-5 EC Conformity Declaration ………………….A-7 B 40-015 e 06/99…
-
Page 74
Carl Zeiss Axiolab A B 40-015 e 06/99… -
Page 75
Axiolab A Carl Zeiss List of Abbreviations incident light, analyzer Alternating Current eyepieces suitable for spectacle wearers Charge-Coupled Device Canadian Standards Association transmitted light, filter attenuation in % German Standards Association Dmr, d diameter coding system for electronic data, e.g. film speed… -
Page 76
Carl Zeiss Axiolab A slow-blow fuse type television T2-Adapter standard adapter for 35 mm cameras B 40-015 e 06/99…
Welcome to the ZEISS instruction for use (IFU) library
Find the instruction for use of the ZEISS product you are looking for easily.
- Unlimited access to latest instruction for use released
- Added value through in-document-search functionalities
- Single place for all instructions for use available1
Phacoemulsification & vitrectomy systems
Learn more
Order a print copy
The hardcopy of the instruction for use is free of charge. The delivery time in Europe is 7 days.
Thank you. Please visit our Homepage for more information. We will reach out to you soon.
- Manuals
- Brands
- Zeiss Manuals
ManualsLib has more than 626 Zeiss manuals
Popular Categories:
![]()
Digital Camera
Featured manuals
DTI 3/35 — Thermal Imager Manual
Cinemizer
Manual
• Quick Manual
• User Manual
cinemizer OLED
Operating Instructions Manual
• Safety And Operation
Accessories
N HBO 103
Operating Manual
Adapter
Cinemizer
Manual
• Quick Manual
• User Manual
DTC-A
Instructions For Use Manual
Victory
Instructions For Use Manual
All in One Printer
ApoTome.2
Operation Manual
• Quick Reference Manual
Binoculars
10×56-FL
Instructions For Use Manual
20 x 60 S
Instructions For Use Manual
52 32 11
Instructions For Use / Guarantee
52 32 12
Instructions For Use / Guarantee
• Instructions For Use
Instructions For Use / Guarantee
52 42 12
Instructions For Use / Guarantee
• Instructions For Use
Show all Zeiss Binoculars manuals
Camera Accessories
Instructions For Use Manual
Biogon T* 2.0 / 35 ZM
Instruction Manual
Biogon T* 2.8 / 21 ZM
Instruction Manual
Biogon T* 2.8 / 28 ZM
Instruction Manual
Compact Prime CP.3
Change Instructions
• Instruction Manual
Compact Prime CP.3 XD
Quick Manual
• Change Instructions
• Instruction Manual
Instructions For Use Manual
• Instructions For Use Manual
Distagon T* 2.8 / 15 ZM
Instruction Manual
Show all Zeiss Camera Accessories manuals
Camera Lens
Arri 135/T1.9
User Manual
Camera Lens
Instructions For Use Manual
Compact Prime CP.3
Change Instructions
• Instruction Manual
Compact Prime CP.3 XD
Quick Manual
• Change Instructions
• Instruction Manual
Lightweight Zoom LWZ.3
Instructions Manual
MiniQuick T SERIES
Instructions For Use Manual
Mono T SERIES
Instructions For Use Manual
Instruction Manual
• Information
Instructions For Use Manual
Supreme Prime
Change Instructions
• Instruction Manual
• Instruction Manual
Show all Zeiss Camera Lens manuals
SYCOP 3
Quick Reference Manual
Desktop
AURIGA Compact Crossbeam
Instruction Manual
Diagnostic Equipment
CIRRUS HD-OCT 500
Technical Specifications
• User Manual
CIRRUS HD-OCT 5000
Technical Specifications
• User Manual
Digital Camera
35 mm SLR Camera
Operating Manual
Axiocam 105 color
Installation & Reference Manual
• User Manual
• Instruction Manual
Axiocam 202 mono
User Manual
• User Manual
• Instruction Manual
Axiocam 208 color
User Manual
• User Manual
• Instruction Manual
Axiocam 305 color
User Manual
• User Manual
Axiocam 305 mono
User Manual
Axiocam 503 color
User Manual
Axiocam 503 mono
User Manual
Show all Zeiss Digital Camera manuals
Film Camera
Ikon Rangefinder
Instruction Manual
• Instruction Manual
Laboratory Equipment
200-mm airlock
Instruction Manual
423003-9000
Operating Manual
423003-9010
Operating Manual
ApoTome.2
Operation Manual
• Quick Reference Manual
Argon Ion Beam System
Instruction Manual
AT.Shooter A1-2000
Handling Instructions
AT.Shooter A2-2000
Handling Instruction
Auto Focus
Operating Manual
Axio Imager A1
User Manual
Axio Imager M1
User Manual
Show all Zeiss Laboratory Equipment manuals
Lantern
Colibri.2
Operating Manual
Lenses
Axioscope 7
Manual
• Operating Manual
• Quick Reference Manual
Cinema Zoom 15-30
Change Instructions
Cinema Zoom 20-80
Change Instructions
Cinema Zoom 70-200
Change Instructions
Compact Prime CP.2
Manual
• Change Instructions
Compact Prime CP.2 100/T2.1 CF
Manual
• Change Instructions
Compact Prime CP.2 135/T2.1
Manual
Compact Prime CP.2 15/T2.9
Manual
Show all Zeiss Lenses manuals
Lighting Equipment
CL 6000 LED
Operating Instructions Manual
CL 9000 LED
Operating Instructions Manual
Colibri 5
Quick Reference Manual
Colibri 7
Operating Manual
• Quick Reference Manual
Magnifiers
LC
Instructions For Use Manual
Measuring Instruments
2289-955
Maintenance And Repair Manual
2298-971
Maintenance And Repair Manual
830
Instructions For Use Manual
840
Instructions For Use Manual
850
Instructions For Use Manual
860
Instructions For Use Manual
AURA
User Manual
• User Manual
Show all Zeiss Measuring Instruments manuals
Medical Equipment
000000-1272-175
User Manual
ATLAS 9000
Quick Start Manual
Cinemizer
Manual
• Quick Manual
• User Manual
CIRRUS
Quick Start Manual
CIRRUS 600
Quick Reference Manual
Show all Zeiss Medical Equipment manuals
Microphone
Axiolab Pol
Operating Manual
• Operating Manual
LSM 510 Inverted
Operating Manual
• Operating Manual
• User Manual
• User Manual
• Brief Operating Manual
• Quick Manual
Microscope
000000-1080-349
Instructions For Use Manual
000000-1095-094
Instructions For Use Manual
000000-1403-542
Instructions For Use Manual
000000-1403-544
Instructions For Use Manual
000000-1403-572
Instructions For Use Manual
000000-1403-573
Instructions For Use Manual
000000-1420-191
Instructions For Use Manual
1154-525
Instructions For Use Manual
1176-968
Instructions For Use Manual
1176-969
Instructions For Use Manual
Show all Zeiss Microscope manuals
Monocular
52 54 01
Instructions For Use Manual
52 54 11
Instructions For Use Manual
52 54 21
Instructions For Use Manual
Conquest 10×25 T* Compact
Instructions For Use Manual
• Instructions For Use Manual
• Instructions For Use Manual
• Instructions For Use Manual
• Instructions For Use Manual
Conquest MiniQuick 5×10 T
Instructions For Use Manual
Conquest MiniQuick T Series
Instructions For Use Manual
Conquest Mono 4×12 T
Instructions For Use Manual
Conquest Mono 6×18 T
Instructions For Use Manual
Conquest Mono T Series
Instructions For Use Manual
DiaScope 65 T FL
Instructions For Use Manual
Show all Zeiss Monocular manuals
Outdoor Light
SL 120
User Manual
• Documentation
Power Supply
432610-9060-000
Quick Reference Manual
Racks & Stands
Floor Stand S
Operating Manual
S8
User Manual
• Instructions For Use Manual
• Instructions For Use Manual
S81
User Manual
• Instructions For Use Manual
Stand M LED
Operating Manual
Riflescope
Classic Diatal T 52 13 40
Instructions For Use Manual
Classic Diatal T Series
Instructions For Use Manual
Classic Diavari T 52 13 00
Instructions For Use Manual
Classic Diavari T 52 13 01
Instructions For Use Manual
Classic Diavari T 52 13 10
Instructions For Use Manual
Show all Zeiss Riflescope manuals
Scanner
AxioCam MRc5
Installation Reference Manual
Security Camera
AxioCam ERc 5s
User Manual
• User Manual
• Operating Instructions Manual
Security Sensors
Smart Glasses
Cinemizer Plus
Quick Start Manual
Stereo System
Telescope
CONQUEST GAVIA 85
Instructions For Use Manual
• Instructions For Use
DIALYT 18-45×65
Instructions For Use Manual
PhotoScope 85 T* FL Series
Instructions For Use Manual
Victory DC4
Instructions For Use Manual
Victory DiaScope 65 T FL
Instructions For Use Manual
Victory DiaScope 85 T FL
Instructions For Use Manual
VICTORY HARPIA 95
Instructions For Use
Thermal cameras
DTI 3/35
Instructions For Use Manual
• Instructions For Use Manual
• User Manual
Tools
FixAssist XTR
Operating Manual
Ultrasonic Jewelry Cleaner
Virtual Reality Headsets
Carl Zeiss Микроскопы: инструкции, паспорта/ ZIP 70,0МБ
Carl Zeiss: Axiolab A Reflected Light Microscope
Carl Zeiss: Axiolab Microscope for transmitted light and fluorescence
Carl Zeiss: Axiolab Pol Polarizing Microscope
Carl Zeiss: Axiomat
Carl Zeiss: Axiophot Pol Photomicroscope for Reflected Light
Carl Zeiss: Axioplan 2 imaging and Axiophot 2
Carl Zeiss: Axioplan Pol Universal Microscope
Carl Zeiss: Axioplan Universal Microscope
Carl Zeiss: Axioplan Universal Microscope for Reflected Light
Carl Zeiss: Axioskop 40 Axioskop 40 FL Routine Microscope
Carl Zeiss: Axioskop for Transmitted Light and Fluorescence
Carl Zeiss: Axioskop Routine Microscope for Reflected Light
Carl Zeiss: Axiostar plus — Transmitted Light Microscope
Carl Zeiss: Axiovert 10/35/35M/405M
Carl Zeiss: Axiovert 100, 135 and 135 M
Carl Zeiss: Axiovert 25 CA
Carl Zeiss: Axiovert 25 Inverted Microscope
Carl Zeiss: Epi-fluorescence condenser III RS
Carl Zeiss: Epi-Fluorescence Condensor IV Fl
Carl Zeiss: Ergoval Microscope (Jena)
Carl Zeiss: Incident-Light Photomicroscope III
Carl Zeiss: Inverted Microscope IM
Carl Zeiss: Invertoscope ID 03 and ID 03 MT
Carl Zeiss: KF 2 ICS Transmitted Light Microscope
Carl Zeiss: Laboval 4
Carl Zeiss: Large, transmitted-light research microscope Universal
Carl Zeiss: MC 100 Microscope Camera
Carl Zeiss: MC 100 Spot Microscope Camera
Carl Zeiss: MC 63 A Photomicrographic Camera for Microscopes and Stereomicroscopes
Carl Zeiss: MC 80 DX Microscope Camera
Carl Zeiss: Microscope Illuminator 100
Carl Zeiss: MPM 100 Microscope-Photometer
Carl Zeiss: Standard GFL WL System Overview
Carl Zeiss: STANDARD JUNIOR 2 microscope
Carl Zeiss: STANDARD LAB 06 Microscope
Carl Zeiss: STANDARD Microscope with LUCIGEN Illuminator
Carl Zeiss: Standard Pol and Standard WL Pol microscopes
Carl Zeiss: Stemi DRC and D
Carl Zeiss: Stereomicroscope SV 6 and SV 11
Carl Zeiss: Stereomicroscope SV 8
Carl Zeiss: Transmitted Light Photomicroscope III
Дальномерная камера Zeiss Ikon
Руководство по эксплуатации
Carl Zeiss AG
Camera Lens Division
73446 Oberkochen
www.zeiss.de/photowww.zeissikon.com
We make it visible.
Название частей камеры
- Индекс выдержки
- Колёсико выдержки / чувствительности плёнки ISO
- Окошко чувствительности плёнки
- Спусковая кнопка затвора
- Рычажок протяжки плёнки
- Счётчик кадров плёнки
- Главный выключатель
- Ушко для ремня
- Кнопка отпирания объектива
- Индекс применения объектива
- Башмачок для аксессуаров
- Селектор поля кадра
- Окошко дальномерного видоискателя
- Окошко с рамочной подсветкой
- Окошко видоискателя
- Байонетная оправа ZM объектива
- Синхро контакт
- Линза для настройки по зрению
- Окуляр видоискателя
- Кнопка экспопамяти
- Направляющие плёнки
- Отсек батарей
- Кнопка перемотки плёнки назад
- Рычаг перемотки плёнки назад
- Отсек кассеты плёнки
- Запирание/отпирание задней дверцы
- Задняя крышка
- Прижимная пластинка для удержания плёнки
- Окошко кассеты плёнки
- Гнездо для штатива
- Кнопка перемотки плёнки назад
- Приёмная катушка для намотки плёнки
- Плёнкопротяжный барабан
Указания по уходу за Вашей камерой
- Не используйте для очистки камеры органические растворители, такие как бензин, бензол или алкоголь.
- Не храните камеру в местах с повышенной влажностью воздуха или высокой температурой. Не оставляйте камеру в автомобиле.
- Избегайте контакта с любого вида химикатами (например, клей, чистящие средства и т.д.). Храните камеру в хорошо проветриваемом месте, по возможности не в узкой сумке.
- Камера не является водонепроницаемой – не используйте камеру во время сильного дождя, берегите ее от попадания брызг воды.
- Сильные толчки, удары или использование камеры не по назначению могут быть причиной нарушения функционирования камеры.
- Никогда не пытайтесь устранять пальцами пыль или другие загрязнения с объектива или видоискателя. Используйте воздуходувное устройство для удаления пыли или очищайте эти поверхности кистью или мягкой тканью.
- Проверьте функционирование Вашей камеры, сделав несколько пробных снимков, если Вы используете камеру после продолжительного хранения, особенно перед важной съемкой.
- Не подвергайте камеру резким перепадам температуры, это может вызвать образование конденсата внутри камеры. В таких ситуациях рекомендуется постепенно регулировать температуру камеры в сумке или кофре.
- При температуре ниже 0°С сокращается мощность батареи питания. Если Вы используете камеру при низких температурах, подготовьте запасные батареи питания.
- Тщательно очистите камеру, если Вы при использовании подвергли ее воздействию пыли, песка, химикатов, морскому туману или брызгам воды.
- Закрывайте отверстие объектива крышкой, если камера не используется или хранится без объектива. Защищайте камеру от воздействия прямых солнечных лучей.
-5-
Крепление ремня для ношения
Следующий рисунок показывает Вам, как прикрепить ремень для ношения к камере.
Рисунок Рисунок Подпись рядом с рисунком – При этом концы ремня должны быть с
внутренней стороны.
-6-
Смена объектива
- Чтобы установить объектив, сначала совместите синие точки на объективе и корпусе камеры. Затем вставьте объектив прямо в этом положении и поверните его по часовой стрелке до щелчка.
- Чтобы снять объектив, нажмите кнопку разблокировки объектива (9), при этом поверните объектив против часовой стрелки до тех пор, пока синяя точка не окажется напротив кнопки разблокировки объектива. Затем вытащите объектив из байонета.
-7-
Установка батарей питания
- Откройте крышку батарейного отсека (22), повернув ее против часовой стрелки при помощи монеты или подходящей отвертки.
- Вы можете установить литиевую батарею питания CR-1/3 или две щелочные батареи питания типа LR44, или две серебряные батареи питания типа SR44 для питания камеры.
- Если Вы используете щелочные или серебряные батареи питания, установите обе батареи питания таким образом, чтобы стороны, обозначенные знаком (+), были направлены в сторону дна батарейного отсека. Если используется только литиевая батарея питания, ее положительный полюс (+) также должен быть направлен в сторону дна батарейного отсека.
- Снова закройте батарейный отсек, завинтив крышку (22) по часовой стрелке.
-8-
Проверка батарей питания
- Поверните главный выключатель (7) в положение “ON” («ВКЛ.»).
- Взведите затвор при помощи ручки (5).
- Выберите выдержку на диске выдержки (2), кроме «В».
- Слегка коснитесь кнопки спуска (4), нажатие до половины активирует экспозамер и автоматическую проверку батарей питания. Смотрите при этом в видоискатель (19).
- Если с левой стороны видоискателя загорелся или мигает один или два светодиода, емкости батареи питания достаточно.
- Если одновременно медленно мигают светодиоды «2000» и «1», батареи питания имеют низкий заряд и их необходимо заменить.
- Если светодиод вообще не мигает, батареи питания разряжены или неправильно установлены.
- Светодиодный индикатор остается включенным в течение 8 секунд после того, как Вы убрали палец с кнопки спуска (4).
Примечание: Во избежание нецелесообразного энергопотребления поверните главный выключатель (7) в положение “OFF” («ВЫКЛ.»), если камера не используется.
-9-
Установка пленки
- Чтобы открыть заднюю крышку (27), нажмите кнопку разблокировки задней крышки (26) вправо и вверх (смотри синюю стрелку на рисунке справа). Предварительно удостоверьтесь, что в камере нет пленки. При открытии задней крышки (27) счетчик кадров (6) автоматически возвращается в стартовое положение “S”.
- Откиньте ручку обратной перемотки (24), а затем потяните кнопку обратной перемотки (23) вниз.
- Установите кассету с пленкой в отсек для кассеты с пленкой (25) таким образом, чтобы выступающий из кассеты элемент был направлен вниз. Примечание: Избегайте прямого попадания солнечных лучей во время установки пленки.
- Нажмите кнопку обратной перемотки (23) в направлении кассеты с пленкой, одновременно крутите ручку обратной перемотки (24) до тех пор, пока ось ручки обратной перемотки не войдет в ось кассеты с пленкой.
- Вставьте конец пленки в прорезь катушки для намотки пленки (32), убедитесь, что зубцы катушки для намотки пленки попали в перфорацию пленки.
- Удостоверьтесь, что зубцы зубчатого колесика (33) правильно попали в перфорацию пленки, и что пленка беспрепятственно перемещается по направляющей пленки.
- Осторожно закройте заднюю крышку (27) до щелчка.
- Натяните пленку, осторожно поворачивая ручку обратной перемотки (24) по направлению стрелки. Закончите вращение, как только почувствуете растущее сопротивление, затем сложите ручку обратной перемотки в нерабочее положение.
- Сделайте несколько пустых снимков, спуская затвор и взводя кадры при помощи ручки (5), пока счетчик кадров (6) не будет показывать «1». При этом убедитесь, что при каждой протяжке пленки вращается кнопка обратной перемотки (23). Это свидетельствует о правильной транспортировке пленки.
Примечание: Плавно и не слишком быстро взводите ручку (5), пока пленка полностью не будет протянута для следующего снимка.
-11-
Установка светочувствительности пленки
- Данные светочувствительности пленки Вы найдете на кассете с пленкой, на упаковке или в прилагаемом руководстве пользователя.
- Чтобы установить светочувствительность пленки, поднимите диск выдержек и светочувствительности пленки ISO (2) и поверните его, чтобы стрелка на внутреннем колесике показывала на соответствующее значение. Светочувствительность ASA/ISO видна в окошке индикации светочувствительности пленки (3).
Внимание: Точно устанавливайте светочувствительность – не на промежуточные значения. В противном случае может иметь место неправильное экспонирование.
Окошко кассеты с пленкой
Через окошко кассеты с пленкой (29) Вы можете увидеть, какая пленка установлена, какую светочувствительность имеет пленка и какова длина пленки в кадрах.
-12-
Определение экспозиции
Режим приоритета диафрагмы (режим автоматической экспозиции (AE))
В этом режиме камера автоматически выбирает необходимую выдержку для правильного экспонирования сюжета в зависимости от установленной на объективе диафрагмы и освещенности сюжета. При выборе значения диафрагмы учитывайте, насколько освещен объект, насколько быстро он двигается, и какой глубины резкости Вы хотите достичь при съемке.
Следующая таблица содержит некоторые рекомендации для пленки ISO 100:
(диапазон выдержки от 1/2000 до 8 сек.)
| Условия съемки: | Рекомендуемое значение диафрагмы: |
| Ночная съемка без штатива | Полное открытие |
| Для незначительной глубины резкости | Полное открытие |
| Съемка внутри помещения при обычном освещении | f/2-f/4 |
| Съемка на улице (облачно) | f/4-f/8 |
| Съемка на улице (солнечно) | f/8-f/11 |
| Пляж летом | f/11 и менее |
| В горах со снегом | f/11 и менее |
-13-
1. Поверните главный выключатель в положение “ON” («ВКЛ.»).
2. Поверните диск выдержек (2), чтобы маркировка «А» находилась напротив индекса (1).
3. Установите необходимое число диафрагмы на кольце диафрагмы объектива.
4. Взведите кадр, слегка нажмите на кнопку спуска (4), пока в видоискателе не загорится светодиодный индикатор.
* Светодиодный индикатор в видоискателе отображает определенное камерой значение выдержки.
* Если быстро мигает светодиод «2000», яркость сюжета слишком велика для выбранной диафрагмы. Закройте диафрагму объектива немного больше – число на кольце диафрагмы при этом увеличится.
* Если быстро мигает светодиод «1», яркость сюжета слишком мала для выбранной диафрагмы. Откройте диафрагму объектива немного больше – число на кольце диафрагмы при этом уменьшится.
* Если горит светодиод «1», затор работает с выдержками между 1 и 8 секундами.
* Светодиодный индикатор остается гореть в течение 8 секунд после того, как Вы отпустили кнопку спуска (4). Если индикатор погас во время подготовки к съемке, снова слегка нажмите кнопку спуска (4), чтобы снова активировать определение экспозиции.
* Произведите съемку, полностью нажав кнопку спуска.
-14-
Экспокоррекция
Экспонометр камеры отрегулирован таким образом, чтобы обеспечить правильную экспозицию с правильной цветопередачей, если объект съемки имеет средний коэффициент отражения. Если сюжет явно отклоняется от средних параметров, необходима корректировка замеренной экспозиции. Например, если значительные части сюжета слишком светлые, коррекция (+), т.е. дополнительное освещение, обеспечивает правильное воспроизведение сюжета; наоборот, коррекция (-), т.е. меньшее освещение, необходима, если в сюжете доминируют темные тона. Особенно при использовании диапозитивной пленки технически правильная экспозиция также не всегда является оптимальной согласно представлению фотографа об изображении. Поэтому камера оснащена возможностью экспокоррекции.
При помощи экспокоррекции Вы получите отличающиеся от обычной экспозиции результаты, не отключая автоматическую экспозицию. Коррекция (+) делает изображение светлее, коррекция (-) делает его темнее.
Диапазон коррекции соответствует +/-2 ступени диафрагмы, размер шага – 1/3 ступени.
Поверните диск выдержек (2), чтобы отметка «А» находилась напротив необходимого значения коррекции.
Если активирована экспокоррекция, в видоискателе медленно мигает индикатор выдержки.
Отображается значение выдержки, полученное после коррекции.
-15-
Сохранение экспозиции
Во всех сюжетах, в которых светлые и темные части распределены не равномерно, а четко разделены, результат автоматического экспозамера всегда зависит от композиции сюжета. Если, например, используется широкоугольный объектив, большое влияние на результат замера оказывает светлое небо, если изображение формируется таким образом, что горизонт находится низко в кадре, в таком случае часто основной сюжет недоэкспонируется. Если же камера направлена немного вниз таким образом, что линия горизонта в кадре находится сверху, небо оказывает меньшее воздействие на результат замера.
Функция сохранения экспозиции предлагает Вам удобную возможность установить экспозицию перед съемкой одного или нескольких кадров и сделать ее независимой от композиции кадра. Это очень полезно, прежде всего, при съемке против света или при съемке с доминирующими светлыми поверхностями.
Вы можете комбинировать функцию сохранения экспозиции с экспокоррекцией. Сохранение происходит в тот момент, когда Вы отпускаете кнопку сохранения экспозиции (20).
- Взведите кадр при помощи ручки и нажмите наполовину кнопку спуска, чтобы активировать индикатор экспозиции в видоискателе.
-16-
2. Вместо кнопки спуска Вы также можете нажать и удерживать кнопку сохранения экспозиции (20), чтобы активировать экспозамер.
3. Направьте камеру на область сюжета со средней освещенностью. При этом обратите внимание на то, что экспонометр определяет экспозицию преимущественно по центру кадра. Следите, чтобы в этой области кадра не было источников света или больших светлых поверхностей сюжета. В случае необходимости подойдите ближе к основному сюжету или выберите дополнительно значение экспокоррекции.
4. Отпустите кнопку сохранения экспозиции (20), когда светодиодный индикатор покажет необходимое значение выдержки.
* Индикатор “AEL”в видоискателе начнет медленно мигать, показывая сохранение отображаемой выдержки.
* Выдержка остается в памяти в течение 20 секунд после того, как Вы отпустили кнопку сохранения. (Пока Вы удерживаете кнопку сохранения экспозиции (20), экспозиция изменяется в зависимости от освещенности сюжета.)
5. Скомпонуйте кадр и произведите съемку
* Выдержка остается в памяти после съемки в течение 20 секунд, чтобы Вы могли снять дальнейшие кадры с такой же экспозицией без повторного замера и сохранения.
* Если Вы изменяете экспокоррекцию, пока активировано сохранение экспозиции, сохраненное значение выдержки регулируется автоматически.
* Если Вы меняете значение диафрагмы на объективе, пока активировано сохранение значения замера, выдержка остается неизменной и экспозиция соответственно меняется.
-17-
* Сохраненное значение выдержки автоматически удаляется через 20 секунд, если затвор не был спущен. Но при нажатии кнопки спуска наполовину сохранение экспозиции остается активированным в течение любого времени. Это делает возможной серийную съемку с постоянным значением выдержки даже, если между съемкой отдельных кадров проходит более 20 секунд.
Сохраненное значение выдержки удаляется при повторном нажатии кнопки сохранения экспозиции (20). Камера возвращается тогда к обычному автоматическому определению экспозиции. Таким образом, при включенном сохранении экспозиции можно быстро сохранить новую экспозицию, дважды быстро нажав кнопку сохранения (20).
-18-
Настройка экспозиции
Ручная экспозиция
В режиме ручной экспозиции можно выбирать любую желаемую комбинацию величины диафрагмы и времени экспозиции, время замеренной экспозиции показывается на видоискателе.
— Индикации на кольце выдержки (2)
«2000» означает 1/2000 сек.
«1» означает 1 сек.
«В» означает свободная выдержка.
— При наличии ярких и /или быстродвижущихся объектов рекомендуется использовать более короткую выдержку.
1. Поверните главный выключатель (7) в положение ВКЛ (ON).
2. Установите кольцо выдержки (2) на необходимую настройку выдержки.
3. Отрегулируйте фокус и нажмите спусковую кнопку затвора (4) до половины,
при этом смотрите через окуляр видоискателя (19).
— Вы увидите в видоискателе два светодиодных индикатора.
Один указывает выбранную вручную выдержку.
Второй мигающий индикатор показывает замеренную величину выдержки.
— 19 —
4. Поверните кольцо диафрагмирования на объективе и/или кольцо выдержки (2) для выравнивания двух светодиодов до их схождения в одной точке.
- Когда мигающий светодиод сходится с другим горящим индикатором и таким образом в видоискателе горит только один светодиод, это означает, что Вы выбрали замеренную величину экспозиции.
- Вы можете, конечно, установить другие отверстие диафрагмы и выдержку с целью достичь специальных эффектов.
- Быстрое мигание светодиода «2000», когда кольцо выдержек установлено на 2000, указывает на то, что это «неправильная экспозиция: передержка». Поверните кольцо диафрагмирования на объективе в сторону более высокой заданной величины.
- Быстрое мигание светодиода «1», когда кольцо выдержек установлено на 1, указывает на то, что это «неправильная экспозиция: недодержка». Поверните кольцо диафрагмирования на объективе в сторону более низкой заданной величины.
- Светодиод остаётся включённым примерно в течение 8 секунд после того, как Вы перестали нажимать спусковую кнопку затвора (4) или перестали поворачивать кольцо выдержек (2).
5. Создайте свою композицию и спустите затвор.
— 20 —
Выбор рамки с подсветкой в видоискателе
Ваша камера меняет линии рамки видоискателя автоматически в зависимости от типа объектива.
Вы можете также иметь предварительный просмотр линий других рамок перед принятием решения о смене объектива путём поворота рычажка селектора поля кадра (12).
— 21 —
Фокусировка
Фокусировка 1
Для точной фокусировки при наличии таких объектов, как группа людей, видоискатель (19) с «двойным изображением» с центральной фокусировочной зоной обеспечит простую съёмку изображений с хорошей резкостью.
Для достижения этого поверните просто объектив и подрегулируйте его, пока двойное изображение не сходится в одно.
Фокусировка 2
Для точной фокусировки при наличии таких объектов, как архитектурные или технические сюжеты с вертикальными линиями, пользуйтесь опцией фокусировки «Совмещение расщеплённого изображения» (“Split image”).
Для достижения этого поверните просто объектив и подрегулируйте его так, чтобы линии сходились вместе.
Примечание: При фокусировке убедитесь, что Ваш глаз находится в середине видоискателя.
Подписи под изображениями:
Not in focus = не в фокусе in focus = в фокусе
— 22 —
Как держать камеру
- Держите камеру на ладони левой руки таким образом, чтобы можно легко
поворачивать фокусировочное кольцо объектива левой рукой.
- Держите устойчиво корпус камеры и слегка прикоснитесь указательным пальцем правой руки к спусковой кнопке затвора (4).
- Прижмите левый локоть слегка к телу и затем посмотрите через окуляр видоискателя (19), чтобы стабилизировать камеру к лицу. Затем расслабьте свою правую руку, которая держит камеру.
Примечание: При более длительной выдержке рекомендуется использовать штатив и/или спусковой тросик во избежание смазывания изображения.
— 23 —
Перемотка плёнки назад
- Когда ролик плёнки заканчивается, рычажок протяжки плёнки не будет
двигаться больше плавно вперёд. Посмотрите дисплей счётчика кадров
плёнки (6). Если счётчик кадров плёнки показывает, что все кадры
вставленной плёнки были экспонированы, тогда плёнка должна быть
перемотана назад.
- Нажмите кнопку перемотки плёнки назад (31), расположенной в нижней части камеры.
- Отложите рычаг перемотки плёнки назад (24) и поверните его в направлении стрелки.
- Когда напряжение перемотки ослабнет, плёнка полностью перемотана назад в кассету и её можно вынуть.
- Откройте заднюю крышку (27), вытащите кнопку перемотки плёнки назад (23) и удалите кассету с плёнкой.
- Не забудьте защитить кассету с плёнкой от прямого солнечного света при удалении кассеты.
Примечание: Если плёнка будет перемотана до конца ролика во время протяжки плёнки, плёнкопротяжный рычажок (5) дойдёт до упора. Перемотайте назад всю плёнку, затем после удаления кассеты доведите до конца движение плёнкопротяжного рычажка.
— 24 —
Установка «В» (свободная выдержка)
1.Когда кольцо выдержки (2) установлено в положении «В», затвор остаётся открытым столько, сколько спусковая кнопка затвора (4) удерживается в нажатом положении.
2.Данная установка полезна, когда необходима более длительная чем одна секунда экспозиция в таких случаях, как ночная фотосъёмка.
3. Не забудьте использовать штатив и/или спусковой тросик при использовании длительной выдержки, чтобы избежать движения камеры.
- 25 –
Фотосъёмка со вспышкой
1. Установите вспышку на башмаке для аксессуаров камеры (11).
При наличии вспышки с рукояткой соедините её с синхро контактом
(17) с помощью кабеля.
2. Установите кольцо выдержки (2) на 1/125 сек. или на более
длительной величине. Вспышка может быть синхронизирована с
выдержками, более длительными чем 1/125 сек., но будьте осторожны,
избегайте движения камеры или объекта.
3. Поставьте подходящую величину отверстия диафрагмы в
соответствии с ведущим числом Вашей вспышки и дистанцией до
объекта. Следуйте указаниям, данным в руководстве для эксплуатации
Вашей вспышки.
4. Убедитесь, что индикатор готовности вспышки горит и спустите
затвор.
— 26 —
Диоптрийная насадка
В качестве опционных аксессуаров имеются диоптрийные насадки шести типов (-3, -2, -1, +1, +2, +3) для коррекции отдельных дефектов зрения.
Крепление диоптрийной насадки:
- Поверните прорезиненную диоптрийную коррективную насадку (18) против часовой стрелки для отсоединения.
- Навинтите выбранную диоптрийную коррективную насадку по часовой стрелке.
Примечание: Попросите больше информации у своего дилера.
Спецификации
Тип камеры: компактная дальномерная камера с фокальным затвором и TTL-системой замера света
Формат плёнки: 24х36мм на 35мм плёнке
Объективы: объективы Carl Zeiss T* с байонетной оправой ZM с фокусным расстоянием от 15мм до 85мм, могут также использоваться почти со всеми другими типами объективов с оправой М и оправой с нарезкой М39 с адаптером.
Видоискатель: 0,74х увеличение, широкий дальномерный видоискатель и широкий видоискатель с рамочной подсветкой, активируемой используемым типом объектива, кадры на дисплее 28/85мм , 35мм, 50мм; отдельный селектор кадров для ручного выбора кадров, независимо от установленного объектива, автоматическая коррекция параллакса, окуляры для настройки по зрению в пределах –3 до +3 диоптрий, стандартная настройка –0,5 диоптрии
Дальномер с широкой базой: центр совмещения оптического дальномера с двойным изображением в центре изображения видоискателя, база замера 75мм (эффективно 55,5мм), диапазон измерения дистанции, поддерживаемый при использовании совместимых объектвов: 0,7м до бесконечности
Замер экспозиции: центровзвешенный TTL-замер при рабочем отверстии диафрагмы, диапазон замера при ISO 100 и f/2: EV 0 – EV 19 (f/2 – 4 сек, f/16 – 1/2000 сек)
Диапазон чувствительности плёнки: ISO 25 – 3200 вручную ступенями 1/3 диафрагменного числа
Режимы экспозиции: автоэкспозиция с приоритетом диафрагмы или ручная экспозиция, возможность экспопамяти для серии экспозиций, экспопоправка +/- 2 диафрагменных числа ступенями 1/3 диафрагменного числа, установленных на диске выдержки
Дисплей видоискателя: светодиодные символы для избранной выдержки вдоль левой стороны кадра, предупреждения при неправильно выбранной выдержке и низком уровне заряженности батарей
Затвор и выдержка: металлический фокальный затвор вертикального хода, с регулируемой электроникой выдержкой (разрешение при 1/12 диафрагменного числа) от 8 до 1/2000 сек. в автоматическом режиме; 1 – 1/2000 сек. ступенями в 1 диафрагменное число в ручном режиме; В
Синхронизатор вспышки: синхронизация при 1/125 сек. и более длительных выдержках
Протяжка плёнки: рычажок ускоренной ручной протяжки с частичной протяжкой храповым механизмом
Корпус камеры: монолитная алюминиевая конструкция основания, наружные магниевые крышки, резьба для штатива ¼ дюйма у основания
Элементы питания: один литиевый элемент CR 1/3 или два элемента 1,5 В типа LR44 или SR44
Габариты/Вес: 138 х 77,5 х 32мм, 460 г
Спецификации могут быть изменены без предварительного извещения в ходе дальнейшей разработки продукции.
— 27 —
- Manuals
- Brands
- Zeiss Manuals
ManualsLib has more than 660 Zeiss manuals
Popular Categories:
![]()
Digital Camera
Featured manuals

DTI 3/35 — Thermal Imager Manual
3D Glasses
Models
Document Type
Cinemizer
Manual
• Quick Manual
• User Manual
cinemizer OLED
Operating Instructions Manual
• Safety And Operation
Accessories
Models
Document Type
N HBO 103
Operating Manual
N XBO 75
Operating Manual
Adapter
Models
Document Type
Cinemizer
Manual
• Quick Manual
• User Manual
DTC-A
Instructions For Use Manual
Victory
Instructions For Use Manual
All in One Printer
Models
Document Type
ApoTome.2
Operation Manual
• Quick Reference Manual
Binoculars
Models
Document Type
10×56-FL
Instructions For Use Manual
20 x 60 S
Instructions For Use Manual
52 32 11
Instructions For Use / Guarantee
52 32 12
Instructions For Use / Guarantee
• Instructions For Use
52 42 11
Instructions For Use / Guarantee
52 42 12
Instructions For Use / Guarantee
• Instructions For Use
Show all Zeiss Binoculars manuals
Camera Accessories
Models
Document Type
528030-0000-000a
Instructions For Use Manual
Biogon T* 2.0 / 35 ZM
Instruction Manual
Biogon T* 2.8 / 21 ZM
Instruction Manual
Biogon T* 2.8 / 25 ZM
Instruction Manual
Biogon T* 2.8 / 28 ZM
Instruction Manual
Compact Prime CP.3
Change Instructions
• Instruction Manual
Compact Prime CP.3 XD
Quick Manual
• Change Instructions
• Instruction Manual
Conquest Gavia
Instructions For Use Manual
• Instructions For Use Manual
Distagon T* 2.8 / 15 ZM
Instruction Manual
Show all Zeiss Camera Accessories manuals
Camera Lens
Models
Document Type
Arri 135/T1.9
User Manual
Camera Lens
Instructions For Use Manual
Compact Prime CP.3
Change Instructions
• Instruction Manual
Compact Prime CP.3 XD
Quick Manual
• Change Instructions
• Instruction Manual
Lightweight Zoom LWZ.3
Instructions Manual
MiniQuick T SERIES
Instructions For Use Manual
Mono T SERIES
Instructions For Use Manual
Planar T* 1.4 / 85
Instruction Manual
• Information
Sharp Max
Instructions For Use Manual
Supreme Prime
Change Instructions
• Instruction Manual
• Instruction Manual
Show all Zeiss Camera Lens manuals
Control Panel
Models
Document Type
SYCOP 3
Quick Reference Manual
Desktop
Models
Document Type
AURIGA Compact Crossbeam
Instruction Manual
Crossbeam 340
Instruction Manual
Diagnostic Equipment
Models
Document Type
CIRRUS HD-OCT 500
Technical Specifications
• User Manual
CIRRUS HD-OCT 5000
Technical Specifications
• User Manual
Digital Camera
Models
Document Type
35 mm SLR Camera
Operating Manual
Axiocam 105 color
Installation & Reference Manual
• User Manual
• Instruction Manual
Axiocam 202 mono
User Manual
• User Manual
• Instruction Manual
Axiocam 208 color
User Manual
• User Manual
• Instruction Manual
Axiocam 305 color
User Manual
• User Manual
Axiocam 305 mono
User Manual
Axiocam 503 color
User Manual
Axiocam 503 mono
User Manual
Show all Zeiss Digital Camera manuals
Film Camera
Models
Document Type
Ikon Rangefinder
Instruction Manual
• Instruction Manual
Laboratory Equipment
Models
Document Type
200-mm airlock
Instruction Manual
423003-9000
Operating Manual
423003-9010
Operating Manual
ApoTome.2
Operation Manual
• Quick Reference Manual
Argon Ion Beam System
Instruction Manual
AT.Shooter A1-2000
Handling Instructions
AT.Shooter A2-2000
Handling Instruction
Auto Focus
Operating Manual
Axio Imager A1
User Manual
Axio Imager M1
User Manual
Show all Zeiss Laboratory Equipment manuals
Lantern
Models
Document Type
Colibri.2
Operating Manual
Lenses
Models
Document Type
Axioscope 7
Manual
• Operating Manual
• Quick Reference Manual
Cinema Zoom 15-30
Change Instructions
Cinema Zoom 20-80
Change Instructions
Cinema Zoom 70-200
Change Instructions
Compact Prime CP.2
Manual
• Change Instructions
Compact Prime CP.2 100/T2.1 CF
Manual
• Change Instructions
Compact Prime CP.2 135/T2.1
Manual
Compact Prime CP.2 15/T2.9
Manual
Show all Zeiss Lenses manuals
Lighting Equipment
Models
Document Type
CL 6000 LED
Operating Instructions Manual
CL 9000 LED
Operating Instructions Manual
Colibri 5
Quick Reference Manual
Colibri 7
Operating Manual
• Quick Reference Manual
Magnifiers
Models
Document Type
LC
Instructions For Use Manual
Measuring Instruments
Models
Document Type
2289-955
Maintenance And Repair Manual
2289-971
User Manual
2298-955
User Manual
2298-971
Maintenance And Repair Manual
830
Instructions For Use Manual
840
Instructions For Use Manual
850
Instructions For Use Manual
860
Instructions For Use Manual
AURA
User Manual
• User Manual
Show all Zeiss Measuring Instruments manuals
Medical Equipment
Models
Document Type
000000-1272-175
User Manual
2075-325
Service Manual
3000
User Manual
ACCURA
Manual
Acuitus 5000
User Manual
Acuitus 5010
User Manual
Acuitus 5015
User Manual
ATLAS 9000
Quick Start Manual
Cinemizer
Manual
• Quick Manual
• User Manual
CIRRUS
Quick Start Manual
Show all Zeiss Medical Equipment manuals
Microphone
Models
Document Type
Axiolab Pol
Operating Manual
• Operating Manual
LSM 510 Inverted
Operating Manual
• Operating Manual
• User Manual
• User Manual
• Brief Operating Manual
• Quick Manual
Microscope
Models
Document Type
000000-1080-349
Instructions For Use Manual
000000-1095-094
Instructions For Use Manual
000000-1403-542
Instructions For Use Manual
000000-1403-544
Instructions For Use Manual
000000-1403-572
Instructions For Use Manual
000000-1403-573
Instructions For Use Manual
000000-1420-191
Instructions For Use Manual
1154-525
Instructions For Use Manual
1176-968
Instructions For Use Manual
1176-969
Instructions For Use Manual
Show all Zeiss Microscope manuals
Monocular
Models
Document Type
52 54 01
Instructions For Use Manual
52 54 11
Instructions For Use Manual
52 54 21
Instructions For Use Manual
Conquest 10×25 T* Compact
Instructions For Use Manual
• Instructions For Use Manual
• Instructions For Use Manual
• Instructions For Use Manual
• Instructions For Use Manual
Conquest MiniQuick 5×10 T
Instructions For Use Manual
Conquest MiniQuick T Series
Instructions For Use Manual
Conquest Mono 4×12 T
Instructions For Use Manual
Conquest Mono 6×18 T
Instructions For Use Manual
Conquest Mono T Series
Instructions For Use Manual
DiaScope 65 T FL
Instructions For Use Manual
Show all Zeiss Monocular manuals
Outdoor Light
Models
Document Type
SL 120
User Manual
• Documentation
Power Supply
Models
Document Type
432610-9060-000
Quick Reference Manual
Racks & Stands
Models
Document Type
Floor Stand S
Operating Manual
S8
User Manual
• Instructions For Use Manual
• Instructions For Use Manual
S81
User Manual
• Instructions For Use Manual
Stand M LED
Operating Manual
Riflescope
Models
Document Type
Classic Diatal T 52 13 40
Instructions For Use Manual
Classic Diatal T Series
Instructions For Use Manual
Classic Diavari T 52 13 00
Instructions For Use Manual
Classic Diavari T 52 13 01
Instructions For Use Manual
Classic Diavari T 52 13 10
Instructions For Use Manual
Show all Zeiss Riflescope manuals
Scanner
Models
Document Type
AxioCam MRc5
Installation Reference Manual
Security Camera
Models
Document Type
AxioCam ERc 5s
User Manual
• User Manual
• Operating Instructions Manual
Security Sensors
Models
Document Type
4QBSD
Instruction Manual
BSD4
Instruction Manual
Smart Glasses
Models
Document Type
Cinemizer Plus
Quick Start Manual
Stereo System
Models
Document Type
LSM 980
Startup Manual
Telescope
Models
Document Type
CONQUEST GAVIA 85
Instructions For Use Manual
• Instructions For Use
DIALYT 18-45×65
Instructions For Use Manual
PhotoScope 85 T* FL Series
Instructions For Use Manual
Victory DC4
Instructions For Use Manual
Victory DiaScope 65 T FL
Instructions For Use Manual
Victory DiaScope 85 T FL
Instructions For Use Manual
VICTORY HARPIA 85
Manual
VICTORY HARPIA 95
Instructions For Use
Thermal cameras
Models
Document Type
4047865000826
Quick Manual
4047865000833
Quick Manual
DTI 1/19
Quick Manual
DTI 1/25
Quick Manual
DTI 3/25
User Manual
DTI 3/25 GEN 2
Quick Manual
• Instructions For Use Manual
DTI 3/35
Instructions For Use Manual
• Instructions For Use Manual
• User Manual
• User Manual
Show all Zeiss Thermal cameras manuals
Tools
Models
Document Type
FixAssist XTR
Operating Manual
Ultrasonic Jewelry Cleaner
Models
Document Type
UVClean
User Manual
Virtual Reality Headsets
Models
Document Type
VR ONE Plus
Manual
Carl Zeiss Микроскопы: инструкции, паспорта/ ZIP 70,0МБ
Carl Zeiss: Axiolab A Reflected Light Microscope
Carl Zeiss: Axiolab Microscope for transmitted light and fluorescence
Carl Zeiss: Axiolab Pol Polarizing Microscope
Carl Zeiss: Axiomat
Carl Zeiss: Axiophot Pol Photomicroscope for Reflected Light
Carl Zeiss: Axioplan 2 imaging and Axiophot 2
Carl Zeiss: Axioplan Pol Universal Microscope
Carl Zeiss: Axioplan Universal Microscope
Carl Zeiss: Axioplan Universal Microscope for Reflected Light
Carl Zeiss: Axioskop 40 Axioskop 40 FL Routine Microscope
Carl Zeiss: Axioskop for Transmitted Light and Fluorescence
Carl Zeiss: Axioskop Routine Microscope for Reflected Light
Carl Zeiss: Axiostar plus — Transmitted Light Microscope
Carl Zeiss: Axiovert 10/35/35M/405M
Carl Zeiss: Axiovert 100, 135 and 135 M
Carl Zeiss: Axiovert 25 CA
Carl Zeiss: Axiovert 25 Inverted Microscope
Carl Zeiss: Epi-fluorescence condenser III RS
Carl Zeiss: Epi-Fluorescence Condensor IV Fl
Carl Zeiss: Ergoval Microscope (Jena)
Carl Zeiss: Incident-Light Photomicroscope III
Carl Zeiss: Inverted Microscope IM
Carl Zeiss: Invertoscope ID 03 and ID 03 MT
Carl Zeiss: KF 2 ICS Transmitted Light Microscope
Carl Zeiss: Laboval 4
Carl Zeiss: Large, transmitted-light research microscope Universal
Carl Zeiss: MC 100 Microscope Camera
Carl Zeiss: MC 100 Spot Microscope Camera
Carl Zeiss: MC 63 A Photomicrographic Camera for Microscopes and Stereomicroscopes
Carl Zeiss: MC 80 DX Microscope Camera
Carl Zeiss: Microscope Illuminator 100
Carl Zeiss: MPM 100 Microscope-Photometer
Carl Zeiss: Standard GFL WL System Overview
Carl Zeiss: STANDARD JUNIOR 2 microscope
Carl Zeiss: STANDARD LAB 06 Microscope
Carl Zeiss: STANDARD Microscope with LUCIGEN Illuminator
Carl Zeiss: Standard Pol and Standard WL Pol microscopes
Carl Zeiss: Stemi DRC and D
Carl Zeiss: Stereomicroscope SV 6 and SV 11
Carl Zeiss: Stereomicroscope SV 8
Carl Zeiss: Transmitted Light Photomicroscope III