Перейти к контенту
Русские электронные инструкции по эксплуатации
Постоянно обновляемый большой каталог документации по эксплуатации и использованию современных устройств и оборудования на русском языке. Бесплатное скачивание файлов.
Поиск:
Главная
♥ В закладки
Просмотр инструкции в pdf
Инструкция по эксплуатации стиральной машины Candy Smart CS34 1051D1-2-07.
Скачать инструкцию к стиральной машине Candy Smart CS34 1051D1-2-07 (7,50 МБ)
Инструкции по эксплуатации стиральных машин Candy
« Инструкция к стиральной машине Candy AQUA 2D1140-07
» Инструкция к стиральной машине Candy EVOGT 12072D-07
Вам также может быть интересно
Инструкция к стиральной машине Candy GrandO Vita Smart GVSW45 385TWHC-07
Инструкция к стиральной машине Candy GVS44 128DC3-07
Инструкция к микроволновой печи Candy CMXW22DS
Инструкция к стиральной машине Candy Grand O Vita Smart GVF44138LWHC3-07
Инструкция к стиральной машине Candy GVSW40364TWHC-07
Инструкция к стиральной машине Candy Smart CS4 1172D1-2-07
Инструкция к стиральной машине Candy CS341062D2-2-07
Инструкция к стиральной машине Candy GrandO EVO3 1052D-07
Добавить комментарий
Имя *
Email *
Сайт
Комментарий


Сохранить моё имя, email и адрес сайта в этом браузере для последующих моих комментариев.
- Добавить инструкцию
- Заказать инструкцию
- Политика конфиденциальности
Candy Smart Touch Washing Machine 5-12 Kg Manual
Carefully read this manual for correct and safe appliance use and for helpful tips on efficient maintenance.

FOR U.K. ONLY
On receipt of your appliance please check it carefully for damage. Any damage found must be reported to the delivery driver immediately. Alternatively damage found must be reported to the retailer within 2 days of receipt.
Each product is identified by a unique 16character code, also called the «serial number», printed on the sticker. This can be found inside the door opening. This code is a unique code for your product that you will need to register the product warranty, or if you need to contact the Customer Service Centre.
Environmental conditions 
WEEE contains both polluting substances (which can cause negative consequences for the environment) and basic components (which can be re-used). It is important to have WEEE subjected to specific treatments, in order to remove and dispose properly all pollutants, and recover and recycle all materials. Individuals can play an important role in ensuring that WEEE does not become an environmental issue; it is essential to follow some basic rules:
- WEEE should not be treated as household waste;
- WEEE should be handed over to the relevant collection points managed by the municipality or by registered companies. In many countries, for large WEEE, home collection could be present.
In many countries, when you buy a new appliance, the old one may be returned to the retailer who has to collect it free of charge on a one-to-one basis, as long as the equipment is of equivalent type and has the same functions as the supplied equipment.
GENERAL SAFETY RULES
- This appliance is intended to be used in household and similar applications such as:
- Staff kitchen areas in shops, offices and other working environments;
- Farm houses;
- By clients in hotels, motels and other residential type environments;
- Bed and breakfast type environments.
A different use of this appliance from household environment or from typical housekeeping functions, as commercial use by expert or trained users, is excluded even in the above applications. If the appliance is used in a manner inconsistent with this it may reduce the life of the appliance and may void the manufacturer’s warranty. Any damage to the appliance or other damage or loss arising through use that is not consistent with domestic or household use (even if located in a domestic or household environment) shall not be accepted by the manufacturer to the fullest extent permitted by law.
- This appliance can be used by children aged from 8 years and above and persons with reduced physical, sensory or mental capabilities or lack of experience and knowledge if they have been given supervision or instruction concerning use of the appliance in a safe way and understand the hazards involved. Children shall not play with the appliance. Cleaning and user maintenance shall not be made by children without supervision.
- Children should be supervised to ensure that they do not play with the appliance.
- Children of less than 3 years should be kept away unless continuously supervised.
- If the supply cord is damaged, it must be replaced by a special cord or assembly available from the manufacturer or its service agent.
- Only use the hose-sets supplied with the appliance for the water supply connection (do not reuse old hose-sets).
- Water pressure must be between 0.05 MPa and 0.8 MPa.
- Make sure carpets or rugs do not obstruct the base or any of the ventilation openings.
- After installation, the appliance must be positioned so that the plug is accessible.
- The maximum load capacity of dry clothes depends on the model used (see control panel).
- To consult the product technical specification please refer to the manufacturer website.
Electrical connections and safety instructions
- The technical details (supply voltage and power input) are indicated on the product rating plate.
- Make sure that the electrical system is earthed, complies with all applicable law and that the (electricity) socket is compatible with the plug of the appliance. Otherwise, seek qualified professional assistance.
- The use of converters, multiple sockets or extension cords is strongly advised against.
- Before cleaning or maintaining the washing machine, unplug the appliance and turn off the water tap.
- Do not pull on the power cord or appliance to unplug the machine.
- Make sure there is no water in the drum before opening the door.
Water may reach very high temperatures during the wash cycle.
- Do not expose the washing machine to rain, direct sunlight or other weather elements. Protect from possible freezing.
- When moving, do not lift the washing machine by the knobs or detergent drawer; during transport, never rest the door on the trolley. We recommend two people lift the washing machine.
- In the event of fault and/or malfunction, turn off the washing machine, close the water tap and do not tamper with the appliance. Immediately contact the Customer Service Centre and only use original spare parts. Failure to observe these instruction may jeopardise appliance safety.
INSTALLATION
In some models this operation will not be necessary, because the corrugated plastic sheet will be already placed on the bottom of the appliance.
Hydraulic connections
Setting
Contact the Customer Service Centre should the power cord need replacement. Installation faults are not covered by the manufacturers warranty.
DETERGENT DRAWER
The detergent draw is split into 3 compartments as illustrated in figure 9:
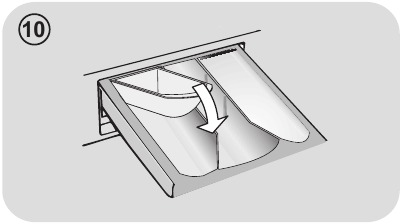
A liquid detergent cup is also included IN SOME MODELS (fig. 10). To use it, place it in compartment «2». This way, liquid detergent will only enter the drum at the right time. The cup can also be used for bleach when the «Rinse» program is selected.
Some detergents are not designed for use in the dispenser drawer but are supplied with their own dispenser that is placed in the drum directly.
SOME MODELS are provided with the automatic dosage, this carries out a precise measurement of detergent and softener. In this case, refer to the specific section in the CONTROLS AND PROGRAMS chapter for details.
PRACTICAL HINTS
Load tips
When sorting laundry, make sure:
- have eliminated metallic objects such as hair clips, pins, coins, from laundry;
- to have buttoned pillow cases, closed zips, tied loose belts and long robe ribbons;
- to have removed rollers, hooks or clips from curtains;
- to have carefully read clothing washing labels;
- to have removed any persistent stains using specific detergents.
- When washing rugs, bedcovers or other heavy clothing, we recommend you avoid the spinning cycle.
- To wash wool, make sure the item can be machine washed. Check the fabric label.
- Leave the appliance’s door slightly open between washes, to prevent possible bad smells developing inside the machine.
Useful advice for saving
Tips on how to save money and not damage the environment when using your appliance.
- Load the machine to the highest capacity shown in the programme table for each programme — this will allow you to SAVE energy and water.
- Noise and residual laundry moisture are affected by spin speed: a faster spin is associated with greater noise and lower residual moisture in the laundry.
- The most efficient programmes in terms of combined use of water and energy are usually the longer-lasting ones with lower temperature.
Maximise the load size
- Achieve the best use of energy, water, detergent and time by using the recommended maximum load size. Save up to 50% energy by washing a full load instead of 2 half loads.
Do you need to pre-wash?
- For heavily soiled laundry only! SAVE detergent, time, water and between 5 to 15% energy consumption by NOT selecting Prewash for slight to normally soiled laundry.
Is a hot wash required?
- Pretreat stains with stain remover or soak dried in stains in water before washing to reduce the necessity of a hot wash programme. Save energy by using a low temperature wash programme.
Before using a drying programme (WASHER-DRYERS)
- SAVE energy and time by selecting a high spin speed to reduce the water content in laundry before using a drying programme.
Dosing the detergent
Below is a short guide with tips and advice on the use of detergent.
- Only use detergents suitable for machine washing.
- Select your detergent according to the type of fabric (cotton, delicates, synthetics, wool, silk, etc.), the colour, the type and level of soiling and the programmed washing temperature.
- To use the right amount of detergent, softener or any other additives, carefully follow the manufacturer’s instructions every time: correctly using the appliance with the right dose allows you to avoid waste and to reduce the environmental impact.
When washing heavily soiled whites, we recommend using cotton programs of 60°C or above and a normal washing powder (heavy duty) that contains bleaching agents that at medium/high temperatures provide excellent results.
For washes between 40°C and 60°C the type of detergent used needs to be appropriate for the type of fabric and level of soiling. Normal powders are suitable for «white» or colour fast fabrics with high soiling, while liquid detergents or «colour protecting» powders are suitable for coloured fabrics with light levels of soiling.
For washing at temperatures below 40°C we recommend the use of liquid detergents or detergents specifically labeled as suitable for low temperature washing.
For washing wool or silk, only use detergents specifically formulated for these fabrics.
- Too much detergent leads to excessive foam, which prevents the cycle being carried out correctly. It could also affect the quality of the washing and rinsing.
The use of ecological detergents without phosphates may cause the following effects:
- cloudier rinse drain water: This effect is tied to the suspended zeolites which do not have negative effects on rinse efficiency.
- white powder (zeolites) on laundry at the end of the wash: this is normal, the powder is not absorbed by fabric and does not change its colour. To remove the zeolites, select a rinse programme. In the future consider using slightly less detergent.
- foam in the water at last rinse: this does not necessary indicate poor rinsing. Consider using less detergent in future washes.
- abundant foam: This is often due to the anionic surfactants found in the detergents which are hard to eliminate from laundry. In this case, do not re-rinse to eliminate these effects: it will not help at all. We suggest conducting a maintenance wash using a proprietary cleaner.
If the problem persists or if you suspect a malfunction, immediately contact an Authorised Customer Service Centre.
CLEANING AND MAINTENANCE
Looking after your appliance correctly can extend its lifespan.
Cleaning the appliance’s exterior
- Disconnect the machine from the power supply.
- Clean the appliance’s external cabinet, using a damp cloth and AVOIDING ABRASIVES, ALCOHOL AND/OR DILUENTS.
Drawer cleaning
- It is advisable to regularly clean the detergent drawer to avoid the accumulation of detergent and additive residues.
- Remove the drawer gently but firmly.
- Clean the drawer under running water and put it back into its compartment.
FOR MODELS WITH AUTOMATIC LIQUID DETERGENT AND SOFTENER DOSING SYSTEM:
Before proceeding with cleaning, all the compartments must be empty.
DO NOT use acid products (for example vinegar) or aggressive detergents to clean the drawer, in order to avoid damaging the seals and/or internal parts of the appliance.
Cleaning the pump filter
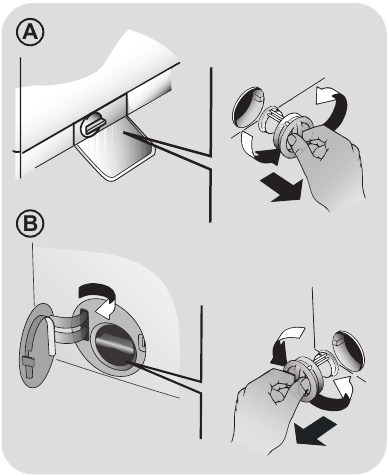
- The appliance has a special filter that traps larger residues that could block the draining system, such as buttons or coins (depending on the model, consider version A or B).
We recommend checking and cleaning the filter 5 or 6 times a year. - Disconnect the machine from the power supply.
- Ensure all the water has been emptied from the drum.
- Before unscrewing the filter, we recommend you place an absorbent cloth under it to keep the floor dry. A small amount of water will come out of the filter as you remove it — this is normal.
- Turn the filter counter-clockwise to the limit stop.
- Remove and clean the filter; when finished, replace it turning it clockwise. The filter handle will be locked when it is not possible to turn any further and the handle is horizontal. Smearing a small amount of liquid soap on the filter seal will help refitting.
- Repeat the previous steps in reverse order to reassemble all parts.
Suggestions for moves or prolonged disuse
- If the appliance is kept in a non-heated room for long periods of time, all water residues must be completely removed from the pipes.
- Disconnect the machine from the power supply socket.
- Detach the tube from the drainage system and clip on the rear of the machine and lower it, fully draining water into a bowl.
- Secure the drain tube with the drainage system and clip on the rear of the machine when finished.
- Keep the door glass and gasket clean.
FOR MODELS WITH AUTOMATIC LIQUID DETERGENT AND SOFTENER DOSING SYSTEM: should you need to tilt or move the machine, remove the detergent drawer before proceeding, keeping it horizontal so as to avoid any leakage.
QUICK USER GUIDE
This washing machine automatically adjusts the level of the water to the type and quantity of washing. This system gives a reduction in energy consumption and a saving in washing times.
Program selection
- Turn on the washing machine and select the required program.
- Adjust the washing temperature if necessary and press the required «option» buttons.
- Press the START/PAUSE button to start washing.
If there is a break in the power supply whilst the machine is operating, when the power is restored, the machine will restart from the beginning of the phase it was in when the power was lost. - At the end of the programme, the message «End» will appear on the display or, on some models, all wash stage indicator lights will turn on.
Wait until the DOOR LOCKED light has gone out before opening the door. - Turn off the washing machine.
For any type of wash, see the program table and follow the operating sequence as indicated.
Technical data
Water pressure: min 0.05 Mpa / max 0.8 Mpa (0.05 MPa dispenses approximately 1 litre of water in 10 seconds)
Spin r.p.m.: See rating plate.
Power input / Power current fuse amp / Supply voltage: See rating plate.
CONTROLS AND PROGRAMS
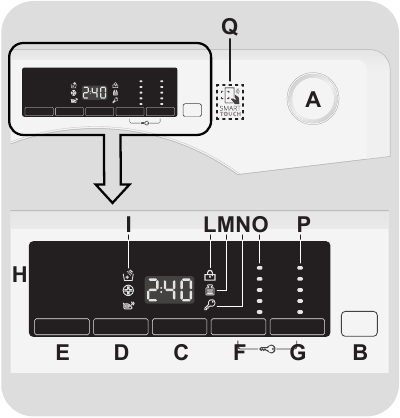
A Programme selector with OFF position
B START/PAUSE button
C DELAY START button
D OPTIONS button
E RAPID / STAIN LEVEL button
F TEMPERATURE SELECTION button
G SPIN SPEED button
F+G KEY LOCK
H Digital display
I OPTIONS indicator lights
L DOOR LOCKED indicator light
M KG DETECTOR indicator light
N KEY LOCK indicator light
O TEMPERATURE SELECTION indicator lights
P SPIN SPEED indicator lights
Q SMART TOUCH area
Opening the door
A special safety device prevents the door from being opened immediately after the end of the cycle. Wait for 2 minutes after the wash cycle has finished and the «Door Security» light has gone out before opening the door.
PROGRAMME selector with OFF position
When the programme selector is turned the display lights up to show the settings for the programme selected. For energy saving, at the end of the cycle or with an inactivity period, the display level contrast will decrease. N.B.: To switch the machine off, turn the programme selector to the OFF position.
- Press the START/PAUSE button to start the selected cycle.
- Once a programme is selected the programme selector remains stationary on the selected programme till cycle ends.
- Switch off the washing machine by turning the selector to OFF.
The programme selector must be returned to the OFF position at the end of each cycle or when starting a subsequent wash cycle prior to the next programme being selected and started.
START/PAUSE button
Close the door BEFORE selecting the button START/PAUSE.
- Press to start the selected cycle.
When the START/PAUSE button has been pressed, the appliance can take few seconds before it starts working.
PAUSING THE MACHINE
- Keep the START/PAUSE button pressed for about 2 seconds (some light indicators and the residual time display will flash, showing that the machine is paused).
For safety reasons, in some wash cycle phases, the door can be opened only if the level of the water is below its lower edge and if the temperature is less than 45°C. If these conditions are met, wait for the DOOR LOCKED light to switch off before opening the door. - Press the START/PAUSE button again to re-start the programme from the point it had been paused at.
CANCELLING THE PROGRAMME
- To cancel the programme, set the selector to the OFF position.
DELAY START button
- This button allows you to pre-programme the wash cycle to delay the start of the cycle for up to 24 hours.
- To delay the start use the following procedure:
- Select the required programme.
- Press the delay start button once to activate it (h00 appears on the display) and then press it again to set a 1 hour delay (h01 appears on the display). The pre-set delay increases by 1 hour each time the button is pressed, until h24 appears on the display, at which point pressing the button again will reset the delay start to zero.
- Confirm by pressing the START/PAUSE button. The delay countdown will begin and when it has finished the programme will start automatically.
- It is possible to cancel the delay start by turning the programme selector to OFF.
If there is a break in the power supply whilst the machine is operating, when the power is restored, the machine will restart from the beginning of the phase it was in when the power was lost.
The option buttons should be selected before pressing the START/PAUSE button.
OPTIONS button
This button allows you to choose between three different options:
EXTRA RINSE
- This option allows you to add one rinse at the end of the washing cycle and is useful for people with delicate and sensitive skin, for which a small amount of detergent residue can cause irritations or allergies.
- It is advisable to also use this function for the children clothes and for the washing of heavily soiled items, which requires a lot of detergent to be used, or for the washing of toweling items whose fibres mostly have the tendency to hold the detergent.
HYGIENE +
Activated when you set 60°C of temperature. This option allows deep cleaning of your clothes by maintaining the same temperature for the whole wash.
EASY IRON
This function allows you to minimizes creases as much as possible, eliminating the intermediate spins or reducing the intensity of the last one.
If an option is selected that is not compatible with the selected programme then the option indicator light first flashes and then goes off.
RAPID / STAIN LEVEL button
This button allows you to choose between two different options, depending on the selected programme.
RAPID
The button becomes active when you select the RAPID (14/30/44 Min.) programme on the knob and allows you to select one of three durations indicated.
STAIN LEVEL button
- Once the programme has been selected the wash time set for that programme will be automatically shown.
- This option allows you to choose between 3 levels of wash intensity modifying the length of the programme, depending on how much the fabrics are soiled (can only be used on some programmes as shown in the table of programmes).
TEMPERATURE SELECTION button
- This button allows you to change the temperature of the wash cycles.
- It is not possible to raise the temperature over the maximum allowed for the programme, in order to protect the fabrics.
- If you want carry out a cold wash all the indicators must be off.
SPIN SPEED button
- By pressing this button, it is possible to reduce the maximum speed, and if you The key lock can be simply cancelled by pressing the two buttons simultaneously again or turning off the appliance.
- If the label does not indicate specific information, it is possible to use the maximum spin expected in the program.
To prevent damage to the fabrics, it is not possible to increase the speed over the maximum allowed for the programme. - To reactivate the spin cycle press the button until you reach the spin speed you would like to set.
- It is possible to modify the spin speed without pausing the machine.
An over dosing of detergent can cause excessive foaming. If the appliance detects the presence of excessive foam, it may exclude the spinning phase or extend the duration of the program and increase water consumption.
The machine is fitted with a special electronic device, which prevents the spin cycle should the load be unbalanced. This reduces the noise and vibration in the machine and so prolongs the life of your machine.
KEY LOCK
- Pressing simultaneously the buttons TEMPERATURE SELECTION and SPIN SPEED for about 3 seconds, the machine allows you to lock the keys. In this way, you can avoid making accidental or unwanted changes if a button on the display is pressed accidently during a cycle.
- The key lock can be simply cancelled by pressing the two buttons simultaneously again or turning off the appliance.
Digital Display
The display’s indicator system allows you to be constantly informed about the status of the machine.
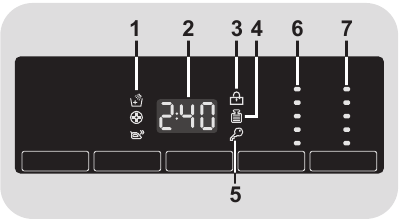
- OPTIONS INDICATOR LIGHTS
The indicator lights show the options that can be selected by the relevant button. - CYCLE DURATION
- When a programme is selected the display automatically shows the cycle duration, which can vary, depending on the options selected.
- During the initial filling phase of the cycle the machine calculates the actual cycle time needed based on the load size, content and options selected. The real time of the wash will then be displayed. This time can recaulculate during the wash depending on detergent levels and load balancing.
- DOOR LOCKED INDICATOR LIGHT
- The indicator light is illuminated when the door is fully closed.
Close the door BEFORE selecting the START/PAUSE button. - When START/PAUSE is pressed on the machine with the door closed, the indicator will flash momentarily and then illuminate.
If the door is not properly closed, the light will continue to flash for about 7 seconds, after which the start command will be automatically cancelled. In this case, close the door in the proper way and press the START/PAUSE button. - A special safety device prevents the door from being opened immediately after the end of the cycle. Wait for 2 minutes after the wash cycle has finished and the DOOR LOCKED light has gone out before opening the door. At the end of the cycle turn the programme selector to OFF.
- The indicator light is illuminated when the door is fully closed.
- Kg Detector INDICATOR LIGHT (function active only on Cotton and Synthetics programmes)
- During the first minutes of the cycle, the «Kg Detector» indicator will remain on while the intelligent sensor will weigh the laundry and adjust the cycle time, water and electricity consumption accordingly.
- Through every wash phase «Kg Detector» allows to monitor information on the wash load in the drum and in the first minutes of the wash it:
- adjusts the amount of water required;
- determines the length of the wash cycle;
- controls rinsing according to the type of fabric selected to be washed it;
- adjusts the rhythm of drum rotation for the type of fabric being washed;
- recognises the presence of too much soap suds, and if necessary, adjust the amount of rinse water.
- adjusts the spin speed according to the load, thus avoiding any imbalance.
- KEY LOCK INDICATOR LIGHT
The indicator light show that the keys are locked. - WASH TEMPERATURE INDICATOR LIGHTS
This show the washing temperature of the selected programme that can be changed (where allowed) by the relevant button. If you want carry out a cold wash all the indicators must be off. - SPIN SPEED INDICATOR LIGHTS
This show the spin speed of the selected programme, you can reduce or omit by the relevant button.
SMART TOUCH
This appliance is equipped with Smart Touch technology that allows you to interact, via the App, with smartphones based on Android operating system and equipped with NFC (Near Field Communication) function.
- Download on your smartphone the Candy simply-Fi App.
The Candy simply-Fi App is available for devices running both Android and iOS, both for tablets and for smartphones. However, you can interact with the machine and take advantage of the potential offered by Smart Touch only with Android smartphones equipped with NFC technology, according to following functional scheme:
| Android smartphone with NFC technology | Interaction with the machine + contents |
| Android smartphone without NFC technology | Contents only |
| Android Tablet | Contents only |
| Apple iPhone | Contents only |
| Apple iPad | Contents only |
FUNCTIONS
The main functions available using the App are:
- Voice Assistant – A guide to help you choose the ideal cycle with only three voice inputs (clothes/fabrics, color, stain level).
- Cycles – To download and launch new washing programmes.
- Smart Care – Smart Check-up and AutoClean cycles and a troubleshooting guide.
- My Statistics – Washing statistics and tips for a more efficient use of your machine.
Get all the details of the Smart Touch functions, browsing the App in DEMO mode or go to: www.candysmarttouch.com
HOW TO USE SMART TOUCH
FIRST TIME — Machine registration
- Enter the «Settings» menu of your Android smartphone and activate the NFC function inside the «Wireless & Networks» menu.
Depending on the smartphone model and its Android OS version, the process of the NFC activation may be different. Refer to the smartphone manual for more details. - Turn the knob to the Smart Touch position to enable the sensor on the dashboard.
- Open the App, create the user profile and register the appliance following the instructions on the phone display or the «Quick Guide» attached on the machine.
More information, F.A.Q. and the video for an easy registration are available on:
www.candysmarttouch.com/how-to
NEXT TIME – Regular usage
- Every time you want to manage the machine through the App, first you have to enable the Smart Touch mode by turning the knob to the Smart Touch indicator.
- Make sure you have unlocked your phone (from stand-by mode) and you have activated the NFC function; following the steps mentioned earlier.
- If you want to start a washing cycle, load the laundry, the detergent and close the door.
- Select the desired function in the App (e.g.: starting a programme, the Smart Check-up cycle, update statistics, etc…).
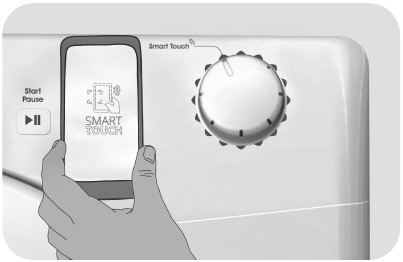
- Follow the instructions on the phone display, KEEPING IT ON the Smart Touch logo on the machine dashboard, when requested to do so by the App.
NOTES:
Place your smartphone so that the NFC antenna on its back matches the position of the Smart Touch logo on the appliance (as illustrated below).
If you do not know the position of your NFC antenna, slightly move the smartphone in a circular motion over the Smart Touch logo until the App confirms the connection. In order for the data transfer to be successful, it is essential TO KEEP THE SMARTPHONE ON THE DASHBOARD DURING THESE FEW SECONDS OF THE PROCEDURE; a message on the device will inform about the correct outcome of the operation and advise you when it is possible to move the smartphone away.
Thick cases or metallic stickers on your smartphone could affect or prevent the transmission of data between machine and telephone. If necessary, remove them.
The replacement of some components of the smartphone (e.g. back cover, battery, etc…) with non-original ones, could result in the NFC antenna removal, preventing the full use of the App.
The management and the control of the machine via App is only possible «by proximity»: it is therefore not possible to perform remote operations (e.g.: from another room; outside of the house).
Table of programmes
 PROGRAMME |
 (see control panel) |
1)
|
 |
|||||||||||
| 5 kg |
6 kg |
7 kg |
8 kg |
9 kg |
10 kg |
11 kg |
12 kg |
2 |  |
1 | ||||
| Cottons | 2) | 5 | 6 | 7 | 8 | 9 | 10 | 11 | 12 | 90° | ● | ● | ||
| Cotton + Prewash | 2) | 5 | 6 | 7 | 8 | 9 | 10 | 11 | 12 | 60° | ● | ● | ● | |
| ECO 40-60 | 2) | 5 | 6 | 7 | 8 | 9 | 10 | 11 | 12 | 60° | ● | ● | ||
| 20°C | 2) | 5 | 6 | 7 | 8 | 9 | 10 | 11 | 12 | 20° | ● | ● | ||
| Synthetics | 2) | 2,5 | 3 | 3,5 | 4 | 4,5 | 5 | 5,5 | 6 | 60° | ● | ● | ||
| Rinse | — | — | — | — | — | — | — | — | — | △ | ● | |||
| Drain + Spin | — | — | — | — | — | — | — | — | — | |||||
| Jeans | 2) | 3 | 3 | 3 | 3 | 3 | 3 | 3 | 3 | 40° | ● | ● | ||
| Hygiene | 3,5 | 4 | 4,5 | 5,5 | 6 | 6,5 | 7 | 8 | 60° | ● | ● | |||
| Wool/Hand Wash | 1 | 1 | 1 | 2 | 2 | 2 | 2 | 2,5 | 30° | ● | ● | |||
| Delicates | 2 | 2 | 2,5 | 2,5 | 2,5 | 2,5 | 2,5 | 3 | 40° | ● | ● | |||
 |
Mixed & Coloured 59′ | 5 | 6 | 7 | 8 | 9 | 10 | 11 | 12 | 40° | ● | ● | ||
 |
Rapid3) | 14′ | 1 | 1 | 1 | 1,5 | 1,5 | 1,5 | 1,5 | 2 | 30° | ● | ● | |
| 30′ | 1,5 | 2 | 2,5 | 2,5 | 2,5 | 2,5 | 2,5 | 3 | 30° | ● | ● | |||
| 44′ | 3 | 3 | 3,5 | 3,5 | 3,5 | 3,5 | 3,5 | 4 | 40° | ● | ● | |||
 |
Perfect Cotton 59′ | 2,5 | 3 | 3,5 | 4 | 4,5 | 5 | 5,5 | 6 | 40° | ● | ● | ||
 |
Customizable setting that interacts with the App on your smartphone and to download the cycles (see the dedicated section). The factory sets the default programme Auto-Clean, which will sanitize the machine. |
Please read these notes:
* Maximum load capacity of dry clothes, according to the model used (see control panel).

When only a limited number of articles have stains which require treatment with liquid bleaching agents, preliminary removal of stain can be carried out in the washing machine. Pour the bleach into the liquid bleach container, inserted into the compartment marked «2» in the detergent drawer, and set the special programme RINSE. When this phase has terminated, switch off the appliance, add the rest of the fabrics and proceed with a normal wash on the most suitable programme.
- When a programme is selected, on the display is shown the display shows the recommended wash temperature that can be reduced (where allowed) by the relevant button.
- For the programmes shown you can adjust the duration and intensity of the wash using the STAIN LEVEL button.
- Selecting the RAPID program on the knob, it will be possible to select with the RAPID button, one of the three rapid programs available among 14′, 30′ and 44′.
INFORMATION FOR THE TEST LABORATORIES
STANDARD PROGRAMMES ACCORDING TO (EU) No 1015/2010 e No 1061/2010
ECO 40-60 PROGRAMME SETTING THE TEMPERATURE TO 40°C
ECO 40-60 PROGRAMME SETTING THE TEMPERATURE TO 60°C
STANDARD PROGRAMME ACCORDING TO (EU) No 2019/2023
ECO 40-60 PROGRAMME
Description of programmes
To clean different types of fabrics and various levels of dirt, the washing machine has specific programs to meet every need of washing (see table of programmes).
Choose programme in accordance with the laundry instructions appearing on labels, especially the maximum recommended temperature.
IMPORTANT WASH PERFORMANCE ADVICE.
- New, coloured garments should be washed separately for at least 5 or 6 washes.
- Certain large dark items such as jeans and towels should always be washed separately.
- Never mix NON COLOURFAST fabrics.
Smart Touch
Customizable setting of the knob that you have to select when you would like to transfer a command from the App to the machine and to download/start a cycle (see the dedicated section and the user manual of the App for more info). In the Smart Touch option the factory sets as a default the «Auto-Clean» cycle, made to clean the drum, remove bad smells and extend the life of the washing machine. Make sure there is no load in the drum before starting the «Auto-Clean» cycle, use a proprietary washing machine cleaning agent or powder detergent. Leave the door of the machine open at the end of the cycle to allow the drum to dry. Recommended every 50 washes.
Cottons
This programme is suitable for washing coloured cotton garments at 40°C or for ensuring the highest degree of cleanliness for cotton resistant laundry washing at 60°C or 90°C. The final spin is at maximum speed that ensures excellent water removal.
Cottons + Prewash
This programme has been designed to remove the stronger stains from cotton white clothes. The prewash guarantees the tough dirt removal. Add into compartment «1» a quantity of detergent equal to 20% of that used for main wash.
ECO 40-60
The ECO 40-60 programme is able to clean normally soiled cotton laundry declared to be washable at 40°C or 60°C, together in the same cycle. This programme is used to assess the compliance with the EU Ecodesign legislation (environmentally friendly products design).
20°C
This innovative programme, allows you to wash different fabrics and colours together, such as cottons, synthetics and mixed fabrics at only 20°C and provides an excellent cleaning performance. Consumption on this program is about 40% of a conventional 40°C cottons wash.
Synthetics
This programme allows you to wash different type’s fabrics and different colours all together. The rotation movement of the drum and the water levels are optimized, both during the washing the rinsing phase. The accurate spin action, ensures a reduced formation of creases in the fabrics.
Rinse
This program performs 3 rinses with an intermediate spin (which can be reduced or excluded by using the appropriate button). It is used for rinsing any type of fabric, for example after a wash carried out by hand.
Drain + Spin
The program completes the drain and a maximum spin. It is possible to delete or reduce the spin through the SPIN SELECTION button.
Jeans
This programme has been designed to have the highest quality cleaning of fabrics such as denim: ideal for removing dirt without affecting the elasticity of the fibers.
Hygiene
Program for durable fabrics it allows you to sanitize the laundry. We recommend the use of powder detergents to increase the effectiveness of sanitizing.
Wool/Hand Wash
This programme performs a wash cycle dedicated to the wool fabrics that can be washed in a washing machine, the articles to be washed by hand or laundry items made from silk or specified as «Wash as Silk» on the fabric label.
Delicates
This programme has reduced periods of drum rotation during the cycle and is particularly suitable or washing delicate fabrics. The wash cycle and rinses are carried out with a high level of water to ensure the best performance.
Mixed & Coloured 59′
This programme offers you the freedom to wash all kinds of fabrics and non-fading colours together, with a full load, obtaining excellent results in only 59 minutes. With washing at medium temperature, this programme is recommended for laundry that is not particularly dirty.
Rapid (14’/30’/44′)
Saving without compromising! This new programme may be used to obtain excellent results while saving water, energy, detergent and time. This option washes at a medium temperature suitable for any kind of fabric. Recommended for small loads and lightly soiled items.
Perfect Cotton 59′
This programme guarantees excellent results for cotton laundry. This option was designed to cut washing time at medium temperatures for medium-soiled cotton laundry. Fill the machine only halfway for best results.
TROUBLESHOOTING AND WARRANTY
If you believe the washing machine is not working correctly, consult the quick guide provided below which includes some practical tips on how to fix the most common problems.
FOR SMART TOUCH MODELS
The Candy simply-Fi app has a Smart Check-up function that allows you to confirm the functionality and status of the product at any time. To use the Candy simply-Fi app you will need an Android smartphone with NFC technology. More info can be found on the App. If the display of the machine is showing an error (by a code or blinking LEDs), you should turn on the App on your Android smartphone, with NFC on. Place your smart phone against the Smart Touch logo on the control panel. You should now be able to read the fault directory to solve the issue.
ERROR CODE FORMAT
- Models with a display: the error is shown by a number preceded by the letter «E» (example: E2 = Error 2).
- Models without display: an error is shown by a sequence of flashes of every LED. The error code is shown by the number of flashes followed by a pause of 5 seconds (example: two flashes – pause 5 seconds – two flashes – repeating = Error 2).
| Error shown | Possible causes and practical solutions |
| E2 (with display) 2 flashes of the LEDs (without display) | The machine cannot load water. |
| Make sure the water supply tap is open. | |
| Make sure the water supply hose isn’t bent, kinked or trapped. | |
| Make sure the drain pipe is at the proper height (see installation section). | |
| Close the water supply tap, unscrew the filler hose from the back of the washing machine and make sure the «anti-sand» filter is clean and not blocked. | |
| Check that the filter is not clogged or that there are no foreign bodies inside the filter compartment that can obstruct the proper flow of water. | |
| E3 (with display) 3 flashes of the LEDs (without display) | The washing machine does not drain water. |
| Check that the filter is not clogged or that there are no foreign bodies inside the filter compartment that can obstruct the proper flow of water. | |
| Make sure the drain hose isn’t bent, kinked or trapped. | |
| Make sure the home drainage system is not blocked and is allowing water to flow through without obstruction. Try to drain the water in the sink. | |
| E4 (with display) 4 flashes of the LEDs (without display) | There is too much foam and/or water. |
| Ensure the correct amount of detergent is being used and the detergent is designed for use in a washing machine. | |
| E7 (with display) 7 flashes of the LEDs (without display) | Door problem. |
| Make sure the door is correctly closed. Make sure the clothes inside the drum are not preventing the door from closing fully. | |
| If the door is locked, turn off and unplug the washing machine from the electrical supply socket, wait 2-3 minutes and reopen the door. | |
| Any other code | Turn off and unplug the washing machine, wait a minute. Turn on the machine and restart a program. If the error occurs again contact an Authorised Customer Service Centre directly. |
OTHER ANOMALIES
| Problem | Possible causes and practical solutions |
| The washing machine does not work / start | Make sure the product is plugged into a working supply socket. |
| Make sure power is on. | |
| Make sure the wall socket is working, testing it with another appliance such as a lamp. | |
| The door may not be correctly closed: open and close it again. | |
| Check whether the required program was correctly selected and the start button pressed. | |
| Make sure the washing machine is not in pause or time delay mode. | |
| Water leaked on the floor near the washing machine | This may be due to a leak from the seal between the tap, supply hose and fill valve; in this case, replace it and tighten the hose connections correctly. |
| Make sure the front filter is correctly closed. | |
| The washing machine does not spin | The machine is fitted with a detection system that protects the load and product from damage if the load is not balanced before spinning. This may result in:-
If this is experienced remove the load de-tangle it, reload it and restart the spin program. |
| This could be due to the fact that water has not been completely drained: wait a few minutes. If the problem persists, see Error 3 section. | |
| Some models include a «no spin» function: make sure it is not selected. | |
| Check which options are selected and their effect on the spin cycle. | |
| Excessive detergent can impede the spin cycle, ensure the correct amount of detergent is being used. | |
| Strong vibrations / noises are heard during the spin cycle | The washing machine may not be fully levelled: if necessary, adjust the feet as indicated in the specific section. |
| Make sure transport screws, rubber bungs and spacer tubes were removed. | |
| Make sure there are no foreign objects inside the drum (coins, hinges, buttons, etc…). |
The standard manufacturer warranty covers faults caused by electrical or mechanical faults in the product due to an act or omission of the manufacturer. If a fault is found to be caused by factors outside the product supplied, miss-use or as a result of the instructions on use not being followed, a charge may be applied.
It is always recommended to use original spare parts, that are available at our Authorised Customer Service Centres.
Warranty
The product is guaranteed under the terms and conditions stated on the certificate included with the product. The certificate has to be stored so as to be shown to the Authorized Customer Service Centre in case of need. You can also check the warranty conditions on our web site. To obtain assistance, please fill in the form on-line or contact us at the number indicated on the support page of our web site.
By placing the 
The manufacturer declines all responsibility for any printing errors in the booklet included with this product. Moreover, it also reserves the right to make any changes deemed useful to its products without changing their essential characteristics.
Videos
How to connect your Candy appliance to the hOn app Video
Documents / Resources
References
Download manual
Here you can download full pdf version of manual, it may contain additional safety instructions, warranty information, FCC rules, etc.
Download Candy Smart Touch Washing Machine 5-12 Kg Manual
Стиральная машина с вертикальной загрузкой чаще всего бывает нужна в небольших квартирах и санузлах, где открывающийся люк может «съесть» ценное пространство. Опять же, с загрузкой нет никаких проблем: открыл люк, забросил белье. А выгружать можно, например, бельевыми щипцами.

На этот раз мы тестируем модель Candy Smart CST G283DM/1-07. Щипцов у нас нет, зато всё остальное мы проверим: проста ли она в управлении, хорошо ли отстирывает наши любимые пятна, можно ли запускать ее ночью и так далее.
Характеристики
| Производитель | Candy |
|---|---|
| Модель | Smart CST G283DM/1-07 |
| Тип | стиральная машина с вертикальной загрузкой |
| Страна производства | Китай |
| Гарантия | 1 год |
| Срок службы* | 7 лет |
| Мощность | 1500 Вт |
| Загрузка хлопка, максимум | 8 кг |
| Класс энергоэффективности | А |
| Класс стирки | А |
| Класс отжима | B |
| Максимальная скорость отжима | 1300 об/мин |
| Отложенный старт | до 24 ч |
| Интерфейс | дисплей с сенсорным управлением |
| Плавное открытие барабана | да |
| Автоматическая парковка люком вверх | да |
| Количество программ | 17 |
| Беспроводное подключение | NFC |
| Уровень шума при стирке | 61 дБ(А) |
| Уровень шума при отжиме | 79 дБ(А) |
| Вес | 56 кг |
| Габариты (Ш×В×Г) | 400×865×630 мм |
| Длина сетевого кабеля | 1,5 м |
| Розничные предложения |
узнать цену |
* Вопреки распространённому заблуждению, это не срок, через который устройство обязательно сломается. Однако по истечении этого срока производитель перестаёт нести какую-либо ответственность за его работоспособность и имеет право отказаться его ремонтировать, даже за плату.
Комплектация
Стиральная машина поставляется в пенопластовой технологической упаковке, которая усилена деревянными распорками и обтянута полиэтиленовой пленкой. Краткая сопроводительная информация (индекс модели, отметки завода-изготовителя, серийный номер и транспортировочные инструкции) размещена на наклейках поверх полиэтилена.
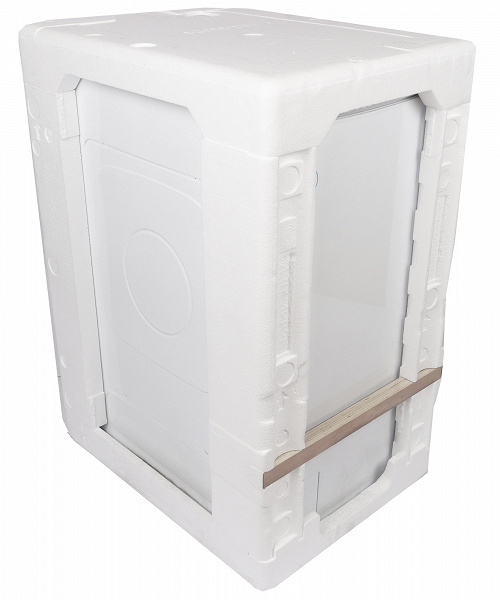
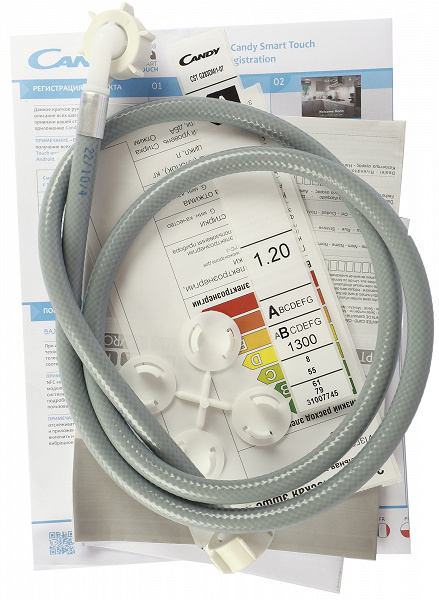
Помимо самой стиральной машины, в комплект поставки входят:
- шланг для подключения к водопроводу
- шланг для подключения к канализации (установлен на машине)
- комплект из четырех пластиковых заглушек для отверстий от транспортировочных болтов
- шумозащитная панель, закрывающая отверстие на дне машины
- руководство пользователя
- гарантийный сертификат
- список авторизованных на территории Российской Федерации сервисных центров
- краткая инструкция по установке и подключению мобильного приложения
- обязательная наклейка с информацией об энергетической эффективности
На первый взгляд
Внешний вид Candy Smart CST G283DM/1-07 делает ее похожей на большинство стиральных машин с вертикальной загрузкой: перед нами белый глянцевый параллелепипед с люком на верхней панели и органами управления рядом с ним.

Прямоугольная пластиковая крышка барабана открывается с узкой стороны корпуса. Для простоты назовем ее передней. Хотя, как показывает практика, такие стиральные машины можно установить и боком к пользователю — в зависимости от конфигурации помещения.
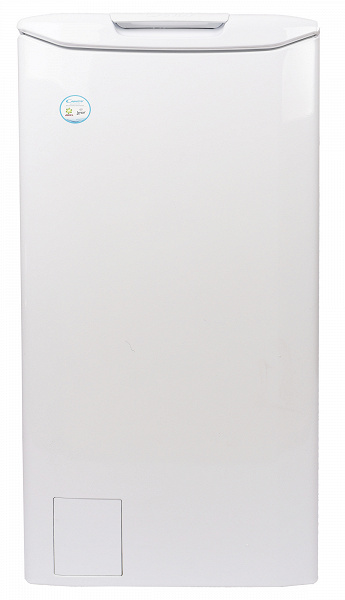
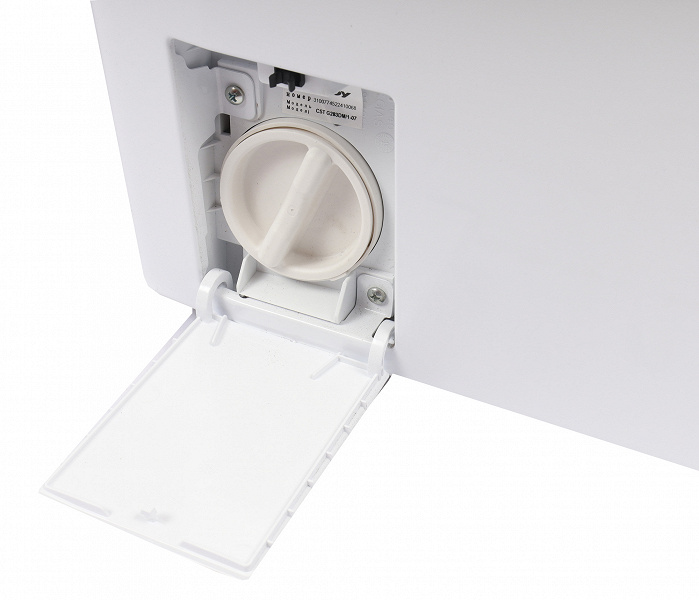
В нижнем правом углу передней панели расположен лючок фильтра. Он открывается с некоторым трудом: при необходимости доступа к пробке лучше воспользоваться лезвием ножа или плоской отверткой. Под крышкой — наклейка с индексом модели и серийным номером изделия.
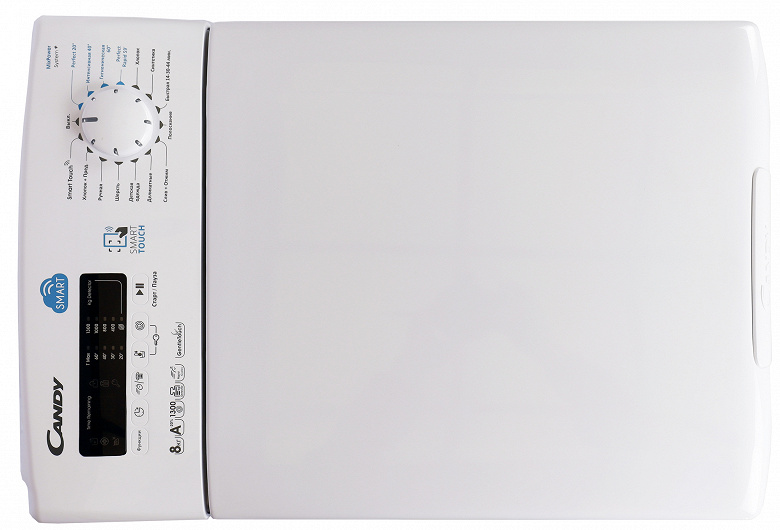
Вернемся к виду машины сверху. За гладким люком, вдоль условной задней стенки, расположена панель управления со светодиодным дисплеем, сенсорными кнопками и селектором программ. Подробнее мы рассмотрим управление стиралкой чуть позже, когда ее подключим.
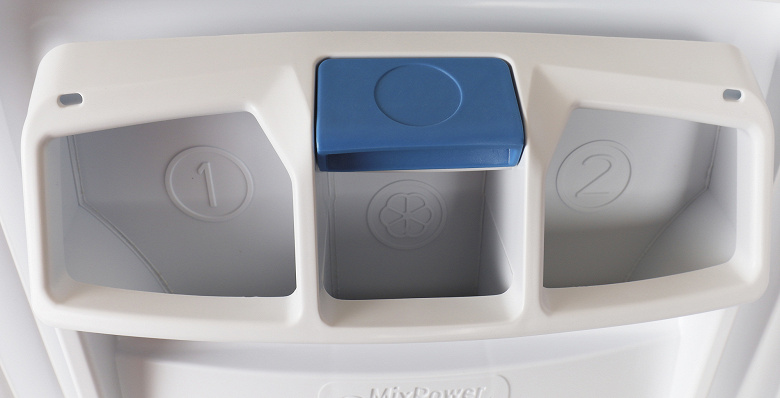
Большую часть внутренней стороны люка занимает контейнер для моющих средств. У него три отсека: слева для предварительной стирки (только сыпучие средства), справа — для основной (сюда можно заливать гели или засыпать порошки), а посередине — для кондиционера.
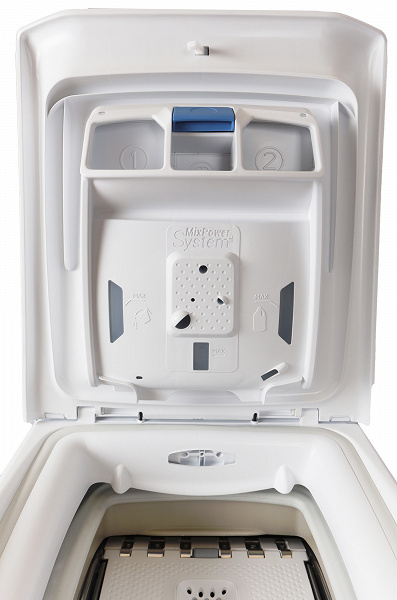
Для чистки и обслуживания контейнер можно снять, воспользовавшись синей клавишей.
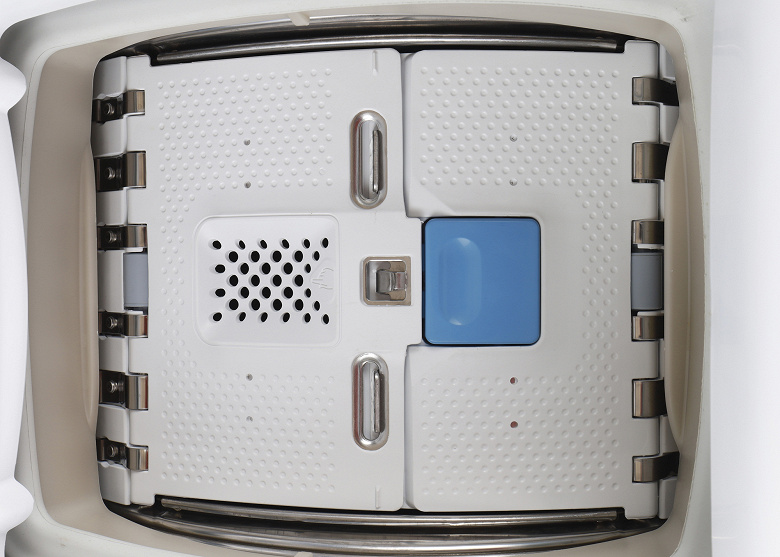
Пластиковые дверцы барабана закрываются на металлическую защелку, управляемую клавишей — тоже синего цвета.
Эта модель снабжена системой автоматической парковки люком вверх: по окончании цикла стирки нет необходимости вручную вращать барабан, чтобы добраться до створок.
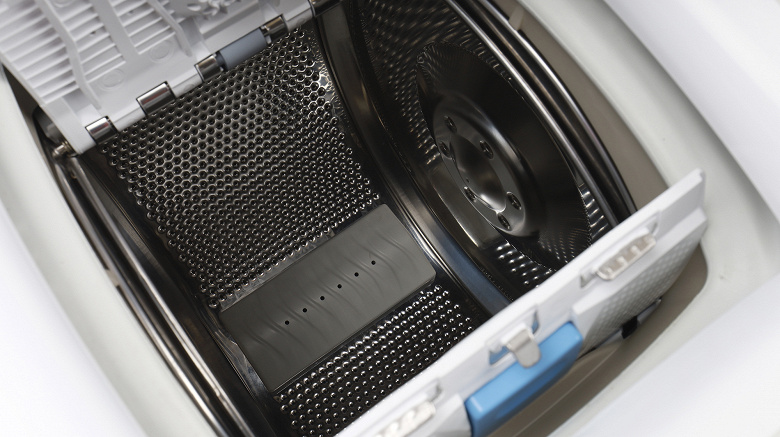
Барабан машины — из нержавеющей стали. Его стенки покрыты частой равномерной перфорацией. На серых пластиковых бойниках, способствующих перемешиванию белья при стирке, также есть несколько отверстий, улучшающих гидродинамику. Каких-либо других инженерных или дизайнерских инноваций в барабане и его деталях нет.
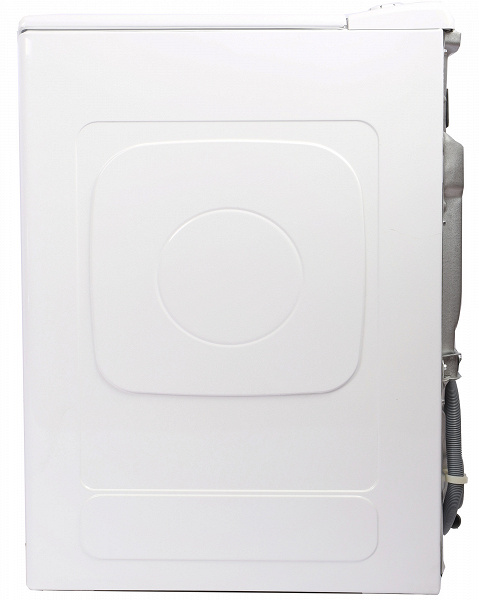
На стенки машины нанесена выштамповка, оживляющая внешний вид и усиливающая конструкцию.
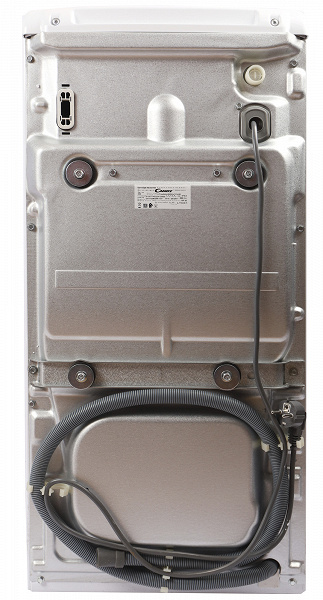
В верхней части металлической задней панели мы видим розетку для подключения заливного шланга, снабженную пластиковой сеткой, которая защищает машину от возможных загрязнений и ржавчины из водопровода. Сливной шланг уже установлен — он выходит из нижнего правого угла.
В средней части — четыре транспортировочных болта, удерживающих барабан в «походном положении»: перед началом эксплуатации их следует удалить, вставив в отверстия пластиковые заглушки (они точно были в коробке, посмотрите внимательнее).
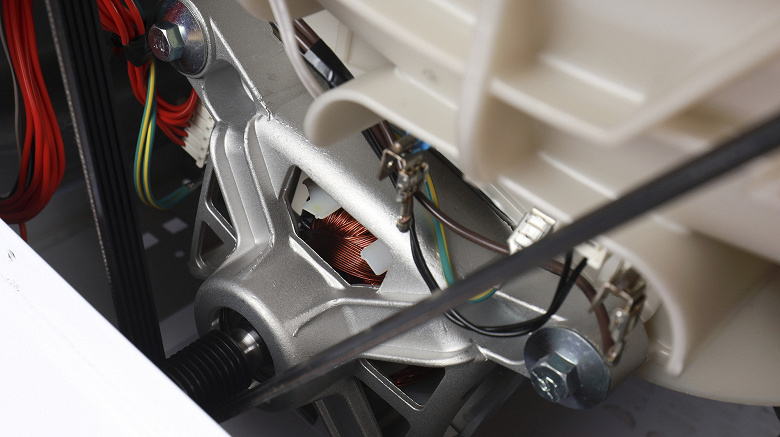
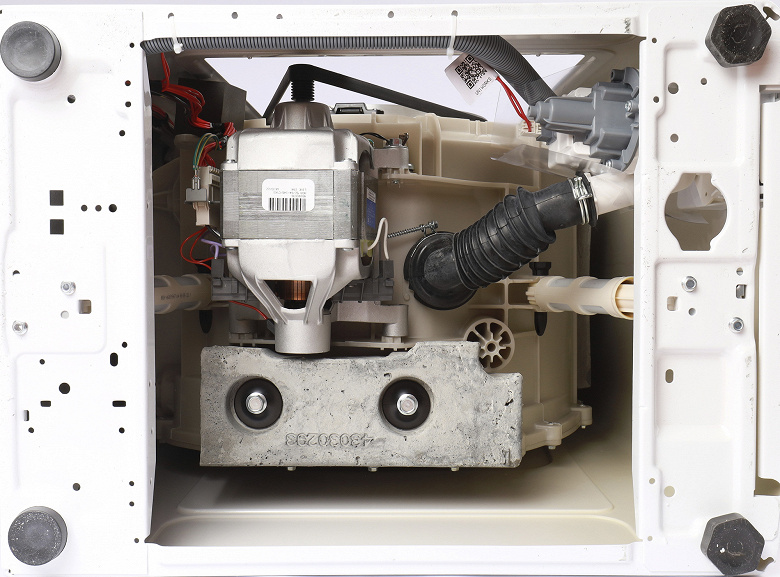
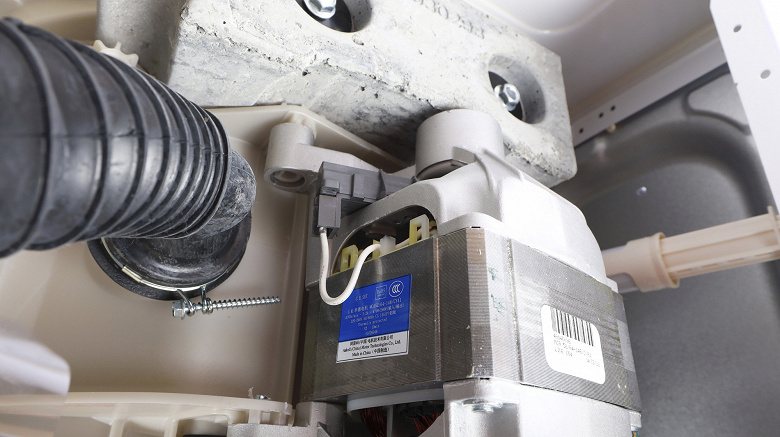
А что внутри?
Как обычно, мы произвели неполную разборку стиральной машины и заглянули внутрь, чтобы оценить расположение и исполнение основных компонентов.


Инструкция
Руководство пользователя содержит 26 страниц формата А5. Бумага средней плотности с большим количеством рисунков и схем, качество полиграфии не слишком высокое.

Как это принято у многих производителей крупной бытовой техники, инструкция составлена сразу для нескольких моделей: различия в работе отдельных функций пользователю придется искать самостоятельно.
Впрочем, в этой модели всё интуитивно понятно — часто заглядывать в документацию не приходится.
Управление
В левой части панели управления расположен дисплей с красными светодиодными индикаторами и сенсорными кнопками дополнительных функций, в правой — круглый селектор программ. Между ними — логотип «Smart Touch», под которым скрывается антенна NFC-модуля.

На дисплее отображаются прогнозируемое/оставшееся до конца цикла время, установленные температура воды и скорость отжима, а также символы дополнительных опций стирки.
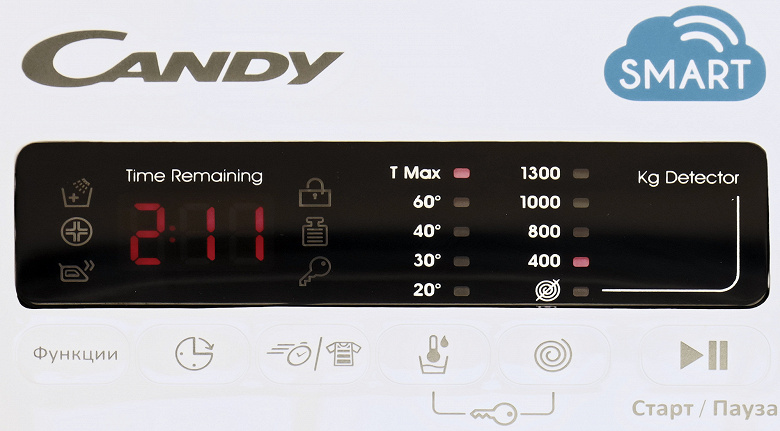
Последовательным нажатием на кнопку «Функции» можно выбрать следующие возможности:
- Дополнительное полоскание: позволяет добавить еще один цикл полоскания после окончания стирки. Предназначено для людей с нежной и чувствительной кожей, у которых даже незначительные остатки порошка могут вызвать раздражения или аллергии. Также рекомендуют для детских вещей.
- Гигиена+: при включении этой опции в течение всего цикла поддерживается температура, оптимальная для уничтожения болезнетворных микроорганизмов — 60 °C.
- Легкая глажка позволяет уменьшить складки и заломы на ткани за счет уменьшения интенсивности последнего отжима.
Сенсором «Задержка запуска» можно отложить выбранный сценарий на срок от 1 до 24 часов с шагом в 1 час.
Кнопка «Быстрая стирка/Уровень пятен» ведет себя по-разному в зависимости от выбранной программы. На «быстрых» режимах с ее помощью можно выбрать нужную продолжительность цикла, а на стандартных — увеличить его время для лучшего удаления пятен.
Температура стирки выбирается нажатием на соответствующий сенсор. Доступны значения в 60, 40, 30 и 20 °C. Последнее нажатие отключает нагрев. На программах для хлопка можно установить также значение «Max»: согласно документации, температура воды при этом составит 75 °C.
Скорость отжима выбирается из значений 1300, 1000, 800 и 400 оборотов в минуту. Есть возможность полностью его отключить.
Слева от цифрового дисплея находятся индикаторы блокировки барабана, функции «Kg Check» (автоматическое определение веса белья для оптимального выбора объема воды) и блокировки управления от детских рук (эта функция включается и выключается одновременным нажатием на кнопки «Отжим» и «Температура»).
Кнопка «Старт/Пауза» в правом нижнем углу запускает или приостанавливает сценарий стирки.
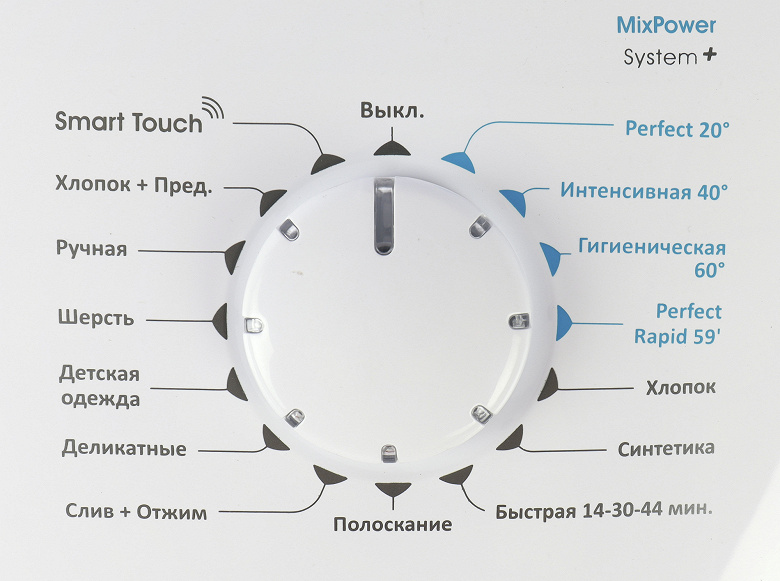
Выбор программ осуществляется вращения селектора в правой части панели. У Candy Smart CST G283DM/1-07 солидный набор режимов с возможностью ручной регулировки в широких пределах температуры воды и скорости отжима. В таблице ниже мы приводим значения по умолчанию для каждой из программ и возможный диапазон ручных настроек.
| Программа | Температура воды по умолчанию, °C | Возможность изменения температуры, °C | Продолжительность программы | Отжим по умолчанию, об/мин | Возможность изменения скорости отжима, об/мин |
|---|---|---|---|---|---|
| Perfect 20° | 20 | 0—20 | 2:01 | 1000 | 0—1000 |
| Интенсивная 40° | 40 | 0—40 | 2:01 | 1000 | 0—1300 |
| Гигиеническая 60° | 60 | — | 1:36 | 1000 | 0—1300 |
| Perfect Rapid 59′ | 40 | 0—40 | 0:59 | 1000 | 0—1000 |
| Хлопок | 40 | 0—60 | 3:52 | 1300 | 0—1300 |
| Синтетика | 40 | 0—60 | 1:56 | 1000 | 0—1000 |
| Быстрая 14/30/44 | 30 | 0—40 | 0:14/0:30/0:44 | 1000 | 0—1000 |
| Полоскание | — | — | 0:28 | 1000 | 0—1000 |
| Слив/отжим | — | — | 0:10 | 1000 | 0—1300 |
| Деликатные | 40 | 0—40 | 0:54 | 400 | 0—400 |
| Детская одежда | 60 | 0—60 | 2:11 | 1000 | 0—1300 |
| Шерсть | 40 | 0—40 | 0:48 | 800 | 0—800 |
| Ручная | 30 | 0—30 | 0:48 | 800 | 0—800 |
| Хлопок+Предварительная | 60 | 0—Max | 3:02 | 1000 | 0—1300 |
Управление со смартфона
Для использования со стиральной машиной производитель предлагает уже знакомое нам приложение Candy simply-Fi.

На момент создания обзора приложение насчитывает более миллиона скачиваний и имеет рейтинг 2,7 из 5 возможных на основе 32,6 тысяч отзывов.
При первом запуске приложение коротко рассказывает о своих возможностях. В любой момент экскурсию можно прервать.

Для использования программы требуется ввести существующие данные для авторизации или зарегистрировать новый аккаунт. Здесь, помимо имени и фамилии, нужно ввести адрес электронной почты (он проверяется отправкой подтверждения) и номер мобильного телефона (при регистрации не проверяется). Также пользователь должен указать страну проживания. Все поля являются обязательными для заполнения.
В процессе синхронизации может потребоваться доступ к данным о местоположении устройства. Впоследствии его можно безболезненно отозвать. Для начала работы следует воспользоваться кнопкой «Добавить новую» на главном экране и среди поддерживаемых типов бытовой техники выбрать первый пункт «стиральная машина без сушки».
Приложение запрашивает дату приобретения устройства и просит ввести серийный номер, рекомендуя поискать наклейку с QR-кодом под крышкой барабана.

QR-кода под крышкой Smart CST G283DM/1-07 нет. Как мы помним, в этой модели наклейка с серийным номером расположена под лючком фильтра. Длинный серийный номер приходится вводить вручную.
После ввода нужных цифр приложение предлагает подготовить данные для доступа к сети Wi-Fi. Но у нашей модели нет сетевого интерфейса, и управляется она только через NFC. Успешно завершив синхронизацию, программа выводит на главный экран иконку нового устройства и еще раз проводит краткую экскурсию по собственным возможностям.

В разделе «Стирка» приложение предлагает запустить одну из встроенных в машину программ и предоставляет доступ к справочной информации: инструкции по выбору режимов, руководству по выведению пятен, сведениям о значениях символов на этикетках одежды и общим рекомендациям.

Выбранную программу можно запустить немедленно или настроить отложенный старт с задержкой до 24 часов.

Выбрав нужный режим, следует перевести селектор программ в положение «Smart Touch» и поднести смартфон к логотипу на панели управления: под ним расположена антенна NFC-модуля.
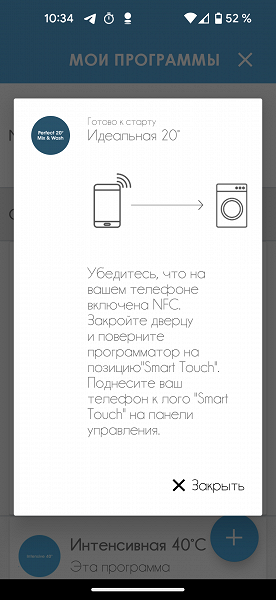
Посредством беспроводного соединения приложение сообщает машине инструкции по текущей стирке и ожидает, вероятно, подтверждения: в нашем случае на этом этапе приложение неизменно замирает в состоянии «ожидание», хотя стиралка исправно запускает сценарий. Эта небольшая недоработка не мешает основной функциональности.

По окончании программы или в случае нештатных ситуаций приложение не присылает каких-либо уведомлений — в отличие от Wi-Fi-моделей обратной связи тут нет.
Помимо встроенных в машину режимов приложение предоставляет широчайший выбор дополнительных сценариев на все случаи жизни — более трех десятков.

Среди них — программы для стирки постельного белья, одеял, ковриков, занавесок, детских вещей, плюшевых игрушек, медицинских масок и многого другого. Только для спортивной одежды целых пять штук. Любую из списка можно добавить в «Мои программы» для быстрого доступа.

В разделе «Обслуживание» приложение позволяет следить за периодичностью уходовых процедур и подскажет, когда их нужно провести.

Для очистки фильтра доступны понятная инструкция и возможность сброса межсервисного интервала.
Режим самоочистки барабана представляет собой цикл для хлопковой ткани с максимальной температурой и самым слабым отжимом. Его можно запустить прямо из приложения.

В разделе «Помощь» можно ознакомиться с электронной версией документации, прочитать расшифровку кодов ошибок и связаться со службой технической поддержки.
Эксплуатация
Итак, мы приступаем к работе. Но сначала надо удалить транспортировочные винты (их четыре), чтобы барабан мог вращаться. На их место надо поставить заглушки (они в комплекте).
С подключением никаких проблем не будет: оно типовое. Эта модель, как и большинство стиральных машин, рассчитана на подсоединение только к ХВС. Аквастопа или аквазащиты на шланге, подающем воду, нет.
Остался еще один шаг: выровнять машину, чтобы не вибрировала при работе. Забежим вперед: конструкция ее задних ножек — широких и с хорошим резиновым покрытием — сводит риск неуставных движений практически к нулю. Заставить ее «прыгать» нам не удалось ни разу. Даже при полной загрузке и максимальной скорости отжима она не сдвигается с места.
Управление не вызвало у нас затруднений, оно интуитивно понятно и не требует подглядывания в инструкцию. Однако кое-что показалось недостаточно удобным и логичным — расположение режимов стирки на селекторе. Как нам кажется, стоило бы разместить самые востребованные программы ближе к исходному положению селектора.
Хорошо было бы также, если бы можно было добавить к одной программе и предварительную стирку, и еще одно полоскание. Однако эти функции активируются только поочередно.
Загрузка моющих средств в машину показалась непривычной: чаще всего два больших отсека в соответствующем контейнере используются для основной и предварительной стирки. При дополнительном изучении инструкции мы выяснили, что в этой модели левый отсек предназначен для стирального порошка, а правый — для жидких моющих средств. При необходимости предварительной стирки порошок или гель следует добавлять прямо в барабан.
Время выполнения программы эта модель оценивает приблизительно. Первые две-три минуты она прикидывает загрузку: на дисплее появляется надпись «Kg check», а светодиоды вокруг индикатора времени начинают мигать. Когда белье взвешено, прогнозируемое время работы может уменьшиться (иногда — существенно). Но доверять таким оценкам не надо, так как стирка или отжим могут занять больше, чем планировалось. Особенно это видно на последних полосканиях.
Наша модель оснащена системой автоматического выравнивания барабана: по окончании стирки он медленно поворачивается до тех пор, пока люк не окажется наверху. Это крайне удобная опция: вращать тяжелый и мокрый барабан вручную — удовольствие небольшое.
В процессе эксплуатации машина порадовала нас хорошим качеством стирки, неплохим отжимом и низким водо- и энергопотреблением.
Уход
Чтобы стиральная машина работала долго и счастливо, ее надо регулярно чистить: выполаскивать емкость для моющих средств от их остатков и освобождать выпускной фильтр от того, что в нем скопилось.
Первый шаг надо делать после каждой стирки — так советует производитель. По крайней мере, надо посмотреть в кювету и определить, есть ли в ней остатки порошка или геля. Если нет, можно ее не снимать, в противном же случае лучше помыть, чтобы избежать блокировки потока воды от дозатора к барабану. Емкость можно снять, нажав на кнопку в верхней ее части, а потом поставить на место.
Как часто чистить фильтр — производитель оставляет на совести пользователя. Напомним, что перед началом работ стоит найти какой-то твердый тонкий предмет (нож или отвертку), чтобы открыть люк, и тряпку, чтобы подложить ее на пол под пробкой. Отвинчиваем пробку, достаем фильтр, промываем — и повторяем всё в обратной последовательности.
Для очистки наружных поверхностей стиральной машины следует использовать влажную ткань. Абразивные чистящие средства или растворители применять нельзя.
Наши измерения
В процессе тестирования мы стараемся хотя бы приблизительно оценить вместительность барабана стиральных машин. Форма его, конечно, отличается от цилиндра, поэтому единственный способ хотя бы приблизительно прикинуть объем — вообразить его правильной фигурой.
В данном случае у нас есть цилиндр радиусом 22 см и глубиной 30 см. Объем его составляет 45 593 см³, то есть примерно 45,5 л.
Стирка
В качестве эксперимента мы решили отследить работу основной программы («Хлопок») поминутно. Вот что у нас получилось.
| Время | Индикация на дисплее | Действие | Суммарный расход воды |
|---|---|---|---|
| 0:00 | 3:52 | старт программы, залив воды, начало стирки | 6,8 |
| 0:04 | 1:52 | вес белья определен, индикатор Kg Check гаснет, время стирки скорректировано | |
| 1:14 | 26 | слив, отжим | |
| 1:17 | 23 | залив воды | 15,4 |
| 1:19 | 23 | слив, отжим | |
| 1:20 | 22 | залив воды, полоскание I | 22,8 |
| 1:25 | 19 | слив, отжим | |
| 1:30 | 16 | залив воды, полоскание II | 38,2 |
| 1:35 | 10 | слив, отжим на максимальной скорости | |
| 1:45 | 2 | завершение сценария, выравнивание барабана | |
| 1:46 | End | разблокировка люка, звуковой сигнал |
В таблице указан суммарный расход воды к моменту окончания каждого этапа. Таким образом, на весь цикл стирки, состоявший из основной программы на 40 °C и двух полосканий, ушло 38,2 литра. Общее количество потребленной электроэнергии составило 0,532 кВт·ч.
Проверили мы и работу самого быстрого, 14-минутного режима.
| Время | Индикация на дисплее | Действие | Суммарный расход воды |
|---|---|---|---|
| 0:00 | 14 | старт программы, залив воды, начало стирки | 8,0 |
| 0:04 | 11 | слив, отжим | |
| 0:05 | 10 | залив воды, полоскание I | 18,3 |
| 0:07 | 10 | слив, отжим | |
| 0:09 | 6 | залив воды, полоскание II | 25,5 |
| 0:10 | 5 | дополнительный залив | 32,7 |
| 0:14 | 4 | слив, отжим | |
| 0:18 | 2 | отжим на максимальной скорости | |
| 0:19 | End | разблокировка люка, звуковой сигнал |
Нетрудно заметить, что в заявленные 14 минут машина не уложилась: от момента запуска сценария до звукового сигнала и щелчка реле, разблокирующего крышку люка, прошло 19 минут и 40 секунд. За это время машина простирнула заложенное белье и дважды выполоскала его. Отличный вариант для минимальных загрязнений.
Расход электроэнергии на цикл составил 0,089 кВт·ч, а суммарный расход воды — 32,7 л.
Энергопотребление и потребление воды
К сожалению, в инструкции эти параметры не приведены, поэтому мы предлагаем результаты наших измерений для тех программ, которыми мы пользовались в процессе тестирования.
| Программа | Количество воды, л | Количество электроэнергии, кВт·ч |
|---|---|---|
| Быстрая, 14′ | 32,7 | 0,089 |
| Хлопок, 40° | 38,2 | 0,532 |
| Шерсть | 64,6 | 0,629 |
| Деликатные ткани | 58,8 | 0,б11 |
| Хлопок+Предварительная стирка | 29,2 | 1,002 |
| Ручная | 61,6 | 0,688 |
Отжим
Также нас интересует реальная эффективность отжима, которую мы измеряем в граммах воды на грамм хлопка по формуле: (вес отжатого − сухой вес) / сухой вес. В качестве эталонного белья использовались 10 махровых белых полотенец общим весом около 2 кг.
| Скорость отжима, об/мин | Остаток воды на грамм сухого белья, г |
|---|---|
| 1300 | 0,60 |
| 1000 | 0,69 |
| 800 | 0,93 |
| 400 | 1,48 |
Уровень шума измерялся в помещении площадью около 8 м². Шумомер располагался на уровне 1 м от пола и на расстоянии 1 м от стиральной машины, по центру спереди.
| Режим работы | Уровень шума, дБА |
|---|---|
| Общий уровень шума в помещении | 32 |
| Стирка | 53 |
| Слив | 51 |
| Промежуточный отжим | 64 |
| Полоскание | 53 |
| Финальный отжим 1300 об/мин | 74 |
Практические тесты
Чтобы оценить основную функцию стиральной машины, мы взяли комплект белых махровых полотенец и украсили их пятнами часто встречающихся и трудно отстирываемых органических загрязнений. Посмотрим, как стандартные программы справятся с ними.
Хлопок
На комплект из пяти полотенец мы художественно нанесли красное вино, соевый соус, кетчуп, кровь и какао (на каждом полотенце свое вещество). Грязные полотенца сохли при комнатной температуре в течение суток, после чего мы загрузили тестовую стирку.
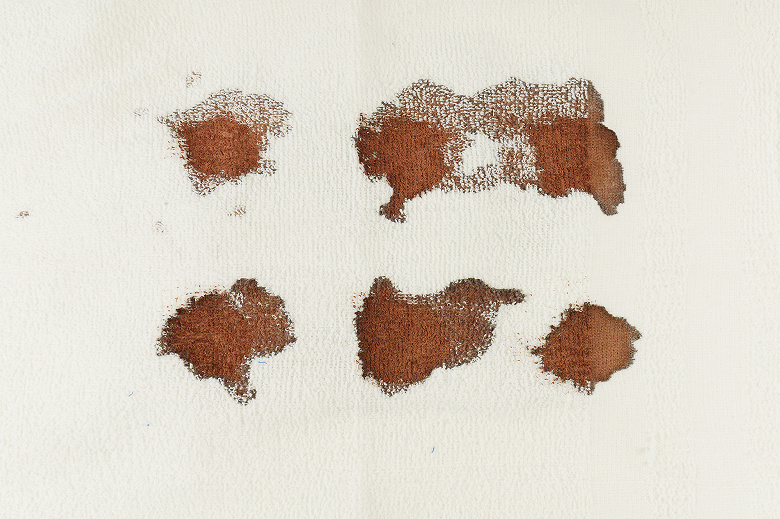

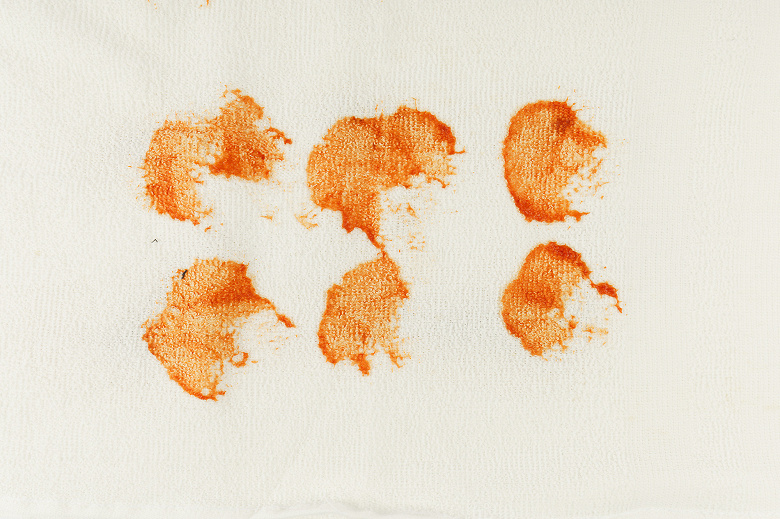
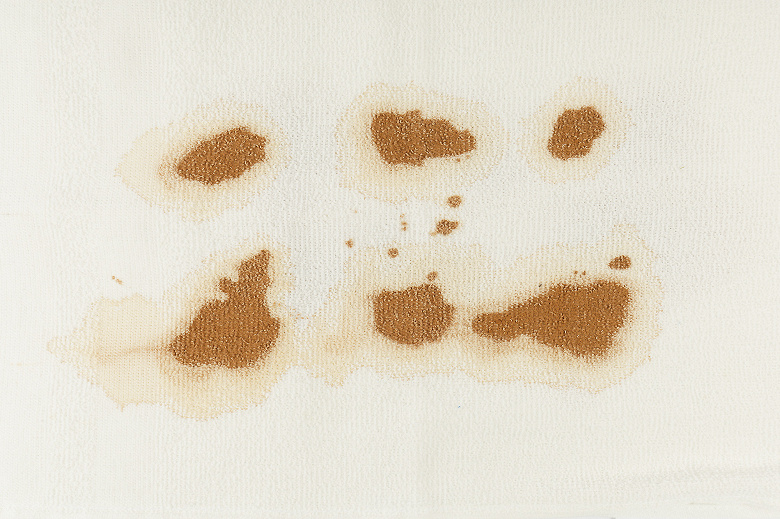
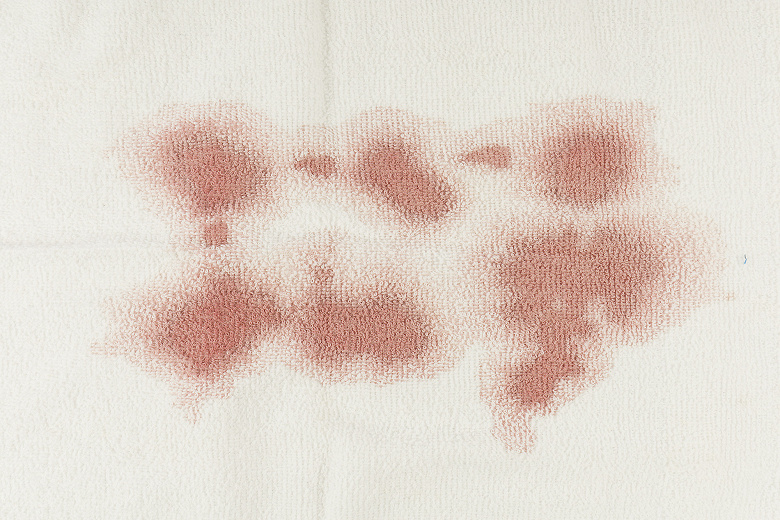
При стирке использовался хорошо известный гель для белого белья одного из производителей. Дозировку мы рассчитали по инструкции на упаковке.
Выбрана была стандартная программа «Хлопок» с температурой 40 °C, а время работы стиралка определила автоматически — оно составило приблизительно 2:15. Результат можно видеть на фотографиях ниже.

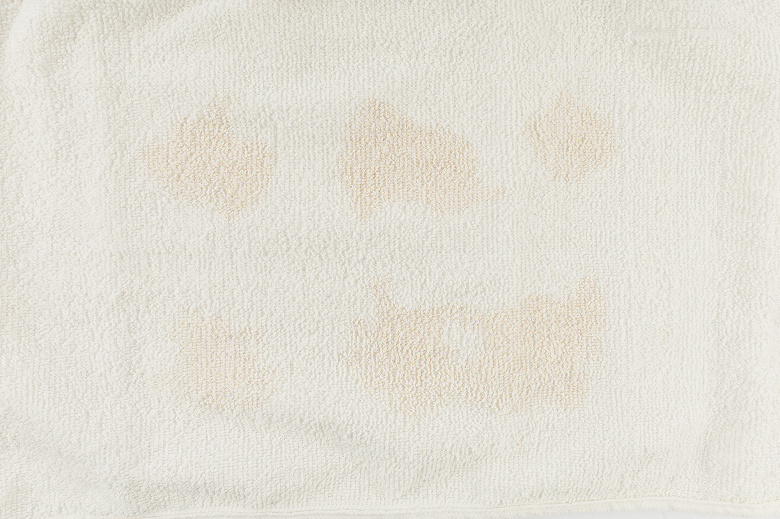
На стандартной программе для хлопка при температуре 40 °C полностью исчезли суточной давности пятна от кетчупа, соевого соуса и какао, а следы крови и красного вина все-таки еще заметны.
Программа для стирки белого хлопка с предварительной стиркой
Мы повторили опыт с теми же самыми веществами и снова сушили испачканные полотенца в течение 24 часов.
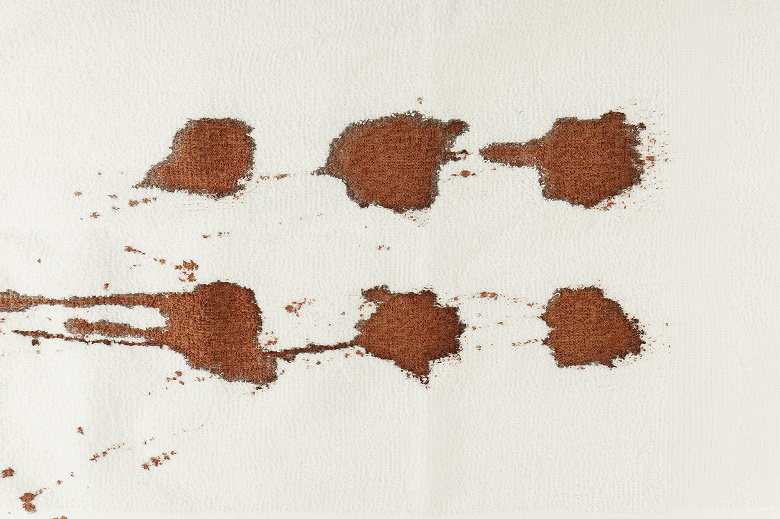

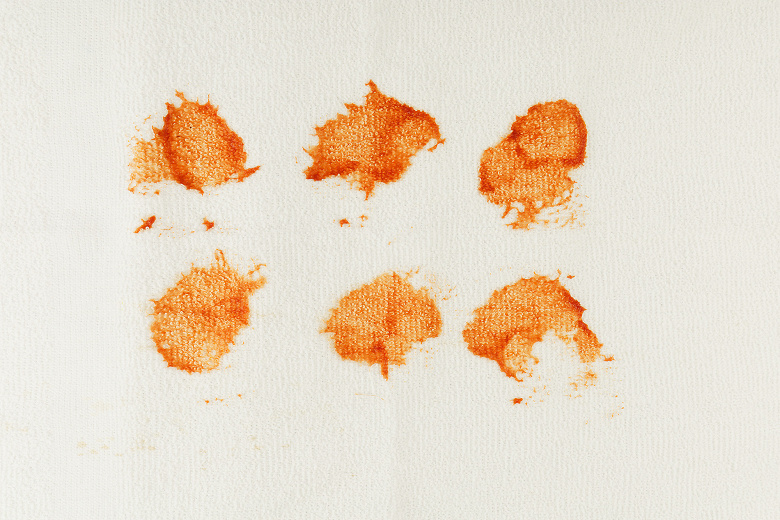
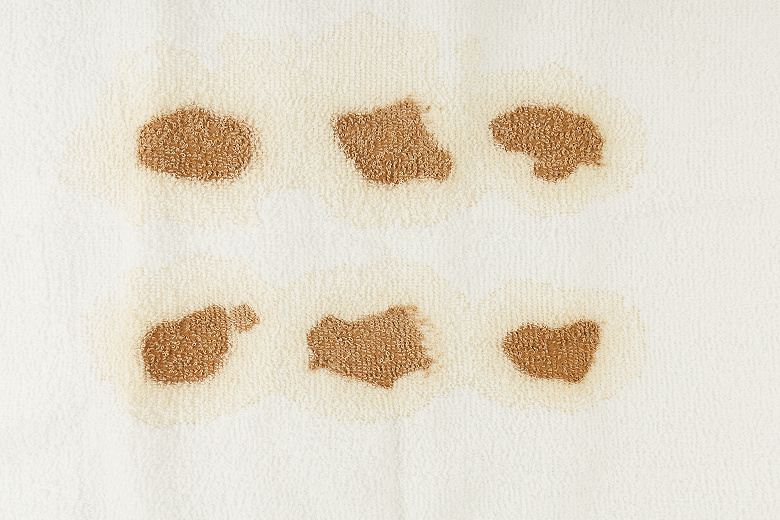
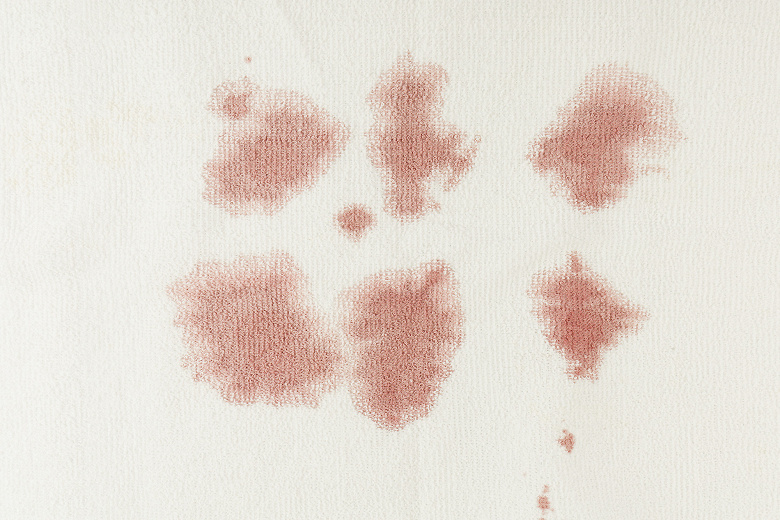
Белье было постирано на программе «Белый хлопок» при максимальной температуре с предварительной стиркой.
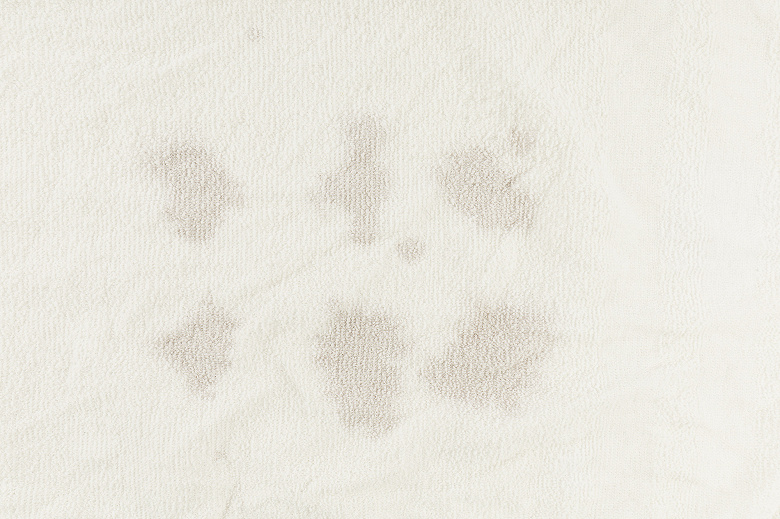
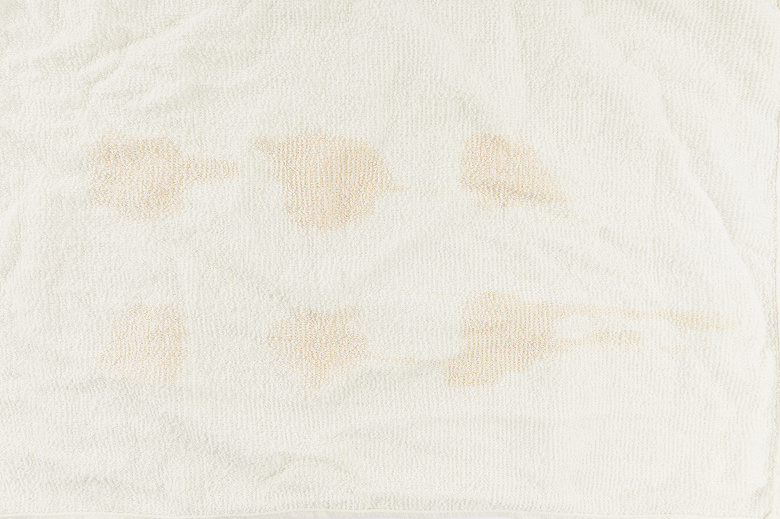
Результат оказался, пожалуй, чуть лучше: хотя кровь и вино не отстирались полностью, пятна стали чуть светлее.
Чтобы полностью удалить следы загрязнений, мы воспользовались отбеливателем и простирали ткань еще раз на максимальной температуре.
Шерсть
Разумеется, в стиральную машину кладут не только хлопок, но и более деликатные ткани. Например, шерсть, которую надо стирать крайне бережно. Так что мы проверили работу модели и в этом режиме, а подопытным стал плед весом чуть меньше килограмма.

После стирки ткань стала чистой, не села, не деформировалась и не покрылась катышками. Даже на минимальной скорости отжима (400 оборотов в минуту) воды в пледе осталось немного — через два часа он был уже сухим.
Выводы
В процессе эксплуатации и тестирования мы сочли стиральную машину с вертикальной загрузкой Candy Smart CST G283DM/1-07 надежной и удобной. Еще одно ее достоинство — компактность, благодаря которой она не займет лишнего места в небольшом помещении. А отличное качество стирки и неплохой объем загрузки сочетаются с приличной энергоэффективностью.
В отличие от предыдущей рассмотренной нами вертикальной модели этого производителя, в нашей стиральной машине есть автоматическое выравнивание барабана: по окончании программы он неизменно поворачивается люком вверх. Это еще один веский плюс: нет необходимости вращать тяжелый и мокрый барабан вручную.
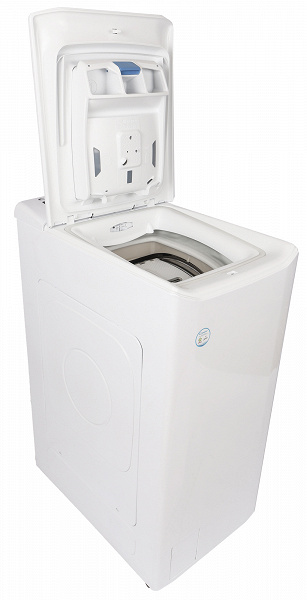
Хорошим дополнением к базовой функциональности стала возможность управления через NFC с помощью мобильного приложения, существенно расширяющего стандартный набор программ.
Единственный, на наш взгляд, недостаток Candy Smart CST G283DM/1-07 — повышенный шум при отжиме на максимальных оборотах.
Плюсы:
- небольшой размер
- хорошая экономичность
- большой объем загрузки (до 8 кг)
- неплохое качество стирки
- отжим до 1300 оборотов в минуту
- управление по NFC
Минусы:
- высокий уровень шума при скоростном отжиме
Узнавай о новинках и акциях первым
Вы успешно зарегистрированы на сайте.
Вам доступен личный кабинет пользователя.
Перейти к покупкам
Ваш пароль воcстановлен!
Теперь вы можете полноценно пользоваться
всеми возможностями нашего интернет-магазина.
Здравствуйте, Ваша претензия принята и зарегистрирована.
В течение 3-х рабочих дней Вам, на электронную почту, будет дан письменный ответ. В случае возникновения дополнительных вопросов, менеджер претензионного отдела свяжется с Вами.
Перейти к покупкам
Ваше сообщение об ошибке на сайте успешно отправлено.
Большое спасибо!
Добавить отзыв о магазине
Торг для данного товара сейчас не возможен!
Сколько вы готовы заплатить за этот товар?
Введите ваше ценовое предложение
Мы согласны с вашим предложением
Мы принимаем вашу цену, и вы можете купить товар по цене:
0 руб.


