На чтение 11 мин Просмотров 1.1к. Опубликовано 24.10.2020
Программное обеспечение для маркировки Cablabel S3 Proот CAB является решением для профессионального дизайна этикеток в промышленном секторе. В программу интегрированы три основные функции: создание, печать и управление заданиями на печать этикеток. Программа разработана по модульному принципу и может быть постепенно адаптирована к вашим потребностям. Для упрощения ваших задач был создан полный набор функций и инструментов: в программу включены расширенные функции счетчика, поля даты, формулы и соединение с базой данных. В программном обеспечении cablabel ваши индивидуальные отпечатки этикеток являются гибкими, поскольку программа может подключаться ко всем системам этикеток CAB. Cablabel также поддерживает автономный режим, а такие элементы, как JScript Viewer, интегрируются через плагин, чтобы наилучшим образом поддерживать нативное программирование Jscript. Поскольку cablabel также может импортировать уже существующие файлы JScript, переключение легко и быстро. Если метка изменяется в интерфейсе конструктора, информация автоматически обновляется в Jscript-Viewer (в режиме реального времени). Специальные функции, такие как Database Connector или Barcode Analyzers, могут быть легко интегрированы.
Функции:
cablabel S3 Lite
cablabel S3 Pro
Поставляется с каждым принтером
Лицензия на компьютер по запросу
Совместим только с кабельными принтерами
Поддерживает все принтеры, обнаруженные и установленные в Windows
Дополнительные параметры текста: максимальная ширина и переносы
Текстовое поле с различными наценками по определению ключевых слов (например, аллергены)
Мастер отображения символов для вставки специальных символов
Растровая графика только типа bmp, jpg, tif,…
Также векторная графика типа dxf, plt, svg,…
Около 30 видов штрих-кодов линейных, 2D, GS1 и композитных
Около 35 типов штрих-кодов, включая варианты EAN 18/128
Мастер штрих-кода для создания GS1 / EAN / UCC-128, FACT / MH10 и QR
Опция проверки штрих-кода
Подскажите поля с бесплатным входом
Дополнительные параметры поля приглашения: маска ввода и список выбора
Мастер создания составных подсказок
Счетчики базовые типа числовые и приращения +/- 1
Счетчики расширенные типов буквенно-цифровых и приращения +/- n
Дополнительные параметры счетчика: частота, сброс и сохранение значения
Дата и время, включая смещения и мастера для создания формата
Формула: математические операции, манипуляции со строками и т. Д.
ABC базовый компилятор с библиотекой кода
Переменные: источники данных с информацией о этикетке, принтере, компьютере и т. Д.
Подключение к: Доступ, файлы Excel, базы данных OLE DB, ODBC, ASCII, Database Connector в автономном режиме
Просмотрщик кода JScript для обзора на лету
Импорт файлов JScript в формате LBL
Сохранение только в формате STC
Также экспорт в формат PDF и изображение PNG
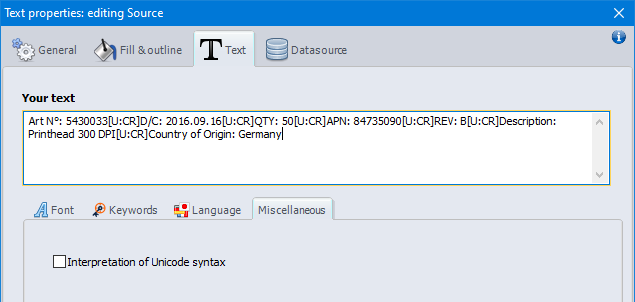
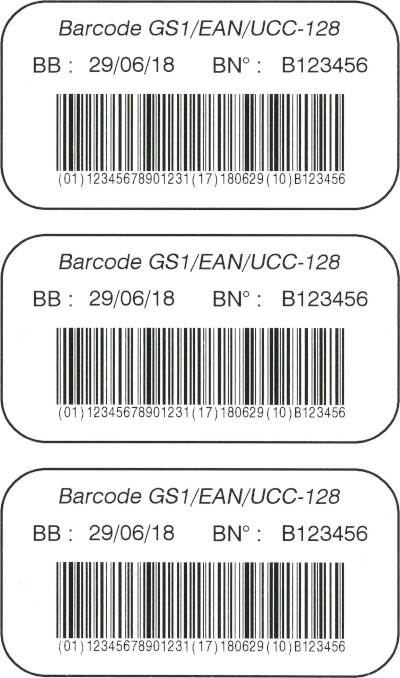
First create a text object, by filling in the data on one line. When you need to add a line break, do not use the “Enter” key on the keyboard, but instead insert the special character “Carriage Return”, using the character map of cablabel S3 Pro.
Then disable the interpretation of Unicode syntax, to display the text as it is in the software. And if you do not want to print this source text, just make it invisible for printing.
- Creation of the multi line text
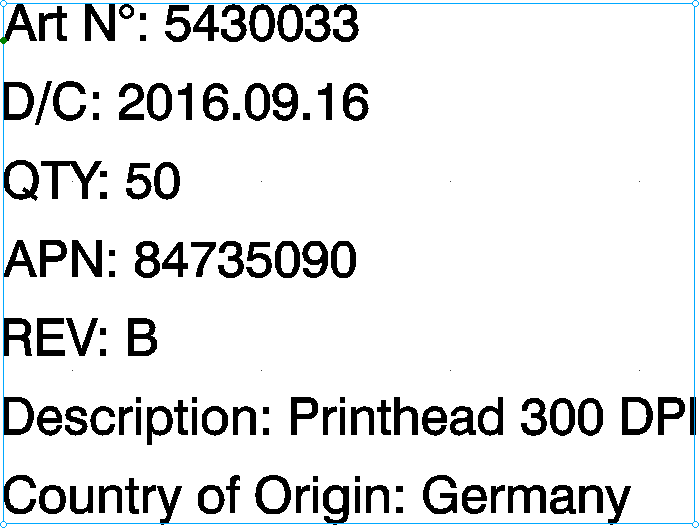
Then create a new text object, having as datasource the text object created previously.
Since the interpretation of Unicode syntax is by default enabled, the text is then displayed over multiple lines, because the carriage return is automatically interpreted by the software.
And of course, this multi line text is printed as shown on the screen (What You See Is What You Get).
Notice: since the content of the multi line text is dynamic, this object is sent to the printer as a picture.
- Creation of the barcode
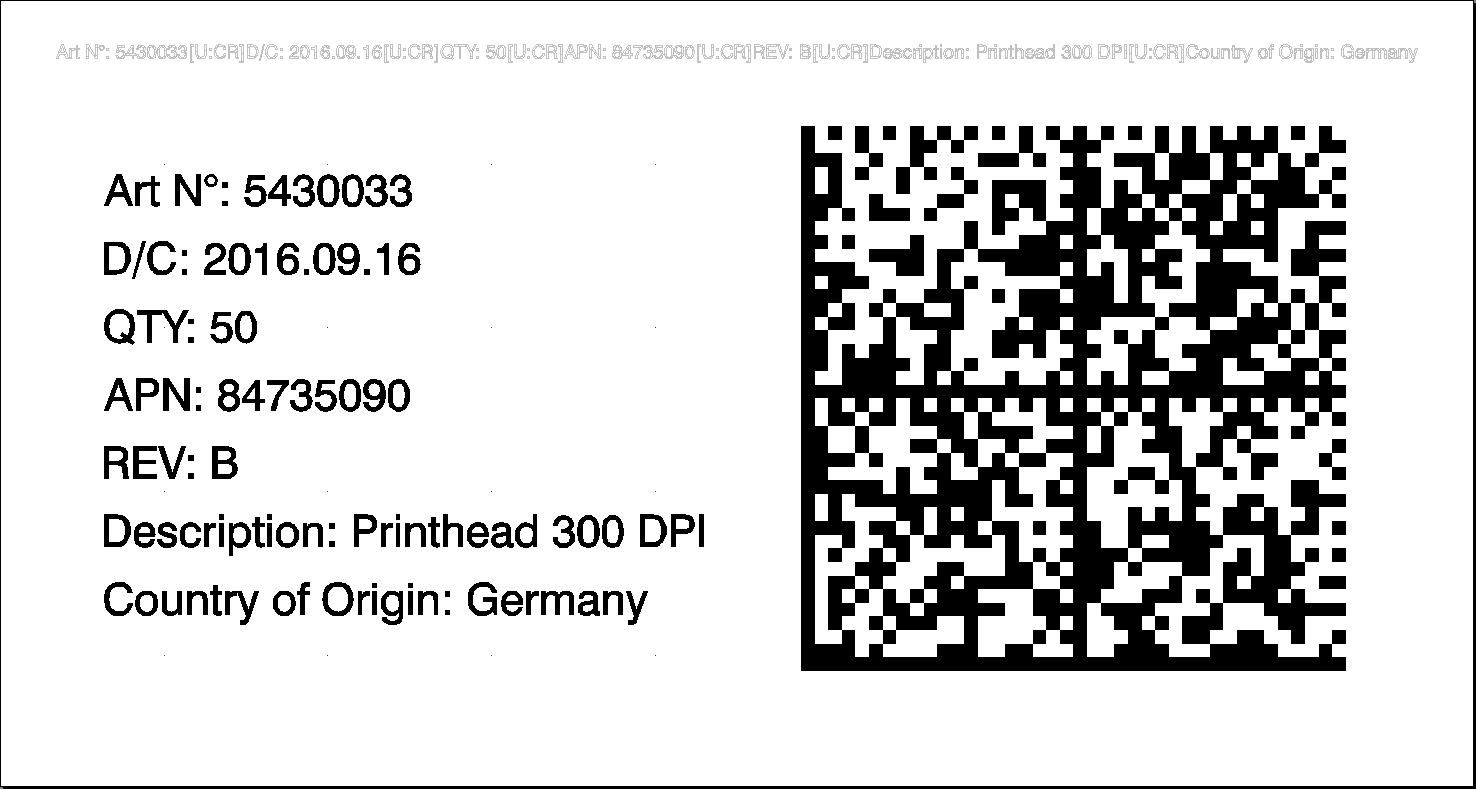
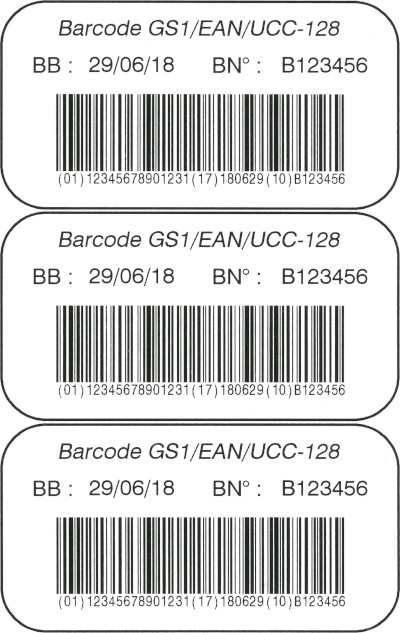
Finally create the barcode, having also as datasource the text object created at first.
In this way, when you need to update the data, only modify the source text. The changes are then automatically propagated to linked objects, in this case the multi line text and the barcode.
Good to know: the carriage return is encoded as well and can possibly be interpreted when reading the barcode. This will depend on used reading device and its configuration.
- To go further
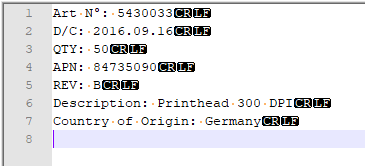
In order to check the contents of a barcode, you can use an app with the smartphone, but not all show the special characters. Another method is to simply connect a barcode reader to the computer, then to create a new text file with Notepad++ and to show all characters.
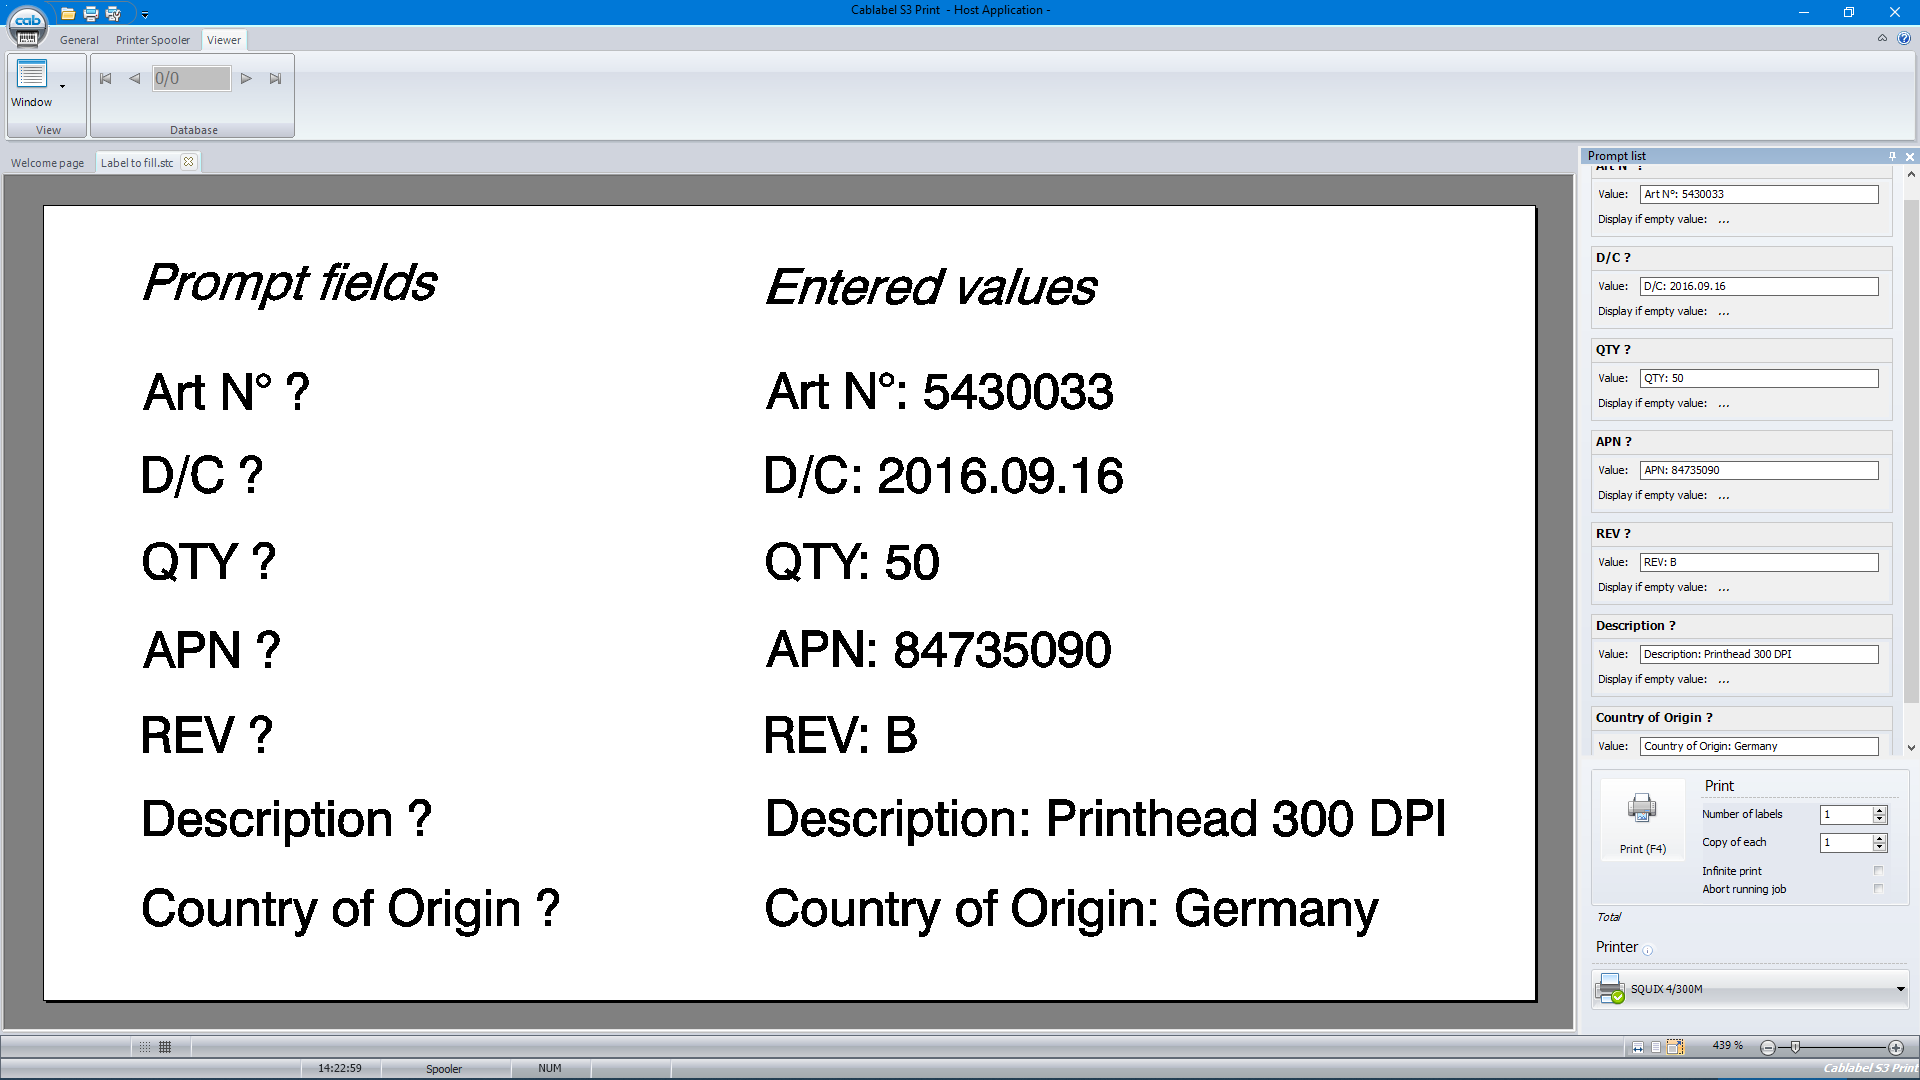
Finally, this DataMatrix can then be used to automatically fill in the input fields of another label, for example in cablabel S3 Print or even in standalone mode. Thus the operator will perform only one action, that is reading the barcode, instead of having to fill in and validate individually each prompt field.
Attention: in this case, it is strongly recommended to first configure the barcode reader, in order to add a delay after the validation of a prompt field. Because depending on the response time of the computer or the printer, the read information may arrive too fast to be processed correctly.
Download example files for cablabel S3 Pro:
First, to better understand the vocabulary from this environment, here is a correspondence of the main terms used in Excel and a database:
| Excel | Access or other databases |
| Workbook or Excel file | Database or Access file |
| Sheet | Table |
| Column | Field |
| Row | Record |
| Cells | Data |
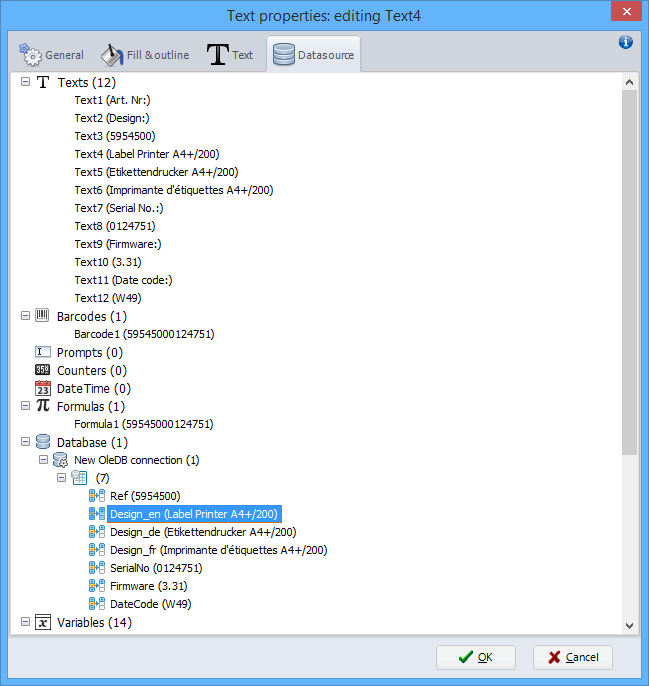
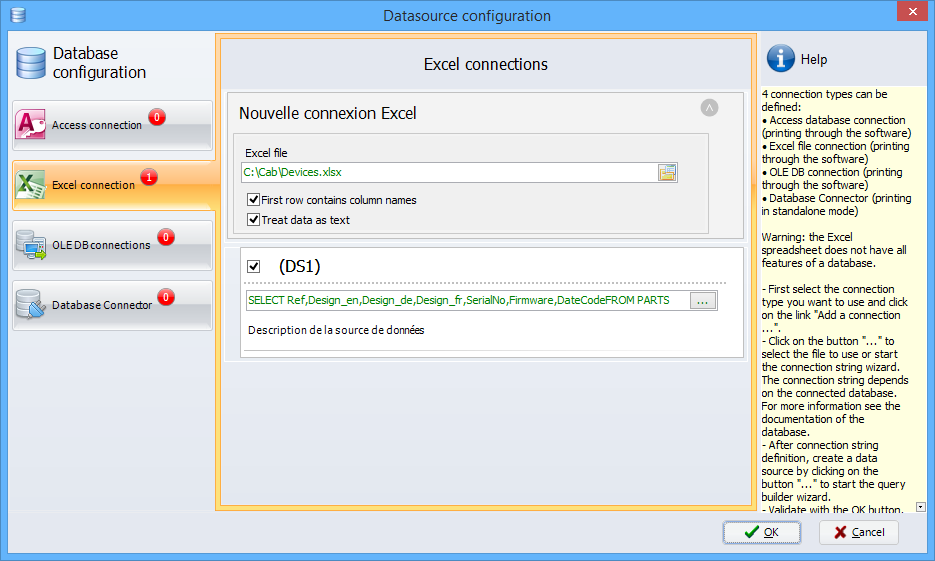
With cablabel S3 Pro, it is possible to define a connection to an Excel and Access file or any other database, allowing to create new data sources that can be used dynamically by the label objects.
Of course, the choice of the database depends particularly on, the advantages and disadvantages of each solution, the hardware and software budget, the knowledge of each, etc.
Good to know: it is not mandatory to install Excel or Access on all computers with cablabel S3 Pro or Print, because the OLE DB provider “Access Database Engine” from Microsoft is sufficient to connect to the data files.
Thereby, the Excel workbook is often favoured for creating and managing a data source, since it has the advantage of being relatively simple and convenient to use. But in order to be fully exploitable with cablabel S3, there are nevertheless some precautions to take:
- Do not use spaces or other special characters in the name of the sheets.
- Do not add empty rows, titles or other texts at the beginning of the sheet.
- The first row of a sheet must imperatively contain, either the field names or the first record.
- Raw data should be preferred, by avoiding applying to the cells a format or a formatting specific to Excel.
Without forgetting that the Excel spreadsheet does not have all features of a database, and that some disadvantages are also to be taken into account:
- Depending on the versions, it is possible to have only one access per file. The same data source can therefore not be used simultaneously by Excel and the cablabel S3 software.
- There is no optimization, like that brought by indexing data. Queries on large tables are therefore longer.
- The field type “BLOB” does not exist. It is therefore for example impossible to save the label in the database.
More information on this subject is also available on the Microsoft website:
In summary, a properly structured Excel workbook, is very suitable for creating a small data source with a dedicated use for cablabel S3.
However, as soon as you have a need for simultaneous access or better performance, it is then better to opt for Access or another database, knowing that the data can be transferred quite easily.
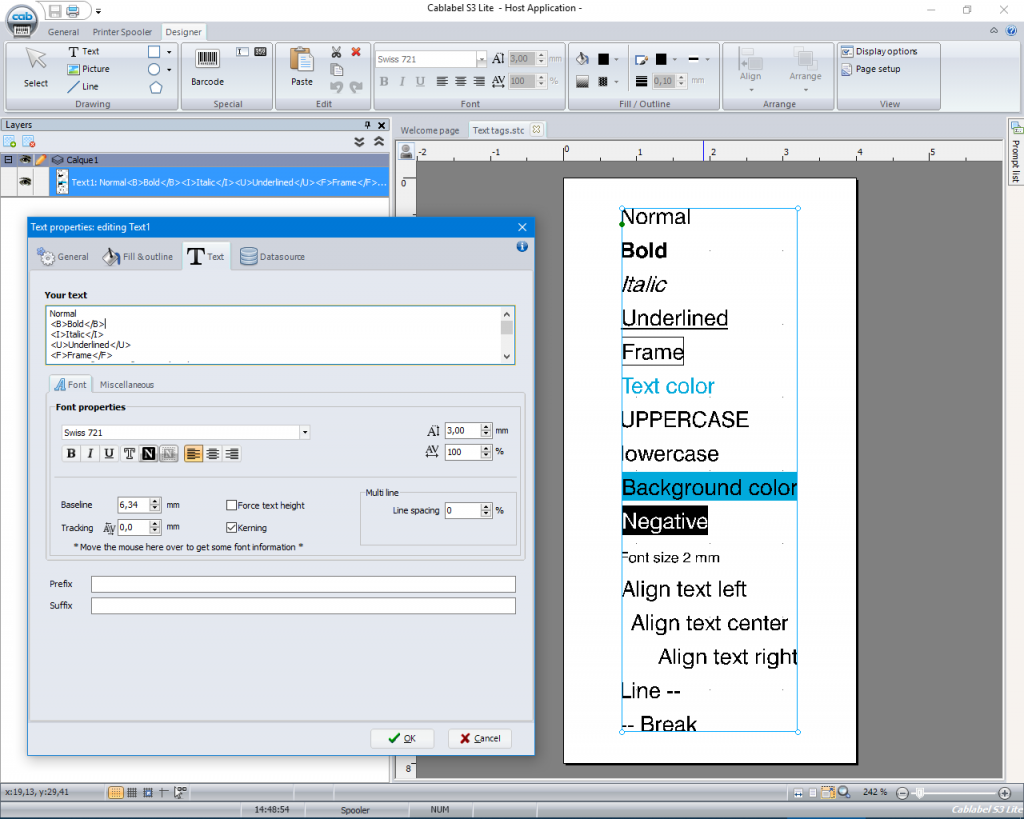
When designing a label in cablabel S3, the different properties of a text (bold, italic…) are applied to the entire content of the object.
With the Pro and Print version, the keywords plugin allows to highlight automatically specific words in a sentence or text, as for example for the allergens.
Since the version 1.2.0.1 of the software, you can now use text tags.
Based on the principle of HTML language, this new feature provides the ability to change manually the formatting of a text part.
Moreover, you can also insert these tags in other editable fields, such as the prefix or the suffix of a text, the operations of a formula, or even directly into your database.
The software will then interpret them and display the result of the formatting on the screen, as it will later be printed on the label.
The whole list of the text tags is available in the Operator’s manual of software (PDF, 5 MB).
Download example file for cablabel S3 Lite and Pro:
Yes of course, but only according to the case and under certain conditions.
Here is a summary of different situations needing the activation of the software and how to proceed.
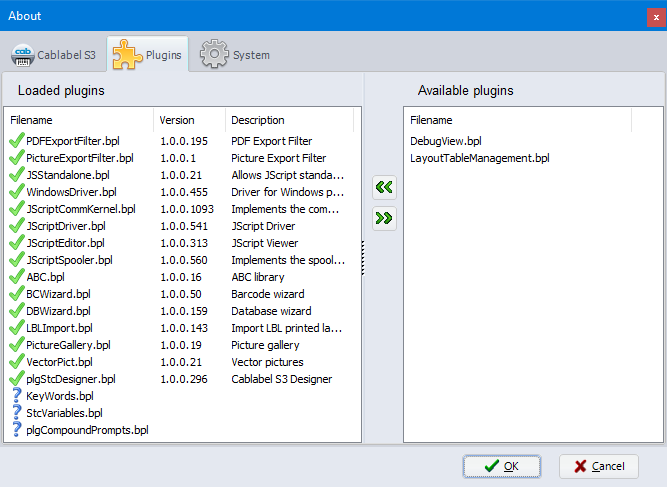
In order to benefit from the latest features provided by the addition of plugins, as the keywords, the variable information or the compound prompts, sometimes a reactivation of the software is required after its update.
In this example, some plugins are not correctly loaded. Then you mostly just have to redo an activation procedure through the wizard, reachable from the “About” button in the General tab.
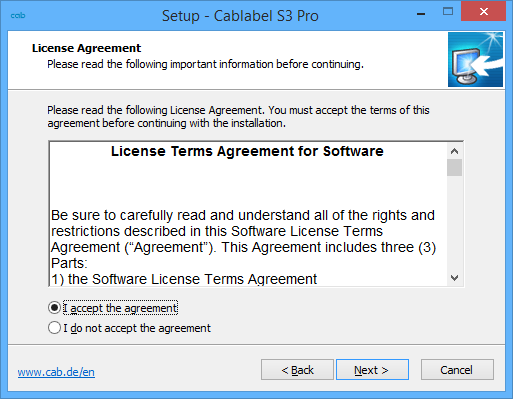
- Reinstallation
If you need to reinstall the software, for example due to change of computer or operating system, there is the possibility to perform a request for reactivation, by filling in the form available on our website:
Once your request has been considered, you will then receive the necessary instructions by email at the address indicated.
- Additional installation
On the other hand, when you wish to use the software on an additional workstation, you first have to purchase either an additional license or a new license.
For more information about this subject or to know all the modalities, you can contact directly your usual reseller.
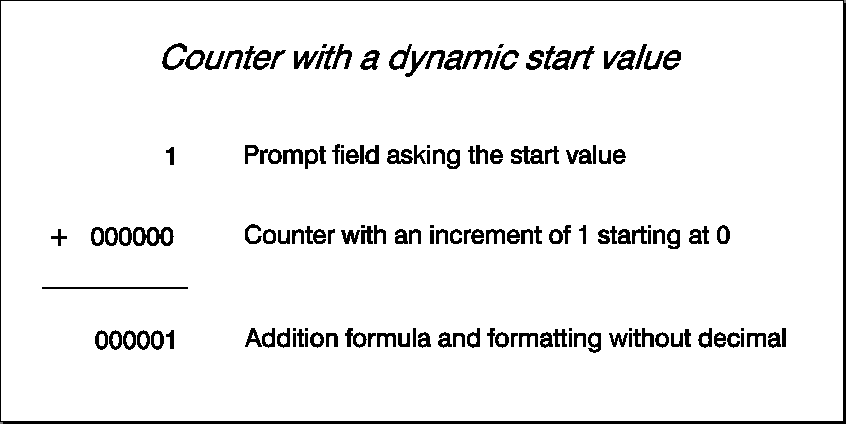
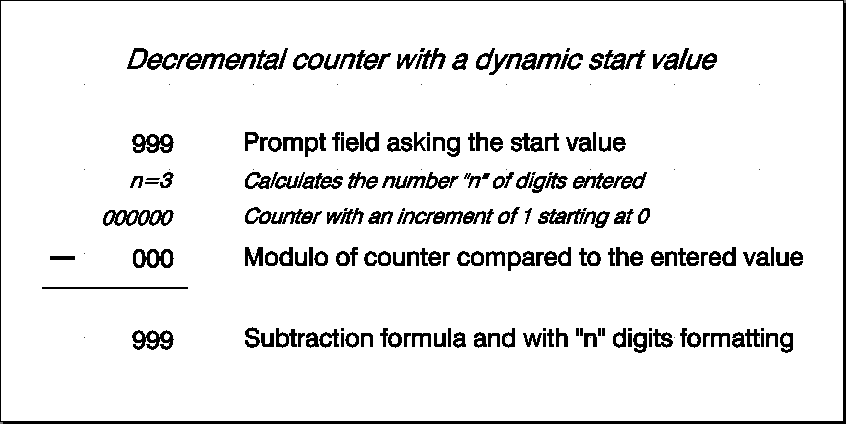
When designing my label, I created a counter and set a starting value.
But how can I change this value dynamically, without having to edit each time the properties of my counter?
In order to perform this easily in standalone mode, you need:
- To create a prompt field asking the start value.
- To insert a basic counter of numeric type.
- Then to add together both values with a formula.
And to go further, here is a more complex design in formular mode with:
- a decremental counter.
- a dynamic formatting in relation to the number of digits entered.
- an automatic reset of the counter, when the current value reaches 1.
Attention: if an operation of the “Math” category is calculated directly on the printer (for example using operands from a datasource), the result is printed by default with 2 digits after the comma.
To change this behaviour, you have as in these cases, to add a “Formatting” operation.
Download example files for cablabel S3 Pro:
You want to create your labels with cablabel S3, but you don’t know which version to choose?
In order to help you to make this decision based on your needs, here is a summary of the main differences and exclusive possibilities:
| cablabel S3 Lite | cablabel S3 Pro |
| Delivered with every printer | License per computer on request |
| Compatible with cab printers only |
Supports all printers detected and installed on Windows |
| Additional text options: max width and hyphenation |
|
| Text box with various markups by keyword detection (e.g. allergens) |
|
| Character map wizard for inserting special characters |
|
| Raster graphics only of type bmp, jpg, tif, … |
Also vector graphics of type dxf, plt, svg, … |
| About 30 types of barcodes linear, 2D, GS1 and composite |
About 35 types of barcodes including the EAN 18/128 variants |
| Barcode wizard for creating GS1/EAN /UCC-128, FACT/MH10 and QR |
|
| – | Barcode verifier option |
| Additional prompt field options: input mask and choice list |
|
| Wizard for creating compound prompts |
|
| Counters basic of type numeric and increment +/-1 |
Counters advanced of types alphanumeric and increment +/-n |
| Additional counter options: frequency, resetting and saving of the value |
|
| Date and time including offsets and wizards for creating the format |
|
| Formula: mathematical operations, manipulate strings, etc. |
|
| ABC basic compiler with code library |
|
| Variables: data sources with information about the label, the printer, the computer, etc. |
|
| Connection to: Access, Excel files, OLE DB, ODBC, ASCII databases, Database Connector in stand alone mode |
|
| JScript code viewer for an overview on the fly |
|
| – | Import of JScript files in LBL format |
| Saving only in STC format |
Also export to PDF format and PNG image |
More information is also available on our website:
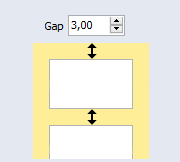
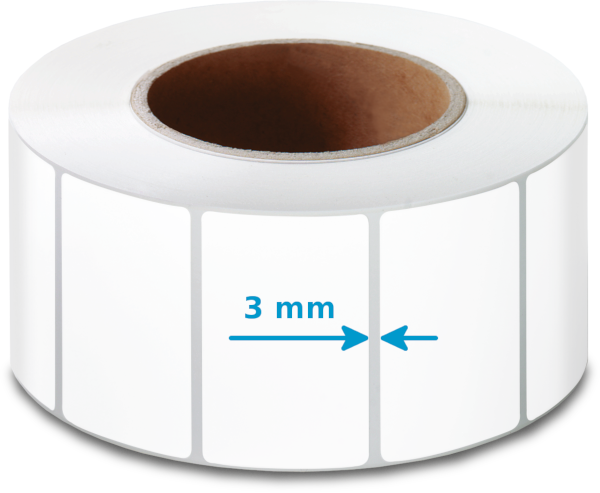
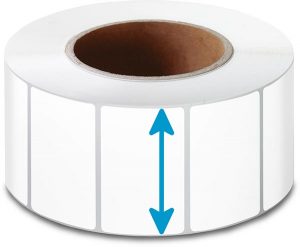
Another property to check in the layout is the “gap”, even if the default value of 3 mm is suitable for most of the labels.
This dimension corresponds to the distance between the labels, and is also measured in the printing direction or in the unwinding direction of the label roll.
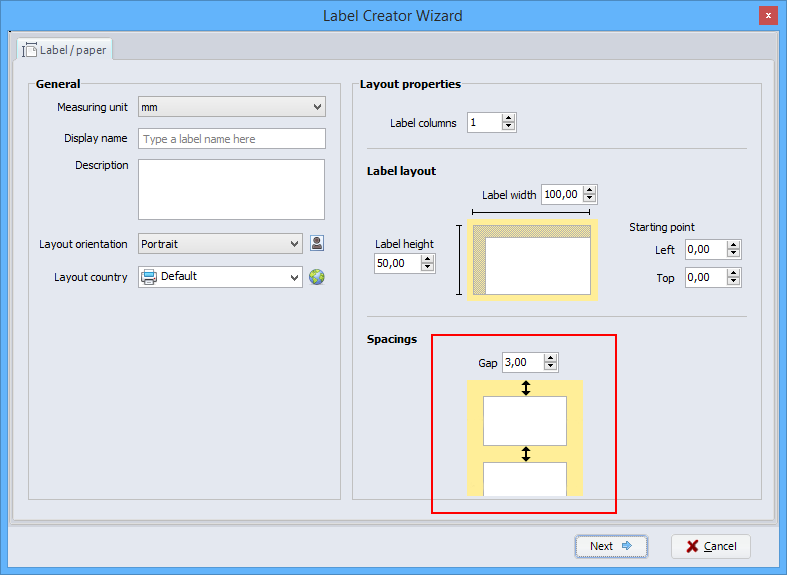
In case of using a material with a gap, you have therefore to be careful that the value indicated in the layout is simply lower or equal to the value measured between the labels:
This avoids some detection problems by the label sensor of printer and especially the emergence of non-printed labels.
And in case of using a continuous material, you are free to set a gap value:
- for example to print the labels one after the other.
- or to intentionally leave more space between each label.
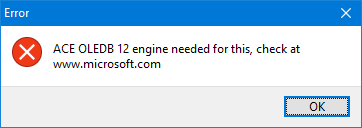
When you try to connect with cablabel S3 Pro to an Excel or Access file, created with the version 2007 or later, and you get the following error message:
Then it is necessary to download and install the 32-bit version of the OLE DB provider “Access Database Engine” from the following Microsoft website:
Notice: if the setup of Access Database Engine warns you that a 64-bit version of Microsoft Office is already installed, you must start it manually by the command prompt “cmd”, from the file location and also with the parameter “/quiet” behind the file name.
Let’s see some tips, to find more easily the size of a label and especially to avoid mixing the measures.
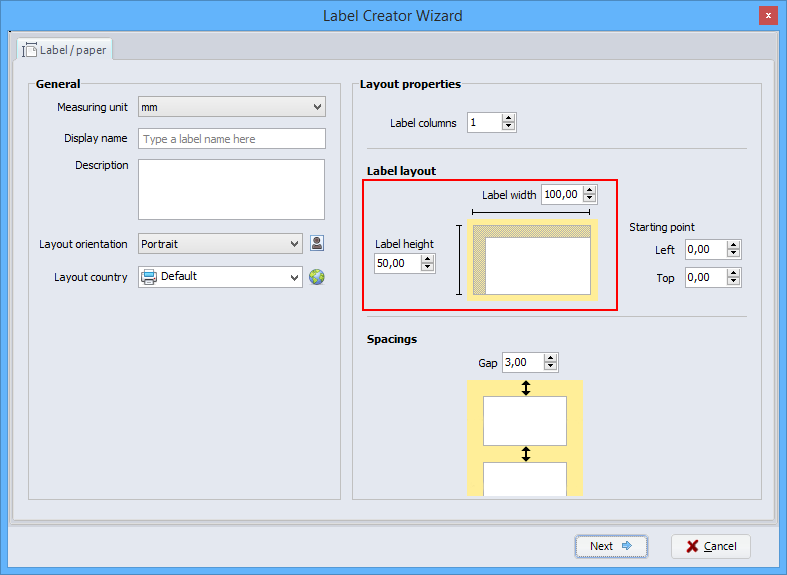
The first number corresponds to the width and the second to the height.
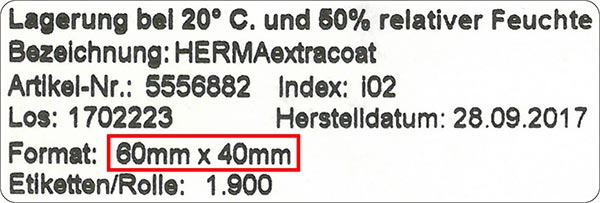
-
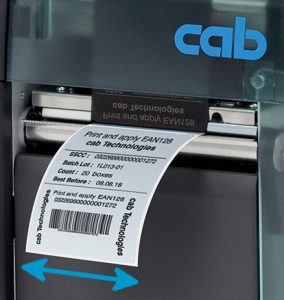
Format 60×40 mm ⇒ w >You can also directly measure the size of the label. But in this case, you must be careful to correctly identify the width.
The height coincides then with the label feed, in the printing direction or in the unwinding direction of label roll. The size of the label is therefore independent of its orientation and also of the reading direction!
Click on the following link, to see some examples of measurements:
You will use cablabel S3 with a cab printer connected to the network?
To connect the printer, you need first to:
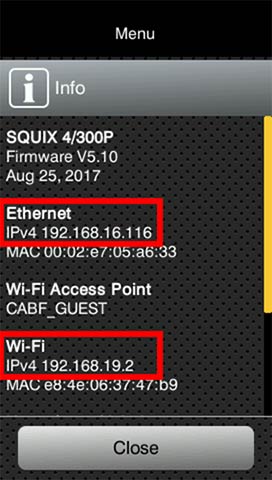
- Connect the cab printer to the network with a not provided Ethernet cable or if appropriate by Wi-Fi.
- After that restart the printer.
- And search in the « Short status » menu, the information about the IPv4 address corresponding to your used connection type.
Attention: for the assignment or reservation of an IP address, please contact your system administrator.
To configure cablabel S3 you need to:
- First, install or update your cablabel S3 version.
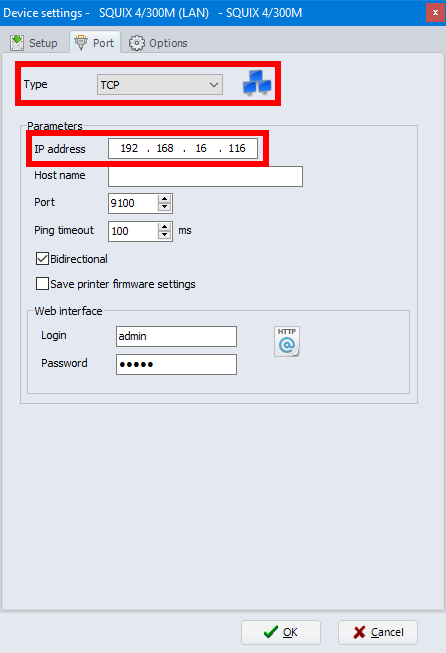
- After that add a new device corresponding to your model.
- Then select the « TCP » port type and fill in the IP address previously collected on the printer.
Notice: the installation of the Windows driver is only necessary for the MACH1 and MACH2 printers, or if you want to use a cab printer from the network with any other software.
For more information or for an installation of the Windows driver, download the detailed guide:
Характеристики
для контроля, для печати, для разработки
Описание
конструкция ярлыка шлихов cablabel S3, управление печати и контроль всех систем маркировки кабины. Развитие приборов и програмного обеспечения синхронизировано.
Это автоматический перевод. (просмотреть оригинал на английском языке)
«>
Программное обеспечение для маркировки Cablabel S3 Proот CAB является решением для профессионального дизайна этикеток в промышленном секторе. В программу интегрированы три основные функции: создание, печать и управление заданиями на печать этикеток. Программа разработана по модульному принципу и может быть постепенно адаптирована к вашим потребностям. Для упрощения ваших задач был создан полный набор функций и инструментов: в программу включены расширенные функции счетчика, поля даты, формулы и соединение с базой данных. В программном обеспечении cablabel ваши индивидуальные отпечатки этикеток являются гибкими, поскольку программа может подключаться ко всем системам этикеток CAB. Cablabel также поддерживает автономный режим, а такие элементы, как JScript Viewer, интегрируются через плагин, чтобы наилучшим образом поддерживать нативное программирование Jscript. Поскольку cablabel также может импортировать уже существующие файлы JScript, переключение легко и быстро. Если метка изменяется в интерфейсе конструктора, информация автоматически обновляется в Jscript-Viewer (в режиме реального времени). Специальные функции, такие как Database Connector или Barcode Analyzers, могут быть легко интегрированы.
Функции:
cablabel S3 Lite
cablabel S3 Pro
Поставляется с каждым принтером
Лицензия на компьютер по запросу
Совместим только с кабельными принтерами
Поддерживает все принтеры, обнаруженные и установленные в Windows
Дополнительные параметры текста: максимальная ширина и переносы
Текстовое поле с различными наценками по определению ключевых слов (например, аллергены)
Мастер отображения символов для вставки специальных символов
Растровая графика только типа bmp, jpg, tif,…
Также векторная графика типа dxf, plt, svg,…
Около 30 видов штрих-кодов линейных, 2D, GS1 и композитных
Около 35 типов штрих-кодов, включая варианты EAN 18/128
Мастер штрих-кода для создания GS1 / EAN / UCC-128, FACT / MH10 и QR
Опция проверки штрих-кода
Подскажите поля с бесплатным входом
Дополнительные параметры поля приглашения: маска ввода и список выбора
Мастер создания составных подсказок
Счетчики базовые типа числовые и приращения +/- 1
Счетчики расширенные типов буквенно-цифровых и приращения +/- n
Дополнительные параметры счетчика: частота, сброс и сохранение значения
Дата и время, включая смещения и мастера для создания формата
Формула: математические операции, манипуляции со строками и т. Д.
ABC базовый компилятор с библиотекой кода
Переменные: источники данных с информацией о этикетке, принтере, компьютере и т. Д.
Подключение к: Доступ, файлы Excel, базы данных OLE DB, ODBC, ASCII, Database Connector в автономном режиме
Просмотрщик кода JScript для обзора на лету
Импорт файлов JScript в формате LBL
Сохранение только в формате STC
Также экспорт в формат PDF и изображение PNG
First create a text object, by filling in the data on one line. When you need to add a line break, do not use the “Enter” key on the keyboard, but instead insert the special character “Carriage Return”, using the character map of cablabel S3 Pro.
Then disable the interpretation of Unicode syntax, to display the text as it is in the software. And if you do not want to print this source text, just make it invisible for printing.
- Creation of the multi line text
Then create a new text object, having as datasource the text object created previously.
Since the interpretation of Unicode syntax is by default enabled, the text is then displayed over multiple lines, because the carriage return is automatically interpreted by the software.
And of course, this multi line text is printed as shown on the screen (What You See Is What You Get).
Notice: since the content of the multi line text is dynamic, this object is sent to the printer as a picture.
- Creation of the barcode
Finally create the barcode, having also as datasource the text object created at first.
In this way, when you need to update the data, only modify the source text. The changes are then automatically propagated to linked objects, in this case the multi line text and the barcode.
Good to know: the carriage return is encoded as well and can possibly be interpreted when reading the barcode. This will depend on used reading device and its configuration.
- To go further
In order to check the contents of a barcode, you can use an app with the smartphone, but not all show the special characters. Another method is to simply connect a barcode reader to the computer, then to create a new text file with Notepad++ and to show all characters.
Finally, this DataMatrix can then be used to automatically fill in the input fields of another label, for example in cablabel S3 Print or even in standalone mode. Thus the operator will perform only one action, that is reading the barcode, instead of having to fill in and validate individually each prompt field.
Attention: in this case, it is strongly recommended to first configure the barcode reader, in order to add a delay after the validation of a prompt field. Because depending on the response time of the computer or the printer, the read information may arrive too fast to be processed correctly.
Download example files for cablabel S3 Pro:
First, to better understand the vocabulary from this environment, here is a correspondence of the main terms used in Excel and a database:
| Excel | Access or other databases |
| Workbook or Excel file | Database or Access file |
| Sheet | Table |
| Column | Field |
| Row | Record |
| Cells | Data |
With cablabel S3 Pro, it is possible to define a connection to an Excel and Access file or any other database, allowing to create new data sources that can be used dynamically by the label objects.
Of course, the choice of the database depends particularly on, the advantages and disadvantages of each solution, the hardware and software budget, the knowledge of each, etc.
Good to know: it is not mandatory to install Excel or Access on all computers with cablabel S3 Pro or Print, because the OLE DB provider “Access Database Engine” from Microsoft is sufficient to connect to the data files.
Thereby, the Excel workbook is often favoured for creating and managing a data source, since it has the advantage of being relatively simple and convenient to use. But in order to be fully exploitable with cablabel S3, there are nevertheless some precautions to take:
- Do not use spaces or other special characters in the name of the sheets.
- Do not add empty rows, titles or other texts at the beginning of the sheet.
- The first row of a sheet must imperatively contain, either the field names or the first record.
- Raw data should be preferred, by avoiding applying to the cells a format or a formatting specific to Excel.
Without forgetting that the Excel spreadsheet does not have all features of a database, and that some disadvantages are also to be taken into account:
- Depending on the versions, it is possible to have only one access per file. The same data source can therefore not be used simultaneously by Excel and the cablabel S3 software.
- There is no optimization, like that brought by indexing data. Queries on large tables are therefore longer.
- The field type “BLOB” does not exist. It is therefore for example impossible to save the label in the database.
More information on this subject is also available on the Microsoft website:
In summary, a properly structured Excel workbook, is very suitable for creating a small data source with a dedicated use for cablabel S3.
However, as soon as you have a need for simultaneous access or better performance, it is then better to opt for Access or another database, knowing that the data can be transferred quite easily.
When designing a label in cablabel S3, the different properties of a text (bold, italic…) are applied to the entire content of the object.
With the Pro and Print version, the keywords plugin allows to highlight automatically specific words in a sentence or text, as for example for the allergens.
Since the version 1.2.0.1 of the software, you can now use text tags.
Based on the principle of HTML language, this new feature provides the ability to change manually the formatting of a text part.
Moreover, you can also insert these tags in other editable fields, such as the prefix or the suffix of a text, the operations of a formula, or even directly into your database.
The software will then interpret them and display the result of the formatting on the screen, as it will later be printed on the label.
The whole list of the text tags is available in the Operator’s manual of software (PDF, 5 MB).
Download example file for cablabel S3 Lite and Pro:
Yes of course, but only according to the case and under certain conditions.
Here is a summary of different situations needing the activation of the software and how to proceed.
In order to benefit from the latest features provided by the addition of plugins, as the keywords, the variable information or the compound prompts, sometimes a reactivation of the software is required after its update.
In this example, some plugins are not correctly loaded. Then you mostly just have to redo an activation procedure through the wizard, reachable from the “About” button in the General tab.
- Reinstallation
If you need to reinstall the software, for example due to change of computer or operating system, there is the possibility to perform a request for reactivation, by filling in the form available on our website:
Once your request has been considered, you will then receive the necessary instructions by email at the address indicated.
- Additional installation
On the other hand, when you wish to use the software on an additional workstation, you first have to purchase either an additional license or a new license.
For more information about this subject or to know all the modalities, you can contact directly your usual reseller.
When designing my label, I created a counter and set a starting value.
But how can I change this value dynamically, without having to edit each time the properties of my counter?
In order to perform this easily in standalone mode, you need:
- To create a prompt field asking the start value.
- To insert a basic counter of numeric type.
- Then to add together both values with a formula.
And to go further, here is a more complex design in formular mode with:
- a decremental counter.
- a dynamic formatting in relation to the number of digits entered.
- an automatic reset of the counter, when the current value reaches 1.
Attention: if an operation of the “Math” category is calculated directly on the printer (for example using operands from a datasource), the result is printed by default with 2 digits after the comma.
To change this behaviour, you have as in these cases, to add a “Formatting” operation.
Download example files for cablabel S3 Pro:
You want to create your labels with cablabel S3, but you don’t know which version to choose?
In order to help you to make this decision based on your needs, here is a summary of the main differences and exclusive possibilities:
| cablabel S3 Lite | cablabel S3 Pro |
| Delivered with every printer | License per computer on request |
| Compatible with cab printers only |
Supports all printers detected and installed on Windows |
| Additional text options: max width and hyphenation |
|
| Text box with various markups by keyword detection (e.g. allergens) |
|
| Character map wizard for inserting special characters |
|
| Raster graphics only of type bmp, jpg, tif, … |
Also vector graphics of type dxf, plt, svg, … |
| About 30 types of barcodes linear, 2D, GS1 and composite |
About 35 types of barcodes including the EAN 18/128 variants |
| Barcode wizard for creating GS1/EAN /UCC-128, FACT/MH10 and QR |
|
| – | Barcode verifier option |
| Additional prompt field options: input mask and choice list |
|
| Wizard for creating compound prompts |
|
| Counters basic of type numeric and increment +/-1 |
Counters advanced of types alphanumeric and increment +/-n |
| Additional counter options: frequency, resetting and saving of the value |
|
| Date and time including offsets and wizards for creating the format |
|
| Formula: mathematical operations, manipulate strings, etc. |
|
| ABC basic compiler with code library |
|
| Variables: data sources with information about the label, the printer, the computer, etc. |
|
| Connection to: Access, Excel files, OLE DB, ODBC, ASCII databases, Database Connector in stand alone mode |
|
| JScript code viewer for an overview on the fly |
|
| – | Import of JScript files in LBL format |
| Saving only in STC format |
Also export to PDF format and PNG image |
More information is also available on our website:
Another property to check in the layout is the “gap”, even if the default value of 3 mm is suitable for most of the labels.
This dimension corresponds to the distance between the labels, and is also measured in the printing direction or in the unwinding direction of the label roll.

In case of using a material with a gap, you have therefore to be careful that the value indicated in the layout is simply lower or equal to the value measured between the labels:
This avoids some detection problems by the label sensor of printer and especially the emergence of non-printed labels.
And in case of using a continuous material, you are free to set a gap value:
- for example to print the labels one after the other.
- or to intentionally leave more space between each label.
When you try to connect with cablabel S3 Pro to an Excel or Access file, created with the version 2007 or later, and you get the following error message:
Then it is necessary to download and install the 32-bit version of the OLE DB provider “Access Database Engine” from the following Microsoft website:
Notice: if the setup of Access Database Engine warns you that a 64-bit version of Microsoft Office is already installed, you must start it manually by the command prompt “cmd”, from the file location and also with the parameter “/quiet” behind the file name.
Let’s see some tips, to find more easily the size of a label and especially to avoid mixing the measures.

The first number corresponds to the width and the second to the height.

-
Format 60×40 mm ⇒ w >You can also directly measure the size of the label. But in this case, you must be careful to correctly identify the width.
The height coincides then with the label feed, in the printing direction or in the unwinding direction of label roll. The size of the label is therefore independent of its orientation and also of the reading direction!
Click on the following link, to see some examples of measurements:
You will use cablabel S3 with a cab printer connected to the network?
To connect the printer, you need first to:
- Connect the cab printer to the network with a not provided Ethernet cable or if appropriate by Wi-Fi.
- After that restart the printer.
- And search in the « Short status » menu, the information about the IPv4 address corresponding to your used connection type.
Attention: for the assignment or reservation of an IP address, please contact your system administrator.
To configure cablabel S3 you need to:
- First, install or update your cablabel S3 version.
- After that add a new device corresponding to your model.
- Then select the « TCP » port type and fill in the IP address previously collected on the printer.
Notice: the installation of the Windows driver is only necessary for the MACH1 and MACH2 printers, or if you want to use a cab printer from the network with any other software.
For more information or for an installation of the Windows driver, download the detailed guide:
Характеристики
для контроля, для печати, для разработки
Описание
конструкция ярлыка шлихов cablabel S3, управление печати и контроль всех систем маркировки кабины. Развитие приборов и програмного обеспечения синхронизировано.
Это автоматический перевод. (просмотреть оригинал на английском языке)
«>
20.09.2023
Выбор технологии печати этикеток в соответствии с вашими…
подробнее
28.08.2023
Предлагаем вам наши рекомендации по выбору маркеров и индикаторов…
подробнее
23.08.2023
Публикуем советы по выбору смываемый промышленных маркеров
подробнее
Драйверы и программы
https://www.satoeurope.com/software/all-in-one-tool.phpДрайверы принтера — часть ПО, назначение которых — конвертация данных печати в понятный принтеру формат. На этой странице вы можете скачать актуальную версию драйверов Windows для печати этикеток на принтерах различных производителей и моделей (SATO, cab, POSTEK). Здесь вы найдете как оригинальные Windows-драйверы, так и процессоры печати от компании Europlus. Также здесь представлены для скачивания бесплатные версии программного обеспечения (настройки, руководство пользователя и другая документация) для подключения к ПК и работы термотрансферных принтеров только отдельных брендов и производителей. Для того, чтобы скачать программу для печати этикеток, найдите в списке необходимый вам пункт и нажмите на иконку. Далее следуйте инструкции по загрузке программы.
Оригинальные Windows-драйверы для принтеров этикеток
Windows-драйверы от компании Europlus
Бесплатное программное обеспечение для создания и печати этикеток
Программа ANSER MessagePro II (создание на ПК сообщений для термоструйных принтеров ANSER)
Вспомогательное ПО и программы для конфигурирования принетров
- Manuals
- Brands
- Texlabel Manuals
- Label Maker
- SP1
- User manual
-
Contents
-
Table of Contents
-
Bookmarks
Quick Links
User Guide
V. 18.0606
SP1 – SP3
www.texlabel.eu
info@texlabel.eu
+39 0444 287026
Related Manuals for Texlabel SP1
Summary of Contents for Texlabel SP1
-
Page 1
User Guide V. 18.0606 SP1 – SP3 www.texlabel.eu info@texlabel.eu +39 0444 287026… -
Page 2: Table Of Contents
PARAMETERS FOR WHITE AND COLORED STICKERS ………………22 PARAMETERS FOR TRANSPARENT STICKERS ………………..24 PARAMETERS FOR CARE LABELS ……………………26 PARAMETERS FOR MAC USER ……………………. 30 PRINCIPAL REQUIREMENTS FOR INTERNATIONAL CARE LABELS …………..39 USER GUIDE SP1-SP3 www.texlabel.eu info@texlabel.eu +39 0444 287026…
-
Page 3: Overview
OVERVIEW Please keep the original packaging in case the printer must be returned. Box Content: SP1 – SP3 Label Printer. DVD Including software and printer driver. Empty foil core. Foil spindle – Set of 2. …
-
Page 4
6. Label sensor 7. Platen 8. Guide track 9. Platen lockers 10. Cover for foil rewind mechanism 11. Foil rewind wheel 12. Print head 13. Foil supply wheel 14. Paper press bar USER GUIDE SP1-SP3 www.texlabel.eu info@texlabel.eu +39 0444 287026… -
Page 5: Installation
Note! When the printer is connected to USB cable, the driver installation will be automatically made. Insert the DVD in the computer. Choose «Software» on the Welcome screen. Press the icon «install software» to start the installation. USER GUIDE SP1-SP3 www.texlabel.eu info@texlabel.eu +39 0444 287026…
-
Page 6: Installation For Mac User
1. Connect to the following link and download the Mac driver for the printer. http://www.godexintl.com/de/download/download/list/Drivers 2. Install the .dmg file and after connect and turn on the printer 3. In your Mac go to: System Preferences – Printers & Scanner 4. Press “ +” USER GUIDE SP1-SP3 www.texlabel.eu info@texlabel.eu +39 0444 287026…
-
Page 7
5. Select “ GODEX RT730i” for SP3 (or “GODEX RT700” for SP1) and in Use select “Other” Go to: MacintoshHD 7. Library USER GUIDE SP1-SP3 www.texlabel.eu info@texlabel.eu +39 0444 287026… -
Page 8
8. Printers 9. PPDs 10. Contents USER GUIDE SP1-SP3 www.texlabel.eu info@texlabel.eu +39 0444 287026… -
Page 9
11. Resources 12. Select “godex-rt730i.ppd” (for SP3) and press OPEN (for SP1 select “godex-rt700.ppd”) 13. Press Add USER GUIDE SP1-SP3 www.texlabel.eu info@texlabel.eu +39 0444 287026… -
Page 10
14. In “Printer & Scanner” press “Option & Supplies” 15. Rename “GODEX RT730i” to “SP3” (“GODEX RT700” to “SP1”) USER GUIDE SP1-SP3 www.texlabel.eu info@texlabel.eu +39 0444 287026… -
Page 11: Loading Ribbons
Open the cover for foil rewind mechanism Insert the foil spindle with the new foil into the Foil rewind wheel. Insert the foil spindle with the empty ribbon core into the Foil supply wheel USER GUIDE SP1-SP3 www.texlabel.eu info@texlabel.eu +39 0444 287026…
-
Page 12
Adjust the label guide plates to fix the label width. Release the locking button and let it click into place. Feed the label through the label guides on both sides. Unlock the release catch to close the printer cover. USER GUIDE SP1-SP3 www.texlabel.eu info@texlabel.eu +39 0444 287026… -
Page 13: Using The Built-In Software — Cablabel S3 Lite
USING THE BUILT-IN SOFTWARE — Cablabel S3 Lite (only Windows) Click the «devices» button In the devices list, select the printer and click the «ok» button USER GUIDE SP1-SP3 www.texlabel.eu info@texlabel.eu +39 0444 287026…
-
Page 14
In «label layout», set the size of the label. In «spacings», set the value in mm of the empty space between one label and the other. Select «Next» button to create the format. USER GUIDE SP1-SP3 www.texlabel.eu info@texlabel.eu +39 0444 287026… -
Page 15
The «Text» tool is used to insert a line of text into the label. When you click the empty label, the following screen appears. From this screen you can enter text and format it using the font properties Click the «ok» button to confirm USER GUIDE SP1-SP3 www.texlabel.eu info@texlabel.eu +39 0444 287026… -
Page 16
After selecting the «Barcode» tool and clicked in the label center, the following window opens. From this screen you can set the size of the bars, size of the numbers, style, code type (EAN13, UPC, CODE39, etc.) USER GUIDE SP1-SP3 www.texlabel.eu info@texlabel.eu +39 0444 287026… -
Page 17
The following tools in the red boxes are used to insert rows, squares, rectangles, circles, ellipses. USER GUIDE SP1-SP3 www.texlabel.eu info@texlabel.eu +39 0444 287026… -
Page 18
SELECTING THE TYPE OF CHARACTER, E.G.: THAT REFERS TO «CHARACTER MAP TEXLABEL – ISO» TO THE FOLLOWING TABLE (EVERY SYMBOL CORRESPONDES TO A CHARACTER). TEXLABEL — ISO TEXLABEL fonts can also purchased at a later time by contacting Gielle Software. USER GUIDE SP1-SP3 www.texlabel.eu info@texlabel.eu… -
Page 19
Separately purchased TEXLABEL fonts TEXLABEL — ISO TEXLABEL – KR TEXLABEL – ASTM USER GUIDE SP1-SP3 www.texlabel.eu info@texlabel.eu +39 0444 287026… -
Page 20
• PLATEN Rotate the platen (shown in the figure) and clean it with a cloth that does not release impurities, dampened with alcohol, until the complete removal of the dirt accumulated. USER GUIDE SP1-SP3 www.texlabel.eu info@texlabel.eu +39 0444 287026… -
Page 21
Keep pressing calibration button for 2 second, the printer can immediately run the label size calibration. The auto-testing text appears on the printer display. During calibration, the printer will advance the ribbon. The calibration operation will end when the text «ready» appears on the display USER GUIDE SP1-SP3 www.texlabel.eu info@texlabel.eu +39 0444 287026… -
Page 22: Parameters For White And Colored Stickers
Set the print orientation by selecting Portrait. By selecting the «Graphics» tab you can set the dithering, for the stickers label select «None». USER GUIDE SP1-SP3 www.texlabel.eu info@texlabel.eu +39 0444 287026…
-
Page 23
AFTER PRINTING NONE / CUT / TEAR OFF. If, after printing, the label does not align exactly at the tear point, you can adjust the parameter adding or removing (less sign) 1 or more millimeters. USER GUIDE SP1-SP3 www.texlabel.eu info@texlabel.eu +39 0444 287026… -
Page 24: Parameters For Transparent Stickers
WARINING: We do not recommend using the default «Use Printer Current Setting» parameters, but always indicate METHOD: THERMAL TRANSFER, CONTINUOUS TYPE / LABEL WITH SPACE / LABEL WITH SIGNALS, ACTION AFTER PRINTING NONE / CUT / TEAR OFF. USER GUIDE SP1-SP3 www.texlabel.eu info@texlabel.eu +39 0444 287026…
-
Page 25
In the «Options» tab settings, set the parameters as shown in Figure. If, after printing, the label does not align exactly at the tear point, you can adjust the parameter adding or removing (less sign) 1 or more millimeters USER GUIDE SP1-SP3 www.texlabel.eu info@texlabel.eu +39 0444 287026… -
Page 26: Parameters For Care Labels
WARINING: We do not recommend using the default «Use Printer Current Setting» parameters, but always indicate METHOD: THERMAL TRANSFER, CONTINUOUS TYPE / LABEL WITH SPACE / LABEL WITH SIGNALS, ACTION AFTER PRINTING NONE / CUT / TEAR OFF. USER GUIDE SP1-SP3 www.texlabel.eu info@texlabel.eu +39 0444 287026…
-
Page 27
We also recommend setting the following parameter (Portrait 180°) so that the label is pulled out of the printer with the unprinted part For care labels it is advisable to set Dithering by selecting «Error Diffusion» USER GUIDE SP1-SP3 www.texlabel.eu info@texlabel.eu +39 0444 287026… -
Page 28
In the «Stock» tab, set «Thermal transfer» as the printing method and «Type» to set «Continuous», and select «Action after printing» from the «None» drop down menu. If the cutter is installed on the printer, set the parameters in the «stock» tab as follows USER GUIDE SP1-SP3 www.texlabel.eu info@texlabel.eu +39 0444 287026… -
Page 29
In the page number 38 contains a mirror showing the intensity values to be set according to the material to be printed on. USER GUIDE SP1-SP3 www.texlabel.eu info@texlabel.eu +39 0444 287026… -
Page 30: Parameters For Mac User
We recommend that you leave the first 12-15 millimeters of the top of the label in blank (not printed), which is the space needed to sew the label into the garment Press “Page setup” USER GUIDE SP1-SP3 www.texlabel.eu info@texlabel.eu +39 0444 287026…
-
Page 31
Go to “Paper Size” Select “Manage Custom Sizes…” For create a new preset custom sizes press “+” USER GUIDE SP1-SP3 www.texlabel.eu info@texlabel.eu +39 0444 287026… -
Page 32
I our case the label which we want to print is 30 x110 ( in the range “Non-Printable Area” for SP3 select “GODEX RT730i” for SP1 select “GODEX RT700” Once you have created the preset, you can use it in future prints. -
Page 33
Select the number of copies you want to print, in our example “1” Select “Paper Handing” USER GUIDE SP1-SP3 www.texlabel.eu info@texlabel.eu +39 0444 287026… -
Page 34
Select “Cover Page” USER GUIDE SP1-SP3 www.texlabel.eu info@texlabel.eu +39 0444 287026… -
Page 35
Select “Printer Features” In the page number 38 contains a mirror showing the intensity (Darkness) value to be set according to the material to be printed on. Printer Features – Label Setup USER GUIDE SP1-SP3 www.texlabel.eu info@texlabel.eu +39 0444 287026… -
Page 36
Printer Features – Printer Setup USER GUIDE SP1-SP3 www.texlabel.eu info@texlabel.eu +39 0444 287026… -
Page 37
For care labels, we recommend setting the print speed at 2, while the value to be set for black level strength varies depending on the material used as a print media USER GUIDE SP1-SP3 www.texlabel.eu info@texlabel.eu +39 0444 287026… -
Page 38
RIBBON As a guideline, nylon (polyamide) is printed at low temperatures (0 — 5), while satin and polyester require higher temperatures (7 — 13). The SP1/SP3 printer is compatible with the software TEXLABEL and the erp DUEMILA MODA USER GUIDE SP1-SP3 www.texlabel.eu… -
Page 39: Principal Requirements For International Care Labels
PRINCIPAL REQUIREMENTS FOR INTERNATIONAL CARE LABELS For any further information or assistance, please contact the support service of Gielle Software www.texlabel.eu info@texlabel.eu USER GUIDE SP1-SP3 www.texlabel.eu info@texlabel.eu +39 0444 287026…
This manual is also suitable for:
Sp3
На чтение 11 мин Просмотров 1.1к. Опубликовано
Программное обеспечение для маркировки Cablabel S3 Proот CAB является решением для профессионального дизайна этикеток в промышленном секторе. В программу интегрированы три основные функции: создание, печать и управление заданиями на печать этикеток. Программа разработана по модульному принципу и может быть постепенно адаптирована к вашим потребностям. Для упрощения ваших задач был создан полный набор функций и инструментов: в программу включены расширенные функции счетчика, поля даты, формулы и соединение с базой данных. В программном обеспечении cablabel ваши индивидуальные отпечатки этикеток являются гибкими, поскольку программа может подключаться ко всем системам этикеток CAB. Cablabel также поддерживает автономный режим, а такие элементы, как JScript Viewer, интегрируются через плагин, чтобы наилучшим образом поддерживать нативное программирование Jscript. Поскольку cablabel также может импортировать уже существующие файлы JScript, переключение легко и быстро. Если метка изменяется в интерфейсе конструктора, информация автоматически обновляется в Jscript-Viewer (в режиме реального времени). Специальные функции, такие как Database Connector или Barcode Analyzers, могут быть легко интегрированы.
Функции:
cablabel S3 Lite
cablabel S3 Pro
Поставляется с каждым принтером
Лицензия на компьютер по запросу
Совместим только с кабельными принтерами
Поддерживает все принтеры, обнаруженные и установленные в Windows
Дополнительные параметры текста: максимальная ширина и переносы
Текстовое поле с различными наценками по определению ключевых слов (например, аллергены)
Мастер отображения символов для вставки специальных символов
Растровая графика только типа bmp, jpg, tif,…
Также векторная графика типа dxf, plt, svg,…
Около 30 видов штрих-кодов линейных, 2D, GS1 и композитных
Около 35 типов штрих-кодов, включая варианты EAN 18/128
Мастер штрих-кода для создания GS1 / EAN / UCC-128, FACT / MH10 и QR
Опция проверки штрих-кода
Подскажите поля с бесплатным входом
Дополнительные параметры поля приглашения: маска ввода и список выбора
Мастер создания составных подсказок
Счетчики базовые типа числовые и приращения +/- 1
Счетчики расширенные типов буквенно-цифровых и приращения +/- n
Дополнительные параметры счетчика: частота, сброс и сохранение значения
Дата и время, включая смещения и мастера для создания формата
Формула: математические операции, манипуляции со строками и т. Д.
ABC базовый компилятор с библиотекой кода
Переменные: источники данных с информацией о этикетке, принтере, компьютере и т. Д.
Подключение к: Доступ, файлы Excel, базы данных OLE DB, ODBC, ASCII, Database Connector в автономном режиме
Просмотрщик кода JScript для обзора на лету
Импорт файлов JScript в формате LBL
Сохранение только в формате STC
Также экспорт в формат PDF и изображение PNG
First create a text object, by filling in the data on one line. When you need to add a line break, do not use the “Enter” key on the keyboard, but instead insert the special character “Carriage Return”, using the character map of cablabel S3 Pro.
Then disable the interpretation of Unicode syntax, to display the text as it is in the software. And if you do not want to print this source text, just make it invisible for printing.
- Creation of the multi line text
Then create a new text object, having as datasource the text object created previously.
Since the interpretation of Unicode syntax is by default enabled, the text is then displayed over multiple lines, because the carriage return is automatically interpreted by the software.
And of course, this multi line text is printed as shown on the screen (What You See Is What You Get).
Notice: since the content of the multi line text is dynamic, this object is sent to the printer as a picture.
- Creation of the barcode
Finally create the barcode, having also as datasource the text object created at first.
In this way, when you need to update the data, only modify the source text. The changes are then automatically propagated to linked objects, in this case the multi line text and the barcode.
Good to know: the carriage return is encoded as well and can possibly be interpreted when reading the barcode. This will depend on used reading device and its configuration.
- To go further
In order to check the contents of a barcode, you can use an app with the smartphone, but not all show the special characters. Another method is to simply connect a barcode reader to the computer, then to create a new text file with Notepad++ and to show all characters.
Finally, this DataMatrix can then be used to automatically fill in the input fields of another label, for example in cablabel S3 Print or even in standalone mode. Thus the operator will perform only one action, that is reading the barcode, instead of having to fill in and validate individually each prompt field.
Attention: in this case, it is strongly recommended to first configure the barcode reader, in order to add a delay after the validation of a prompt field. Because depending on the response time of the computer or the printer, the read information may arrive too fast to be processed correctly.
Download example files for cablabel S3 Pro:
First, to better understand the vocabulary from this environment, here is a correspondence of the main terms used in Excel and a database:
| Excel | Access or other databases |
| Workbook or Excel file | Database or Access file |
| Sheet | Table |
| Column | Field |
| Row | Record |
| Cells | Data |
With cablabel S3 Pro, it is possible to define a connection to an Excel and Access file or any other database, allowing to create new data sources that can be used dynamically by the label objects.
Of course, the choice of the database depends particularly on, the advantages and disadvantages of each solution, the hardware and software budget, the knowledge of each, etc.
Good to know: it is not mandatory to install Excel or Access on all computers with cablabel S3 Pro or Print, because the OLE DB provider “Access Database Engine” from Microsoft is sufficient to connect to the data files.
Thereby, the Excel workbook is often favoured for creating and managing a data source, since it has the advantage of being relatively simple and convenient to use. But in order to be fully exploitable with cablabel S3, there are nevertheless some precautions to take:
- Do not use spaces or other special characters in the name of the sheets.
- Do not add empty rows, titles or other texts at the beginning of the sheet.
- The first row of a sheet must imperatively contain, either the field names or the first record.
- Raw data should be preferred, by avoiding applying to the cells a format or a formatting specific to Excel.
Without forgetting that the Excel spreadsheet does not have all features of a database, and that some disadvantages are also to be taken into account:
- Depending on the versions, it is possible to have only one access per file. The same data source can therefore not be used simultaneously by Excel and the cablabel S3 software.
- There is no optimization, like that brought by indexing data. Queries on large tables are therefore longer.
- The field type “BLOB” does not exist. It is therefore for example impossible to save the label in the database.
More information on this subject is also available on the Microsoft website:
In summary, a properly structured Excel workbook, is very suitable for creating a small data source with a dedicated use for cablabel S3.
However, as soon as you have a need for simultaneous access or better performance, it is then better to opt for Access or another database, knowing that the data can be transferred quite easily.
When designing a label in cablabel S3, the different properties of a text (bold, italic…) are applied to the entire content of the object.
With the Pro and Print version, the keywords plugin allows to highlight automatically specific words in a sentence or text, as for example for the allergens.
Since the version 1.2.0.1 of the software, you can now use text tags.
Based on the principle of HTML language, this new feature provides the ability to change manually the formatting of a text part.
Moreover, you can also insert these tags in other editable fields, such as the prefix or the suffix of a text, the operations of a formula, or even directly into your database.
The software will then interpret them and display the result of the formatting on the screen, as it will later be printed on the label.
The whole list of the text tags is available in the Operator’s manual of software (PDF, 5 MB).
Download example file for cablabel S3 Lite and Pro:
Yes of course, but only according to the case and under certain conditions.
Here is a summary of different situations needing the activation of the software and how to proceed.
In order to benefit from the latest features provided by the addition of plugins, as the keywords, the variable information or the compound prompts, sometimes a reactivation of the software is required after its update.
In this example, some plugins are not correctly loaded. Then you mostly just have to redo an activation procedure through the wizard, reachable from the “About” button in the General tab.
- Reinstallation
If you need to reinstall the software, for example due to change of computer or operating system, there is the possibility to perform a request for reactivation, by filling in the form available on our website:
Once your request has been considered, you will then receive the necessary instructions by email at the address indicated.
- Additional installation
On the other hand, when you wish to use the software on an additional workstation, you first have to purchase either an additional license or a new license.
For more information about this subject or to know all the modalities, you can contact directly your usual reseller.
When designing my label, I created a counter and set a starting value.
But how can I change this value dynamically, without having to edit each time the properties of my counter?
In order to perform this easily in standalone mode, you need:
- To create a prompt field asking the start value.
- To insert a basic counter of numeric type.
- Then to add together both values with a formula.
And to go further, here is a more complex design in formular mode with:
- a decremental counter.
- a dynamic formatting in relation to the number of digits entered.
- an automatic reset of the counter, when the current value reaches 1.
Attention: if an operation of the “Math” category is calculated directly on the printer (for example using operands from a datasource), the result is printed by default with 2 digits after the comma.
To change this behaviour, you have as in these cases, to add a “Formatting” operation.
Download example files for cablabel S3 Pro:
You want to create your labels with cablabel S3, but you don’t know which version to choose?
In order to help you to make this decision based on your needs, here is a summary of the main differences and exclusive possibilities:
| cablabel S3 Lite | cablabel S3 Pro |
| Delivered with every printer | License per computer on request |
| Compatible with cab printers only |
Supports all printers detected and installed on Windows |
| Additional text options: max width and hyphenation |
|
| Text box with various markups by keyword detection (e.g. allergens) |
|
| Character map wizard for inserting special characters |
|
| Raster graphics only of type bmp, jpg, tif, … |
Also vector graphics of type dxf, plt, svg, … |
| About 30 types of barcodes linear, 2D, GS1 and composite |
About 35 types of barcodes including the EAN 18/128 variants |
| Barcode wizard for creating GS1/EAN /UCC-128, FACT/MH10 and QR |
|
| – | Barcode verifier option |
| Additional prompt field options: input mask and choice list |
|
| Wizard for creating compound prompts |
|
| Counters basic of type numeric and increment +/-1 |
Counters advanced of types alphanumeric and increment +/-n |
| Additional counter options: frequency, resetting and saving of the value |
|
| Date and time including offsets and wizards for creating the format |
|
| Formula: mathematical operations, manipulate strings, etc. |
|
| ABC basic compiler with code library |
|
| Variables: data sources with information about the label, the printer, the computer, etc. |
|
| Connection to: Access, Excel files, OLE DB, ODBC, ASCII databases, Database Connector in stand alone mode |
|
| JScript code viewer for an overview on the fly |
|
| – | Import of JScript files in LBL format |
| Saving only in STC format |
Also export to PDF format and PNG image |
More information is also available on our website:
Another property to check in the layout is the “gap”, even if the default value of 3 mm is suitable for most of the labels.
This dimension corresponds to the distance between the labels, and is also measured in the printing direction or in the unwinding direction of the label roll.

In case of using a material with a gap, you have therefore to be careful that the value indicated in the layout is simply lower or equal to the value measured between the labels:
This avoids some detection problems by the label sensor of printer and especially the emergence of non-printed labels.
And in case of using a continuous material, you are free to set a gap value:
- for example to print the labels one after the other.
- or to intentionally leave more space between each label.
When you try to connect with cablabel S3 Pro to an Excel or Access file, created with the version 2007 or later, and you get the following error message:
Then it is necessary to download and install the 32-bit version of the OLE DB provider “Access Database Engine” from the following Microsoft website:
Notice: if the setup of Access Database Engine warns you that a 64-bit version of Microsoft Office is already installed, you must start it manually by the command prompt “cmd”, from the file location and also with the parameter “/quiet” behind the file name.
Let’s see some tips, to find more easily the size of a label and especially to avoid mixing the measures.

The first number corresponds to the width and the second to the height.

-
Format 60×40 mm ⇒ w >You can also directly measure the size of the label. But in this case, you must be careful to correctly identify the width.
The height coincides then with the label feed, in the printing direction or in the unwinding direction of label roll. The size of the label is therefore independent of its orientation and also of the reading direction!
Click on the following link, to see some examples of measurements:
You will use cablabel S3 with a cab printer connected to the network?
To connect the printer, you need first to:
- Connect the cab printer to the network with a not provided Ethernet cable or if appropriate by Wi-Fi.
- After that restart the printer.
- And search in the « Short status » menu, the information about the IPv4 address corresponding to your used connection type.
Attention: for the assignment or reservation of an IP address, please contact your system administrator.
To configure cablabel S3 you need to:
- First, install or update your cablabel S3 version.
- After that add a new device corresponding to your model.
- Then select the « TCP » port type and fill in the IP address previously collected on the printer.
Notice: the installation of the Windows driver is only necessary for the MACH1 and MACH2 printers, or if you want to use a cab printer from the network with any other software.
For more information or for an installation of the Windows driver, download the detailed guide:
Характеристики
для контроля, для печати, для разработки
Описание
конструкция ярлыка шлихов cablabel S3, управление печати и контроль всех систем маркировки кабины. Развитие приборов и програмного обеспечения синхронизировано.
Это автоматический перевод. (просмотреть оригинал на английском языке)
«>

