- Manuals
- Brands
- BMW Manuals
- Motorcycle
- R 1200 GS 2014
- Rider’s manual
-
Contents
-
Table of Contents
-
Troubleshooting
-
Bookmarks
Quick Links
BMW Motorrad
The Ultimate
Riding Machine
Rider’s Manual (US Model)
R 1200 GS
Related Manuals for BMW R 1200 GS 2014
Summary of Contents for BMW R 1200 GS 2014
-
Page 1
BMW Motorrad The Ultimate Riding Machine Rider’s Manual (US Model) R 1200 GS… -
Page 2
Motorcycle/Dealer Data Motorcycle data Dealer Data Model Contact in Service Ms./Mr. Vehicle identification number Phone number Color number Initial registration Dealer’s address/phone number (company License plate stamp) -
Page 3
About this Rider’s Manual BMW Motorrad. Please read this Rider’s Manual carefully before starting to use your new BMW. It contains im- portant information on how to operate the controls and how to get the most benefit from your BMW’s advanced technical fea- tures. -
Page 4: Table Of Contents
……20 BMW Motorrad Integral Shifting gears ….88 Multifunction display .
-
Page 5
Wheels and tires ..165 BMW Motorrad ASC ..103 9 Care ….151 Electrical system . -
Page 6
Maintenance proce- dures ….. . 173 Confirmation of mainte- nance work ….175 Confirmation of service . -
Page 7: General Instructions
General instructions Overview ……6 Abbreviations and symbols ..6 Equipment .
-
Page 8: Overview
Reference to a page with BMW Motorrad retailer. When the time comes to sell more detailed informa- your BMW, remember to hand tion. EWS Electronic immobilizer. over this Rider’s Manual; it is an important part of the motorcycle.
-
Page 9: Equipment
BMW Motorrad cannot guarantee ASC Automatic Stability Con- you can find the descriptions in a the total absence of errors. For trol. this reason BMW is unable to separate manual. recognize any claims stemming Electronic Suspension Technical data from the information, illustrations Adjustment.
-
Page 11: Overviews
Overviews General view, left side ….11 General view, right side … . . 13 Underneath seat ….14 Multifunction switch, left .
-
Page 13: General View, Left Side
General view, left side Fuel filler opening ( Seat lock ( Adjuster for rear damp- ing (at the bottom on the spring strut) (…
-
Page 15: General View, Right Side
General view, right side 10 Battery (behind side panel) 131) Adjuster for spring preload, Auxiliary terminal for jump rear ( starting (behind side panel) Air cleaner (under center 130) fairing panel) ( 128) 11 Brake-fluid reservoir, rear Brake-fluid reservoir, front 113) 112) Height adjuster for wind-…
-
Page 16: Underneath Seat
Underneath seat Standard tool kit ( 108) Rider’s Manual (US Model) Tire inflation pressure table Load capacity table Adjuster for the rider’s seat height ( Fuses ( 134)
-
Page 17: Multifunction Switch, Left
Multifunction switch, left Headlight flasher and high- beam headlight ( with cruise control Switch on cruise control 67). Hazard warning flashers ABS ( ASC ( with dynamic ESA Adjustment options with additional LED headlight Auxiliary headlight ( 60). Turn indicators ( Horn Multifunction display…
-
Page 18
with preparation for navi- gation system Operating the navigation system ( 140) -
Page 19: Right
Multifunction switch, right with heated handlebar grips Heated handlebar grips Riding mode ( Emergency on/off switch (kill switch) ( Starting the engine…
-
Page 20: Instrument Cluster
Instrument cluster Speedometer Tachometer Ambient light sensor (for brightness adjustment of instrument lighting) with anti-theft alarm Anti-theft alarm indicator light with Keyless Ride Indicator light for radio- operated key Warning and indicator lights ( Multifunction display…
-
Page 21: Displays
Displays Warning and indicator lights..20 Multifunction display ….22 Warning symbols in the display panel ……. 23 Warning lamps .
-
Page 22: Warning And Indicator Lights
Warning and indicator lights with cruise control Switch on cruise control 67). Idle Deactivate ASC function 63). Turn indicator, left ABS ( Turn indicator, right Universal warning light, ap- pears together with warn- ing symbols in display panel ( with anti-theft alarm Alarm ( Indicator light for radio- operated key…
-
Page 23
with additional LED headlight Auxiliary headlight ( 60). 11 Fuel reserve ( The ABS symbol can be shown differently depend- ing on the country. -
Page 24: Multifunction Display
Multifunction display Fuel fill level indicator Upshift recommendation Gear indicator display, «N» indicates «neutral» with heated handlebar grips Operating heated grips 75). Odometer ( Service display (mainte- nance interval) ( 173) Warning symbols ( Onboard computer with dynamic ESA Adjustment options 10 Use of the riding modes 11 Clock ( 12 Outside temperature warn-…
-
Page 25: Warning Symbols In The Display
Warning symbols in the display panel with Tire Pressure Con- trol (TPC/RDC) Tire inflation pressures Electronic immobilizer Coolant temperature Engine oil level ( Electronic engine manage- ment ( Battery charging ( 131) Warnings (…
-
Page 26: Warning Lamps
Warning lamps The universal warning light lights up for the most urgent warning. Display of the warning lights The following page contains a list of potential warnings. Warnings are displayed with ap- propriate warning lights. Warnings for which no separate warning light is provided are sig- naled by the general warning light 1 and are accompanied by…
-
Page 27
Overview of warning indicators Warning and indicator Warning symbols in the Meaning lamps display panel appears on the Outside temperature warning ( display lights up yellow appears on the Electronic immobilizer is active ( display lights up yellow appears on the Radio-operated key outside reception display range (… -
Page 28
Warning and indicator Warning symbols in the Meaning lamps display panel DWALO ! is indi- Anti-theft alarm battery low charge cated DWA ! lights up yellow is indicated Anti-theft alarm system battery discharged ( lights up yellow indicated with one Tire inflation pressure is at limit of ap- or two arrows and proved range (… -
Page 29
Warning and indicator Warning symbols in the Meaning lamps display panel RDC! lights up yellow is indicated. Battery of tire-inflation pressure sensor weak ( flashes ABS self-diagnosis not completed lights up ABS error ( lights up ABS deactivated ( flashes rapidly ASC intervention ( flashes slowly ASC self-diagnosis not completed… -
Page 30
Warning and indicator Warning symbols in the Meaning lamps display panel ESA! lights up yellow is indicated ESA error ( lights up Fuel down to reserve ( flashes yellow flashes Severe fault in the engine management system ( appears on the Engine oil level too low ( display OILLVL CHECK… -
Page 31
Keyless Ride placed, preferably by an autho- ing at measured temperatures Battery of radio-operated key is rized BMW Motorrad retailer. above 37 °F (3 °C). completely drained or radio- At low outside temperatures, Radio-operated key… -
Page 32
Replace battery of radio- Driving with an overheated workshop, preferably an autho- engine can result in engine rized BMW Motorrad retailer. operated key damage. The general warning lamp Engine in emergency- Be sure to observe the measures lights up yellow. -
Page 33
DWALO ! thorized workshop, preferably is indicated. an authorized BMW Motorrad bulbs on the motorcycle. This fault message is only retailer. Possible cause: shown for a short time im- mediately following the Pre-Ride- One or more bulbs are defective. -
Page 34
A tire inflation pressure out- sure is in the limit area of the shop, preferably an authorized side the permissible toler- permissible tolerance. BMW Motorrad retailer. ance result in poorer handling of Correct tire inflation pressure in the motorcycle. accordance with instructions on… -
Page 35
Have fault eliminated at a spe- Possible cause: suitability for continued riding: cialist service facility, preferably Do not continue riding. The measured tire inflation pres- an authorized BMW Motorrad Contact roadside service. sure is outside the approved tol- retailer. erance range. Sensor defective or… -
Page 36
BMW Motorrad ABS self-diagnosis not Watch the TCP/RDC display at a higher rate of speed. A con- dealer. completed tinuous error is only present if ABS warning light flashes. Battery of tire-inflation the general warning lamp also pressure sensor weak lights up. -
Page 37
If the ASC warning lamp contin- an authorized BMW Motorrad active closed-loop intervention ues to flash: retailer. even after the critical situation Contact an authorized work- has passed. -
Page 38
Please be aware management system thorized workshop, preferably that ASC functionality is no an authorized BMW Motorrad The general warning lamp longer available. Observe addi- retailer. flashes yellow. tional information on situations Fuel down to reserve The engine symbol flashes. -
Page 39
Defect in alternator or the alter- thorized workshop, preferably The general warning lamp nator drive assembly, or the volt- an authorized BMW Motorrad age regulator fuse has been trig- lights up red. retailer. gered. The battery symbol is dis- Have the malfunction corrected played. -
Page 40: Outside Temperature
BMW Motorrad Dealer. above 37 °F (3 °C). At low outside temperatures, icy Outside temperature conditions must especially be ex- pected on bridges and in shady Engine heat can lead to spuri- road areas.
-
Page 41: Oil Level Indicator
depends on the driving style (on Service display The conditions for the oil level the consumption) and on the fuel indicator are as follows: level when the warning lamp was Engine at operating tempera- initially activated (see the expla- ture nation above).
-
Page 42: Tire Inflation Pressures
BMW Motorrad retailer, for right 2 shows the inflation pres- setting of the date. sure in the rear tire. Immediately after switching on the ignition,…
-
Page 43
Upshift recommendation 1 sig- nals the economically best point in time for upshifting. -
Page 45: Operation
Windshield ……77 BMW Motorrad Integral ABS ..62 Rider and passenger seats .
-
Page 46: Ignition
The cases and the topcase can Turn handlebars to full left or right lock position. also be ordered with locks for the same key on request. Please contact an authorized workshop for this purpose, preferably an authorized BMW Motorrad re- tailer.
-
Page 47
Switching on ignition The parking lamp briefly lights Electrically powered acces- sories remain operational for a limited period of time. with additional LED headlight Battery can be recharged via onboard socket. The auxiliary headlights and the After the ignition is switched rear parking lamp briefly light off, the instrument cluster re- mains switched on for a short… -
Page 48: Ignition With Keyless Ride
The indicator light for the cle keys, you can have it disabled cannot be locked/unlocked. radio-operated key flashes by your authorized BMW motor- If the range is exceeded, the igni- as long as the radio-operated key cycle retailer. tion is switched off after approx.
-
Page 49
However, the motorcycle is more Range of Keyless Ride stable on a level surface with the radio-operated key handlebars turned to the left than with the handlebars turned to the with Keyless Ride right. Approx. 3.3 ft (Approx. 1 m) On level ground, always turn the handlebars to the left to set the Locking handlebars… -
Page 50
EWS Electronic Version 2: immobilizer Steering lock is locked, press and hold button 1. The motorcycle’s electronic cir- Steering lock is unlocked. cuitry monitors the data stored in Parking lights and all function the radio-operated key through a circuits switched on. ring antenna incorporated in the Pre-Ride-Check is carried out. -
Page 51
Emergency and spare keys are gine must be started. only available through an autho- Then unlocking must be re- Should you lose your keys, re- rized BMW Motorrad retailer. As peated. fer to the information regard- the radio-operated keys are part 30 s… -
Page 52: Multifunction Display
Replace battery of radio- Multifunction display Dispose of the old battery in accordance with legal regula- operated key Selecting display readings tions. Do not dispose of the If the radio-operated key fails to Switch on ignition ( 45). battery in the household waste. react when the button is pressed Incorrect batteries or polar- briefly or is pressed and held:…
-
Page 53
SETUP displayed and selected per push SETUP menu ( ), while with onboard computer Pro stationary only of a button: Stopwatch driving time Outside temperature ( RDTIME with onboard computer Pro TEMP Resetting tripmeter The following information is ad- Engine temperature ( ditionally displayed using the on- GTMP Switch on ignition (… -
Page 54
Repeat pressing button 1 Repeat pressing button 1 Press button 1 briefly to re- briefly, until the average value briefly, until in the top line of spectively switch to the next SETUP ENTER to be reset is shown in the the display 2 menu item. -
Page 55
SETUP with preparation for navigation In the menu, select SETUP CLOCK system menu item. GPS TM : If a navigation sys- tem is installed: apply GPS time and GPS date ( ) re- spectively do not apply them CLOCK : Setting the clock DATE : Setting the date ECOSFT… -
Page 56
Press and hold button 2, until Increase the flashing value us- the minutes flash in the bottom ing button 1 respectively de- line of display 3. crease it using button 2. Increase the flashing value us- Press and hold button 2, until ing button 1 respectively de- the year flashes in the bottom crease it using button 2. -
Page 57
SETUP BC BASIC In the individualization menu it is selected, the factory set- possible to adjust, which infor- ting becomes active again. The mation should be shown in which CUSTOM individualization re- display line. mains stored. SETUP In the menu, select SETUP BC BASIC menu item. -
Page 58: Anti-Theft Alarm System
CONS 2 : The value is not indi- : Average consump- BELOW cated. tion 2 ( CONS C Press button 1 briefly to : Current fuel con- change the adjusted value. sumption ( ØSPEED The following menu items can be : Average speed BELOW selected.
-
Page 59: Emergency On/Off Switch
Anti-theft alarm system is acti- turn indicators flash. The alarm switch) in normal operating po- vated. tone type can be adjusted by sition. an authorized BMW Motorrad Alarm Switch on ignition. retailer. Turn indicators light up once. The alarm can be set off by:…
-
Page 60: Switch)
Customize anti-theft : DWA is deactivated. alarm system settings Emergency on/off Switch on ignition ( 45). switch (kill switch) Press button 1 briefly to re- spectively select the menu item. The top line of the display 2 shows Repeat pressing button 1 Emergency on/off switch The adjusted value appears briefly, until in the top line of…
-
Page 61: Headlight
Adjusting headlight for specialized workshop, preferably blinding the oncoming traffic: RHD/LHD traffic an authorized BMW Motorrad Turn adjustment wheel 1 coun- If the motorcycle is ridden in a retailer. terclockwise to lower the head- country where vehicles are driven light beam.
-
Page 62: Lights
on longer than absolutely Parking light with LED headlights necessary. with LED headlights Switch off ignition ( 45). The lowbeam headlamp switches on automatically when the engine is switched on. High-beam headlight and headlight flasher Switch on ignition ( 45). A swiveling lever is used for the headlight range adjustment.
-
Page 63: Turn Indicator
Turn indicator Precondition: The auxiliary head- Turn indicator cancella- light is only active, if the low- Operating turn indicator tion beam headlight is active. Switch on ignition ( 45). Start engine ( 84). The turn indicators automati- cally switch off when the de- fined driving time and distance have been reached.
-
Page 64: Bmw Motorrad Integral Abs
In this ers. lever is actuated. case, the ASC setting does not BMW Motorrad Integral change. Switch on ABS function ABS warning light lights up. Switch on ignition ( 45).
-
Page 65: Asc Automatic Stability Control
If the ABS warning lamp lights up after switching the ignition off and on and then continued driving over 3 mph (5 km/h), an ABS error has occurred. ASC Automatic Stability Control Press and hold button 1 until Press the 1 button and con- Deactivate ASC function ABS warning lamp’s display tinue to hold it down until the…
-
Page 66: Riding Mode
ASC Use of the riding modes Setting riding mode warning lamp changes. BMW Motorrad has developed 5 Switch on ignition ( 45). The ASC warning light riding scenarios for your motor- does not light up anymore;…
-
Page 67
shown next to the desired rid- Details on the selectable driving modes are provided ing mode. in the chapter «Technology in When selecting the Detail». Enduro PRO mode, remember the restrictions on ABS control intervention at the rear wheel (see the chapter «Technology in detail»). -
Page 68
DYNA Switching off TCP/RDC in : When riding dynami- Press and hold button 1 to SETUP cally on dry roads. start the menu. off-road mode Enduro : When driving off- with Pro driving modes road. Enduro PRO : When riding If you want to ride off-road with a sporty off-road (with coding reduced tire inflation pressure, it… -
Page 69: Cruise Control
Enduro and Enduro Pro driving After removing the encoding modes. plug, refit the cover cap. : The TCP/RDC display Remove cover cap of the plug warning symbol is not shown connection 1. in the Enduro and Enduro Pro driving modes. Install coding plug with Pro driving modes Symbol 1 for the coding plug…
-
Page 70
Enduro or Enduro Pro driving Setting road speed Acceleration mode has been deactivated. Briefly press button 1 forward. Briefly press button 1 forward. Speed is increased by 1.2 mph Push switch 1 to right. Adjustment range for (2 km/h) each time button is cruise control Button 2 is operational. -
Page 71
Decreasing speed yond back position) to deacti- though you might have intended vate cruise-control system. slowing to a lower speed. Cruise control indicator lamp Indicator lamp for cruise- goes out. control system lights up. Resuming former cruising Switching off cruise speed control Briefly press button 1 back-… -
Page 72: Spring Preload
Spring preload Basic setting of spring preload, rear Setting It is essential to set the spring Turn adjustment wheel as far preload to suit the load carried by as possible into LOW direction the motorcycle. Increase spring (One-up without load) preload when the vehicle is heav- Turn adjuster wheel as far as ily loaded and reduce spring…
-
Page 73: Dynamic Esa, Electronic Suspension Adjustment
duction in spring preload re- Dynamic ESA, Basic setting of rear quires softer damping. Electronic Suspension wheel rear-wheel damp- Adjustment Adjusting damping on rear wheel with dynamic ESA without dynamic ESA Park the motorcycle, ensuring Turn adjuster wheel as far as Adjustment options that the support surface is firm possible clockwise, then 8…
-
Page 74
with Pro driving modes The display is automatically hidden again after a short time. The running gear adjustment as well as the number of selectable Adjusting chassis damping variants depend on the Switch on ignition ( 45). selected riding mode. Damping set by the riding mode can be changed by the rider. -
Page 75: Clutch
Clutch The following settings are avail- One-up able: Adjusting clutch lever SOFT : Comfortable damping One-up with luggage Adjusting the clutch lever NORMAL : Normal damping while driving can lead to HARD : Sporty, performance- accidents. Two-up (with luggage) oriented damping Only adjust the clutch lever when the motorcycle is stationary.
-
Page 76: Brakes
Tires Position 1: smallest distance between handlebar grip and Checking tire pressure clutch lever Incorrect tire inflation pres- Position 4: largest distance sure results in poorer hand- between handlebar grip and ing characteristics of the motor- clutch lever cycle and reduces the life of the Brakes tires.
-
Page 77: Handlebars
The inclination of the motor- cycle handlebars can be ad- Start engine ( 84). justed within the 1 markings. Consult an authorized work- shop, preferably an authorized BMW Motorrad retailer, for ad- justment of the handlebars. Heated handlebar grips with heated handlebar grips…
-
Page 78: Mirrors
then the switch should be Adjusting mirror arm switched back to the 1st level. If no further changes are made the selected heating level is adopted as the setting. To switch off heated grips, press button 1 until heated grip symbol 2 is no longer shown in the display.
-
Page 79: Windshield
Rider and passenger Slide protective cap 1 over upholstered side facing down- screw fitting. ward. seats Install the passenger seat Remove passenger seat Windshield Make sure ground is level and Adjusting windshield firm and park motorcycle. Passenger seat can be ad- justed to 2 different seat po- Windshield adjustments sitions.
-
Page 80
Lugs 1 of passenger seat are correctly fixed in place. Turn seat lock 1 to the left Fit rider’s seat in mounts 1 on with ignition key and hold while left and right and loosely place pressing rider’s seat downward on motorcycle. -
Page 81
adjustment in orientation 1 (L marking). In order to adjust the high seat position, install the front height adjustment in orientation 2 (H marking). In order to remove the front In order to adjust the low seat height adjustment 1, press position, swivel rear height ad- locking mechanism 2 down to justment 1 into position 3 (L… -
Page 83: Riding
Riding Safety instructions ….82 Checklist ……84 Starting .
-
Page 84: Safety Instructions
Your authorized Ensure that case volumes on uations. Remember to take the BMW Motorrad Dealer will be left and right are equal. limited ground clearance of your happy to advise you and has…
-
Page 85
Risk of poisoning with topcase Insufficient tire inflation pres- sure Observe maximum payload and Exhaust fumes contain carbon Tire tread in poor condition top speed as indicated on label monoxide, which is colorless and in topcase. Etc. odorless but highly toxic. Inhaling exhaust fumes Maximum speed with with tank rucksack… -
Page 86: Checklist
Catalytic converter still: overheating would result. In Before every journey extreme cases, the motorcycle Brakes If misfiring causes unburned fuel could catch fire. Front and rear brake fluid levels to enter the catalytic converter, Do not allow the engine to idle there is a danger of overheating Coolant level unnecessarily.
-
Page 87
Pre-Ride Check ASC self-diagnosis in progress. When the ignition is switched on Engage neutral, or pull back the instrument cluster performs clutch lever if a gear is en- a test routine on the warning and gaged. indicator lights — this is the «Pre- Ride-Check.»… -
Page 88
3 mph (5 km/h) before the ABS authorized service facility, is determining whether the preferably an authorized self-diagnosis routine can be BMW Motorrad Integral ASC is completed. BMW Motorrad Dealer. ready for operation. The self- ABS warning light flashes. ABS self-diagnosis… -
Page 89: Breaking In
0…621 miles thorized workshop, preferably (0…1000 km)) Tires an authorized BMW Motorrad Observe mileage, after which retailer. New tires have a smooth sur- the running-in check should be face. This must be roughened by performed.
-
Page 90: Shifting Gears
New tires do not provide When changing gear using BMW Motorrad recommends full tire traction. Accident the Pro Gear-shift Assis- only changing gear using the hazards exist in particular on wet tance function, the cruise control clutch in such situations.
-
Page 91: Brakes
Locking up of the front wheel is must be expected in the follow- changes during braking. The prevented by the BMW Motorrad ing situations: heavier you brake, the greater Integral ABS. When driving in the rain and the weight transfer to the front through puddles.
-
Page 92: Parking Your Motorcycle
After driving offroad while it is resting on the center Do not lean or sit on the stand. BMW Motorrad recommends motorcycle with the side stand that the following be observed Fold out center stand and jack extended.
-
Page 93: Refueling
Brakes Rims gasoline should be sulfur-free or When the motorcycle is very low in sulfur content. BMW Motorrad recommends ridden on loose surfaces checking the rims for possible Leaded fuel will destroy the or muddy roads, the brakes may damage after riding offroad.
-
Page 94
Place motorcycle on the center thorized BMW Motorrad re- stand, ensuring that it is resting tailer.) (max. 10 % ethanol, on a firm and level support sur- E10) face. -
Page 95
When refueling after run- Press fuel tank cap down firmly Place motorcycle on center ning on reserve, make sure to close. stand, ensuring that it is resting that you top up the tank to a on a firm and level support sur- Remove key and close protec- level above reserve, as other- face. -
Page 96: Secure Motorcycle For Transport
Slowly pull lug 1 upward a the engine dies off due to lack of second time. fuel. Fuel filler cap unlocked. Usable fuel quantity Version 2 with LED headlights Approx. 5.3 gal (Approx. 20 l) Switch off ignition ( 45). After the ignition is switched Reserve fuel quantity off, the fuel filler cap can be…
-
Page 97
Fasten rear straps on both When jacking up the vehi- Components can be dam- sides to the passenger foot- cle it can tip away to the aged. pegs and then tighten them. side and fall over. Do not squeeze components Tension all straps evenly;… -
Page 99: Technology In
Integral ABS ….. . . 100 Engine management with BMW Motorrad ASC ….103 Tire Pressure Control TCP/…
-
Page 100: Riding Mode
Riding mode is aligned to off-road operation ABS and/or ASC can be using massive-bar tires. switched off in each mode; the Selection following explanations always In order to adjust the motorcycle refer to the activated systems. to the road condition, one of 5 The front wheel lift assistant is riding modes can be selected: Throttle response…
-
Page 101: Gearshift Assistant
engine-speed ranges without op- In the ENDURO and ENDURO Turn back throttle grip PRO modes, damping variants erating the clutch or accelerator. Do not actuate brake lever HARD and SOFT can be se- Actuate clutch. lected. Benefits First the desired riding mode is ENDURO mode default setting: 70-80 % of all gear changes preselected.
-
Page 102: Brake System With Bmw Motorrad
The footbrake lever acts only on Gear Shift Assistant can exe- the rear brake. cute a new gear change. The The BMW Motorrad Integral ABS Upshifts load factor (throttle grip position) adapts the braking force distribu- The Pro Gear Shift Assistant…
-
Page 103
This enables optimum brake pressure. and rapid deceleration it is possi- the wheels to continue to turn ble that the BMW Motorrad Inte- and maintains driving stability re- gral ABS will not prevent the rear gardless of the road surface con- wheel from lifting off the ground. -
Page 104
ABS? also lead to a fault code: But remember: the potentially The BMW Motorrad Integral ABS Heating up on the main or aux- shorter braking distances which ensures driving stability on any iliary stand at idle or with gear… -
Page 105: Engine Management With Bmw Motorrad Asc
The rider is always respon- BMW Motorrad ASC? and momentum take over and sible for adapting his/her driving BMW Motorrad ASC is an assis- even ABS is unable to counteract style. tance system for the rider and their effects. The rider is always…
-
Page 106: Tire Pressure Control Tcp
(wheelie) for a longer period ature and the inflation pressure In this case, BMW Motorrad rec- with ASC deactivated. inside the tire and sends these ommends turning back the throt- Rear wheel spinning in place values to the control unit.
-
Page 107
the outside temperature and on compensated with the air pres- of wheels with TPC/RDC sen- sors can be driven. If a TPC/RDC the driving style and duration. sure tester at the filling station. control unit is installed, however The tire inflation pressures are Example: according to the the wheels have no sensors, then shown temperature-compen-… -
Page 109: Maintenance
Maintenance General instructions ….108 Onboard tool kit ….108 Engine oil .
-
Page 110: General Instructions
Further information about main- Use with screwdriver bit. tenance and repair work can be Topping up engine oil obtained on DVD through your 110). authorized BMW Motorrad re- Reversible screwdriver in- tailer. sert Special tools and thorough spe- Phillips PH1 and Torx T25…
-
Page 111: Engine Oil
Wait five minutes to allow oil to your authorized BMW Motorrad drain to the oil pan. retailer. Engine oil Checking engine oil level The oil level varies with the temperature of the oil. The higher the temperature,…
-
Page 112: Brake System
Have the brakes checked at an authorized workshop, preferably max 1 quarts (max 0.95 l) (Dif- an authorized BMW Motorrad ference between MIN and retailer. MAX) Checking engine oil level Checking front brake pad Wipe area around oil fill loca- 109).
-
Page 113
Have the brake pads replaced at an authorized service facil- ity, preferably an authorized BMW Motorrad retailer. Checking rear brake pad thickness Visually inspect left and right Front brake-pad wear brake pads to determine their… -
Page 114
Have the brake pads replaced at an authorized service facil- ity, preferably an authorized BMW Motorrad retailer. Checking front brake fluid level A low fluid level in the brake reservoir can allow air to penetrate the brake system. Conduct a visual inspection of… -
Page 115
MIN mark. (Brake-fluid reservoir horizon- tal, motorcycle standing up- right) If brake fluid level falls below the approved level: Have the defect corrected as soon as possible by an autho- rized workshop, preferably an authorized BMW Motorrad re- tailer. -
Page 116: Coolant
If brake fluid level falls below the Do not touch hot engine. approved level: Read off coolant level on ex- Have the defect corrected as pansion tank 1. soon as possible by an autho- rized workshop, preferably an authorized BMW Motorrad re- tailer.
-
Page 117
Check coolant level ( 114). If coolant level drops below ap- Close cap of coolant expansion proved level: tank. Add coolant. Topping up coolant Remove screws 1. Remove the side panels at po- sitions 2, 3 and 4 from the holders. -
Page 118: Clutch
Make sure ground is level and fore the minimum tread depth authorized workshop, preferably firm and park motorcycle. is reached. an authorized BMW Motorrad Sweep across spokes with a retailer. Make sure ground is level and screwdriver handle or similar firm and park motorcycle.
-
Page 119: Wheels
Tire recommendation due to conversion to others than For every size of tire, the wheels installed as standard BMW Motorrad has tested and equipment can seriously affect approved certain makes as the control comfort of these sys- roadworthy. BMW Motorrad tems.
-
Page 120
TPC/RDC sensor bore. is not damaged. Inform the Mask off areas of wheel rim BMW Motorrad retailer or the that could be scratched in the authorized workshop of the TPC/ process of removing the brake RDC sensor. -
Page 121
Slightly press the quick-release axle inward for a better grip on the right side. Remove right-hand axle clamp- Remove spacer bushing 1 from ing screw 1. the wheel hub. Installing front wheel Pull quick-release axle 1 out Malfunctions may occur while supporting the front during control interventions wheel. -
Page 122
Roll front wheel into front threads can suffer damage. suspension. Always have the tightening torques checked by a specialized workshop, preferably an authorized BMW Motorrad retailer. Install screw 1 with specified torque. Brace quick-release axle on the right side at the same time. -
Page 123
Engage the brakes repeatedly, continuing until the brake pads seat against the rotors. Locate wheel speed sensor lead in the retaining clips 1 and 2. Insert wheel speed sensor in bore and install screw 3. Wheel speed sensor on Tighten the right-hand axle Install securing screws 4 on left fork clamping screw 1 with the… -
Page 124: Front Wheel Stand
ABS or ASC if a wheel other stand than the standard wheel is in- stalled. The BMW Motorrad front Please see the information on wheel stand is not designed the effect of wheel sizes on the for holding motorcycles without a…
-
Page 125
Place the motorcycle on the center stand or an auxiliary stand before lifting it with the BMW Motorrad front wheel stand. Place motorcycle on the center Loosen screws 1. Align two mounts 2 so that… -
Page 126: Bulbs
Bulbs Replacing bulbs for dipped and main-beam headlights The alignment of connec- tor, spring wire strap and bulb may differ from that shown in the following illustrations. Remove cover 1 by turning it If the motorcycle is resting Make sure ground is level and counterclockwise to replace on the center stand: The firm and park motorcycle.
-
Page 127
Insert spring clip 1 into catch. Bulb for high-beam headlight with LED headlights To protect the glass against soiling, only grasp the bulb by the base. Remove spring strap 1 from detent and fold to side. Insert plug 1. Remove bulb 2. Position cover panel and install Replace defective bulb. -
Page 128
Remove cover panel 1 by turn- Remove bulb 1 from the Insert bulb 1 in bulb socket. ing counterclockwise. socket. Replace defective bulb. Bulb for parking light W5W / 12 V / 5 W with LED headlights To prevent contaminants from Insert bulb holder 1 into the being deposited on the glass Remove bulb holder 1 from the… -
Page 129
Replacing bulb for front Replace defective bulb. and rear turn indicator Bulbs for flashing turn Make sure ground is level and indicators, front firm and park motorcycle. RY10W / 12 V / 10 W Switch off ignition. Bulbs for flashing turn indicators, rear RY10W / 12 V / 10 W Pull glass on screw connection… -
Page 130: Air Filter
Please contact a specialist Please contact a specialized service facility for this pur- workshop, preferably an autho- pose, preferably an authorized rized BMW Motorrad retailer. BMW Motorrad retailer. Replacing the LED Air filter headlight Insert inside end of lens into…
-
Page 131
Remove screws 1. Clean air filter insert 2 or re- Position center fairing panel, place if necessary. while paying attending to con- Remove air filter cover. nections 1 to the side panels. Insert air filter insert 2 and frame 1. Remove frame 1. -
Page 132: Jump-Starting
Jump-starting Park the motorcycle, ensuring If the 12 V battery is in- that the support surface is firm stalled incorrectly, or if the The wires leading to the and level. terminals are interchanged (dur- power socket do not have ing jump-starting, etc.), the fuse Remove battery cover ( 132).
-
Page 133: Battery
To start the engine, do not Do not turn the battery upside formation is available at your au- use start sprays or similar down. thorized BMW Motorrad retailer. items. If the battery is not discon- Charging connected Install the protective cap.
-
Page 134
Unsuitable chargers can result in damage to the motorcycle elec- Charging disconnected tronics. battery Use suitable BMW chargers. Charge battery using a suitable The correct charger is available charger. through your authorized Comply with operating instruc- BMW Motorrad retailer. -
Page 135
Slightly lift and remove battery from holder until positive termi- nal becomes accessible. Remove negative battery ca- Fasten positive battery cable 1. ble 1 and rubber strap 2. Slide battery into holder. Remove positive battery ca- ble 1 and pull out battery. If the 12 V battery is in- stalled incorrectly, or if the terminals are interchanged (dur-… -
Page 136: Fuses
Fuses Replacing fuses Fasten negative battery ca- Install screw 1. ble 1. Set clock ( 53). Fasten battery with rubber Set date ( 54). Switch off ignition. strap 2. Remove rider’s seat ( 78). Disconnect plug 1. If defective fuses are bridged, this results in a danger of short-circuit and thus a danger of fire.
-
Page 137
7.5 A have the electrical system Multifunction switch, left checked by an authorized spe- Tire Pressure Control cialized workshop, preferably (TCP/RDC) an authorized BMW Motorrad retailer. Fuse for alternator regulator Install connector 1. Install rider’s seat ( 78). Fuse assignment… -
Page 139: Accessories
Accessories General instructions ….138 Onboard power sockets … 138 Navigation system ….139 Case .
-
Page 140: General Instructions
Cables must not be trapped. erating conditions experienced by products. BMW motorcycles and, conse- Automatic deactivation You will find all BMW Motorrad quently, they are not sufficient in optional accessories on The onboard sockets are au- some circumstances. tomatically switched off during our website: «www.bmw-…
-
Page 141: Navigation System
Press in locking device 3. ignition key can be removed. The navigation preparation Mount Cradle is unlocked and is suitable for the cover 4 can be removed with BMW Motorrad Navigator IV and a rotating movement toward the BMW Motorrad Navigator V. front.
-
Page 142
BMW Motorrad com- munication system is supported. A software update may be re- quired for the BMW Motorrad communication system. In this case, please contact your autho- rized BMW Motorrad retailer. Mount cover 1 in lower area… -
Page 143
Compass and Medi- is set). long actuation to the left. aplayer page. Mute: Switch automatic navi- Menu items on the BMW special gation announcements (off: the menu are selected by turning the top line in the display shows Multi-Controller. -
Page 144
(only displayed if route is pro- Turning increases or reduces vided with way points). If a BMW Motorrad com- volume of a BMW Motorrad munication system is con- communication system con- My Motorcycle nected, an acoustic signal is also nected via Bluetooth. -
Page 145
Security settings the motorcycle while switched Special functions on, a security prompt asking for The BMW Motorrad Navigator V Due to integration of the the PIN to be entered is issued. can be secured against unau- BMW Motorrad Navigator, there… -
Page 146: Case
Case with case Opening case Press yellow button 1 down- If the carrying handle is ward while opening case lid. folded down when the slot of the case lock is oriented in the Closing case direction of travel, the lock tab Turn key in case lock perpen- can be damaged.
-
Page 147
Removing case Locking flap 2 pops up. Fold locking flap all the way open. Remove case from mount by its handle. Mounting case Engage pivot lever 1 in upper end position to obtain smaller Turn key 1 clockwise. volume. Hold down yellow locking de- Engage pivot lever 1 in lower vice 2 and fold out carrying end position to set larger vol-… -
Page 148: Topcase
Next, press locking flap and Turn key 2 counterclockwise red release lever 2 down at the and remove. same time. Topcase Locking flap clicks into place. with topcase Opening topcase Insert case from the top into mounts 1 and 2. If the carrying handle is folded down when the slot of the case lock is oriented in the…
-
Page 149
Press yellow button 1 forward Engage pivot lever 1 in front If the carrying handle is while opening the topcase lid. end position to set larger vol- folded down when the slot ume. of the Topcase lock is horizontal, Closing topcase Engage pivot lever 1 in rear the lock tab can be damaged. -
Page 150
Removing topcase Locking flap 2 pops up. Fold locking flap all the way open. Remove topcase from mount- ing by its handle. Mounting topcase Hook topcase into front hold- ers 1 of topcase retaining plate. Turn key 1 clockwise. Press topcase onto topcase Hold down yellow locking de- retaining plate at rear. -
Page 151
Next, press locking flap and red Turn key 2 counterclockwise release lever 2 forward at the and remove. same time. Locking flap clicks into place. If the carrying handle is folded down when the slot of the Topcase lock is horizontal, the lock tab can be damaged. -
Page 153: Care
Care Care products ….. 152 Washing your motorcycle ..152 Cleaning sensitive motorcycle parts .
-
Page 154: Care Products
Warm water intensifies the that you use cleaning and BMW Motorrad recommends effect of salt. care products available at your that you use BMW Insect Re- Only use cold water to remove authorized BMW Motorrad mover to soften and wash off road salt.
-
Page 155: Cleaning Sensitive Motorcy
Especially in the case of road scratches. care products that contain salt, carefully clean chrome parts silicone. with plenty of water and BMW Fairings and panels auto shampoo. Use chrome pol- Clean fairings and panels with Paint care ish for additional treatment.
-
Page 156: Storing The Motorcycle
BMW Motorrad recommends grease (Vaseline). BMW car polish or BMW paint Store the motorcycle in a dry cleaner for the purpose. room, raising it to remove the Contamination on the paint finish…
-
Page 157: Technical Data
Technical data Troubleshooting chart … . . 156 Weights ……169 Threaded fasteners .
-
Page 158: Troubleshooting Chart
Troubleshooting chart Engine does not start at all or is very difficult to start. Possible cause Remedy Side stand extended and gear engaged Retract side stand. Gear engaged and clutch not disengaged Place transmission in neutral or disengage clutch. No fuel in tank Refueling procedure ( 92).
-
Page 159: Threaded Fasteners
Threaded fasteners Front wheel Value Valid Quick-release axle in telescopic fork M12 x 20 22 lb/ft (30 Nm) Clamping screw for quick-re- lease axle in telescopic fork M8 x 35 14 lb/ft (19 Nm) Brake caliper on telescopic forks M10 x 65 28 lb/ft (38 Nm) Wheel speed sensor on fork M6 x 16…
-
Page 160
Mirror arm Value Valid Mirror (locknut) on adapter Left-hand thread, M10 x 1.25 16 lb/ft (22 Nm) Adapter on clamping block M10 x 14 — 4.8 18 lb/ft (25 Nm) Handlebars Value Valid Clamping block (handlebar clamp) on fork bridge M8 x 35 Tighten on block in front (in the direc- tion of travel) -
Page 161: Engine
Engine Engine design Air/liquid-cooled two-cylinder, four-stroke opposed-twin engine with two spur gear-driven overhead camshafts and one counterbalance shaft Displacement 1170 cc (1170 cm Cylinder bore 4 in (101 mm) Piston stroke 2.9 in (73 mm) Compression ratio 12.5:1 Rated output 125 hp (92 kW), at engine speed: 7750 min Torque 92 lb/ft (125 Nm), at engine speed: 6500 min…
-
Page 162: Fuel
If the engine should for example be operated with 91 RON in countries with lower fuel quality, the motorcycle must be respectively programmed first by your authorized BMW Motorrad retailer.) (max. 10 % ethanol, E10) 87 AKI (91 ROZ/RON) 87 AKI Usable fuel quantity Approx.
-
Page 163: Engine Oil
BMW Motorrad rec- ommends that you use the BMW Motorrad oils available from your BMW Motorrad Dealer. Engine oil, quantity for topping up max 1 quarts (max 0.95 l), difference between…
-
Page 164: Clutch
Clutch Clutch design Multi-disk oil-bath clutch, slipper clutch Transmission Transmission design Dog-engagement 6-speed transmission with heli- cal gears Transmission gear ratios 1.000 (60:60 teeth), Primary gear ratio 1.650 (33:20 teeth), Transmission input ratio 2.438 (39:16 teeth), 1st gear 1.714 (36:21 teeth), 2nd gear 1.296 (35:27 teeth), 3rd gear 1.059 (36:34 teeth), 4th gear 0.943 (33:35 teeth), 5th gear…
-
Page 165: Rear-Wheel Drive
2.91 (32:11 teeth) Suspension Front wheel Type of front suspension BMW Telelever, upper fork bridge tilt decoupled, leading link mounted in engine and on telescopic fork, centrally positioned spring strut supported on leading link and frame Design of the front-wheel suspension…
-
Page 166: Brakes
Rear wheel Type of rear suspension Cast-aluminum single swing arm with BMW Motorrad paralever Type of rear suspension Central spring strut with coil spring, adjustable rebound-stage damping and spring preload with dynamic ESA Central spring strut with coil spring and expan-…
-
Page 167: Wheels And Tires
Wheels and tires Recommended tire combinations You can obtain an overview of the current tire approvals from your authorized BMW Motorrad retailer or on the Internet at www.bmw- motorrad.com. Front wheel Front wheel design Aluminum cast wheel with cross-spoke wheels…
-
Page 168: Electrical System
Electrical system Electrical rating of onboard sockets max 5 A, all onboard sockets together Fuse carrier 1 10 A, Slot 1: instrument cluster, anti-theft alarm system (DWA), ignition lock, diagnostic socket 7.5 A, Slot 2: left multifunction switch, Tire Pres- sure Control (TCP/RDC) Battery Battery design…
-
Page 169: Alarm System
with LED headlights Bulb for taillight/brake light Bulbs for flashing turn indicators, front RY10W / 12 V / 10 W Bulbs for flashing turn indicators, rear RY10W / 12 V / 10 W Alarm system Activation time Approx. 30 s Alarm duration Approx.
-
Page 170: Dimensions
Dimensions Motorcycle length 86.8 in (2205 mm), across splash guard Motorcycle height 56.3…58.7 in (1430…1490 mm), across wind- shield, at DIN unladen weight with lowering 55.3…57.7 in (1405…1465 mm), above windshield, lower position, at DIN unladen weight Motorcycle width 37.6 in (955 mm), with mirrors Rider’s seat height 33.5…34.3 in (850…870 mm), without rider at un- laden weight…
-
Page 171: Weights
Weights Unladen weight 525 lbs (238 kg), DIN unladen weight, ready for road, fuel tank 90 % full, without OE Permissible gross weight 992 lbs (450 kg) Maximum payload 467 lbs (212 kg) Performance data Top speed >124 mph (>200 km/h)
-
Page 173: Service
Service Reporting safety defects … 172 BMW Motorrad Service … . 173 BMW Motorrad Mobility Services ……173 Maintenance procedures .
-
Page 174: Defects
National Highway Traffic Safety Ad- ministration (NHTSA) in addition to notifying BMW of North America, LLC. If NHTSA receives similar complaints, it may open an investigation, and if it finds that a safety defect exists in a group of vehicles, it may order a recall and remedy campaign.
-
Page 175: Bmw Motorrad Service
Services With its worldwide dealer network, BMW Motorrad The BMW Motorrad Mobility Ser- To ensure that your BMW con- can attend to you and your vices furnish you and your new sistently remains in optimal con- motorcycle in over 100 countries…
-
Page 176
300 mls (500 km) and 750 mls before the entered values. (1200 km). BMW Service BMW Service is carried out once a year. The scope of the ser- vices performed may be de- pendent on the vehicle owner and the mileage driven. Your… -
Page 177: Confirmation Of Mainte
Confirmation of maintenance work BMW Pre-Delivery BMW Running-in Check Check Conducted Conducted Odometer reading Next service at the latest or, if reached sooner, Odometer reading Stamp, Signature Stamp, Signature…
-
Page 178
BMW Service BMW Service BMW Service Conducted Conducted Conducted Odometer reading Odometer reading Odometer reading Next service Next service Next service at the latest at the latest at the latest or, if reached sooner, or, if reached sooner, or, if reached sooner,… -
Page 179
BMW Service BMW Service BMW Service Conducted Conducted Conducted Odometer reading Odometer reading Odometer reading Next service Next service Next service at the latest at the latest at the latest or, if reached sooner, or, if reached sooner, or, if reached sooner,… -
Page 180
BMW Service BMW Service BMW Service Conducted Conducted Conducted Odometer reading Odometer reading Odometer reading Next service Next service Next service at the latest at the latest at the latest or, if reached sooner, or, if reached sooner, or, if reached sooner,… -
Page 181
BMW Service BMW Service BMW Service Conducted Conducted Conducted Odometer reading Odometer reading Odometer reading Next service Next service Next service at the latest at the latest at the latest or, if reached sooner, or, if reached sooner, or, if reached sooner,… -
Page 182: Confirmation Of Service
Confirmation of service The table is intended as proof of maintenance and repair work, the installed optional accessories and any special campaign (recall) work carried out. Work carried out Odometer Date reading…
-
Page 183
Work carried out Odometer Date reading… -
Page 185: Appendix
Appendix Certificate ……184…
-
Page 186
USA, Canada Any changes or modifications not expressly Product name: BMW Keyless Ride ID Device approved by the party responsible for FCC ID: YGOHUF5750 compliance could void the user’s authority to IC: 4008C-HUF5750… -
Page 187
Declaration Of Conformity We declare under our responsibility that the product BMW Keyless Ride ID Device (Model: HUF5750) camplies with the appropriate essential requirements of the article 3 of the R&TIE and the other relevant provisions, when used for its intended purpose. Applied Standards: 1. -
Page 188
Certification Tire Pressure Control (TPC) FCC ID: MRXBC54MA4 FCC ID: MRXBC5A4 IC: 2546A-BC54MA4 IC: 2546A-BC5A4 This device complies with Part 15 of the FCC Le présent appareil est conforme aux CNR Rules and with Industry Canada license-exempt d’Industrie Canada applicables aux appareils RSS standard(s). -
Page 189: Index
Average values Brakes Abbreviations and symbols, 6 Adjusting handlebar lever, 74 Resetting, 51 Checking operation, 110 Control, 15 Safety instructions, 89 Operating, 62 Battery Technical data, 164 Charging connected Self-diagnosis, 86 Breaking in, 87 battery, 131 Technology in detail, 100 Bulbs Charging disconnected Warning indicators, 34…
-
Page 190
Warning for engine oil level, 37 Case Indicator light, 18 Equipment, 7 Operating, 144 Technical data, 167 Checklist, 84 Control, 15 Clock Operating, 71 Adjusting, 53 Electrical system Technical data, 166 Clutch Adjusting handlebar lever, 73 Emergency on/off switch (kill Frame Technical data, 167 Checking operation, 116… -
Page 191
Immobilizer Handlebars Lights Emergency key, 48 Adjusting, 75 Control, 15 Spare key, 45 Hazard warning flashers Lowbeam headlamp, 60 Warning indicator, 29 Control, 15, 17 Operating auxiliary Indicator lights, 18 Operating, 61 headlight, 60 Overview, 20 Headlight Operating headlight flasher, 60 Instrument cluster Adjusting for RHD/LHD Ambient light photosensor, 18… -
Page 192
Parking, 90 Onboard tool kit Contents, 108 Returning to use, 154 Rim sticker, 117 Position on vehicle, 14 Storage, 154 Technology in detail, 104 Outside temperature Tying down, 94 Warning lamps, 32 Display, 38 Multifunction display, 18 Rear-wheel drive Overview of warning Control, 15 Technical data, 163 indicators, 25… -
Page 193
Seats Technical data Inflation pressure table, 14 Adjusting seat height, 78 Alarm system, 167 Inflation pressures, 165 Locking mechanism, 11 Battery, 166 Recommendation, 117 Removing and installing, 77 Brakes, 164 Running in, 87 Service, 173 Bulbs, 166 Technical data, 165 Reporting safety defects, 172 Clutch, 162 Top speed, 83… -
Page 194
Wheels Warning lamps, 18 Check wheel rims, 116 ABS, 34 Checking spokes, 116 Anti-theft alarm system, 32 Install rear wheel, 122 ASC, 35 Installing front wheel, 119 Battery charging voltage, 37 Removing front wheel, 118 Bulb defect, 31 Size change, 117 Coolant temperature, 30 Technical data, 165 Display, 24… -
Page 196
Errors and omissions excepted. © 2014 Bayerische Motoren Werke Aktiengesellschaft 80788 Munich, Germany Reprints and duplication of this work, in whole or part, are pro- hibited without the express writ- ten approval of BMW Motorrad, Aftersales. -
Page 197
If the engine should for example be operated with 91 RON in countries with lower fuel quality, the motorcycle must be respectively programmed first by your authorized BMW Motorrad retailer.) (max. 10 % ethanol, E10) 87 AKI (91 ROZ/RON)
инструкцияBMW R 1200 GS (2014)

Руководство по эксплуатации и обслуживанию
R 1200GS
BMW Motorrad
С удовольствием
за рулем
Посмотреть инструкция для BMW R 1200 GS (2014) бесплатно. Руководство относится к категории мотоциклы, 18 человек(а) дали ему среднюю оценку 8.6. Руководство доступно на следующих языках: русский. У вас есть вопрос о BMW R 1200 GS (2014) или вам нужна помощь? Задайте свой вопрос здесь
- Руководство по эксплуатации и обслуживанию R 1200 GS
- Общие указания
- Обзорная информация
- Индикация
- Пользование
- Вождение
- Подробное описание системы
- Техническое обслуживание
- Принадлежности
- Уход
- Технические характеристики
- Служба сервиса
- Приложение
- Алфавитный указатель
Мотоцикл BMW R 1200 GS (2014) — это полностью обновленная модель от компании BMW. Он оснащен двигателем двойного вала и имеет общую массу 238 кг. Мощность двигателя составляет 125 л.с. при 7 750 об/мин (92 кВт при 7 750 об/мин). К тому же, мотоцикл оснащен 6-ступенчатой коробкой передач и имеет максимальную скорость около 200 км/ч. Его высота составляет 880 мм, ширина — 953 мм, длина — 2 207 мм.
Мотоцикл BMW R 1200 GS оснащен надежной системой ABS, которая обеспечивает безопасность во время езды. Кроме того, он имеет полностью настраиваемую подвеску для более комфортной езды. Мотоцикл также оснащен системой контроля давления в шинах, которая следит за правильным давлением в шинах.
Кроме того, мотоцикл BMW R 1200 GS (2014) имеет топливный бак ёмкостью 20 литров, что позволяет проехать длинные расстояния без дополнительных заправок. Он также оснащен двухцилиндровым двигателем с воздушным и жидкостным охлаждением и системой инжектора, которая обеспечивает более экономичный расход топлива. Изготовлен из высококачественных материалов, мотоцикл BMW R 1200 GS (2014) легко и надежно поддерживает высокие скорости на дорогах, предоставляя при этом максимальный комфорт во время езды.
Главная
| BMW | |
| R 1200 GS (2014) | |
| мотоцикл | |
| русский | |
| Руководство пользователя (PDF) |
Не можете найти ответ на свой вопрос в руководстве? Вы можете найти ответ на свой вопрос ниже, в разделе часто задаваемых вопросов о BMW R 1200 GS (2014).
Как перевести мили в километры?
1 миля равна 1,609344 километрам, а 1 километр — 0,62137119 милям.
В чем разница между топливом E10 и E5?
В топливе E10 содержится до десяти процентов этанола, в то время как в E5 содержится менее пяти процентов. Соответственно, топливо E10 менее вредит окружающей среде.
Какова рекомендуемая частота замены масляного фильтра в двигателе BMW?
В большинстве двигателей масляный фильтр необходимо менять через каждые 6000 километров (около 4000 миль).
Как часто следует менять масло в двигателе BMW?
В большинстве двигателей масло необходимо менять через каждые 6000 километров (около 4000 миль).
Как удалить ржавчину с устройства BMW мотоцикл?
1. Замочите поржавевшую деталь в уксусе, пока ржавчина не размокнет полностью. 2. Обрабатывайте ржавчину уксусом в течение 24 часов. 3. Удалите ржавчину с помощью металлической щетки или алюминиевой фольги.
Инструкция BMW R 1200 GS (2014) доступно в русский?
Да, руководствоBMW R 1200 GS (2014) доступно врусский .
Не нашли свой вопрос? Задайте свой вопрос здесь
BMW MOTORRAD R 1200 GS ADVENTURE 2014 Owner’s Manuals and Service Manuals for online browsing and download. View BMW MOTORRAD R 1200 GS ADVENTURE Manuals online for free. CarManualsOnline.info is the largest free online database of BMW MOTORRAD Owner’s Manuals and BMW MOTORRAD Service Manuals.
BMW MOTORRAD, Select Model Year:
All, 2000, 2002, 2003, 2004, 2005, 2006, 2007, 2008, 2009, 2010, 2011, 2012, 2013, 2014, 2015, 2016, 2017, 2018, 2019, 2020, 2021
BMW MOTORRAD 2014, Select Model:
- BMW MOTORRAD C 600 SPORT 2014
- BMW MOTORRAD C 650 GT 2014
- BMW MOTORRAD F 700 GS 2014
- BMW MOTORRAD G 650 GS Sertão 2014
- BMW MOTORRAD K 1300 R 2014
- BMW MOTORRAD K 1300 S 2014
- BMW MOTORRAD K 1600 GT 2014
- BMW MOTORRAD K 1600 GTL 2014
- BMW MOTORRAD R 1200 GS 2014
- BMW MOTORRAD R 1200 GS ADVENTURE 2014
- BMW MOTORRAD R 1200 R 2014
List of BMW MOTORRAD R 1200 GS ADVENTURE 2014 Manuals:
Recent Searches in BMW MOTORRAD Manuals
service schedule BMW MOTORRAD K 1200 S 2006 Rider’s Manual (in English), ignition BMW MOTORRAD R NINE T RACER 2018 Betriebsanleitung (in German), lights BMW MOTORRAD R 1150 R 2004 Rider’s Manual (in English), tire pressure BMW MOTORRAD F 750 GS 2019 Rider’s Manual (in English), fuel pressure BMW MOTORRAD R 1150 R 2004 Rider’s Manual (in English), service BMW MOTORRAD R 1150 R 2004 Rider’s Manual (in English), steering wheel BMW MOTORRAD R 1150 R 2004 Rider’s Manual (in English), maintenance BMW MOTORRAD R 1150 R 2004 Rider’s Manual (in English), instrument cluster BMW MOTORRAD G 650 XCHALLENGE 2007 Rider’s Manual (in English)
- Manuals
- Brands
- BMW Motorrad Manuals
- Motorcycle
- R 1200GS Adventure 2014
- Rider’s manual
-
Contents
-
Table of Contents
-
Troubleshooting
-
Bookmarks
Quick Links
BMW Motorrad
The Ultimate
Riding Machine
Rider’s Manual (US Model)
R 1200 GS Adventure
Related Manuals for BMW Motorrad R 1200GS Adventure 2014
Summary of Contents for BMW Motorrad R 1200GS Adventure 2014
-
Page 1
BMW Motorrad The Ultimate Riding Machine Rider’s Manual (US Model) R 1200 GS Adventure… -
Page 2
Motorcycle/Dealer Data Motorcycle data Dealer Data Model Contact in Service Ms./Mr. Vehicle identification number Phone number Color number Initial registration Dealer’s address/phone number (company License plate stamp) -
Page 3
Suggestions and complaints If you have any questions con- Congratulations on choosing a cerning your motorcycle, your au- motorcycle from BMW Motorrad thorized BMW Motorrad retailer and welcome to the community is always happy to provide advice of BMW motorcycle owners and and assistance. -
Page 4: Table Of Contents
……20 BMW Motorrad Inte- Starting….. . 82 Multifunction display .
-
Page 5
Frame ….. 164 BMW Motorrad ASC ..101 9 Care ….147 Alarm system . -
Page 6
Maintenance proce- dures ….. . 169 Confirmation of mainte- nance work ….171 Confirmation of service . -
Page 7: General Instructions
General instructions Overview ……6 Abbreviations and symbols ..6 Equipment .
-
Page 8: Overview
Optional extra. of your motorcycle, this informa- motorcycle as well as mainte- BMW Motorrad optional tion has been provided in chapter nance and adjustment proce- extras are already com- 2. All maintenance and repair dures.
-
Page 9: Equipment
Rider’s Manual. In addition, ABS Anti-Lock Brake System. If your motorcycle comes with equipment not described here, BMW Motorrad cannot guarantee ASC Automatic Stability Con- you can find the descriptions in a the total absence of errors. For trol.
-
Page 11: Overviews
Overviews General view, left side ….11 General view, right side … . . 13 Underneath seat ….14 Multifunction switch, left .
-
Page 13: General View, Left Side
General view, left side Fuel filler opening ( Seat lock ( Adjuster for rear damp- ing (at the bottom on the spring strut) (…
-
Page 15: General View, Right Side
General view, right side 11 Brake-fluid reservoir, rear 111) Adjuster for spring preload, rear ( Air cleaner (under center fairing panel) ( 126) Brake-fluid reservoir, front 110) Height adjuster for wind- shield ( Onboard power socket 136) Vehicle Identification Num- ber (at fork bearing) Data plate (at fork bearing) Coolant level indicator…
-
Page 16: Underneath Seat
Underneath seat Standard tool kit ( 106) Rider’s Manual (US Model) Tire inflation pressure table Load capacity table Adjuster for the rider’s seat height ( Fuses ( 132)
-
Page 17: Multifunction Switch, Left
Multifunction switch, left High-beam headlight and headlight flasher ( with cruise control Cruise control ( Hazard warning flashers ABS ( ASC ( with dynamic ESA ESA ( with additional LED headlight Additional LED headlight Turn indicator ( Horn Multifunction display with preparation for navi- gation system Navigation system…
-
Page 18: Right
Multifunction switch, right with heated handlebar grips Heated handlebar grips Riding mode ( Emergency on/off switch (kill switch) ( Starting the engine…
-
Page 19: Instrument Cluster
Instrument cluster Speedometer Tachometer Ambient light sensor (for brightness adjustment of instrument lighting) with anti-theft alarm Anti-theft alarm indicator light with Keyless Ride Indicator light for radio- operated key Warning and indicator lights ( Multifunction display…
-
Page 21: Displays
Displays Warning and indicator lights..20 Multifunction display ….21 Warning symbols in the display panel ……. 22 Warning lamps .
-
Page 22: Warning And Indicator Lights
Warning and indicator lights with cruise control Cruise control ( Neutral position (idling) ASC ( Turn indicator, left ABS ( Turn indicator, right General warning lamp (in conjunction with warn- ing symbols on display) High-beam headlight with additional LED headlight Auxiliary headlight ( 11 Fuel reserve ( The ABS symbol can be…
-
Page 23: Multifunction Display
Multifunction display Fuel level Upshift recommendation Gear indicator, shows «N» in neutral (idling) with heated handlebar grips Heated grip settings Odometer ( Service display (mainte- nance interval) ( 169) Warning symbols ( Onboard computer with dynamic ESA ESA setting ( 10 Riding mode ( 11 Clock ( 12 Outside temperature warn-…
-
Page 24: Warning Symbols In The Display
Warning symbols in the display panel with Tire Pressure Con- trol (TPC/RDC) Tire inflation pressure EWS ( Coolant temperature Engine oil level ( Electronic engine manage- ment ( Battery charging ( 129) Warnings (…
-
Page 25: Warning Lamps
Warning lamps You will find an overview of the potential warnings on the follow- Display ing pages. Warnings are displayed with ap- propriate warning lights. Warnings for which no separate warning light is provided are sig- naled by the general warning light 1 and are accompanied by a warning symbol in area 2 or by a warning notice in area 3.
-
Page 26
Overview of warning indicators Warning and indicator Warning symbols in the Meaning lamps display panel appears on the Outside temperature warning ( display lights up yellow appears on the Electronic immobilizer is active ( display lights up yellow appears on the Radio-operated key outside reception display range (… -
Page 27
Warning and indicator Warning symbols in the Meaning lamps display panel DWA ! lights up yellow is indicated Anti-theft alarm system battery discharged ( lights up yellow indicated with one Tire inflation pressure is at limit of ap- or two arrows and proved range ( critical tire-infla- tion pressure also… -
Page 28
Warning and indicator Warning symbols in the Meaning lamps display panel flashes ABS self-diagnosis not completed lights up ABS error ( lights up ABS deactivated ( flashes rapidly ASC intervention ( flashes slowly ASC self-diagnosis not completed lights up ASC deactivated ( lights up ASC error ( ESA! -
Page 29
Warning and indicator Warning symbols in the Meaning lamps display panel lights up Fuel down to reserve ( flashes yellow flashes Severe fault in the engine management system ( appears on the Engine oil level too low ( display OILLVL CHECK is indicated lights up red appears on the… -
Page 30
Have the defective key re- with Keyless Ride At a low outside temperature, placed, preferably by an autho- Battery of radio-operated key is rized BMW Motorrad retailer. icy conditions must especially completely drained or radio- be expected on bridges and in Radio-operated key operated key has been lost shady road areas. -
Page 31
Coolant temperature too Possible cause: Have the defective radio-oper- ated key replaced by an autho- high The coolant temperature is too rized BMW Motorrad retailer. high. The general warning lamp If possible, continue driving lights up red. Replace battery of radio-… -
Page 32
Replace defective bulbs as soon shown for a short time im- thorized workshop, preferably as possible; it is best always to mediately following the Pre-Ride- an authorized BMW Motorrad carry a complete set of spare Check. retailer. bulbs on the motorcycle. -
Page 33
Contact an authorized work- Before adjusting the tire in- shop, preferably an authorized flation pressure, observe at limit of approved range BMW Motorrad retailer. the information on temperature with Tire Pressure Control compensation and on inflation (TPC/RDC) Anti-theft alarm system… -
Page 34
Have fault eliminated at a spe- Possible cause: suitability for continued riding: cialist service facility, preferably Do not continue riding. The measured tire inflation pres- an authorized BMW Motorrad Contact roadside service. sure is outside the approved tol- retailer. erance range. Sensor defective or… -
Page 35
BMW Motorrad ABS self-diagnosis not Watch the TCP/RDC display at a higher rate of speed. A con- dealer. completed tinuous error is only present if ABS warning light flashes. Battery of tire-inflation the general warning lamp also pressure sensor weak lights up. -
Page 36
If the ASC warning lamp contin- an authorized BMW Motorrad active closed-loop intervention ues to flash: retailer. even after the critical situation Contact an authorized work- has passed. -
Page 37
Please be aware management system thorized workshop, preferably that ASC functionality is no an authorized BMW Motorrad The general warning lamp longer available. Observe addi- retailer. flashes yellow. tional information on situations Fuel down to reserve The engine symbol flashes. -
Page 38
The general warning lamp Defect in alternator or the alter- thorized workshop, preferably lights up red. nator drive assembly, or the volt- an authorized BMW Motorrad age regulator fuse has been trig- retailer. The battery symbol is dis- gered. played. -
Page 39: Outside Temperature
BMW Motorrad Dealer. 37 °F (3 °C). At a low outside temperature, Outside temperature icy conditions must especially be expected on bridges and in Engine heat can lead to spuri- shady road areas.
-
Page 40: Oil Level Indicator
depends on the driving style (on Service display The conditions for the oil level the consumption) and on the fuel indicator are as follows: level when the warning lamp was Engine at operating tempera- initially activated (see the expla- ture nation above).
-
Page 41: Tire Inflation Pressure
Consult a certified workshop, preferably an authorized Additional information on the The figure on the left side 1 in- BMW Motorrad retailer, for BMW Motorrad Tire Pressure dicates the front tire’s inflation setting of the date. Control is provided starting on…
-
Page 42
Upshift recommendation 1 sig- nals the economically best point in time for upshifting. -
Page 43: Operation
Mirrors ……75 BMW Motorrad Integral ABS ..59 Windshield .
-
Page 44: Ignition
Parking lights and all function contact an authorized workshop circuits are switched on. for this purpose, preferably an Pre-Ride-Check is carried out. authorized BMW Motorrad re- tailer. ABS self-diagnosis is Locking handlebars performed. ( Turn key to position 1 while ASC self-diagnosis in progress.
-
Page 45
BMW Motorrad retailer. recognized as «authorized» for Handlebars not locked. The keys are part of an inte- your motorcycle. -
Page 46: Ignition With Keyless Ride
Ignition with key. The seat lock, Topcase and Locking handlebars case can be operated manually. Keyless Ride Condition: Handlebars are turned to left or right. Radio-operated When the range of the with Keyless Ride key is within reception range. radio-operated key is ex- ceeded (e.g.
-
Page 47
handlebars to the left to set the ASC self-diagnosis in progress. Version 1: steering lock. Briefly press button 1. Parking lights and all function Press and hold button 1. Switch off ignition circuits are switched on. Steering lock audibly locks. Condition: Radio-operated key is with additional LED Ignition, lights and all electrical… -
Page 48
A further key attached to rized BMW Motorrad retailer. As motorcycle can be started by the same ring as the radio- the radio-operated keys are part using the emergency key. -
Page 49
cover with the radio-operated Replace battery of radio- Dispose of the old battery in key. accordance with legal regula- operated key tions. Do not dispose of the Hold emergency key 1 or com- If the radio-operated key fails to pletely drained radio-operated battery in the household waste. -
Page 50: Multifunction Display
SETUP Multifunction display displayed and selected per push SETUP menu ( ), while stationary only of a button: Selecting display readings Outside temperature ( Switch on ignition ( 42). with onboard computer Pro TEMP The following information is ad- Engine temperature ( ditionally displayed using the on- GTMP board computer Pro:…
-
Page 51
with onboard computer Pro Stopwatch driving time RDTIME Reset tripmeter Switch on ignition ( 42). Repeat pressing button 1 Repeat pressing button 1 briefly, until the average value briefly, until in the top line of SETUP ENTER to be reset is shown in the the display 2 bottom line of the display 2. -
Page 52
with preparation for navigation system GPS TM : If a navigation sys- tem is installed: apply GPS time and GPS date ( ) re- spectively do not apply them CLOCK : Setting the clock DATE : Setting the date ECOSFT : Show upshift rec- SETUP Press button 1 briefly to re-… -
Page 53
SETUP In the menu, select Press and hold button 2, until SETUP CLOCK menu the minutes flash in the bottom item. line of display 3. Increase the flashing value us- ing button 1 respectively de- crease it using button 2. Press and hold button 2, until the minutes stop flashing. -
Page 54
SETUP BC BASIC Increase the flashing value us- In the individualization menu it is ing button 1 respectively de- selected, the factory set- possible to adjust, which infor- crease it using button 2. ting becomes active again. The mation should be shown in which CUSTOM individualization re- Press and hold button 2, until… -
Page 55
CONS 2 : The value is not indi- : Average consump- BELOW cated. tion 2 ( CONS C Press button 1 briefly to : Current fuel con- change the adjusted value. sumption ( ØSPEED The following menu items can be : Average speed BELOW selected. -
Page 56: Anti-Theft Alarm System
The alarm press and hold button 2. vated. tone type can be adjusted by All adjustments applied until an authorized BMW Motorrad Alarm then will be stored. retailer. The alarm can be set off by: Anti-theft alarm system…
-
Page 57
cator lamp then signals the rea- Customize anti-theft son for the alarm for one minute. alarm system settings The meanings of the flash codes Switch on ignition ( 42). are as follows: Flashes 1x: Motion sensor 1 Flashes 2x: Motion sensor 2 Flashes 3x: Ignition switched on with unauthorized key Flashes 4x: Alarm system is… -
Page 58: Emergency On/Off Switch
: DWA is deactivated. If there are questions whether the headlight Emergency on/off range is correct, consult a specialized workshop, preferably switch (kill switch) an authorized BMW Motorrad retailer. Headlight range adjustment Engine switched off Operating position Headlight Headlamp range and…
-
Page 59: Lights
The parking lamps come on au- rized workshop, preferably an tomatically when the ignition is authorized BMW Motorrad re- switched on. tailer. The parking lights are a with LED headlights strain on the battery. Do…
-
Page 60: Turn Indicator
Immediately after switching off Press button 1 to switch on Press button 1 toward left to the ignition push button 1 to the auxiliary headlights. switch on left-hand turn indica- the left and hold until the park- tor. The indicator lamp for the ing lights come on.
-
Page 61: Hazard Warning Flashers
ASC setting does not Operating hazard warning button 1 once again. change. flashers ABS warning light lights up. BMW Motorrad Switch on ignition ( 42). Integral ABS Release button 1 within two The hazard warning flash- seconds.
-
Page 62: Gral Abs
(5 km/h), an ABS error has occurred. Press and hold button 1 until More detailed information the ASC warning lamp’s display on the BMW Motorrad Inte- changes. gral ABS braking system can be Press and hold button 1 until found in the section «Technology…
-
Page 63: Riding Mode
More detailed information vided. Press and hold button 1 until on the BMW Motorrad Au- the ASC warning lamp’s display tomatic Stability Control (ASC) with dynamic ESA changes. system can be found in the sec- The suspension settings is ad- tion «Technology in detail».
-
Page 64
(Enduro and Enduro Pro) on dur- ing road operation can result in unstable riding conditions when braking in ABS or accelerating in ASC. This results in a danger of falling. Switch off-road mode (Enduro and Enduro Pro) during off-road riding on only. Press button 1. -
Page 65
ROAD : When riding on dry tions of the engine character- roads. istics, ABS, ASC and dynamic ESA is maintained, even after with Pro driving modes the ignition is switched off. The following driving modes Switching off TCP/RDC in can also be selected: off-road mode DYNA : When riding dynami-… -
Page 66
warning is shown in the Enduro and Enduro Pro riding modes. : the RDC warning symbol is displayed and in addition the tire pressure outside permissi- ble tolerance warning is shown in the Enduro and Enduro Pro riding modes. Install coding plug Press button 1 briefly to re- Dirt and moisture can get with Pro driving modes… -
Page 67: Cruise Control
Enduro PRO mode 2 can be selected. The selected riding mode re- mains active even after the ig- nition is switched off. Install rider’s seat ( 77). Cruise control with cruise control To do so, press in locking de- Push switch 1 to right. vice 1 and pull off cap.
-
Page 68
Press button 1 forward and The motorcycle decelerates Adjustment range for hold. steplessly. cruise control The motorcycle accelerates If the button 1 is no longer steplessly. pressed, the speed achieved 19…130 mph (30…210 km/h) is maintained and saved. If the button 1 is no longer Indicator lamp for cruise- pressed, the speed achieved control system lights up. -
Page 69: Spring Preload
Resuming former cruising preload accordingly when the Indicator lamp for cruise- control system lights up. vehicle is lightly loaded. speed Adjusting spring preload Switching off cruise at rear wheel control Park the motorcycle, ensuring that the support surface is firm and level.
-
Page 70: Damping
Adjusting damping on rear Adjusting the spring preload Basic setting of spring while the motorcycle is be- wheel preload, rear ing ridden can lead to accidents. Park the motorcycle, ensuring Adjust the spring preload Turn adjuster wheel as far as that the support surface is firm only when the motorcycle is possible in LOW direction,…
-
Page 71: Dynamic Esa, Electronic Suspension Adjustment
Dynamic ESA, with Pro driving modes Basic setting of rear The running gear adjustment as Electronic Suspension wheel rear-wheel damp- well as the number of selectable Adjustment damping variants depend on the with dynamic ESA without dynamic ESA selected riding mode. Damping set by the riding mode can be Turn adjuster wheel as far as Adjustment options…
-
Page 72
The display is automatically The following settings are avail- hidden again after a short time. able: SOFT : Comfortable damping Adjust chassis NORMAL : Normal damping Switch on ignition ( 42). HARD : Sporty, performance- oriented damping with Pro driving modes In the ENDURO and ENDURO PRO modes two adjustments are Press button 1 briefly to… -
Page 73: Clutch
Clutch One-up Position 1: smallest distance between handlebar grip and Adjusting clutch lever clutch lever One-up with luggage Adjusting the clutch lever Position 4: largest distance while driving can lead to between handlebar grip and accidents. clutch lever Two-up (with luggage) Only adjust the clutch lever when Brakes the motorcycle is stationary.
-
Page 74
Adjusting footbrake lever Make sure ground is level and firm and park motorcycle. Turn adjusting wheel 1 into Fold step plate upward up desired position. to detent when riding while seated. The adjustment wheel can be turned more easily if Slide treadplate 1 of footrest you press the handbrake lever sideways to the left to unlock. -
Page 75: Shifting
Shifting Check tire pressures against Treadplate (fixing) on data below. gear lever Adjusting shift lever Tire pressure, front 6 lb/ft (8 Nm) Tires 36.3 psi (2.5 bar) (with tire cold) Check tire pressure Tire pressure, rear Incorrect tire inflation pres- sure results in poorer hand- ing characteristics of the motor- 42.1 psi (2.9 bar) (with tire…
-
Page 76: Handlebars
50 % heating output Consult an authorized work- shop, preferably an authorized 100 % heating output BMW Motorrad retailer, for ad- justment of the handlebars. Heated handlebar grips The 2nd heating level is used for fast heat-up of the grips;…
-
Page 77: Mirrors
Adjust mirror arm If no further changes are made Slide protective cap over the selected heating level is threaded fastener. adopted as the setting. Windshield To switch off heated grips, press button 1 until heated grip Adjust windshield symbol 2 is no longer shown in the display.
-
Page 78: Rider And Passenger Seats
Rider and passenger Installing passenger seat seats Remove passenger seat Remove rider’s seat ( 77). Firmly press pillion seat 1 downwards. Fit passenger seat centered Passenger seat clicks audibly in rear mounts 1 and in front into place. mount 2. Install rider’s seat ( 77).
-
Page 79
Remove rider’s seat Install rider’s seat In order to remove the front height adjustment 1, press Turn vehicle key 1 counter- Fit front seat 1 into seat locking mechanism 2 down to clockwise and hold while lifting mount 2 on left and right and remove the height adjustment driver’s seat 2 in rear area. -
Page 80: Storage Compartment
adjustment in orientation 1 (L Storage compartment marking). Opening and locking stow In order to adjust the high seat compartment position, install the front height adjustment in orientation 2 (H marking). In order to adjust the low seat position, swivel rear height ad- justment 1 into position 3 (L marking).
-
Page 81: Riding
Riding Safety instructions ….80 Checklist ……82 Starting .
-
Page 82: Safety Instructions
Your authorized left and right are equal. uations. Remember to take the BMW Motorrad Dealer will be Make sure that weight is uni- limited ground clearance of your happy to advise you and has…
-
Page 83
Maximum speed with with tank rucksack Do not inhale exhaust fumes. Do not run the engine in closed massive-bar tires Observe maximum payload of rooms. tank rucksack and correspond- The maximum speed spec- ing top speed. ified for the motorcycle may Burn hazard be higher than the maximum Payload of tank rucksack… -
Page 84: Checklist
Modifications Stop the engine immediately if Firm seating of cases and lug- it misfires gage Modifications of the mo- Use unleaded fuel only torcycle (e.g. engine man- At regular intervals Comply with all specified main- agement system, throttle valves, Engine oil level (every time you tenance intervals.
-
Page 85
Pre-Ride Check authorized service facility, When the ignition is switched on preferably an authorized the instrument cluster performs BMW Motorrad Dealer. a test routine on the warning and indicator lights — this is the «Pre- ABS self-diagnosis Ride-Check.» Starting the engine… -
Page 86
Watch all warning and indicator ASC warning light flashes thorized workshop, preferably lights on the display. slowly. an authorized BMW Motorrad An ABS error is indicated follow- retailer. ing completion of the ABS self- Phase 2 diagnosis routine. -
Page 87: Breaking In
Breaking in dure is essential if the tires are to Mileage until running-in achieve maximum grip. Engine check New tires do not provide While running in the motorcy- 311…746 miles full tire traction. Accident cle, vary the throttle opening (500…1200 km) hazards exist in particular on wet and engine-speed range fre- roads and at extreme angles.
-
Page 88: Brakes
How do you achieve major load change reactions. When changing gear using the shortest stopping BMW Motorrad recommends the Pro Gear-shift Assis- distances? only changing gear using the tance function, the cruise control clutch in such situations. The…
-
Page 89: Parking Your Motorcycle
If the ground is soft or un- Locking up of the front wheel is must be expected in the follow- even, there is no guaran- prevented by the BMW Motorrad ing situations: tee that the motorcycle will rest Integral ABS.
-
Page 90: Off-Road Riding
Switch off engine. After driving offroad brake pad wear. If the ground is soft or un- BMW Motorrad recommends Check the brake pad thickness even, there is no guaran- that the following be observed more often and replace the brake…
-
Page 91: Refueling
Fuel specifications thorized BMW Motorrad re- Recommended fuel qual- For optimal fuel economy, the tailer.) (max. 10 % ethanol, gasoline should be sulfur-free or E10) very low in sulfur content.
-
Page 92
Fuel expands when ex- When refueling after run- posed to heat. When the ning on reserve, make sure tank is overfilled, fuel can escape that you top up the tank to a and get onto the road. This re- level above reserve, as other- sults in a danger of falling. -
Page 93
Press fuel tank cap down firmly Place motorcycle on center Slowly pull lug 1 upward a to close. stand, ensuring that it is resting second time. on a firm and level support sur- Remove key and close protec- Fuel filler cap unlocked. face. -
Page 94: Fastening Motorcycle For Trans
the engine dies off due to lack of fuel. Usable fuel quantity Approx. 7.9 gal (Approx. 30 l) Reserve fuel quantity Do not fill the tank past the When jacking up the vehi- Approx. 1.1 gal (Approx. 4 l) bottom edge of the filler neck. cle it can tip away to the Press fuel filler cap of fuel tank side and fall over.
-
Page 95
Fasten rear straps on both Components can be dam- sides to the passenger foot- aged. pegs and then tighten them. Do not squeeze components Tension all straps evenly; the such as brake lines or wiring vehicle should be pulled down harnesses. -
Page 97: Technology In
Integral ABS ……98 Engine management with BMW Motorrad ASC ….101 Tire Pressure Control TCP/…
-
Page 98: Riding Mode
Riding mode is aligned to off-road operation ABS and/or ASC can be using massive-bar tires. switched off in each mode; the Selection following explanations always In order to adjust the motorcycle refer to the activated systems. to the road condition, one of 5 The front wheel lift assistant is riding modes can be selected: Throttle response…
-
Page 99: Gearshift Assistant
In the ENDURO and ENDURO Benefits First the desired riding mode is PRO modes, damping variants preselected. The switchover 70-80 % of all gear changes HARD and SOFT can be se- does not take place until the can be performed without us- lected.
-
Page 100: Brake System With Bmw Motorrad
The footbrake lever acts only on should remain constant both prior the rear brake. to and during execution of shifts The BMW Motorrad Integral ABS Upshifts using the Pro Gear Shift Assis- adapts the braking force distribu- The Pro Gear Shift Assistant tant.
-
Page 101
This enables optimum brake pressure. and rapid deceleration it is possi- the wheels to continue to turn ble that the BMW Motorrad Inte- and maintains driving stability re- gral ABS will not prevent the rear gardless of the road surface con- wheel from lifting off the ground. -
Page 102
ABS? also lead to a fault code: But remember: the potentially The BMW Motorrad Integral ABS Heating up on the main or aux- shorter braking distances which ensures driving stability on any iliary stand at idle or with gear… -
Page 103: Engine Management With Bmw Motorrad Asc
The rider is always respon- BMW Motorrad ASC? and momentum take over and sible for adapting his/her driving BMW Motorrad ASC is an assis- even ABS is unable to counteract style. tance system for the rider and their effects. The rider is always…
-
Page 104: Tire Pressure Control Tcp
A sensor is located in each tire, wheel touches the ground again. (wheelie) for a longer period which measures the air temper- In this case, BMW Motorrad rec- with ASC deactivated ature and the inflation pressure ommends turning back the throt-…
-
Page 105
no sensors, then a fault code is The tire inflation pressures are Example: According to the output. shown temperature-compen- Rider’s Manual, the tire inflation sated in the multifunction display; pressure is to be 36 psi (2.5 bar), Tire inflation pressure they refer to a tire temperature however 33 psi (2.3 bar) is ranges… -
Page 107: Maintenance
Maintenance General instructions ….106 Onboard tool kit ….106 Engine oil .
-
Page 108: General Instructions
Topping up engine oil Open-ended wrench obtained on DVD through your 108). Wrench size: 14 authorized BMW Motorrad re- Adjust mirror arm tailer. 75). Special tools and thorough spe- Torx wrench T30 cialized knowledge are required Lower gear lever adjust- to carry out some of the work.
-
Page 109: Engine Oil
For more extensive service op- engine oil level is correct, only erations (such as wheel removal check the oil level with the en- and installation), BMW Motorrad gine at operating temperature. has put together a service tool kit Switch off engine at operating matched to your motorcycle.
-
Page 110: Brake System
Add engine oil up to specified Have the brakes checked at an level. authorized workshop, preferably Engine oil, quantity for an authorized BMW Motorrad topping up retailer. max 1 quarts (max 0.95 l) (Dif- ference between MIN and Wipe area around oil fill loca- MAX) tion to clean it.
-
Page 111
Park the motorcycle, ensuring Have the brake pads replaced that the support surface is firm and level. at an authorized service facil- ity, preferably an authorized BMW Motorrad retailer. Checking rear brake pad thickness Front brake-pad wear Park the motorcycle, ensuring limit that the support surface is firm and level. -
Page 112
Have the brake pads replaced by a specialist service facil- ity, preferably an authorized BMW Motorrad retailer. Check front brake fluid level A low fluid level in the brake reservoir can allow air to penetrate the brake system. Conduct a visual inspection of… -
Page 113
MIN mark. (Brake-fluid reservoir horizon- tal, motorcycle standing up- right) If brake fluid level falls below the approved level: Have the defect corrected as soon as possible by an autho- rized workshop, preferably an authorized BMW Motorrad re- tailer. -
Page 114: Coolant
If brake fluid level falls below the approved level: Have the defect corrected as Read off coolant level on ex- soon as possible by an autho- pansion tank 1. rized workshop, preferably an authorized BMW Motorrad re- tailer.
-
Page 115: Clutch
Remove screw 1 and remove Pull back the clutch lever. cover 2. Pressure point must be clearly perceptible. If no clear pressure point can be felt: Have the clutch checked by an authorized workshop, preferably an authorized BMW Motorrad retailer.
-
Page 116: Wheel Rims And Tires
For every size of tire, Have tires replaced even be- ity, preferably an authorized BMW Motorrad has tested and fore the minimum tread depth BMW Motorrad retailer. approved certain makes as is reached.
-
Page 117
(TPC/RDC) The wheel sizes play a major role is not damaged. Inform the in the ABS and ASC chassis BMW Motorrad retailer or the control systems. Especially the authorized workshop of the TPC/ diameter and width of the wheels RDC sensor. -
Page 118
Raise front of motorcy- Remove securing screws 4 of cle, preferably using a left and right brake calipers. BMW Motorrad front wheel stand, continuing until the wheel rotates freely. Remove screw 1. Mounting front wheel stand Remove left axle clamping 120). -
Page 119
Always have the tightening torques checked by a specialized workshop, preferably an authorized BMW Motorrad retailer. Remove spacer bushing 1 from the wheel hub. Installing front wheel Pull quick-release axle 1 out… -
Page 120
tion arrows on the tires or on the rim. Roll front wheel into front suspension. Install screw 1 with specified Tighten the right-hand axle torque. Brace quick-release clamping screw 1 with the axle on the right side at the specified torque. same time. -
Page 121
Engage the brakes repeatedly, Do not touch hot parts of the continuing until the brake pads exhaust system. seat against the rotors. Let rear muffler cool down. Locate wheel speed sensor lead in the retaining clips 1 and 2. Insert wheel speed sensor in bore and install screw 3. -
Page 122: Front Wheel Stand
BMW Motorrad used with cast wheels and retailer. wire wheels vary. Mixing up sets The BMW Motorrad front of lug bolts or using the wrong wheel stand is not designed Place rear wheel on rear wheel lug bolts would mean that the for holding motorcycles without a support.
-
Page 123
Use basic stand with front wheel mount. The base stand and its accessories are avail- able through your authorized BMW Motorrad retailer. Align two mounts 2 so that If the motorcycle is resting front suspension rests securely on the center stand: The on them. -
Page 124: Bulbs
Bulbs Replacing bulbs for dipped and main-beam headlights The alignment of connec- tor, spring wire strap and bulb may differ from that shown in the following illustrations. Remove cover 1 by turning it Remove spring strap 1 from Make sure ground is level and counterclockwise to replace detent and fold to side.
-
Page 125
Insert spring clip 1 into catch. Bulb for high-beam headlight with LED headlights To avoid contamination of the glass of the new bulb, only hold the bulb by its metal cap. Remove cover panel 1 by turn- ing counterclockwise. Insert plug 1. Position cover panel and install it by turning clockwise. -
Page 126
Replacing bulb for front and rear turn indicator Make sure ground is level and firm and park motorcycle. Switch off ignition. Remove bulb 1 from the Insert bulb 1 in bulb socket. socket. Replace defective bulb. Bulb for parking light Remove screw 1. -
Page 127
Replace defective bulb. Bulbs for flashing turn indicators, front RY10W / 12 V / 10 W Bulbs for flashing turn indicators, rear RY10W / 12 V / 10 W Pull glass on screw connection Locate lens in mirror housing To protect the bulb glass from side out of mirror housing. -
Page 128: Air Filter
LEDs. Please contact a specialist Please contact a specialized service facility for this pur- workshop, preferably an autho- pose, preferably an authorized rized BMW Motorrad retailer. BMW Motorrad retailer. Replacing the LED Air filter headlight Remove screws 1. Replacing air cleaner…
-
Page 129: Jump-Starting
A short-circuit can result if the crocodile clips of the jump leads are accidentally brought into contact with the motorcycle. Use only jump leads fitted with fully insulated crocodile clips at both ends. Jump-starting with a donor- Attach air cleaner housing Install screws 1, 2 and 3.
-
Page 130: Battery
Battery negative terminal 3 of the dis- charged battery. Maintenance instructions Run engine of donor vehicle Correct battery maintenance during jump-starting procedure. combined with proper charging Start engine of the vehicle with and storage procedures extends discharged battery in usual the battery’s service life, and is way;…
-
Page 131
The motorcycle’s onboard battery. ignition, the battery is completely electronics know when the discharged (battery voltage be- BMW Motorrad has devel- battery is fully charged. The low 9 V). Attempts to recharge oped a trickle-charger spe- onboard socket is switched off… -
Page 132
Charging disconnected Removing and installing battery battery Charge battery using a suitable charger. Comply with operating instruc- tions of charger. Once battery is fully charged, disconnect charger’s terminal clips from battery terminals. Remove negative battery ca- In the case of longer peri- ble 1 and rubber strap 2. -
Page 133
Slightly lift and remove battery from holder until positive termi- nal becomes accessible. Install positive cable 1. Fasten negative battery ca- ble 1. Slide battery into holder. Fasten battery with rubber strap 2. Remove positive cable 1. If the 12 V battery is in- stalled incorrectly, or if the terminals are interchanged (dur- ing jump-starting, etc.), the fuse… -
Page 134: Fuses
Fuses If the fuses blow frequently, have the electrical system Replace fuses checked by an authorized spe- cialized workshop, preferably an authorized BMW Motorrad retailer. Install connector 1. Install rider’s seat ( 77). Fuse assignment Install screw 1. Setting the clock ( 50).
-
Page 135
7.5 A Multifunction switch, left Tire Pressure Control (TCP/RDC) Fuse for alternator regulator 50 A Alternator regulator… -
Page 137: Accessories
Accessories General instructions ….136 Onboard power sockets … 136 Navigation system ….137 Case .
-
Page 138: General Instructions
Cables must not be trapped. erating conditions experienced by products. BMW motorcycles and, conse- Automatic deactivation You will find all BMW Motorrad quently, they are not sufficient in optional accessories on The onboard sockets are au- some circumstances. tomatically switched off during our website: «www.bmw-…
-
Page 139: Navigation System
Press in locking device 3. ignition key can be removed. The navigation preparation Mount Cradle is unlocked and is suitable for the cover 4 can be removed with BMW Motorrad Navigator IV and a rotating movement toward the BMW Motorrad Navigator V. front.
-
Page 140
BMW Motorrad com- munication system is supported. A software update may be re- quired for the BMW Motorrad communication system. In this case, please contact your autho- rized BMW Motorrad retailer. Mount cover 1 in lower area… -
Page 141
Compass page My motorcycle page Turning increases or reduces The Multi-Controller is operated Long actuation of the Multi-Con- volume of a BMW Motorrad using six motions: troller corresponds to the activa- communication system con- Turning up and down. tion of certain functions on the nected via Bluetooth. -
Page 142
(only displayed if route is pro- Turning increases or reduces vided with way points). If a BMW Motorrad com- volume of a BMW Motorrad munication system is con- communication system con- My Motorcycle nected, an acoustic signal is also nected via Bluetooth. -
Page 143
Security settings the motorcycle while switched Special functions on, a security prompt asking for The BMW Motorrad Navigator V Due to integration of the the PIN to be entered is issued. can be secured against unau- BMW Motorrad Navigator, there… -
Page 144: Case
Case Closing case with aluminum case Open case Detach lid retaining cable 1. Close case lid. Close case lid. Open second latch of case lid. Position locking claw 1 on lid. Remove case lid. Press lock housing 2 down- ward while making sure that Turn key 1 counterclockwise.
-
Page 145: Topcase
Press lock housing 2 to side to release locking claw 3. Pull locking claw 3 to side while holding case in place. Pull case forward as far as pos- sible and remove to side. Mount case Hook in lid retaining cable 1. Position locking claw 1 on case carrier while holding case in Close case lid.
-
Page 146
Opening topcase Close topcase Remove topcase Turn key 1 counterclockwise. Close topcase lid. Turn key 1 counterclockwise. Press lock housing 2 down- Press lock housing 2 upward Position locking claw 1 on lid. ward to release locking claw 3. to release locking claw 3. Press lock housing 2 down- Pull locking claw 3 toward rear ward while making sure that… -
Page 147
Mounting topcase Position locking claw 1 on top- case carrier. Position topcase on topcase Press lock housing 2 upward rack and slide forward so that while making sure that claw tabs on topcase rack 1 engage grips around carrier. with lugs on topcase 2. To lock lock, turn key clock- wise and remove. -
Page 149: Care
Care Care products ….. 148 Washing your motorcycle ..148 Cleaning sensitive motorcycle parts .
-
Page 150: Care Products
Washing your Care products Brake early until the brake rotors and brake pads are dry. motorcycle BMW Motorrad recommends Warm water intensifies the that you use cleaning and BMW Motorrad recommends effect of salt. care products available at your that you use BMW Insect Re-…
-
Page 151: Cleaning Sensitive Motorcycle
Cleaning sensitive Soften stubborn dirt and Cooling fins can be bent dead insects by covering easily. motorcycle parts the affected areas with a wet When cleaning the radiator, en- Plastics cloth. sure that the fins are not bent. If plastic parts are cleaned Clean with water and Rubber parts using unsuitable cleaning…
-
Page 152: Storing The Motorcycle
Then add To preserve the finish of your a protective wax coating to the vehicle, BMW Motorrad recom- paint at these locations. mends BMW Car Wax or agents that contain carnauba or syn- Storing the motorcycle thetic waxes.
-
Page 153: Technical Data
Technical data Troubleshooting chart … . . 152 Weights ……166 Threaded fasteners .
-
Page 154: Troubleshooting Chart
Troubleshooting chart Engine does not start at all or is very difficult to start. Possible cause Remedy Emergency on/off switch (kill switch) Adjust emergency on/off switch (kill switch) to nor- mal operating position. Side stand extended and gear engaged Retract side stand. Gear engaged and clutch not disengaged Place transmission in neutral or disengage clutch.
-
Page 155: Threaded Fasteners
Threaded fasteners Front wheel Value Valid Brake caliper on telescopic forks M10 x 65 28 lb/ft (38 Nm) Clamping screw for quick-re- lease axle in telescopic fork M8 x 35 14 lb/ft (19 Nm) Wheel speed sensor on fork M6 x 16 6 lb/ft (8 Nm) Micro-encapsulated or medium- strength screw lock…
-
Page 156
Mirror arm Value Valid Mirror (locknut) on adapter Left-hand thread, M10 x 1.25 16 lb/ft (22 Nm) Adapter on clamping block M10 x 14 — 4.8 18 lb/ft (25 Nm) Handlebars Value Valid Clamping block (handlebar clamp) on fork bridge M8 x 35 Tighten on block in front (in the direc- tion of travel) -
Page 157: Engine
Engine Engine number location Lower right of engine block beneath the starter Engine type 122EN Engine design Air/liquid-cooled two-cylinder, four-stroke opposed-twin engine with two spur gear-driven overhead camshafts and one counterbalance shaft Displacement 1170 cc (1170 cm Cylinder bore 4 in (101 mm) Piston stroke 2.9 in (73 mm) Compression ratio…
-
Page 158: Fuel
If the engine should for example be operated with 91 RON in countries with lower fuel quality, the motorcycle must be respectively programmed first by your authorized BMW Motorrad retailer.) (max. 10 % ethanol, E10) 87 AKI (91 ROZ/RON) 87 AKI Usable fuel quantity Approx.
-
Page 159: Engine Oil
BMW Motorrad rec- ommends that you use the BMW Motorrad oils available from your BMW Motorrad Dealer. Engine oil, quantity for topping up max 1 quarts (max 0.95 l), difference between…
-
Page 160: Clutch
Clutch Clutch design Multi-disk oil-bath clutch, slipper clutch Transmission Transmission design Dog-engagement 6-speed transmission with heli- cal gears Transmission gear ratios 1.000 (60:60 teeth), Primary gear ratio 1.650 (33:20 teeth), Transmission input ratio 2.438 (39:16 teeth), 1st gear 1.714 (36:21 teeth), 2nd gear 1.296 (35:27 teeth), 3rd gear 1.059 (36:34 teeth), 4th gear 0.943 (33:35 teeth), 5th gear…
-
Page 161: Rear-Wheel Drive
Rear-wheel drive Type of final drive Shaft drive with bevel gears Type of rear suspension Cast-aluminum single swing arm with BMW Motorrad paralever Gear ratio of final drive 2.91 (32:11 teeth) Suspension Front wheel Type of front suspension BMW Telelever, upper fork bridge tilt decoupled, leading link mounted in engine and on telescopic fork, centrally positioned spring strut supported on leading link and frame…
-
Page 162: Brakes
Rear wheel Type of rear suspension Cast-aluminum single swing arm with BMW Motorrad paralever Type of rear suspension Central spring strut with coil spring, adjustable rebound-stage damping and spring preload with dynamic ESA Central spring strut with coil spring and expan- sion tank, electrically adjustable rebound-stage and compression damping, electrically adjustable spring preload…
-
Page 163: Wheels And Tires
Approx. 0.04 in (Approx. 1 mm), at piston Wheels and tires Recommended tire combinations You can obtain an overview of the current tire approvals from your authorized BMW Motorrad retailer or on the Internet at www.bmw- motorrad.com. Front wheel Front wheel design…
-
Page 164: Electrical System
Permissible rear wheel load max 677 lbs (max 307 kg) Tire inflation pressures Tire pressure, front 36.3 psi (2.5 bar), with tire cold Tire pressure, rear 42.1 psi (2.9 bar), with tire cold Electrical system Electrical rating of onboard sockets max 5 A, all onboard sockets together Fuse carrier 1 10 A, Slot 1: instrument cluster, anti-theft alarm…
-
Page 165
Bulbs Bulb for high-beam headlight H7 / 12 V / 55 W with LED headlights Bulbs for low-beam headlight H7 / 12 V / 55 W with LED headlights Bulb for parking light W5W / 12 V / 5 W with LED headlights Bulb for taillight/brake light Bulbs for flashing turn indicators, front… -
Page 166: Frame
Frame Frame design Steel-tube frame with partially self-supporting drive unit, steel-tube rear frame Location of type plate Frame at front right (next to spring strut) Location of the vehicle identification number Frame at front right on steering head Alarm system with anti-theft alarm Activation time Approx.
-
Page 167: Dimensions
Dimensions Motorcycle length 88.8 in (2255 mm), above luggage rack Motorcycle height 57.1 in (1450 mm), windshield in highest position with lowering 55.5 in (1410 mm), windshield in highest position Motorcycle width 37.5 in (952 mm), across mirrors 38.6 in (980 mm), across hand protectors Rider’s seat height 35…35.8 in (890…910 mm), without rider at un- laden weight…
-
Page 168: Weights
with lowering 72.8…74.4 in (1850…1890 mm), without rider at unladen weight with lowering 71.7…73.2 in (1820…1860 mm), without rider at unladen weight with black seat Weights Unladen weight 573 lbs (260 kg), DIN unladen weight, ready for road, fuel tank 90 % full, without OE Permissible gross weight 1058 lbs (480 kg) Maximum payload…
-
Page 169: Service
Service Reporting safety defects … 168 BMW Motorrad Service … . 169 BMW Motorrad Mobility Services ……169 Maintenance procedures .
-
Page 170: Defects
Reporting safety defects If you believe that your vehicle has a defect which could cause a crash or could cause injury or death, you should immediately inform the National Highway Traffic Safety Ad- ministration (NHTSA) in addition to notifying BMW of North America, LLC. If NHTSA receives similar complaints, it may open an investigation, and if it finds that a safety defect exists in a group of vehicles, it may order a recall and remedy campaign.
-
Page 171: Bmw Motorrad Service
BMW Motorrad Mobility BMW Motorrad Service by an authorized BMW Motorrad retailer. Services With its worldwide dealer network, BMW Motorrad The BMW Motorrad Mobility Ser- To ensure that your BMW con- can attend to you and your vices furnish you and your new…
-
Page 172
The scope of the ser- vices performed may be de- pendent on the vehicle owner and the mileage driven. Your BMW Motorrad retailer confirms that the service has been per- formed and enters the date for the next service. -
Page 173: Confirmation Of Mainte
Confirmation of maintenance work BMW Pre-Delivery BMW Running-in Check Check Conducted Conducted Odometer reading Next service at the latest or, if reached sooner, Odometer reading Stamp, Signature Stamp, Signature…
-
Page 174
BMW Service BMW Service BMW Service Conducted Conducted Conducted Odometer reading Odometer reading Odometer reading Next service Next service Next service at the latest at the latest at the latest or, if reached sooner, or, if reached sooner, or, if reached sooner, Odometer reading Odometer reading Odometer reading… -
Page 175
BMW Service BMW Service BMW Service Conducted Conducted Conducted Odometer reading Odometer reading Odometer reading Next service Next service Next service at the latest at the latest at the latest or, if reached sooner, or, if reached sooner, or, if reached sooner, Odometer reading Odometer reading Odometer reading… -
Page 176
BMW Service BMW Service BMW Service Conducted Conducted Conducted Odometer reading Odometer reading Odometer reading Next service Next service Next service at the latest at the latest at the latest or, if reached sooner, or, if reached sooner, or, if reached sooner, Odometer reading Odometer reading Odometer reading… -
Page 177
BMW Service BMW Service BMW Service Conducted Conducted Conducted Odometer reading Odometer reading Odometer reading Next service Next service Next service at the latest at the latest at the latest or, if reached sooner, or, if reached sooner, or, if reached sooner, Odometer reading Odometer reading Odometer reading… -
Page 178: Confirmation Of Service
Confirmation of service The table is intended as proof of maintenance and repair work, the installed optional accessories and any special campaign (recall) work carried out. Work carried out Odometer Date reading…
-
Page 179
Work carried out Odometer Date reading… -
Page 181: Appendix
Appendix Certificate ……180…
-
Page 182
Certifications BMW Keyless Ride ID Device Canada: Operation is subject to the following two conditions: (1) This device may not cause harmful interference, (2) this device must accept any interference received, including interference that may cause undesired operation. USA: This device complies with Part 15 of the FCC rules. Operation is subject to the following two conditions: (1) This device may not cause harmful interference,… -
Page 183
Declaration Of Conformity We declare under our responsibility that the product BMW Keyless Ride ID Device (Model: HUF5750) camplies with the appropriate essential requirements of the article 3 of the R&TIE and the other relevant provisions, when used for its intended purpose. Applied Standards: 1. -
Page 184
Certification Tire Pressure Control (TPC) FCC ID: MRXBC54MA4 FCC ID: MRXBC5A4 IC: 2546A-BC54MA4 IC: 2546A-BC5A4 This device complies with Part 15 of the FCC Le présent appareil est conforme aux CNR Rules and with Industry Canada license-exempt d’Industrie Canada applicables aux appareils RSS standard(s). -
Page 185: Index
Average values Brakes Abbreviations and symbols, 6 Adjusting brake lever, 71 Resetting, 49 Checking operation, 108 Control, 15 Safety instructions, 86 Operating, 59 Battery Technical data, 160 Charging connected Self-diagnosis, 83 Breaking in, 85 battery, 129 Technology in detail, 98 Bulbs Charging disconnected Warning indicators, 33…
-
Page 186
Warning for engine oil level, 36 Case Indicator light, 17 Equipment, 7 Operating, 142 Technical data, 164 Checklist, 82 Control, 15 Clock Operating, 69 Adjusting, 50 Electrical system Technical data, 162 Clutch Adjusting handlebar lever, 71 Emergency on/off switch (kill Frame Technical data, 164 Checking operation, 113… -
Page 187
Instrument cluster Operating headlight flasher, 57 Handlebars Ambient light photosensor, 17 Operating high-beam Adjusting, 74 Overview, 17 headlight, 57 Hazard warning flashers Parking lamps, 57 Control, 15, 16 Parking light, 57 Jump-start, 127 Operating, 59 Lowered suspension Headlight Limitations, 80 Headlamp range, 56 Keyless Ride Luggage… -
Page 188
Multifunction display, 17 Outside temperature Rear-wheel drive Technical data, 159 Control, 15 Display, 37 Refueling, 89, 91 Operating, 48 Overview of warning Remote control indicators, 24 Overview, 21 Replacing battery, 47 Overviews Selecting display readings, 48 Rider’s Manual (US Model) Instrument cluster, 17 Multifunction switch Position on vehicle, 14… -
Page 189
Shift lever Clutch, 158 Technical data, 161 Adjusting, 73 Dimensions, 165 Top speed, 81 Shifting gears Electrical system, 162 Topcase Upshift recommendation, 39 Operating, 143 Engine, 155 Spark plugs Torques, 153 Engine oil, 157 Technical data, 162 Transmission Frame, 164 Speedometer, 17 Technical data, 158 Fuel, 156… -
Page 190
Coolant temperature, 29 Windshield Adjusting, 75 Display, 23 Adjustment element, 13 Electronic engine management, 29 Engine management system, 35 Engine oil level, 36 Fuel reserve, 35 Immobilizer, 28 Outside temperature warning, 28 Overview, 20, 22 Tire Pressure Monitor, 31 Weights Load capacity table, 14 Technical data, 166 Wheels… -
Page 192
Errors and omissions excepted. © 2014 Bayerische Motoren Werke Aktiengesellschaft 80788 Munich, Germany Reprints and duplication of this work, in whole or part, are pro- hibited without the express writ- ten approval of BMW Motorrad, Aftersales. -
Page 193
If the engine should for example be operated with 91 RON in countries with lower fuel quality, the motorcycle must be respectively programmed first by your authorized BMW Motorrad retailer.) (max. 10 % ethanol, E10) 87 AKI (91 ROZ/RON)
Rider’s Manual
R 1200 GS
BMW Motorrad
The Ultimate
Riding Machine

Vehicle data/dealership details
Vehicle data
Model
Vehicle Identification Number
Colour code
Date of first registration
Registration number
Dealership details
Person to contact in Service department
Ms/Mr
Phone number
Dealership address/phone number (com-
pany stamp)

Welcome to BMW
We congratulate you on
your choice of a vehicle from
BMW Motorrad and welcome
you to the community of BMW
riders. Familiarise yourself with
your new vehicle so that you can
ride it safely and confidently in all
traffic situations.
About this Rider’s Manual
Please read this Rider’s Manual
carefully before starting to use
your new BMW. It contains im-
portant information on how to
operate the controls and how to
make the best possible use of all
your BMW’s technical features.
In addition, it contains informa-
tion on maintenance and care to
help you maintain your vehicle’s
reliability and safety, as well as its
value.
Suggestions and criticism
If you have questions concerning
your motorcycle, your authorised
BMW Motorrad dealer will gladly
provide advice and assistance.
We hope you will enjoy riding
your BMW and that all your jour-
neys will be pleasant and safe
BMW Motorrad.
01 41 8 558 951
*01418558951*

Table of Contents
1 General instructions ... . 5
Overview . . . . . . . . . . . . . . . . . . . . . 6
Abbreviations and
symbols . . . . . . . . . . . . . . . . . . . . . . 6
Equipment . . . . . . . . . . . . . . . . . . . 7
Technical data . . . . . . . . . . . . . . . 7
Actuality . . . . . . . . . . . . . . . . . . . . . . 7
2 General views . .. .. .. .. .. . 9
General view, left side . . . . . . . 11
General view, right side . . . . . 13
Underneath the seat . . . . . . . . 14
Multifunction switch, left . . . . 15
Multifunction switch,
right . . . . . . . . . . . . . . . . . . . . . . . . . 17
Instrument panel . . . . . . . . . . . . 18
3 Status indicators ... .. .. 19
Warning and telltale
lights . . . . . . . . . . . . . . . . . . . . . . . . 20
Multifunction display . . . . . . . . 22
Warning symbols in the
display . . . . . . . . . . . . . . . . . . . . . . 24
Warnings . . . . . . . . . . . . . . . . . . . . 25
Ambient temperature. . . . . . . . 39
Fuel reserve . . . . . . . . . . . . . . . . . 39
Oil level . . . . . . . . . . . . . . . . . . . . . 40
Service-due indicator . . . . . . . . 41
Tyre pressure . . . . . . . . . . . . . . . 41
Recommendation to up-
shift . . . . . . . . . . . . . . . . . . . . . . . . . 42
4 Operation . .. . .. .. .. .. .. . . 43
Ignition . . . . . . . . . . . . . . . . . . . . . . 44
Ignition with Key-
less Ride . . . . . . . . . . . . . . . . . . . . 46
Multifunction display . . . . . . . . 50
Anti-theft alarm (DWA) . . . . . . 56
Emergency off switch (kill
switch) . . . . . . . . . . . . . . . . . . . . . . 58
Headlight . . . . . . . . . . . . . . . . . . . . 59
Lights . . . . . . . . . . . . . . . . . . . . . . . 60
Daytime riding light . . . . . . . . . . 61
Turn indicators . . . . . . . . . . . . . . 63
Hazard warning flashers . . . . . 63
BMW Motorrad Integ-
ral ABS . . . . . . . . . . . . . . . . . . . . . . 63
Automatic Stability Control
ASC . . . . . . . . . . . . . . . . . . . . . . . . . 64
Riding mode . . . . . . . . . . . . . . . . 65
Cruise-control system . . . . . . . 69
Spring preload . . . . . . . . . . . . . . 71
Damping . . . . . . . . . . . . . . . . . . . . 72
Dynamic ESA, electronic
suspension adjustment . . . . . . 73
Clutch . . . . . . . . . . . . . . . . . . . . . . . 75
Brakes . . . . . . . . . . . . . . . . . . . . . . 76
Tyres . . . . . . . . . . . . . . . . . . . . . . . . 76
Handlebars . . . . . . . . . . . . . . . . . . 77
Heated handlebar grips . . . . . 77
Mirrors . . . . . . . . . . . . . . . . . . . . . . 78
Windscreen . . . . . . . . . . . . . . . . . 79
Front and rear seats . . . . . . . . . 79
5 Riding .. .. .. .. .. . .. .. .. .. . 83
Safety instructions .. . . . . . . . . 84
Checklist . . . . . . . . . . . . . . . . . . . . 86
Starting. . . . . . . . . . . . . . . . . . . . . . 87
Running in . . . . . . . . . . . . . . . . . . 89
Shifting gear . . . . . . . . . . . . . . . . 89
Brakes . . . . . . . . . . . . . . . . . . . . . . 90
Parking your motorcycle . . . . 91
Off-roading . . . . . . . . . . . . . . . . . . 92
Refuelling . . . . . . . . . . . . . . . . . . . 93

Securing motorcycle for
transportation . . . . . . . . . . . . . . . 96
6 Engineering details . .. . . 99
Riding mode . . . . . . . . . . . . . . 100
Shift assistant . . . . . . . . . . . . . 101
Brake system with
BMW Motorrad Integral
ABS . . . . . . . . . . . . . . . . . . . . . . . 102
Electronic engine manage-
ment with BMW Motorrad
ASC . . . . . . . . . . . . . . . . . . . . . . . 105
Tyre pressure monitoring
RDC . . . . . . . . . . . . . . . . . . . . . . . 107
7 Maintenance . . . .. .. . .. 109
General instructions . . . . . . . 110
Toolkit. . . . . . . . . . . . . . . . . . . . . 110
Engine oil . . . . . . . . . . . . . . . . . 111
Brake system . . . . . . . . . . . . . 112
Coolant. . . . . . . . . . . . . . . . . . . . 116
Clutch . . . . . . . . . . . . . . . . . . . . . 118
Rims and tyres . . . . . . . . . . . . 118
Wheels . . . . . . . . . . . . . . . . . . . . 119
Front-wheel stand . . . . . . . . . 125
Lighting . . . . . . . . . . . . . . . . . . . 127
Air filter . . . . . . . . . . . . . . . . . . . . 132
Jump-starting . . . . . . . . . . . . . 133
Battery . . . . . . . . . . . . . . . . . . . . 134
Fuses . . . . . . . . . . . . . . . . . . . . . 138
8 Accessories . .. .. .. . .. . 141
General instructions . . . . . . . 142
Power sockets . . . . . . . . . . . . 142
Navigation system . . . . . . . . . 143
Cases . . . . . . . . . . . . . . . . . . . . . 147
Topcase. . . . . . . . . . . . . . . . . . . 150
9 Care ... . . .. .. .. .. .. . .. .. 155
Care products . . . . . . . . . . . . . 156
Washing the vehicle . . . . . . . 156
Cleaning easily damaged
components . . . . . . . . . . . . . . . 157
Paint care . . . . . . . . . . . . . . . . . 157
Laying up the motor-
cycle . . . . . . . . . . . . . . . . . . . . . . 158
Protective wax coating . . . . 158
Restoring motorcycle to
use . . . . . . . . . . . . . . . . . . . . . . . . 158
10 Technical data . . . .. . 159
Troubleshooting chart . . . . . 160
Threaded fasteners . . . . . . . 161
Engine . . . . . . . . . . . . . . . . . . . . 163
Fuel . . . . . . . . . . . . . . . . . . . . . . . 164
Engine oil . . . . . . . . . . . . . . . . . 165
Clutch . . . . . . . . . . . . . . . . . . . . . 165
Transmission . . . . . . . . . . . . . . 166
Rear-wheel drive . . . . . . . . . . 166
Running gear . . . . . . . . . . . . . . 167
Brakes . . . . . . . . . . . . . . . . . . . . 169
Wheels and tyres . . . . . . . . . . 169
Electrics . . . . . . . . . . . . . . . . . . . 171
Frame . . . . . . . . . . . . . . . . . . . . . 172
Anti-theft alarm. . . . . . . . . . . . 173
Dimensions .. . . . . . . . . . . . . . 173
Weights . . . . . . . . . . . . . . . . . . . 174
Riding specifications . . . . . . 174
11 Service . . .. . .. .. .. .. .. 175
BMW Motorrad Service . . . 176
BMW Motorrad Mobility
services . . . . . . . . . . . . . . . . . . . 176
Maintenance work . . . . . . . . . 176
Confirmation of mainten-
ance work . . . . . . . . . . . . . . . . . 178
Confirmation of service . . . . 183
12 Appendix . .. .. .. .. . .. . 185
Certificate . . . . . . . . . . . . . . . . . 186
13 Index . .. .. .. .. .. .. .. .. 189


General instructions
Overview . . . . . . . . . . . . . . . . . . . . . . . . . . . . 6
Abbreviations and symbols . . . . . . . . . . 6
Equipment . . . . . . . . . . . . . . . . . . . . . . . . . . . 7
Technical data . . . . . . . . . . . . . . . . . . . . . . . 7
Actuality . . . . . . . . . . . . . . . . . . . . . . . . . . . . . 7
1
5
z
General instructions
Overview
An important aspect of this
Rider’s Manual is that it can
be used for quick and easy
reference. Consulting the
extensive index at the end of this
Rider’s Manual is the fastest way
to find information on a particular
topic or item. To first read an
overview of your motorcycle,
please go to Chapter 2. All
maintenance and servicing work
on the vehicle is documented
in Chapter 11. This record of
the maintenance work you have
had performed on your vehicle
is a precondition for generous
treatment of goodwill claims.
When the time comes to sell
your BMW, please remember
to hand over this Rider’s Manual;
it is an important part of the mo-
torcycle.
Abbreviations and
symbols
Indicates warnings that you
must comply with for reas-
ons of your safety and the safety
of others, and to protect your
product against damage.
Specific instructions on
how to operate, control, ad-
just or look after items of equip-
ment on the motorcycle.
Indicates the end of an
item of information.
Instruction.
Result of an activity.
Reference to a page with
more detailed informa-
tion.
Indicates the end of a
passage relating to spe-
cific accessories or items
of equipment.
Tightening torque.
Technical data.
OE Optional extras.
The vehicles are as-
sembled complete with
all the BMW Motorrad
optional extras originally
ordered.
1
6
z
General instructions

OA Optional accessories.
You can obtain
BMW Motorrad
optional accessories
through your authorised
BMW Motorrad dealer;
optional accessories have
to be retrofitted to the
vehicle.
EWS
Electronic immobiliser.
DWA
Anti-theft alarm (Dieb-
stahlwarnanlage).
ABS
Anti-lock brake system.
ASC Automatic Stability Con-
trol.
ESA Electronic Suspension
Adjustment.
RDC
Tyre pressure monitoring.
Equipment
When you purchased your BMW
motorcycle, you chose a model
with individual equipment. This
Rider’s Manual describes the
optional extras (OE) offered by
BMW and selected optional ac-
cessories (OA). This explains why
the manual may also contain de-
scriptions of equipment which
you have not ordered. Please
note, too, that your motorcycle
might not be exactly as illus-
trated in this manual on account
of country-specific differences.
If your motorcycle contains
equipment that has not been
described, its description can be
found in a separate manual.
Technical data
All dimensions, weights and
power ratings stated in the
Rider’s Manual are quoted to the
standards and comply with the
tolerance requirements of the
Deutsches Institut für Normung
e.V. (DIN). Versions for individual
countries may differ.
Actuality
The high safety and quality level
of BMW motorcycles is ensured
by continuous development
work on design, equipment
and accessories. Because of
this, your motorcycle may differ
from the information supplied
in the Rider’s Manual. Nor
can BMW Motorrad entirely
rule out errors and omissions.
Consequently no claims can be
derived from the information,
graphics or descriptions.
1
7
z
General instructions

1
8
z
General instructions

General views
General view, left side . . . . . . . . . . . . . . . 11
General view, right side . . . . . . . . . . . . . 13
Underneath the seat . . . . . . . . . . . . . . . . 14
Multifunction switch, left . . . . . . . . . . . . 15
Multifunction switch, right . . . . . . . . . . . 17
Instrument panel . . . . . . . . . . . . . . . . . . . . 18
2
9
z
General views
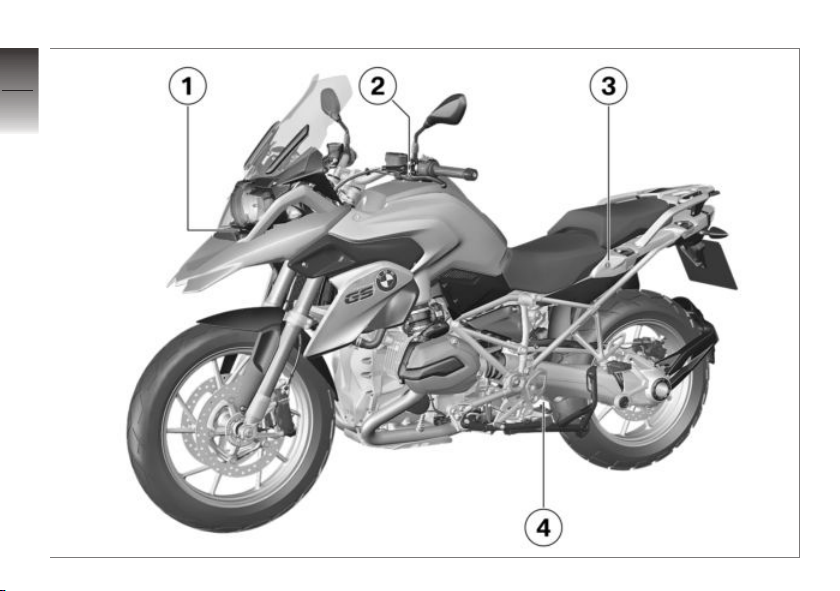
2
10
z
General views

General view, left side
1 with daytime riding
lights
OE
Daytime riding lights
( 61)
2 Fuel filler neck ( 94)
3 Seat lock ( 79)
4 Setting the rear damping
(down at the spring strut)
( 72)
2
11
z
General views
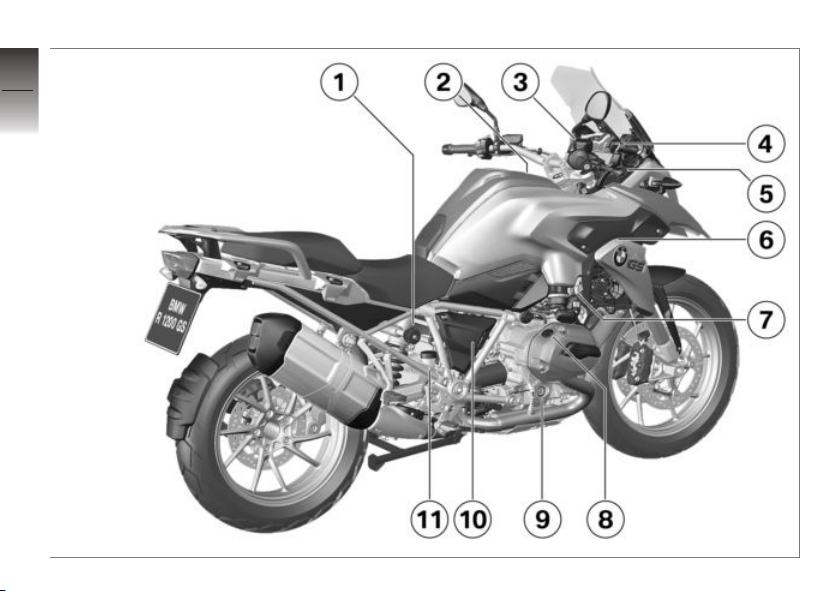
2
12
z
General views

General view, right side
1 Adjuster for spring preload,
rear ( 71)
2 Air filter (underneath the
centre trim panel) ( 132)
3 Brake-fluid reservoir, front
( 114)
4 Height adjustment of the
windscreen ( 79)
5 Power socket ( 142)
6 VIN (on steering-head
bearing)
Type plate (on the frame,
front right)
7 Coolant-level indicator
( 116)
Coolant reservoir ( 117)
8 Oil filler neck ( 112)
9 Engine oil level indicator
( 111)
10 Battery (behind the side
trim panel) ( 134)
Battery support point (be-
hind the side trim panel)
( 133)
11 Brake-fluid reservoir, rear
( 115)
2
13
z
General views
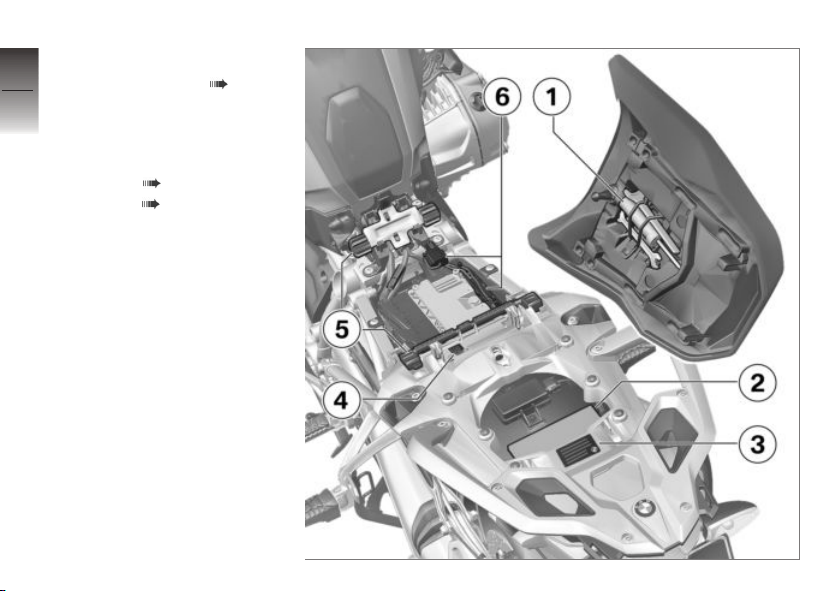
Underneath the seat
1 Standard toolkit ( 110)
2 Rider’s Manual
3 Table of tyre pressures
4 Payload table
5 Adjusting the front seat
height ( 80)
6 Fuses ( 138)
2
14
z
General views
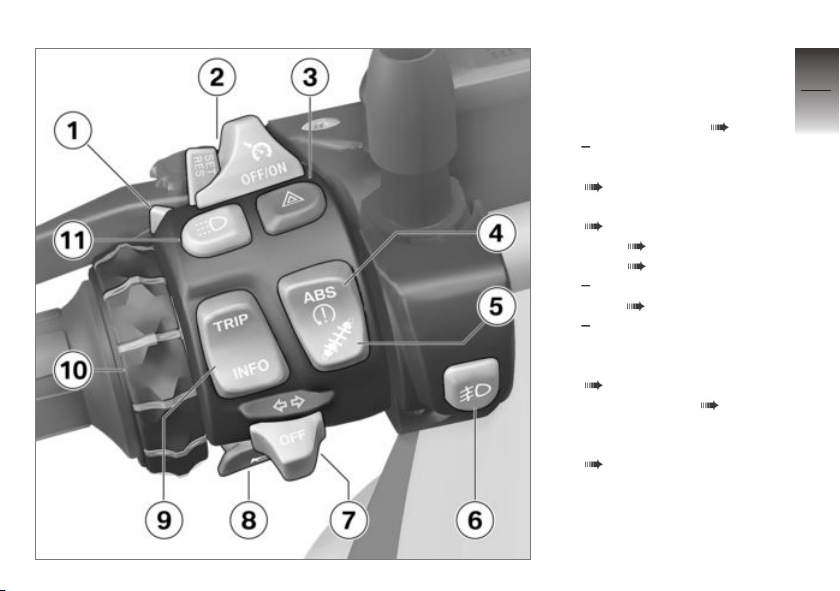
Multifunction switch,
left
1 High-beam headlight and
headlight flasher ( 60)
2 with speed control
OE
Cruise-control system
( 69)
3 Hazard warning flashers
( 63)
4 ABS ( 63)
ASC ( 64)
5 with Dynamic ESA
OE
ESA ( 73)
6 with LED auxiliary head-
light
OA
LED auxiliary headlights
( 60)
7 Turn indicators ( 63)
8 Horn
9 Multifunction display
( 50)
2
15
z
General views

10 with preparation for nav-
igation system
OE
Navigation system
( 144)
11 with daytime riding
lights
OE
Daytime riding lights
( 61)
2
16
z
General views
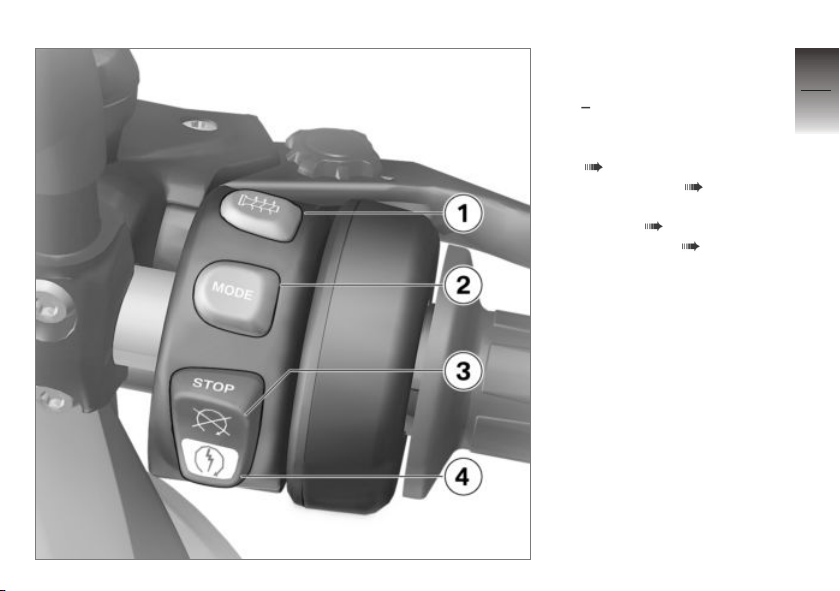
Multifunction switch,
right
1 with heated handlebar
grips
OE
Heated handlebar grips
( 77)
2 Riding mode ( 65)
3 Emergency off switch (kill
switch) ( 58)
4 Start engine ( 87)
2
17
z
General views
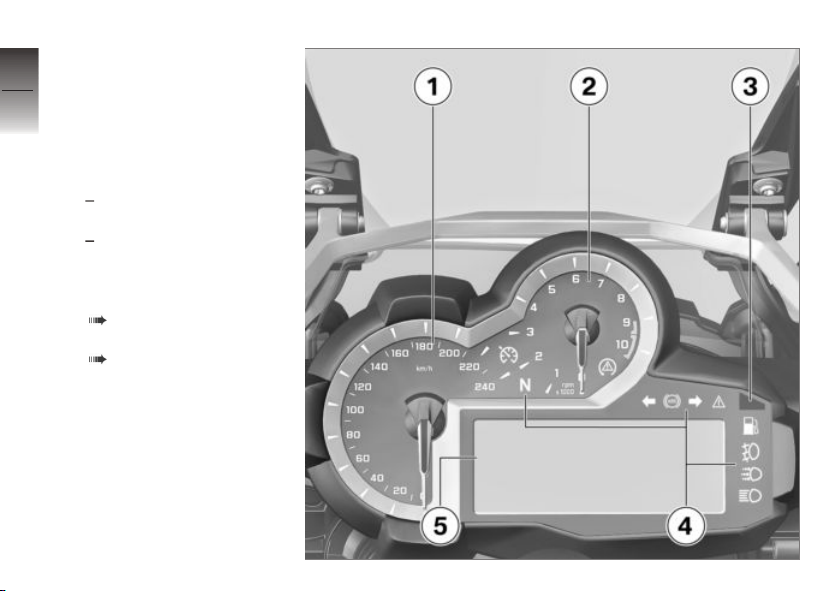
Instrument panel
1 Speedometer
2 Rev. counter
3 Ambient-light brightness
sensor (for adapting the
brightness of the instru-
ment lighting)
with anti-theft alarm
OE
Anti-theft alarm telltale light
with Keyless Ride
OE
Telltale light for the radio-
operated key
4 Warning and telltale lights
( 20)
5 Multifunction display
( 22)
2
18
z
General views

Status indicators
Warning and telltale lights . . . . . . . . . . . 20
Multifunction display . . . . . . . . . . . . . . . . 22
Warning symbols in the display . . . . . 24
Warnings . . . . . . . . . . . . . . . . . . . . . . . . . . . 25
Ambient temperature . . . . . . . . . . . . . . . 39
Fuel reserve . . . . . . . . . . . . . . . . . . . . . . . . 39
Oil level . . . . . . . . . . . . . . . . . . . . . . . . . . . . . 40
Service-due indicator . . . . . . . . . . . . . . . 41
Tyre pressure . . . . . . . . . . . . . . . . . . . . . . . 41
Recommendation to upshift . . . . . . . . 42
3
19
z
Status indicators
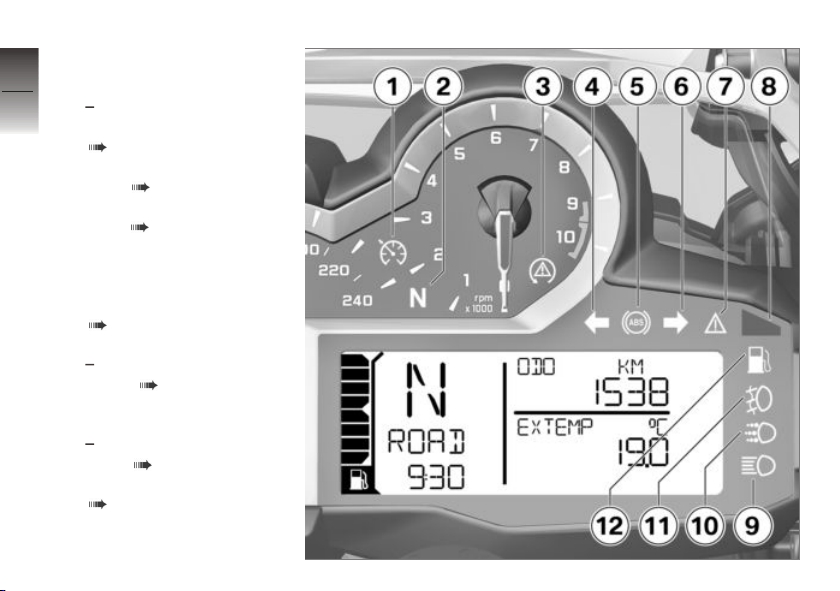
Warning and telltale
lights
1 with speed control
OE
Cruise-control system
( 69)
2 Neutral
3 ASC ( 64)
4 Turn indicators, left
5 ABS ( 63)
6 Turn indicators, right
7 General warning light (in
combination with warn-
ing symbols in the display)
( 25)
8 DWA
with anti-theft alarm
OE
Alarm ( 57)
Telltale light for the radio-
operated key
with Keyless Ride
OE
Keys ( 46)
9 High-beam headlight
( 60)
3
20
z
Status indicators

10 with daytime riding
lights
OE
Daytime riding light
( 61)
11 with LED auxiliary head-
light
OA
Auxiliary headlights ( 60)
12 Fuel reserve ( 39)
The ABS symbol might dif-
fer, depending on the spe-
cifics of national regulations.
3
21
z
Status indicators
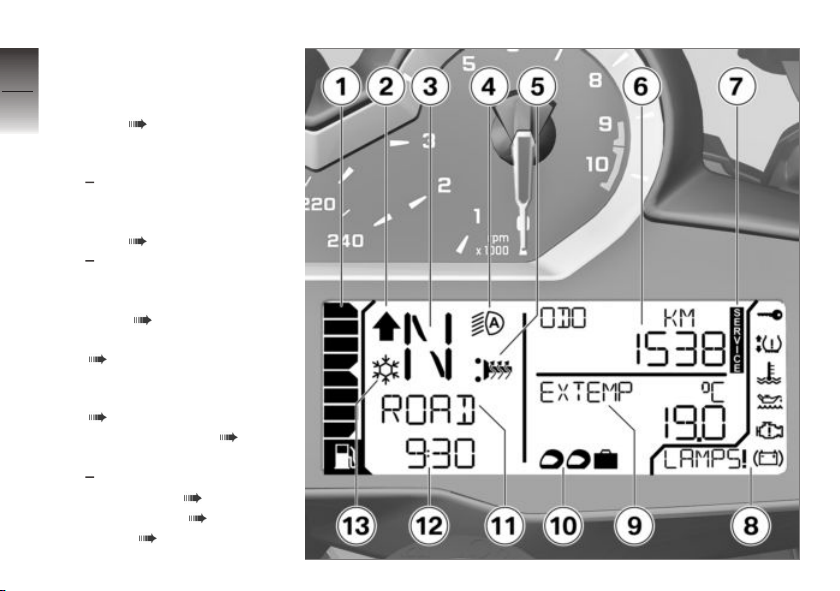
Multifunction display
1 Fuel level
2 Recommendation to up-
shift ( 42)
3 Gear indicator; «N» indic-
ates neutral
4 with daytime riding
lights
OE
Automatic daytime running
light ( 61)
5 with heated handlebar
grips
OE
Heating stages, handlebar
grips ( 77)
6 Odometer and tripmeters
( 50)
7 Service-due indicator
(maintenance interval)
( 176)
8 Warning symbols ( 25)
9 On-board computer
10 with Dynamic ESA
OE
ESA setting ( 73)
11 Riding mode ( 65)
12 Clock ( 53)
3
22
z
Status indicators

13 Outside temperature warn-
ing ( 39)
3
23
z
Status indicators
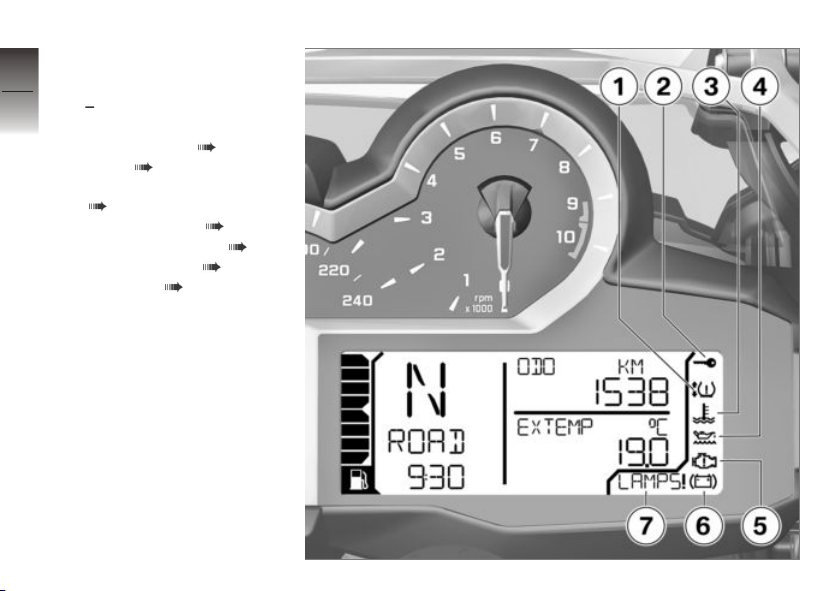
Warning symbols in the
display
1 with tyre pressure monit-
oring (RDC)
OE
Tyre pressure ( 33)
2 EWS ( 30)
3 Coolant temperature
( 31)
4 Engine oil level ( 38)
5 Engine electronics ( 31)
6 Battery charge ( 135)
7 Warnings ( 25)
3
24
z
Status indicators

Warnings
Mode of presentation
Warnings are indicated by the
corresponding warning lights.
Warnings that do not have warn-
ing lights of their own are indic-
ated by ‘General’ warning light 1
showing in combination with a
warning symbol at 2 or a text
warning at 3. The ‘general’ warn-
ing light shows yellow or red, de-
pending on the urgency of the
warning.
The status of the ‘General’ warn-
ing light matches the most ur-
gent warning.
The possible warnings are listed
on the next pages.
3
25
z
Status indicators
Warnings, overview
Warning and telltale
lights
Warning symbols in the
display
Meaning
appears on the
display
Outside temperature warning ( 30)
lights up yellow appears on the
display
Electronic immobiliser active ( 30)
lights up yellow appears on the
display
Radio-operated key out of range ( 30)
lights up yellow
Replace the battery of the radio-oper-
ated key ( 31)
lights up red appears on the
display
Coolant temperature too high ( 31)
lights up yellow appears on the
display
Engine in emergency-operation mode
( 31)
lights up yellow
!LAMP_ appears
on the display
Bulb faulty ( 32)
!LAMPF appears
on the display
3
26
z
Status indicators
Warning and telltale
lights
Warning symbols in the
display
Meaning
DWALO ! appears
on the display
Anti-theft alarm battery weak ( 32)
lights up yellow
DWA ! appears on
the display
Anti-theft alarm battery flat ( 33)
lights up yellow is displayed with
one or two arrows
and the critical tyre
pressure reading
flashes
Tyre pressure close to limit of permitted
tolerance ( 33)
flashes red
is displayed with
one or two arrows
and the critical tyre
pressure reading
flashes
Tyre pressure outside permitted toler-
ance ( 33)
lights up yellow is displayed with
one or two arrows
Sensor defective or system error
( 34)
«—« or «— —«
is displayed
«—« or «— —«
is displayed
Signal transmission disrupted ( 35)
3
27
z
Status indicators
Warning and telltale
lights
Warning symbols in the
display
Meaning
lights up yellow
RDC! appears on
the display
Battery of tyre-pressure sensor weak
( 35)
flashes ABS self-diagnosis not completed
( 36)
lights up
ABS fault ( 36)
lights up
ABS deactivated ( 36)
quick-flashes ASC intervention ( 36)
slow-flashes ASC self-diagnosis not completed
( 36)
lights up
ASC deactivated ( 37)
lights up
ASC fault ( 37)
3
28
z
Status indicators
Warning and telltale
lights
Warning symbols in the
display
Meaning
lights up yellow
ESA! appears on
the display
ESA fault ( 37)
lights up Fuel down to reserve ( 37)
flashes yellow flashes Severe fault in the engine control unit
( 38)
appears on the
display
Engine-oil level too low ( 38)
OILLVL CHECK
appears on the
display
lights up red appears on the
display
Battery charge voltage insufficient
( 38)
3
29
z
Status indicators
Outside temperature
warning
The ice-crystal symbol ap-
pears on the display.
Possible cause:
The air temperature
measured at the vehicle
is lower than:
approx. 3 °C
The ambient temperature
warning does not mean that
there is no risk of ice forming at
measured temperatures above
3 °C.
Always take extra care when
temperatures are low; remember
that the danger of black ice form-
ing is particularly high on bridges
and where the road is in shade.
Ride carefully and think well
ahead.
Electronic immobiliser
active
The «General» warning light
shows yellow.
The warning symbol for
the electronic immobiliser
appears on the display.
Possible cause:
The key being used is not au-
thorised for starting, or commu-
nication between key and engine
electronics is disrupted.
Remove all other vehicle keys
from the same ring as the igni-
tion key.
Use the emergency key.
Have the defective key re-
placed, preferably by an au-
thorised BMW Motorrad dealer.
Radio-operated key out of
range
with Keyless Ride
OE
The «General» warning light
shows yellow.
appears on the display.
Possible cause:
Communication between R/C key
and engine electronics is disrup-
ted.
Check the battery in the radio-
operated key.
with Keyless Ride
OE
Replacing battery of radio-op-
erated key ( 49).
Use the reserve key to con-
tinue your journey.
with Keyless Ride
OE
Battery of the radio-operated
key is empty or loss of the
radio-operated key ( 49).
Remain calm if the warning
symbol appears while you are
3
30
z
Status indicators
riding. You can continue your
journey, the engine will not
switch off.
Have the defective radio-op-
erated key replaced by an au-
thorised BMW Motorrad dealer.
Replace the battery of the
radio-operated key
The «General» warning light
shows yellow.
The battery symbol appears
on the display.
Possible cause:
The integral battery in the
radio-operated key has lost
a significant proportion of its
original capacity. There is no
assurance of how long the R/C
key can remain operational.
with Keyless Ride
OE
Replacing battery of radio-op-
erated key ( 49).
Coolant temperature too
high
The «General» warning light
shows red.
Temperature symbol ap-
pears on the display.
Riding when the engine is
overheated could result in
engine damage.
Compliance with the information
set out below is essential.
Possible cause:
If the coolant level is too low.
Checking coolant level
( 116).
If the coolant level is too low:
Top up the coolant and have
the coolant system checked
by a specialist workshop,
preferably by an authorised
BMW Motorrad dealer.
Possible cause:
The coolant temperature is too
high.
If possible, ride in the part-load
range to cool down the engine.
If the coolant temperature
is frequently too high, have
the fault rectified as soon
as possible by a specialist
workshop, preferably an
authorised BMW Motorrad
dealer.
Engine in emergency-
operation mode
The «General» warning light
shows yellow.
The engine symbol appears
on the display.
The engine is running in
emergency operating mode.
Unusual engine response is a
possibility.
Adapt your style of riding accord-
3
31
z
Status indicators
ingly. Avoid accelerating sharply
and overtaking.
Possible cause:
The engine control unit has dia-
gnosed a fault. In exceptional
cases, the engine stops and re-
fuses to start. Otherwise, the en-
gine runs in emergency operating
mode.
You can continue to ride, but
bear in mind that the usual en-
gine performance might not be
available.
Have the fault rectified as
quickly as possible by a
specialist workshop, preferably
an authorised BMW Motorrad
dealer.
Bulb faulty
The «General» warning light
shows yellow.
!LAMP_ appears on the
display.
!LAMPR: brake light, rear
light, indicator light rear or li-
cense plate light faulty.
!LAMPF: low-beam headlight,
high-beam headlight, parking
light or front turn indicator de-
fective.
!LAMPS: several bulbs de-
fective.
with daytime riding lights
OE
!LAMPF: additionally: day-
time riding light faulty.
A bulb failure on the mo-
torcycle is a safety risk, be-
cause it is easy for other road
users to overlook the vehicle.
Replace defective bulbs as
soon as possible; always carry a
complete set of spare bulbs if
possible.
Possible cause:
One or more bulbs defective.
Identify defective bulb or bulbs
by visual check.
Replacing bulbs for low-beam
and high-beam headlight
( 127).
Replacing bulb for parking light
( 128).
Replacing LED headlight
( 131).
Replacing bulbs for front and
rear turn indicators ( 130).
Replacing LED rear light
( 131).
Replacing LED turn indicators
( 131).
Anti-theft alarm battery
weak
with anti-theft alarm
OE
DWALO ! appears on the
display.
3
32
z
Status indicators

This error message shows
briefly only after the Pre-
Ride-Check completes.
Possible cause:
The integral battery in the anti-
theft alarm has lost a significant
proportion of its original capacity.
There is no assurance of how
long the anti-theft alarm can re-
main operational if the vehicle’s
battery is disconnected.
Seek the advice of a specialist
workshop, preferably an author-
ised BMW Motorrad dealer.
Anti-theft alarm battery
flat
with anti-theft alarm
OE
The «General» warning light
shows yellow.
DWA ! appears on the display.
This error message shows
briefly only after the Pre-
Ride-Check completes.
Possible cause:
The integral battery in the anti-
theft alarm has lost its entire ori-
ginal capacity. There is no as-
surance that the anti-theft alarm
will be operational if the vehicle’s
battery is disconnected.
Seek the advice of a specialist
workshop, preferably an author-
ised BMW Motorrad dealer.
Tyre pressure close
to limit of permitted
tolerance
with tyre pressure monitoring
(RDC)
OE
The «General» warning light
shows yellow.
The tyre symbol with one
or two arrows appears in
the display. The critical tyre pres-
sure flashes.
The up arrow indicates a front-
tyre pressure problem, the down
arrow indicates a rear-tyre pres-
sure problem.
Possible cause:
Measured tyre pressure is close
to the limit of permitted toler-
ance.
Correct the tyre pressure as
stated on the inside cover of
the Rider’s Manual.
Before you adjust tyre pres-
sure, read the information
on temperature compensation
and adjusting pressure in the
section entitled «Engineering
details».
Tyre pressure outside
permitted tolerance
with tyre pressure monitoring
(RDC)
OE
The «General» warning light
flashes red.
3
33
z
Status indicators
The tyre symbol with one
or two arrows appears in
the display. The critical tyre pres-
sure flashes.
Out-of-tolerance tyre pres-
sures impair the motor-
cycle’s handling characteristics.
Adapt your style of riding
accordingly.
The up arrow indicates a front-
tyre pressure problem, the down
arrow indicates a rear-tyre pres-
sure problem.
Possible cause:
Measured tyre pressure is out-
side permitted tolerance.
Check the tyre for damage
and to ascertain whether the
vehicle can be ridden with the
tyre in its present condition.
If the vehicle can be ridden with
the tyre in its present condition:
Correct the tyre pressure at the
earliest possible opportunity.
Before you adjust tyre pres-
sure, read the information
on temperature compensation
and adjusting pressure in the
section entitled «Engineering
details».
You can deactivate RDC
warnings for riding in off-
road mode.
Have the tyre checked for
damage by a specialist
workshop, preferably an
authorised BMW Motorrad
dealer.
If you are unsure whether the
vehicle can be ridden with the
tyre in its present condition:
Do not continue your journey.
Notify the breakdown service.
Sensor defective or
system error
with tyre pressure monitoring
(RDC)
OE
The «General» warning light
shows yellow.
The tyre symbol with one
or two arrows appears in
the display.
«—« or «— —« is displayed.
Possible cause:
Vehicle is fitted with wheels not
equipped with RDC sensors.
Fit wheels and tyres equipped
with RDC sensors.
Possible cause:
1 or 2 RDC sensors have failed
or a system error has occurred.
Have the fault rectified by a
specialist workshop, preferably
an authorised BMW Motorrad
dealer.
3
34
z
Status indicators
Signal transmission
disrupted
with tyre pressure monitoring
(RDC)
OE
«—« or «— —« is displayed.
Possible cause:
The vehicle did not reach
the minimum required speed
( 107).
RDC sensor is not active
min 30 km/h (The RDC sensor
does not transmit its signal
to the vehicle until a certain
minimum speed has been
reached.)
Increase speed above this
threshold and observe the RDC
readings. Assume that a per-
manent fault has not occurred
unless the ‘General’ warning
light comes on to accompany
the symptoms. Under these
circumstances:
Have the fault rectified by a
specialist workshop, preferably
an authorised BMW Motorrad
dealer.
Possible cause:
Wireless communication with the
RDC sensors has been disrupted.
Possible causes include radio-
communication systems operat-
ing in the vicinity and interfering
with the link between the RDC
control unit and the sensors.
Move to another location and
observe the RDC readings. As-
sume that a permanent fault
has not occurred unless the
‘General’ warning light comes
on to accompany the symp-
toms. Under these circum-
stances:
Have the fault rectified by a
specialist workshop, preferably
an authorised BMW Motorrad
dealer.
Battery of tyre-pressure
sensor weak
with tyre pressure monitoring
(RDC)
OE
The «General» warning light
shows yellow.
RDC! appears on the display.
This error message shows
briefly only after the Pre-
Ride-Check completes.
Possible cause:
The integral battery in the tyre-
pressure sensor has lost a sig-
nificant proportion of its original
capacity. There is no assurance
of how long the tyre pressure
control system can remain opera-
tional.
Seek the advice of a specialist
workshop, preferably an author-
ised BMW Motorrad dealer.
3
35
z
Status indicators
ABS self-diagnosis not
completed
ABS warning light flashes.
Possible cause:
ABS self-diagnosis not
completed
The ABS function is not avail-
able, because self-diagnosis
did not complete. (The motor-
cycle has to reach a defined
minimum speed for the wheel
sensors to be checked: min
5 km/h)
Pull away slowly. Bear in mind
that the ABS function is not
available until self-diagnosis has
completed.
ABS fault
ABS warning light flashes.
Possible cause:
The ABS control unit has detec-
ted a fault. The ABS function is
not available.
You can continue to ride. Bear
in mind the more detailed in-
formation on situations that can
lead to an ABS fault message
( 104).
Have the fault rectified as
quickly as possible by a
specialist workshop, preferably
an authorised BMW Motorrad
dealer.
ABS deactivated
ABS warning light flashes.
Possible cause:
The rider has switched off the
ABS system.
Activate the ABS function.
ASC intervention
The ASC warning light
quick-flashes.
The ASC has detected a degree
of instability at the rear wheel
and has intervened to reduce
torque. The warning light flashes
for longer than ASC intervention
lasts. This affords the rider visual
feedback on control intervention
even after the critical situation
has been dealt with.
ASC self-diagnosis not
completed
The ASC warning light
slow-flashes.
3
36
z
Status indicators

Possible cause:
ASC self-diagnosis not
completed
The ASC function is not avail-
able, because self-diagnosis
did not complete. (The motor-
cycle has to reach a defined
minimum speed for the wheel
sensors to be checked: min
5 km/h)
Pull away slowly. The ASC
warning light must go out
within a few metres.
If the ASC warning light contin-
ues to flash:
Seek the advice of a specialist
workshop, preferably an author-
ised BMW Motorrad dealer.
ASC deactivated
The ASC warning light
shows.
Possible cause:
The rider has switched off the
ASC system.
Switch on the ASC function.
ASC fault
The ASC warning light
shows.
Possible cause:
The ASC control unit has detec-
ted a fault. The ASC function is
not available.
You can continue to ride. Bear
in mind that the ASC function
is not available. Bear in mind
the more detailed information
on situations that can lead to
an ASC fault ( 106).
Have the fault rectified as
quickly as possible by a
specialist workshop, preferably
an authorised BMW Motorrad
dealer.
ESA fault
The «General» warning light
shows yellow.
ESA! appears on the display.
Possible cause:
The ESA control unit has detec-
ted a fault. In this condition, the
motorcycle has too much damp-
ing and is uncomfortable to drive,
especially on roads in poor con-
dition.
Have the fault rectified as
quickly as possible by a
specialist workshop, preferably
an authorised BMW Motorrad
dealer.
Fuel down to reserve
Warning light for fuel down
to reserve shows.
Lack of fuel can cause the
engine to run irregularly or
die (risk of accident) and result
in damage to the catalytic con-
verter.
3
37
z
Status indicators

Do not run the fuel tank dry.
Possible cause:
The fuel tank contains no more
than the reserve quantity of fuel.
Reserve fuel
approx. 4 l
Refuelling ( 94).
Severe fault in the engine
control unit
General warning light
flashes yellow.
The engine symbol flashes.
The engine is running in
emergency operating mode.
A risk of damaging the engine
cannot be precluded.
Adapt your style of riding accord-
ingly: ride slowly, avoid accelerat-
ing and overtaking.
If possible, have the motorcycle
brought in and the fault rectified
by a specialist workshop,
preferably an authorised
BMW Motorrad dealer.
Possible cause:
The engine control unit has dia-
gnosed a fault which may cause
severe secondary faults. The en-
gine is in emergency-operation
mode.
It is possible to continue to ride
but not recommended.
Avoid high load and rpm
ranges if possible.
Have the fault rectified as
quickly as possible by a
specialist workshop, preferably
an authorised BMW Motorrad
dealer.
Engine-oil level too low
The oil-can symbol appears
on the display.
OILLVL CHECK appears on
the display.
Possible cause:
The electronic oil-level sensor
has registered an excessively low
oil level. The next time you stop
for fuel:
Check engine oil level ( 111).
If the oil level is too low:
Top up the engine oil ( 112).
If the oil level is correct:
Seek the advice of a specialist
workshop, preferably an author-
ised BMW Motorrad dealer.
Battery charge voltage
insufficient
The «General» warning light
shows red.
The battery symbol appears
on the display.
A discharged battery can
render various systems un-
available, for example the lights,
3
38
z
Status indicators
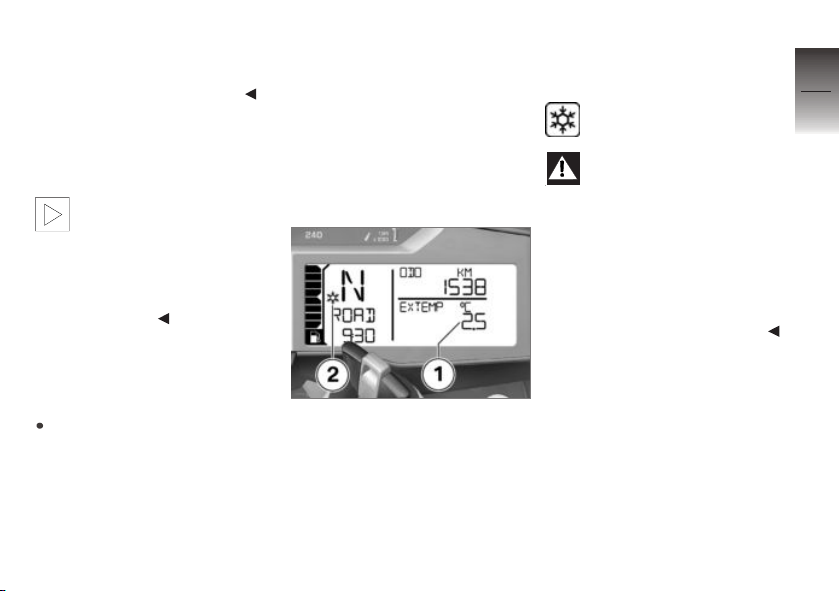
the engine or the ABS. This can
result in dangerous situations.
Do not continue your journey.
Battery is not being charged. If
you continue to ride the vehicle
the on-board electronics will
drain the battery.
If the 12V battery is not
correctly installed or if the
polarity of the terminals is re-
versed (e.g. in an attempt to
jump-start the vehicle), this can
cause the fuse for the alternator
regulator to blow.
Possible cause:
Alternator or alternator drive
faulty or fuse for alternator
regulator has blown.
Have the fault rectified as
quickly as possible by a
specialist workshop, preferably
an authorised BMW Motorrad
dealer.
Ambient temperature
When the motorcycle is at a
standstill, the heat of the engine
can falsify the ambient-tempera-
ture reading. If the effect of the
engine’s heat becomes excess-
ive, — temporarily appears on
the display.
At ambient temperatures be-
low 3 °C, there is a risk of ice
forming. When this temperature
threshold is undershot for the
first time, there will be an auto-
matic switchover to the ambient
temperature display 1, irrespect-
ive of the actual display setting;
the displayed value flashes.
In addition, the ice crystal
symbol 2 is shown.
The ambient temperature
warning does not mean that
there is no risk of ice forming at
measured temperatures above
3 °C.
Always take extra care when
temperatures are low; remember
that the danger of black ice form-
ing is particularly high on bridges
and where the road is in shade.
Fuel reserve
The amount of fuel present in
the fuel tank when the fuel warn-
ing light is switched on is de-
pendent on vehicle dynamics.
The more the fuel moves in-
side the tank (due to regularly
changing angles of heel, fre-
quent braking and acceleration),
the more difficult it becomes to
3
39
z
Status indicators
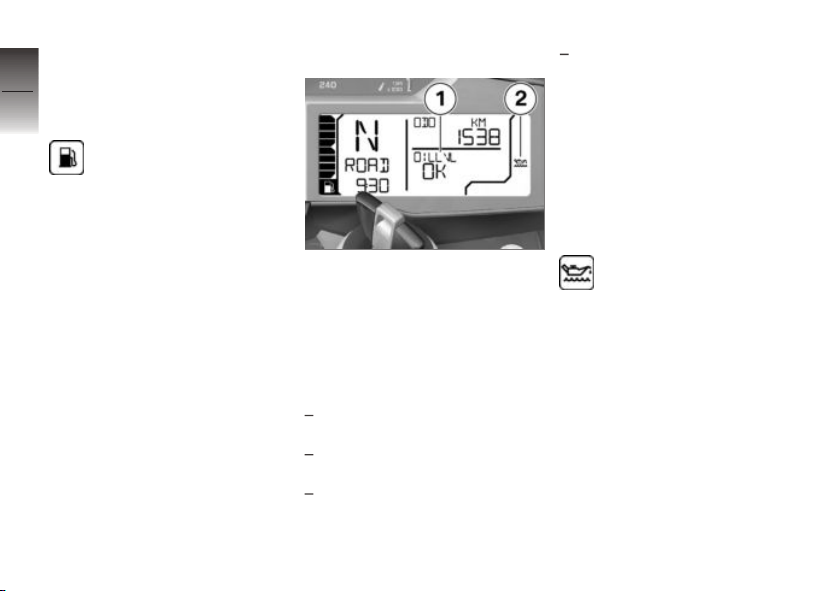
determine the reserve volume.
For this reason, the fuel reserve
volume cannot be displayed ex-
actly.
After the fuel warning light
has switched on, the range
is displayed automatically.
The distance that can still be
travelled using the reserve
volume depends on the style of
driving (usage) and the amount
of fuel remaining at the time the
light came on (see explanation
above).
The odometer for the fuel re-
serve is reset when the amount
of fuel after refuelling is greater
than the reserve volume.
Oil level
The oil-level indicator 1 gives you
an indication of the engine oil
level. You can call up this read-
ing only when the vehicle is at a
standstill.
The preconditions for the oil level
check are as follows:
Engine at operating tempera-
ture
Engine idling for at least ten
seconds
Side stand retracted
Motorcycle standing upright on
a smooth, level surface.
The readings mean:
OK: oil level is correct.
CHECK: check the oil level the
next time you stop for fuel.
—: oil level cannot be meas-
ured (conditions as stated above
not satisfied).
If the oil level needs to be
checked, the symbol 2 is
displayed until the oil level is de-
tected as being correct again.
3
40
z
Status indicators
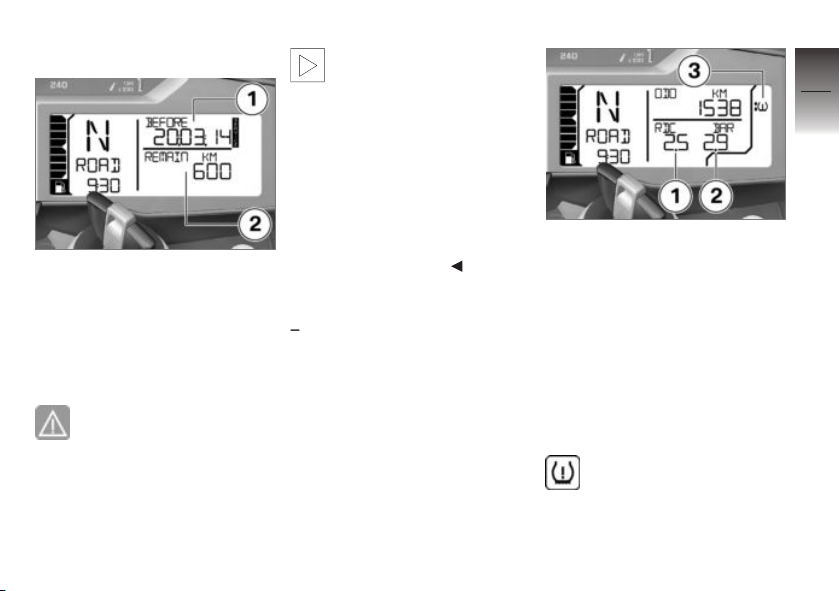
Service-due indicator
If the time remaining to the next
service is less than a month or if
the next service falls due within
1000 km, service due date 1
and countdown distance 2 show
briefly after the Pre-Ride-Check
completes.
If service is overdue, the
due date or the odometer
reading at which service was due
is accompanied by the ‘Gener-
al’ warning light showing yellow.
The word «Service» remains per-
manently visible.
If the service-due indicator
appears more than a month
before the service date, the date
saved in the instrument cluster
must be adjusted. This situation
can occur if the battery was dis-
connected for a prolonged period
of time.
If you want to have the date
set consult a specialist work-
shop, preferably an authorised
BMW Motorrad dealer.
Tyre pressure
with tyre pressure monitoring
(RDC)
OE
The front tyre pressure is on the
left 1; the reading on the right 2
is the rear tyre pressure. « »
appears in the display directly
after the ignition is switched on.
The sensors do not transmit tyre
pressures until the first time the
vehicle accelerates to more than
30 km/h. The reference tyre-air
temperature for these tyre-pres-
sure readings is always 20 °C.
If the symbol 3 also shows,
this is a warning. The crit-
ical tyre pressure flashes.
3
41
z
Status indicators
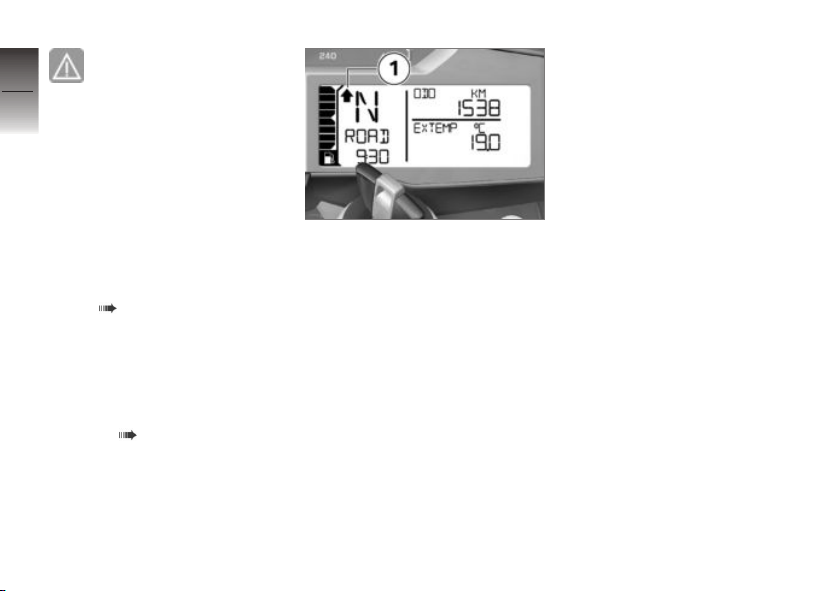
If the value in question is
close to the limit of the
permissible tolerance range, the
reading is accompanied by the
‘General’ warning light showing
yellow. If the tyre pressure re-
gistered by the sensor is outside
the permissible tolerance range,
the ‘General’ warning light flashes
red.
The detailed description of
BMW Motorrad RDC starts on
page ( 107).
Recommendation to
upshift
The upshift recommendation
must be activated in the display
settings ( 52).
The upshift recommendation 1
signals the economically best
point in time for upshift.
3
42
z
Status indicators

Operation
Ignition. . . . . . . . . . . . . . . . . . . . . . . . . . . . . . 44
Ignition with Keyless Ride . . . . . . . . . . . 46
Multifunction display . . . . . . . . . . . . . . . . 50
Anti-theft alarm (DWA) . . . . . . . . . . . . . . 56
Emergency off switch (kill
switch) . . . . . . . . . . . . . . . . . . . . . . . . . . . . . . 58
Headlight . . . . . . . . . . . . . . . . . . . . . . . . . . . 59
Lights . . . . . . . . . . . . . . . . . . . . . . . . . . . . . . . 60
Daytime riding light . . . . . . . . . . . . . . . . . 61
Turn indicators . . . . . . . . . . . . . . . . . . . . . . 63
Hazard warning flashers . . . . . . . . . . . . . 63
BMW Motorrad Integral ABS . . . . . . . 63
Automatic Stability Control ASC . . . . 64
Riding mode . . . . . . . . . . . . . . . . . . . . . . . . 65
Cruise-control system . . . . . . . . . . . . . . 69
Spring preload . . . . . . . . . . . . . . . . . . . . . . 71
Damping . . . . . . . . . . . . . . . . . . . . . . . . . . . . 72
Dynamic ESA, electronic suspension
adjustment. . . . . . . . . . . . . . . . . . . . . . . . . . 73
Clutch . . . . . . . . . . . . . . . . . . . . . . . . . . . . . . 75
Brakes . . . . . . . . . . . . . . . . . . . . . . . . . . . . . . 76
Tyres . . . . . . . . . . . . . . . . . . . . . . . . . . . . . . . 76
Handlebars . . . . . . . . . . . . . . . . . . . . . . . . . 77
Heated handlebar grips . . . . . . . . . . . . . 77
Mirrors . . . . . . . . . . . . . . . . . . . . . . . . . . . . . . 78
Windscreen . . . . . . . . . . . . . . . . . . . . . . . . . 79
Front and rear seats . . . . . . . . . . . . . . . . 79
4
43
z
Operation
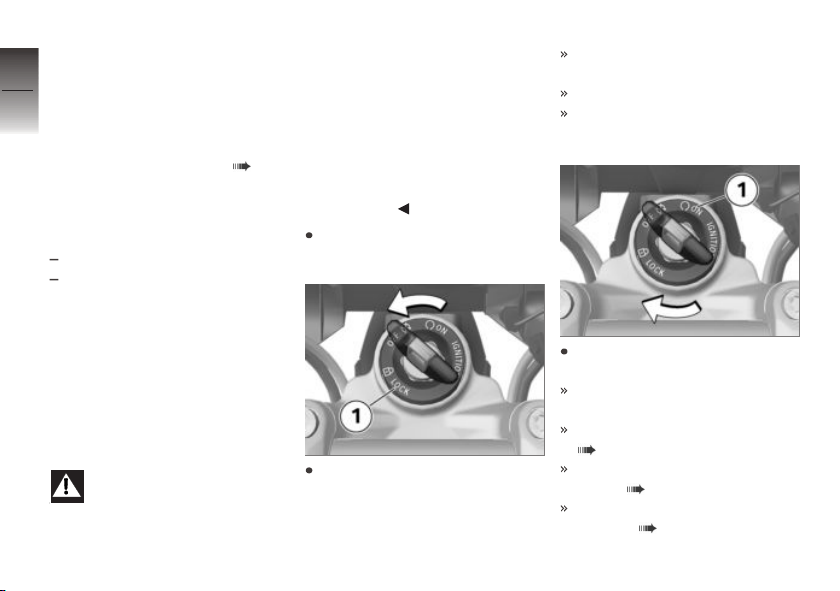
Ignition
Keys
You receive 2 ignition keys.
Please consult the information on
the electronic immobiliser (EWS)
if a key is lost or mislaid ( 45).
Ignition switch/steering lock, fuel
filler cap lock and seat lock are all
operated with the same key.
with cases
OA
with topcase
OA
If you wish you can arrange to
have the cases and the top-
case fitted with locks that can be
opened with the ignition key as
well. Consult a specialist work-
shop, preferably an authorised
BMW Motorrad dealer.
Locking the handlebars
If the motorcycle is on the
side stand, the surface
of the ground will determine
whether it is better to turn the
handlebars to the left or right.
However, the motorcycle is more
stable on a level surface with the
handlebars turned to the left than
with the handlebars turned to the
right.
On level ground, always turn the
handlebars to the left to set the
steering lock.
Turn the handlebars to the full
left or right lock position.
Turn the key to position 1,
while moving the handlebars
slightly.
Ignition, lights and all function
circuits switched off.
Handlebars are locked.
Key can be removed.
Switching on ignition
Insert the key in the ignition
switch and turn to position 1.
Side lights and all function cir-
cuits are switched on.
Pre-Ride-Check is performed.
( 87)
ABS self-diagnosis is in pro-
gress. ( 88)
ASC self-diagnosis is per-
formed. ( 88)
4
44
z
Operation
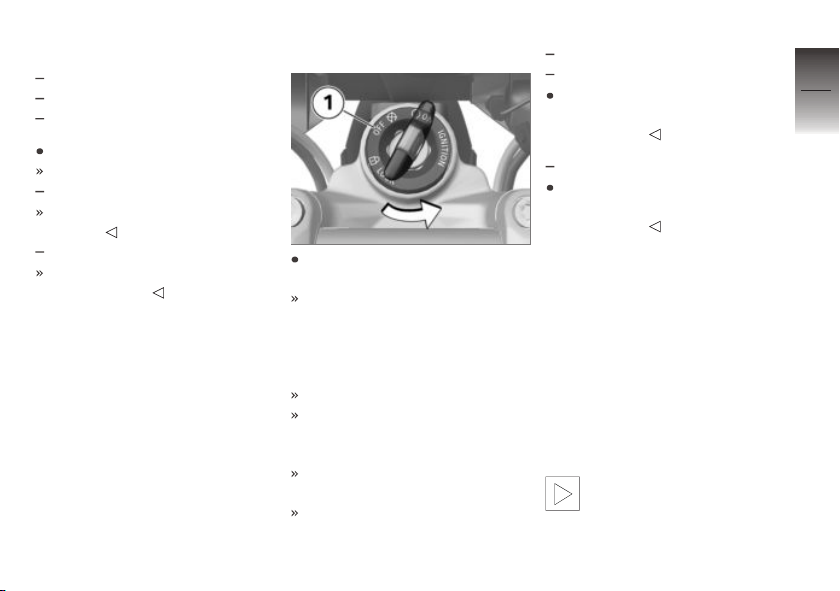
Welcome lights
with LED headlights
OE
with daytime riding lights
OE
with LED auxiliary headlight
OA
Switch on the ignition.
The side lights briefly light up.
with daytime riding lights
OE
The daytime riding lights briefly
light up.
with LED auxiliary headlight
OA
The LED auxiliary headlights
briefly light up.
Switching off ignition
Turn the ignition key to posi-
tion 1.
When the ignition is switched
off, the instrument cluster re-
mains switched on for a short
time and displays any existing
fault messages.
Handlebars not locked.
Electrically powered accessor-
ies remain operational for a lim-
ited period of time.
The battery can be recharged
via the socket.
Key can be removed.
with daytime riding lights
OE
with LED headlights
OE
The daytime running light goes
out soon after the ignition is
switched off.
with LED auxiliary headlight
OA
The LED auxiliary headlights
go out soon after the ignition is
switched off.
Electronic immobiliser
EWS
The electronic design of the
motorcycle allows it to access
data stored in the ignition key
by means of a ring antenna loc-
ated in the ignition switch/steer-
ing lock. The engine control unit
will not permit the engine to be
started unless the key is identi-
fied as “authorised”.
A spare key attached to
the same ring as the igni-
tion key used to start the engine
could «irritate» the electronics,
4
45
z
Operation
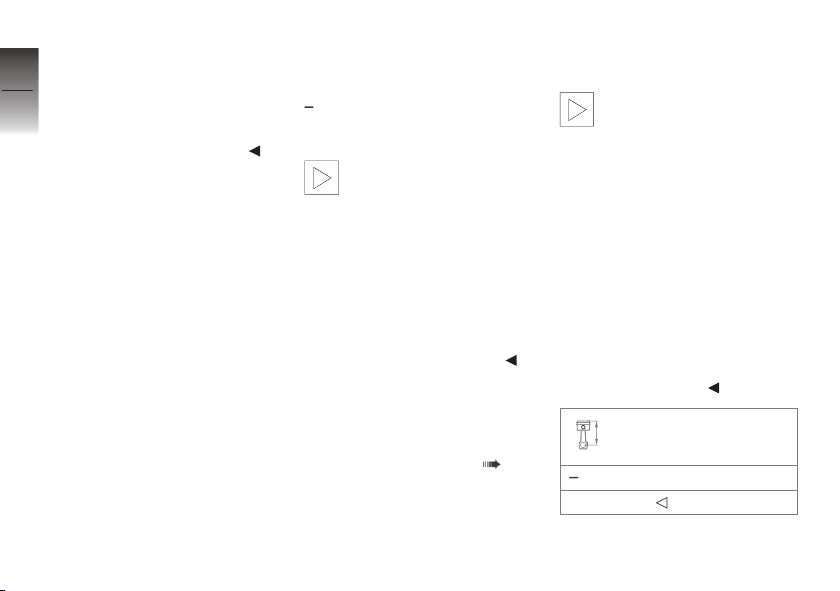
in which case the enabling sig-
nal for starting is not issued. The
warning with the key symbol ap-
pears in the multifunction display.
Always keep the spare key sep-
arately from the ignition key.
If you lose your key, you can
have it barred by your author-
ised BMW Motorrad dealer.
If you wish to do this, you will
need to bring all other keys for
the motorcycle with you. The
engine cannot be started by a
barred key, but a key that has
been barred can subsequently be
reactivated.
You can obtain emergency/extra
keys only through an authorised
BMW Motorrad dealer. The keys
are part of an integrated security
system, so the dealer is under an
obligation to check the legitimacy
of all applications for replace-
ment/extra keys.
Ignition with
Keyless Ride
with Keyless Ride
OE
Keys
The telltale light for the
radio-operated key flashes
while the search for the radio-op-
erated key is in progress.
The telltale light goes out as
soon as the radio-operated key
or the emergency key is found.
The telltale light goes out briefly
if the search times out without
the radio-operated key or the
emergency key being found.
You receive one radio-operated
key and one emergency key.
Please consult the information on
the electronic immobiliser (EWS)
if a key is lost or mislaid ( 45).
Ignition, fuel filler cap and anti-
theft alarm system all work with
the radio-operated key. Seat
lock, topcase and cases can be
locked and unlocked manually.
The vehicle cannot be star-
ted or the central locking
system locked or unlocked if the
radio-operated key is not within
range (e.g. key inside one of the
cases or the topcase).
If the key is taken out of range
the ignition is switched off after
approximately 1.5 minutes, but
the central locking system is not
locked.
It is advisable to keep the radio-
operated key on your person
(e.g. in a jacket pocket) and to
have the emergency key with
you as an alternative.
Range of the Keyless
Ride radio-operated key
with Keyless Ride
OE
approx. 1 m
4
46
z
Operation
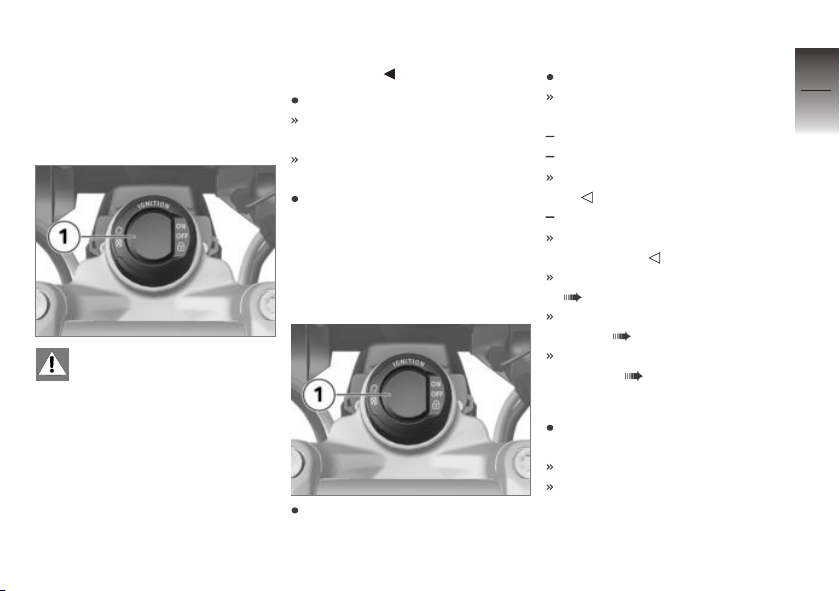
Lock the handlebars
Precondition: handlebars turned
to the right or left full-lock posi-
tion. Radio-operated key is within
range.
If the motorcycle is on the
side stand, the surface
of the ground will determine
whether it is better to turn the
handlebars to the left or right.
However, the motorcycle is more
stable on a level surface with the
handlebars turned to the left than
with the handlebars turned to the
right.
On level ground, always turn the
handlebars to the left to set the
steering lock.
Press and hold down button 1.
The steering lock engages with
an audible click.
Ignition, lights and all function
circuits switched off.
Short-press button 1 to disen-
gage the steering lock.
Switching on ignition
Precondition: radio-operated key
is within range.
There are two ways of activat-
ing the ignition.
Version 1:
Short-press button 1.
Side lights and all function cir-
cuits are switched on.
with daytime riding lights
OE
with LED headlights
OE
Daytime riding light is switched
on.
with LED auxiliary headlight
OA
LED auxiliary headlights are
switched on.
Pre-Ride-Check is performed.
( 87)
ABS self-diagnosis is in pro-
gress. ( 88)
ASC self-diagnosis is per-
formed. ( 88)
Version 2:
Steering lock is engaged; press
and hold down button 1.
The steering lock disengages.
Parking lights and all function
circuits switched on.
4
47
z
Operation

Pre-Ride-Check is performed.
( 87)
ABS self-diagnosis is in pro-
gress. ( 88)
ASC self-diagnosis is per-
formed. ( 88)
Switching off ignition
Precondition: radio-operated key
is within range.
There are two ways of deactiv-
ating the ignition.
Version 1:
Short-press button 1.
Light is switched off.
Handlebars (steering lock) are
not locked.
Version 2:
Turn the handlebars to the full
left or right lock position.
Press and hold down button 1.
Light is switched off.
The steering lock engages.
Electronic immobiliser
EWS
The on-board electronics access
the data saved in the radio-op-
erated key via a ring aerial in the
R/C ignition lock. The ignition is
not enabled for starting until the
engine control unit has recog-
nised the radio-operated key as
«authorised» for your motorcycle.
A spare vehicle key at-
tached to the same ring
as the radio-operated key used
to start the engine could «irritate»
the electronics, in which case the
enabling signal for starting is not
issued. The warning with the key
symbol appears in the multifunc-
tion display.
Always keep the spare key sep-
arately from the radio-operated
key.
If you mislay a radio-operated key
you can have the key in ques-
tion barred by your authorised
BMW Motorrad dealer. In order
to have a key barred you must
bring along all the other keys be-
longing to the motorcycle.
The engine cannot be started
by a barred radio-operated key,
but a radio-operated key that has
been barred can subsequently be
reactivated.
You can obtain emergency/ex-
tra keys only through an author-
ised BMW Motorrad dealer. The
radio-operated keys are part of
an integrated security system, so
the dealer is under an obligation
to check the legitimacy of all ap-
4
48
z
Operation
 Loading…