- Manuals
- Brands
- BMW Manuals
- Motorcycle
- F 800 R —
- Rider’s manual
-
Contents
-
Table of Contents
-
Troubleshooting
-
Bookmarks
Quick Links
Rider’s Manual
F 800 R
BMW Motorrad
The Ultimate
Riding Machine
Related Manuals for BMW F 800 R
Summary of Contents for BMW F 800 R
-
Page 1
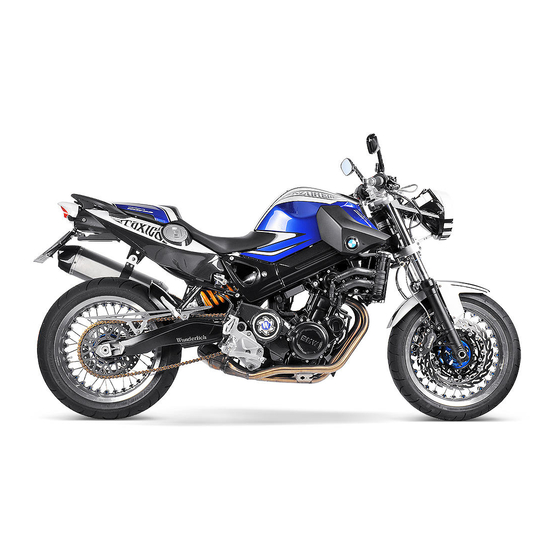
Rider’s Manual F 800 R BMW Motorrad The Ultimate Riding Machine… -
Page 2
Motorcycle data/dealership details Motorcycle data Dealership details Model Person to contact in Service department Vehicle identification number Ms/Mr Phone number Colour code Date of first registration Dealership address/phone number (com- Registration number pany stamp) -
Page 3
The right to modify designs, equipment and accessories is reserved. Errors and omissions excepted. © 2010 BMW Motorrad Not to be reproduced either wholly or in part without written permission from BMW Motorrad, After Sales. Printed in Germany. -
Page 4
89 AKI Usable fuel capacity approx. 16 l Reserve fuel approx. 2 l Tyre pressures Tyre pressure, front 2.5 bar, Tyre cold Tyre pressure, rear 2.9 bar, Tyre cold BMW recommends Order No.: 01 41 8 521 171 06.2010, 3rd edition… -
Page 5
We congratulate you on your choice of a motorcycle from We hope that you will enjoy rid- BMW and welcome you to the ing your BMW and that all your community of BMW riders. journeys will be pleasant and Familiarise yourself with your new safe. -
Page 6: Table Of Contents
Table of Contents You can also consult the index at Emergency off switch (kill 3 Status indicators ..21 the end of this Rider’s Manual if Multifunction display ..22 switch) .
-
Page 7
RDC ……68 Cleaning easily damaged BMW Motorrad service ..130 7 Accessories … . . 71 components . -
Page 9: General Instructions
General instructions General instructions Overview ……6 Abbreviations and symbols ..6 Equipment .
-
Page 10: Overview
BMW optional ex- overview of your motorcycle. All tras originally ordered. Indicates the end of an maintenance and repair work on item of information.
-
Page 11: Equipment
This Rider’s Manual are quoted to the Rider’s Manual describes option- standards and comply with the al extras (OE) offered by BMW tolerance requirements of the and selected optional accessor- Deutsches Institut für Normung ies (OA). This explains why the e.V.
-
Page 13: General Views
General views General views General view, left side ….11 General view, right side … . . 13 Underneath the seat .
-
Page 15: General View, Left Side
General view, left side Payload table (on left on steering-head bearing) Seat lock ( Engine-oil filler neck and oil dipstick (…
-
Page 17: General View, Right Side
General view, right side Fuel filler neck ( Adjuster, spring preload VIN, type plate (on steering-head bearing) Brake-fluid reservoir, front Coolant level indicator (be- hind side panel) ( Power socket ( Adjuster for damping char- acteristic ( Brake-fluid reservoir, rear…
-
Page 18: Underneath The Seat
Underneath the seat Tool for adjusting spring preload ( Standard toolkit ( Rider’s Manual Stowage with first-aid kit Location of the first-aid kit Table of tyre pressures Stowage with service toolkit Location of the service toolkit (…
-
Page 19: Underneath The Centre Trim Pan
Underneath the centre trim panel Battery ( 107) Stowage with tyre repair kit Location of the tyre repair…
-
Page 20: Handlebar Fitting, Left
Handlebar fitting, left High-beam headlight and headlight flasher ( Selecting reading in exten- ded area ( Hazard warning flashers Operation of the flashing turn indicators ( Horn…
-
Page 21: Handlebar Fitting, Right
Handlebar fitting, right with heated handlebar grips Grip heating control Starter button ( Emergency off switch (kill switch) (…
-
Page 22: Instrument Panel
Instrument panel Warning and telltale lights Speedometer Set the clock ( 39). with on-board com- puter Operation of the stopwatch Multifunction display Select the readings 40). Resetting tripmeter 41).
-
Page 23
Ambient-light brightness sensor (for adapting the brightness of the instru- ment lighting) with anti-theft alarm Anti-theft alarm telltale light (see the instructions for use for the anti-theft alarm) with on-board com- puter Redline warning ( Rev. counter The instrument-cluster lighting has automatic day and night switchover. -
Page 25: Status Indicators
Status indicators Status indicators Multifunction display ….22 Meaning of symbols ….23 Fuel capacity .
-
Page 26: Multifunction Display
Multifunction display Trip meter ( Warning for engine elec- tronics ( with on-board com- puter Stopwatch ( Time ( with tyre pressure monit- oring (RDC) Tyre pressures ( Warning for coolant tem- perature ( Service due ( Values area ( with on-board com- puter Symbols explaining the…
-
Page 27: Meaning Of Symbols
Meaning of symbols 11 – with on-board computer the others and the quantity of (optional extra) fuel it represents is significantly with on-board computer larger. Gear indicator; «N» indic- ates neutral Once you have refuelled, the distance travelled after gauge briefly shows the original with on-board com- fuel down to reserve in km level, before the reading is up-…
-
Page 28: Warning And Telltale Lights
Warning and telltale lights Oil-pressure warning light with BMW Motorrad ABS warning light ( Warning light for fuel down to reserve ( General warning light, in combination with warnings in the display ( High-beam headlight tell- tale light Telltale light for right turn…
-
Page 29: Service-Due Indicator
1 is shown briefly consult a specialist workshop, serviced at a date in advance after the Pre-Ride Check com- preferably an authorised BMW of the forecast due date. If the pletes. The month is shown as a Motorrad dealer.
-
Page 30: Ambient Temperature
‘General’ warning light temperature reading. If the effect flashes red. of the engine’s heat becomes ex- The detailed description of BMW The tyre-pressure readings are cessive, temporarily appears Motorrad RDC starts on page based on a reference tyre tem- on the display.
-
Page 31: Warnings
Warnings Warnings in multifunction display A reading in values area 2 that constitutes a warning is accompanied by warning triangle 3. These warnings can Warnings that do not have warn- alternate with the odometer ing lights of their own are indic- readings ( 40).
-
Page 32
Warnings, overview Warning light Status indicators Meaning Lights up yellow + » » appears Electronic immobiliser active ( on the display Lights up Fuel down to reserve ( Lights up red Flashes Coolant temperature too high ( Lights up yellow Appears on the dis- Engine in emergency-operation mode play… -
Page 33
Warning light Status indicators Meaning Flashes ABS self-diagnosis not completed Lights up ABS fault ( Lights up yellow + » » flashes Tyre pressure close to limit of permitted tolerance ( Flashes red Tyre pressure outside permitted toler- + » «… -
Page 34
Have the defective key re- engine, but leave the ignition placed, preferably by an au- Coolant temperature too switched on so that the radiat- thorised BMW Motorrad dealer. high or fan continues to operate. General warning light shows Fuel down to reserve If the coolant temperature is red. -
Page 35
Possible cause: preferably an authorised BMW mode. Motorrad dealer. The engine-oil level is too low. You can continue to ride, but Checking engine oil level Engine in emergency- bear in mind that the usual en- 81). -
Page 36
Ride carefully and think well Replacing the brake light and Seek the advice of a specialist ahead. rear light bulbs ( 102). workshop, preferably an author- Replacing turn indicator bulbs, ised BMW Motorrad dealer. front and rear ( 103). -
Page 37
» (critical pressure) flashes. completed The ABS control unit has detec- ted a fault. The ABS function is with BMW Motorrad ABS Possible cause: not available. Measured tyre pressure is close ABS warning light flashes. You can continue to ride. Bear… -
Page 38
If the motorcycle can be ridden Have the fault rectified by a authorised BMW Motorrad with the tyre in its present condi- specialist workshop, preferably dealer. tion: an authorised BMW Motorrad Signal transmission dealer. Incorrect tyre pressures im- disrupted pair the motorcycle’s hand- Possible cause: ling characteristics. -
Page 39
Possible cause: stances: specialist workshop, preferably The integral battery in the tyre- Have the fault rectified by a an authorised BMW Motorrad pressure sensor has lost a sig- specialist workshop, preferably dealer. nificant proportion of its original an authorised BMW Motorrad capacity. -
Page 41: Operation
Operation Operation Ignition switch and steering lock ..38 Damping ……49 Electronic immobiliser EWS .
-
Page 42: Ignition Switch And Steering Lock
Electrically powered accessor- with topcase ies remain operational for a lim- If you wish you can arrange to with BMW Motorrad ABS ited period of time. have the cases and the top- The battery can be recharged ABS self-diagnosis is case fitted with locks that can via the on-board socket.
-
Page 43: Electronic Immobiliser Ews
You can obtain replacement/extra unit has recognised the key as keys only through an authorised «authorised» for your motorcycle. BMW Motorrad dealer. The keys are part of an integrated security A spare key attached to system, so the dealer is under an…
-
Page 44: Reading
Reading with tyre pressure monitoring (RDC) Select the readings Tyre pressures Switch on the ignition. Warnings, if applicable with on-board computer Press and hold down button 1 until the hours number 2 flashes. Repeatedly press the button until the hours number is cor- Press button 2 to select the rect.
-
Page 45: Stopwatch
Resetting average values Stopwatch Average consumption in l/ 100 km with on-board computer Current consumption in l/ Switch on the ignition. 100 km Select average consumption or average speed. distance travelled after fuel down to reserve in km Resetting tripmeter Switch on the ignition.
-
Page 46
use button 2 to operate the on- Changing button board computer. functions The stopwatch continues to time in the background if you switch back temporarily to the odometer reading. Similarly, the stopwatch continues timing if you temporar- ily switch off the ignition. Operating stopwatch When the stopwatch is stopped, press button 2 to… -
Page 47: Lights
: Stopwatch operated by Low-beam headlight Pull switch 1 back to operate means of the INFO button on the headlight flasher. The low-beam headlight switches the handlebar fitting. on automatically when you start Parking light : Stopwatch operated by the engine. Switch off the ignition.
-
Page 48: Turn Indicators
Turn indicators Centre button 1 to cancel the flashing turn indicators. Operating flashing turn indicators Hazard warning Switch on the ignition. flashers The turn indicators are can- Operating hazard warning celled automatically after flashers you have ridden for approxim- Switch on the ignition. ately 10 seconds, or covered a distance of about 200 m.
-
Page 49: Emergency Off Switch
Emergency off switch gine speeds. If the charge level is low, grip heating is switched (kill switch) off to ensure the battery’s start- ing capability. Engine switched off Normal operating position (run) Emergency off switch (kill switch) Grip heating Repeatedly press button 1 until with heated handlebar grips Operating the kill switch the desired heating stage ap-…
-
Page 50: Clutch
Clutch the span between the clutch lever and the handlebar grip. Adjusting clutch lever The adjusting screw is easi- Attempting to adjust the er to turn if you push the clutch lever while riding the clutch lever forward. motorcycle can lead to accidents. Do not attempt to adjust the Brakes clutch lever unless the motor-…
-
Page 51: Mirrors
Mirrors Adjusting mirror arm Adjusting mirrors Turn adjusting screw 1 clockwise to increase the span Push protective cap 1 up over between the brake lever and the threaded fastener on the Turn the mirror to the correct the handlebar grip. mirror arm.
-
Page 52: Spring Preload
Push the protective cap over Adjust the damping characteristic the threaded fastener. to suit spring preload. If you want to increase spring Spring preload preload, use the tool from the Setting on-board toolkit to turn knob 2 clockwise. It is essential to set spring pre- If you want to reduce spring load of the rear suspension to preload, use the tool from the…
-
Page 53: Damping
Damping Tyres Setting Checking tyre pressure Damping must be adapted to suit Incorrect tyre pressures im- the surface on which the motor- pair the motorcycle’s hand- cycle is ridden and to suit spring ling characteristics and increase preload. the rate of tyre wear. An uneven surface requires Always check that the tyre pres- softer damping than a smooth…
-
Page 54: Headlight
Adjusting headlight beam Check tyre pressures against preferably an authorised BMW the data below. Motorrad dealer. throw Tyre pressure, front Headlight beam throw and spring preload Headlight beam throw is gener- 2.5 bar (Tyre cold) ally kept constant when spring Tyre pressure, rear preload is adjusted to suit load.
-
Page 55: Seat
Beam-throw basic setting Remove the seat and place it, upholstered side down, on a clean surface. Installing seat Turn the key to the left in seat lock 1 and hold it in this pos- Slacken screws 1 on left and ition while pressing down the right.
-
Page 57: Riding
Riding Riding Safety instructions ….54 Checklist ……56 Starting .
-
Page 58: Safety Instructions
Payload of tankbag Note the maximum permissible the year. Your authorised BMW payload and the speed limit Motorrad dealer will be glad to for riding with cases fitted, as advise you on the correct cloth-…
-
Page 59
Settings of the spring-strut and Catalytic converter Risk of overheating shock-absorber system If misfiring causes unburned fuel Cooling would be Imbalanced load to enter the catalytic converter, inadequate if the engine Loose clothing there is a danger of overheating were allowed to idle for a lengthy Insufficient tyre pressure and damage. -
Page 60: Checklist
Pre-ride check is performed. Brakes switch itself off if you start it with Brake-fluid levels, front and rear the gearbox in neutral and then with BMW Motorrad ABS Clutch engage a gear before retracting ABS self-diagnosis is Damping-characteristic setting the side stand.
-
Page 61
0 °C, disengage the clutch after If ambient temperatures are ted if you start the engine before switching on the ignition. very low, you might find it it completes. necessary to open the throttle The start attempt is auto- Phase 1 slightly when starting the en- matically interrupted if bat- The rev. -
Page 62: Running In
Test of the diagnosis-compat- specialist workshop, preferably not show: ible system components with an authorised BMW Motorrad the motorcycle at a standstill. Some malfunctions cannot dealer. ABS warning light flashes. be indicated if one of the warning lights fails to show.
-
Page 63: Speed
dicate that the engine is red- Do not omit the first inspection Tyres do not have their full lining. after 500 — 1200 km. grip when new and there is a risk of accidents at extreme The signal remains active un- Brake pads angles of heel.
-
Page 64: Brakes
The reckoned with in the following with BMW Motorrad ABS higher the wheel load, the more situations: braking force can be transmitted BMW Motorrad ABS prevents Riding in the rain or through without the wheel locking.
-
Page 65: Parking Your Motorcycle
Riding on salted or gritted tee that the motorcycle will rest Centre stand roads. firmly on the stand. with centre stand After work has been carried on Always check that the ground Switch off the engine. the brakes, due to traces of oil under the stand is level and or grease.
-
Page 66: Refuelling
Refuelling The volume of the tank can be utilised to the full only Fuel is highly flammable. A when the motorcycle is propped naked flame close to the on its side stand. fuel tank can cause a fire or ex- Open the protective cap.
-
Page 67: Securing Motorcycle For Transportation
motorcycle are adequately pro- Recommended fuel tected against scratching. Use grade adhesive tape or soft cloths, for example, for this purpose. Super unleaded 95 ROZ/RON 89 AKI Usable fuel capacity Risk of damaging compon- approx. 16 l ents. Take care not to trap Reserve fuel components such as brake lines or wires.
-
Page 68
At the rear, secure the straps to the rear footrests on both sides and tighten the straps. Tighten all the straps uniformly; the motorcycle’s suspension should be compressed as tightly as possible front and rear. -
Page 69: Engineering Details
Engineering details Brake system with BMW Motorrad ABS ……. . 66…
-
Page 70: Brake System With Bmw
Severe braking can cause ing force exceeds the maxim- face. At this instant the BMW the rear wheel to lift off the um transferrable limit, the wheels Motorrad ABS must assume an ground.
-
Page 71
The system is not op- of maintenance. Rear wheel rotating with the timised for special requirements In order to ensure that the BMW motorcycle held stationary by that apply under extreme com- Motorrad ABS is always main- applying the front brake (burn-… -
Page 72: Tyre Pressure Monitoring
15 minutes The tyre-pressure readings BMW Motorrad ABS is unable to after the motorcycle comes to a shown by the multifunction counteract their effects. stop. display are temperature- compensated; the reference tyre…
-
Page 73
Tyre pressure within permitted tyre pressure by the 0.2 bar dif- tolerance. ference between the value in the table and the RDC reading; when Tyre pressure close to limit of the air-line gauge shows 2.6 bar, permitted tolerance. the tyre is inflated to the correct Tyre pressure outside permit- pressure. -
Page 75: Accessories
Accessories Accessories General instructions ….72 Power sockets ….. . 72 Luggage .
-
Page 76: General Instructions
BMW Power sockets are shut down proved by BMW for this purpose. motorcycles without constituting automatically under the following Genuine BMW parts and ac- a safety hazard. Country-specific…
-
Page 77: Luggage
in order to prevent overloading of the on-board electrics. Cable routing The cables from the power sock- ets to the auxiliary devices must be routed in such a way that they: Do not impede the rider Do not restrict the steering Pull luggage strap 1 through Pass luggage strap 1 through angle or obstruct handling…
-
Page 78
Opening cases Pull the grey release lever (OPEN) up again and simultaneously pull case lid 3 out of the retainer. Closing cases Also press catches 3 of the lock straps into retainers 2 until Turn the lock barrel to the they engage. -
Page 79
Press the case lid against the case body. The case volume adapts to the contents. Removing cases Push lock straps 1 out and pull Pull the black release lever 1 them up. (RELEASE) up and simultan- eously pull the case out. This expands the case to max- imum volume. -
Page 80: Topcase
Secure attachment Pull the black release lever 1 Screws 1 inside the case allow (RELEASE) up and simultan- you to make this adjustment. If a case wobbles or is difficult eously push the case into the to fit, it has to be adapted to the topcase upper holder 2.
-
Page 81
Opening topcase Pull the release lever all the way up. The lid of the topcase opens. Close the topcase Push release lever 2 down until it engages. Turn the key to the OPEN pos- Turn the key in the topcase ition in the topcase lock. -
Page 82
Removing topcase Lift the topcase at the rear and remove it from the luggage carrier. Installing topcase Pull the handle up as far as it will go. Push handle 3 down until it engages. Turn the key to the RELEASE Turn the key in the topcase position in the topcase lock. -
Page 83: Maintenance
Maintenance Maintenance General instructions ….80 Toolkit ……80 Engine oil .
-
Page 84: General Instructions
Some of the work calls for spe- Adjusting headlight beam cial tools and a thorough know- throw ( 50). ledge of motorcycle technology. Tools service set If you are in doubt consult a spe- cialist workshop, preferably your with service toolkit authorised BMW Motorrad deal-…
-
Page 85: Engine Oil
BMW Motorrad has assembled In order to ensure that the en- a tools service set that is ideal gine oil level is read correctly,…
-
Page 86: Brake System
Remove the oil dipstick and by a specialist workshop, high. check the oil level. preferably an authorised BMW Always make sure that the oil Motorrad dealer. level is correct. Install the oil dipstick.
-
Page 87
Have the brakes checked by a Visually inspect the left and specialist workshop, preferably Brake-pad wear limit, right brake pads to ascertain an authorised BMW Motorrad front their thickness. Viewing direc- dealer. tion: between wheel and front min 1.0 mm (Friction pad… -
Page 88
Have the brake pads replaced by a specialist workshop, preferably an authorised BMW Visually inspect the brake pads Brake-pad wear limit, Motorrad dealer. to ascertain their thickness. rear… -
Page 89
Move the handlebars to the past the minimum permissible straight-ahead position. thickness. Have the brake pads replaced by a specialist workshop, preferably an authorised BMW Brake fluid level, front Motorrad dealer. (visual inspection) Check the brake-fluid DOT4 brake fluid level, front brakes… -
Page 90
If the brake fluid level drops be- low the permitted level: Have the defect rectified as quickly as possible by a spe- cialist workshop, preferably an authorised BMW Motorrad dealer. -
Page 91: Coolant
Coolant Checking coolant level Make sure the ground is level and firm and place the motor- cycle on its stand. Open cap 1 of the expansion Minimum quantity of tank. coolant Top up coolant to specified level. do not permit the fluid level Close the cap of the expansion to drop below the MIN mark tank.
-
Page 92: Rims And Tyres
Have the clutch checked by a Repeat the steps in this pro- specialist workshop, preferably Clutch play cedure until clutch play is set an authorised BMW Motorrad correctly. dealer. Tighten nut 3. 3 mm (Handlebars turned Check the clutch play…
-
Page 93: Chain
Check the tyre tread e.g. by the letters TI, TWI or by Clean the drive chain with a an arrow. suitable cleaning product, dry it depth and apply chain lubricant. If the tyre tread is worn to minim- Your motorcycle’s handling Wipe off excess lubricant.
-
Page 94
Tighten quick-release axle Chain deflection nut 1 to the specified tight- ening torque. 30…40 mm (Motorcycle with Rear quick-release axle no weight applied, supported in swinging arm on its side stand) 100 Nm If measured value is outside per- mitted tolerance: Checking chain wear Adjust the chain sag ( 90). -
Page 95: Wheels
Tyre recommendation with tyre pressure monitoring and are fundamental to all cal- (RDC) For each size of tyre BMW culations. Any change in these Motorrad tests certain makes, influencing variables, caused for and approves those that it example by a switch to wheels certifies as roadworthy.
-
Page 96
RDC sensor. Remove screws 2 of the brake bore. When changing the tyre, take calipers on left and right. care not to damage the RDC sensor. Be sure to draw the attention of the authorised BMW Motorrad dealer or specialist… -
Page 97
Raise front of motorcycle until the front wheel can turn freely. BMW Motorrad recommends the BMW Motorrad front-wheel stand for lifting the motorcycle. Force the brake pads 3 slightly Install the front-wheel stand apart by rocking brake caliper 4 97). -
Page 98
without centre stand Remove the auxiliary stand. Ease the brake calipers on to the brake discs. Slip spacing bushing 3 onto Raise the front wheel, insert the left-hand side of the wheel quick-release axle 2 and tight- hub. en to specified torque. The front wheel must be Quick-release axle in fork installed right way round to… -
Page 99
Remove the rear wheel Operate the brake several times until the brake pads are bedded. with BMW Motorrad ABS Remove axle nut 2. Slacken locknuts 3 on left and Remove screw 1 and remove right. the speed sensor from its bore. -
Page 100
Always have the security of the fasteners checked by a specialist workshop, preferably an author- ised BMW Motorrad dealer. Roll the rear wheel into the swinging arm, making sure that the brake disc passes between Roll the rear wheel as far for- the brake pads. -
Page 101: Front-Wheel Stand
Place the motorcycle on an aux- wheel. iliary stand before lifting the front wheel with the BMW Motorrad Make sure that the axle fits in- to the recess of the adjusting front-wheel stand. plate. Make sure the ground is level…
-
Page 102: Bulbs
Slacken adjusting screws 1. Make sure the motorcycle is standing firmly. Push the two adapters 2 apart until the front forks fit between Bulbs them. Adjust the adapter studs to suit the front suspension. General instructions Use locating pins 3 to set the A warning appears in the multi- front-wheel stand to the de- function display if a bulb is de-…
-
Page 103
in the section entitled «Technical Replace the defective bulb. data». Do not touch the glass of new bulbs with your fingers. Replacing low-beam and Use a clean, dry cloth to hold high-beam headlight bulb the bulbs when handling them. Make sure the ground is level Dirt deposits, in particular oil and and firm and place the motor- grease, interfere with heat radi-… -
Page 104
Install the bulb, making sure Install cover 1 or cover 2, as Remove cover 2. that alignment is correct at po- applicable. sition 6. Replacing parking-light Close and lock spring clips 4. bulb Make sure the ground is level and firm and place the motor- cycle on its stand. -
Page 105
Bulb for parking light W5W / 12 V / 5 W Remove the bulb from the bulb Insert parking-light bulb 3 into holder. the headlight housing. Replace the defective bulb. Do not touch the glass of new bulbs with your fingers. Push the bulb into the bulb Use a clean, dry cloth to hold socket. -
Page 106
Replacing the brake light and rear light bulbs Make sure the ground is level and firm and place the motor- cycle on its stand. Switch off the ignition. Remove bulb 2. Install bulb 2. Replace the defective bulb. Bulb for tail light/brake light P21/5W / 12 V / 5 W / 21 W Remove screws 1. -
Page 107
Replacing turn indicator Replace the defective bulb. bulbs, front and rear Do not touch the glass of new bulbs with your fingers. Make sure the ground is level Use a clean, dry cloth to hold and firm and place the motor- the bulbs when handling them. -
Page 108: Body Panels
Turn bulb 2 clockwise to install Install screw 1. Remove four screws 1 on it in the bulb housing. left and right and remove the Body panels centre trim panel. Removing centre trim panel Remove the seat ( 51). Working from the inboard side, insert the glass into the bulb housing and close the housing.
-
Page 109
Installing centre trim panel Install four screws 1 on left and Remove circlip 1. right. Install the seat ( 51). Slip the centre trim panel un- derneath the left and right side Remove the right side panels at position 2 and then panel seat it in guides 3 on left and Remove the centre trim panel… -
Page 110: Jump Starting
Install the right side panel A short-circuit can res- ult if the crocodile clips of the jump leads are accident- ally brought into contact with the motorcycle. Use only jump leads fitted with fully insulated crocodile clips at both ends. Jump-starting with a donor- Install circlip 1.
-
Page 111: Battery
The spring-strut screw can Install the centre trim panel be used as an alternative to 105). the battery’s negative terminal. Battery Run the engine of the donor Maintenance instructions vehicle during jump-starting. Start the engine of the vehicle Correct upkeep, recharging and with the discharged battery storage will prolong the life of in the usual way;…
-
Page 112
Use BMW chargers with the without having to disconnect the electrical system. part numbers 71 60 7 688 864 battery from the motorcycle’s… -
Page 113
Comply with the operating in- of disuse. See the instructions structions of the charger. for caring for your battery. Al- ways fully recharge the battery If you are unable to charge before restoring it to use the battery through the on- board socket, you may be using Removing battery a charger that is not compatible… -
Page 114
If you want to have the date set Slip the battery holder over the battery and install screw 3. consult a specialist workshop, preferably an authorised BMW Connection in the wrong Motorrad dealer. sequence increases the risk of short-circuits. -
Page 115: Care
Care Care Care products ….. 112 Washing motorcycle ….112 Cleaning easily damaged compon- ents .
-
Page 116: Care Products
Washing motorcycle until the brake discs and brake Glass of the instrument panel BMW Motorrad recommends pads have dried out. Black, unpainted parts that you use BMW insect re- mover to soften and wash off insects and stubborn dirt on…
-
Page 117: Paint Care
BMW rubber-care Chrome include spilt fuel, oil, grease, products. brake fluid and bird droppings. Use plenty of water and BMW Using silicone sprays for We recommend BMW vehicle shampoo to clean chrome, par- the care of rubber seals can…
-
Page 118: Protective Wax Coating
«puddles» on BMW Motorrad dealer. Com- the surface, instead of forming bine work for laying up/restoring beads. to use with a BMW service or inspection. Laying up motorcycle Restoring motorcycle Clean the motorcycle. to use Removing battery ( 109).
-
Page 119: Technical Data
Technical data Technical data troubleshooting chart ….116 Riding specifications ….127 Threaded fasteners ….117 Engine .
-
Page 120: Troubleshooting Chart
troubleshooting chart Engine does not start at all or is difficult to start. Possible cause Rectification Emergency off switch (kill switch) Kill switch in operating position (run). Side stand Retract the side stand ( 56). Gear engaged and clutch not disengaged. Select neutral or pull the clutch lever ( 56).
-
Page 121: Threaded Fasteners
Threaded fasteners Front wheel Value Valid Brake caliper on fork leg M10 x 1.25 x 35 — 10.9 30 Nm Clamp of quick-release axle M8 x 40 20 Nm Quick-release axle in fork leg M24 x 1.5 50 Nm Rear wheel Value Valid Locknut of the final-drive chain…
-
Page 122
Mirrors Value Valid Locknut (mirror) to clamp ad- apter M14 x 1 20 Nm… -
Page 123: Engine
Engine Engine design Two-cylinder four-stroke, DOHC with chain-and- sprocket drive, 4 valves operated by cam follow- ers, balancing conrod, liquid-cooled cylinders and heads, integral water pump, 6-speed gearbox and dry sump lubrication Displacement 798 cm Cylinder bore 82 mm Piston stroke 75.6 mm Compression ratio 12 : 1…
-
Page 124: Fuel
BMW recommends BP fuels Engine oil Engine oil, capacity 3 l, with filter change products recommended by BMW Motorrad and generally admissible viscosity classes Castrol GPS SAE 10W-40, API SG / JASO MA ~-20 °C SAE 10W-40, API SF / SG / SH ~-20 °C, Operation in winter…
-
Page 125: Clutch
Oil additives BMW Motorrad recommends not using oil addit- ives, because they can have a detrimental effect on clutch operation. Please do not hesitate to contact your authorised BMW Motorrad dealer if you have any questions relating the choice of a suitable engine oil for your motorcycle.
-
Page 126: Rear-Wheel Drive
Rear-wheel drive Type of final drive Chain drive Type of rear suspension Two-arm cast-aluminium swinging arm Number of teeth, rear-wheel drive (Pinion / 20 / 47 sprocket) Running gear Front wheel Type of front suspension Telescopic forks Spring travel, front 125 mm, At wheel Rear wheel Type of rear suspension…
-
Page 127: Brakes
Brake-pad material, rear sintered metal Wheels and tyres Recommended tyre sets You can obtain an up-to-date list of approved tyres from your authorised BMW Motorrad dealer or on the Internet at «www.bmw-motorrad.com». Front wheel front wheel type Cast aluminium, MT H2 front wheel rim size 3.50″…
-
Page 128: Electrics
Rear wheel rear-wheel type Cast aluminium, MT H2 rear wheel rim size 5.5″ x 17″ Tyre designation, rear 180 / 55 ZR 17 Tyre pressures Tyre pressure, front 2.5 bar, Tyre cold Tyre pressure, rear 2.9 bar, Tyre cold Electrics Electrical rating of on-board socket 5 A, One on-board socket Fuses…
-
Page 129
Spark plugs Spark plugs, manufacturer and designation NGK DCPR 8 E Electrode gap of spark plug 0.8…0.9 mm, When new Lighting Bulb for high-beam headlight H7 / 12 V / 55 W Bulbs for the low-beam headlight H7 / 12 V / 55 W Bulb for parking light W5W / 12 V / 5 W Bulb for tail light/brake light… -
Page 130: Frame
Frame Frame type Light alloy weldment with bolt-on tubular steel rear frame type plate location Steering head, right VIN location Steering head, right Dimensions Length of motorcycle 2082 mm Height of motorcycle 1240 mm, without rider at DIN unladen weight Width of motorcycle 812 mm, across mirrors without mirrors Front-seat height…
-
Page 131: Weights
Weights Unladen weight 199 kg, DIN unladen weight, ready for road, 90 % load of fuel, without optional extras Permissible gross weight 405 kg Maximum payload 201 kg Riding specifications Top speed >200 km/h with power reduction 155 km/h…
-
Page 133: Service
Service Service BMW Motorrad service … . 130 BMW Motorrad service quality ..130 BMW Motorrad mobility services — roadside assistance ….130 BMW Motorrad service network .
-
Page 134: Bmw Motorrad Service
To ensure that your BMW is al- BMW Motorrad mobility ably an authorised BMW Motor- ways in optimum condition, BMW rad dealer.
-
Page 135: Bmw Motorrad Service
BMW Service place to look after you and your advance when the time for a ser- The BMW Service is carried out motorcycle in more than 100 vice is approaching, on the basis once a year; the extent of servi- countries.
-
Page 136: Confirmation Of Mainten
Confirmation of maintenance work BMW Pre-delivery BMW Running-in Check Check Completed Completed Odometer reading Next service at the latest or, if logged beforehand, Odometer reading Stamp, signature Stamp, signature…
-
Page 137
BMW Service BMW Service BMW Service Completed Completed Completed Odometer reading Odometer reading Odometer reading Next service Next service Next service at the latest at the latest at the latest or, if logged beforehand, or, if logged beforehand, or, if logged beforehand,… -
Page 138
BMW Service BMW Service BMW Service Completed Completed Completed Odometer reading Odometer reading Odometer reading Next service Next service Next service at the latest at the latest at the latest or, if logged beforehand, or, if logged beforehand, or, if logged beforehand,… -
Page 139
BMW Service BMW Service BMW Service Completed Completed Completed Odometer reading Odometer reading Odometer reading Next service Next service Next service at the latest at the latest at the latest or, if logged beforehand, or, if logged beforehand, or, if logged beforehand,… -
Page 140
BMW Service BMW Service BMW Service Completed Completed Completed Odometer reading Odometer reading Odometer reading Next service Next service Next service at the latest at the latest at the latest or, if logged beforehand, or, if logged beforehand, or, if logged beforehand,… -
Page 141: Confirmation Of Service
Confirmation of service The table is intended as a record of maintenance and repair work, the installation of optional accessories and, if appropriate, special campaign (recall) work. Item Odometer Date reading…
-
Page 142
Item Odometer Date reading… -
Page 143
Brake fluid Technical data, 125 Abbreviations and symbols, 6 Checking fluid level, front, 85 Warning for bulb failure, 31 Checking fluid level, rear, 86 Engineering details, 66 Reservoir, front, 13 Self-diagnosis, 58 Case Reservoir, rear, 13 Operation, 73 Warnings, 33 Brake pads Chain Accessories… -
Page 144
Coolant Engine Fuel Checking fill level, 87 Filler neck, 13 Control, 17 Fill-level indicator, 13 Fill-level indicator, 23 Starting, 56 Refuelling, 62 Topping up, 87 Technical data, 119 Technical data, 120 Warning for Warning for engine overtemperature, 30 Warning for fuel down to electronics, 31 Currency, 7 reserve, 30… -
Page 145
Motorcycle Handlebar fittings Jump starting, 106 care, 111 General view, left side, 16 Cleaning, 111 General view, right side, 17 Laying up, 114 Keys, 38 Hazard warning flashers Parking, 61 Control, 16 Restoring to use, 114 Operation, 44 Lights Multifunction display, 18 Headlight Control, 16 Overview, 22… -
Page 146
Service, 130 Engine, 119 Rear-wheel drive Service toolkit Engine oil, 120 Technical data, 122 Stowage, 14 Frame, 126 Redline warning Service-due indicator, 25 Fuel, 120 Indicator, 18 Spark plugs Rear-wheel drive, 122 Switching on, 59 Technical data, 125 Running gear, 122 Refuelling, 62 Speedometer, 18 Spark plugs, 125… -
Page 147
Trim panels Vehicle identification number Installing centre trim panel, 105 Position on the motorcycle, 13 Removing centre trim panel, 104 troubleshooting chart, 116 Warning lights, 18 Turn indicators Overview, 24 Control, 16 Warnings Operation, 44 Mode of presentation, 27 Type plate With ABS, 33 Position on the motorcycle, 13 With anti-theft alarm, 32…
Page 1 — Rider’s Manual
BMW MotorradRider’s ManualF 800 RThe UltimateRiding Machine
Page 2 — Dealership details
OverviewChapter 2 of this Rider’s Manu-al will provide you with an initialoverview of your motorcycle. Allmaintenance and repair work onthe motor
Page 3
Remove circlip 1 and washer 2.Remove screw 3.Raise the side panel slightly atthe rear and then work it to theside to remove.Open cap of expansion tank
Page 4 — *01417726211*
Install the centre trim panel( 117).ClutchChecking clutch operationPull the clutch lever.The pressure point must beclearly perceptible.If the pressure
Page 5 — Welcome to BMW
TyresChecking tyre tread depthYour motorcycle’s handlingand grip can be impairedeven before the tyres wear tothe minimum tyre tread depthpermitte
Page 6 — Table of Contents
Checking chain tensionMake sure the ground is leveland firm and place the motor-cycle on its stand.Turn the rear wheel until itreaches the position wi
Page 7
Locknut of the final-drivechain tensioning screw19 NmTighten quick-release axlenut 1 to the specified tight-ening torque.Rear quick-release axle inswi
Page 8
and are fundamental to all cal-culations. Any change in theseinfluencing variables, caused forexample by a switch to wheelsother than those installed
Page 9
Once the calipers havebeen removed, there isa risk of the brake pads beingpressed together to the extentthat they cannot be slipped backover the brake
Page 10 — General instructions
Remove quick-release axle 2,while supporting the wheel.Roll the front wheel forward toremove.Remove spacing bushing 3from the left-hand side of thewhe
Page 11 — Currency
Remove the front-wheel stand.without centre standOARemove the auxiliary stand.Ease the brake calipers on tothe brake discs.Tighten screws 1 of the bra
Page 12
Remove axle nut 1.Slacken locknuts 2 on left andright.Slacken adjusting screws 3 onleft and right.Remove adjusting plate 4 andpush the axle in as far
Page 13 — General views
EquipmentWhen you ordered your BMWmotorcycle, you chose variousitems of custom equipment. ThisRider’s Manual describes option-al extras (OE) offe
Page 14
Roll the rear wheel as farforward as possible and loopchain 7 over the sprocket.Seat left adjusting plate 6 inthe swinging arm and installquick-releas
Page 15 — General view, left side
stand and the rear wheel cantopple.Place the motorcycle on an aux-iliary stand before lifting the frontwheel with the BMW Motorradfront-wheel stand.Ma
Page 16
Apply uniform pressure to pushthe front-wheel stand downand raise the motorcycle.with centre standOAIf the motorcycle is raisedtoo far the centre stan
Page 17 — General view, right side
Remove cover 1 for the high-beam headlight or cover 2 forthe low-beam headlight.Disconnect plug 3.Disengage spring clips 4 fromthe fastenings and swin
Page 18 — Underneath the seat
Install cover 1 or cover 2, asapplicable.Replacing parking-lightbulbMake sure the ground is leveland firm and place the motor-cycle on its stand.Switc
Page 19 — Underneath the trim
Push the bulb into the bulbsocket.Insert parking-light bulb 3 intothe headlight housing.Install cover 2.Replacing turn indicatorbulbs, front and rearM
Page 20 — Handlebar fitting, left
Turn bulb 2 counter-clockwiseand remove it from the bulbhousing.Replace the defective bulb.Bulbs for flashing turnindicators, frontR10W / 12 V / 10 Ww
Page 21 — Handlebar fitting, right
Remove screws 1.Pull the bulb housing to therear to remove.Remove bulb 2.Replace the defective bulb.Bulb for tail light/brakelightP21/5W / 12 V / 5 W
Page 22 — Instrument panel
Touching live parts of theignition system with theengine running can cause electricshock.Do not touch parts of the igni-tion system when the engine is
Page 23
BatteryMaintenance instructionsCorrect upkeep, recharging andstorage will prolong the life ofthe battery and are essential ifwarranty claims are to be
Page 25 — Status indicators
systems and connect the chargerdirectly to the battery.If you switch on the igni-tion and the multifunctiondisplay and telltale lights fail tolight up
Page 26 — Standard status
Installing centre trimpanelSlip the centre trim panel un-derneath the left and right sidepanels at position 2 and thenseat it in guides 3 on left andr
Page 27 — Status indicators with
Installing batterySwitch off the ignition.Insert the battery into the bat-tery compartment, with thepositive terminal on the rightin the direction of
Page 28 — Mode of presentation
CareCareCare products . . . . . . . . . . . . . . . . . . . . . 120Washing motorcycle . . . . . . . . . . . . . . . 120Cleaning easily damaged compon-
Page 29
Care productsBMW Motorrad recommendsthat you use the cleaning andcare products you can obtainfrom your authorised BMWMotorrad dealer. The substancesin
Page 30 — LAMP appears on
If plastic parts are cleanedusing unsuitable cleaningagents, the surfaces can be dam-aged.Do not use cleaning agents thatcontain alcohol, solvents or
Page 31 — EWS appears on the display
Remove stains of this kind im-mediately, using cleaning-gradebenzene or petroleum spirit on aclean cloth or ball of cotton wool.BMW Motorrad recommend
Page 32
Technical dataTechnical dataTroubleshooting chart . . . . . . . . . . . . . 124Threaded fasteners . . . . . . . . . . . . . . . . 125Engine . . . . .
Page 33
Troubleshooting chartEngine does not start at all or is difficult to start.Possible cause RemedyEmergency off switch (kill switch) Kill switch in oper
Page 34
Threaded fastenersFront wheel Value ValidBrake caliper on fork legM10 x 1.25 x 35 — 10.9 30 NmClamp of quick-release axleM8 x 40 20 NmQuick-release ax
Page 35
General viewsGeneral viewsGeneral view, left side. . . . . . . . . . . . . . . 11General view, right side . . . . . . . . . . . . . 13Underneath the s
Page 37
EngineEngine design Two-cylinder four-stroke, DOHC with chain-and-sprocket drive, 4 valves operated by cam follow-ers, balancing conrod, liquid-cooled
Page 38 — RdC appears on
FuelRecommended fuel grade 95 ROZ/RON, Super unleadedUsable fuel capacity approx. 16 lReserve fuel approx. 2 lEngine oilEngine oil, capacity 3 l, with
Page 39
ClutchClutch type Multiplate clutch running in oil bathTransmissionGearbox type Claw-shift 6-speed gearbox, integrated into en-gine blockGearbox trans
Page 40 — RdC appears on the display
Rear-wheel driveType of final drive Chain driveSecondary transmission ratio 2,350Running gearFront wheelType of front suspension Telescopic forksSprin
Page 41 — Anti-theft alarm
BrakesType of front brake Hydraulically operated twin disc brake with 4-pis-ton fixed calipers and floating brake discsBrake-pad material, front Sinte
Page 42
Tyre pressuresTyre pressure, front 2.5 bar, Tyre coldTyre pressure, rear 2.9 bar, Tyre coldElectricsElectrical rating of on-board socket 5 A, One on-b
Page 43 — Operation
LightingBulb for high-beam headlight H7 / 12 V / 55 WBulbs for the low-beam headlight H7 / 12 V / 55 WBulb for parking light W5W / 12 V / 5 WBulb for
Page 44 — Ignition switch and
FrameFrame type Light alloy weldment with bolt-on tubular steelrear frameType plate location Steering head, rightVIN location Steering head, rightDime
Page 45 — EWS warning appears in the
WeightsUnladen weight 199 kg, DIN unladen weight, ready for road, 90 %load of fuel, without optional extrasPermissible gross weight 405 kgMaximum payl
Page 49
BMW Motorrad serviceAdvanced technology requiresspecially adapted methods ofmaintenance and repair.If maintenance and re-pair work is performed in-exp
Page 50 — > symbol
contact the Mobile Service or-ganisation of BMW Motorrad.The specialists will provide thenecessary advice and assistance.You will find important count
Page 51 — 0.00.00.0
Confirmation of maintenance workBMW Pre-deliveryCheckCompletedonStamp, signatureBMW Running-inCheckCompletedonOdometer readingNext serviceat the lates
Page 52 — Activating redline warning
BMW ServiceCompletedonOdometer readingNext serviceat the latestonor, if logged beforehand,Odometer readingStamp, signatureBMW ServiceCompletedonOdomet
Page 53 — Low-beam headlight
BMW ServiceCompletedonOdometer readingNext serviceat the latestonor, if logged beforehand,Odometer readingStamp, signatureBMW ServiceCompletedonOdomet
Page 54 — Turn indicators
BMW ServiceCompletedonOdometer readingNext serviceat the latestonor, if logged beforehand,Odometer readingStamp, signatureBMW ServiceCompletedonOdomet
Page 55 — Operating hazard warning
BMW ServiceCompletedonOdometer readingNext serviceat the latestonor, if logged beforehand,Odometer readingStamp, signatureBMW ServiceCompletedonOdomet
Page 56 — Grip heating
Confirmation of serviceThe table is intended as a record of maintenance and repair work, the installation of optional accessoriesand, if appropriate,
Page 57
General view, left side1 Payload table (on left ofsteering-head bearing)2 Seat lock ( 58)3 Engine-oil filler neck( 90)Oil dipstick ( 89)211zGeneral vi
Page 59
AAbbreviations and symbols, 6ABSSelf-diagnosis, 64AccessoriesGeneral instructions, 78Anti-theft alarmTelltale light, 18Warnings, 37BBattery, 15Chargin
Page 60
DDampingAdjuster, rear, 13Adjusting, 55DimensionsTechnical data, 134EElectricsTechnical data, 132Electronic immobiliser EWSWarning, 27Emergency off sw
Page 61
IgnitionSwitching off, 40Switching on, 40Immobiliser, 41Instrument clusterAmbient-light brightnesssensor, 18Overview, 18JJump starting, 113KKeys, 40,
Page 62
RRear-wheel driveTechnical data, 130Redline warningReading, 18Refuelling, 68Reserve volumeWarning, 27Restoring to use, 122Rev. counter, 18Rider’s
Page 63
Turn indicatorsControl, 16Operation, 50Telltale light, 22Type plate, 13Tyre pressure monitoring RDCAdhesive label for rim, 101Operation, 49Status indi
Page 65
General view, right side1 Fuel filler neck ( 68)2 Adjuster for spring preload,rear ( 54)3 VIN, type plate (onsteering-head bearing,right)4 Brake-fluid
Page 66 — Starting
Underneath the seat1 Tool for adjusting springpreload ( 54)2 Standard toolkit ( 88)3 Rider’s Manual4 Location of first-aid kit(OA)5 Table of tyre
Page 68 — Running in
Motorcycle data/dealership detailsMotorcycle dataModelVehicle identification numberColour codeDate of first registrationRegistration numberDealership
Page 69 — How can stopping
Handlebar fitting, left1 High-beam headlight andheadlight flasher ( 50)2 with on-board com-puterOEOperating the on-boardcomputer ( 43)3 Hazard warning
Page 70 — Parking your
Handlebar fitting, right1 with heated handlebargripsOEGrip heating ( 52)2 Starter button ( 62)3 Emergency off switch (killswitch) ( 51)217zGeneral vie
Page 71 — Placing motorcycle on
Instrument panel1 Telltale lights ( 22)2 Speedometer3 Operation of the clock( 42)4 Multifunction display( 22)5 Operating the odometer( 42)with on-boar
Page 72 — Refuelling
The instrument-clusterlighting has automatic dayand night switchover.219zGeneral views
Page 74
Status indicatorsStatus indicatorsStandard status indicators . . . . . . . . . . 22Status indicators with on-boardcomputer . . . . . . . . . . . . . .
Page 75 — Engineering details
Standard statusindicatorsMultifunction display1 Clock ( 42)2 Odometer and tripmeters( 42)Telltale lights1 High-beam headlight2 Flashing turn indicator
Page 76 — BMW Motorrad ABS
If the motorcycle covers long dis-tances in the course of the year,under certain circumstances itmight be necessary to have itserviced at a date in ad
Page 77
Coolant temperatureThe horizontal bars abovethe temperature symbolindicate the coolant temperature.Fuel capacityThe horizontal bars abovethe fuel-pump
Page 78 — Tyre pressure
Warning symbols 1 and 2 canappear on the multifunction dis-play. Text warnings such as 3,for example, appear in the odo-meter panel and are accompan-i
Page 79
Details described or illustratedin this booklet may differ fromthe motorcycle’s actual specifica-tion as purchased, the accessor-ies fitted or th
Page 80
Warnings, overviewTelltale lights Status indicators MeaningLights up yellow Appears on the dis-playElectronic immobiliser active ( 27)EWS appears onth
Page 81 — Accessories
Electronic immobiliseractiveGeneral warning light showsyellow.Warning-triangle symbolappears on the display.EWS appears on the display.Possible cause:
Page 82 — Power socket
preferably an authorised BMWMotorrad dealer.Engine in emergency-operation modeGeneral warning light showsyellow.Engine symbol appears onthe display.Th
Page 83
Warning-triangle symbolappears on the display.LAMP appears on the display.A defective bulb placesyour safety at risk becauseit is easier for other use
Page 84
The detailed descriptions relatingto BMW Motorrad ABS start onpage ( 72), and you will findan overview listing the possiblewarnings on the next page.3
Page 85
Warnings, overviewTelltale lights Status indicators MeaningFlashesSelf-diagnosis not completed ( 32)Lights upABS fault ( 32)331zStatus indicators
Page 86
Self-diagnosis notcompletedABS warning light flashes.Possible cause:The ABS function is notavailable, because self-diagnosis did not complete. Themoto
Page 87
The detailed descriptions relatingto BMW Motorrad RDC start onpage ( 74), and you will findan overview listing the possiblewarnings on the next page.3
Page 88
Warnings, overviewTelltale lights Status indicators MeaningLights up yellow Appears on the dis-playTyre pressure close to limit of permittedtolerance
Page 89
Tyre pressure closeto limit of permittedtoleranceGeneral warning light showsyellow.Warning-triangle symbolappears on the display.The critical pressure
Page 90
Important data for refuellingFuelRecommended fuel grade 95 ROZ/RON, Super unleadedUsable fuel capacity approx. 16 lReserve fuel approx. 2 lTyre pressu
Page 91
mitting signals until the motor-cycle reaches a speed above thisthreshold ( 74).Increase speed above thisthreshold observe the RDCreadings. Assume tha
Page 92
This error message appearsonly briefly after the pre-ride check completes.Possible cause:The integral battery in the tyre-pressure sensor has lost a s
Page 94
OperationOperationIgnition switch and steering lock . . . . 40Electronic immobiliser EWS . . . . . . . . . 41Clock . . . . . . . . . . . . . . . . . .
Page 95 — Brake system, general
Ignition switch andsteering lockKeysYou receive two master keys andone spare key. Please consultthe information on the electronicimmobiliser (EWS) if
Page 96
Turn the key to position 3,while moving the handlebarsslightly.Ignition, lights and all functioncircuits switched off.Handlebars locked.Key can be rem
Page 97 — Brake fluid
been barred can subsequently becleared and reactivated for use.ClockSetting clockAttempting to set the clockwhile riding the motorcyclecan lead to acc
Page 98
The following values can be dis-played:Total distance covered 3Tripmeter 1 (Trip I)Tripmeter 2 (Trip II)with tyre pressure monitoring(RDC)OETyre press
Page 99
Average speedAverage consumptionCurrent consumptionRangeAmbient temperatureWhen the motorcycle is at astandstill the heat of the enginecan falsify amb
Page 100 — Maintenance
Press and hold down button 1until the average-speed readingis reset.Average consumptionAverage consumption 1 is cal-culated by dividing the distanceco
Page 101
Welcome to BMWWe congratulate you on yourchoice of a motorcycle fromBMW and welcome you to thecommunity of BMW riders.Familiarise yourself with your n
Page 102
Current consumptionCurrent consumption 1 is shown.RangeThe range readout 1 indicateshow far you can ride with the fuelremaining in the tank. The figur
Page 103
StopwatchYou can switch from the odo-meter reading to a stopwatch 3.The readout is in hours, minutes,seconds and tenths of a second,with dots as separ
Page 104
Changing buttonfunctionsPress button 1 and button 2at the same time and holdthem down until the readingchanges.FLASH (redline warning) ap-pears, along
Page 105
ON: Redline warning activated.OFF: Redline warning deactiv-ated.To save the setting, pressbutton 1 and button 2 atthe same time and holdthem down unti
Page 106
When the engine is notrunning you can switch onthe lights by switching on the ig-nition and either switching on thehigh-beam headlight or operatingthe
Page 107
Centre button 1 to cancel theflashing turn indicators.Hazard warningflashersOperating hazard warningflashersSwitch on the ignition.The hazard warning
Page 108
a Engine switched offb Normal operating position(run)Grip heatingwith heated handlebar gripsOEOperating grip heatingStart the engine.Grip heating can
Page 109
ClutchAdjusting clutch leverAttempting to adjust theclutch lever while riding themotorcycle can lead to accidents.Do not attempt to adjust theclutch l
Page 110 — Front-wheel stand
MirrorsAdjusting mirrorsTurn the mirror to the correctposition.Adjusting mirror armPush protective cap 1 up overthe threaded fastener on themirror arm
Page 111
Remove on-board toolkit 1.Your motorcycle’s hand-ling will suffer if you do notmatch the spring-preload anddamping-characteristic settings.Adjust
Page 112
Table of ContentsYou can also consult the index atthe end of this Rider’s Manual ifyou want to find a particular topicor item of information.1 Ge
Page 113
Adjusting damping forrear wheelMake sure the ground is leveland firm and place the motor-cycle on its stand.You adjust the damping char-acteristic by
Page 114
Check tyre pressures againstthe data below.Tyre pressure, front2.5 bar (Tyre cold)Tyre pressure, rear2.9 bar (Tyre cold)If tyre pressure is too low:Co
Page 115
Beam-throw basic settingSlacken screws 1 on left andright.Tilt the headlight slightlyabout its horizontal axis untilarrowhead 2 is pointing towardmark
Page 116
RidingRidingSafety instructions . . . . . . . . . . . . . . . . . . 60Checklist . . . . . . . . . . . . . . . . . . . . . . . . . . . . 62Starting . .
Page 117 — Jump starting
Safety instructionsRider’s equipmentDo not ride without the correctclothing. Always wear:HelmetMotorcycling jacket andtrousersGlovesBootsThis app
Page 118
Catalytic converterIf misfiring causes unburned fuelto enter the catalytic converter,there is a danger of overheatingand damage.For this reason, obser
Page 119
ChecklistUse the following checklist tocheck important functions, set-tings and wear limits before youride off.BrakesBrake-fluid levels, front and rea
Page 120
At ambient temperatures below0 °C, disengage the clutch afterswitching on the ignition.The start attempt is auto-matically interrupted if bat-tery vol
Page 121
Have the fault rectified asquickly as possible by aspecialist workshop, preferablyan authorised BMW Motorraddealer.ABS self-diagnosiswith BMW Motorrad
Page 122
Avoid low engine speeds at fullload.Do not omit the first inspectionafter 500 — 1200 km.Brake padsNew brake pads have to beddown before they can achie
Page 123
Securing motorcycle fortransportation . . . . . . . . . . . . . . . 696 Engineering details. .. . . 71Brake system with BMWMotorrad ABS . . . . . . .
Page 124 — Plastics
Descending mountainpassesThere is a danger of thebrakes fading if you useonly the rear brakes when des-cending mountain passes. Underextreme condition
Page 125 — Paint care
Switch off the engine.Pull the handbrake lever.Hold the motorcycle uprightand balanced.Use your left foot to extend theside stand fully.The side stand
Page 126
Dismount and keep your lefthand on the left handlebar grip.Grip the rear frame with yourright hand.Use your right foot on the pinof the centre stand t
Page 127
The volume of the tank canbe utilised to the full onlywhen the motorcycle is proppedon its side stand.Open the protective cap.Use the ignition key to
Page 128 — Troubleshooting chart
tected against scratching. Useadhesive tape or soft cloths, forexample, for this purpose.The motorcycle can toppleand fall on its side.Make sure that
Page 129 — Threaded fasteners
Engineering detailsEngineering detailsBrake system with BMW MotorradABS . . . . . . . . . . . . . . . . . . . . . . . . . . . . . . . . 72Tyre pressur
Page 130
Brake system withBMW Motorrad ABSwith BMW Motorrad ABSOEHow does ABS work?The amount of braking force thatcan be transferred to the roaddepends on fac
Page 131
What is the designbaseline for BMWMotorrad ABS?Within the limits imposed byphysics, BMW Motorrad ABS en-sures directional stability on anysurface. The
Page 132 — Engine oil
momentum take over and evenBMW Motorrad ABS is unable tocounteract their effects.Tyre pressuremonitoring RDCwith tyre pressure monitoring(RDC)OEFuncti
Page 133 — Transmission
A warning is also issued if tyrepressure drops sharply but stayswithin the permitted tolerance.675zEngineering details
Page 136 — Electrics
AccessoriesAccessoriesGeneral instructions. . . . . . . . . . . . . . . . . 78Power socket . . . . . . . . . . . . . . . . . . . . . . . 78Luggage . .
Page 137
General instructionsBMW Motorrad recommendsthe use of parts and accessoriesfor your motorcycle that are ap-proved by BMW for this purpose.Genuine BMW
Page 138 — Dimensions
order to ensure that the drain onthe on-board power supply sys-tem is minimised, the supply tothe power socket is cut off ap-proximately 15 minutes af
Page 139 — Riding specifications
Maximum permissiblespeed for riding with top-case fitted to the motorcyclesee label in topcasewith tank rucksackOANote the maximum permissiblepayload
Page 140
Opening casesTurn the lock barrel to theOPEN position.Pull the grey release lever 1(OPEN) up.Lock straps 2 open.Pull the grey release lever(OPEN) up a
Page 141
Press the case lid against thecase body.The case volume adapts to thecontents.Removing casesTurn the lock barrel to the RE-LEASE position.Pull the bla
Page 142
Secure attachmentIf a case wobbles or is difficultto fit, it has to be adapted to thegap between the top and bottomholders.Screws 1 inside the case al
Page 143 — Maintenance work
Pull the release lever all theway up.The lid of the topcase opens.Closing topcasePull release lever 2 all the wayup.Close the lid of the topcaseand ho
Page 144 — BMW Running-in
Hook the topcase into positionon the luggage carrier. Makesure that hooks 4 are securelyseated in the correspondingkeepers 5.Push handle 3 down until
Page 145 — BMW Service
General instructionsGeneral instructionsOverview . . . . . . . . . . . . . . . . . . . . . . . . . . . . 6Abbreviations and symbols . . . . . . . . .
Page 147
MaintenanceMaintenanceGeneral instructions. . . . . . . . . . . . . . . . . 88Toolkit . . . . . . . . . . . . . . . . . . . . . . . . . . . . . . 88En
Page 148
General instructionsThe «Maintenance» chapter de-scribes straightforward proced-ures for checking and replacingcertain wear parts.Special ti
Page 149 — Confirmation of service
1 Extending tool holderholds all tools by means ofadapters, and for removingthe spark plug2 1/4″ bitsBits of various sizes3 3/8″ adapter for
Page 150 — Item Odometer
Remove oil dipstick 1.Wipe the oil off MIN-MAX partof dipstick 2 with a clean, drycloth.Seat the oil dipstick on the oilfiller neck, but do not engage
Page 151
Damage to the enginecan result if it is operatedwithout enough oil, but the samealso applies if the oil level is toohigh.Always make sure that the oil
Page 152
Brake-pad wear limit,frontmin 1.0 mm (Friction padonly, without backingplate. The wear indicators(grooves) must be clearlyvisible.)If the wear indicat
Page 153
Brake-pad wear limit, rearmin 1.0 mm (Friction padonly, without backing plate.The wear indicators must beclearly visible.)If the wear indicating mark
Page 154
Brake fluid level, front(visual inspection)DOT4 brake fluidDo not permit the brake fluidlevel to drop below the MINmark.If the brake fluid level drops
Page 155
Brake fluid level, rear(visual inspection)DOT4 brake fluidDo not permit the brake fluidlevel to drop below the MINmark.If the brake fluid level drops
(Ocr-Read Summary of Contents of some pages of the BMW F800 R Document (Main Content), UPD: 15 February 2023)
-
135, Lighting Bulb for high-beam headlight H7 / 12 V / 55 W Bulbs for the low-beam headlight H7 / 12 V / 55 W Bulb for parking light W5W / 12 V / 5 W Bulb for tail light/brake light P21/5W / 12 V / 5 W / 21 W Bulbs for flashing turn indicators, front R10W / 12 V / 10 W with white turn indicators OE RY10W / 12 V / 10 W with LED turn indicators OE LED / 12 V Bulbs for flashing turn indicators, rear R10W / 12 V / 10 W…
-
55, Clutch Adjusting clutch lever Attempting to adjust the clutch lever while riding the motorcycle can lead to accidents. Do not attempt to adjust the clutch lever unless the motor- cycle is at a standstill. Turn adjusting screw 1 clockwise to increase the span between the clutch lever and the handlebar grip. Turn adjusting screw 1 counter-clockwise to reduce the span between the clutch lever and the handlebar grip. The adjusting screw is easi- er to turn if you push the clutch lever…
-
80, General instructions BMW Motorrad recommends the use of parts and accessories for your motorcycle that are ap- proved by BMW for this purpose. Genuine BMW parts and ac- cessories and other products which BMW has approved can be obtained from your authorised BMW Motorrad dealer, together with expert advice on their install- ation and use. These parts and products have been tested by BMW for safety, function and suitability. BMW accepts product liability for them. Conversely…
-
144, BMW Service Completed on Odometer reading Next service at the latest on or, if logged beforehand, Odometer reading Stamp, signature BMW Service Completed on Odometer reading Next service at the latest on or, if logged beforehand, Odometer reading Stamp, signature BMW Service Completed on Odometer reading Next service at the latest on or, if logged beforehand, Odometer reading Stamp, signature 11 142 z Service
… -
15, General view, right side 1 Fuel filler neck ( 68) 2 Adjuster for spring preload, rear ( 54) 3 VIN, type plate (on steering-head bearing, right) 4 Brake-fluid reservoir, front ( 93) 5 Coolant-level indicator ( 95) 6 with power socket OE Power socket ( 78) 7 Adjuster for damping char- acteristic, rear suspension ( 55) 8 Brake-fluid reservoir, rear ( 94) 2 13 z General views
… -
82, BMW F800 R Maximum permissible speed for riding with top- case fitted to the motorcycle see label in topcase with tank rucksack OA Note the maximum permissible payload of the tank rucksack. Payload of tank rucksack }5 kg with tankbag OA Note the maximum permissible payload of the tankbag. Payload of tankbag }5 kg Lashing luggage Remove the seat ( 58). Pull luggage strap 1 through underneath the seat in the vi- cinity 2 of the filler neck of the fuel tank. Make sure that the strap is in front of the rib…
-
100, BMW F800 R Tyres Checking tyre tread depth Your motorcycle’s handling and grip can be impaired even before the tyres wear to the minimum tyre tread depth permitted by law. Have the tyres changed in good time before they wear to the minimum permissible tread depth. Make sure the ground is level and firm and place the motor- cycle on its stand. Measure the tyre tread depth in the main tread grooves with wear marks. Tyres have we…
-
134, Tyre pressures Tyre pressure, front 2.5 bar, Tyre cold Tyre pressure, rear 2.9 bar, Tyre cold Electrics Electrical rating of on-board socket 5 A, One on-board socket Fuses Electronic fuses protect the circuits. If an elec- tronic fuse trips and de-energises a circuit, the circuit is active as soon as the ignition is switched on after the fault has been rectified. Battery Battery, manufacturer and designation ETX 14 BS Bat…
-
97, Brake fluid level, rear (visual inspection) DOT4 brake fluid Do not permit the brake fluid level to drop below the MIN mark. If the brake fluid level drops be- low the permitted level: Have the defect rectified as quickly as possible by a spe- cialist workshop, preferably an authorised BMW Motorrad dealer. Coolant Checking coolant level Make sure the ground is level and firm and place the motor- cycle on its stand. Check the coolant level…
-
155, 3 .4 565%# 7 *$ 89 *$ , ( # ,$4 # ( ( # ,$. …
-
72, tected against scratching. Use adhesive tape or soft cloths, for example, for this purpose. The motorcycle can topple and fall on its side. Make sure that the motorcycle cannot topple sideways. Push the motorcycle onto the transportation flat and hold it in position: do not place it on the side stand or centre stand. Risk of damaging compon- ents. Take care not to trap components such as brake lines or wires. At …
-
137, Weights Unladen weight 199 kg, DIN unladen weight, ready for road, 90 % load of fuel, without optional extras Permissible gross weight 405 kg Maximum payload 201 kg Riding specifications Top speed >200 km/h with power reduction OE 155 km/h 10 135 z Technical data
… -
8, Overview Chapter 2 of this Rider’s Manu- al will provide you with an initial overview of your motorcycle. All maintenance and repair work on the motorcycle is documented in Chapter 11. This record of the maintenance work you have had performed on your motorcycle is a precondition for generous treat- ment of goodwill claims. When the time comes to sell your BMW, please remember to hand over this Rider’s Manu- al; it is an important part of the motorcycle. Abbreviations and symbols Indi…
-
33, Warnings, overview Telltale lights Status indicators Meaning Flashes Self-diagnosis not completed ( 32) Lights up ABS fault ( 32) 3 31 z Status indicators
… -
66, Have the fault rectified as quickly as possible by a specialist workshop, preferably an authorised BMW Motorrad dealer. ABS self-diagnosis with BMW Motorrad ABS OE BMW Motorrad ABS performs self-diagnosis to ensure its op- erability. Self-diagnosis is per- formed automatically when you switch on the ignition. The mo- torcycle has to move forward a few metres for the wheel sensors to be tested. Phase 1 Test of…
-
94, BMW F800 R Brake-pad wear limit, front min 1.0 mm (Friction pad only, without backing plate. The wear indicators (grooves) must be clearly visible.) If the wear indicating marks are no longer clearly visible: Brake pads worn past the minimum permissible thick- ness can cause a reduction in braking efficiency and under certain circumstances they can cause damage to the brake sys- tem. In order to ensure the dependab- ility of the brake system, do not permit the brake pads to wear pas…
-
109, stand and the rear wheel can topple. Place the motorcycle on an aux- iliary stand before lifting the front wheel with the BMW Motorrad front-wheel stand. Make sure the ground is level and firm and place the mo- torcycle on a suitable auxiliary stand. with centre stand OA Make sure the ground is level and firm and place the motor- cycle on its centre stand. Use basic stand (0 402 241) with front-wheel adapter (0 402 242). Slacken adjustin…
![]()
|
BMW Motorrad |
||
|
The Ultimate |
||
|
bmw motorrad.com |
Riding Machine |
|
Rider’s Manual (US Model)
F 800R

Motorcycle/Retailer Data
Motorcycle Data
Model
Vehicle identification number
Color number
Initial registration
License plate
Retailer Data
Contact in Service
Ms./Mr.
Phone number
Retailer’s address/phone number (company stamp)
Welcome to BMW
Congratulations on choosing a motorcycle from BMW Motorrad and welcome to the community of BMW motorcycle owners and riders. Familiarize yourself with your new motorcycle so that you can ride it safely and confidently in all highway traffic situations.
About this Rider’s Manual
Please read this Rider’s Manual carefully before starting to use your new BMW. It contains important information on how to operate the controls and how to get the most benefit from your BMW’s advanced technical features.
In addition, it contains information on maintenance and care to help you maintain your motorcycle’s reliability and safety, as well as its value.
Documentation confirming performance of scheduled maintenance is a precondition for generous handling of out-of-warranty claims and goodwill warranty treatment.
Should you want to sell your BMW one day, please also remember to turn over the Ride’s Manual to the new owner. it is an important part of your motorcycle.
Suggestions and complaints
If you have any questions concerning your motorcycle, your authorized BMW Motorrad retailer is always happy to provide advice and assistance.
We wish you many miles of safe and enjoyable riding on your BMW
BMW Motorrad.
01 40 8 388 337
*01408388337*
*01408388337*
Table of Contents
1 General instructions …. 5
Overview . . . . . . . . . . . . . . . . . . . . . 6 Abbreviations and
symbols . . . . . . . . . . . . . . . . . . . . . . 6 Equipment . . . . . . . . . . . . . . . . . . . 7 Technical Data . . . . . . . . . . . . . . . 7 Notice concerning current status . . . . . . . . . . . . . . . . . . . . . . . . . . . 7
2 Overviews ……………. 9
General view, left side . . . . . . . 11 General view, right side . . . . . 13 Underneath seat . . . . . . . . . . . . 14 Underneath the center fair-
ing panel . . . . . . . . . . . . . . . . . . . . 15 Multifunction switch, left . . . . 16 Multifunction switch,
right . . . . . . . . . . . . . . . . . . . . . . . . . 17 Instrument panel . . . . . . . . . . . . 18
3 Displays …………….. 21
Indicator and warning
lights . . . . . . . . . . . . . . . . . . . . . . . . 22 Multifunction display . . . . . . . . 23 Multifunction display . . . . . . . . 24 Onboard computer
display . . . . . . . . . . . . . . . . . . . . . . 25 Warning lights . . . . . . . . . . . . . . . 25 Service display . . . . . . . . . . . . . . 37 Fuel gage . . . . . . . . . . . . . . . . . . . 38 Fuel reserve . . . . . . . . . . . . . . . . . 38
4 Operation……………. 41
Steering and ignition
lock . . . . . . . . . . . . . . . . . . . . . . . . . 42 Emergency on/off switch (kill switch) . . . . . . . . . . . . . . . . . . . . . . 44 Lights . . . . . . . . . . . . . . . . . . . . . . . 44 Hazard warning lights sys-
tem . . . . . . . . . . . . . . . . . . . . . . . . . 45 Turn indicators . . . . . . . . . . . . . . 45 Display . . . . . . . . . . . . . . . . . . . . . . 46 Clock . . . . . . . . . . . . . . . . . . . . . . . . 48 Stopwatch. . . . . . . . . . . . . . . . . . . 48
Automatic Stability Control (ASC) . . . . . . . . . . . . . . . . . . . . . . . 50 Electronic suspension adjustment (ESA) . . . . . . . . . . . . . . 51 Riding mode . . . . . . . . . . . . . . . . 52 Heated handlebar grips . . . . . 53 Seat . . . . . . . . . . . . . . . . . . . . . . . . . 54 Passenger seat cover . . . . . . . 54
5 Alarm system ……….. 57
Overview . . . . . . . . . . . . . . . . . . . . 58 Activation . . . . . . . . . . . . . . . . . . . 58 Alarm function. . . . . . . . . . . . . . . 59 Deactivation . . . . . . . . . . . . . . . . . 60 Programming . . . . . . . . . . . . . . . . 61 Logging on additional re-
mote controls . . . . . . . . . . . . . . . 63 Synchronizing . . . . . . . . . . . . . . . 64 Battery . . . . . . . . . . . . . . . . . . . . . . 64
6 Setting ………………. 67
Mirrors . . . . . . . . . . . . . . . . . . . . . . 68 Headlight . . . . . . . . . . . . . . . . . . . . 68 Clutch . . . . . . . . . . . . . . . . . . . . . . . 69 Brakes . . . . . . . . . . . . . . . . . . . . . . 69
Spring preload . . . . . . . . . . . . . . 70 Damping . . . . . . . . . . . . . . . . . . . . 71
7 Riding ……………….. 73
Safety information . . . . . . . . . . . 74 Observe checklist . . . . . . . . . . . 76 If there is a change in the
load status . . . . . . . . . . . . . . . . . . 76 Always before riding off . . . . . 76 At every third refueling
stop . . . . . . . . . . . . . . . . . . . . . . . . . 76 Starting. . . . . . . . . . . . . . . . . . . . . . 77 Running in . . . . . . . . . . . . . . . . . . 79 Shifting gears . . . . . . . . . . . . . . . 80 Brakes . . . . . . . . . . . . . . . . . . . . . . 81 Parking your motorcycle . . . . 82 Refueling . . . . . . . . . . . . . . . . . . . . 83 Secure motorcycle for transport . . . . . . . . . . . . . . . . . . . . . . . . . 85
8 Technology in
detail ………………… 87
General instructions . . . . . . . . . 88 Antilock Brake System
(ABS) . . . . . . . . . . . . . . . . . . . . . . . . 88 Automatic Stability Control (ASC) . . . . . . . . . . . . . . . . . . . . . . . 90
Tire pressure control
(RDC) . . . . . . . . . . . . . . . . . . . . . . . 91
9 Maintenance ………… 93
General instructions . . . . . . . . . 94 Tool kit . . . . . . . . . . . . . . . . . . . . . . 94 Service tool kit . . . . . . . . . . . . . . 94 Front wheel stand . . . . . . . . . . . 95 Bulb mask . . . . . . . . . . . . . . . . . . . 96 Engine oil . . . . . . . . . . . . . . . . . . . 96 Brake system . . . . . . . . . . . . . . . 99 Clutch . . . . . . . . . . . . . . . . . . . . . 103 Coolant. . . . . . . . . . . . . . . . . . . . 104 Tires . . . . . . . . . . . . . . . . . . . . . . 105 Rims and tires . . . . . . . . . . . . . 105 Wheels . . . . . . . . . . . . . . . . . . . . 106 Chain . . . . . . . . . . . . . . . . . . . . . . 115 Light sources . . . . . . . . . . . . . 117 Fairings and panels . . . . . . . 121 Jump-starting . . . . . . . . . . . . . 124 Battery . . . . . . . . . . . . . . . . . . . . 125 Fuses . . . . . . . . . . . . . . . . . . . . . 129 Diagnostic connector . . . . . . 130
10 Accessories ……… 131
General instructions . . . . . . . 132 Power socket . . . . . . . . . . . . . 132 Luggage . . . . . . . . . . . . . . . . . . 133 Sport Case . . . . . . . . . . . . . . . . 134 Touring Case . . . . . . . . . . . . . 137 Topcase. . . . . . . . . . . . . . . . . . . 140
11 Care ……………… 143
Care products . . . . . . . . . . . . . 144 Washing your motorcy-
cle . . . . . . . . . . . . . . . . . . . . . . . . . 144 Cleaning sensitive motorcy-
cle parts . . . . . . . . . . . . . . . . . . . 145 Paint care . . . . . . . . . . . . . . . . . 145 Paint preservation . . . . . . . . . 146 Store motorcycle . . . . . . . . . . 146 Return motorcycle to
use . . . . . . . . . . . . . . . . . . . . . . . . 146
12 Technical data …… 147
Troubleshooting chart . . . . . 148 Threaded fasteners . . . . . . . 149 Fuel . . . . . . . . . . . . . . . . . . . . . . . 151 Engine oil . . . . . . . . . . . . . . . . . 151 Engine . . . . . . . . . . . . . . . . . . . . 152 Clutch . . . . . . . . . . . . . . . . . . . . . 153
Transmission . . . . . . . . . . . . . . 153 Rear-wheel drive . . . . . . . . . . 154 Frame . . . . . . . . . . . . . . . . . . . . . 154 Suspension . . . . . . . . . . . . . . . 154 Brakes . . . . . . . . . . . . . . . . . . . . 155 Wheels and tires . . . . . . . . . . 155 Electrical system . . . . . . . . . . 156 Dimensions . . . . . . . . . . . . . . . 158 Weights . . . . . . . . . . . . . . . . . . . 159 Performance data . . . . . . . . . 159
13 Service …………… 161
Reporting safety
defects . . . . . . . . . . . . . . . . . . . . 162 BMW Motorrad Service . . . 163 BMW Motorrad Mobility Services . . . . . . . . . . . . . . . . . . . 163 Maintenance proce-
dures . . . . . . . . . . . . . . . . . . . . . . 163 Maintenance schedule . . . . 167 Confirmation of mainte-
nance work . . . . . . . . . . . . . . . . 168 Confirmation of service . . . . 182
14 Appendix…………. 185
Certificate for Electronic Immobilizer . . . . . . . . . . . . . . . . 186 Certificate for Tire Pressure Control . . . . . . . . . . . . . . . . . . . . 188
15 Index …………….. 189

General instructions
Overview . . . . . . . . . . . . . . . . . . . . . . . . . . . . 6 Abbreviations and symbols . . . . . . . . . . 6 Equipment . . . . . . . . . . . . . . . . . . . . . . . . . . . 7 Technical Data . . . . . . . . . . . . . . . . . . . . . . . 7 Notice concerning current status . . . . 7
Overview
Chapter 2 of this Rider’s Manual will provide you with an initial overview of your motorcycle. All maintenance and repair work carried out on your motorcycle will be documented in Chapter 13. Documentation confirming performance of scheduled maintenance is a precondition for generous handling of out-of-
warranty claims and goodwill warranty treatment.
When the time comes to sell your BMW, please remember
to hand over this Rider’s Manual; it is an important part of the motorcycle.
Abbreviations and symbols
CAUTION Hazard with low risk. Failure to avoid
this hazard can result in minor or moderate injury.
WARNING Hazard with moderate risk. Failure to avoid this hazard can result in
death or serious injury.
DANGER Hazard with high risk. Failure to avoid this
hazard results in death or serious injury.
ATTENTION Special instructions and precautionary measures. Non-compliance
can cause damage to the vehicle or accessories and warranty claims may be denied as a result.
NOTICE Special information on operating and in-
specting your motorcycle as well as maintenance and adjustment procedures.
Indicates the end of an item of information.
Instruction.
Result of an activity.
Reference to a page with more detailed information.
Indicates the end of accessory or equipmentdependent information.
Tightening torque.
Technical data.
National-market version. National-
market version

|
OE |
Optional extra. |
|
BMW Motorrad optional |
|
|
extras are already com- |
|
|
pletely installed during |
|
|
motorcycle production. |
|
|
OA |
Optional accessory. |
|
BMW Motorrad op- |
|
|
tional accessories can |
|
|
be purchased and in- |
|
|
stalled at your autho- |
|
|
rized BMW Motorrad |
|
|
retailer. |
|
|
EWS |
Electronic immobilizer. |
|
DWA |
Anti-theft alarm. |
|
ABS |
Anti-Lock Brake System. |
|
ASC |
Automatic Stability Con- |
|
trol. |
|
|
TPC |
Tire Pressure Control |
|
(TPC). |
ESA Electronic Suspension
Adjustment.
Equipment
When you ordered your BMW motorcycle, you chose various items of custom equipment. This Rider’s Manual describes optional equipment (OE) offered by BMW and selected optional accessories (OA). This explains why the manual may also contain descriptions of equipment which you have not ordered. Please note, too, that your motorcycle might not be exactly as illustrated in this manual on account of country-specific differences.
If your motorcycle comes with equipment not described here, you can find the descriptions in a separate manual.
Technical Data
All dimensions, weights and performance data contained this Rider’s Manual refer to the German DIN standards and comply with their tolerance specifications. Versions for individual countries may differ.
Notice concerning current status
The outstanding levels of safety and quality furnished by every BMW motorcycle are the result of ongoing advanced development focusing on continuous improvement in design and engineering as well as equipment and accessories. Because of this, your motorcycle may differ from the information supplied in the Rider’s Manual. In addition, BMW Motorrad cannot guarantee the total absence of errors. We hope you will appreciate that no

claims can be entertained on the basis of the data, illustrations or descriptions in this manual.
![]()
Overviews
General view, left side. . . . . . . . . . . . . . . 11 General view, right side . . . . . . . . . . . . . 13 Underneath seat . . . . . . . . . . . . . . . . . . . . 14
Underneath the center fairing
panel . . . . . . . . . . . . . . . . . . . . . . . . . . . . . . . 15 Multifunction switch, left . . . . . . . . . . . . 16 Multifunction switch, right . . . . . . . . . . . 17 Instrument panel . . . . . . . . . . . . . . . . . . . . 18
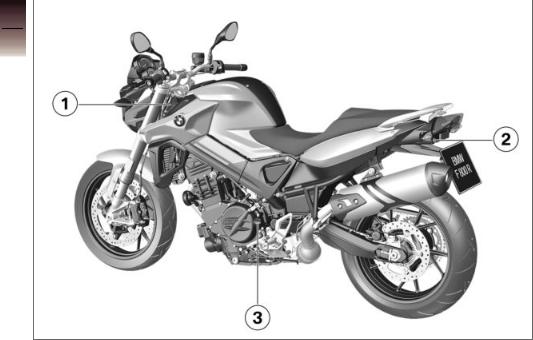
2
10
Overviews

General view, left side
1Payload table (on steering head at left)
2Seat lock ( 54)
54)
3Oil fill location and oil dipstick ( 96)
96)

2
12
Overviews

General view, right side
1Fuel filler opening ( 84)
84)
2Brake-fluid reservoir, rear ( 102)
102)
3Brake-fluid reservoir, front ( 101)
101)
4Vehicle identification number, type plate (on steering head)
5Coolant level indicator (behind side panel) ( 104)
104)
6with power socketOE Power socket ( 132)
132)
7without Electronic Suspension Adjustment (ESA)OE
Adjusting spring preload at rear wheel ( 70).
70).
8without Electronic Suspension Adjustment (ESA)OE
Adjusting damping on rear wheel ( 71).
71).

Underneath seat
1Tools for adjusting spring preload ( 70)
70)
2Tool kit ( 94)
94)
3Rider’s Manual (US Model)
4Diagnostic connector ( 130)
130)
5Storage
with first-aid kit OA Storing first-aid kit
6 Storage
with service tool setOA Storing service tool kit
( 94)
94)

Underneath the center fairing panel
1Battery ( 125)
125)
2Storage
with tire repair kit OA Storage space for tire repair set
3Fuse ( 129).
129).
4Connector for optional accessories
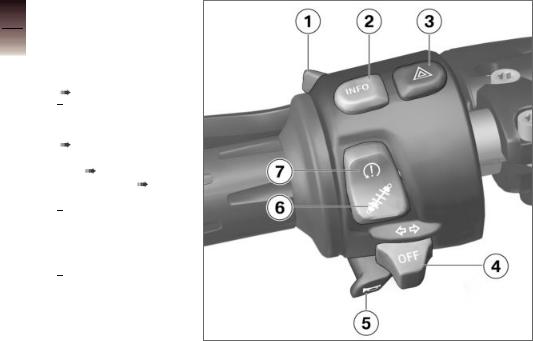
Multifunction switch, left
1High-beam headlight and headlight flasher ( 44)
44)
2INFO button
|
Selecting display readings |
|
|
( 46). |
|
|
with onboard |
|
|
computerOE |
|
|
Resetting average data |
|
|
( 47). |
|
|
3 |
Hazard warning lights sys- |
|
tem ( 45) |
|
|
4 |
Turn indicators ( 45) |
|
5 |
Horn |
|
6 |
with Electronic |
|
Suspension Adjustment |
|
|
(ESA)OE |
Viewing current setting ( 51).
51).
7with Automatic Stability Control (ASC)OE
Switching the ASC function off ( 50).
50).
Multifunction switch, right
1with heated gripsOE Operating heated grips ( 53).
53).
2MODE button Setting riding mode ( 52).
52).
3Starter ( 77)
77)
4Emergency on/off switch (kill switch) ( 44)
44)

Instrument panel
1Indicator and warning lights ( 22)
22)
2Speedometer
3Button
Set clock ( 48).
48).
with onboard computerOE
Operating stopwatch ( 49).
49).
4Multifunction display
—without optional equipmentOE (standard) ( 23)
23)
—with optional equipmentOE ( 24)
24)
5Button
Selecting display readings ( 46).
46).
Resetting the trip odometer ( 47).
47).
![]()
6Photo sensor (brightness control)
with onboard computerOE
Activating the engine speed warner ( 81).
81).
with anti-theft alarm system (DWA)OE
DWA LED
General information on DWA ( 58)
58)
7 Tachometer

2
20
Overviews

Displays
Indicator and warning lights . . . . . . . . . 22 Multifunction display . . . . . . . . . . . . . . . . 23 Multifunction display . . . . . . . . . . . . . . . . 24 Onboard computer display . . . . . . . . . . 25 Warning lights . . . . . . . . . . . . . . . . . . . . . . 25 Service display . . . . . . . . . . . . . . . . . . . . . . 37 Fuel gage . . . . . . . . . . . . . . . . . . . . . . . . . . . 38 Fuel reserve . . . . . . . . . . . . . . . . . . . . . . . . 38

Indicator and warning lights
1with Automatic Stability Control (ASC)OE
Switching the ASC function off ( 50).
50).
2ABS
3Fuel reserve ( 38) Fuel gage (
 29)
29)
4Turn indicator, right
5Neutral position (idling)
6Turn indicator, left
7High-beam headlamp
8General warning light ( 25)
25)
Multifunction display
without heated gripsOE without onboard computerOE without riding modes ProOE without Electronic Suspension Adjustment (ESA)OE
1Warning light for electronic engine management ( 30)
30)
2Clock ( 48)
48)
3Coolant-temperature warning indicator ( 29)
29)
4Service display ( 37)
37)
5Indication range for values Odometer ( 46)
46)
Trip odometer ( 47)
47)
6Fuel gage ( 38)
38)
7Riding modes ( 52)
52)
8Warning symbol ( 25)
25)
9Trip odometer ( 47)
47)
Multifunction display
with heated gripsOE
with onboard computerOE with riding modes ProOE
with Electronic Suspension Adjustment (ESA)OE
1Set heating stage of the heated grips ( 53)
53)
2Stopwatch ( 48)
48)
3Displays for OE ESA ( 51)
51)
Engine speed warner ( 81)
81)
4Onboard computer display ( 46)
46)
Symbols ( 25)
25)
5Riding modes ( 52)
52)
6Gear indicator, «N» indicates ‘neutral’
Onboard computer display
with onboard computerOE
Mileage covered since reaching the fuel reserve
( 38)
38)
 Average fuel consumption
 Average speed
 Current fuel consumption
Ambient temperature ( 32)
32)
 Coolant temperature
Warning lights
Displays
Warnings are displayed with appropriate warning lights.
Warnings for which no separate warning lamp is available are indicated by the ‘universal’ warning lamp 1 in conjunction with a warning notice or a warning symbol in the multifunction display. The universal warning light lights up in either yellow or red depending on the urgency of the warning.
Adjacent to the numerical data display 2 a warning triangle 3 may also appear. These warnings appear in alternation with the odometers ( 46).
46).
The universal warning light lights up for the most urgent warning.
You will find an overview of the potential warnings on the following pages.

|
Overview of warning indicators |
||||
|
Indicator and warning |
Warning symbols in the |
Meaning |
||
|
lights |
display panel |
|||
|
lights up yellow |
+ «EWS» is indi- |
Electronic immobilizer is active |
( 29) |
|
|
cated |
||||
|
lights up |
Fuel down to reserve ( 29) |
|||
|
lights up red |
flashes |
Coolant temperature too high |
( 29) |
|
|
lights up yellow |
appears on the |
Engine in emergency-operation mode |
||
|
display |
( 30) |
|||
|
lights up red |
The engine symbol |
Engine warning |
( 30) |
|
|
is displayed |
||||
|
lights up yellow |
+ «LAMP» is indi- |
Bulb defective |
( 31) |
|
|
cated |
||||
|
«x.x °F» flashes |
Outside temperature warning |
( 31) |
||
|
flashes |
ABS self-diagnosis not completed |
|||
|
( 32) |
||||

|
Indicator and warning |
Warning symbols in the |
Meaning |
|
lights |
display panel |
|
|
lights up |
ABS error ( 33) |
|
|
flashes rapidly |
ASC intervention ( 33) |
|
|
flashes slowly |
ASC self-diagnosis not completed |
|
|
( 33) |
||
|
lights up |
ASC switched off ( 33) |
|
|
lights up |
ASC error ( 33) |
|
|
lights up yellow |
+ «DWA» is indi- |
DWA battery drained ( 34) |
|
cated |
||
|
lights up yellow |
+ «x.x» flashes |
Tire inflation pressure is at limit of ap- |
|
proved range ( 34) |
||
|
flashes red |
+ «x.x» flashes |
Tire inflation pressure is outside ap- |
|
proved range ( 34) |
||

|
Indicator and warning |
Warning symbols in the |
Meaning |
|
lights |
display panel |
|
|
lights up yellow |
+ «—» or |
Sensor defective or system error |
|
«— —» is |
( 35) |
|
|
displayed |
||
|
lights up yellow |
+ «RdC» is dis- |
Battery of tire-inflation pressure sensor |
|
played |
weak ( 36) |
|
|
+ «—» or |
Transmission error ( 36) |
|
|
«— —» is |
||
|
displayed |
||
![]()
Electronic immobilizer is active
General warning light shows yellow.
 + «EWS» is indicated.
Possible cause:
The key being used is not authorized for starting, or communication between the key and engine electronics is disrupted.
 Remove other motorcycle keys from the ignition key ring.
 Use the reserve key.
  Have the defective key re-
placed, preferably by an authorized BMW Motorrad retailer.
Fuel down to reserve
Fuel-reserve warning light lights up.
 WARNING
Rough engine running or switching off of the engine due to a fuel shortage
Accident hazard, damage to catalytic converter
 Do not drive to the extent that the fuel tank is completely empty.
Possible cause:
At the most, the fuel tank still contains the reserve fuel quantity.
Fuel reserve
Approx. 3.2 quarts (Approx. 3 l)
 Refueling procedure (
 84).
84).
Coolant temperature too high
General warning light shows red.
The temperature symbol flashes.
 ATTENTION
Riding with overheated engine
Engine damage
 Be sure to observe the measures listed below.
Possible cause:
Coolant level is too low.
 Checking coolant level (
 104).
104).
If coolant level is too low:  Topping up coolant (
 104).
104).

Possible cause:
The coolant temperature is too high.
 If possible, continue driving in the part-load range to cool down the engine.
 In traffic jams, switch off the engine, but keep the ignition switched on so that the radiator fan continues to operate.
  Have the fault rectified as quickly as possible by a specialist workshop, preferably an authorized BMW Motorrad retailer, if the coolant temperature is frequently too high.
Engine in emergencyoperation mode
General warning light shows yellow.
Engine symbol appears on the display.
 WARNING
Unusual handling when engine is in emergency operating mode
Accident hazard
 Adapt riding style: avoid rapid acceleration and passing maneuvers.
Possible cause:
The engine control unit has diagnosed a fault. In exceptional cases, the engine stops and can no longer be started. Otherwise, the engine runs in the emergency operating mode.
 Continued driving is possible, however the accustomed engine performance may not be available.
 Have the malfunction corrected as soon as possible at an authorized service facility, preferably an authorized
BMW Motorrad Retailer.
Engine warning
General warning light shows red.
The engine symbol is displayed
 WARNING
Damage to the engine when it is in the emergency operating mode
Accident hazard
 Adapt riding style: Ride slowly, avoid rapid acceleration and passing maneuvers.
 If possible, have the motorcycle picked up and the malfunction source eliminated by a specialized service facility, preferably an authorized BMW Motorrad Retailer.

Possible cause:
The engine control unit has diagnosed a fault, which can lead to a severe secondary fault. The engine is in the emergency-oper- ation mode.
 Avoid high load and engine speed ranges if possible.
 Have the malfunction corrected as soon as possible at an authorized service facility, preferably an authorized
BMW Motorrad Retailer.  Continued driving is possible, however it is not recommended.
Bulb defective
General warning light shows yellow.
 + «LAMP» is indicated.
 WARNING
Overlooking the vehicle in traffic due to a defective light source on the vehicle
Safety risk
 Replace defective bulbs as soon as possible; it is best always to carry a complete set of spare bulbs on the motorcycle.
Possible cause:
Light source defective.
 Locate defective light source with visual check.
 Replacing bulbs for low-beam and high-beam headlight
( 117).
117).
 Replacing bulb for parking light (
 118).
118).
 Replacing bulb for brake and rear light (
 119).
119).  Replacing bulb for front and rear turn indicator (
 120).
120).
Outside temperature warning
with onboard computerOE
«x.x °F» (outside temperature) flashes.
Possible cause:
The ambient temperature measured at the vehicle is lower than 37 °F (3 °C).
 WARNING
Risk of black ice, even above 37 °F (3 °C)
Accident hazard
 At a low outside temperature, icy conditions must expected on bridges and in shady road areas.
 Think well ahead when driving.

Ambient temperature with onboard computerOE
Engine heat can lead to spurious readings of ambi-
ent temperature when the motorcycle is stationary. When the effects of engine heat on the monitored temperature become excessive the display responds by temporarily reverting to «—» as the display reading.
When the ambient temperature drops below 37 °F (3 °C) the temperature display flashes as a warning to indicate possible ice formation on the road surface. The display automatically switches from any other mode
to the temperature reading when the temperature drops below this threshold for the first time.
Outside temperature display
with onboard computerOE
When the outside temperature drops below 37 °F
(3 °C) the temperature display responds by flashing a warning indicating possible ice formation on the road surface. The display automatically switches from any other mode to the temperature reading when the temperature drops below this threshold for the first time.
Engine heat can lead to spurious readings of ambient temperature when the motorcycle is stationary. When the effects of engine heat on the monitored temperature become excessive the display responds by temporarily reverting to «—» as the display reading.
 WARNING
Risk of black ice, even above 37 °F (3 °C)
Accident hazard
 At a low outside temperature, icy conditions must expected on bridges and in shady road areas.
ABS self-diagnosis not completed
 ABS indicator light flashes.
Possible cause:
The ABS is not available because the self-diagnosis has not been completed. To check the wheel sensors, the motorcycle must be driven a few yards.
 Ride off slowly. It must be noted that the ABS function is not available until the self-
diagnosis has been completed.

ABS error
ABS indicator light lights up.
Possible cause:
The ABS control unit has detected an error.
 It remains possible to continue riding. It must be noted that the ABS function is not available. Observe additional information on special situations which can lead to ABS fault codes (
 89).
89).
 Have the malfunction corrected as soon as possible at an authorized workshop, preferably an authorized BMW Motorrad retailer.
ASC intervention
with Automatic Stability Control (ASC)OE
ASC indicator and warning light flashes rapidly.
ASC has detected instability at the rear wheel and responded by reducing the torque. The warning light flashes longer than the ASC intervention lasts. This feature continues to furnish the rider with visual feedback confirm-
ing that the system has initiated active closed-loop intervention even after the critical situation has passed.
ASC self-diagnosis not completed
with Automatic Stability Control (ASC)OE
ASC indicator and warning light flashes slowly.
Possible cause:
The self-diagnosis routine was not completed; the ASC function is not available. The engine must be running and the motorcycle
must be moving at a speed of at least 5 km/h in order for the ASC self-diagnosis to complete.
 Ride off slowly. It must be noted that the ASC function is not available until the self-
diagnosis has been completed.
ASC switched off
with Automatic Stability Control (ASC)OE
ASC indicator and warning light lights up.
Possible cause:
The ASC has been deactivated by the rider.
 Switch ASC on.
ASC error
with Automatic Stability Control (ASC)OE
ASC indicator and warning light lights up.

Possible cause:
The ASC control unit has detected an error.
 It remains possible to continue riding. It must be noted that the ASC function is not available. Observe additional information on special situations which can lead to ASC fault codes (
 90).
90).
 Have the malfunction corrected as soon as possible at an authorized service facility, preferably an authorized
BMW Motorrad retailer.
DWA battery drained
with anti-theft alarm system (DWA)OE
General warning light shows yellow.
 + «DWA» is indicated.
 NOTICE
This fault message is only shown for a short time immediately following the Pre-Ride-Check.
Possible cause:
The anti-theft alarm system battery is completely discharged. Operation of the anti-theft alarm system is no longer ensured when the motorcycle’s battery is disconnected.
 Contact an authorized service facility, preferably an authorized BMW Motorrad retailer.
Tire inflation pressure is at limit of approved range
with Tire Pressure Monitor (TPM)OE
General warning light shows yellow.
+ «x.x» (the critical tire pressure) flashes.
Possible cause:
The measured tire inflation pressure is in the limit area of the permissible tolerance.
 Correct tire inflation pressure in accordance with instructions on back of cover of Rider’s Manual.
 NOTICE
Before adjusting the tire inflation pressure, observe the information on temperature compensation and on inflation pressure adjustment in the chapter «Technology in detail».
Tire inflation pressure is outside approved range
with Tire Pressure Monitor (TPM)OE

General warning light flashes red.
+ «x.x» (the critical tire pressure) flashes.
 WARNING
Tire inflation pressure is outside approved range.
Poorer handling characteristic of the motorcycle.
 Adapt your style of riding accordingly.
Possible cause:
The measured tire inflation pressure is outside the approved tolerance range.
 Check tire for damage and suitability for continued use.
If it is still possible to drive with tire:
 WARNING
Tire inflation pressure is outside approved range.
Poorer handling characteristic of the motorcycle.
 Adapt your style of riding accordingly.
 Correct tire inflation pressure at the next opportunity.
 Have the tire checked for damage at an authorized service facility, preferably an authorized BMW Motorrad retailer.
If you are unsure about the tire’s suitability for continued riding:
 Do not continue riding.
 Contact roadside service.
  Have the tire checked for damage at an authorized service facility, preferably an authorized BMW Motorrad retailer.
Sensor defective or system error
with Tire Pressure Monitor (TPM)OE
General warning light shows yellow.
|
+ «— |
» or «— |
—» is dis- |
|
played. |
Possible cause:
Wheels without TPC/RDC sensors are mounted.
 Retrofit wheel set with TPC/RDC sensors.
Possible cause:
1 or 2 TPC/RDC sensors have failed.
 Have fault eliminated by a specialized workshop, preferably an authorized BMW Motorrad retailer.
Possible cause:
A system fault has occurred.  Have fault eliminated at a specialist service facility, preferably an authorized BMW Motorrad retailer.

Battery of tire-inflation pressure sensor weak
with Tire Pressure Monitor (TPM)OE
General warning light shows yellow.
+ «RdC» is displayed
 NOTICE
This fault message is only shown for a short time immediately following the Pre-Ride-Check.
Possible cause:
The battery of the tire inflation pressure sensor has almost no capacity anymore. The operation of the tire inflation pressure control is only ensured for a limited time.
 Contact a specialist service facility, preferably an authorized BMW Motorrad retailer.
Transmission error
with Tire Pressure Monitor (TPM)OE
|
+ «— |
» or «— |
—» is dis- |
|
played. |
Possible cause:
The motorcycle’s speed has not exceeded the threshold of approx. 30 km/h. The TPC/RDC sensors do not transmit their signal until a speed above this threshold is reached ( 91).
91).
 Watch the TCP/RDC display at a higher rate of speed. A
continuous error is only present if the general warning light also lights up.
In this case:
 Have fault eliminated at a specialist service facility, preferably an authorized BMW Motorrad retailer.
Possible cause:
There is a fault in the radio connection to the TPC/RDC sensors. Possible causes are radio systems in the surrounding area, which interfere with the connection between the TPC/RDC control unit and the sensors.
 Watch the TPC/RDC display in another environment. A continuous error is only present if the general warning light also lights up.
In this case:
 Have fault eliminated at a specialist service facility, preferably an authorized BMW Motorrad retailer.
Tire pressure
with Tire Pressure Monitor (TPM)OE

The figure on the left side 1 indicates the front tire’s inflation pressure, while the figure on the right 2 shows the inflation pressure in the rear tire. Immediately after switching on the ignition, «— —» is indicated. The transfer of the tire pressure values does not begin until a speed of 19 mph (30 km⁄h) is exceeded for the first time.
The displayed tire pressures refer to a tire air temperature of 68 °F (20 °C).
If the warning triangle 3 symbol appears at the
same time, the display is a warning. The affected tire pressure flashes.
If the level concerned is borderline in terms of the permissible tolerance, the general warning light lights up yellow. If the monitored tire inflation pressure is outside the specified range the general warning light will flash in red.
Further information on
BMW Motorrad TPC/RDC can be found starting from page
( 91).
91).
Service display
If the time remaining until the next service will elapse within one month, the service date 1 appears briefly following the Pre- Ride-Check. The month and year are shown with two and four digits respectively separated by a colon. In this example the display means «June 2014.».

If the motorcycle covers high annual mileages then shorter service intervals may be required. When the odometer reading
for the recalculated early service falls to within 621 miles (1000 km), the remaining miles (kilometers) 1 are counted down in 62-miles steps (100-km
steps). They are briefly displayed following the Pre-Ride-Check.
When a service date elapses without service, the
universal warning light lights up in yellow, appearing together with the date and mileage (kilometer)
display. The «Service» message is displayed continuously.
 NOTICE
If the service display appears more than a month before the service date, the stored date must be adjusted in the instrument cluster. This situation can occur if the battery has been disconnected for a longer time. Consult a certified workshop, preferably an authorized
BMW Motorrad retailer, for setting of the date.
Fuel gage
Due to the complex fuel tank geometry, the fill level cannot be determined in the upper filling range. For this reason, the fuel level indicator only details the lower half of the filling range.
The 2 tip indicates that the fuel tank is more than half full.
If the fuel gage drops to the 1/ 2 mark 1, the fuel tank is still half full. Now, the fill level is exactly displayed.
If the fuel reserve has been reached, the low-fuel warning light is switched on.
Fuel reserve
The fuel quantity that is in the fuel tank when the low-fuel warning light switches on depends on the riding dynamics: the more substantially the fuel is moved in
![]()
the tank (as a result of frequently changing lean angles, frequent braking and acceleration), the more difficult it becomes to determine the fuel reserve. However, the fuel tank still contains at least the fuel reserve specified on the back cover.
After the low-fuel warning light is switched on, the
distance ridden since this point in time is indicated.
The distance that can still be traveled with the fuel reserve depends on the riding style (on the consumption) and on the fuel quantity that was still available at the time of switch-on (see previous explanation).
The odometer for the fuel reserve is reset when the fuel quantity after refueling is greater than the fuel reserve.

3
40
Displays

Operation |
4 |
|||||
|
Steering and ignition lock . . . . . . . . . . . |
42 |
Passenger seat cover . . . . . . . . . . . . . . . |
54 |
|||
|
41 |
||||||
|
Emergency on/off switch (kill |
||||||
|
switch) . . . . . . . . . . . . . . . . . . . . . . . . . . . . . . |
44 |
|||||
|
Lights . . . . . . . . . . . . . . . . . . . . . . . . . . . . . . . |
44 |
Operation |
||||
|
Hazard warning lights system |
45 |
|||||
|
Turn indicators. . . . . . . . . . . . . . . . . . . . . . |
45 |
|||||
|
Display . . . . . . . . . . . . . . . . . . . . . . . . . . . . . . |
46 |
|||||
|
Clock . . . . . . . . . . . . . . . . . . . . . . . . . . . . . . . |
48 |
|||||
|
Stopwatch . . . . . . . . . . . . . . . . . . . . . . . . . . |
48 |
|||||
|
Automatic Stability Control |
||||||
|
(ASC) . . . . . . . . . . . . . . . . . . . . . . . . . . . . . . . |
50 |
|||||
|
Electronic suspension adjustment |
||||||
|
(ESA) . . . . . . . . . . . . . . . . . . . . . . . . . . . . . . . |
51 |
|||||
|
Riding mode . . . . . . . . . . . . . . . . . . . . . . . . |
52 |
|||||
|
Heated handlebar grips . . . . . . . . . . . . . |
53 |
|||||
|
Seat . . . . . . . . . . . . . . . . . . . . . . . . . . . . . . . . |
54 |

Steering and ignition lock
Keys
You are provided with 2 ignition keys. Should you lose your keys please refer to the information regarding the electronic immobilizer (EWS) ( 43).
43).
The ignition lock, fuel filler cap and seat lock are operated with the same key.
with sport caseOA
or
with touring caseOA
or
with topcaseOA
The cases and the topcase can also be ordered with locks for the same key on request. Please contact an authorized workshop for this purpose, preferably an authorized BMW Motorrad retailer.
Locking handlebars
 Turn handlebars to left.
 Turn key to position 1 while moving handlebars slightly.
 Handlebars are locked.
  Key can now be removed.
Switching on ignition
 Insert key into the ignition lock and turn key to position 1.
 Parking lights and all function circuits are switched on.
 Pre-Ride-Check (
 77)
77)
 ABS self-diagnosis (
 78) with Automatic Stability Control (ASC)OE
 ASC self-diagnosis (
 79)
79)

Switch off ignition
 Turn key to position 1.
 Light switched off.
 Handlebars not locked.
 Key can now be removed.
 Electrically powered accessories remain operational for a limited period of time.
 Battery can be recharged via onboard socket.
Electronic immobilizer
The motorcycle’s electronic circuitry monitors the data stored in the ignition key through a ring antenna incorporated in the igni-
tion lock. The engine management system does not enable engine starting until this key is recognized as «authorized» for your motorcycle.
 NOTICE
A further key attached to the same ring as the ignition key used to start the engine could «irritate» the electronics, in which case the enabling signal for starting is not issued. The EWS warning is shown in the multifunction display.
Always store further vehicle keys separately from the ignition key.
If you lose a vehicle key, you can have it disabled by your authorized BMW Motorrad retailer. When having a key disabled you should also bring all of the motorcycle’s remaining keys with you.
The engine can no longer be started using a disabled key; however, a disabled key can be enabled again.
Ignition keys are available only through an authorized BMW Motorrad retailer. The keys are part of an integrated
security system, so the retailer is under an obligation to check the legitimacy of all applications for replacement/extra keys.

Emergency on/off switch (kill switch)
1Emergency on/off switch (kill switch)
 WARNING
Operation of the emergency ON/OFF switch when riding
Danger of falling due to blocking of rear wheel
 Do not operate the emergency ON/OFF switch when riding.
The engine can be switched off easily and quickly using the emergency on/off switch.
AEngine is switched off
BOperating position
Lights
Parking lights
The parking lights switch on automatically when the ignition is switched on.
 NOTICE
The parking lights are a strain on the battery. Do not leave the
ignition switched on longer than absolutely necessary.
Headlight low beam
The headlights automatically come on in their low-beam mode as soon as you start the engine.
High-beam headlight and headlight flasher
 Press switch 1 toward front to switch on high-beam headlight.
  Pull switch 1 toward rear to actuate headlight flasher.

Parking lights
 Switch off ignition.
 Immediately after switching off ignition, push button 1 to left and hold it until parking lights come on.
 Switch ignition on and then off again to switch off parking light.
Hazard warning lights system
Operate hazard warning flashers
 NOTICE
The hazard warning flashers place a strain on the battery. Do not use the hazard warning
flashers for longer than absolutely necessary.
 NOTICE
If a turn indicator button is pressed with the emergency flashing function switched on, the flashing function replaces the emergency flashing function as long as the button is pressed.
If the turn indicator button is released, the emergency flasher function becomes active again.
 Press button 1 to switch on hazard warning flashers.
 Ignition can be switched off.
  Press button 1 again to turn off the hazard warning lights system.
Turn indicators
Operate turn indicators
 Switch on ignition.
 Switch on the ignition.

 Press button 1 to left to switch on left-side turn indicators.
 Press button 1 to right to switch on right-side turn indicators.
 Press button 1 to switch off the turn indicators.
 NOTICE
The turn signals automatically switch off when the defined riding time and distance have been reached. The defined riding time and distance can be set by an authorized BMW Motorrad retailer.
Display
Selecting display readings
 Switching on ignition (
 42).
42).
 Press button 1 to select the display in value area 2.
The following values can be indicated:
Total kilometers (in illustration) Trip distance 1 (Trip I) Trip distance 2 (Trip II)
Warnings if necessary
with onboard computerOE
 Actuate INFO 1 to select the display in the value range 2.
The following data can be displayed:
 Outside temperature
 Coolant temperature
 Average speed
 Average fuel consumption

 Current fuel consumption
Mileage covered since reaching the fuel reserve
 Press button 3 to select the display in value area 4.
The following values can be indicated:
Total kilometers (in illustration) Trip distance 1 (Trip I) Trip distance 2 (Trip II)
Warnings if necessary
Resetting the trip odometer
 Switching on ignition (
 42).
42).
 Selecting display readings (
 46).
46).
 The desired trip odometer is selected.
TRIP I or TRIP II is displayed.
 Keep INFO 1 pressed down until the trip odometer 2 is reset.
with onboard computerOE
 Press and hold button 1 until tripmeter 2 has been reset.
Resetting average data with onboard computerOE
 Switching on ignition (
 42).
42).
 Selecting display readings (
 46).
46).
 Average fuel consumption
 Average speed
 The symbol of the desired average value is displayed.

 Keep INFO 1 pressed down until the displayed average value is reset.
Clock
Set clock
 WARNING
Adjusting the clock while riding
Accident hazard
 Adjust the clock only when the motorcycle is stationary.
 Switching on ignition (
 42).
42).
 Press and hold button 1 until hours 2 flash.
 Press button 1 repeatedly until desired hours are shown.
 Press and hold button 1 until minutes 3 flash.
 Press button 1 repeatedly until desired minutes are shown.
 Press and hold button 1 until minutes do not flash anymore.
  Setting is completed.
Stopwatch
with onboard computerOE
Stopwatch function
As an alternative to the odometer, the stopwatch 1 can be displayed. The display consists of hours, minutes, seconds and tenths of a second separated by dots.
The stopwatch continues to run in the background when the display is temporarily switched over to the odometer. The stopwatch also continues to run
 Loading…
BMW MOTORRAD F 800 R 2013 Owner’s Manuals and Service Manuals for online browsing and download. View BMW MOTORRAD F 800 R Manuals online for free. CarManualsOnline.info is the largest free online database of BMW MOTORRAD Owner’s Manuals and BMW MOTORRAD Service Manuals.
BMW MOTORRAD, Select Model Year:
All, 2000, 2002, 2003, 2004, 2005, 2006, 2007, 2008, 2009, 2010, 2011, 2012, 2013, 2014, 2015, 2016, 2017, 2018, 2019, 2020, 2021
BMW MOTORRAD 2013, Select Model:
- BMW MOTORRAD F 700 GS 2013
- BMW MOTORRAD F 800 R 2013
- BMW MOTORRAD HP 4 2013
- BMW MOTORRAD K 1300 R 2013
- BMW MOTORRAD K 1300 S 2013
- BMW MOTORRAD K 1600 GT 2013
- BMW MOTORRAD K 1600 GTL 2013
- BMW MOTORRAD R 1200 GS 2013
List of BMW MOTORRAD F 800 R 2013 Manuals:
Recent Searches in BMW MOTORRAD Manuals
ESP BMW MOTORRAD K 1300 S 2008 Manual de instrucciones (in Spanish), tire pressure BMW MOTORRAD R 1250 RS 2021 Manual do condutor (in Portuguese), tire pressure BMW MOTORRAD R 1150 R 2004 Rider’s Manual (in English), power steering BMW MOTORRAD R 1150 R 2004 Rider’s Manual (in English), warning BMW MOTORRAD F 750 GS 2019 Rider’s Manual (in English), ignition BMW MOTORRAD F 750 GS 2019 Rider’s Manual (in English), ESP BMW MOTORRAD F 900 R 2021 Instrukcja obsługi (in Polish), length BMW MOTORRAD R 1150 R 2004 Rider’s Manual (in English), fuse box BMW MOTORRAD R 1150 R 2004 Rider’s Manual (in English)