-
Contents
-
Table of Contents
-
Troubleshooting
-
Bookmarks
Quick Links
Automatic labeler GLM-I
Instruction manual
as of program version 11.20, menu type 1
38.019.129.001 en
Related Manuals for Bizerba GLM-I
Summary of Contents for Bizerba GLM-I
-
Page 1
Automatic labeler GLM-I Instruction manual as of program version 11.20, menu type 1 38.019.129.001 en… -
Page 2
All rights reserved Tous droits réservés Reservados todos los derechos Tutti i diritti riservati © 06/2011 Bizerba GmbH & Co. KG, 72336 Balingen P.O. Box 10 01 64 72301 Balingen, Germany Telephone (+49 7433) 12-0, Fax (+49 7433) 12-2696 Email: marketing@bizerba.com… -
Page 3: Table Of Contents
Instruction manual GLM-I Contents Contents Page About these instructions ……….
-
Page 4
Contents Instruction manual GLM-I Sources of risk related to the system …… -
Page 5
Instruction manual GLM-I Contents Labeling from bottom with belt labeler ……6.8.1 Adjusting air supply for grippers …….. -
Page 6
Contents Instruction manual GLM-I Setting text display ………. -
Page 7
Instruction manual GLM-I Contents 10.5 Managing and using templates ……..112 10.5.1 Create new template . -
Page 8
Contents Instruction manual GLM-I Article data …………131 12.1… -
Page 9
Instruction manual GLM-I Contents 13.5 Configure weight printing ……..145 13.5.1 Configure printing of weight dimension on single labels . -
Page 10
Contents Instruction manual GLM-I 14.5 Rounding of price ……….163 14.5.1 Select rounding of price for primary country . -
Page 11
Instruction manual GLM-I Contents Date and time …………187 16.1… -
Page 12
Contents Instruction manual GLM-I 18.4 Delete label layout ……….205 18.5… -
Page 13
Instruction manual GLM-I Contents 19.6 Settings for printing barcodes ……..228 19.6.1 Allocate total code . -
Page 14
Contents Instruction manual GLM-I 20.2 Labeler adjustment ……….252 20.2.1 Activating and deactivating the height adjustment for labelers . -
Page 15
Instruction manual GLM-I Contents 20.10 Ejecting package for quality assurance ……268 20.11 Signal lamp for paper status ……..269 20.12 Polarities . -
Page 16
Contents Instruction manual GLM-I 22.3 Configure equaled total ……… . 288 22.3.1 Fill up box total 1 . -
Page 17
Instruction manual GLM-I Contents Weight classes and statistics ……… . 310 23.1… -
Page 18
Contents Instruction manual GLM-I 24.9 Cancel …………338 24.9.1 Cancelling via numerator . -
Page 19
Instruction manual GLM-I Contents 25.5 Test functions for service purposes ……. 361 25.5.1 Testing belt tension of conveyor belts . -
Page 20
Contents Instruction manual GLM-I 28.3 Cleaning …………377 28.3.1 Cleaning information . -
Page 21
Instruction manual GLM-I Contents 30.2 Output port ……….. . . 400 30.3… -
Page 22
Contents Instruction manual GLM-I 31.2 Manual package guidance ……..421 31.2.1 Centered package alignment . -
Page 23
32.1.2 GLM-I 70/100 …….. -
Page 24
Font set Eastern Europe2, ASCII 144 — 255 Font set Greek, ASCII 144 — 255 Font set Cyrillic, ASCII 144 — 255 Overview: Font sizes Overview: AI identifiers in GS1-128 Overview: Transfer data Bizerba Service Oil: EU safety data sheet 38.019.129.001 en… -
Page 25: About These Instructions
Contents These instructions describe the operation and setting of the automatic labeler GLM-I (Gra- phic Labeling Machine — Industry, in the following only called device). It describes the software of menu type 1. It contains information on: –…
-
Page 26: Symbols Used
About these instructions Instruction manual GLM-I Symbols used The following symbols can be found in the manual: Text with arrow prompts you to carry out an action. Position number in figure. <OK> Text inside a < > refers to a key or softkey.
-
Page 27: How Safety Warnings Are Displayed
Instruction manual GLM-I About these instructions 1.5.2 How safety warnings are displayed The signal word above the symbol indicates the risk level. DANGER Source of danger with high risk with direct threatening danger for personnel! Resulting in: – Critical injuries –…
-
Page 28: Viewing Of Menu Call-Up
About these instructions Instruction manual GLM-I 1.5.3 Viewing of menu call-up In order to present the menu navigation clearly and concisely, this manual makes use of the following abbreviations (example): <ETC> / <Languages & characters> / <Language> / <Operator language>…
-
Page 29: About The Device
Instruction manual GLM-I About the device About the device The device consists of the following components: Conveying unit – Conveying unit with infeed and separation belt – Weighing conveyor – Light barrier for package identification – Two-part or one-part conveyor belts –…
-
Page 30: Overall View Of Device
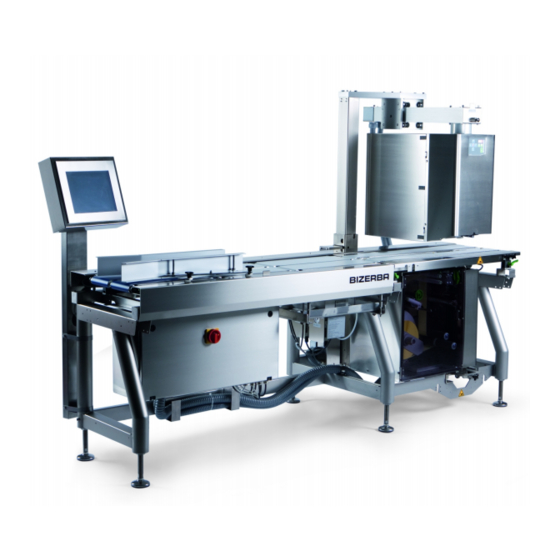
About the device Instruction manual GLM-I Overall view of device The device is available in many different versions. Here is an example: Illustration 1: Device view GLM-I xx Display and operating unit Switch cabinet Infeed conveyor Frame with foot screws for height adjustment…
-
Page 31: Device Types
1 = Number of labelers, T = Top (labeler from top) 1 = Number of labelers, B = Bottom (labelers from bottom) Accessories We offer a comprehensive range of accessories for the device. Contact your Bizerba trade consultant for complete information. Excerpt of accessories list: –…
-
Page 32: Identification Plate
About the device Instruction manual GLM-I Identification plate The identification plate is located at the scale under the weighing belt. The identification plate may differ in design depending on device and country of installation. Manufacturer, Type designation CE identification and verification mark Weights and Measures Office EC type approval no.
-
Page 33: Verification Information
Instruction manual GLM-I About the device Verification information The device is authorized for verifiable use. Scales that are verified to a specific calibration area (acceleration of fall) may not be used in other calibration areas without being recali- brated. As per statutory conditions the device operator needs to make sure that it is only applied in proper use , see page 30.
-
Page 34: On-Site Mains Power Supply
The permitted values can be found on the identification plate on the device and in chapter Technical data. Electrical charge Packages may not be charged electrically when being transported to the Bizerba conveyor belts. Written permission for changes Modifications to the devices require our prior written consent.
-
Page 35: Warranty
In addition, there will not be responsible for any liability if any other spare parts than Bizerba parts are used, especially thermal labels and ticket rolls, which are not manufactured according to Bizerba specifications and not approved by Bizerba. If you have any questions on warranty, spare parts or resources please contact your Bizerba consultant.
-
Page 36: Safety Instructions
The operating personnel must be familiar with the safety devices on the device and have to read and understand the safety instructions in this operating manual. Only qualified trade personnel or Bizerba service technicians may open the device components.
-
Page 37: Main Switch
Before carrying out work in the switch cabinet, disconnect the pow- er connector. – Work in the switch cabinet may only be carried out by qualified trade personnel or Bizerba service technicians. WARNING Compressed air supply remains on when device is switched off — also if power supply is disconnected! When working on the device risk of injury at compressed-air oper- ated device parts.
-
Page 38: Sources Of Risk Related To The System
Safety instructions Instruction manual GLM-I Risk of crushing fingers and hands During operation, keep fingers and hands away from movable parts of the device. Warning of automatic initiation During operation, keep fingers and hands away from movable parts of the device. Wear closely fitting clothes and a hair-net.
-
Page 39: Automatically Starting Components
Instruction manual GLM-I Safety instructions 3.4.1 Automatically starting components During operation, components may automatically switch on or off. WARNING Automatically starting components! During automatic operation components can switch on and off au- tomatically. This may result in serious injuries and damage to property.
-
Page 40: Pusher To Package Ejection
Safety instructions Instruction manual GLM-I 3.4.3 Pusher to package ejection During operation, operator may be exposed to hazards. WARNING Crushing and impact hazard! During automatic operation there is a risk of injuries due to impact and trapping of fingers by the pusher.
-
Page 41: Package Ejector
Instruction manual GLM-I Safety instructions 3.4.4 Package ejector CAUTION Pressure of compressed air of the pusher too high! Risk of injury due to a too high force at the flaps of the package ejector. – Check permissible pressure of compressed air. The permissible pressure is indicated on a plate at the pressure reducing valve.
-
Page 42: Equipment Description
Equipment description Instruction manual GLM-I Equipment description Automatic labeler The automatic labeler weighs and labels pre-packed goods of any type. Infeed belts trans- port the packages to be labeled to the respective labeler. A light barrier at the conveying unit identifies the packages.
-
Page 43: Belt Labeler
Instruction manual GLM-I Equipment description 4.2.4 Belt labeler A belt labeler labels the packages from the bottom. The printed label is detached from the backing paper and conveyed to the vacuum nozzles of the gripper control with the assis- tance of supporting air. The respective vacuum nozzles of the gripper are then activated holding the label in place.
-
Page 44: Multi-Labeling
Equipment description Instruction manual GLM-I Multi-labeling To apply several labels to the packages within one labeling process, max. 7 labeling sta- tions can be integrated. For operation a connection can be established from the display and operating unit GT-12C to each labeler via the system bus, see page 125.
-
Page 45: Interfaces
Equipment description Interfaces The device has several interfaces for labeling network, data communication as well as controlling of external optional equipment. RS485 Bizerba systembus with RJ45 for connecting Gx devices via GxNet Minibus RS422 for scale connection EDP1 RS232 or RS422 TTY with GxNet via AEDP, connection 9-pin…
-
Page 46: Installation
Installation Installation and first commissioning as well as instruction on how to operate, clean, care and maintain the device will be carried out by the responsible BIZERBA Customer Service or the BIZERBA specialist. Install the device so that it is easily accessible for operation, mainte- nance and cleaning.
-
Page 47: Labeling Systems
Instruction manual GLM-I Labeling systems Labeling systems Adjusting labeler to package height To achieve a high position accuracy of the labels on the packages, the labeler must be ad- justed in height for different package heights. Depending on the device model this can be done through a power-driven height adjustment or by moving it manually.
-
Page 48: Power-Driven Adjustment Of The Labeler Height
Labeling systems Instruction manual GLM-I 6.1.2 Power-driven adjustment of the labeler height With the power-driven adjustment the labeler can be adjusted as follows: – Automatically upon calling the PLU or aut. labeler parameters, if the respective package height is saved under the aut. labeler parameters.
-
Page 49: Cross-Adjusting Labeler
Instruction manual GLM-I Labeling systems Cross-adjusting labeler 6.2.1 Manual cross- adjustment of the labeler With the power-driven cross-adjustment the labeler can be adjusted as follows: 1. Pull rocking lever A down and hold in position 2. With your other hand, move the labeler forward or back 3.
-
Page 50: Power-Driven Cross- Adjustment Of The Labeler
Labeling systems Instruction manual GLM-I 6.2.2 Power-driven cross- adjustment of the labeler With the power-driven cross-adjustment the labeler can be adjusted as follows: – Automatically when calling up PLU data, if the respective cross position was saved as automatic data, see page 250, and the automatic parameter numbers were assigned to PLU data.
-
Page 51
Instruction manual GLM-I Labeling systems Release lever knob A and continue turning the labeler until the locking device engag- es in end position. Illustration 11: Turning labeler Return labeler to basic position Pull out lever knob A and turn labeler until it engages in basic position. -
Page 52: Setting Label Width
Labeling systems Instruction manual GLM-I Setting label width The air-jet or stamp labeler can be adjusted to the respective label width. Proceed as fol- lows: Illustration 12: Setting labeling system Open the right side door of the labeler and turn away to the right.
-
Page 53: Switching Off Vacuum Set Of Gripper
Instruction manual GLM-I Labeling systems 6.4.1 Switching off vacuum set of gripper With the piston labeler the printed label is removed from the printer with a gripper and con- veyed under the labeling piston. The label is hold with 2 vacuum jets at the gripper. If small labels or decorative labels with an oddly-shaped outer form is used, with which the right vacuum jet is not covered through the label, this vacuum jet can be switched off.
-
Page 54: Labeling From Bottom With Air Jet Or Stamp Labeler
Labeling systems Instruction manual GLM-I Open pressure rollers in front of the take-up pin. Pull out pivot lever and turn it counter- clockwise. The pressure rollers are lifted from the stripping roller. Illustration 15: Open Adjust width Adjust pressure rollers to width of back- ing paper.
-
Page 55
Instruction manual GLM-I Labeling systems The package must stand firmly on the outer belts. This ensures a smooth transport via label opening. Illustration 18: Setting belt distance Symmetrical adjustment of belts Adjust rotary knob A and B by the same value. -
Page 56: Adjusting Rotary Arm Labeler
Labeling systems Instruction manual GLM-I Adjusting rotary arm labeler After lossening a knurled nut the labeler can be moved on a rail. Therefore, the chute if the rotary arm labeler can be adjusted centrally to the respective label width. Proceed as fol- lows: Loosen the knurled screw.
-
Page 57: Labeling From Bottom With Belt Labeler
Instruction manual GLM-I Labeling systems Labeling from bottom with belt labeler The belt labeler can be pulled out from the transport rack if required. This is necessary if air supply for the grippers needs to be adjusted for other label sizes or if the label roll is located on the back during assembly.
-
Page 58: Adjusting Air Supply For Grippers
Labeling systems Instruction manual GLM-I 6.8.1 Adjusting air supply for grippers The labels are removed from the printer by the grippers and conveyed beneath the pack- ages to be labeled. Up to eight grippers with integrated vacuum nozzles are available for the different label widths.
-
Page 59: Din A5 Label Applicator
Instruction manual GLM-I Labeling systems Switching on and off vacuum nozzles The switches for the vacuum nozzles are at the back panel of the labeling system. The la- beling system can be folded away if the labeler is pulled out and the locking opened, see page 55.
-
Page 60: Adjusting The Din A5 Label Applicator
Labeling systems Instruction manual GLM-I If label sizes other than DIN A5 are used, the air-jet plate has to be adjusted to the rele- vant label size. The original labels are required to make the air-jet plate settings. Illustration 25: Label position…
-
Page 61
Instruction manual GLM-I Labeling systems Labeler with safety catch, stop bolt or magnet lock. Lift safety catch and pivot the labeling system to the left. Illustration 27: Safety catch or stop bolt Press stop bolt , pull the labeling sys- tem and pivot it to the left. -
Page 62
Labeling systems Instruction manual GLM-I Pivot pressure roller away. Loosen knurled screw Turn swivel arm to the left. Tighten knurled screw. Illustration 30: Pressure roller Remove label roll Fold clamping lever forward. The label roll can now be pulled off the take-up device. -
Page 63
Instruction manual GLM-I Labeling systems Insert bearing roll Re-mount take-up arbor The take-up arbor automatically engag- es in the take-up device. Illustration 34: Take-up arbor Lead label roll through printer Remove labels over a length of approx. 30 cm from the backing paper. -
Page 64
Labeling systems Instruction manual GLM-I Closing printhead Platen printer: Turn pivot lever printer down and close printhead. Illustration 38: Pivot lever EcoMotion Printer: Turn pivot lever at printer up and close printhead. Apply fixation ring Place the fixation ring of guide roller on the backing paper to guide the backing paper laterally. -
Page 65: Display And Operating Unit
Instruction manual GLM-I Display and operating unit Display and operating unit The device is supplied by standard equipped with the display and operating unit GT-12C. Configure display The following functions on your device may have an effect on the screen: –…
-
Page 66
Display and operating unit Instruction manual GLM-I The screen can be configured individually via the GT-SoftControl pro- gram. With GT-SoftControl display elements can be arranged differently and activated or deactivated individually. The screen on your device may differ from this description due to an individual configuration. -
Page 67
Instruction manual GLM-I Display and operating unit Illustration 40: Display and operating ranges on the screen (example) Key block left Selective criteria for weight class labeling (example) or tendency regulation signs Price Weight Tare Verification data Systembus address and device name… -
Page 68: Keys Gt-12C
Display and operating unit Instruction manual GLM-I Keys GT-12C <Zero setting> Set scale to zero. The zero setting is possible within a range of a maximum of +/2% of the maximum weight. <Operator language> Change language setting of the device.
-
Page 69
Instruction manual GLM-I Display and operating unit <One-line> Hide additional keys. <Information> Display verification information: – «Software ID»: Display information on software, see page 128. – «Log software update»: Display logbook of software up- dates, see page 129. – «Teach history»: Display logbook of teaching processes. -
Page 70: Symbols In Status Bar
Display and operating unit Instruction manual GLM-I After pressing <Two-lines> visible <2nd.> For key combinations. Activate through touching or deactivate again. <Alt> For key combinations. Activate through touching or deactivate again. <Shift> Switch between upper/lower case. Activate through touching or deactivate again.
-
Page 71
Instruction manual GLM-I Display and operating unit Information on device status Processing is locked. Softkey is copied. Update or background distribution is running. Statistics data are transmitted. Line back-up or loading process is running. Pause was pressed. Symbols of macro recorder The macro recorder is not active. -
Page 72: Total Display
If there is no total preselection for a total window and the numerator is switched off, the tare total is displayed in the line below. To do so, the display needs to be configured via GT-SoftControl accordingly. For fur- ther information please contact your Bizerba consultant or Bizerba Service. 38.019.129.001 en…
-
Page 73: Display Total Temporarily
Instruction manual GLM-I Display and operating unit 7.4.1 Display total temporarily Each total can be displayed in a separate window for a short time. Mode level: 2 <Release total> <Press Shift> and softkey for the required total. Softkeys The screen shows up to eight softkeys simultaneously. Selection and number of softkeys depend on the called-up menu and the mode level.
-
Page 74
Display and operating unit Instruction manual GLM-I A black field in one of several softkeys marks the active softkey in a group of softkeys, of which only one can be activated. Mode level T: The «#» character identifies that the softkey is pro- tected by a password. -
Page 75: Find Softkeys
Instruction manual GLM-I Display and operating unit 7.5.1 Find softkeys With function «Search softkey» you can call up the softkeys directly and without knowing the menu path. Search function accesses all softkeys which are released in the current mode level or the mode level below.
-
Page 76: Data Recording And Administration
Display and operating unit Instruction manual GLM-I Data recording and administration 7.6.1 Entering and saving text To enter a one-line text a keyboard appears underneath the input field. This comprises not only numeric and letter keys but also keys of the user interface, see page 66.
-
Page 77: Data For Current Production Or Saving Into Database
Instruction manual GLM-I Display and operating unit 7.6.3 Data for current production or saving into database Depending on functional correlation and configuration of database you can decide during saving if the data are to apply only for the current production or if they are to be saved also into the database.
-
Page 78
Display and operating unit Instruction manual GLM-I – Macros, see page 103 – Statistics reports, see page 332 – Total evaluations, see page 304 – Preselections, see page 303 The tables are administered in the system like several texts under parameter numbers. -
Page 79: Recording Parameter Number
Instruction manual GLM-I Display and operating unit 7.7.1 Recording parameter number New and existing parameter numbers can be recorded as described in the following exam- ple that shows how to save a date text. Illustration 44: Example for accessing parameter numbers: Saving date text The following functions are available: –…
-
Page 80: Creating Parameter Tables And Opening Them For Editing
Display and operating unit Instruction manual GLM-I Select required data record and confirm. The parameter number of the data record is entered in the input field. 7.7.2 Creating parameter tables and opening them for editing For administrating parameter tables the matching menus contain functions. The respective chapters contain information on how to call up for editing, for example calling up a label parameter table in chapter Manage label parameters in tables.
-
Page 81: Editing Table
Instruction manual GLM-I Display and operating unit 7.7.3 Editing table Most tables have three columns: left column: Line number middle column: Attribute right column: Value of attribute The values are submitted as follows depending on the attribute: Illustration 45: Template as example of a table with attributes of different types Text input, see page 80.
-
Page 82
Display and operating unit Instruction manual GLM-I Editing text or numeric value The format is provided for input of numbers. If the numeric value contains a comma or a unit, comma and unit remain unchanged during input. You do not need to enter comma and unit. -
Page 83
Instruction manual GLM-I Display and operating unit Edit table values for lines, columns or complete tables In some tables you have the possibility to make settings for complete lines, complete col- umns or complete table with only one entry. To edit the setting in all cells of column in the same way, touch head of column. -
Page 84
Display and operating unit Instruction manual GLM-I Use the search function in tables <Search> Via this key you have access to a search function in numerous tables that you can use to look for table entries. The following search modes are provided: «Fragment»:… -
Page 85: Printing Table Data
68 mm. Blank labels and ticket rolls with a width of 58 mm can only be used when setting a smaller character set. Please contact your Bizerba consultant or Bizerba Service for further in- formation.
-
Page 86
Display and operating unit Instruction manual GLM-I Preparing list printing A list printer is connected to labeler. Mode level: 2 <Printer + interface> / <List printer> / <Deviating print service print> Press <List print. interface>. After printing switch print routing again to previous setting (standard set- ting: <Label printer>). -
Page 87: Saving And Closing Table
Instruction manual GLM-I Display and operating unit 7.7.5 Saving and closing table When closing the table you may save or cancel the modifications made. If you save the modified table, you may use the existing or any other parameter number.
-
Page 88: Deleting Table Or Text
Display and operating unit Instruction manual GLM-I 7.7.6 Deleting table or text There are functions available in the corresponding menus to delete parameter tables as well as texts saved under parameters. The corresponding chapters describe how to call up these functions, e.g. deleting an autom. labeler table in chapter autom. labeler parameter.
-
Page 89: Setting Display And Keyboard Layout
«Español» Other languages may be available. Subsidiaries have the option to load own translations. For further information, please contact your specialist Bizerba consultant or Bizerba Service. Mode level 2: <Etc> / <Languages & characters> / <Languages> / <Operator language> Press key with flag.
-
Page 90: Setting Label Language
«Português» – «Español» Other languages may be available. Subsidiaries have the option to load own translations. For further information please contact your Bizerba consultant or Bizerba Service. Mode level: 2 <Etc> / <Languages & characters> / <Languages> / <Label language>…
-
Page 91: Setting Keyboard Layout
Instruction manual GLM-I Setting display and keyboard layout 8.1.4 Setting keyboard layout The keyboard layout is the basis for the assignment and layout of the keyboard. It has been factory-set according to the country of destination. The following settings are possi- ble: –…
-
Page 92: Setting Country-Specific Sorting
Setting display and keyboard layout Instruction manual GLM-I 8.1.6 Setting country-specific sorting Texts are sorted in alphanumeric order in tables and for search functions. As different rules apply for different languages when sorting, the sorting can be set in accordance to your country.
-
Page 93: Selecting Display Format
Instruction manual GLM-I Setting display and keyboard layout Selecting display format The display format defines which contents are shown on the screen. The following settings are possible: <L1: Large diagr. dis- In the middle of the screen the statistics is displayed graphical- play>:…
-
Page 94: Setting Weight Display
Setting display and keyboard layout Instruction manual GLM-I Press softkey with respective setting. Setting weight display You may configure content and layout of large display (L2), see page 91. With setting <Enlarged view> you can define which data are to be viewed largely in a separate display frame.
-
Page 95: Switching On Or Off Weight History
Instruction manual GLM-I Setting display and keyboard layout Example: Total window 1. Settings and procedures for total windows 2 and 3 are analog. The following totals can be displayed in the total window 1: – <#1: Total 1> – <#1: Total 2>…
-
Page 96: Setting Statistics Display
Setting display and keyboard layout Instruction manual GLM-I <Processing> / <Weight class &statistics> / <Statistics display> / <Weight history> Touch softkey until required setting is achieved. Setting statistics display 8.9.1 Structure of statistics display Illustration 47: Example of a statistics display…
-
Page 97: Histogram Display
Instruction manual GLM-I Setting display and keyboard layout 8.9.2 Histogram display The histogram display (also: horizontal bar graph) indicates the static distribution of weights in form of nine bars. It is indicated in the display formats <L1: Large diagr. display> and <L3: Small diagr. display>, see page 91.
-
Page 98
Setting display and keyboard layout Instruction manual GLM-I The needles may lie very close to each other on the scale or may even overlap. In these cases the following order applies for displaying: – Average value of preset package number (in the front) –… -
Page 99: Displaying Numerical Data
Instruction manual GLM-I Setting display and keyboard layout 8.9.4 Displaying numerical data In display format <L3: Small diagr. display> statistics data are listed in numeric order, see page 91. The function <Statistics: num. data> is without function in combination with the display and operating terminal GT-12C.
-
Page 100: Selecting Statistics Display
Setting display and keyboard layout Instruction manual GLM-I 8.10 Selecting statistics display Use this function to select which statistics is to be displayed. The function is available if there are active statistics reports with values. The selection menu does not only include the setting «No display»…
-
Page 101: Deleting Modified Softkey Texts
Instruction manual GLM-I Setting display and keyboard layout 8.12.2 Deleting modified softkey texts With this function all modified softkey texts are deleted irrevocably and replaced by the standard inscriptions. Mode level: 5 <Etc> / <Device operation> / <Delete modif. softkey text>…
-
Page 102: Permission Concept
Permission concept Instruction manual GLM-I Permission concept Mode levels and passwords The access to the functions of the device is regulated through so-called mode levels. With passwords the mode levels can be protected against unauthorized access. The mode levels include functions for different responsibilities. The following mode levels…
-
Page 103: Manage Passwords
Instruction manual GLM-I Permission concept Manage passwords Mode level: 3 <Etc> / <Password editor> Select mode level and confirm. If necessary enter and confirm the old password. Enter and confirm new password. Re-enter new password and confirm. If an empty input field for the new password is confirmed both times, the mode level is accessible without password.
-
Page 104: Customer Specific Functions
Customer specific functions Instruction manual GLM-I Customer specific functions 10.1 Approve or block key programming If you approve key programming, this function is no longer available. – Record macro and open via a key, see page 106 – Set up customer-specific model level T, see page 120 –…
-
Page 105: Assign Image To Softkey
Instruction manual GLM-I Customer specific functions 10.3 Assign image to softkey You can assign pictures to softkeys. Do this by importing the required image files via GT- SoftControl. Different display types are available, as follows: «Without image»: No image in softkey.
-
Page 106
Customer specific functions Instruction manual GLM-I – Less time required for training – The operator can use functions in higher mode levels A macro can perform the following tasks: – Run operating steps – Query inputs – Change numerators or values automat- ically –… -
Page 107
Instruction manual GLM-I Customer specific functions If necessary, you can protect macros against unauthorized access with passwords. Macros only work for the device type with which they were created. Macros are allocated to the mode level in which they began to be recorded. However, dur- ing the recording of a macro, you can change the mode level. -
Page 108: Record Macro
Customer specific functions Instruction manual GLM-I 10.4.1 Record macro CAUTION Macros can change mode levels. Unqualified personnel gain ac- cess to higher mode levels! Risk of damage to property or loss of data due to operating errors in the higher mode level.
-
Page 109
Instruction manual GLM-I Customer specific functions Include input of a value during a macro Start function that requires input of a value during the ongoing recording. Press <Shift> and <Record>. The macro menu appears. Select and confirm «Recording pause». The screen indicates that the recording is on hold by the following icon: . -
Page 110: Add To Macro
Customer specific functions Instruction manual GLM-I Cancel recording Press <Shift> and <Record>. The macro menu appears. Select and confirm «Abort macro». «Save recording»: select this if you want to save the previous recording, «Cancel recording»: select this if you want to delete the previous recording.
-
Page 111: Play Macro
Instruction manual GLM-I Customer specific functions 10.4.3 Play macro Key programming is approved, see page 102. Macro is available in current mode level. Starting macro The following describes the start of a macro per key. As an alternative you can start the macro also via function «List macros», see page 111.
-
Page 112: Delete Macro
Customer specific functions Instruction manual GLM-I 10.4.4 Delete macro How to delete a macro with a key is described below. Alternatively, you can also delete the macro via the «List macros»function, see page 111. The macro you want to delete belongs to the current mode level.
-
Page 113: List Macros
Instruction manual GLM-I Customer specific functions 10.4.5 List macros With the «List macros» function from the macro menu you can: – list all the macros in the current mode level – start macros – delete macros – rename macros –…
-
Page 114: Managing And Using Templates
Customer specific functions Instruction manual GLM-I Exit the macro menu The macro list is open. Select and confirm macro. Select and confirm «Exit macro menu» in the menu. 10.5 Managing and using templates Individually created templates make changing or entering values easier. The template summarizes entries and settings that would otherwise have to be accessed by different softkeys.
-
Page 115: Edit And Save Template
Instruction manual GLM-I Customer specific functions 10.5.3 Edit and save template You can edit a template as follows: – Enter or change a template name, see page 113. – Insert new template cells, see page 114. – Insert existing template cells, see page 115.
-
Page 116: Insert New Cell Into Template
Customer specific functions Instruction manual GLM-I 10.5.5 Insert new cell into template The template is open. Select the row into which you want to insert the function. <Insert new cell> Search for and softkey for the function you want and confirm the result, see page 73.
-
Page 117: Insert The Existing Template Cell
Instruction manual GLM-I Customer specific functions Enter or switch value. After editing all the cell properties, close the window with < >. Close template with < >. To save the template reply to security query with «yes». Enter and confirm a template number for the new template, see page 77.
-
Page 118: Enter Or Change The Default Values
Customer specific functions Instruction manual GLM-I 10.5.8 Enter or change the default values A new template cell is initially created without a default value. If «Default from cell» is acti- vated in the cell properties, you can enter a default value, which is automatically set when the template is opened.
-
Page 119: Remove The Template Cell From The Template
Instruction manual GLM-I Customer specific functions 10.5.10 Remove the template cell from the template The template is open. Select template cell. Press <Delete cell>. The template row is emptied. The empty row is removed after you have saved. 10.5.11 Copy cell properties You can copy the cell properties for a template cell to a new template cell.
-
Page 120: Delete Unused Cells
Customer specific functions Instruction manual GLM-I 10.5.13 Delete unused cells Delete unused cells to keep the selection list clear and easy to understand. Mode level: 3 (local) or 4 (global) <Etc> / <Templates> / <Delete unused cells> Mark the cells in the table you want to delete.
-
Page 121: Calling Up And Using Form
Function keys (e. g. <Print>) – Sublevels – HTML pages in intranet (e. g. a page of the operating instructions) GxNet commands are not part of this documentation. For further infor- mation, please contact your specialist Bizerba consultant or Bizerba Service. 38.019.129.001 en…
-
Page 122: Define Customer-Specific Mode Level T
Customer specific functions Instruction manual GLM-I The GT-SoftControl operating instructions describe how to program the Quick keyboard. Use Quick keyboard <Quick> The quick keyboard appears. Select Quick page in lower key row, e. g. «Fruit». Press required Quick key. The respective article is called up or the function that is assigned to the key is run.
-
Page 123: Copy Softkeys To Mode Level T
Instruction manual GLM-I Customer specific functions – Assign input cells to softkeys from a PLU data template, see page 124. – Assign operating calls to softkeys for other devices, see page 125. 10.7.1 Copy softkeys to mode level T Softkeys that are assigned directly with a function and have no submenu can be copied to the customer-specific mode level T.
-
Page 124: Define A Menu Structure For Softkeys
Customer specific functions Instruction manual GLM-I 10.7.2 Define a menu structure for softkeys In mode level T you can define softkeys in menu structures with up to eight levels. At the highest level you can copy up to 16 softkeys and in the lower levels up to eight softkeys, see page 121.
-
Page 125: Edit Softkeys In Mode Level T
Instruction manual GLM-I Customer specific functions 10.7.3 Edit softkeys in mode level T The following functions are available: – Delete soft key, see page 123. – Block softkey, see page 123. – Activate softkey, see page 123. Key programming is approved, see page 102.
-
Page 126: Copy Macros To Soft Key
Customer specific functions Instruction manual GLM-I 10.7.5 Copy macros to soft key A macro recorded in mode level T can be copied to a softkey and subsequently started by this softkey. Mode level: T Press <2nd.> and <Record>. Press the empty softkey you want to copy the macro to.
-
Page 127: Copy Operating Connection To Other Devices On Softkey
Instruction manual GLM-I Customer specific functions 10.7.7 Copy operating connection to other devices on softkey If several devices are connected to your operating and display unit, you can copy an oper- ating connection to a connected device on a softkey. Via the softkey you can switch to the operation of a different device.
-
Page 128: Info Menu
Info menu Instruction manual GLM-I Info menu 11.1 Show manuals 11.1.1 Open the manual With this function, you can have the manuals concerning your device shown on the screen. You can select from the manuals on your system in the current operating lan- guage.
-
Page 129: Navigate Through The Manuals
Instruction manual GLM-I Info menu 11.1.2 Navigate through the manuals Navigate through the manual page with the help of the scroll bar and arrow keys. These keys can be used to move to different pages: <Forward> Browse forward. <Back> Browse back.
-
Page 130: Display Information About Software
Illustration 50: Information about software For users, the following data are particularly significant: «Software ID»: ID of the software 2. Line: – Device type in example: «PA-GLM-I» – Version of software in example: «11.00» – Software status in example: «1100SP8» «Scale info»: Information about the measuring range of the scales «Menu Type»:…
-
Page 131: Software Update Display Log Book
Instruction manual GLM-I Info menu Select and confirm «Software ID». Alternatively, you can open this function in mode level 5 via <Service menu> / <Software info> <Software version>. 11.5 Software update Display log book This function opens the software update logbook. It shows you version numbers, version dates and times of all the device components registered for the device that are relevant to verification issues.
-
Page 132: Display Hour-Meter
Info menu Instruction manual GLM-I 11.8 Display hour-meter This function shows you the overall operating time of your device in days and hours. Mode level: 1 <Information> Select and confirm «Operating hours». 11.9 Viewing number of labels and paper length With this function the total number labels printed on the device and the paper length used are indicated.
-
Page 133: Article Data
Instruction manual GLM-I Article data Article data 12.1 Organize article data PLU number (also: article number) Article data can be entered in article data tables. The article data tables can be saved un- der PLU numbers (PLU = parameter look up) and — depending on configuration — customer numbers.
-
Page 134: Overview Of Article Data
The following overview shows all possible article data. it depends on the configuration of the database which article data of your system are effectively administered. The configuration of the database is not subject of this documentation. For further information, please contact your Bizerba consultant or Bizer- ba Service. Attribute…
-
Page 135
Instruction manual GLM-I Article data Attribute Input mode Explanation «Fixed weight» Value Fixed weight for fixed weight or fixed value article, nominal weight for statistics, see page 144 «Tare» Value Packaging weight, see page 149 «Minimum weight», «Max- Value Min. and maximum weight for sorting light imum weight»… -
Page 136: Article Configuration
Article data Instruction manual GLM-I Attribute Input mode Explanation «Pr. group number» Value Product group number, see page 197 «Logo number logo Parameters Allocation of logos to logo fields, see field1» .… «Logo number page 210 logo field5» «Label param. No.»…
-
Page 137: Select Arity Of Plu And Customer Number
Instruction manual GLM-I Article data The configuration of the database is not subject of this documentation. For further information please contact your Bizerba consultant or Bizer- ba Service. 12.3.1 Select arity of PLU and customer number These functions are used to define the arity of the PLU and customer number. You can deactivate using the customer number to access a PLU if you like by applying the «Without…
-
Page 138: Release Or Disable Article Call-Up Via Keyboard
Article data Instruction manual GLM-I 12.3.3 Release or disable article call-up via keyboard The following settings are possible: «Disabled»: Article change via keyboard has been disabled. «Permitted»: Article change via keyboard is permissible. «Permitted with autom. The article change via the keyboard is only permissible when stop»:…
-
Page 139: Opening Article For Processing
Instruction manual GLM-I Article data Enter new article number or set automatically via <Next availb. no.>. If required: Enter customer number or set automatically via <Next availb. no.>. Press <OK>. An empty PLU date table appears. You can also create a new article by calling up an existing article for processing, editing data and save the article under a new PLU number and customer number, if existing.
-
Page 140: Processing And Saving Article Data
Article data Instruction manual GLM-I 12.6 Processing and saving article data Some PLU data are entered directly in the PLU data editor, see page 79, while other are allocated to the PLU via a parameter number. When entering parameters, insert this value «-1″…
-
Page 141: Edit Reference Target
Instruction manual GLM-I Article data 12.6.2 Edit reference target To edit the following reference targets, you can move directly from the PLU data table to another editor: – all texts: – Label data – Autom. labeler data – Tendency control The <Edit reference>…
-
Page 142: Copy Reference Target
Article data Instruction manual GLM-I 12.6.3 Copy reference target Changes to the reference target have an effect on all those PLUs to which the modified data record is allocated. If you want to change an existing parameter data record for the currently processed PLU only, make a copy first and then save the copy under the new parameter number and then make your changes.
-
Page 143: Deleting Article
Instruction manual GLM-I Article data 12.8 Deleting article Delete a selected article with this function. Mode level 3 (local) or 4 (global) Mode level 3: <PLU> / <Delete PLU locally> Mode level 4: <PLU> / <Delete PLU> In order to finally delete the article, reply to security query with <yes>.
-
Page 144: Calling Up Article Via Plu Number And Customer Number, If Available
– under a fixed combination of PLU and customer number The configuration of the database is not subject of this documentation. For further information please contact your Bizerba consultant or Bizer- ba Service. Mode level: 1 or 2 Mode level 1: <PLU>…
-
Page 145: Weights And Ingredients
15/30 lb, 0.005/0.01 lb 15/30 kg, 5/10 g 30/60 lb, 0.01/0.02lb Changing the weight type for the current labeling job has to be approved by Bizerba Serv- ice. <Article data> / <Weight> / <Weight types> Select and confirm weight type.
-
Page 146: Set Weight Type For Weight 2
Weights and ingredients Instruction manual GLM-I 13.2 Set weight type for weight 2 If you have customer labels that include two weight fields, it is possible to print a weight in two different types of weight. If, for example, the weight should be printed in kg in weight field 1, weight can be printed in lb in weight field 2.
-
Page 147: Configure Weight Printing
Instruction manual GLM-I Weights and ingredients Under the following prerequisites, the nominal weight, Qn, can be dis- played and changed for tolerance control purposes indirectly via the <Fixed weight> softkey: – «0» is entered in the weight class as the fixed weight.
-
Page 148: Configure Printing Of Weight Dimension On Single Labels
Weights and ingredients Instruction manual GLM-I 13.5.1 Configure printing of weight dimension on single labels Determine here how the weight is printed on single labels. You can also enter this setting, providing the database has been config- ured respectively, in label parameter tables.
-
Page 149: Switch Printing Of Gross Weight On Or Off
Instruction manual GLM-I Weights and ingredients 13.5.4 Switch printing of gross weight on or off Determine here whether the gross weight should be printed. The following settings are possible: – «no». Default setting. – «With» Mode level: 2 The gross weight can only be printed on customer labels in specially designed data fields.
-
Page 150: Select Font Height For Printing Weight On Standard Labels
The weight is printed at a font height of 6 mm. Mode level: 2 The specification only applies to Bizerba standard labels with a width of 68 mm or 37 mm, and also to the ISB 68mm label. <Article data> / <Weight> / <Print weight> / <6 mm wgt only>…
-
Page 151: Selecting Weight Indication For Display And Print
Instruction manual GLM-I Weights and ingredients 13.5.10 Selecting weight indication for display and print The function is described in chapter «Setting display and keyboard layout», see page 98. You can also enter this setting, providing the database has been config- ured respectively, in label parameter tables.
-
Page 152: Configure Ingredient Percentage
Weights and ingredients Instruction manual GLM-I 13.8.1 Configure ingredient percentage Whether and how an ingredient percentage is entered and taken into consideration, is de- termined via the «Ingredient selection» table field in the PLU data. You can change the set- ting for the current labeling job.
-
Page 153: Prices And Currencies
Instruction manual GLM-I Prices and currencies Prices and currencies 14.1 Enter prices Depending on the labeling type, enter either a unit price or a fixed price: Labeling mode Fixed price Unit price <Weight> <Fixed price> <Fixed weight> <Fixed value> Next to the unit or fixed price, you can enter a special unit price or special fixed price, see page 152.
-
Page 154: Enter Unit Or Fixed Price
Prices and currencies Instruction manual GLM-I 14.1.2 Enter unit or fixed price The following description refers to the special price option <Without spec. price>. If unit price splitting is switched on, a different input window appears, see page 155. Mode level: 2 <Article data>…
-
Page 155: Enter Parameter For Special Price
Instruction manual GLM-I Prices and currencies 14.1.4 Enter parameter for special price The following description refers to the special price option <Extra spec. price>. Illustration 51: Enter parameters for special price (example) Depending on the labeling type, the input fields «Fixed price» and «Spec.fix.pr.» or «Unit price»…
-
Page 156: Unit Price Splitting
Prices and currencies Instruction manual GLM-I Possible settings: – Enter fixed price only. The PLU is labeled with the fixed price. – Enter unit price only. The PLU is labeled with the unit price and with the price calcula- ted from the unit price and the weight.
-
Page 157: Enter Unit Price Splitting
Instruction manual GLM-I Prices and currencies 14.2.2 Enter unit price splitting The weight type determines which unit price splitting is set. In kg-based weight types, the following splitting options are available: – «per unit». Default setting. – «per 100g» In lb-based weight types, the following splitting options are available: –…
-
Page 158: Print Dimension And Currency Symbol For The Unit Price
Prices and currencies Instruction manual GLM-I 14.3.2 Print dimension and currency symbol for the unit price Select here if you want the the weight dimension and currency symbol to be printed as well as the Unit price. You can have this setting saved in label parameter tables for each label type, see page 200.
-
Page 159: Print The Second Unit Price
Instruction manual GLM-I Prices and currencies 14.3.4 Print the second unit price Determine here whether the unit price should also be printed in the secondary currency. The following settings are possible: «W/o»: Only print unit price in the first currency.
-
Page 160: Print The Currency Unit For Totals
Prices and currencies Instruction manual GLM-I 14.3.6 Print the currency unit for totals Determine here whether the currency units printed for price totals as well. The following settings are possible: «W/o»: Don’t print the currency symbol for price totals on total labels.
-
Page 161: Select A Different Font Size For The Places After The Decimal Point
Instruction manual GLM-I Prices and currencies 14.3.8 Select a different font size for the places after the decimal point You can print the digits in the price before and after the decimal point in different font sizes. This is where you select different font sizes for the places after the decimal point.
-
Page 162: Select A Position For The Currency Symbol
Prices and currencies Instruction manual GLM-I 14.3.10 Select a position for the currency symbol Determine here whether the currency symbol is printed in front of or after the sales price or unit price. The following settings are possible: «Price print s.a.nat.cur.»: Print the currency symbol in the position that is typical for the set country, in front of or after the price.
-
Page 163: Select Primary Country
Instruction manual GLM-I Prices and currencies «Neutral 2»: Print currency of neutral country with three places after the deci- mal place. «Neutral 3»: Print currency of neutral country with three places after the deci- mal place. Allocation of one of the settings «Neutral 0» to «Neutral 3» is prerequisite for being able to use the price rounding feature, see page 163.
-
Page 164: Select Secondary Country
Prices and currencies Instruction manual GLM-I 14.4.2 Select secondary country This is where you can select the secondary country for double price labeling. The related currency is displayed with the 2nd unit price and if the respective print settings are set, printing includes the 2nd unit price and sales price.
-
Page 165: Rounding Of Price
Instruction manual GLM-I Prices and currencies 14.5 Rounding of price Price rounding is usually aligned to the country table stored in the device. It is therefore done in way that is suitable for the set country. With the functions <Price rounding> and <Price round.
-
Page 166: Select Rounding Of Price For Secondary Country
Prices and currencies Instruction manual GLM-I 14.5.2 Select rounding of price for secondary country Mode level: 5 For <Country 2nd cur.> one of the settings, «Neutral 0» to «Neutral 3» was selected. <Main menu> / <Prices> / <Price round. sec.country>…
-
Page 167: Swap Primary And Secondary Country
Instruction manual GLM-I Prices and currencies In the «Secondary» column, select the respective secondary country, see page 80. The prices are converted into the currency of the secondary country. For the classic EU countries, the respective conversion rate is proposed automatically in accordance with the countries selected in the «Primary»…
-
Page 168: Currency Of Neutral Country
Prices and currencies Instruction manual GLM-I In the «to customer No.» row, enter the last customer number, providing the PLU data- base is respectively configured, for which you want to run the swap. Close table. To make the conversion, reply to the security query «Carry out conversion?» with <yes>.
-
Page 169: Texts
Instruction manual GLM-I Texts Texts 15.1 Using text editor Texts can be entered within different functions. To do so, the text editor described in the following is used. For entering one-line texts a simple text editor is available that compri- ses only the functions needed to enter short texts.
-
Page 170
Texts Instruction manual GLM-I Key functions <Esc>: Quit editor. <2nd.>: Activate to enter a character indicated on top left on a letter key. <Shift>: Activate to enter capital letter or the characters indica- ted on numeric keys at left bottom. The characters at left bottom do only appear by entering the following character in the editor. -
Page 171
Instruction manual GLM-I Texts Key block beside the text input field <Beginning of line>: Set cursor to beginning of line. <End of line>: Set cursor to line end. <Beginning of page>: Set cursor to beginning of page. <End of page>: Set cursor to end of page. -
Page 172: Call Up Text Editor
Texts Instruction manual GLM-I 15.1.1 Call up text editor Mode level: 3 (local) or 4 (global) Mode level 3: <Text> / <Text editor local> Mode level 4: <Text> / <Text editor> The text editor appears. 15.1.2 Loading text into Editor Text editor is open.
-
Page 173: Selecting Character Size
In order to load fonts, the license «LOADA- BLE FONTS» is required. For further information on loadable fonts, please contact your specialist Bizerba consultant or Bizerba Service. The character size description is composed as follows: 12: 12×6 — 12 — 2 — 2 — 0 (example)
-
Page 174: Selecting Text Alignment
Texts Instruction manual GLM-I 15.1.4 Selecting text alignment The text can be aligned per paragraph. A respective control character appears in the editor at the beginning of the paragraph from where the text alignment applies. The alignment applies until the next alignment control characters.
-
Page 175: Inserting Further Control Characters
Instruction manual GLM-I Texts 15.1.5 Inserting further control characters The following control characters are available: Frame on/off: Frames the text. Graying-out on/off: Prints the text in gray. Inversion on/off: White text on black background. Underline on/off: Underlines the text. Crossing-out on/off: Crosses out the text.
-
Page 176: Saving Text For Current Labeling
Texts Instruction manual GLM-I Set cursor at the place where the control character is to be inserted. <Add. contr. characters> Select control characters and confirm. With control characters «Character spacing» and «Line spacing»: Enter value and con- firm. With «Line break»: Select setting and confirm.
-
Page 177: Closing Text Editor
Instruction manual GLM-I Texts 15.1.8 Closing text editor Text editor is open. Text editor is opened via a text function Close without saving: <Esc> Close with saving for current labeling: <Exit> Text editor was directly opened <Esc> <Exit> In both cases there is a security inquiry with the following responses: <yes>:…
-
Page 178: Print List Of Saved Texts
Texts Instruction manual GLM-I 15.1.11 Print list of saved texts Mode level: 3 (local) or 4 (global) <Text> / <Text No. occupied> A list is printed. It contains all the texts saved under text numbers in the system and also gives details of the date and time of creation.
-
Page 179: Edit General Text
Configuration of the database is not part of this documentation. For fur- ther information please contact your Bizerba consultant or Bizerba Service. 38.019.129.001 en…
-
Page 180
Allocation of static texts to text fields on customer-specific labels is han- dled by a layout program, such as Bizerba Label Designer (BLD) or the label layout editor in GT-SoftControl. You can find more information in the introduction to the program you decide to use. -
Page 181: Open Table Of Static Texts In Order To Edit
Instruction manual GLM-I Texts 15.3.1 Open table of static texts in order to edit Mode level: 3 (local) or 4 (global) Mode level 3: <Etc> / <Static texts> / <Static text editor loc.> Mode level 4: <Etc> / <Static texts> / <Stat. texts global only>…
-
Page 182: Save The Static Text Table
Texts Instruction manual GLM-I 15.3.3 Save the static text table The static text table is open. <Save as …> Close table with < >. To save the table, answer the security check with <yes>. Enter required parameter number and confirm, see page 77.
-
Page 183: Open The Static Text Table For The Current Labeling Job
Instruction manual GLM-I Texts 15.3.6 Open the static text table for the current labeling job When a PLU is changed, the static text table assigned to the PLU is opened automatically. You can also open a static text table manually for the current labeling job. It is applied until the PLU is changed or until a different static text table is opened.
-
Page 184
Texts Instruction manual GLM-I Date texts are only printed on labels if the related date is printed as well. In order to print variable date texts on date 1 and 2, set the label layout options for date text printing <With var. -
Page 185: Configure Printing Of Date Text
Instruction manual GLM-I Texts 15.4.1 Configure printing of date text With this function you define whether standard date texts or variable date texts are printed in addition to the data on blank labels and customer labels. You can only use variable texts if one of the following prerequisites is given: –…
-
Page 186: Managing The Date Text In The Database
Texts Instruction manual GLM-I 15.4.2 Managing the date text in the database You can manage date texts in the database and assign them to PLUs via the date text number. When a PLU is changed, the assigned date text is accessed automatically.
-
Page 187: Enter Or Change The Date Text For The Current Labeling Job
Instruction manual GLM-I Texts 15.4.3 Enter or change the date text for the current labeling job The date text that is entered as described below applies until the next change or until a different date text is opened, for example when the PLU is changed.
-
Page 188: Managing Simple Texts
Texts Instruction manual GLM-I <Exit> The text editor is closed. The entered text appears in the softkey and is used in the next labeling job. 15.6 Managing simple texts Simple texts consist of a single line and contain up to 15 characters. Use simple texts for delivery addresses, dispatch types and store names, for example, on customer-specific la- bels.
-
Page 189: Date And Time
Use-by date (date 3) Date 1 to Date 3 can be assigned differently, see page 191. For further information please contact your Bizerba consultant or Bizerba Service. Dates are entered or calculated based on the system time. On the softkeys in the display,…
-
Page 190: Enter Date 3
2. Calculation of date 1, 2 and 3 can be configured differently from the de- scription above. For further information please contact your Bizerba consultant or Bizerba Service. For certain types of food, the specification of half-days for sell-by and use-by are required.
-
Page 191: Enter Shelf-Life Days 1
Instruction manual GLM-I Date and time 16.2.1 Enter shelf-life days 1 With this function you enter the shelf-life days 1 for the current labeling job. If necessary, you can have your input applied to the PLU data. Mode level: 2 Enter shelf-life days 1 <Date>…
-
Page 192: Configure Printing Of Date And Time
To support this feature, printing of the date is configured in such a way that the shelf-life days 1 or 2 are printed instead of date 3. For fur- ther information please contact your Bizerba consultant or Bizerba Service.
-
Page 193: Print Options For Date 3
Instruction manual GLM-I Date and time 16.5.3 Print options for date 3 Select here how you would like date 3 printed on the labels. The available settings and procedure are the same as for printing options for date 1, see page 190.
-
Page 194: Determine Format For Printing Date
Date and time Instruction manual GLM-I 16.5.4 Determine format for printing date You can specify formatting for printing the date in a table. The effect of the date printout are shown in the last row of the table «Preview (Date 1)».
-
Page 195: Select How To Write The Date
Instruction manual GLM-I Date and time «Half-daysymbol»: Select half-day symbol. Possible settings: – <W/o>: Do not use a half-day symbol. – <V/N>: Use V for morning and N for afternoon. – <V/N>: Use the French half-day symbols, e.g. «M» for morning (matin), «A»…
-
Page 196: Select Date Format
Date and time Instruction manual GLM-I 16.5.6 Select date format This is where you select the format you want for printing the date. The available formats differ in how the date parts are organized T (position for day), M (position for month) and Y (position for year) as well as how separators are used.
-
Page 197: Select How Half-Days Should Be Displayed
Instruction manual GLM-I Date and time 16.5.7 Select how half-days should be displayed This is where you select how you want half-days to be displayed on labels. The following settings are possible: <Da.w/o haDa Display without half-days, DD.MM.YY>: e. g. «03.11.09»…
-
Page 198: Select Time Format
Tap the <Print of Time 1> or <Print of Time 2> softkey until the setting you want is visible. 16.5.11 Further print settings Further settings relevant to printing date and time can be made by Bizerba Service. These relate to: – deviation from printed reference date and system date –…
-
Page 199: Numbers And Values
Instruction manual GLM-I Numbers and values Numbers and values The chapter describes the following numbers and values that can be saved together with the PLU data: – Product group number, see page 197 – Piece number per package, see page 198 –…
-
Page 200: Entering The Number Of Pieces Per Package
Numbers and values Instruction manual GLM-I 17.2 Entering the number of pieces per package One piece number per package can be printed on labels for fixed price packages. This is done via the fixed price. The piece number per package is entered as follows: –…
-
Page 201: Enter Printable Numbers
Instruction manual GLM-I Numbers and values «Numerator total 3»: Print the value of the Total 3 numerator. «Configurable counter 1»: Print the content of configurable counter 1, see page 284. Example: General number 1. The procedure for general numbers 2 and 3 is identical.
-
Page 202: Label Data
(only for the device) or globally (for all the devices in the network), see page 131. For further information on working with the system network please con- tact your Bizerba sales consultant or the Bizerba Service. 38.019.129.001 en…
-
Page 203: Overview Of Label Parameters
The configuration of the database is not subject of this documentation. For further information please contact your Bizerba consultant or Bizer- ba Service. Attribute…
-
Page 204: Edit Label Parameter Table
Label data Instruction manual GLM-I Mode level 4 (edit global attributes): <Labels> / <Lab. data global only> Mode level 4 (edit global and local attributes): <Labels> / <Lab. data glob.+local> Define new label parameter table Enter new label parameter number and confirm, see page 77.
-
Page 205: Call Up Label Parameter Table
How to create a customer label layout is not part of this documentation. For further information please contact your Bizerba consultant or Bizer- ba Service. If double price labeling is activated, instead of the selected standard la- bel type, the corresponding euro-label type is set automatically.
-
Page 206: Select Label Size For Standard Labels
Label data Instruction manual GLM-I If you set a different label layout, you have to insert a suitable label roll. Mode level: 1 or 2 Mode level 1: <Etc> / <Labels> / <Label type> Mode level 2: <Labels> / <Label type>…
-
Page 207: Delete Label Layout
Instruction manual GLM-I Label data 18.4 Delete label layout Delete customer-specific label layouts you no longer require. Mode level: 5 <Main menu> / <Labels> / <Delete labelLayout> Enter and confirm label layout number, see page 77. To delete the label layout completely, answer the security check with <yes>.
-
Page 208: Set The Light Barrier Offset
Label data Instruction manual GLM-I A variable header length can be defined in the label layout. If you set the variable header length to «0» at the device directly or via the label parameter table, the variable header length in the label layout could take effect.
-
Page 209: Set Line Spacing
Switch frame on or off This is where you select, if a frame is to be printed on the blank labels around the selling price. Frames cannot be printed for 68 mm labels (Bizerba and ISB). The following settings are possible: «W/o»: Print without frame.
-
Page 210: Switch Weight Text On Or Off
Label data Instruction manual GLM-I – Additional text, see page 209 – Total text, see page 209 18.11.1 Switch weight text on or off Decide here if you want a country-specific weight text to be printed on blank labels, see page 148.
-
Page 211: Activate Or Deactivate Supplementary Text
Instruction manual GLM-I Label data 18.11.3 Activate or deactivate supplementary text In standard labels you can use this function to print an additional text in Text 3 on the bot- tom edge of blank labels, see page 176. The following settings are possible: «W/o»:…
-
Page 212: Switch Logo In Textfield 1 On Or Off
How to load a logo into the device is not part of this documentation. For further information please contact your Bizerba consultant or Bizerba Service. Example: Logo field 1.The procedure for logo fields 2 and 5 is the same.
-
Page 213: Delete Logo
Instruction manual GLM-I Label data 18.15 Delete logo Delete logos you no longer require. Mode level: 5 <Main menu> / <Labels> / <Delete logo> Enter number of logo you want to delete, see page 77. To delete the logo completely, answer the security check with <yes>.
-
Page 214: Codes And Scanning Rules
Codes and scanning rules Instruction manual GLM-I Codes and scanning rules You can print barcodes on labels. A data field on standard labels and up to seven data fields on customer labels are available. Which article data are to be printed as a barcode on the labels, can be defined in the code structure rules.
-
Page 215: Overview Of Code Types
Instruction manual GLM-I Codes and scanning rules Number of characters: The number of the characters integrated in a code depends on the code type. Depending on the code, the number of charac- ters is preset or variable. Constant: The code structure can be amended by numeric or alphanumer- ic constants depending on the code.
-
Page 216: Manage Code Structure Rules
(for the device only) or globally (for all the devices in the network), see page 131. For further information on working with the system network please con- tact your Bizerba sales consultant or the Bizerba Service. 38.019.129.001 en…
-
Page 217: Code Editor Overview
Instruction manual GLM-I Codes and scanning rules 19.3.1 Code editor overview Not all the described data fields are displayed in the code editor. Which data fields are displayed depends on the set code type. Data field/function Input mode Description 1st Line…
-
Page 218: Edit And Save Code Structure Rule
Codes and scanning rules Instruction manual GLM-I 19.3.3 Edit and save code structure rule Code editor is open. Select and confirm code type, see page 213. Enter and confirm module width and code height, see page 215. If necessary, enter and confirm the ratio. The code type determines whether or not you can enter the ratio, see page 215.
-
Page 219: Possible Code Contents
Instruction manual GLM-I Codes and scanning rules 19.3.4 Possible code contents Overview of code contents Different code contents can be inserted depending on the type of code. The following table provides an overview of the supported code contents. Code content…
-
Page 220
Codes and scanning rules Instruction manual GLM-I Code content Required specifica- Explanation/Special features tions «ISO code» No. of digits, see page 221 «Numerator» «Total 1 num.» «Total 2 num.» «Gen. No. 1» to «Gen. No. 20» «Lot No.» No. of digits, see page 221 «Batch number»… -
Page 221
Instruction manual GLM-I Codes and scanning rules Middle check digit The middle check digit can be selected in most code types. Depending on the code struc- ture, the middle check digit may only be set once. If a check digit has already been as- signed by the code substring format, no further check digits can be inserted. -
Page 222: Enter Code Structure
Codes and scanning rules Instruction manual GLM-I 19.3.5 Enter code structure In the code structure you define which article data are to be printed in encoded form on the label. The subelements of the code structure can be combined as you wish as long as you comply with the maximum code length.
-
Page 223
Instruction manual GLM-I Codes and scanning rules Selecting number of digits After inserting the following code contents the selecton list «Nmb o.dig.in barcode» ap- pears: – Weights – ISO code – Prices – Numerators – Numbers – Quantity Select number of digits for the inserted element and confirm. -
Page 224
Codes and scanning rules Instruction manual GLM-I Selecting data format After inserting data elements the selection list «Date format» appears. The following set- tings are possible: «DD.MM.YY»: Day. Month. Year. «YY.MM.DD»: Year. Month. Day. «MM.DD.YY»: Month. Day. Year. «DD.MM.YYYY»: Day. Month. Year. -
Page 225
Instruction manual GLM-I Codes and scanning rules Removing code content from code structure Code editor is open. Set cursor on field «Code structure» in front of the code content to be deleted. Press <Clear>. The code content is removed from the code structure. -
Page 226: Special Inputs
Codes and scanning rules Instruction manual GLM-I 19.3.6 Special inputs Depending on the code type, different settings can be made via the softkey <Special inputs>. Special input field Description «Horizontal bar» Switch the bars over the barcode on or off.
-
Page 227
Instruction manual GLM-I Codes and scanning rules Special input field Description «Correction level» PDF417 code: Enter adjustment level (1-8). The higher the level, the more errors are corrected. In level 0, errors are detected but not corrected. «Lines, columns» Data Matrix Code: Enter the exterior shape of the 2D code and the number of rows and columns. -
Page 228: Error Messages Concerning Code Structure
Codes and scanning rules Instruction manual GLM-I 19.3.7 Error messages concerning code structure Error messages in the code editor Error message Cause and rectification «Invalid data in code struc- Appears when an existing code structure rule is selected ture.» for a different code type, for which at least one code con- tent is not allowed.
-
Page 229: Delete Code Structure Rule
Instruction manual GLM-I Codes and scanning rules 19.3.8 Delete code structure rule Delete the code structure rules you no longer require. Mode level: 3 (local) or 4 (global) <Code> / <Delete code struct. No.> Enter and confirm code structure number, see page 77.
-
Page 230: Settings For Printing Barcodes
Codes and scanning rules Instruction manual GLM-I Confirm with <OK>. 19.6 Settings for printing barcodes 19.6.1 Allocate total code A different barcode in comparison to the one printed on single labels can be printed on to- tals labels from Total 1-3 — or product total. The different barcode has to be saved with the code structure rules in advance, see page 215.
-
Page 231: Switch Separate Code String Printing On Or Off
Instruction manual GLM-I Codes and scanning rules 19.6.3 Switch separate code string printing on or off The code strings is printed by standard in the visible text line underneath the barcode. It contains the barcode data in numerical form. You can print code strings or sections thereof separately in code number fields on customer cables, see page 231.
-
Page 232: Print Sub-Code String: Explanations
Codes and scanning rules Instruction manual GLM-I 19.6.4 Print sub-code string: Explanations In additional code number fields on customer labels, you can print a code string or selec- ted parts of a code string separately. The license «CODE_PART_PRINT» is required for separate printing.
-
Page 233: Print Sub-Code String
Instruction manual GLM-I Codes and scanning rules Specialty in GS1-128 In the GS1-128, «Start»and»End»do not refer to individual pieces of code content, but to complete AI identifiers and their related content. Specify the first and last AI identifier rep- resenting the content you want to print.
-
Page 234: Ean-D3 Code
Codes and scanning rules Instruction manual GLM-I 19.7.2 EAN-D3 code The EAN-D3 code is formed from a total of 24 digits. This number of digits is binding. Only numeric data can be encoded. The minimum module width is 0.27 mm. The light zones amount to 9 modules each.
-
Page 235: Industrial Code
Instruction manual GLM-I Codes and scanning rules 19.7.3 Industrial code The data structure of industrial codes can be selected as you wish. For the evaluation process, it must be known how the data are to be interpreted. A legible optical character row is not stipulated for industry codes.
-
Page 236: Code For Rfid Labels (Uhf Only)
Codes and scanning rules Instruction manual GLM-I 19.7.6 EPC-96 Code for RFID labels (UHF only) If the device is equipped with a write unit or RFID labels (Smart Label, RFID = Radio Frequency Identification), information can be transmitted by the transponder integrated in the labels.
-
Page 237
Instruction manual GLM-I Codes and scanning rules Partition: Determines at which position the company prefix and item refer- ence are separated. Both fields together may have maximum 44 bits. In SGTIN-96, you can set how the fields are separated. Company prefix:… -
Page 238
Codes and scanning rules Instruction manual GLM-I Discover value for partition in SGTIN-96 The partition is an ID for the separation between manufacturer number and product num- ber. The value can be taken from the technical data for the SGTIN-96 by EPC. -
Page 239: Enter Code Structure Rule Sgtin-96 (Example)
Instruction manual GLM-I Codes and scanning rules 19.7.7 Enter code structure rule SGTIN-96 (example) The example shows how to create an SGTIN-96 with the following code structure: Code part Decimal Binary max. bits Header 01100000 8 Bits Filter val- 3 Bits…
-
Page 240: Scanning Rule
Codes and scanning rules Instruction manual GLM-I 19.8 Scanning rule With the scanning rule it can be defined how a barcode that was read by the scanner has to be interpreted. Depending on the presetting the read data can be considered as opera- tor input, or it canrelease certain functions like printing single and total labels.
-
Page 241
1, 2 or 3. «Fomula in text field» Text field number Contact your Bizerba technical consultant or Bizerba Service if you have any questions on the formula interpreter. «Macro» Key for macro request Function (without scan charac-… -
Page 242: Sequence During Processing Of Scanned Code Contents
Codes and scanning rules Instruction manual GLM-I Code content Additional presettings Explanation «Repeat» The scan process is repeated from beginning of string. There- fore, a string can be used for several code contents. Example: string: 12345 Scanning rule: «Code substring1 / Repeat / Lot No.»…
-
Page 243: Re-Creating Or Opening Scanning Rule For Editing
(only for the device) or globally (for all devices of the network), see page 131. For further information on working with the system network please con- tact your Bizerba sales consultant or the Bizerba Service. CAUTION If incorrect modifications are made, the scancodes can no longer be read or evaluated! Possible production failure.
-
Page 244: Editing And Saving Scanning Rule
Codes and scanning rules Instruction manual GLM-I 19.11.2 Editing and saving scanning rule Scanning rule editor is open. Select code type, see page 242. Press <Code structure>. The code structure editor appears. Define part elements of code, see page 243.
-
Page 245: Entering Code Structure For Scanning Rule
Instruction manual GLM-I Codes and scanning rules 19.11.4 Entering code structure for scanning rule The code structure defines how the scanned characters of the barcode are interpreted. The scanning rule may not contain more characters than the scanned code. If the code is longer than the scanning rule, the scanning rule must define the handling of the remaining code digits through «Variable…
-
Page 246
Codes and scanning rules Instruction manual GLM-I Highlighting content as optional Apart from verification-related code contents like weight, tare and price, as well as the print command for single and total labels, all code contents can be highlighted as optional. If the optional code contents in the scan code are available, they are evaluated like non-optional code contents. -
Page 247
Instruction manual GLM-I Codes and scanning rules Selecting number of digits After inserting the following code contents the selecton list «Nmb o.dig.in barcode» ap- pears: – Weights – ISO code – Prices – Numerators – Numbers – Quantity Select number of digits for the inserted element and confirm. -
Page 248
Codes and scanning rules Instruction manual GLM-I Selecting data format After inserting data elements the selection list «Date format» appears. The following set- tings are possible: «DD.MM.YY»: Day. Month. Year. «YY.MM.DD»: Year. Month. Day. «MM.DD.YY»: Month. Day. Year. «DD.MM.YYYY»: Day. Month. Year. -
Page 249: Deleting Scanning Rule
After insertion of code content «Fomula in text field» a window appears for entering the text field that includes the formula. Contact your Bizerba technical consultant or Bizerba Service if you have any questions on the formula interpreter. Enter text field number and confirm.
-
Page 250: Changing Current Scanning Rule
Codes and scanning rules Instruction manual GLM-I Enter number of required scanning rule and confirm, see page 77. The selected scanning rule is called up and is used for the current labeling. 19.13 Changing current scanning rule Use this function to change the current scanning rule. Your changes can be saved either for the current labeling or saved into the database.
-
Page 251: Automatic Machine Parameters
(only for the device) or globally (for all the devices in the network), see page 131. For further information on working with the system network please con- tact your Bizerba sales consultant or the Bizerba Service. 38.019.129.001 en…
-
Page 252: Overview Of Automatic Labeler Parameters
Which attributes can actually be managed in your labeler parameter tables depends on how the database is configured. The configuration of the database is not subject of this documentation. Please contact your Bizerba consultant or Bizerba Service for further in- formation. Attribute…
-
Page 253: Editing Labeler Parameter Tables
Instruction manual GLM-I Automatic machine parameters <Automat> / <A.lab.data glob.only> (mode level 4, edit global attributes) <Automat> / <A.lab.data glob.+local> (mode level 4, edit local and global attributes) To create a new label parameter table, enter and confirm a new label parameter num- ber, see page 77.
-
Page 254: Labeler Adjustment
Automatic machine parameters Instruction manual GLM-I 20.2 Labeler adjustment 20.2.1 Activating and deactivating the height adjustment for labelers Possible settings: «W/o»: The motorized height adjustment is not active. Default setting. «With»: Motorized height adjustment is active. The motorized height adjustment for labelers is available.
-
Page 255: Setting The Height Offset Of The Labeler
The height offset is factory-set or set by the Bizerba service and may not be changed. The motorized height adjustment for labelers is available and activated.
-
Page 256: Enter The Maximum Package Height
Automatic machine parameters Instruction manual GLM-I 20.2.5 Enter the maximum package height If the device is equipped with a motorized height adjustment for labelers, the different package heights can be saved in the automatic labeler parameter tables. When calling up an article that an automatic labeler parameter table is assigned to, the labeler is automati- cally adjusted to the respective package height.
-
Page 257: Enter Transverse Position Of Labeler
Instruction manual GLM-I Automatic machine parameters 20.2.7 Enter transverse position of labeler If the device is equipped with a motorized transverse adjustment for labelers, the labeler can automatically be moved to the desired position when the article is changed. To do so, save the transverse position in the automatic labeler parameter table associated to the ar- ticle, see page 250.
-
Page 258: Distances And Positions Of The Labeler
Automatic machine parameters Instruction manual GLM-I 20.3 Distances and positions of the labeler 20.3.1 Entering the label distance The label distance is the distance between the label stop edge at the printer mechanism and the reference line of the package. Depending on the setting, the reference line is the leading edge, trailing edge, or centerline of the package, see page 257.
-
Page 259: Enter Reference Line For Label Distance
Instruction manual GLM-I Automatic machine parameters 20.3.2 Enter reference line for label distance By default, the leading edge of the package is defined as the reference line for label dis- tance input. In this regard, leading edge and trailing edge refer to the transport direction of the package.
-
Page 260: Entering Package Height
Automatic machine parameters Instruction manual GLM-I 20.4.1 Entering package height By defining the package height, the piston is started in such a manner as to ensure that the label is always applied to the same position on the package. If the database is config- ured accordingly, you may save the package height in the article data and in the automatic labeler data.
-
Page 261: Entering Rotational Angle
Instruction manual GLM-I Automatic machine parameters 20.4.3 Entering rotational angle The piston of the piston labeler can be rotated degree by degree up to +/- 360 degrees. In this manner the label can be applied to the package at any rotated position. The rotational angle that is called up together with the article data, may be changed for the current label- ing job.
-
Page 262: Rotation Parameter
Automatic machine parameters Instruction manual GLM-I The preset parameters may only be changed after consultation with Bi- zerba service. 20.5.1 Rotation parameter The rotary arm labeler parameters are set prior to delivery. If settings have to be custom- ized, the values can be adapted accordingly. After changing parameters, adjustment of other rotation parameters may be required.
-
Page 263: Entering Extension Time Of Pressure Roller
Instruction manual GLM-I Automatic machine parameters 20.6.4 Entering extension time of pressure roller Type of labeler: <Belt labeler> Mode level: 5 <Automat> / <Labeler> / <Labeler parameters> / <Belt labeler> / <Moving time press.roller> Enter value and confirm. 20.7 Delay for the external triggered labeler Here you may enter an additional delay time for a stand-alone labeler that is activated by an external signal.
-
Page 264: Registration Of Light Barrier Masking Section
Automatic machine parameters Instruction manual GLM-I 20.8.2 Registration of light barrier masking section Packages with an irregular external form may trigger a light barrier several times. In order to avoid this, define a masking section. After the first edge of the package, the light barrier is deactivated for the length of the masking section.
-
Page 265: Entering Belt Speed For Labeling
Instruction manual GLM-I Automatic machine parameters 20.8.4 Entering belt speed for labeling The belt speed determines the system throughput. Choose belt speed to prevent package jam in front of the device. The following cases might require a reduction in belt speed: –…
-
Page 266: Entering Speed Of Pressure Roller
Automatic machine parameters Instruction manual GLM-I 20.8.8 Entering speed of pressure roller Enter the pressure roller speed as factor in percent depending on the belt speed. The device is equipped with a pressure roller. Mode level: 1 <Device menu> / <Transport equipment> / <Speed IF/ press. roller>…
-
Page 267: Adjusting And Calibrating Guide Rails
Instruction manual GLM-I Automatic machine parameters 20.8.11 Adjusting and calibrating guide rails The device may be equipped with motorized guide rails. They allow easy and fast adjust- ment of the guide rails to the respective aperture width according to different package or article sizes.
-
Page 268: Selecting Polarity
Automatic machine parameters Instruction manual GLM-I 20.9.2 Selecting polarity For the package ejector or the dividers, the active signal level can be set accordingly. Ex- ample: Package ejector. The procedure for dividers is analog. The following settings are possible: «+»: Positive logic.
-
Page 269: Selecting Activation Criteria
Instruction manual GLM-I Automatic machine parameters 20.9.3 Selecting activation criteria If a package ejector or dividers are integrated in the conveying direction and if the respec- tive distance in front of the light barrier is preset, you can chose when the package ejector or a divider is to be activated.
-
Page 270: Registration Of Delay Time
Automatic machine parameters Instruction manual GLM-I 20.9.4 Registration of delay time If need be, you can set a delay time for the package ejector or a divider, after which a package is ejected. Example: Package ejector. The procedure for dividers is analog.
-
Page 271: Signal Lamp For Paper Status
Instruction manual GLM-I Automatic machine parameters 20.11 Signal lamp for paper status If a signal lamp is connected to the fault output of the device, select here the paper status that activates the signal lamp. The following settings are possible: <On paper supply>:…
-
Page 272: Setting Polarity For Container Light Barriers
Automatic machine parameters Instruction manual GLM-I 20.12.2 Setting polarity for container light barriers Here you can set the polarities for the container light barriers of the package ejector and the dividers: – <Polarity cont.-LB EJ> – <Polarity cont.-LB D1> –…
-
Page 273: Delays
Instruction manual GLM-I Automatic machine parameters 20.13 Delays Here you predefine the delay time for constructional package ejectors, dividers and other outputs, after which a package needs to be ejected. The following functions are available: <Delay infeed control>: Delay time for output infeed control.
-
Page 274: Processing
Processing Instruction manual GLM-I Processing 21.1 Configuring resolution for label printing You can set a variety of resolution types for label printing. The following settings are possi- ble: <Automatic>: Print labels automatically after scales at rest. <Manual>: Start label printing manually.
-
Page 275
Instruction manual GLM-I Processing «Operating mode»: The following settings are possible: «passive»: No automatic PLU change. Standard setting. «PLU change after *»: The automatic change to the speci- fied PLU number/customer number takes place as soon as the total set under «Execute if»… -
Page 276: Configure Synchronization Message Of Weighing Belt
Processing Instruction manual GLM-I «Execute if»: Only for the «PLU change after *» and «Lock after *» operating modes: Total, which triggers the PLU change. The following settings are possible: «*1 reached»: PLU change is triggered once Total 1 is reached.
-
Page 277: Enter Labeling Type
Instruction manual GLM-I Processing With this function, you determine how the synchronization message can be canceled. The following settings are possible: «no»: No synchronization. Default setting. «Release by entering The synchronization message is canceled by a PLU change or PLU»: by a GxNet interface command.
-
Page 278
Processing Instruction manual GLM-I The pictures show standard labels for the different types of labeling. Illustration 58: Standard label for PLUs with «Weight» labeling type (example) Illustration 59: Standard label for PLUs with «Fixed price» labeling type (example) Illustration 60: Standard label for PLUs with «Fixed weight» labeling type (example) -
Page 279
Instruction manual GLM-I Processing Illustration 61: Standard label for PLUs with «Fixed value» labeling type (example) Product designation Packaged-on date Use-by date Unit price Weighed weight Fixed weight calculated price Fixed price Number of pieces per package The usual procedure is to save the labeling type in the PLU data, see page 131, or in the weight class data, see page 310. -
Page 280: Configure Change Of Labeling Type
Processing Instruction manual GLM-I 21.5 Configure change of labeling type If PLUs have to be labeled differently, this is where you specify how the labeling type is changed. The following settings are possible: <Disable change>: The labeling type may not be changed.
-
Page 281: Enter Production Numbers
Instruction manual GLM-I Processing – in the top right of the screen (display field for ID and device name) – in the display connection table of GT-SoftControl Mode level: 5 <Service menu> / <System services> / <Device name> Enter and confirm the device names.
-
Page 282: Configuring Batch Number
Processing Instruction manual GLM-I 21.8.3 Configuring batch number This is where you define what is printed as batch number on suitable customer labels. The following settings are possible: <Without batch number>: Batch numbers are not printed on the label (standard setting).
-
Page 283: Use Numerators
Instruction manual GLM-I Processing 21.9 Use numerators Numerators create consecutive numbers. The device can print a consecutive number on single labels and also on totals labels for the totals *1 — *3. You can configure which nu- merators are used in which way and when they are deleted, see page 281. You can as- sign a value range and a start value to activated numerators, see page 283.
-
Page 284: Configuring Total Numerator
Processing Instruction manual GLM-I 21.9.2 Configuring total numerator In this configuration you determine whether and how the total numerators should be used and when they should be deleted. The following settings are possible: <Without *1 numerator>: The numerator is deactivated.
-
Page 285: Enter The Range Of Values Of The Numerators
Instruction manual GLM-I Processing 21.9.3 Enter the range of values of the numerators You can define the range of values in which the numerator counts. The device issues a message as soon as the end of the value range has been reached. The numerator subse- quently starts again with the start value.
-
Page 286: Configuring Available Counters
Processing Instruction manual GLM-I 21.9.5 Configuring available counters The device has a freely configurable counter that increments according to a prespecified event. When a package or box is canceled, the counter can be decreased. In order to print the value of the counter on customer-specific labels that have been configured for this pur- pose, you have to allocate the counter to one of the general numbers 1 to 3, see page 198.
-
Page 287
Instruction manual GLM-I Processing The settings for the print channels can also be made in the PLU data, so that they auto- matically appear when the PLU is changed, see page 132. This function allows to enter or change the current labeling process settings. The settings are not saved in the database. -
Page 288: Totals
Totals Instruction manual GLM-I Totals 22.1 Set totalization type Weight, price and number of labeled packages can be added in various total memory loca- tions. Totalization can be performed generally, related to the PLU or to the weight class. By setting a totalization type you determine in which total memory location the addition is made.
-
Page 289: General Total Preselections
Instruction manual GLM-I Totals 22.2 General total preselections 22.2.1 Selecting the preselection type for Total 1 to 3 This is where you define the size to trigger the total memory locations 1 to 3. If the defined size reaches a preset value, the total label is printed. The total is deleted in correspond- ence with the total delete criteria, see page 291.
-
Page 290: Entering Preselection Value For Total 1 To 3
Totals Instruction manual GLM-I 22.2.2 Entering preselection value for total 1 to 3 After defining the size that should trigger a total, you have to enter a value for the prese- lection. For a piece-preselection, enter the piece number to trigger the total, for a price pre- selection, enter the price total etc.
-
Page 291: Fill Up Box Total 1
Instruction manual GLM-I Totals 22.3.1 Fill up box total 1 The following settings are possible: «Yes»: The should always keep its nominal weight. «No»: The pallet total has priority over the box total. Set this when <Fill up *2 pallet> has this setting: <Yes>.
-
Page 292: Enter Special Unit Price For Total Weight
Totals Instruction manual GLM-I 22.3.4 Enter special unit price for total weight If the price is calculated from the total weight, e.g. of the box and a special unit price, enter «Extra total unit price» here. If the «Extra total unit price» » is 0″, the price of the box, for example, is established independently of the weight by adding up the prices of the packages included in the box.
-
Page 293: Select Deletion Criteria For Totals
Instruction manual GLM-I Totals Tare total *2: Total 2 counts single packages – The tare total for total 2 is increased for each package by the tare weight of the pack- age. – If printing total 2 or if the preset value for total 2 is reached, a prespecified total2 tare is added to the tare total for total 2.
-
Page 294: Select Totals Deletion Criteria For Total 2
Totals Instruction manual GLM-I 22.6.2 Select Totals deletion criteria for Total 2 This is where you can define whether and at what mode level Total 2 is deleted when trig- gered. The following settings are possible: <With delete>: Total 2 is deleted with the next single weight after printing with Total 2.
-
Page 295: Set Up Total Release
The automatic machine has to be stopped for a new total prese- lection or PLU change. How the printer interfaces are configured is not part of this documenta- tion. For further information please contact your Bizerba consultant or Bizerba Service. synchronously unse-…
-
Page 296: Set Up Total Acknowledgement For External Printer
Totals Instruction manual GLM-I The following settings are possible: – <*1, *2, *3 manual> – <*1, *2, *3 synchronous> – <*1 synchr. *2,*3 man.> – <*1,*2 sync. *3 manual> – <*1, *2, *3 asynchr.> – <*1 asynchr. *2,*3 sync.> –…
-
Page 297: Print Totals On Different Customer Labels
Instruction manual GLM-I Totals 22.7.2 Print totals on different customer labels If you print totals on customer labels, you can allocate different customer-specific label lay- outs to Totals 1 to 3. And you can allocate another customer-specific label layout to all the remaining totals.
-
Page 298: Configure Printing Of Weight Dimension On Total Labels
Totals Instruction manual GLM-I 22.7.4 Configure printing of weight dimension on total labels Determine here how the weight is printed on total labels. The following settings are possi- ble: <Without>: Print total weight without weight dimension. <With (normal)>: Print total weight with weight dimension. Default setting.
-
Page 299: Printing Article Totals Greater Than Zero
Instruction manual GLM-I Totals You can display the current total on the screen at any time. Do this by pressing <Shift> plus the softkey to trigger the respective total, see page 71. Mode level: 2 Print total 1 <Release total> / <Total 1>…
-
Page 300
Totals Instruction manual GLM-I «Deduct from attrib.area»: If required, define here too which totals should be deducted due to returned goods. The following settings are possible: – «no key attribute» – «PLU» – «Customer number» In the standard setting «no key attribute» no deductions are made. -
Page 301: Total Preselection Matrix
Instruction manual GLM-I Totals 22.10 Total preselection matrix 22.10.1 Use total preselection matrix In the form of a table, the total preselection matrix contains the total preselections and cur- rent totals for up to 40 PLU numbers (totalization type: <PLU — related> or <PLU dynamic>) or for the weight classes of the current weight class table (totalization…
-
Page 302
Totals Instruction manual GLM-I Illustration 63: Total preselection matrix weight class-related (example) Rows in total preselection matrix: «PLU number»: Only for PLU-related total preselection: PLU number display. «Customer No.:»: Only for PLU-related total preselection: Customer number dis- play. «Preset type»: This is where you define the preselection types for PLU-related and weight class-related totals 1 and 2. -
Page 303
Instruction manual GLM-I Totals Printing and deleting are performed without a security check. Acknowledge label tear-off after printing. «Include in global totali- Switches additional totalization in the general total memory to- zation process»: tal 1 and total 2 on or off. -
Page 304: Use Total Preselection Column
Totals Instruction manual GLM-I 22.10.2 Use total preselection column With the totalization type <PLU dynamic>, you can label up to 40 nested articles at the same time using separate totals and preselections. When the PLU is changed, the device checks whether the new PLU and its preselection is already included in the total preselec- tion matrix.
-
Page 305: Enter Or Edit Total Preselection Data For A Plu
Instruction manual GLM-I Totals 22.10.3 Enter or edit total preselection data for a PLU You can save a total preselection for each PLU. This total preselection is called up auto- matically during a PLU call-up and used when <PLU — related> or <PLU dynamic> is set as totalization type.
-
Page 306: Delete Total Preselection Data For A Plu
CONFSUM1, CONFSUM2 and CONFSUM3 are not defined for the respective total evaluation until the key attributes are saved. The configuration of the database is not subject of this documentation. For further information please contact your Bizerba consultant or Bizer- ba Service. 38.019.129.001 en…
-
Page 307: Allocate Key Attributes For Total Evaluations
Instruction manual GLM-I Totals 22.11.1 Allocate key attributes for total evaluations Before total evaluations are created, allocate key attributes to the respective evaluation in a table. With the key attribute «PLU», you can, for example, restrict the evaluation later to a predefined range of PLU numbers.
-
Page 308: Configure Total Evaluations A To C
Totals Instruction manual GLM-I 22.11.2 Configure total evaluations A to C In a table, allocate the ranges you want evaluated to the total evaluations A, B and C based on the respective key attributes. In addition make settings to determine printing, cal- culation of the average value and if necessary how to handle returned goods.
-
Page 309
Instruction manual GLM-I Totals Illustration 64: Example for total evaluation A with subtraction Example: Total evaluation A. The procedure for total evaluations B and C is equal. Mode level: 5 38.019.129.001 en… -
Page 310: Delete Data Records From Total Evaluations
Totals Instruction manual GLM-I Configure total evaluation A <Main menu> / <Totalization> / <Evaluation of total> / <Evaluation of total A> Make Settings, see page 79. Close table. To save the settings and to print the total evaluation, answer the security check with <yes>.
-
Page 311: Printing Total Evaluation A, B, Or C
Instruction manual GLM-I Totals 22.11.6 Printing total evaluation A, B, or C With these functions total evaluations A to C are transmitted to a printer or EDP system. The basic settings for printout are defined in the configuration of the respective total evalu- ation, see page 304.
-
Page 312: Weight Classes And Statistics
Weight classes and statistics Instruction manual GLM-I Weight classes and statistics 23.1 Weight classes Weight-class-specific labeling enables the following functions: – Label packages dependent on their weight differently. – In labelers with an integrated package separator or divider: Automatically separate overweight or underweight packages.
-
Page 313: Define Or Edit Weight Class Table
Instruction manual GLM-I Weight classes and statistics 23.1.2 Define or edit weight class table Mode level: 3 (local) or 4 (global) <Weight class> / <Weight class data> To create a new weight class table, record new weight class number and confirm, see page 77.
-
Page 314: Enter The Same Presettings For All Weight Classes
Weight classes and statistics Instruction manual GLM-I 23.1.4 Enter the same presettings for all weight classes In the weight class table you can either make entries for individual weight classes or for all the weight classes that are included. In order to make entries for all weight classes, select the respective row of the table on the left hand side of the table.
-
Page 315: Edit Weight Class Attribute
Instruction manual GLM-I Weight classes and statistics 23.1.5 Edit weight class attribute Edit weight classes in the table editor, see page 75. The weight class attributes are com- bined in table fields. If you open a table field to edit it, an input window appears containing all the attributes belonging to that table field.
-
Page 316
If packages that are too heavy or too light need to be separated, this is where you can acti- vate a package separator or divider for each weight class. There are no dividers available for GLM-I. Table field «Deactivate print!»… -
Page 317
Instruction manual GLM-I Weight classes and statistics Table field «Automat stops after ..» The automatic machine stops automatically at a number of packages with the incorrect weight. Enter the respective number of packages for each weight class. If the number of packages is changed, you only have to reenter the value in one weight class. -
Page 318: Types Of Statistics
Weight classes and statistics Instruction manual GLM-I 23.1.6 Types of statistics In order to use the statistics types you need the «Prepack Regulation li- cense». The following types of statistics are available: «no»: Without statistic evaluation. «FPV Europe»: The device checks and manages the packages in line with Eu- ropean prepack regulations (FPV).
-
Page 319: Delete Weight Class Table
Instruction manual GLM-I Weight classes and statistics 23.1.7 Delete weight class table Delete the weight class tables you don’t need anymore. Mode level: 3 (local) or 4 (global) <Weight class> / <Delete weight class> Enter and confirm the weight class number, see page 77.
-
Page 320: Open Weight Class Table Manually
Weight classes and statistics Instruction manual GLM-I 23.1.9 Open weight class table manually If the weight class data are not called up automatically when the PLU is changed, or if you want to use a different weight class table, this is where you can access the weight class table directly for the current labeling job.
-
Page 321: Edit The Current Weight Class Table
Instruction manual GLM-I Weight classes and statistics 23.1.10 Edit the current weight class table To change the data in the current weight class table, you can open the table, as described below, and edit it as a whole. Alternatively, you can make use of the Input Assistant, which restricts your options to the selections relevant to the preselected type of statistic (selection criterion).
-
Page 322: Edit Current Weight Class Table Via Input Assistant
Weight classes and statistics Instruction manual GLM-I 23.1.11 Edit current weight class table via input assistant An input assistant is available for standard applications that makes entering input easier by displaying simple input windows to do so. The type of weight control that is in place deter- mines which input is required for the weight class table.
-
Page 323: Selection Criteria For Editing Weight Class Tables Via The Input Assistant
Weight classes and statistics 23.1.12 Selection criteria for editing weight class tables via the input assistant There are no dividers available for GLM-I. The following selection criteria are supported: «Weight determination» The device weighs all packages. The statistical evaluation includes all packages. Package selection does not take place based on statistics.
-
Page 324
Weight classes and statistics Instruction manual GLM-I «Statistics»: Activate, if you want a statistical evaluation of all packages with- in the predetermined limits. No selection is made based on the statistics. «Nominal weight»: Nominal weight of the article. «Sliding contents control»… -
Page 325
Instruction manual GLM-I Weight classes and statistics Settings are required for the following attributes: «Range 1 to», «Range 2 Each line corresponds to a weight class. to» etc.: «Limiting value»: Upper limit value for the appropriate weight class. «Ejector»: Specify switch or package ejector if you want packages that are in the weight range to be separated. -
Page 326
Weight classes and statistics Instruction manual GLM-I Settings are required for the following attributes: «Nominal weight»: Nominal weight of the article. «TO»: Upper tolerance weight: From the nominal weight, the device works out the upper tolerance weight in accordance with «NIST Handbook 133». -
Page 327: Enter The Fixed Weight For The Current Labeling Job
Instruction manual GLM-I Weight classes and statistics «Too light»: Specify a divider or package ejector if too light packages should be sorted. In the standard setting «Do not eject» no packages are separated. «Good»: Specify the divider or package ejector when accepted packages need to be ejected.
-
Page 328: Enter The Minimum And Maximum Weight
Weight classes and statistics Instruction manual GLM-I 23.1.14 Enter the minimum and maximum weight Checks to inspect the minimum and maximum weight help sort out the following packages: – non-isolated packages that could be taken for a single package –…
-
Page 329: Statistics
Instruction manual GLM-I Weight classes and statistics 23.2 Statistics 23.2.1 Selecting statistics report The following statistics are available: – Main statistics – Marginal statistics – Free statistics 1 – Free statistics 2 Main and marginal statistics are based on the same data but can be triggered independ- ently of one another and can be created with different report templates and add-ons.
-
Page 330: Selecting Initiation Criterion For Statistics Reports
«Change PLU no.» and «Change customer no.» are approved depends on how your database is configured. The configuration of the database is not subject of this documentation. For further information please contact your Bizerba consultant or Bizer- ba Service. 38.019.129.001 en…
-
Page 331
Instruction manual GLM-I Weight classes and statistics Possible settings: – «No report»: No report is triggered. Standard setting. – «Activate report»: A report is initiated. – «Store statistic»: The statistics evaluation can be interrup- ted for an article change and continued later. The statistics data are saved in the database and reloaded when the arti- cle is called up again. -
Page 332: Releasing Statistics Reports Manually
Weight classes and statistics Instruction manual GLM-I 23.2.3 Releasing statistics reports manually Statistics reports usually are released automatically after a preset initiation criteria. Based upon the configuration they are transmitted to a printer, storage medium or EDP, see page 328.
-
Page 333: Adding To Statistics Data
Instruction manual GLM-I Weight classes and statistics 23.2.4 Adding to statistics data When statistics are activated, you can send the statistical evaluation via defined transmis- sion channels to a storage media, for example, or to an EDP system or printer. The <Add.
-
Page 334: Creating Customer-Specific Statistics Reports
The transmission channels are assigned in a customer-specific manner. How the channels are configured is not part of this documentation. For further information please contact your Bizerba consultant or Bizerba Service. If you want define the same settings for all customer-specific report, tap the respective field in the left-hand column.
-
Page 335: Assigning Statistics Report To A Transmission Channel
Instruction manual GLM-I Weight classes and statistics Select the «Formatting rule» field from the column in the report template you are edit- ing. Select and confirm the setting you want. Place the cursor successively in each of the remaining fields in the report template.
-
Page 336: Operation
If switching off device briefly, wait at least 10 seconds before switching it on again to make sure that the device is switched off completely. Main switch (rotary switch) Main switch (push-button) System reboot push-button Illustration 65: GLM-I main switch Prerequisites: – The device has been installed properly and connected. –…
-
Page 337: Preparatory Work
Instruction manual GLM-I Operation 24.3 Preparatory work Before starting labeling the following preparatory works needs to be done: – Setting labeler, see page 45 – Changing label roll, see page 58 – Setting alignment rails, see page 421 Depending on the accessories inserted, further preparatory works might be necessary.
-
Page 338: Calling Up Article Via Plu Number And Customer Number, If Available
– under a fixed combination of PLU and customer number The configuration of the database is not subject of this documentation. For further information please contact your Bizerba consultant or Bizer- ba Service. Mode level: 1 or 2 Mode level 1: <PLU>…
-
Page 339: Search Article Via Article Text
Instruction manual GLM-I Operation 24.5.2 Search article via article text The article that is to be called up can be searched via the article text. Mode level: 1 or 2 The article data table contains the attribute «Article text». An article text is administered for each article.
-
Page 340: Labeling
Operation Instruction manual GLM-I The configuration of the tare input is not subject of this documentation. For further information please contact your Bizerba consultant or Bizer- ba Service. Mode level: 1 Sequential control <Manual> is set, see page 272. Place packaging on the scale.
-
Page 341: Cancelling Via Numerator
Instruction manual GLM-I Operation 24.9.1 Cancelling via numerator If the consecutive number of the individual numerator has been printed on the labels, you can enter this number and cancel the respective package. This is possible for up to 100 packages at a later point of time. All totals generated during labeling will be effected by the cancellation.
-
Page 342: Cancel With Minus Tool
Operation Instruction manual GLM-I 24.9.2 Cancel with minus tool In the event of a cancellation, prices, weights and piece numbers have to be deducted from the total memories. Via the minus tool, you can stipulate flexibly which values are to be deducted from which total memories.
-
Page 343
Instruction manual GLM-I Operation «Subtract nmb of *2 fr. If the number of reached preselected totals from Total 2 is part *3»: of Total 3: Number of reached total reselections from Total 2, which should be deducted from Total 3. -
Page 344
Operation Instruction manual GLM-I Cancel fixed value package When a fixed value package is canceled, the fixed weight and the price of the package are deducted from the relevant totals and the piece number is decreased. To cancel a fixed value package, you don’t usually have to stipulate anything manually, as the currently de- fined data are automatically displayed when the minus tool is started. -
Page 345: Printing Total Label
Instruction manual GLM-I Operation 24.10 Printing total label You can pre-define a total for a some or numerous totals for several articles for labeling, see page 286. When the total is achieved a total label is printed. Depending on the total initiation set it is printed as follows: –…
-
Page 346
Operation Instruction manual GLM-I Printing of label sequences is configured via the <Lab. sequ.: mode> function. The follow- ing settings are possible: <With label sequence>: Label sequence without separating label at the end. <W/o label sequence>: No label sequence. Default setting. -
Page 347: Print Label Sequence For Unknown Package Number
Instruction manual GLM-I Operation After you have printed the label sequence, switch the tear-off light barrier back on again. Reset original trigger type. 24.11.1 Print label sequence for unknown package number Mode level: 2 The labeling type is <Fixed price>, <Fixed weight> or <Fixed value>.
-
Page 348: Printing Lists
Operation Instruction manual GLM-I Select setting and confirm. 24.14 Printing lists You can print the following list types: Weight lists: Successive printing of the weight values for a PLU. Item lists: Successive printing of special items of the same PLU.
-
Page 349
Instruction manual GLM-I Operation After triggering the statistics data are deleted. Mode level: 1 or 2 Mode level 1: <Etc> / <Weight class &statistics> / <Statistics report> Mode level 2: <Processing> / <Weight class &statistics> / <Statistics report> Press softkey of required report. -
Page 350: Troubleshooting
Troubleshooting Instruction manual GLM-I Troubleshooting If you are not able to remedy an error yourself, please contact the Bizerba Service. Please provide the Bizerba Service with the following information: – Device type (see identification plate) – Device number (see identification plate) –…
-
Page 351: Messages
Instruction manual GLM-I Troubleshooting 25.2 Messages 25.2.1 Acknowledging messages The following softkeys are displayed on the device together with the error messages: <Cancel>: Close display. Processing remains locked (lock). <Enable>: Close display and approve processing (end lock). <Accept all>: All error messages whose causes could have been remedied through a package reset, disappear.
-
Page 352: Lock Messages: «Processing Disabled
Troubleshooting Instruction manual GLM-I 25.2.3 Lock messages: «Processing disabled:» Message Cause Rectification «Process blocked:Error dur- Article data is incomplete. Check article data and if ing loading of PLU data re- necessary make additions. cord» Change article. Only a successful article change can end the lock.
-
Page 353: Messages: Scale
Instruction manual GLM-I Troubleshooting 25.2.4 Messages: Scale Message Cause Rectification «Scale not connected» No scale is connected when Connect scale. the device is switched on. «Scale does not give weight The scale does not provide Check cables. value» any weight values after initi- Connect scale.
-
Page 354: Messages: Printer And Labeling System
Troubleshooting Instruction manual GLM-I 25.2.5 Messages: Printer and labeling system Message Cause Troubleshooting «Print head lifted up» The printhead is open. Close printhead. «Paper supply?» The label roll is empty soon. Provide new label roll. «Label roll empty» The label roll is empty.
-
Page 355: Messages: Package
Instruction manual GLM-I Troubleshooting 25.2.6 Messages: Package Message Cause Rectification «Infeed error» The infeed rate is too high or Adjust belt speeds. the belt speed of the device is too low. «Separation error» The interval between pack- Lower the singling factor for ages is too small.
-
Page 356: Other Messages
Troubleshooting Instruction manual GLM-I 25.2.7 Other messages Message Cause Troubleshooting «Motion detected» The scale was not in stable Avoid drafts and vibrations equilibrium. The package around the scale. was not marked as invalid. «Speed of conveyor belt too The package was marked Reduce belt speed.
-
Page 357
Instruction manual GLM-I Troubleshooting Message Cause Troubleshooting «Activation not possible max. The input value is larger Enter a smaller value. limit violated» than the largest permissible value. «Weight type change: weight While switching to another Print daily total and delete total deleted»… -
Page 358: Configure Error Behavior
Troubleshooting Instruction manual GLM-I 25.3 Configure error behavior 25.3.1 Setting operating mode in case of error The device counts faulty packages in succession. The causes of the error could be: – Package separation error – Scales not at rest –…
-
Page 359: Service Print-Outs
Instruction manual GLM-I Troubleshooting 25.4 Service print-outs You can print different service printouts. Depending on how the device is configured, it sends data to a printer, for example, or to a storage medium or connected computer. 25.4.1 Select device for service printouts If the device is integrated in a system network, you can trigger service printouts from all devices in the system network.
-
Page 360: Redirecting Service Printouts
Troubleshooting Instruction manual GLM-I 25.4.3 Redirecting service printouts You can redirect service printouts to the following targets: «Label printer»: The device sends print jobs to the label printer. Default setting. «List print. interface»: The device sends printouts to the configured list printer.
-
Page 361: Print Log Book Of Metal Detector
Instruction manual GLM-I Troubleshooting 25.4.5 Print log book of metal detector Only for devices with a metal detector. The protocols in this logbook document the com- plete production process. The documentation guidelines set by HACCP regulations are ful- filled. The following print functions are available: «Archive protocol»:…
-
Page 362: Diagnostic Tool
Troubleshooting Instruction manual GLM-I 25.4.6 Diagnostic tool The diagnoses lists are used by Bizerba Service. For additional information, please contact Bizerba Service. <Service menu> / <System services> / <Service printouts> / <Diagnostics tool> Select and confirm function. The device sends the data to the configured printer, or deletes the data if the delete func- tion has been selected.
-
Page 363: Print Menu Tree And Set Parameters
«Softkeys copied from Mode T» – «Value range of all options» – «Ethernet address» For additional information, please contact Bizerba Service. Mode level: 5 <Service menu> / <System services> / <Service printouts> / <Menu tree/ Fix. param.> Select and confirm list.
-
Page 364: Testing Belt Drives
Troubleshooting Instruction manual GLM-I 25.5.2 Testing belt drives Functions to test the following belt drives are available: <Test IC>: Starts the feed belt for 2 seconds. <Test SC>: Starts the separation belt for 2 seconds. <Test WC>: Starts the weighing belt for 2 seconds.
-
Page 365: Test Scales
25.5.5 Check if within permissible verification limits This function tests the verification error limits. This test is usually performed by Bizerba Service. For further informa- tion please contact your Bizerba consultant or Bizerba Service. Mode level: 5 <Service menu> / <Automat> / <Verifiy article>…
-
Page 366: Manage Licenses
Manage licenses Instruction manual GLM-I Manage licenses You can acquire additional software licenses for the device. Ex works each device is given trial licenses relating to a date and operating time. The following functions are available: – Enter license code to activate licenses, see page 364 –…
-
Page 367: Switch Licenses On And Off
Instruction manual GLM-I Manage licenses The following licenses permit the following: Demo license: Authorization of licensable software a specific, date-relevant pre-specified period. Trial license. The licensable software available for you to use for a prespeci- fied period without charge. The remaining time is displayed next…
-
Page 368: Back Up Data
Back up data Instruction manual GLM-I Back up data 27.1 Data backup on storage medium 27.1.1 Formatting storage medium A new storage medium should be formatted before starting the first data backup. CAUTION During formatting all data on the storage medium are to be de- leted! Possible data loss.
-
Page 369: Saving Line Backup
Instruction manual GLM-I Back up data 27.1.2 Saving line backup In the case of a line with several devices you can save the data from all devices in one work step. The system bus address of the devices may not be subsequently modified.
-
Page 370
Back up data Instruction manual GLM-I Start line back-up. Close table with < >. The line backup can take a few minutes — depending on the quantity of data. During line backup, the icon flashes in the display You can view status of data transmission, see page 370. After line back-up is completed a message appears. -
Page 371: Load Line Backup
Instruction manual GLM-I Back up data 27.1.3 Load line backup Only load a line backup back to the line where it has come from. Requirements: – The devices are connected with each other via the system bus. – The devices are switched on.
-
Page 372: Display Status Of Line Backup
Back up data Instruction manual GLM-I Select data If not all data of the line back-up are to be loaded, deselect data that are not required, see page 367. Unselectable data are included in line back-up and cannot be loaded.
-
Page 373: Select Device For Line Backup
Instruction manual GLM-I Back up data 27.1.6 Select device for line backup If a line comprises several devices, you can determine here which devices shall be inclu- ded in the line backup. This selection applies to the line backup of devices and for the loading of the line backup onto the devices.
-
Page 374: User-Defined Soft Keys
Back up data Instruction manual GLM-I 27.2 User-defined soft keys 27.2.1 Save user-defined softkeys User-defined softkeys can be created in mode level T, see page 121. These user-defined softkeys can be saved to a storage medium. Mode level: 5 Make sure that the storage medium is inserted in device.
-
Page 375: Save Setup
Instruction manual GLM-I Back up data 27.3.1 Save setup Mode level: 5 <Setup> / <Create setup> Enter name of setup. The name can be a maximum of four characters, e. g. SET1. Take note of large and small case. Press <ok>.
-
Page 376: Delete Setup
27.3.3 Delete setup Delete setups you no longer require. This frees up storage space for new setups. The de- vice can save a maximum of 3 setups. Only the Bizerba customer services can delete the Service Setup @BIZ. CAUTION The device deletes the setup immediately after you have confirmed with <ok>!
-
Page 377: Maintenance
Before carrying out work in the switch cabinet, disconnect the pow- er connector. – Work in the switch cabinet may only be carried out by qualified trade personnel or Bizerba service technicians. WARNING Compressed air supply remains on when device is switched off — also if power supply is disconnected! When working on the device risk of injury at compressed-air oper- ated device parts.
-
Page 378
Maintenance Instruction manual GLM-I CAUTION Automatically starting components! During automatic operation components can switch on and off au- tomatically. Serious injuries and damage to property can result. – Wear closely fitting clothes and a hair-net. – Do not wear necklaces, ties etc. -
Page 379: Cleaning
28.3.3 Switch cabinet Clean with a soft, lint-free, damp cloth. To protect against corrosion, subsequently treat with Bizerba service oil (96001740000). 28.3.4 Conveyor belts Clean conveyor belts regularly with suitable cleaning agents as per cleaning and service tables, see page 383.
-
Page 380: Package Guides
Maintenance Instruction manual GLM-I 28.3.5 Package guides Clean with a soft, lint-free, damp cloth. Clean with label loosening solvent in the event of heavy soiling. Follow the instructions for use of the label loosening solvent. 28.3.6 Light barrier and reflecting foil Clean using a soft, lint-free cloth.
-
Page 381: Cleaning Printer
Do not touch or clean the thermal printhead with hard objects. – Do not spray thermal printhead. Clean thermal printhead carefully with the Bizerba cleaner or a cotton bud soaked in spirits. Rub down with dry cloth. Illustration 68: Cleaning thermal printhead 38.019.129.001 en…
-
Page 382
Maintenance Instruction manual GLM-I Cleaning guide rollers The guide rollers can be removed for cleaning. Grap guide rollers at the front and back and pull out with a strong force (spring detent). Pull the guide rollers out, clean with spi- rit and wipe dry. -
Page 383: Maintenance
Instruction manual GLM-I Maintenance Cleaning stripping roller The pull-off roller can be removed for cleaning. Loosen Torx screws Remove guide plate. Pull out stripping roller Clean the stripping with spirits and wipe dry. Lubricate both ends of axis. Insert stripping roller…
-
Page 384: Ecomotion Printer: Changing The Felt Strip In The Printer
Maintenance Instruction manual GLM-I 28.4.2 EcoMotion Printer: Changing the felt strip in the printer Opposite the thermal print bar in the printer there is a felt bar which is passed over by the backing paper. This felt bar is subject to wear and must be replaced when the print image starts to deteriorate.
-
Page 385: Service And Maintenance Tables
Instruction manual GLM-I Maintenance 28.5 Service and maintenance tables 28.5.1 1-shift operation (approx. 50,000 labels per day) Labeler Activity Interval Cleaning agent/ lubricant General Clean point of reversal of la- 15 days Label remover, bels and TTF material. 95943000000 Platen printer…
-
Page 386
Maintenance Instruction manual GLM-I Activity Interval Cleaning agent/ lubricant Rotary arm labeler Labeling chute: Spray soiling 1.5 days Label remover, with sufficient label remover. 95943000000 Leave it to soak in well and re- move the label residues by hand or with a cloth. -
Page 387
Instruction manual GLM-I Maintenance Protection and safety devices Activity Interval Cleaning agent/lu- bricant Optional: Weekly – EMERG-OFF button, contactor, relay, safety switch: Check function. Trigger EMERG- OFF intentionally outside production. Connections (cable cover tubes): Activity Interval Cleaning agent/lu- bricant Check correct routing. -
Page 388: 2-Shift Operation
Maintenance Instruction manual GLM-I 28.5.2 2-shift operation (approx. 100,000 labels per day) Labeler Activity Interval Cleaning agent/ lubricant General Clean point of reversal of la- 10 days Label remover, bels and TTF material. 95943000000 Platen printer Clean printer roller, stripping…
-
Page 389
Instruction manual GLM-I Maintenance Activity Interval Cleaning agent/ lubricant Rotary arm labeler Labeling chute: Spray soiling Daily Label remover, with sufficient label remover. 95943000000 Leave it to soak in well and re- move the label residues by hand or with a cloth. -
Page 390
Maintenance Instruction manual GLM-I Activity Interval Cleaning agent/lu- bricant Check conveyor rollers and replace, if nec- With each belt re- – essary. placement Clean belt bodies: With each belt re- Brush and label re- placement mover, 95943000000 Connections (cable cover tubes):… -
Page 391: 3-Shift Operation
Instruction manual GLM-I Maintenance 28.5.3 3-shift operation (approx. 150,000 labels per day) Labeler Activity Interval Cleaning agent/ lubricant General Clean point of reversal of la- 5 days Label remover, bels and TTF material. 95943000000 Platen printer Clean printer roller, stripping…
-
Page 392
Maintenance Instruction manual GLM-I Activity Interval Cleaning agent/ lubricant Rotary arm labeler Labeling chute: Spray soiling 0.5 days Label remover, with sufficient label remover. 95943000000 Leave it to soak in well and re- move the label residues by hand or with a cloth. -
Page 393
Instruction manual GLM-I Maintenance Protection and safety devices Activity Interval Cleaning agent/lu- bricant Optional: Weekly – EMERG-OFF button, contactor, relay, safety switch: Check function. Trigger EMERG- OFF intentionally outside production. Connections (cable cover tubes): Activity Interval Cleaning agent/lu- bricant Check correct routing. -
Page 394: Printer
Printer Instruction manual GLM-I Printer 29.1 Printer equipment 29.1.1 Display thermal strip type If the labeler is only used as a label dispenser and no printed is integra- ted, only the «Label dispenser» text is displayed. Mode level: 5 <Printer> / <Printer equipment> / <Thermal strip>…
-
Page 395: Operating Mode
Instruction manual GLM-I Printer 29.2 Operating mode 29.2.1 Activate or deactivate reverse mode When using an EcoMotion printer, this function cannot be applied, as it isn’t needed. With this function, you can switch reverse mode for the current labeling job on or off. In reverse mode, the label is retracted by about 10 mm in order to be printed from the begin- ning again.
-
Page 396: Sent Print Output
Printer Instruction manual GLM-I 29.2.3 Sent print output With this function you determine which material is printed on. The following settings are possible: «Lab.w. backing paper»: Print feed is controlled by the gap between the labels or by the black synchronization strips on the backing tape.
-
Page 397: Change Horizontal And Vertical Print Position
Instruction manual GLM-I Printer 29.3.2 Change horizontal and vertical print position If the text is printed adjusted in a horizontal or vertical direction, you can correct this by entering a dot value. Usually the adjustment value is entered specific to each label in the label parameter table, see page 201.
-
Page 398: Print Quality
Printer Instruction manual GLM-I 29.4 Print quality 29.4.1 Modify printing speed If the print quality in labels that are not very good is insufficient, enter a lower printing speed. The range of values of applicable printing speeds depends on the printing head that is used.
-
Page 399: Printer Sensor System
Instruction manual GLM-I Printer Excessive contact pressure will reduce the lifetime of the thermal strip. Increase contact pressure: Turn the knurled head screw in a clockwise direc- tion. Illustration 74: Set print image Decrease contact pressure: Turn the knurled head screw in an anti-clockwise direction.
-
Page 400: Select Label Light Barrier
The transmission current from the label light barriers is calculated during the automatic cal- ibration process and, if necessary, can be changed here by Bizerba Service. Example: La- bel light barrier 1. The procedure for label light barrier 2 is the same.
-
Page 401: Enter Diameter Of The Label Roll For Supply Message
Instruction manual GLM-I Printer 29.6.5 Enter diameter of the label roll for supply message You can enter the minimum outer diameter of the label roll in order to monitor how many labels you still have. When the preset external diameter has been reached, the warning signal appears «Paper supply?».
-
Page 402: Interfaces
The output to the I/O port is used to control external devices such as transportation sys- tems or packaging machines. The output port is set up by Bizerba Service. For further information please contact your Bizerba consultant or Bizerba Service.
-
Page 403: Allocate Serial Interface Application
Instruction manual GLM-I Interfaces 30.3.1 Allocate serial interface application The following applications can be used for serial interfaces: <Ser1: AEDP, GxNet>: Only for serial interface 1. Set this if you want to connect to a higher-ranking EDP system (ASCII interface, GxNet protocol).
-
Page 404: Set The Aedp Parameters
Interfaces Instruction manual GLM-I 30.3.2 Set the AEDP parameters Adjust the settings here for serial interface 1. In the table, grayed-out parameters means that they cannot be set for this application. The following parameters are available: – «Baud rate» –…
-
Page 405: Set Parameters For List Printer And Scanner
Instruction manual GLM-I Interfaces 30.3.3 Set parameters for list printer and scanner This is where you can determine which connection is used for the list printer or scanner. All the other interface parameters are grayed out in the displayed table. The following set- tings can be made for the connection: «Serial 1-A»:…
-
Page 406: Systembus
The systembus connects devices in a system network. It operates via profibus or Ethernet. Each connected device has a unique systembus address. The systembus is set up by Bizerba Service. For further information please contact your Bizerba consultant or Bizerba Service.
-
Page 407: Enter Gateway Address
Instruction manual GLM-I Interfaces 30.5.3 Enter gateway address The gateway address is the address of the node via which the partner can be accessed outside of the local network. The gateway address is allocated by the network administrator. This must not be changed at a later date.
-
Page 408: Outgoing Connections
Interfaces Instruction manual GLM-I 30.6 Outgoing connections 30.6.1 Send data The device can send data and commands via the AEDP channel, the system bus or TCP/ IP to other devices. Use the following table to determine which data are sent via which channel to which device: <Connecting parame-…
-
Page 409
Instruction manual GLM-I Interfaces Example: Data transmission from device to EDP system and two external total print- Illustration 75: Example system EDP, system bus address 1 Channel A, bus type e.g. AEDP Device, system bus address 2 Channel B, bus type, e.g. standard system bus… -
Page 410
Interfaces Instruction manual GLM-I Illustration 76: Data transmission 38.019.129.001 en… -
Page 411: Specify The Connection Parameters
«Port No.»: Only for TCP/IP. Port number of the connected device. The port number can be used as an access number for a specific serv- ice. For connections to Bizerba labeling systems, the port num- ber 1045 is preset. «Socket»: Cannot be input.
-
Page 412
Interfaces Instruction manual GLM-I «Synchronization»: Only for TCP/IP. The following settings are possible: – «no»: If the application dialog can guarantee that after each initiatively sent telegram the sender waits for the logic GxNet acknowledgement, an additional synchronization is not required. -
Page 413: Assign Package-Synchronous Data (Psv_Pck Wdout-Flag)
Instruction manual GLM-I Interfaces 30.6.3 Assign package-synchronous data (PSV_PCK WDout-flag) In the «PSV_PCK WDout flag» table, for each channel you have to determine whether sin- gle package data, the different totals and/or statistics reports are operated via these chan- nels.
-
Page 414: Select Send Single Package Data To Higher-Ranking Edp System
Interfaces Instruction manual GLM-I 30.6.5 Select Send single package data to higher-ranking EDP sys- tem (content of PSV_DATA) In the «Contents of PSV_DATA» table (package-synchronous data), select the single pack- age data you want sent to the higher-ranking EDP system.
-
Page 415: Only Send Valid Or Also Faulty Package Data To The Higher-Ranking
Instruction manual GLM-I Interfaces 30.6.7 Only send valid or also faulty package data to the higher-rank- ing EDP system This is where you determine whether package-synchronous data are sent to the higher- ranking EDP system for all packages or only for valid packages. The following settings are possible: «Valid»:…
-
Page 416: Incoming Connections
Interfaces Instruction manual GLM-I 30.7 Incoming connections 30.7.1 Set receiving level for remote printing If print jobs are stored temporarily in a total printer, this is where you can set the number of print jobs you want saved (receiving level). This can be necessary, if, for example, total la- bels for boxes are printed on a separate total printer (see picture), or if there are several boxes between the box machine and the total printer and «Ack.
-
Page 417: Set Confirmation For Remote Printing
Instruction manual GLM-I Interfaces 30.7.2 Set confirmation for remote printing On remotely operated devices (e.g. total printer), you can determine whether the automatic labeler should continue with labeling after a print order has been sent. The following set- tings are possible: «Ack.
-
Page 418: Set Error Message For Remote Printing
Interfaces Instruction manual GLM-I 30.7.4 Set error message for remote printing On remotely-operated devices (e.g. total printer), you can determine whether the master device receives negative confirmation in the event of an error. The following settings are possible: «ErrMsg»: The master devices receives negative confirmation in the event of an error.
-
Page 419: E-Mails
Instruction manual GLM-I Interfaces 30.9 E-mails 30.9.1 Creating E-mail address book Enter the name and email addresses of the people you want to send emails to in the email address book. You can save up to five email addresses for each recipient.
-
Page 420: E-Mail Configuration
Instruction manual GLM-I 30.9.3 E-mail configuration To send e-mails, the device has to be configured appropriately, see page 418. Configura- tion is usually handled by Bizerba Service. The configuration table contains the following entries: «Protocol»: – «SMTP»: E-mail function is activated with SMTP protocol.
-
Page 421: Send E-Mail
Instruction manual GLM-I Interfaces 30.9.4 Send e-mail The device is configured to send e-mails, see page 418. The email address book is not empty. Mode level: 5 <Interfaces> / <Ethernet> / <Emails> / <Send email> Select the recipient using the cursor keys.
-
Page 422: Select Year Formatting Via Interface
Interfaces Instruction manual GLM-I Application example: This function enables you to close the connection, for example, to a higher-ranking EDP system by switching off the respective transmission channel. You can operate the device afterwards independently. Mode level: 2 <Printer + interface> / <Send chan. active?>…
-
Page 423: Accessories
Instruction manual GLM-I Accessories Accessories 31.1 Package guidance The device may be equipped with an adjustable package guidance (alignment rails). Un- der certain circumstances, packages of critical dimensions must be laterally guided during transport to avoid toppling over. For this reason, optional package guidances can be mounted onto the conveyor belts.
-
Page 424: Lateral Package Guidance
Accessories Instruction manual GLM-I 31.2.2 Lateral package guidance For lateral package guidance the alignment rail is pre-set and the alignment rail is set ac- cordingly to the package width. Illustration 79: Lateral package guidance When changing the package width the alignment rail B must be set.
-
Page 425: Defining Operating Mode Of Guide Rails
Instruction manual GLM-I Accessories 31.3.2 Defining operating mode of guide rails The following operating modes are available for the motorized guide rails: «One-sid.» The outer guide rail remains fixed. To adjust the relative pack- age width, only one guide rail is moved by means of a motor.
-
Page 426: Entering The Package Width
Accessories Instruction manual GLM-I 31.3.4 Entering the package width Here you may enter the package width for motorized guide rail adjustment or modify a package width called up with the PLU or automatic labeler data. If package width is man- aged in the automatic labeler data, the entered value can be saved in the database if re- quired.
-
Page 427: Guide Rail Adjustment
Instruction manual GLM-I Accessories 31.3.6 Guide rail adjustment The motorized guide rails can be adjusted using a tilt lever. The front and rear guide rail can be adjusted separately. The rear guide rail is adjusted using the tilt lever A, the front guide rail is adjusted using the tilt lever B.
-
Page 428
Accessories Instruction manual GLM-I After manually adjusting the guide rail, bring titling lever back to position Without guide rail adjustment: Tilt lever in position In case of lateral alignment of packages, see page 422, one guide rail is fixed and the oth- er one’s position is changed by means of a motor. -
Page 429: Removing Motorized Guide Rails
Instruction manual GLM-I Accessories 31.3.7 Removing motorized guide rails The motorized guide rails can be removed and remounted in order to clean the guide rails themselves or conveyor belts and belt units. Illustration 82: Remove guide rails Removing guide rails: –…
-
Page 430: Guide Rail Calibration
Accessories Instruction manual GLM-I 31.3.8 Guide rail calibration First calibration or re-calibration of the motorized guide rails is necessary in the following cases: – At first commissioning of the device. – After adjustment of the fixed guide rail. – If the device was switched off during device adjustment.
-
Page 431: Operating The Metal Detector
Instruction manual GLM-I Accessories 31.4.3 Operating the metal detector Metal detectors generate strong magnetic fields. DANGER The magnetic field of the metal detector affects cardiac pacemak- ers! Mortal danger! The pacemaker sends no or incorrect impulses. – Persons with pacemakers must not stay near a metal detector.
-
Page 432: Package Ejector Description
Accessories Instruction manual GLM-I 31.5.1 Package ejector description The flaps of the package ejector that are provided with transport rollers are controlled pneumatically by means of compressed air cylinders. For this reason, the package ejector is connected to the compressed air supply of the device. The permissible max. force at the flaps of the package ejector is 75 N.
-
Page 433: Settings
Instruction manual GLM-I Accessories 31.5.3 Settings The following settings can be made for the package ejector: – Polarity, see page 266 – Activation criteria, see page 267 – Delay time, see page 268 – Parameter of control and container light barrier, see page 268 –…
-
Page 434: Adjusting Pusher Lengthwise To Conveying Direction
Accessories Instruction manual GLM-I 31.6.1 Adjusting pusher lengthwise to conveying direction The pusher can be moved lengthwise to the conveying direction. To do so, loosen the four fastening screws , move the pusher to the desired position and tighten the screws.
-
Page 435: Belts
Required settings The swivel-mounted labeling conveyor has to activated by the Bizerba service once. To be able to work with the swivel-mounted conveyor, the weighing belt has to be set to the <Weighing Start/Stop> operating mode, see page 264.
-
Page 436
Accessories Instruction manual GLM-I The V belts of the device have to be activated by the Bizerba service once. Illustration 86: V belt, side view Adjustment unit with crank handle Front part of V belt Tilt lever for belt change… -
Page 437: Oblique Adjustment Of V Belts
Instruction manual GLM-I Accessories 31.8.1 Oblique adjustment of V belts The optimal inclination of V belts depends on the product. Find out the best adjustment by performing tests with the product to be labeled. Indicator field Crank Illustration 87: Adjustment unit of V belt Press <Stop>.
-
Page 438: Label Dispenser
Accessories Instruction manual GLM-I The pressure of the label pressure roller can be increased by inserting washers. Up to three mounting rails can be mounted (see figure on the left). If the labeler position changes, the label pressure roller can be fastened to one of the mounting rails depending on the labeler position.
-
Page 439
The label dispenser can be configured by means of a formula sent by the device at first commissioning or when labels of a different size are used. If required, the Bizerba service will program and configure the de- vice accordingly. -
Page 440: Inserting The Label Roll
Accessories Instruction manual GLM-I 31.10.1 Inserting the label roll Before inserting a new label roll, set the label dispenser to «PAUSE» or switch it off using the mains switch. Illustration 91: Insert label roll Remove the outside guide disk Insert the new label roll with labels facing outside.
-
Page 441
Instruction manual GLM-I Accessories Remove labels from the backing paper that protrudes beyond the dispenser tongue Feed label strip around dispenser tongue and pass it through the auxiliary rolls the draw roller Lift the counterpressure roll and pass the label strip between the draw roller… -
Page 442: Specifications For The Label Dispenser
Accessories Instruction manual GLM-I 31.10.2 Specifications for the label dispenser Specifications for the label dispenser are made via the display and operating unit. Illustration 92: Display and operating unit Key functions <START – STOP> This key is used to switch on or off the device. In the subme- nus, a test dispensing process can be activated by pressing this key.
-
Page 443: Display
Instruction manual GLM-I Accessories 31.10.3 Display The display shows the various parameters and the status. After switching on, the program version number and program date are displayed. This function disappears after a few sec- onds or can be deleted by confirming it us- ing a key.
-
Page 444: Error Messages
Accessories Instruction manual GLM-I 31.10.4 Error messages The label dispenser automatically generates an error message at label roll end. After inserting the new label roll, press the <START – STOP> key until the label dis- penser changes to the «READY» mode.
-
Page 445: Setting Label Parameters
Instruction manual GLM-I Accessories 31.10.5 Setting label parameters Label positioning This parameter determines the label posi- tion on the package. Change this value by pressing the <+> or <-> key. Illustration 97: Label positioning If the product sensor is located at 100 mm in front of the dispenser tongue and the label shall be placed at a distance of 37.5 mm from the product leading edge, the value must be…
-
Page 446: Saving Label Settings
Accessories Instruction manual GLM-I Label length This parameter determines the feed motion length that the label dispenser needs to find a space between two labels. If the label dis- penser does not find any space within the Illustration 100: Label length entered length, it stops and an audible «RUN-OUT»…
-
Page 447: Calling Up Saved Label Settings
Instruction manual GLM-I Accessories 31.10.7 Calling up saved label settings Saved label settings can be called up at any time. By pressing the <UP> or <DOWN> keys, call up the «CALL NO.» parameter. Call the next label number using the <+> key or the previous label number using the <->key.
-
Page 448: Troubleshooting
Prior to trouble shooting, make sure that the label dispenser has been cleaned to rule out that glue and label residues cause the malfunction. Only qualified personnel or Bizerba service technicians may carry out works on the device. Wrinkled-up label…
-
Page 449
Instruction manual GLM-I Accessories Problem Possible cause Possible solution Imprecise scanning. Product sensor incorrectly Adjust product sensor. set. Product sensor incorrectly Position product sensor correct- positioned. Distance between dis- Excessive distance. Position label dispenser closer penser tongue and to the product. -
Page 450: Writing Unit For Rfid Labels
With the label printer, optionally, data can be transmitted to RFID labels (RFID = Radio Frequency Identification, or: Smart Label). This is currently only possible for RFID labels with UHF transponders. When purchasing RFID labels, ask Bizerba Service which RFID labels types have been tested by Bizerba. Labels with UHF transponders UHF labels have a semi-conductor chip incorporated in special positions that transmit and receive in a frequency range of 865-920 MHz.
-
Page 451: Scanner
Instruction manual GLM-I Accessories 31.12 Scanner WARNING Scanner operate using laser radiation. Risk of injuries to the eyes. – Do not look directly into the laser beam. – Avoid reflection from laser beams on reflecting surfaces (e.g. watch, jewelry). In order to read a barcode you can connect a scanner (barcode reading device) to your device.
-
Page 452: Configure Scanning Behavior
Accessories Instruction manual GLM-I 31.12.1 Configure scanning behavior Set user restricted guidance You determine in which cases the user has to perform a scan. The following settings are possible: <Scan. not compulsory>: User restricted guidance is switched off. In the event of an er- ror, the scan code, or corrected code content is entered man- ually.
-
Page 453: List Printer
Send print job to a computer. «EPSON FX80 (re- Simple thermal or matrix printer with reduced scope of duced)» function. «GLP58» Bizerba GLP 58 industry printer. «CUSTOM PLUS-S-0004 Special printer driver, standard. Standard» «CUSTOM PLUS-S-0004 Special printer driver, BIZERBA. BIZERBA»…
-
Page 454: Enter Paper Size
Accessories Instruction manual GLM-I 31.13.2 Enter paper size Mode level: 5 <Etc> / <List printer> The following settings are possible: – <Paper length> – <Upper page margin> – <Lower page margin> Press the required softkey. Enter value and confirm input.
-
Page 455
Instruction manual GLM-I Accessories The following functions are available: – Define or edit tendency control parameter tables, see page 454 – Delete tendency control parameter tables, see page 455 – Directly call up tendency control parameter tables, see page 455 –… -
Page 456: Principle Of The Tendency Control
The configuration of the database is not subject of this documentation. Please contact your Bizerba consultant or Bizerba Service for further in- formation. «Target weight»: The package weight that should be attained with the help of the tendency control.
-
Page 457: Editing The Tendency Control Parameter Table
Instruction manual GLM-I Accessories To open an existing tendency control parameter table for editing, enter and confirm the tendency control parameter number of the desired table, see page 77. 31.14.4 Editing the tendency control parameter table Tendency control parameter tables are edited the same way as generally described for ta- bles.
-
Page 458: Code Checker
Accessories Instruction manual GLM-I 31.15 Code checker WARNING Code checkers use laser beams. Risk of injuries to the eyes. – Do not look directly into the laser beam. – Avoid reflection from laser beams on reflecting surfaces (e.g. watch, jewelry).
-
Page 459: Selecting Packages To Be Checked
Instruction manual GLM-I Accessories 31.15.1 Selecting packages to be checked Select the packages whose bar code has to be checked. The following settings are possi- ble: «Off»: No code check at all. «All packages»: The labels of all labeled packages are checked.
-
Page 460: Technical Data
Technical data Instruction manual GLM-I Technical data 32.1 Dimensions 32.1.1 GLM-I 40 Illustration 106: Dimensions (example) 38.019.129.001 en…
-
Page 461: Glm-I 70/100
Instruction manual GLM-I Technical data 32.1.2 GLM-I 70/100 Illustration 107: Dimensions (example) Infeed con- Separation Metal detector Weighing Labeling Belt widths veyor conveyor conveyor conveyor conveyor (BB) (ZB) (VB) (MB) (WB) (EB) 400 mm 400 mm 910 mm 400 mm…
-
Page 462: Glm-I 150
Technical data Instruction manual GLM-I 32.1.3 GLM-I 150 Illustration 108: Dimensions (example) Infeed Separa- Metal detec- Weighing Labeling Other label- Belt conveyor tion con- tor conveyor conveyor conveyor 1 ing convey- widths veyor (ZB) (MB) (WB) (EB1) (BB) (VB) 500 mm…
-
Page 463: Glm-I 170
Instruction manual GLM-I Technical data 32.1.4 GLM-I 170 Illustration 109: Dimensions (example) Infeed con- Metal detec- Separation Weighing Transfer Labeling veyor tor conveyor conveyor conveyor conveyor conveyor (ZB) (MB) (VB) (WB) (ÜB) (EB) 200 mm 800 mm 200 mm 250 mm…
-
Page 464: Printer
Technical data Instruction manual GLM-I 32.2 Printer The labeler can be equipped with a 80 mm or a 160 mm thermal or thermal transfer print- er. Depending on the printer version there are two differently wide labeler housings. Printer version…
-
Page 465: Label Roll, Take-Up Roll, Labels
Roll width D 32,5–96 mm 32,5–178 mm Label distance F 2 mm Label dimensions Special sizes possible. For further information please contact your Bizerba consultant or Bizerba Service. Labeler Printer Label width x label height [mm] Comment D x E minimum max.
-
Page 466: Compressed Air Supply
Technical data Instruction manual GLM-I Labeler Printer Label width x label height [mm] Comment D x E minimum max. with max. with labeler 80 labeler 160 Piston labeler Platen 40 x 40 86 x 100 100 x 100 Printer, EcoMotion…
-
Page 467: Power Supply
Instruction manual GLM-I Technical data The rotary arm labeler does not require any customer-sided com- pressed air supply. The vacuum for the rotating labeler arm is gener- ated by a vacuum pump in the device. Depending on the version, the devices are equipped with a compressed air reducer with water separator.
-
Page 468: Protection Type
Labels There are labels for different temperature ranges. For – further information please contact your Bizerba consul- tant or Bizerba Service. Exter- The threshold values of the respective manufacturer apply. nal de- vices 32.6…
-
Page 469: Display And Operating Units
Instruction manual GLM-I Technical data – PDF417 with AI – GS1 DataBar Omni – GS1 DataBar Expanded – Composite-C-Components – UPC-A-Code – ITF-14 – EAN-D3-Code – EPC 96 – QR-Code, as of program version 12.00 32.9 Display and operating units…
-
Page 470: Scale Data
Technical data Instruction manual GLM-I Interfaces on GT-12C System bus SB: for connection to Bizerba system network, connector: D-Sub 9- pin (socket). EDP 1: for software download, RS232, RS422, TTY, connector: D-Sub 9-pin (socket). Ethernet: Connector: 10 base T, TCP/IP 32.10…
-
Page 471: Package Weights
Instruction manual GLM-I Technical data 32.11.1 Package weights The package weights depend on the scale installed and are displayed on the verification display, see page 128. 32.12 Labeling performance The labeling performance of a device is dependent on the belt speed set, the weight, length and bearing surface (rocking effect) of the packages, as well as a smooth package infeed.
-
Page 472: Appendix
Font set Eastern Europe2, ASCII 144 — 255 Font set Greek, ASCII 144 — 255 Font set Cyrillic, ASCII 144 — 255 Overview: Font sizes Overview: AI identifiers in GS1-128 Overview: Transfer data Bizerba Service Oil: EU safety data sheet 38.019.129.001 en…
-
Page 473: Overview: List Formats
Instruction manual GLM-I Appendix Overview: List formats You can output different weight, item and database lists to a connected list printer. The fol- lowing overview describes the formats and contents of the various lists. General information about lists – If a package or a complete item is re-weighed, the respective weight, prefixed with a minus sign is highlighted and printed in the list.
-
Page 474: Weight Lists
Appendix Instruction manual GLM-I Weight lists To print the weight lists correctly, activate the single numerator and if necessary the Total1-numerator as well. List 1 Header field: Text field 1 and date 1. Columns: Successive printing of all weight values of a product across four columns with numerator.
-
Page 475
Instruction manual GLM-I Appendix Totals: Weight totals of printed total labels with total type (for example: *1 for total 1, *T for daily total). When total 1 is printed with to- tal1 numerator. Page break: On PLU change and after printing the daily total. -
Page 476
Appendix Instruction manual GLM-I Illustration 114: Example of list 6 List 7 Header field: Text field 1 and 2, PLU number and date 1. Columns: Successive printing of all weight values and prices belonging to a PLU, in two columns with numerator. -
Page 477
Instruction manual GLM-I Appendix Illustration 115: Example of list 7 List 8 Header field: Text field 1 and date 1. Columns: Successive printing of PLU number, PLU text, weight and price, in one column. Totals: Weight totals of printed total labels. For total 1 add overall num- ber of labeled packages. -
Page 478
Appendix Instruction manual GLM-I List 11 Header field: Text field 1 and 2, date 1 to 3, PLU number, batch number, de- vice number. Columns: Successive printing of all weight values, in three columns with numerator. Totals: Weight totals of printed totals 1 and 2 with total type. When to- tal 1 is printed with total1 numerator. -
Page 479
Instruction manual GLM-I Appendix Illustration 118: Example of list 12 List 13 As list 8, but additional column for secondary price. When configured correspondingly, the conversion rate in printed in the list header, see page 159. Illustration 119: Example of list 13… -
Page 480: Item Lists
Appendix Instruction manual GLM-I Item lists After labeling an item containing the same products, the device can print an item list on the list printer parallel to printing the totals label. To print the item lists correctly, activate the total1 numerator, and if nec- essary, the total2 numerator as well.
-
Page 481
Instruction manual GLM-I Appendix Illustration 120: Example of list 3 List 4 Header field: Text field 1 and 2, PLU number, date 2. Columns: The total1 numerator (=item number) and the weight total are printed for each item. Totals: Weight total for each item (see columns), at the end of the item list, parallel to printing the total label for total 2: Overall piece number and total weight. -
Page 482
Appendix Instruction manual GLM-I Illustration 121: Example of list 4 List 5 Header field: Text field 1 and 2, PLU number, date 2. Columns: The total1 numerator (=item number) and the weight total are printed for each item. Totals: Weight total for each item (see columns), at the end of the item… -
Page 483
Instruction manual GLM-I Appendix Illustration 122: Example of list 5 List 9 Header field: Text field 1, date 1. Columns: Print successive number, PLU text and weight. Totals: Weight total and pallet number (=total2 numerator) for each pal- let. Page break: On PLU change, after total 2 is printed. -
Page 484
Appendix Instruction manual GLM-I Illustration 123: Example of list 9 38.019.129.001 en… -
Page 485: Database Lists
Instruction manual GLM-I Appendix Database lists Using the database lists, you print the price and weight totals of the PLU labeled per cus- tomer during a particular labeling period. In comparison to the weight and item lists, print- ing does not take place in parallel to labeling. After specifying the list number, you have to start the printing job separately.
-
Page 486
Appendix Instruction manual GLM-I Illustration 125: Example of list 14 38.019.129.001 en… -
Page 487: Overview: Font Set
Instruction manual GLM-I Appendix Overview: Font set Font set Western Europe, ASCII 032 — 127 38.019.129.001 en…
-
Page 488
Appendix Instruction manual GLM-I Font set Western Europe, ASCII 144 — 255 38.019.129.001 en… -
Page 489: Font Set Eastern Europe1, Ascii
Instruction manual GLM-I Appendix Font set Eastern Europe1, ASCII 144 — 255 38.019.129.001 en…
-
Page 490: Font Set Eastern Europe2, Ascii
Appendix Instruction manual GLM-I Font set Eastern Europe2, ASCII 144 — 255 38.019.129.001 en…
-
Page 491: Font Set Greek, Ascii
Instruction manual GLM-I Appendix Font set Greek, ASCII 144 — 255 38.019.129.001 en…
-
Page 492: Font Set Cyrillic, Ascii
Appendix Instruction manual GLM-I Font set Cyrillic, ASCII 144 — 255 38.019.129.001 en…
-
Page 493: Overview: Font Sizes
Instruction manual GLM-I Appendix Overview: Font sizes The following table contains text samples showing the supported font sizes. Allocate the font size you want in the text editor via the softkey <Character size>, on page 171. The character size description is composed as follows:…
-
Page 494
Appendix Instruction manual GLM-I Font size no. Format Original size on label 19×7-19-2-2-0 23×9-23-2-2-0 23×9-23-2-3-0 27×17-27-2-1-0 27×10-27-2-2-0 23×9-23-3-3-0 27×17-27-3-2-0 27×10-27-3-2-0 27×17-27-3-3-0 27×17-27-4-4-0 27×17-27-7-7-0 12×6-12-1-1-0 15×6-15-1-1-0 9×5-9-2-2-0 23×9-23-1-1-0 27×17-27-1-1-0 23×9-23-2-2-0 12×6-12-2-2-0 15×6-15-2-2-0 19×7-19-2-2-0 19×7-19-1-1-0 27×10-27-1-1-0 15×6-15-1-2-0 Character record is incomplete, only suitable for nu- 27×15-27-1-1-0 merical values. -
Page 495
Instruction manual GLM-I Appendix Font size no. Format Original size on label 27×10-27-1-1-0 27×17-27-2-3-0 15×6-15-1-1-0 38.019.129.001 en… -
Page 496: Overview: Ai Identifiers In Gs1-128
Appendix Instruction manual GLM-I Overview: AI identifiers in GS1-128 Code contents Code structure proposal max. num./ digits alpha AI 00 Dispatch unit number Constant {0} X1: Designation of the package Code substr.1{7-digit} X2-X8: bbn of sender Numerator{9digits} X9-X17: Serial number…
-
Page 497
Instruction manual GLM-I Appendix Code contents Code structure proposal max. num./ digits alpha AI 97 Internal — Wholesale and retail Code substr.1{12-digit} trade AI 98 Internal — Wholesale and retail Code substr.1{12-digit} trade AI 99 Bilaterally agreed texts Simple text 10{0 characters} 30 AI 240 Additional product informations Code substr.1{6-digit}… -
Page 498
Appendix Instruction manual GLM-I Code contents Code structure proposal max. num./ digits alpha AI 420 Zip code of the receiver when Code substr. 3{5-digit} dispatching domestically AI 421 Zip code of the receiver with Code substr. 2{3-digit} n3 + n3 + an..9 prefixed ISO country doe Code substr. -
Page 499: Overview: Transfer Data
Instruction manual GLM-I Appendix Overview: Transfer data Transfer data <Add.data to <Contents of <Send if data <Add. data to PSV_PCK> PSV_DATA> is mod.> statistics> «Country» «Labeling mode» «Label language» «Date 1» «Date 2» «Date 3» «Date 1 coded» «Date 2 coded»…
-
Page 500
Appendix Instruction manual GLM-I Transfer data <Add.data to <Contents of <Send if data <Add. data to PSV_PCK> PSV_DATA> is mod.> statistics> «Fixed price» or. «Unit price» «Special unit price» «Code sub- string 1″ to»Code sub- string 7» «Text 1» to»Text 20″… -
Page 501
Instruction manual GLM-I Appendix Transfer data <Add.data to <Contents of <Send if data <Add. data to PSV_PCK> PSV_DATA> is mod.> statistics> «Print 2nd price» «Print.of conv.rate» «Print.o. secondary *» «Conversion rate» «Print.of year» «Ext. weight totals» «Time Date 1» to»Time Date 3″… -
Page 502
Appendix Instruction manual GLM-I Transfer data <Add.data to <Contents of <Send if data <Add. data to PSV_PCK> PSV_DATA> is mod.> statistics> «Label distance» «Ref. point lab. distan.» «Error flags» «LOCK-Info» «UNLOCK-Info» «Max. pckg. height» «Operator language» «Formatted label contents» «Signature»… -
Page 503: Bizerba Service Oil: Eu Safety Data Sheet
Instruction manual GLM-I Appendix Bizerba Service Oil: EU safety data sheet 1. Product name: Bizerba Service Oil Article no.: 94008900022 Manufacturer: Bizerba GmbH & Co. KG, 72336 Balingen Post box 100164 72301 Balingen/Germany Emergency call: Phone 07433-120 2. Composition/ data on components Chemical characteriza- Synth.
-
Page 504
Appendix Instruction manual GLM-I Requirements to storage None rooms and containers: Merging information: Incompatible with oxidation agents Further data: Store in original container at room temperature. 8. Exposition limit / Personal protective equipment Add. note for designing Omitted technical plants:… -
Page 505
Instruction manual GLM-I Appendix Hazardous decomposi- Unknown tion products: Further data: none 11. Data on toxicology The product was not checked. Information is based upon products with similar forma- tion. Acute toxicology: oral: > 2 g/kg rat (literature value). Chronical toxicology:…
-
Page 1
Automatic labeler GLM-I Instruction manual as of program version 11.20, menu type 1 38.019.129.001 en… -
Page 2
All rights reserved Tous droits réservés Reservados todos los derechos Tutti i diritti riservati © 06/2011 Bizerba GmbH & Co. KG, 72336 Balingen P.O. Box 10 01 64 72301 Balingen, Germany Telephone (+49 7433) 12-0, Fax (+49 7433) 12-2696 Email: marketing@bizerba.com… -
Page 3: Table Of Contents
Instruction manual GLM-I Contents Contents Page About these instructions ……….
-
Page 4
Contents Instruction manual GLM-I Sources of risk related to the system …… -
Page 5
Instruction manual GLM-I Contents Labeling from bottom with belt labeler ……6.8.1 Adjusting air supply for grippers …….. -
Page 6
Contents Instruction manual GLM-I Setting text display ………. -
Page 7
Instruction manual GLM-I Contents 10.5 Managing and using templates ……..112 10.5.1 Create new template . -
Page 8
Contents Instruction manual GLM-I Article data …………131 12.1… -
Page 9
Instruction manual GLM-I Contents 13.5 Configure weight printing ……..145 13.5.1 Configure printing of weight dimension on single labels . -
Page 10
Contents Instruction manual GLM-I 14.5 Rounding of price ……….163 14.5.1 Select rounding of price for primary country . -
Page 11
Instruction manual GLM-I Contents Date and time …………187 16.1… -
Page 12
Contents Instruction manual GLM-I 18.4 Delete label layout ……….205 18.5… -
Page 13
Instruction manual GLM-I Contents 19.6 Settings for printing barcodes ……..228 19.6.1 Allocate total code . -
Page 14
Contents Instruction manual GLM-I 20.2 Labeler adjustment ……….252 20.2.1 Activating and deactivating the height adjustment for labelers . -
Page 15
Instruction manual GLM-I Contents 20.10 Ejecting package for quality assurance ……268 20.11 Signal lamp for paper status ……..269 20.12 Polarities . -
Page 16
Contents Instruction manual GLM-I 22.3 Configure equaled total ……… . 288 22.3.1 Fill up box total 1 . -
Page 17
Instruction manual GLM-I Contents Weight classes and statistics ……… . 310 23.1… -
Page 18
Contents Instruction manual GLM-I 24.9 Cancel …………338 24.9.1 Cancelling via numerator . -
Page 19
Instruction manual GLM-I Contents 25.5 Test functions for service purposes ……. 361 25.5.1 Testing belt tension of conveyor belts . -
Page 20
Contents Instruction manual GLM-I 28.3 Cleaning …………377 28.3.1 Cleaning information . -
Page 21
Instruction manual GLM-I Contents 30.2 Output port ……….. . . 400 30.3… -
Page 22
Contents Instruction manual GLM-I 31.2 Manual package guidance ……..421 31.2.1 Centered package alignment . -
Page 23
32.1.2 GLM-I 70/100 …….. -
Page 24
Font set Eastern Europe2, ASCII 144 — 255 Font set Greek, ASCII 144 — 255 Font set Cyrillic, ASCII 144 — 255 Overview: Font sizes Overview: AI identifiers in GS1-128 Overview: Transfer data Bizerba Service Oil: EU safety data sheet 38.019.129.001 en… -
Page 25: About These Instructions
Contents These instructions describe the operation and setting of the automatic labeler GLM-I (Gra- phic Labeling Machine — Industry, in the following only called device). It describes the software of menu type 1. It contains information on: –…
-
Page 26: Symbols Used
About these instructions Instruction manual GLM-I Symbols used The following symbols can be found in the manual: Text with arrow prompts you to carry out an action. Position number in figure. <OK> Text inside a < > refers to a key or softkey.
-
Page 27: How Safety Warnings Are Displayed
Instruction manual GLM-I About these instructions 1.5.2 How safety warnings are displayed The signal word above the symbol indicates the risk level. DANGER Source of danger with high risk with direct threatening danger for personnel! Resulting in: – Critical injuries –…
-
Page 28: Viewing Of Menu Call-Up
About these instructions Instruction manual GLM-I 1.5.3 Viewing of menu call-up In order to present the menu navigation clearly and concisely, this manual makes use of the following abbreviations (example): <ETC> / <Languages & characters> / <Language> / <Operator language>…
-
Page 29: About The Device
Instruction manual GLM-I About the device About the device The device consists of the following components: Conveying unit – Conveying unit with infeed and separation belt – Weighing conveyor – Light barrier for package identification – Two-part or one-part conveyor belts –…
-
Page 30: Overall View Of Device
About the device Instruction manual GLM-I Overall view of device The device is available in many different versions. Here is an example: Illustration 1: Device view GLM-I xx Display and operating unit Switch cabinet Infeed conveyor Frame with foot screws for height adjustment…
-
Page 31: Device Types
1 = Number of labelers, T = Top (labeler from top) 1 = Number of labelers, B = Bottom (labelers from bottom) Accessories We offer a comprehensive range of accessories for the device. Contact your Bizerba trade consultant for complete information. Excerpt of accessories list: –…
-
Page 32: Identification Plate
About the device Instruction manual GLM-I Identification plate The identification plate is located at the scale under the weighing belt. The identification plate may differ in design depending on device and country of installation. Manufacturer, Type designation CE identification and verification mark Weights and Measures Office EC type approval no.
-
Page 33: Verification Information
Instruction manual GLM-I About the device Verification information The device is authorized for verifiable use. Scales that are verified to a specific calibration area (acceleration of fall) may not be used in other calibration areas without being recali- brated. As per statutory conditions the device operator needs to make sure that it is only applied in proper use , see page 30.
-
Page 34: On-Site Mains Power Supply
The permitted values can be found on the identification plate on the device and in chapter Technical data. Electrical charge Packages may not be charged electrically when being transported to the Bizerba conveyor belts. Written permission for changes Modifications to the devices require our prior written consent.
-
Page 35: Warranty
In addition, there will not be responsible for any liability if any other spare parts than Bizerba parts are used, especially thermal labels and ticket rolls, which are not manufactured according to Bizerba specifications and not approved by Bizerba. If you have any questions on warranty, spare parts or resources please contact your Bizerba consultant.
-
Page 36: Safety Instructions
The operating personnel must be familiar with the safety devices on the device and have to read and understand the safety instructions in this operating manual. Only qualified trade personnel or Bizerba service technicians may open the device components.
-
Page 37: Main Switch
Before carrying out work in the switch cabinet, disconnect the pow- er connector. – Work in the switch cabinet may only be carried out by qualified trade personnel or Bizerba service technicians. WARNING Compressed air supply remains on when device is switched off — also if power supply is disconnected! When working on the device risk of injury at compressed-air oper- ated device parts.
-
Page 38: Sources Of Risk Related To The System
Safety instructions Instruction manual GLM-I Risk of crushing fingers and hands During operation, keep fingers and hands away from movable parts of the device. Warning of automatic initiation During operation, keep fingers and hands away from movable parts of the device. Wear closely fitting clothes and a hair-net.
-
Page 39: Automatically Starting Components
Instruction manual GLM-I Safety instructions 3.4.1 Automatically starting components During operation, components may automatically switch on or off. WARNING Automatically starting components! During automatic operation components can switch on and off au- tomatically. This may result in serious injuries and damage to property.
-
Page 40: Pusher To Package Ejection
Safety instructions Instruction manual GLM-I 3.4.3 Pusher to package ejection During operation, operator may be exposed to hazards. WARNING Crushing and impact hazard! During automatic operation there is a risk of injuries due to impact and trapping of fingers by the pusher.
-
Page 41: Package Ejector
Instruction manual GLM-I Safety instructions 3.4.4 Package ejector CAUTION Pressure of compressed air of the pusher too high! Risk of injury due to a too high force at the flaps of the package ejector. – Check permissible pressure of compressed air. The permissible pressure is indicated on a plate at the pressure reducing valve.
-
Page 42: Equipment Description
Equipment description Instruction manual GLM-I Equipment description Automatic labeler The automatic labeler weighs and labels pre-packed goods of any type. Infeed belts trans- port the packages to be labeled to the respective labeler. A light barrier at the conveying unit identifies the packages.
-
Page 43: Belt Labeler
Instruction manual GLM-I Equipment description 4.2.4 Belt labeler A belt labeler labels the packages from the bottom. The printed label is detached from the backing paper and conveyed to the vacuum nozzles of the gripper control with the assis- tance of supporting air. The respective vacuum nozzles of the gripper are then activated holding the label in place.
-
Page 44: Multi-Labeling
Equipment description Instruction manual GLM-I Multi-labeling To apply several labels to the packages within one labeling process, max. 7 labeling sta- tions can be integrated. For operation a connection can be established from the display and operating unit GT-12C to each labeler via the system bus, see page 125.
-
Page 45: Interfaces
Equipment description Interfaces The device has several interfaces for labeling network, data communication as well as controlling of external optional equipment. RS485 Bizerba systembus with RJ45 for connecting Gx devices via GxNet Minibus RS422 for scale connection EDP1 RS232 or RS422 TTY with GxNet via AEDP, connection 9-pin…
-
Page 46: Installation
Installation Installation and first commissioning as well as instruction on how to operate, clean, care and maintain the device will be carried out by the responsible BIZERBA Customer Service or the BIZERBA specialist. Install the device so that it is easily accessible for operation, mainte- nance and cleaning.
-
Page 47: Labeling Systems
Instruction manual GLM-I Labeling systems Labeling systems Adjusting labeler to package height To achieve a high position accuracy of the labels on the packages, the labeler must be ad- justed in height for different package heights. Depending on the device model this can be done through a power-driven height adjustment or by moving it manually.
-
Page 48: Power-Driven Adjustment Of The Labeler Height
Labeling systems Instruction manual GLM-I 6.1.2 Power-driven adjustment of the labeler height With the power-driven adjustment the labeler can be adjusted as follows: – Automatically upon calling the PLU or aut. labeler parameters, if the respective package height is saved under the aut. labeler parameters.
-
Page 49: Cross-Adjusting Labeler
Instruction manual GLM-I Labeling systems Cross-adjusting labeler 6.2.1 Manual cross- adjustment of the labeler With the power-driven cross-adjustment the labeler can be adjusted as follows: 1. Pull rocking lever A down and hold in position 2. With your other hand, move the labeler forward or back 3.
-
Page 50: Power-Driven Cross- Adjustment Of The Labeler
Labeling systems Instruction manual GLM-I 6.2.2 Power-driven cross- adjustment of the labeler With the power-driven cross-adjustment the labeler can be adjusted as follows: – Automatically when calling up PLU data, if the respective cross position was saved as automatic data, see page 250, and the automatic parameter numbers were assigned to PLU data.
-
Page 51
Instruction manual GLM-I Labeling systems Release lever knob A and continue turning the labeler until the locking device engag- es in end position. Illustration 11: Turning labeler Return labeler to basic position Pull out lever knob A and turn labeler until it engages in basic position. -
Page 52: Setting Label Width
Labeling systems Instruction manual GLM-I Setting label width The air-jet or stamp labeler can be adjusted to the respective label width. Proceed as fol- lows: Illustration 12: Setting labeling system Open the right side door of the labeler and turn away to the right.
-
Page 53: Switching Off Vacuum Set Of Gripper
Instruction manual GLM-I Labeling systems 6.4.1 Switching off vacuum set of gripper With the piston labeler the printed label is removed from the printer with a gripper and con- veyed under the labeling piston. The label is hold with 2 vacuum jets at the gripper. If small labels or decorative labels with an oddly-shaped outer form is used, with which the right vacuum jet is not covered through the label, this vacuum jet can be switched off.
-
Page 54: Labeling From Bottom With Air Jet Or Stamp Labeler
Labeling systems Instruction manual GLM-I Open pressure rollers in front of the take-up pin. Pull out pivot lever and turn it counter- clockwise. The pressure rollers are lifted from the stripping roller. Illustration 15: Open Adjust width Adjust pressure rollers to width of back- ing paper.
-
Page 55
Instruction manual GLM-I Labeling systems The package must stand firmly on the outer belts. This ensures a smooth transport via label opening. Illustration 18: Setting belt distance Symmetrical adjustment of belts Adjust rotary knob A and B by the same value. -
Page 56: Adjusting Rotary Arm Labeler
Labeling systems Instruction manual GLM-I Adjusting rotary arm labeler After lossening a knurled nut the labeler can be moved on a rail. Therefore, the chute if the rotary arm labeler can be adjusted centrally to the respective label width. Proceed as fol- lows: Loosen the knurled screw.
-
Page 57: Labeling From Bottom With Belt Labeler
Instruction manual GLM-I Labeling systems Labeling from bottom with belt labeler The belt labeler can be pulled out from the transport rack if required. This is necessary if air supply for the grippers needs to be adjusted for other label sizes or if the label roll is located on the back during assembly.
-
Page 58: Adjusting Air Supply For Grippers
Labeling systems Instruction manual GLM-I 6.8.1 Adjusting air supply for grippers The labels are removed from the printer by the grippers and conveyed beneath the pack- ages to be labeled. Up to eight grippers with integrated vacuum nozzles are available for the different label widths.
-
Page 59: Din A5 Label Applicator
Instruction manual GLM-I Labeling systems Switching on and off vacuum nozzles The switches for the vacuum nozzles are at the back panel of the labeling system. The la- beling system can be folded away if the labeler is pulled out and the locking opened, see page 55.
-
Page 60: Adjusting The Din A5 Label Applicator
Labeling systems Instruction manual GLM-I If label sizes other than DIN A5 are used, the air-jet plate has to be adjusted to the rele- vant label size. The original labels are required to make the air-jet plate settings. Illustration 25: Label position…
-
Page 61
Instruction manual GLM-I Labeling systems Labeler with safety catch, stop bolt or magnet lock. Lift safety catch and pivot the labeling system to the left. Illustration 27: Safety catch or stop bolt Press stop bolt , pull the labeling sys- tem and pivot it to the left. -
Page 62
Labeling systems Instruction manual GLM-I Pivot pressure roller away. Loosen knurled screw Turn swivel arm to the left. Tighten knurled screw. Illustration 30: Pressure roller Remove label roll Fold clamping lever forward. The label roll can now be pulled off the take-up device. -
Page 63
Instruction manual GLM-I Labeling systems Insert bearing roll Re-mount take-up arbor The take-up arbor automatically engag- es in the take-up device. Illustration 34: Take-up arbor Lead label roll through printer Remove labels over a length of approx. 30 cm from the backing paper. -
Page 64
Labeling systems Instruction manual GLM-I Closing printhead Platen printer: Turn pivot lever printer down and close printhead. Illustration 38: Pivot lever EcoMotion Printer: Turn pivot lever at printer up and close printhead. Apply fixation ring Place the fixation ring of guide roller on the backing paper to guide the backing paper laterally. -
Page 65: Display And Operating Unit
Instruction manual GLM-I Display and operating unit Display and operating unit The device is supplied by standard equipped with the display and operating unit GT-12C. Configure display The following functions on your device may have an effect on the screen: –…
-
Page 66
Display and operating unit Instruction manual GLM-I The screen can be configured individually via the GT-SoftControl pro- gram. With GT-SoftControl display elements can be arranged differently and activated or deactivated individually. The screen on your device may differ from this description due to an individual configuration. -
Page 67
Instruction manual GLM-I Display and operating unit Illustration 40: Display and operating ranges on the screen (example) Key block left Selective criteria for weight class labeling (example) or tendency regulation signs Price Weight Tare Verification data Systembus address and device name… -
Page 68: Keys Gt-12C
Display and operating unit Instruction manual GLM-I Keys GT-12C <Zero setting> Set scale to zero. The zero setting is possible within a range of a maximum of +/2% of the maximum weight. <Operator language> Change language setting of the device.
-
Page 69
Instruction manual GLM-I Display and operating unit <One-line> Hide additional keys. <Information> Display verification information: – «Software ID»: Display information on software, see page 128. – «Log software update»: Display logbook of software up- dates, see page 129. – «Teach history»: Display logbook of teaching processes. -
Page 70: Symbols In Status Bar
Display and operating unit Instruction manual GLM-I After pressing <Two-lines> visible <2nd.> For key combinations. Activate through touching or deactivate again. <Alt> For key combinations. Activate through touching or deactivate again. <Shift> Switch between upper/lower case. Activate through touching or deactivate again.
-
Page 71
Instruction manual GLM-I Display and operating unit Information on device status Processing is locked. Softkey is copied. Update or background distribution is running. Statistics data are transmitted. Line back-up or loading process is running. Pause was pressed. Symbols of macro recorder The macro recorder is not active. -
Page 72: Total Display
If there is no total preselection for a total window and the numerator is switched off, the tare total is displayed in the line below. To do so, the display needs to be configured via GT-SoftControl accordingly. For fur- ther information please contact your Bizerba consultant or Bizerba Service. 38.019.129.001 en…
-
Page 73: Display Total Temporarily
Instruction manual GLM-I Display and operating unit 7.4.1 Display total temporarily Each total can be displayed in a separate window for a short time. Mode level: 2 <Release total> <Press Shift> and softkey for the required total. Softkeys The screen shows up to eight softkeys simultaneously. Selection and number of softkeys depend on the called-up menu and the mode level.
-
Page 74
Display and operating unit Instruction manual GLM-I A black field in one of several softkeys marks the active softkey in a group of softkeys, of which only one can be activated. Mode level T: The «#» character identifies that the softkey is pro- tected by a password. -
Page 75: Find Softkeys
Instruction manual GLM-I Display and operating unit 7.5.1 Find softkeys With function «Search softkey» you can call up the softkeys directly and without knowing the menu path. Search function accesses all softkeys which are released in the current mode level or the mode level below.
-
Page 76: Data Recording And Administration
Display and operating unit Instruction manual GLM-I Data recording and administration 7.6.1 Entering and saving text To enter a one-line text a keyboard appears underneath the input field. This comprises not only numeric and letter keys but also keys of the user interface, see page 66.
-
Page 77: Data For Current Production Or Saving Into Database
Instruction manual GLM-I Display and operating unit 7.6.3 Data for current production or saving into database Depending on functional correlation and configuration of database you can decide during saving if the data are to apply only for the current production or if they are to be saved also into the database.
-
Page 78
Display and operating unit Instruction manual GLM-I – Macros, see page 103 – Statistics reports, see page 332 – Total evaluations, see page 304 – Preselections, see page 303 The tables are administered in the system like several texts under parameter numbers. -
Page 79: Recording Parameter Number
Instruction manual GLM-I Display and operating unit 7.7.1 Recording parameter number New and existing parameter numbers can be recorded as described in the following exam- ple that shows how to save a date text. Illustration 44: Example for accessing parameter numbers: Saving date text The following functions are available: –…
-
Page 80: Creating Parameter Tables And Opening Them For Editing
Display and operating unit Instruction manual GLM-I Select required data record and confirm. The parameter number of the data record is entered in the input field. 7.7.2 Creating parameter tables and opening them for editing For administrating parameter tables the matching menus contain functions. The respective chapters contain information on how to call up for editing, for example calling up a label parameter table in chapter Manage label parameters in tables.
-
Page 81: Editing Table
Instruction manual GLM-I Display and operating unit 7.7.3 Editing table Most tables have three columns: left column: Line number middle column: Attribute right column: Value of attribute The values are submitted as follows depending on the attribute: Illustration 45: Template as example of a table with attributes of different types Text input, see page 80.
-
Page 82
Display and operating unit Instruction manual GLM-I Editing text or numeric value The format is provided for input of numbers. If the numeric value contains a comma or a unit, comma and unit remain unchanged during input. You do not need to enter comma and unit. -
Page 83
Instruction manual GLM-I Display and operating unit Edit table values for lines, columns or complete tables In some tables you have the possibility to make settings for complete lines, complete col- umns or complete table with only one entry. To edit the setting in all cells of column in the same way, touch head of column. -
Page 84
Display and operating unit Instruction manual GLM-I Use the search function in tables <Search> Via this key you have access to a search function in numerous tables that you can use to look for table entries. The following search modes are provided: «Fragment»:… -
Page 85: Printing Table Data
68 mm. Blank labels and ticket rolls with a width of 58 mm can only be used when setting a smaller character set. Please contact your Bizerba consultant or Bizerba Service for further in- formation.
-
Page 86
Display and operating unit Instruction manual GLM-I Preparing list printing A list printer is connected to labeler. Mode level: 2 <Printer + interface> / <List printer> / <Deviating print service print> Press <List print. interface>. After printing switch print routing again to previous setting (standard set- ting: <Label printer>). -
Page 87: Saving And Closing Table
Instruction manual GLM-I Display and operating unit 7.7.5 Saving and closing table When closing the table you may save or cancel the modifications made. If you save the modified table, you may use the existing or any other parameter number.
-
Page 88: Deleting Table Or Text
Display and operating unit Instruction manual GLM-I 7.7.6 Deleting table or text There are functions available in the corresponding menus to delete parameter tables as well as texts saved under parameters. The corresponding chapters describe how to call up these functions, e.g. deleting an autom. labeler table in chapter autom. labeler parameter.
-
Page 89: Setting Display And Keyboard Layout
«Español» Other languages may be available. Subsidiaries have the option to load own translations. For further information, please contact your specialist Bizerba consultant or Bizerba Service. Mode level 2: <Etc> / <Languages & characters> / <Languages> / <Operator language> Press key with flag.
-
Page 90: Setting Label Language
«Português» – «Español» Other languages may be available. Subsidiaries have the option to load own translations. For further information please contact your Bizerba consultant or Bizerba Service. Mode level: 2 <Etc> / <Languages & characters> / <Languages> / <Label language>…
-
Page 91: Setting Keyboard Layout
Instruction manual GLM-I Setting display and keyboard layout 8.1.4 Setting keyboard layout The keyboard layout is the basis for the assignment and layout of the keyboard. It has been factory-set according to the country of destination. The following settings are possi- ble: –…
-
Page 92: Setting Country-Specific Sorting
Setting display and keyboard layout Instruction manual GLM-I 8.1.6 Setting country-specific sorting Texts are sorted in alphanumeric order in tables and for search functions. As different rules apply for different languages when sorting, the sorting can be set in accordance to your country.
-
Page 93: Selecting Display Format
Instruction manual GLM-I Setting display and keyboard layout Selecting display format The display format defines which contents are shown on the screen. The following settings are possible: <L1: Large diagr. dis- In the middle of the screen the statistics is displayed graphical- play>:…
-
Page 94: Setting Weight Display
Setting display and keyboard layout Instruction manual GLM-I Press softkey with respective setting. Setting weight display You may configure content and layout of large display (L2), see page 91. With setting <Enlarged view> you can define which data are to be viewed largely in a separate display frame.
-
Page 95: Switching On Or Off Weight History
Instruction manual GLM-I Setting display and keyboard layout Example: Total window 1. Settings and procedures for total windows 2 and 3 are analog. The following totals can be displayed in the total window 1: – <#1: Total 1> – <#1: Total 2>…
-
Page 96: Setting Statistics Display
Setting display and keyboard layout Instruction manual GLM-I <Processing> / <Weight class &statistics> / <Statistics display> / <Weight history> Touch softkey until required setting is achieved. Setting statistics display 8.9.1 Structure of statistics display Illustration 47: Example of a statistics display…
-
Page 97: Histogram Display
Instruction manual GLM-I Setting display and keyboard layout 8.9.2 Histogram display The histogram display (also: horizontal bar graph) indicates the static distribution of weights in form of nine bars. It is indicated in the display formats <L1: Large diagr. display> and <L3: Small diagr. display>, see page 91.
-
Page 98
Setting display and keyboard layout Instruction manual GLM-I The needles may lie very close to each other on the scale or may even overlap. In these cases the following order applies for displaying: – Average value of preset package number (in the front) –… -
Page 99: Displaying Numerical Data
Instruction manual GLM-I Setting display and keyboard layout 8.9.4 Displaying numerical data In display format <L3: Small diagr. display> statistics data are listed in numeric order, see page 91. The function <Statistics: num. data> is without function in combination with the display and operating terminal GT-12C.
-
Page 100: Selecting Statistics Display
Setting display and keyboard layout Instruction manual GLM-I 8.10 Selecting statistics display Use this function to select which statistics is to be displayed. The function is available if there are active statistics reports with values. The selection menu does not only include the setting «No display»…
-
Page 101: Deleting Modified Softkey Texts
Instruction manual GLM-I Setting display and keyboard layout 8.12.2 Deleting modified softkey texts With this function all modified softkey texts are deleted irrevocably and replaced by the standard inscriptions. Mode level: 5 <Etc> / <Device operation> / <Delete modif. softkey text>…
-
Page 102: Permission Concept
Permission concept Instruction manual GLM-I Permission concept Mode levels and passwords The access to the functions of the device is regulated through so-called mode levels. With passwords the mode levels can be protected against unauthorized access. The mode levels include functions for different responsibilities. The following mode levels…
-
Page 103: Manage Passwords
Instruction manual GLM-I Permission concept Manage passwords Mode level: 3 <Etc> / <Password editor> Select mode level and confirm. If necessary enter and confirm the old password. Enter and confirm new password. Re-enter new password and confirm. If an empty input field for the new password is confirmed both times, the mode level is accessible without password.
-
Page 104: Customer Specific Functions
Customer specific functions Instruction manual GLM-I Customer specific functions 10.1 Approve or block key programming If you approve key programming, this function is no longer available. – Record macro and open via a key, see page 106 – Set up customer-specific model level T, see page 120 –…
-
Page 105: Assign Image To Softkey
Instruction manual GLM-I Customer specific functions 10.3 Assign image to softkey You can assign pictures to softkeys. Do this by importing the required image files via GT- SoftControl. Different display types are available, as follows: «Without image»: No image in softkey.
-
Page 106
Customer specific functions Instruction manual GLM-I – Less time required for training – The operator can use functions in higher mode levels A macro can perform the following tasks: – Run operating steps – Query inputs – Change numerators or values automat- ically –… -
Page 107
Instruction manual GLM-I Customer specific functions If necessary, you can protect macros against unauthorized access with passwords. Macros only work for the device type with which they were created. Macros are allocated to the mode level in which they began to be recorded. However, dur- ing the recording of a macro, you can change the mode level. -
Page 108: Record Macro
Customer specific functions Instruction manual GLM-I 10.4.1 Record macro CAUTION Macros can change mode levels. Unqualified personnel gain ac- cess to higher mode levels! Risk of damage to property or loss of data due to operating errors in the higher mode level.
-
Page 109
Instruction manual GLM-I Customer specific functions Include input of a value during a macro Start function that requires input of a value during the ongoing recording. Press <Shift> and <Record>. The macro menu appears. Select and confirm «Recording pause». The screen indicates that the recording is on hold by the following icon: . -
Page 110: Add To Macro
Customer specific functions Instruction manual GLM-I Cancel recording Press <Shift> and <Record>. The macro menu appears. Select and confirm «Abort macro». «Save recording»: select this if you want to save the previous recording, «Cancel recording»: select this if you want to delete the previous recording.
-
Page 111: Play Macro
Instruction manual GLM-I Customer specific functions 10.4.3 Play macro Key programming is approved, see page 102. Macro is available in current mode level. Starting macro The following describes the start of a macro per key. As an alternative you can start the macro also via function «List macros», see page 111.
-
Page 112: Delete Macro
Customer specific functions Instruction manual GLM-I 10.4.4 Delete macro How to delete a macro with a key is described below. Alternatively, you can also delete the macro via the «List macros»function, see page 111. The macro you want to delete belongs to the current mode level.
-
Page 113: List Macros
Instruction manual GLM-I Customer specific functions 10.4.5 List macros With the «List macros» function from the macro menu you can: – list all the macros in the current mode level – start macros – delete macros – rename macros –…
-
Page 114: Managing And Using Templates
Customer specific functions Instruction manual GLM-I Exit the macro menu The macro list is open. Select and confirm macro. Select and confirm «Exit macro menu» in the menu. 10.5 Managing and using templates Individually created templates make changing or entering values easier. The template summarizes entries and settings that would otherwise have to be accessed by different softkeys.
-
Page 115: Edit And Save Template
Instruction manual GLM-I Customer specific functions 10.5.3 Edit and save template You can edit a template as follows: – Enter or change a template name, see page 113. – Insert new template cells, see page 114. – Insert existing template cells, see page 115.
-
Page 116: Insert New Cell Into Template
Customer specific functions Instruction manual GLM-I 10.5.5 Insert new cell into template The template is open. Select the row into which you want to insert the function. <Insert new cell> Search for and softkey for the function you want and confirm the result, see page 73.
-
Page 117: Insert The Existing Template Cell
Instruction manual GLM-I Customer specific functions Enter or switch value. After editing all the cell properties, close the window with < >. Close template with < >. To save the template reply to security query with «yes». Enter and confirm a template number for the new template, see page 77.
-
Page 118: Enter Or Change The Default Values
Customer specific functions Instruction manual GLM-I 10.5.8 Enter or change the default values A new template cell is initially created without a default value. If «Default from cell» is acti- vated in the cell properties, you can enter a default value, which is automatically set when the template is opened.
-
Page 119: Remove The Template Cell From The Template
Instruction manual GLM-I Customer specific functions 10.5.10 Remove the template cell from the template The template is open. Select template cell. Press <Delete cell>. The template row is emptied. The empty row is removed after you have saved. 10.5.11 Copy cell properties You can copy the cell properties for a template cell to a new template cell.
-
Page 120: Delete Unused Cells
Customer specific functions Instruction manual GLM-I 10.5.13 Delete unused cells Delete unused cells to keep the selection list clear and easy to understand. Mode level: 3 (local) or 4 (global) <Etc> / <Templates> / <Delete unused cells> Mark the cells in the table you want to delete.
-
Page 121: Calling Up And Using Form
Function keys (e. g. <Print>) – Sublevels – HTML pages in intranet (e. g. a page of the operating instructions) GxNet commands are not part of this documentation. For further infor- mation, please contact your specialist Bizerba consultant or Bizerba Service. 38.019.129.001 en…
-
Page 122: Define Customer-Specific Mode Level T
Customer specific functions Instruction manual GLM-I The GT-SoftControl operating instructions describe how to program the Quick keyboard. Use Quick keyboard <Quick> The quick keyboard appears. Select Quick page in lower key row, e. g. «Fruit». Press required Quick key. The respective article is called up or the function that is assigned to the key is run.
-
Page 123: Copy Softkeys To Mode Level T
Instruction manual GLM-I Customer specific functions – Assign input cells to softkeys from a PLU data template, see page 124. – Assign operating calls to softkeys for other devices, see page 125. 10.7.1 Copy softkeys to mode level T Softkeys that are assigned directly with a function and have no submenu can be copied to the customer-specific mode level T.
-
Page 124: Define A Menu Structure For Softkeys
Customer specific functions Instruction manual GLM-I 10.7.2 Define a menu structure for softkeys In mode level T you can define softkeys in menu structures with up to eight levels. At the highest level you can copy up to 16 softkeys and in the lower levels up to eight softkeys, see page 121.
-
Page 125: Edit Softkeys In Mode Level T
Instruction manual GLM-I Customer specific functions 10.7.3 Edit softkeys in mode level T The following functions are available: – Delete soft key, see page 123. – Block softkey, see page 123. – Activate softkey, see page 123. Key programming is approved, see page 102.
-
Page 126: Copy Macros To Soft Key
Customer specific functions Instruction manual GLM-I 10.7.5 Copy macros to soft key A macro recorded in mode level T can be copied to a softkey and subsequently started by this softkey. Mode level: T Press <2nd.> and <Record>. Press the empty softkey you want to copy the macro to.
-
Page 127: Copy Operating Connection To Other Devices On Softkey
Instruction manual GLM-I Customer specific functions 10.7.7 Copy operating connection to other devices on softkey If several devices are connected to your operating and display unit, you can copy an oper- ating connection to a connected device on a softkey. Via the softkey you can switch to the operation of a different device.
-
Page 128: Info Menu
Info menu Instruction manual GLM-I Info menu 11.1 Show manuals 11.1.1 Open the manual With this function, you can have the manuals concerning your device shown on the screen. You can select from the manuals on your system in the current operating lan- guage.
-
Page 129: Navigate Through The Manuals
Instruction manual GLM-I Info menu 11.1.2 Navigate through the manuals Navigate through the manual page with the help of the scroll bar and arrow keys. These keys can be used to move to different pages: <Forward> Browse forward. <Back> Browse back.
-
Page 130: Display Information About Software
Illustration 50: Information about software For users, the following data are particularly significant: «Software ID»: ID of the software 2. Line: – Device type in example: «PA-GLM-I» – Version of software in example: «11.00» – Software status in example: «1100SP8» «Scale info»: Information about the measuring range of the scales «Menu Type»:…
-
Page 131: Software Update Display Log Book
Instruction manual GLM-I Info menu Select and confirm «Software ID». Alternatively, you can open this function in mode level 5 via <Service menu> / <Software info> <Software version>. 11.5 Software update Display log book This function opens the software update logbook. It shows you version numbers, version dates and times of all the device components registered for the device that are relevant to verification issues.
-
Page 132: Display Hour-Meter
Info menu Instruction manual GLM-I 11.8 Display hour-meter This function shows you the overall operating time of your device in days and hours. Mode level: 1 <Information> Select and confirm «Operating hours». 11.9 Viewing number of labels and paper length With this function the total number labels printed on the device and the paper length used are indicated.
-
Page 133: Article Data
Instruction manual GLM-I Article data Article data 12.1 Organize article data PLU number (also: article number) Article data can be entered in article data tables. The article data tables can be saved un- der PLU numbers (PLU = parameter look up) and — depending on configuration — customer numbers.
-
Page 134: Overview Of Article Data
The following overview shows all possible article data. it depends on the configuration of the database which article data of your system are effectively administered. The configuration of the database is not subject of this documentation. For further information, please contact your Bizerba consultant or Bizer- ba Service. Attribute…
-
Page 135
Instruction manual GLM-I Article data Attribute Input mode Explanation «Fixed weight» Value Fixed weight for fixed weight or fixed value article, nominal weight for statistics, see page 144 «Tare» Value Packaging weight, see page 149 «Minimum weight», «Max- Value Min. and maximum weight for sorting light imum weight»… -
Page 136: Article Configuration
Article data Instruction manual GLM-I Attribute Input mode Explanation «Pr. group number» Value Product group number, see page 197 «Logo number logo Parameters Allocation of logos to logo fields, see field1» .… «Logo number page 210 logo field5» «Label param. No.»…
-
Page 137: Select Arity Of Plu And Customer Number
Instruction manual GLM-I Article data The configuration of the database is not subject of this documentation. For further information please contact your Bizerba consultant or Bizer- ba Service. 12.3.1 Select arity of PLU and customer number These functions are used to define the arity of the PLU and customer number. You can deactivate using the customer number to access a PLU if you like by applying the «Without…
-
Page 138: Release Or Disable Article Call-Up Via Keyboard
Article data Instruction manual GLM-I 12.3.3 Release or disable article call-up via keyboard The following settings are possible: «Disabled»: Article change via keyboard has been disabled. «Permitted»: Article change via keyboard is permissible. «Permitted with autom. The article change via the keyboard is only permissible when stop»:…
-
Page 139: Opening Article For Processing
Instruction manual GLM-I Article data Enter new article number or set automatically via <Next availb. no.>. If required: Enter customer number or set automatically via <Next availb. no.>. Press <OK>. An empty PLU date table appears. You can also create a new article by calling up an existing article for processing, editing data and save the article under a new PLU number and customer number, if existing.
-
Page 140: Processing And Saving Article Data
Article data Instruction manual GLM-I 12.6 Processing and saving article data Some PLU data are entered directly in the PLU data editor, see page 79, while other are allocated to the PLU via a parameter number. When entering parameters, insert this value «-1″…
-
Page 141: Edit Reference Target
Instruction manual GLM-I Article data 12.6.2 Edit reference target To edit the following reference targets, you can move directly from the PLU data table to another editor: – all texts: – Label data – Autom. labeler data – Tendency control The <Edit reference>…
-
Page 142: Copy Reference Target
Article data Instruction manual GLM-I 12.6.3 Copy reference target Changes to the reference target have an effect on all those PLUs to which the modified data record is allocated. If you want to change an existing parameter data record for the currently processed PLU only, make a copy first and then save the copy under the new parameter number and then make your changes.
-
Page 143: Deleting Article
Instruction manual GLM-I Article data 12.8 Deleting article Delete a selected article with this function. Mode level 3 (local) or 4 (global) Mode level 3: <PLU> / <Delete PLU locally> Mode level 4: <PLU> / <Delete PLU> In order to finally delete the article, reply to security query with <yes>.
-
Page 144: Calling Up Article Via Plu Number And Customer Number, If Available
– under a fixed combination of PLU and customer number The configuration of the database is not subject of this documentation. For further information please contact your Bizerba consultant or Bizer- ba Service. Mode level: 1 or 2 Mode level 1: <PLU>…
-
Page 145: Weights And Ingredients
15/30 lb, 0.005/0.01 lb 15/30 kg, 5/10 g 30/60 lb, 0.01/0.02lb Changing the weight type for the current labeling job has to be approved by Bizerba Serv- ice. <Article data> / <Weight> / <Weight types> Select and confirm weight type.
-
Page 146: Set Weight Type For Weight 2
Weights and ingredients Instruction manual GLM-I 13.2 Set weight type for weight 2 If you have customer labels that include two weight fields, it is possible to print a weight in two different types of weight. If, for example, the weight should be printed in kg in weight field 1, weight can be printed in lb in weight field 2.
-
Page 147: Configure Weight Printing
Instruction manual GLM-I Weights and ingredients Under the following prerequisites, the nominal weight, Qn, can be dis- played and changed for tolerance control purposes indirectly via the <Fixed weight> softkey: – «0» is entered in the weight class as the fixed weight.
-
Page 148: Configure Printing Of Weight Dimension On Single Labels
Weights and ingredients Instruction manual GLM-I 13.5.1 Configure printing of weight dimension on single labels Determine here how the weight is printed on single labels. You can also enter this setting, providing the database has been config- ured respectively, in label parameter tables.
-
Page 149: Switch Printing Of Gross Weight On Or Off
Instruction manual GLM-I Weights and ingredients 13.5.4 Switch printing of gross weight on or off Determine here whether the gross weight should be printed. The following settings are possible: – «no». Default setting. – «With» Mode level: 2 The gross weight can only be printed on customer labels in specially designed data fields.
-
Page 150: Select Font Height For Printing Weight On Standard Labels
The weight is printed at a font height of 6 mm. Mode level: 2 The specification only applies to Bizerba standard labels with a width of 68 mm or 37 mm, and also to the ISB 68mm label. <Article data> / <Weight> / <Print weight> / <6 mm wgt only>…
-
Page 151: Selecting Weight Indication For Display And Print
Instruction manual GLM-I Weights and ingredients 13.5.10 Selecting weight indication for display and print The function is described in chapter «Setting display and keyboard layout», see page 98. You can also enter this setting, providing the database has been config- ured respectively, in label parameter tables.
-
Page 152: Configure Ingredient Percentage
Weights and ingredients Instruction manual GLM-I 13.8.1 Configure ingredient percentage Whether and how an ingredient percentage is entered and taken into consideration, is de- termined via the «Ingredient selection» table field in the PLU data. You can change the set- ting for the current labeling job.
-
Page 153: Prices And Currencies
Instruction manual GLM-I Prices and currencies Prices and currencies 14.1 Enter prices Depending on the labeling type, enter either a unit price or a fixed price: Labeling mode Fixed price Unit price <Weight> <Fixed price> <Fixed weight> <Fixed value> Next to the unit or fixed price, you can enter a special unit price or special fixed price, see page 152.
-
Page 154: Enter Unit Or Fixed Price
Prices and currencies Instruction manual GLM-I 14.1.2 Enter unit or fixed price The following description refers to the special price option <Without spec. price>. If unit price splitting is switched on, a different input window appears, see page 155. Mode level: 2 <Article data>…
-
Page 155: Enter Parameter For Special Price
Instruction manual GLM-I Prices and currencies 14.1.4 Enter parameter for special price The following description refers to the special price option <Extra spec. price>. Illustration 51: Enter parameters for special price (example) Depending on the labeling type, the input fields «Fixed price» and «Spec.fix.pr.» or «Unit price»…
-
Page 156: Unit Price Splitting
Prices and currencies Instruction manual GLM-I Possible settings: – Enter fixed price only. The PLU is labeled with the fixed price. – Enter unit price only. The PLU is labeled with the unit price and with the price calcula- ted from the unit price and the weight.
-
Page 157: Enter Unit Price Splitting
Instruction manual GLM-I Prices and currencies 14.2.2 Enter unit price splitting The weight type determines which unit price splitting is set. In kg-based weight types, the following splitting options are available: – «per unit». Default setting. – «per 100g» In lb-based weight types, the following splitting options are available: –…
-
Page 158: Print Dimension And Currency Symbol For The Unit Price
Prices and currencies Instruction manual GLM-I 14.3.2 Print dimension and currency symbol for the unit price Select here if you want the the weight dimension and currency symbol to be printed as well as the Unit price. You can have this setting saved in label parameter tables for each label type, see page 200.
-
Page 159: Print The Second Unit Price
Instruction manual GLM-I Prices and currencies 14.3.4 Print the second unit price Determine here whether the unit price should also be printed in the secondary currency. The following settings are possible: «W/o»: Only print unit price in the first currency.
-
Page 160: Print The Currency Unit For Totals
Prices and currencies Instruction manual GLM-I 14.3.6 Print the currency unit for totals Determine here whether the currency units printed for price totals as well. The following settings are possible: «W/o»: Don’t print the currency symbol for price totals on total labels.
-
Page 161: Select A Different Font Size For The Places After The Decimal Point
Instruction manual GLM-I Prices and currencies 14.3.8 Select a different font size for the places after the decimal point You can print the digits in the price before and after the decimal point in different font sizes. This is where you select different font sizes for the places after the decimal point.
-
Page 162: Select A Position For The Currency Symbol
Prices and currencies Instruction manual GLM-I 14.3.10 Select a position for the currency symbol Determine here whether the currency symbol is printed in front of or after the sales price or unit price. The following settings are possible: «Price print s.a.nat.cur.»: Print the currency symbol in the position that is typical for the set country, in front of or after the price.
-
Page 163: Select Primary Country
Instruction manual GLM-I Prices and currencies «Neutral 2»: Print currency of neutral country with three places after the deci- mal place. «Neutral 3»: Print currency of neutral country with three places after the deci- mal place. Allocation of one of the settings «Neutral 0» to «Neutral 3» is prerequisite for being able to use the price rounding feature, see page 163.
-
Page 164: Select Secondary Country
Prices and currencies Instruction manual GLM-I 14.4.2 Select secondary country This is where you can select the secondary country for double price labeling. The related currency is displayed with the 2nd unit price and if the respective print settings are set, printing includes the 2nd unit price and sales price.
-
Page 165: Rounding Of Price
Instruction manual GLM-I Prices and currencies 14.5 Rounding of price Price rounding is usually aligned to the country table stored in the device. It is therefore done in way that is suitable for the set country. With the functions <Price rounding> and <Price round.
-
Page 166: Select Rounding Of Price For Secondary Country
Prices and currencies Instruction manual GLM-I 14.5.2 Select rounding of price for secondary country Mode level: 5 For <Country 2nd cur.> one of the settings, «Neutral 0» to «Neutral 3» was selected. <Main menu> / <Prices> / <Price round. sec.country>…
-
Page 167: Swap Primary And Secondary Country
Instruction manual GLM-I Prices and currencies In the «Secondary» column, select the respective secondary country, see page 80. The prices are converted into the currency of the secondary country. For the classic EU countries, the respective conversion rate is proposed automatically in accordance with the countries selected in the «Primary»…
-
Page 168: Currency Of Neutral Country
Prices and currencies Instruction manual GLM-I In the «to customer No.» row, enter the last customer number, providing the PLU data- base is respectively configured, for which you want to run the swap. Close table. To make the conversion, reply to the security query «Carry out conversion?» with <yes>.
-
Page 169: Texts
Instruction manual GLM-I Texts Texts 15.1 Using text editor Texts can be entered within different functions. To do so, the text editor described in the following is used. For entering one-line texts a simple text editor is available that compri- ses only the functions needed to enter short texts.
-
Page 170
Texts Instruction manual GLM-I Key functions <Esc>: Quit editor. <2nd.>: Activate to enter a character indicated on top left on a letter key. <Shift>: Activate to enter capital letter or the characters indica- ted on numeric keys at left bottom. The characters at left bottom do only appear by entering the following character in the editor. -
Page 171
Instruction manual GLM-I Texts Key block beside the text input field <Beginning of line>: Set cursor to beginning of line. <End of line>: Set cursor to line end. <Beginning of page>: Set cursor to beginning of page. <End of page>: Set cursor to end of page. -
Page 172: Call Up Text Editor
Texts Instruction manual GLM-I 15.1.1 Call up text editor Mode level: 3 (local) or 4 (global) Mode level 3: <Text> / <Text editor local> Mode level 4: <Text> / <Text editor> The text editor appears. 15.1.2 Loading text into Editor Text editor is open.
-
Page 173: Selecting Character Size
In order to load fonts, the license «LOADA- BLE FONTS» is required. For further information on loadable fonts, please contact your specialist Bizerba consultant or Bizerba Service. The character size description is composed as follows: 12: 12×6 — 12 — 2 — 2 — 0 (example)
-
Page 174: Selecting Text Alignment
Texts Instruction manual GLM-I 15.1.4 Selecting text alignment The text can be aligned per paragraph. A respective control character appears in the editor at the beginning of the paragraph from where the text alignment applies. The alignment applies until the next alignment control characters.
-
Page 175: Inserting Further Control Characters
Instruction manual GLM-I Texts 15.1.5 Inserting further control characters The following control characters are available: Frame on/off: Frames the text. Graying-out on/off: Prints the text in gray. Inversion on/off: White text on black background. Underline on/off: Underlines the text. Crossing-out on/off: Crosses out the text.
-
Page 176: Saving Text For Current Labeling
Texts Instruction manual GLM-I Set cursor at the place where the control character is to be inserted. <Add. contr. characters> Select control characters and confirm. With control characters «Character spacing» and «Line spacing»: Enter value and con- firm. With «Line break»: Select setting and confirm.
-
Page 177: Closing Text Editor
Instruction manual GLM-I Texts 15.1.8 Closing text editor Text editor is open. Text editor is opened via a text function Close without saving: <Esc> Close with saving for current labeling: <Exit> Text editor was directly opened <Esc> <Exit> In both cases there is a security inquiry with the following responses: <yes>:…
-
Page 178: Print List Of Saved Texts
Texts Instruction manual GLM-I 15.1.11 Print list of saved texts Mode level: 3 (local) or 4 (global) <Text> / <Text No. occupied> A list is printed. It contains all the texts saved under text numbers in the system and also gives details of the date and time of creation.
-
Page 179: Edit General Text
Configuration of the database is not part of this documentation. For fur- ther information please contact your Bizerba consultant or Bizerba Service. 38.019.129.001 en…
-
Page 180
Allocation of static texts to text fields on customer-specific labels is han- dled by a layout program, such as Bizerba Label Designer (BLD) or the label layout editor in GT-SoftControl. You can find more information in the introduction to the program you decide to use. -
Page 181: Open Table Of Static Texts In Order To Edit
Instruction manual GLM-I Texts 15.3.1 Open table of static texts in order to edit Mode level: 3 (local) or 4 (global) Mode level 3: <Etc> / <Static texts> / <Static text editor loc.> Mode level 4: <Etc> / <Static texts> / <Stat. texts global only>…
-
Page 182: Save The Static Text Table
Texts Instruction manual GLM-I 15.3.3 Save the static text table The static text table is open. <Save as …> Close table with < >. To save the table, answer the security check with <yes>. Enter required parameter number and confirm, see page 77.
-
Page 183: Open The Static Text Table For The Current Labeling Job
Instruction manual GLM-I Texts 15.3.6 Open the static text table for the current labeling job When a PLU is changed, the static text table assigned to the PLU is opened automatically. You can also open a static text table manually for the current labeling job. It is applied until the PLU is changed or until a different static text table is opened.
-
Page 184
Texts Instruction manual GLM-I Date texts are only printed on labels if the related date is printed as well. In order to print variable date texts on date 1 and 2, set the label layout options for date text printing <With var. -
Page 185: Configure Printing Of Date Text
Instruction manual GLM-I Texts 15.4.1 Configure printing of date text With this function you define whether standard date texts or variable date texts are printed in addition to the data on blank labels and customer labels. You can only use variable texts if one of the following prerequisites is given: –…
-
Page 186: Managing The Date Text In The Database
Texts Instruction manual GLM-I 15.4.2 Managing the date text in the database You can manage date texts in the database and assign them to PLUs via the date text number. When a PLU is changed, the assigned date text is accessed automatically.
-
Page 187: Enter Or Change The Date Text For The Current Labeling Job
Instruction manual GLM-I Texts 15.4.3 Enter or change the date text for the current labeling job The date text that is entered as described below applies until the next change or until a different date text is opened, for example when the PLU is changed.
-
Page 188: Managing Simple Texts
Texts Instruction manual GLM-I <Exit> The text editor is closed. The entered text appears in the softkey and is used in the next labeling job. 15.6 Managing simple texts Simple texts consist of a single line and contain up to 15 characters. Use simple texts for delivery addresses, dispatch types and store names, for example, on customer-specific la- bels.
-
Page 189: Date And Time
Use-by date (date 3) Date 1 to Date 3 can be assigned differently, see page 191. For further information please contact your Bizerba consultant or Bizerba Service. Dates are entered or calculated based on the system time. On the softkeys in the display,…
-
Page 190: Enter Date 3
2. Calculation of date 1, 2 and 3 can be configured differently from the de- scription above. For further information please contact your Bizerba consultant or Bizerba Service. For certain types of food, the specification of half-days for sell-by and use-by are required.
-
Page 191: Enter Shelf-Life Days 1
Instruction manual GLM-I Date and time 16.2.1 Enter shelf-life days 1 With this function you enter the shelf-life days 1 for the current labeling job. If necessary, you can have your input applied to the PLU data. Mode level: 2 Enter shelf-life days 1 <Date>…
-
Page 192: Configure Printing Of Date And Time
To support this feature, printing of the date is configured in such a way that the shelf-life days 1 or 2 are printed instead of date 3. For fur- ther information please contact your Bizerba consultant or Bizerba Service.
-
Page 193: Print Options For Date 3
Instruction manual GLM-I Date and time 16.5.3 Print options for date 3 Select here how you would like date 3 printed on the labels. The available settings and procedure are the same as for printing options for date 1, see page 190.
-
Page 194: Determine Format For Printing Date
Date and time Instruction manual GLM-I 16.5.4 Determine format for printing date You can specify formatting for printing the date in a table. The effect of the date printout are shown in the last row of the table «Preview (Date 1)».
-
Page 195: Select How To Write The Date
Instruction manual GLM-I Date and time «Half-daysymbol»: Select half-day symbol. Possible settings: – <W/o>: Do not use a half-day symbol. – <V/N>: Use V for morning and N for afternoon. – <V/N>: Use the French half-day symbols, e.g. «M» for morning (matin), «A»…
-
Page 196: Select Date Format
Date and time Instruction manual GLM-I 16.5.6 Select date format This is where you select the format you want for printing the date. The available formats differ in how the date parts are organized T (position for day), M (position for month) and Y (position for year) as well as how separators are used.
-
Page 197: Select How Half-Days Should Be Displayed
Instruction manual GLM-I Date and time 16.5.7 Select how half-days should be displayed This is where you select how you want half-days to be displayed on labels. The following settings are possible: <Da.w/o haDa Display without half-days, DD.MM.YY>: e. g. «03.11.09»…
-
Page 198: Select Time Format
Tap the <Print of Time 1> or <Print of Time 2> softkey until the setting you want is visible. 16.5.11 Further print settings Further settings relevant to printing date and time can be made by Bizerba Service. These relate to: – deviation from printed reference date and system date –…
-
Page 199: Numbers And Values
Instruction manual GLM-I Numbers and values Numbers and values The chapter describes the following numbers and values that can be saved together with the PLU data: – Product group number, see page 197 – Piece number per package, see page 198 –…
-
Page 200: Entering The Number Of Pieces Per Package
Numbers and values Instruction manual GLM-I 17.2 Entering the number of pieces per package One piece number per package can be printed on labels for fixed price packages. This is done via the fixed price. The piece number per package is entered as follows: –…
-
Page 201: Enter Printable Numbers
Instruction manual GLM-I Numbers and values «Numerator total 3»: Print the value of the Total 3 numerator. «Configurable counter 1»: Print the content of configurable counter 1, see page 284. Example: General number 1. The procedure for general numbers 2 and 3 is identical.
-
Page 202: Label Data
(only for the device) or globally (for all the devices in the network), see page 131. For further information on working with the system network please con- tact your Bizerba sales consultant or the Bizerba Service. 38.019.129.001 en…
-
Page 203: Overview Of Label Parameters
The configuration of the database is not subject of this documentation. For further information please contact your Bizerba consultant or Bizer- ba Service. Attribute…
-
Page 204: Edit Label Parameter Table
Label data Instruction manual GLM-I Mode level 4 (edit global attributes): <Labels> / <Lab. data global only> Mode level 4 (edit global and local attributes): <Labels> / <Lab. data glob.+local> Define new label parameter table Enter new label parameter number and confirm, see page 77.
-
Page 205: Call Up Label Parameter Table
How to create a customer label layout is not part of this documentation. For further information please contact your Bizerba consultant or Bizer- ba Service. If double price labeling is activated, instead of the selected standard la- bel type, the corresponding euro-label type is set automatically.
-
Page 206: Select Label Size For Standard Labels
Label data Instruction manual GLM-I If you set a different label layout, you have to insert a suitable label roll. Mode level: 1 or 2 Mode level 1: <Etc> / <Labels> / <Label type> Mode level 2: <Labels> / <Label type>…
-
Page 207: Delete Label Layout
Instruction manual GLM-I Label data 18.4 Delete label layout Delete customer-specific label layouts you no longer require. Mode level: 5 <Main menu> / <Labels> / <Delete labelLayout> Enter and confirm label layout number, see page 77. To delete the label layout completely, answer the security check with <yes>.
-
Page 208: Set The Light Barrier Offset
Label data Instruction manual GLM-I A variable header length can be defined in the label layout. If you set the variable header length to «0» at the device directly or via the label parameter table, the variable header length in the label layout could take effect.
-
Page 209: Set Line Spacing
Switch frame on or off This is where you select, if a frame is to be printed on the blank labels around the selling price. Frames cannot be printed for 68 mm labels (Bizerba and ISB). The following settings are possible: «W/o»: Print without frame.
-
Page 210: Switch Weight Text On Or Off
Label data Instruction manual GLM-I – Additional text, see page 209 – Total text, see page 209 18.11.1 Switch weight text on or off Decide here if you want a country-specific weight text to be printed on blank labels, see page 148.
-
Page 211: Activate Or Deactivate Supplementary Text
Instruction manual GLM-I Label data 18.11.3 Activate or deactivate supplementary text In standard labels you can use this function to print an additional text in Text 3 on the bot- tom edge of blank labels, see page 176. The following settings are possible: «W/o»:…
-
Page 212: Switch Logo In Textfield 1 On Or Off
How to load a logo into the device is not part of this documentation. For further information please contact your Bizerba consultant or Bizerba Service. Example: Logo field 1.The procedure for logo fields 2 and 5 is the same.
-
Page 213: Delete Logo
Instruction manual GLM-I Label data 18.15 Delete logo Delete logos you no longer require. Mode level: 5 <Main menu> / <Labels> / <Delete logo> Enter number of logo you want to delete, see page 77. To delete the logo completely, answer the security check with <yes>.
-
Page 214: Codes And Scanning Rules
Codes and scanning rules Instruction manual GLM-I Codes and scanning rules You can print barcodes on labels. A data field on standard labels and up to seven data fields on customer labels are available. Which article data are to be printed as a barcode on the labels, can be defined in the code structure rules.
-
Page 215: Overview Of Code Types
Instruction manual GLM-I Codes and scanning rules Number of characters: The number of the characters integrated in a code depends on the code type. Depending on the code, the number of charac- ters is preset or variable. Constant: The code structure can be amended by numeric or alphanumer- ic constants depending on the code.
-
Page 216: Manage Code Structure Rules
(for the device only) or globally (for all the devices in the network), see page 131. For further information on working with the system network please con- tact your Bizerba sales consultant or the Bizerba Service. 38.019.129.001 en…
-
Page 217: Code Editor Overview
Instruction manual GLM-I Codes and scanning rules 19.3.1 Code editor overview Not all the described data fields are displayed in the code editor. Which data fields are displayed depends on the set code type. Data field/function Input mode Description 1st Line…
-
Page 218: Edit And Save Code Structure Rule
Codes and scanning rules Instruction manual GLM-I 19.3.3 Edit and save code structure rule Code editor is open. Select and confirm code type, see page 213. Enter and confirm module width and code height, see page 215. If necessary, enter and confirm the ratio. The code type determines whether or not you can enter the ratio, see page 215.
-
Page 219: Possible Code Contents
Instruction manual GLM-I Codes and scanning rules 19.3.4 Possible code contents Overview of code contents Different code contents can be inserted depending on the type of code. The following table provides an overview of the supported code contents. Code content…
-
Page 220
Codes and scanning rules Instruction manual GLM-I Code content Required specifica- Explanation/Special features tions «ISO code» No. of digits, see page 221 «Numerator» «Total 1 num.» «Total 2 num.» «Gen. No. 1» to «Gen. No. 20» «Lot No.» No. of digits, see page 221 «Batch number»… -
Page 221
Instruction manual GLM-I Codes and scanning rules Middle check digit The middle check digit can be selected in most code types. Depending on the code struc- ture, the middle check digit may only be set once. If a check digit has already been as- signed by the code substring format, no further check digits can be inserted. -
Page 222: Enter Code Structure
Codes and scanning rules Instruction manual GLM-I 19.3.5 Enter code structure In the code structure you define which article data are to be printed in encoded form on the label. The subelements of the code structure can be combined as you wish as long as you comply with the maximum code length.
-
Page 223
Instruction manual GLM-I Codes and scanning rules Selecting number of digits After inserting the following code contents the selecton list «Nmb o.dig.in barcode» ap- pears: – Weights – ISO code – Prices – Numerators – Numbers – Quantity Select number of digits for the inserted element and confirm. -
Page 224
Codes and scanning rules Instruction manual GLM-I Selecting data format After inserting data elements the selection list «Date format» appears. The following set- tings are possible: «DD.MM.YY»: Day. Month. Year. «YY.MM.DD»: Year. Month. Day. «MM.DD.YY»: Month. Day. Year. «DD.MM.YYYY»: Day. Month. Year. -
Page 225
Instruction manual GLM-I Codes and scanning rules Removing code content from code structure Code editor is open. Set cursor on field «Code structure» in front of the code content to be deleted. Press <Clear>. The code content is removed from the code structure. -
Page 226: Special Inputs
Codes and scanning rules Instruction manual GLM-I 19.3.6 Special inputs Depending on the code type, different settings can be made via the softkey <Special inputs>. Special input field Description «Horizontal bar» Switch the bars over the barcode on or off.
-
Page 227
Instruction manual GLM-I Codes and scanning rules Special input field Description «Correction level» PDF417 code: Enter adjustment level (1-8). The higher the level, the more errors are corrected. In level 0, errors are detected but not corrected. «Lines, columns» Data Matrix Code: Enter the exterior shape of the 2D code and the number of rows and columns. -
Page 228: Error Messages Concerning Code Structure
Codes and scanning rules Instruction manual GLM-I 19.3.7 Error messages concerning code structure Error messages in the code editor Error message Cause and rectification «Invalid data in code struc- Appears when an existing code structure rule is selected ture.» for a different code type, for which at least one code con- tent is not allowed.
-
Page 229: Delete Code Structure Rule
Instruction manual GLM-I Codes and scanning rules 19.3.8 Delete code structure rule Delete the code structure rules you no longer require. Mode level: 3 (local) or 4 (global) <Code> / <Delete code struct. No.> Enter and confirm code structure number, see page 77.
-
Page 230: Settings For Printing Barcodes
Codes and scanning rules Instruction manual GLM-I Confirm with <OK>. 19.6 Settings for printing barcodes 19.6.1 Allocate total code A different barcode in comparison to the one printed on single labels can be printed on to- tals labels from Total 1-3 — or product total. The different barcode has to be saved with the code structure rules in advance, see page 215.
-
Page 231: Switch Separate Code String Printing On Or Off
Instruction manual GLM-I Codes and scanning rules 19.6.3 Switch separate code string printing on or off The code strings is printed by standard in the visible text line underneath the barcode. It contains the barcode data in numerical form. You can print code strings or sections thereof separately in code number fields on customer cables, see page 231.
-
Page 232: Print Sub-Code String: Explanations
Codes and scanning rules Instruction manual GLM-I 19.6.4 Print sub-code string: Explanations In additional code number fields on customer labels, you can print a code string or selec- ted parts of a code string separately. The license «CODE_PART_PRINT» is required for separate printing.
-
Page 233: Print Sub-Code String
Instruction manual GLM-I Codes and scanning rules Specialty in GS1-128 In the GS1-128, «Start»and»End»do not refer to individual pieces of code content, but to complete AI identifiers and their related content. Specify the first and last AI identifier rep- resenting the content you want to print.
-
Page 234: Ean-D3 Code
Codes and scanning rules Instruction manual GLM-I 19.7.2 EAN-D3 code The EAN-D3 code is formed from a total of 24 digits. This number of digits is binding. Only numeric data can be encoded. The minimum module width is 0.27 mm. The light zones amount to 9 modules each.
-
Page 235: Industrial Code
Instruction manual GLM-I Codes and scanning rules 19.7.3 Industrial code The data structure of industrial codes can be selected as you wish. For the evaluation process, it must be known how the data are to be interpreted. A legible optical character row is not stipulated for industry codes.
-
Page 236: Code For Rfid Labels (Uhf Only)
Codes and scanning rules Instruction manual GLM-I 19.7.6 EPC-96 Code for RFID labels (UHF only) If the device is equipped with a write unit or RFID labels (Smart Label, RFID = Radio Frequency Identification), information can be transmitted by the transponder integrated in the labels.
-
Page 237
Instruction manual GLM-I Codes and scanning rules Partition: Determines at which position the company prefix and item refer- ence are separated. Both fields together may have maximum 44 bits. In SGTIN-96, you can set how the fields are separated. Company prefix:… -
Page 238
Codes and scanning rules Instruction manual GLM-I Discover value for partition in SGTIN-96 The partition is an ID for the separation between manufacturer number and product num- ber. The value can be taken from the technical data for the SGTIN-96 by EPC. -
Page 239: Enter Code Structure Rule Sgtin-96 (Example)
Instruction manual GLM-I Codes and scanning rules 19.7.7 Enter code structure rule SGTIN-96 (example) The example shows how to create an SGTIN-96 with the following code structure: Code part Decimal Binary max. bits Header 01100000 8 Bits Filter val- 3 Bits…
-
Page 240: Scanning Rule
Codes and scanning rules Instruction manual GLM-I 19.8 Scanning rule With the scanning rule it can be defined how a barcode that was read by the scanner has to be interpreted. Depending on the presetting the read data can be considered as opera- tor input, or it canrelease certain functions like printing single and total labels.
-
Page 241
1, 2 or 3. «Fomula in text field» Text field number Contact your Bizerba technical consultant or Bizerba Service if you have any questions on the formula interpreter. «Macro» Key for macro request Function (without scan charac-… -
Page 242: Sequence During Processing Of Scanned Code Contents
Codes and scanning rules Instruction manual GLM-I Code content Additional presettings Explanation «Repeat» The scan process is repeated from beginning of string. There- fore, a string can be used for several code contents. Example: string: 12345 Scanning rule: «Code substring1 / Repeat / Lot No.»…
-
Page 243: Re-Creating Or Opening Scanning Rule For Editing
(only for the device) or globally (for all devices of the network), see page 131. For further information on working with the system network please con- tact your Bizerba sales consultant or the Bizerba Service. CAUTION If incorrect modifications are made, the scancodes can no longer be read or evaluated! Possible production failure.
-
Page 244: Editing And Saving Scanning Rule
Codes and scanning rules Instruction manual GLM-I 19.11.2 Editing and saving scanning rule Scanning rule editor is open. Select code type, see page 242. Press <Code structure>. The code structure editor appears. Define part elements of code, see page 243.
-
Page 245: Entering Code Structure For Scanning Rule
Instruction manual GLM-I Codes and scanning rules 19.11.4 Entering code structure for scanning rule The code structure defines how the scanned characters of the barcode are interpreted. The scanning rule may not contain more characters than the scanned code. If the code is longer than the scanning rule, the scanning rule must define the handling of the remaining code digits through «Variable…
-
Page 246
Codes and scanning rules Instruction manual GLM-I Highlighting content as optional Apart from verification-related code contents like weight, tare and price, as well as the print command for single and total labels, all code contents can be highlighted as optional. If the optional code contents in the scan code are available, they are evaluated like non-optional code contents. -
Page 247
Instruction manual GLM-I Codes and scanning rules Selecting number of digits After inserting the following code contents the selecton list «Nmb o.dig.in barcode» ap- pears: – Weights – ISO code – Prices – Numerators – Numbers – Quantity Select number of digits for the inserted element and confirm. -
Page 248
Codes and scanning rules Instruction manual GLM-I Selecting data format After inserting data elements the selection list «Date format» appears. The following set- tings are possible: «DD.MM.YY»: Day. Month. Year. «YY.MM.DD»: Year. Month. Day. «MM.DD.YY»: Month. Day. Year. «DD.MM.YYYY»: Day. Month. Year. -
Page 249: Deleting Scanning Rule
After insertion of code content «Fomula in text field» a window appears for entering the text field that includes the formula. Contact your Bizerba technical consultant or Bizerba Service if you have any questions on the formula interpreter. Enter text field number and confirm.
-
Page 250: Changing Current Scanning Rule
Codes and scanning rules Instruction manual GLM-I Enter number of required scanning rule and confirm, see page 77. The selected scanning rule is called up and is used for the current labeling. 19.13 Changing current scanning rule Use this function to change the current scanning rule. Your changes can be saved either for the current labeling or saved into the database.
-
Page 251: Automatic Machine Parameters
(only for the device) or globally (for all the devices in the network), see page 131. For further information on working with the system network please con- tact your Bizerba sales consultant or the Bizerba Service. 38.019.129.001 en…
-
Page 252: Overview Of Automatic Labeler Parameters
Which attributes can actually be managed in your labeler parameter tables depends on how the database is configured. The configuration of the database is not subject of this documentation. Please contact your Bizerba consultant or Bizerba Service for further in- formation. Attribute…
-
Page 253: Editing Labeler Parameter Tables
Instruction manual GLM-I Automatic machine parameters <Automat> / <A.lab.data glob.only> (mode level 4, edit global attributes) <Automat> / <A.lab.data glob.+local> (mode level 4, edit local and global attributes) To create a new label parameter table, enter and confirm a new label parameter num- ber, see page 77.
-
Page 254: Labeler Adjustment
Automatic machine parameters Instruction manual GLM-I 20.2 Labeler adjustment 20.2.1 Activating and deactivating the height adjustment for labelers Possible settings: «W/o»: The motorized height adjustment is not active. Default setting. «With»: Motorized height adjustment is active. The motorized height adjustment for labelers is available.
-
Page 255: Setting The Height Offset Of The Labeler
The height offset is factory-set or set by the Bizerba service and may not be changed. The motorized height adjustment for labelers is available and activated.
-
Page 256: Enter The Maximum Package Height
Automatic machine parameters Instruction manual GLM-I 20.2.5 Enter the maximum package height If the device is equipped with a motorized height adjustment for labelers, the different package heights can be saved in the automatic labeler parameter tables. When calling up an article that an automatic labeler parameter table is assigned to, the labeler is automati- cally adjusted to the respective package height.
-
Page 257: Enter Transverse Position Of Labeler
Instruction manual GLM-I Automatic machine parameters 20.2.7 Enter transverse position of labeler If the device is equipped with a motorized transverse adjustment for labelers, the labeler can automatically be moved to the desired position when the article is changed. To do so, save the transverse position in the automatic labeler parameter table associated to the ar- ticle, see page 250.
-
Page 258: Distances And Positions Of The Labeler
Automatic machine parameters Instruction manual GLM-I 20.3 Distances and positions of the labeler 20.3.1 Entering the label distance The label distance is the distance between the label stop edge at the printer mechanism and the reference line of the package. Depending on the setting, the reference line is the leading edge, trailing edge, or centerline of the package, see page 257.
-
Page 259: Enter Reference Line For Label Distance
Instruction manual GLM-I Automatic machine parameters 20.3.2 Enter reference line for label distance By default, the leading edge of the package is defined as the reference line for label dis- tance input. In this regard, leading edge and trailing edge refer to the transport direction of the package.
-
Page 260: Entering Package Height
Automatic machine parameters Instruction manual GLM-I 20.4.1 Entering package height By defining the package height, the piston is started in such a manner as to ensure that the label is always applied to the same position on the package. If the database is config- ured accordingly, you may save the package height in the article data and in the automatic labeler data.
-
Page 261: Entering Rotational Angle
Instruction manual GLM-I Automatic machine parameters 20.4.3 Entering rotational angle The piston of the piston labeler can be rotated degree by degree up to +/- 360 degrees. In this manner the label can be applied to the package at any rotated position. The rotational angle that is called up together with the article data, may be changed for the current label- ing job.
-
Page 262: Rotation Parameter
Automatic machine parameters Instruction manual GLM-I The preset parameters may only be changed after consultation with Bi- zerba service. 20.5.1 Rotation parameter The rotary arm labeler parameters are set prior to delivery. If settings have to be custom- ized, the values can be adapted accordingly. After changing parameters, adjustment of other rotation parameters may be required.
-
Page 263: Entering Extension Time Of Pressure Roller
Instruction manual GLM-I Automatic machine parameters 20.6.4 Entering extension time of pressure roller Type of labeler: <Belt labeler> Mode level: 5 <Automat> / <Labeler> / <Labeler parameters> / <Belt labeler> / <Moving time press.roller> Enter value and confirm. 20.7 Delay for the external triggered labeler Here you may enter an additional delay time for a stand-alone labeler that is activated by an external signal.
-
Page 264: Registration Of Light Barrier Masking Section
Automatic machine parameters Instruction manual GLM-I 20.8.2 Registration of light barrier masking section Packages with an irregular external form may trigger a light barrier several times. In order to avoid this, define a masking section. After the first edge of the package, the light barrier is deactivated for the length of the masking section.
-
Page 265: Entering Belt Speed For Labeling
Instruction manual GLM-I Automatic machine parameters 20.8.4 Entering belt speed for labeling The belt speed determines the system throughput. Choose belt speed to prevent package jam in front of the device. The following cases might require a reduction in belt speed: –…
-
Page 266: Entering Speed Of Pressure Roller
Automatic machine parameters Instruction manual GLM-I 20.8.8 Entering speed of pressure roller Enter the pressure roller speed as factor in percent depending on the belt speed. The device is equipped with a pressure roller. Mode level: 1 <Device menu> / <Transport equipment> / <Speed IF/ press. roller>…
-
Page 267: Adjusting And Calibrating Guide Rails
Instruction manual GLM-I Automatic machine parameters 20.8.11 Adjusting and calibrating guide rails The device may be equipped with motorized guide rails. They allow easy and fast adjust- ment of the guide rails to the respective aperture width according to different package or article sizes.
-
Page 268: Selecting Polarity
Automatic machine parameters Instruction manual GLM-I 20.9.2 Selecting polarity For the package ejector or the dividers, the active signal level can be set accordingly. Ex- ample: Package ejector. The procedure for dividers is analog. The following settings are possible: «+»: Positive logic.
-
Page 269: Selecting Activation Criteria
Instruction manual GLM-I Automatic machine parameters 20.9.3 Selecting activation criteria If a package ejector or dividers are integrated in the conveying direction and if the respec- tive distance in front of the light barrier is preset, you can chose when the package ejector or a divider is to be activated.
-
Page 270: Registration Of Delay Time
Automatic machine parameters Instruction manual GLM-I 20.9.4 Registration of delay time If need be, you can set a delay time for the package ejector or a divider, after which a package is ejected. Example: Package ejector. The procedure for dividers is analog.
-
Page 271: Signal Lamp For Paper Status
Instruction manual GLM-I Automatic machine parameters 20.11 Signal lamp for paper status If a signal lamp is connected to the fault output of the device, select here the paper status that activates the signal lamp. The following settings are possible: <On paper supply>:…
-
Page 272: Setting Polarity For Container Light Barriers
Automatic machine parameters Instruction manual GLM-I 20.12.2 Setting polarity for container light barriers Here you can set the polarities for the container light barriers of the package ejector and the dividers: – <Polarity cont.-LB EJ> – <Polarity cont.-LB D1> –…
-
Page 273: Delays
Instruction manual GLM-I Automatic machine parameters 20.13 Delays Here you predefine the delay time for constructional package ejectors, dividers and other outputs, after which a package needs to be ejected. The following functions are available: <Delay infeed control>: Delay time for output infeed control.
-
Page 274: Processing
Processing Instruction manual GLM-I Processing 21.1 Configuring resolution for label printing You can set a variety of resolution types for label printing. The following settings are possi- ble: <Automatic>: Print labels automatically after scales at rest. <Manual>: Start label printing manually.
-
Page 275
Instruction manual GLM-I Processing «Operating mode»: The following settings are possible: «passive»: No automatic PLU change. Standard setting. «PLU change after *»: The automatic change to the speci- fied PLU number/customer number takes place as soon as the total set under «Execute if»… -
Page 276: Configure Synchronization Message Of Weighing Belt
Processing Instruction manual GLM-I «Execute if»: Only for the «PLU change after *» and «Lock after *» operating modes: Total, which triggers the PLU change. The following settings are possible: «*1 reached»: PLU change is triggered once Total 1 is reached.
-
Page 277: Enter Labeling Type
Instruction manual GLM-I Processing With this function, you determine how the synchronization message can be canceled. The following settings are possible: «no»: No synchronization. Default setting. «Release by entering The synchronization message is canceled by a PLU change or PLU»: by a GxNet interface command.
-
Page 278
Processing Instruction manual GLM-I The pictures show standard labels for the different types of labeling. Illustration 58: Standard label for PLUs with «Weight» labeling type (example) Illustration 59: Standard label for PLUs with «Fixed price» labeling type (example) Illustration 60: Standard label for PLUs with «Fixed weight» labeling type (example) -
Page 279
Instruction manual GLM-I Processing Illustration 61: Standard label for PLUs with «Fixed value» labeling type (example) Product designation Packaged-on date Use-by date Unit price Weighed weight Fixed weight calculated price Fixed price Number of pieces per package The usual procedure is to save the labeling type in the PLU data, see page 131, or in the weight class data, see page 310. -
Page 280: Configure Change Of Labeling Type
Processing Instruction manual GLM-I 21.5 Configure change of labeling type If PLUs have to be labeled differently, this is where you specify how the labeling type is changed. The following settings are possible: <Disable change>: The labeling type may not be changed.
-
Page 281: Enter Production Numbers
Instruction manual GLM-I Processing – in the top right of the screen (display field for ID and device name) – in the display connection table of GT-SoftControl Mode level: 5 <Service menu> / <System services> / <Device name> Enter and confirm the device names.
-
Page 282: Configuring Batch Number
Processing Instruction manual GLM-I 21.8.3 Configuring batch number This is where you define what is printed as batch number on suitable customer labels. The following settings are possible: <Without batch number>: Batch numbers are not printed on the label (standard setting).
-
Page 283: Use Numerators
Instruction manual GLM-I Processing 21.9 Use numerators Numerators create consecutive numbers. The device can print a consecutive number on single labels and also on totals labels for the totals *1 — *3. You can configure which nu- merators are used in which way and when they are deleted, see page 281. You can as- sign a value range and a start value to activated numerators, see page 283.
-
Page 284: Configuring Total Numerator
Processing Instruction manual GLM-I 21.9.2 Configuring total numerator In this configuration you determine whether and how the total numerators should be used and when they should be deleted. The following settings are possible: <Without *1 numerator>: The numerator is deactivated.
-
Page 285: Enter The Range Of Values Of The Numerators
Instruction manual GLM-I Processing 21.9.3 Enter the range of values of the numerators You can define the range of values in which the numerator counts. The device issues a message as soon as the end of the value range has been reached. The numerator subse- quently starts again with the start value.
-
Page 286: Configuring Available Counters
Processing Instruction manual GLM-I 21.9.5 Configuring available counters The device has a freely configurable counter that increments according to a prespecified event. When a package or box is canceled, the counter can be decreased. In order to print the value of the counter on customer-specific labels that have been configured for this pur- pose, you have to allocate the counter to one of the general numbers 1 to 3, see page 198.
-
Page 287
Instruction manual GLM-I Processing The settings for the print channels can also be made in the PLU data, so that they auto- matically appear when the PLU is changed, see page 132. This function allows to enter or change the current labeling process settings. The settings are not saved in the database. -
Page 288: Totals
Totals Instruction manual GLM-I Totals 22.1 Set totalization type Weight, price and number of labeled packages can be added in various total memory loca- tions. Totalization can be performed generally, related to the PLU or to the weight class. By setting a totalization type you determine in which total memory location the addition is made.
-
Page 289: General Total Preselections
Instruction manual GLM-I Totals 22.2 General total preselections 22.2.1 Selecting the preselection type for Total 1 to 3 This is where you define the size to trigger the total memory locations 1 to 3. If the defined size reaches a preset value, the total label is printed. The total is deleted in correspond- ence with the total delete criteria, see page 291.
-
Page 290: Entering Preselection Value For Total 1 To 3
Totals Instruction manual GLM-I 22.2.2 Entering preselection value for total 1 to 3 After defining the size that should trigger a total, you have to enter a value for the prese- lection. For a piece-preselection, enter the piece number to trigger the total, for a price pre- selection, enter the price total etc.
-
Page 291: Fill Up Box Total 1
Instruction manual GLM-I Totals 22.3.1 Fill up box total 1 The following settings are possible: «Yes»: The should always keep its nominal weight. «No»: The pallet total has priority over the box total. Set this when <Fill up *2 pallet> has this setting: <Yes>.
-
Page 292: Enter Special Unit Price For Total Weight
Totals Instruction manual GLM-I 22.3.4 Enter special unit price for total weight If the price is calculated from the total weight, e.g. of the box and a special unit price, enter «Extra total unit price» here. If the «Extra total unit price» » is 0″, the price of the box, for example, is established independently of the weight by adding up the prices of the packages included in the box.
-
Page 293: Select Deletion Criteria For Totals
Instruction manual GLM-I Totals Tare total *2: Total 2 counts single packages – The tare total for total 2 is increased for each package by the tare weight of the pack- age. – If printing total 2 or if the preset value for total 2 is reached, a prespecified total2 tare is added to the tare total for total 2.
-
Page 294: Select Totals Deletion Criteria For Total 2
Totals Instruction manual GLM-I 22.6.2 Select Totals deletion criteria for Total 2 This is where you can define whether and at what mode level Total 2 is deleted when trig- gered. The following settings are possible: <With delete>: Total 2 is deleted with the next single weight after printing with Total 2.
-
Page 295: Set Up Total Release
The automatic machine has to be stopped for a new total prese- lection or PLU change. How the printer interfaces are configured is not part of this documenta- tion. For further information please contact your Bizerba consultant or Bizerba Service. synchronously unse-…
-
Page 296: Set Up Total Acknowledgement For External Printer
Totals Instruction manual GLM-I The following settings are possible: – <*1, *2, *3 manual> – <*1, *2, *3 synchronous> – <*1 synchr. *2,*3 man.> – <*1,*2 sync. *3 manual> – <*1, *2, *3 asynchr.> – <*1 asynchr. *2,*3 sync.> –…
-
Page 297: Print Totals On Different Customer Labels
Instruction manual GLM-I Totals 22.7.2 Print totals on different customer labels If you print totals on customer labels, you can allocate different customer-specific label lay- outs to Totals 1 to 3. And you can allocate another customer-specific label layout to all the remaining totals.
-
Page 298: Configure Printing Of Weight Dimension On Total Labels
Totals Instruction manual GLM-I 22.7.4 Configure printing of weight dimension on total labels Determine here how the weight is printed on total labels. The following settings are possi- ble: <Without>: Print total weight without weight dimension. <With (normal)>: Print total weight with weight dimension. Default setting.
-
Page 299: Printing Article Totals Greater Than Zero
Instruction manual GLM-I Totals You can display the current total on the screen at any time. Do this by pressing <Shift> plus the softkey to trigger the respective total, see page 71. Mode level: 2 Print total 1 <Release total> / <Total 1>…
-
Page 300
Totals Instruction manual GLM-I «Deduct from attrib.area»: If required, define here too which totals should be deducted due to returned goods. The following settings are possible: – «no key attribute» – «PLU» – «Customer number» In the standard setting «no key attribute» no deductions are made. -
Page 301: Total Preselection Matrix
Instruction manual GLM-I Totals 22.10 Total preselection matrix 22.10.1 Use total preselection matrix In the form of a table, the total preselection matrix contains the total preselections and cur- rent totals for up to 40 PLU numbers (totalization type: <PLU — related> or <PLU dynamic>) or for the weight classes of the current weight class table (totalization…
-
Page 302
Totals Instruction manual GLM-I Illustration 63: Total preselection matrix weight class-related (example) Rows in total preselection matrix: «PLU number»: Only for PLU-related total preselection: PLU number display. «Customer No.:»: Only for PLU-related total preselection: Customer number dis- play. «Preset type»: This is where you define the preselection types for PLU-related and weight class-related totals 1 and 2. -
Page 303
Instruction manual GLM-I Totals Printing and deleting are performed without a security check. Acknowledge label tear-off after printing. «Include in global totali- Switches additional totalization in the general total memory to- zation process»: tal 1 and total 2 on or off. -
Page 304: Use Total Preselection Column
Totals Instruction manual GLM-I 22.10.2 Use total preselection column With the totalization type <PLU dynamic>, you can label up to 40 nested articles at the same time using separate totals and preselections. When the PLU is changed, the device checks whether the new PLU and its preselection is already included in the total preselec- tion matrix.
-
Page 305: Enter Or Edit Total Preselection Data For A Plu
Instruction manual GLM-I Totals 22.10.3 Enter or edit total preselection data for a PLU You can save a total preselection for each PLU. This total preselection is called up auto- matically during a PLU call-up and used when <PLU — related> or <PLU dynamic> is set as totalization type.
-
Page 306: Delete Total Preselection Data For A Plu
CONFSUM1, CONFSUM2 and CONFSUM3 are not defined for the respective total evaluation until the key attributes are saved. The configuration of the database is not subject of this documentation. For further information please contact your Bizerba consultant or Bizer- ba Service. 38.019.129.001 en…
-
Page 307: Allocate Key Attributes For Total Evaluations
Instruction manual GLM-I Totals 22.11.1 Allocate key attributes for total evaluations Before total evaluations are created, allocate key attributes to the respective evaluation in a table. With the key attribute «PLU», you can, for example, restrict the evaluation later to a predefined range of PLU numbers.
-
Page 308: Configure Total Evaluations A To C
Totals Instruction manual GLM-I 22.11.2 Configure total evaluations A to C In a table, allocate the ranges you want evaluated to the total evaluations A, B and C based on the respective key attributes. In addition make settings to determine printing, cal- culation of the average value and if necessary how to handle returned goods.
-
Page 309
Instruction manual GLM-I Totals Illustration 64: Example for total evaluation A with subtraction Example: Total evaluation A. The procedure for total evaluations B and C is equal. Mode level: 5 38.019.129.001 en… -
Page 310: Delete Data Records From Total Evaluations
Totals Instruction manual GLM-I Configure total evaluation A <Main menu> / <Totalization> / <Evaluation of total> / <Evaluation of total A> Make Settings, see page 79. Close table. To save the settings and to print the total evaluation, answer the security check with <yes>.
-
Page 311: Printing Total Evaluation A, B, Or C
Instruction manual GLM-I Totals 22.11.6 Printing total evaluation A, B, or C With these functions total evaluations A to C are transmitted to a printer or EDP system. The basic settings for printout are defined in the configuration of the respective total evalu- ation, see page 304.
-
Page 312: Weight Classes And Statistics
Weight classes and statistics Instruction manual GLM-I Weight classes and statistics 23.1 Weight classes Weight-class-specific labeling enables the following functions: – Label packages dependent on their weight differently. – In labelers with an integrated package separator or divider: Automatically separate overweight or underweight packages.
-
Page 313: Define Or Edit Weight Class Table
Instruction manual GLM-I Weight classes and statistics 23.1.2 Define or edit weight class table Mode level: 3 (local) or 4 (global) <Weight class> / <Weight class data> To create a new weight class table, record new weight class number and confirm, see page 77.
-
Page 314: Enter The Same Presettings For All Weight Classes
Weight classes and statistics Instruction manual GLM-I 23.1.4 Enter the same presettings for all weight classes In the weight class table you can either make entries for individual weight classes or for all the weight classes that are included. In order to make entries for all weight classes, select the respective row of the table on the left hand side of the table.
-
Page 315: Edit Weight Class Attribute
Instruction manual GLM-I Weight classes and statistics 23.1.5 Edit weight class attribute Edit weight classes in the table editor, see page 75. The weight class attributes are com- bined in table fields. If you open a table field to edit it, an input window appears containing all the attributes belonging to that table field.
-
Page 316
If packages that are too heavy or too light need to be separated, this is where you can acti- vate a package separator or divider for each weight class. There are no dividers available for GLM-I. Table field «Deactivate print!»… -
Page 317
Instruction manual GLM-I Weight classes and statistics Table field «Automat stops after ..» The automatic machine stops automatically at a number of packages with the incorrect weight. Enter the respective number of packages for each weight class. If the number of packages is changed, you only have to reenter the value in one weight class. -
Page 318: Types Of Statistics
Weight classes and statistics Instruction manual GLM-I 23.1.6 Types of statistics In order to use the statistics types you need the «Prepack Regulation li- cense». The following types of statistics are available: «no»: Without statistic evaluation. «FPV Europe»: The device checks and manages the packages in line with Eu- ropean prepack regulations (FPV).
-
Page 319: Delete Weight Class Table
Instruction manual GLM-I Weight classes and statistics 23.1.7 Delete weight class table Delete the weight class tables you don’t need anymore. Mode level: 3 (local) or 4 (global) <Weight class> / <Delete weight class> Enter and confirm the weight class number, see page 77.
-
Page 320: Open Weight Class Table Manually
Weight classes and statistics Instruction manual GLM-I 23.1.9 Open weight class table manually If the weight class data are not called up automatically when the PLU is changed, or if you want to use a different weight class table, this is where you can access the weight class table directly for the current labeling job.
-
Page 321: Edit The Current Weight Class Table
Instruction manual GLM-I Weight classes and statistics 23.1.10 Edit the current weight class table To change the data in the current weight class table, you can open the table, as described below, and edit it as a whole. Alternatively, you can make use of the Input Assistant, which restricts your options to the selections relevant to the preselected type of statistic (selection criterion).
-
Page 322: Edit Current Weight Class Table Via Input Assistant
Weight classes and statistics Instruction manual GLM-I 23.1.11 Edit current weight class table via input assistant An input assistant is available for standard applications that makes entering input easier by displaying simple input windows to do so. The type of weight control that is in place deter- mines which input is required for the weight class table.
-
Page 323: Selection Criteria For Editing Weight Class Tables Via The Input Assistant
Weight classes and statistics 23.1.12 Selection criteria for editing weight class tables via the input assistant There are no dividers available for GLM-I. The following selection criteria are supported: «Weight determination» The device weighs all packages. The statistical evaluation includes all packages. Package selection does not take place based on statistics.
-
Page 324
Weight classes and statistics Instruction manual GLM-I «Statistics»: Activate, if you want a statistical evaluation of all packages with- in the predetermined limits. No selection is made based on the statistics. «Nominal weight»: Nominal weight of the article. «Sliding contents control»… -
Page 325
Instruction manual GLM-I Weight classes and statistics Settings are required for the following attributes: «Range 1 to», «Range 2 Each line corresponds to a weight class. to» etc.: «Limiting value»: Upper limit value for the appropriate weight class. «Ejector»: Specify switch or package ejector if you want packages that are in the weight range to be separated. -
Page 326
Weight classes and statistics Instruction manual GLM-I Settings are required for the following attributes: «Nominal weight»: Nominal weight of the article. «TO»: Upper tolerance weight: From the nominal weight, the device works out the upper tolerance weight in accordance with «NIST Handbook 133». -
Page 327: Enter The Fixed Weight For The Current Labeling Job
Instruction manual GLM-I Weight classes and statistics «Too light»: Specify a divider or package ejector if too light packages should be sorted. In the standard setting «Do not eject» no packages are separated. «Good»: Specify the divider or package ejector when accepted packages need to be ejected.
-
Page 328: Enter The Minimum And Maximum Weight
Weight classes and statistics Instruction manual GLM-I 23.1.14 Enter the minimum and maximum weight Checks to inspect the minimum and maximum weight help sort out the following packages: – non-isolated packages that could be taken for a single package –…
-
Page 329: Statistics
Instruction manual GLM-I Weight classes and statistics 23.2 Statistics 23.2.1 Selecting statistics report The following statistics are available: – Main statistics – Marginal statistics – Free statistics 1 – Free statistics 2 Main and marginal statistics are based on the same data but can be triggered independ- ently of one another and can be created with different report templates and add-ons.
-
Page 330: Selecting Initiation Criterion For Statistics Reports
«Change PLU no.» and «Change customer no.» are approved depends on how your database is configured. The configuration of the database is not subject of this documentation. For further information please contact your Bizerba consultant or Bizer- ba Service. 38.019.129.001 en…
-
Page 331
Instruction manual GLM-I Weight classes and statistics Possible settings: – «No report»: No report is triggered. Standard setting. – «Activate report»: A report is initiated. – «Store statistic»: The statistics evaluation can be interrup- ted for an article change and continued later. The statistics data are saved in the database and reloaded when the arti- cle is called up again. -
Page 332: Releasing Statistics Reports Manually
Weight classes and statistics Instruction manual GLM-I 23.2.3 Releasing statistics reports manually Statistics reports usually are released automatically after a preset initiation criteria. Based upon the configuration they are transmitted to a printer, storage medium or EDP, see page 328.
-
Page 333: Adding To Statistics Data
Instruction manual GLM-I Weight classes and statistics 23.2.4 Adding to statistics data When statistics are activated, you can send the statistical evaluation via defined transmis- sion channels to a storage media, for example, or to an EDP system or printer. The <Add.
-
Page 334: Creating Customer-Specific Statistics Reports
The transmission channels are assigned in a customer-specific manner. How the channels are configured is not part of this documentation. For further information please contact your Bizerba consultant or Bizerba Service. If you want define the same settings for all customer-specific report, tap the respective field in the left-hand column.
-
Page 335: Assigning Statistics Report To A Transmission Channel
Instruction manual GLM-I Weight classes and statistics Select the «Formatting rule» field from the column in the report template you are edit- ing. Select and confirm the setting you want. Place the cursor successively in each of the remaining fields in the report template.
-
Page 336: Operation
If switching off device briefly, wait at least 10 seconds before switching it on again to make sure that the device is switched off completely. Main switch (rotary switch) Main switch (push-button) System reboot push-button Illustration 65: GLM-I main switch Prerequisites: – The device has been installed properly and connected. –…
-
Page 337: Preparatory Work
Instruction manual GLM-I Operation 24.3 Preparatory work Before starting labeling the following preparatory works needs to be done: – Setting labeler, see page 45 – Changing label roll, see page 58 – Setting alignment rails, see page 421 Depending on the accessories inserted, further preparatory works might be necessary.
-
Page 338: Calling Up Article Via Plu Number And Customer Number, If Available
– under a fixed combination of PLU and customer number The configuration of the database is not subject of this documentation. For further information please contact your Bizerba consultant or Bizer- ba Service. Mode level: 1 or 2 Mode level 1: <PLU>…
-
Page 339: Search Article Via Article Text
Instruction manual GLM-I Operation 24.5.2 Search article via article text The article that is to be called up can be searched via the article text. Mode level: 1 or 2 The article data table contains the attribute «Article text». An article text is administered for each article.
-
Page 340: Labeling
Operation Instruction manual GLM-I The configuration of the tare input is not subject of this documentation. For further information please contact your Bizerba consultant or Bizer- ba Service. Mode level: 1 Sequential control <Manual> is set, see page 272. Place packaging on the scale.
-
Page 341: Cancelling Via Numerator
Instruction manual GLM-I Operation 24.9.1 Cancelling via numerator If the consecutive number of the individual numerator has been printed on the labels, you can enter this number and cancel the respective package. This is possible for up to 100 packages at a later point of time. All totals generated during labeling will be effected by the cancellation.
-
Page 342: Cancel With Minus Tool
Operation Instruction manual GLM-I 24.9.2 Cancel with minus tool In the event of a cancellation, prices, weights and piece numbers have to be deducted from the total memories. Via the minus tool, you can stipulate flexibly which values are to be deducted from which total memories.
-
Page 343
Instruction manual GLM-I Operation «Subtract nmb of *2 fr. If the number of reached preselected totals from Total 2 is part *3»: of Total 3: Number of reached total reselections from Total 2, which should be deducted from Total 3. -
Page 344
Operation Instruction manual GLM-I Cancel fixed value package When a fixed value package is canceled, the fixed weight and the price of the package are deducted from the relevant totals and the piece number is decreased. To cancel a fixed value package, you don’t usually have to stipulate anything manually, as the currently de- fined data are automatically displayed when the minus tool is started. -
Page 345: Printing Total Label
Instruction manual GLM-I Operation 24.10 Printing total label You can pre-define a total for a some or numerous totals for several articles for labeling, see page 286. When the total is achieved a total label is printed. Depending on the total initiation set it is printed as follows: –…
-
Page 346
Operation Instruction manual GLM-I Printing of label sequences is configured via the <Lab. sequ.: mode> function. The follow- ing settings are possible: <With label sequence>: Label sequence without separating label at the end. <W/o label sequence>: No label sequence. Default setting. -
Page 347: Print Label Sequence For Unknown Package Number
Instruction manual GLM-I Operation After you have printed the label sequence, switch the tear-off light barrier back on again. Reset original trigger type. 24.11.1 Print label sequence for unknown package number Mode level: 2 The labeling type is <Fixed price>, <Fixed weight> or <Fixed value>.
-
Page 348: Printing Lists
Operation Instruction manual GLM-I Select setting and confirm. 24.14 Printing lists You can print the following list types: Weight lists: Successive printing of the weight values for a PLU. Item lists: Successive printing of special items of the same PLU.
-
Page 349
Instruction manual GLM-I Operation After triggering the statistics data are deleted. Mode level: 1 or 2 Mode level 1: <Etc> / <Weight class &statistics> / <Statistics report> Mode level 2: <Processing> / <Weight class &statistics> / <Statistics report> Press softkey of required report. -
Page 350: Troubleshooting
Troubleshooting Instruction manual GLM-I Troubleshooting If you are not able to remedy an error yourself, please contact the Bizerba Service. Please provide the Bizerba Service with the following information: – Device type (see identification plate) – Device number (see identification plate) –…
-
Page 351: Messages
Instruction manual GLM-I Troubleshooting 25.2 Messages 25.2.1 Acknowledging messages The following softkeys are displayed on the device together with the error messages: <Cancel>: Close display. Processing remains locked (lock). <Enable>: Close display and approve processing (end lock). <Accept all>: All error messages whose causes could have been remedied through a package reset, disappear.
-
Page 352: Lock Messages: «Processing Disabled
Troubleshooting Instruction manual GLM-I 25.2.3 Lock messages: «Processing disabled:» Message Cause Rectification «Process blocked:Error dur- Article data is incomplete. Check article data and if ing loading of PLU data re- necessary make additions. cord» Change article. Only a successful article change can end the lock.
-
Page 353: Messages: Scale
Instruction manual GLM-I Troubleshooting 25.2.4 Messages: Scale Message Cause Rectification «Scale not connected» No scale is connected when Connect scale. the device is switched on. «Scale does not give weight The scale does not provide Check cables. value» any weight values after initi- Connect scale.
-
Page 354: Messages: Printer And Labeling System
Troubleshooting Instruction manual GLM-I 25.2.5 Messages: Printer and labeling system Message Cause Troubleshooting «Print head lifted up» The printhead is open. Close printhead. «Paper supply?» The label roll is empty soon. Provide new label roll. «Label roll empty» The label roll is empty.
-
Page 355: Messages: Package
Instruction manual GLM-I Troubleshooting 25.2.6 Messages: Package Message Cause Rectification «Infeed error» The infeed rate is too high or Adjust belt speeds. the belt speed of the device is too low. «Separation error» The interval between pack- Lower the singling factor for ages is too small.
-
Page 356: Other Messages
Troubleshooting Instruction manual GLM-I 25.2.7 Other messages Message Cause Troubleshooting «Motion detected» The scale was not in stable Avoid drafts and vibrations equilibrium. The package around the scale. was not marked as invalid. «Speed of conveyor belt too The package was marked Reduce belt speed.
-
Page 357
Instruction manual GLM-I Troubleshooting Message Cause Troubleshooting «Activation not possible max. The input value is larger Enter a smaller value. limit violated» than the largest permissible value. «Weight type change: weight While switching to another Print daily total and delete total deleted»… -
Page 358: Configure Error Behavior
Troubleshooting Instruction manual GLM-I 25.3 Configure error behavior 25.3.1 Setting operating mode in case of error The device counts faulty packages in succession. The causes of the error could be: – Package separation error – Scales not at rest –…
-
Page 359: Service Print-Outs
Instruction manual GLM-I Troubleshooting 25.4 Service print-outs You can print different service printouts. Depending on how the device is configured, it sends data to a printer, for example, or to a storage medium or connected computer. 25.4.1 Select device for service printouts If the device is integrated in a system network, you can trigger service printouts from all devices in the system network.
-
Page 360: Redirecting Service Printouts
Troubleshooting Instruction manual GLM-I 25.4.3 Redirecting service printouts You can redirect service printouts to the following targets: «Label printer»: The device sends print jobs to the label printer. Default setting. «List print. interface»: The device sends printouts to the configured list printer.
-
Page 361: Print Log Book Of Metal Detector
Instruction manual GLM-I Troubleshooting 25.4.5 Print log book of metal detector Only for devices with a metal detector. The protocols in this logbook document the com- plete production process. The documentation guidelines set by HACCP regulations are ful- filled. The following print functions are available: «Archive protocol»:…
-
Page 362: Diagnostic Tool
Troubleshooting Instruction manual GLM-I 25.4.6 Diagnostic tool The diagnoses lists are used by Bizerba Service. For additional information, please contact Bizerba Service. <Service menu> / <System services> / <Service printouts> / <Diagnostics tool> Select and confirm function. The device sends the data to the configured printer, or deletes the data if the delete func- tion has been selected.
-
Page 363: Print Menu Tree And Set Parameters
«Softkeys copied from Mode T» – «Value range of all options» – «Ethernet address» For additional information, please contact Bizerba Service. Mode level: 5 <Service menu> / <System services> / <Service printouts> / <Menu tree/ Fix. param.> Select and confirm list.
-
Page 364: Testing Belt Drives
Troubleshooting Instruction manual GLM-I 25.5.2 Testing belt drives Functions to test the following belt drives are available: <Test IC>: Starts the feed belt for 2 seconds. <Test SC>: Starts the separation belt for 2 seconds. <Test WC>: Starts the weighing belt for 2 seconds.
-
Page 365: Test Scales
25.5.5 Check if within permissible verification limits This function tests the verification error limits. This test is usually performed by Bizerba Service. For further informa- tion please contact your Bizerba consultant or Bizerba Service. Mode level: 5 <Service menu> / <Automat> / <Verifiy article>…
-
Page 366: Manage Licenses
Manage licenses Instruction manual GLM-I Manage licenses You can acquire additional software licenses for the device. Ex works each device is given trial licenses relating to a date and operating time. The following functions are available: – Enter license code to activate licenses, see page 364 –…
-
Page 367: Switch Licenses On And Off
Instruction manual GLM-I Manage licenses The following licenses permit the following: Demo license: Authorization of licensable software a specific, date-relevant pre-specified period. Trial license. The licensable software available for you to use for a prespeci- fied period without charge. The remaining time is displayed next…
-
Page 368: Back Up Data
Back up data Instruction manual GLM-I Back up data 27.1 Data backup on storage medium 27.1.1 Formatting storage medium A new storage medium should be formatted before starting the first data backup. CAUTION During formatting all data on the storage medium are to be de- leted! Possible data loss.
-
Page 369: Saving Line Backup
Instruction manual GLM-I Back up data 27.1.2 Saving line backup In the case of a line with several devices you can save the data from all devices in one work step. The system bus address of the devices may not be subsequently modified.
-
Page 370
Back up data Instruction manual GLM-I Start line back-up. Close table with < >. The line backup can take a few minutes — depending on the quantity of data. During line backup, the icon flashes in the display You can view status of data transmission, see page 370. After line back-up is completed a message appears. -
Page 371: Load Line Backup
Instruction manual GLM-I Back up data 27.1.3 Load line backup Only load a line backup back to the line where it has come from. Requirements: – The devices are connected with each other via the system bus. – The devices are switched on.
-
Page 372: Display Status Of Line Backup
Back up data Instruction manual GLM-I Select data If not all data of the line back-up are to be loaded, deselect data that are not required, see page 367. Unselectable data are included in line back-up and cannot be loaded.
-
Page 373: Select Device For Line Backup
Instruction manual GLM-I Back up data 27.1.6 Select device for line backup If a line comprises several devices, you can determine here which devices shall be inclu- ded in the line backup. This selection applies to the line backup of devices and for the loading of the line backup onto the devices.
-
Page 374: User-Defined Soft Keys
Back up data Instruction manual GLM-I 27.2 User-defined soft keys 27.2.1 Save user-defined softkeys User-defined softkeys can be created in mode level T, see page 121. These user-defined softkeys can be saved to a storage medium. Mode level: 5 Make sure that the storage medium is inserted in device.
-
Page 375: Save Setup
Instruction manual GLM-I Back up data 27.3.1 Save setup Mode level: 5 <Setup> / <Create setup> Enter name of setup. The name can be a maximum of four characters, e. g. SET1. Take note of large and small case. Press <ok>.
-
Page 376: Delete Setup
27.3.3 Delete setup Delete setups you no longer require. This frees up storage space for new setups. The de- vice can save a maximum of 3 setups. Only the Bizerba customer services can delete the Service Setup @BIZ. CAUTION The device deletes the setup immediately after you have confirmed with <ok>!
-
Page 377: Maintenance
Before carrying out work in the switch cabinet, disconnect the pow- er connector. – Work in the switch cabinet may only be carried out by qualified trade personnel or Bizerba service technicians. WARNING Compressed air supply remains on when device is switched off — also if power supply is disconnected! When working on the device risk of injury at compressed-air oper- ated device parts.
-
Page 378
Maintenance Instruction manual GLM-I CAUTION Automatically starting components! During automatic operation components can switch on and off au- tomatically. Serious injuries and damage to property can result. – Wear closely fitting clothes and a hair-net. – Do not wear necklaces, ties etc. -
Page 379: Cleaning
28.3.3 Switch cabinet Clean with a soft, lint-free, damp cloth. To protect against corrosion, subsequently treat with Bizerba service oil (96001740000). 28.3.4 Conveyor belts Clean conveyor belts regularly with suitable cleaning agents as per cleaning and service tables, see page 383.
-
Page 380: Package Guides
Maintenance Instruction manual GLM-I 28.3.5 Package guides Clean with a soft, lint-free, damp cloth. Clean with label loosening solvent in the event of heavy soiling. Follow the instructions for use of the label loosening solvent. 28.3.6 Light barrier and reflecting foil Clean using a soft, lint-free cloth.
-
Page 381: Cleaning Printer
Do not touch or clean the thermal printhead with hard objects. – Do not spray thermal printhead. Clean thermal printhead carefully with the Bizerba cleaner or a cotton bud soaked in spirits. Rub down with dry cloth. Illustration 68: Cleaning thermal printhead 38.019.129.001 en…
-
Page 382
Maintenance Instruction manual GLM-I Cleaning guide rollers The guide rollers can be removed for cleaning. Grap guide rollers at the front and back and pull out with a strong force (spring detent). Pull the guide rollers out, clean with spi- rit and wipe dry. -
Page 383: Maintenance
Instruction manual GLM-I Maintenance Cleaning stripping roller The pull-off roller can be removed for cleaning. Loosen Torx screws Remove guide plate. Pull out stripping roller Clean the stripping with spirits and wipe dry. Lubricate both ends of axis. Insert stripping roller…
-
Page 384: Ecomotion Printer: Changing The Felt Strip In The Printer
Maintenance Instruction manual GLM-I 28.4.2 EcoMotion Printer: Changing the felt strip in the printer Opposite the thermal print bar in the printer there is a felt bar which is passed over by the backing paper. This felt bar is subject to wear and must be replaced when the print image starts to deteriorate.
-
Page 385: Service And Maintenance Tables
Instruction manual GLM-I Maintenance 28.5 Service and maintenance tables 28.5.1 1-shift operation (approx. 50,000 labels per day) Labeler Activity Interval Cleaning agent/ lubricant General Clean point of reversal of la- 15 days Label remover, bels and TTF material. 95943000000 Platen printer…
-
Page 386
Maintenance Instruction manual GLM-I Activity Interval Cleaning agent/ lubricant Rotary arm labeler Labeling chute: Spray soiling 1.5 days Label remover, with sufficient label remover. 95943000000 Leave it to soak in well and re- move the label residues by hand or with a cloth. -
Page 387
Instruction manual GLM-I Maintenance Protection and safety devices Activity Interval Cleaning agent/lu- bricant Optional: Weekly – EMERG-OFF button, contactor, relay, safety switch: Check function. Trigger EMERG- OFF intentionally outside production. Connections (cable cover tubes): Activity Interval Cleaning agent/lu- bricant Check correct routing. -
Page 388: 2-Shift Operation
Maintenance Instruction manual GLM-I 28.5.2 2-shift operation (approx. 100,000 labels per day) Labeler Activity Interval Cleaning agent/ lubricant General Clean point of reversal of la- 10 days Label remover, bels and TTF material. 95943000000 Platen printer Clean printer roller, stripping…
-
Page 389
Instruction manual GLM-I Maintenance Activity Interval Cleaning agent/ lubricant Rotary arm labeler Labeling chute: Spray soiling Daily Label remover, with sufficient label remover. 95943000000 Leave it to soak in well and re- move the label residues by hand or with a cloth. -
Page 390
Maintenance Instruction manual GLM-I Activity Interval Cleaning agent/lu- bricant Check conveyor rollers and replace, if nec- With each belt re- – essary. placement Clean belt bodies: With each belt re- Brush and label re- placement mover, 95943000000 Connections (cable cover tubes):… -
Page 391: 3-Shift Operation
Instruction manual GLM-I Maintenance 28.5.3 3-shift operation (approx. 150,000 labels per day) Labeler Activity Interval Cleaning agent/ lubricant General Clean point of reversal of la- 5 days Label remover, bels and TTF material. 95943000000 Platen printer Clean printer roller, stripping…
-
Page 392
Maintenance Instruction manual GLM-I Activity Interval Cleaning agent/ lubricant Rotary arm labeler Labeling chute: Spray soiling 0.5 days Label remover, with sufficient label remover. 95943000000 Leave it to soak in well and re- move the label residues by hand or with a cloth. -
Page 393
Instruction manual GLM-I Maintenance Protection and safety devices Activity Interval Cleaning agent/lu- bricant Optional: Weekly – EMERG-OFF button, contactor, relay, safety switch: Check function. Trigger EMERG- OFF intentionally outside production. Connections (cable cover tubes): Activity Interval Cleaning agent/lu- bricant Check correct routing. -
Page 394: Printer
Printer Instruction manual GLM-I Printer 29.1 Printer equipment 29.1.1 Display thermal strip type If the labeler is only used as a label dispenser and no printed is integra- ted, only the «Label dispenser» text is displayed. Mode level: 5 <Printer> / <Printer equipment> / <Thermal strip>…
-
Page 395: Operating Mode
Instruction manual GLM-I Printer 29.2 Operating mode 29.2.1 Activate or deactivate reverse mode When using an EcoMotion printer, this function cannot be applied, as it isn’t needed. With this function, you can switch reverse mode for the current labeling job on or off. In reverse mode, the label is retracted by about 10 mm in order to be printed from the begin- ning again.
-
Page 396: Sent Print Output
Printer Instruction manual GLM-I 29.2.3 Sent print output With this function you determine which material is printed on. The following settings are possible: «Lab.w. backing paper»: Print feed is controlled by the gap between the labels or by the black synchronization strips on the backing tape.
-
Page 397: Change Horizontal And Vertical Print Position
Instruction manual GLM-I Printer 29.3.2 Change horizontal and vertical print position If the text is printed adjusted in a horizontal or vertical direction, you can correct this by entering a dot value. Usually the adjustment value is entered specific to each label in the label parameter table, see page 201.
-
Page 398: Print Quality
Printer Instruction manual GLM-I 29.4 Print quality 29.4.1 Modify printing speed If the print quality in labels that are not very good is insufficient, enter a lower printing speed. The range of values of applicable printing speeds depends on the printing head that is used.
-
Page 399: Printer Sensor System
Instruction manual GLM-I Printer Excessive contact pressure will reduce the lifetime of the thermal strip. Increase contact pressure: Turn the knurled head screw in a clockwise direc- tion. Illustration 74: Set print image Decrease contact pressure: Turn the knurled head screw in an anti-clockwise direction.
-
Page 400: Select Label Light Barrier
The transmission current from the label light barriers is calculated during the automatic cal- ibration process and, if necessary, can be changed here by Bizerba Service. Example: La- bel light barrier 1. The procedure for label light barrier 2 is the same.
-
Page 401: Enter Diameter Of The Label Roll For Supply Message
Instruction manual GLM-I Printer 29.6.5 Enter diameter of the label roll for supply message You can enter the minimum outer diameter of the label roll in order to monitor how many labels you still have. When the preset external diameter has been reached, the warning signal appears «Paper supply?».
-
Page 402: Interfaces
The output to the I/O port is used to control external devices such as transportation sys- tems or packaging machines. The output port is set up by Bizerba Service. For further information please contact your Bizerba consultant or Bizerba Service.
-
Page 403: Allocate Serial Interface Application
Instruction manual GLM-I Interfaces 30.3.1 Allocate serial interface application The following applications can be used for serial interfaces: <Ser1: AEDP, GxNet>: Only for serial interface 1. Set this if you want to connect to a higher-ranking EDP system (ASCII interface, GxNet protocol).
-
Page 404: Set The Aedp Parameters
Interfaces Instruction manual GLM-I 30.3.2 Set the AEDP parameters Adjust the settings here for serial interface 1. In the table, grayed-out parameters means that they cannot be set for this application. The following parameters are available: – «Baud rate» –…
-
Page 405: Set Parameters For List Printer And Scanner
Instruction manual GLM-I Interfaces 30.3.3 Set parameters for list printer and scanner This is where you can determine which connection is used for the list printer or scanner. All the other interface parameters are grayed out in the displayed table. The following set- tings can be made for the connection: «Serial 1-A»:…
-
Page 406: Systembus
The systembus connects devices in a system network. It operates via profibus or Ethernet. Each connected device has a unique systembus address. The systembus is set up by Bizerba Service. For further information please contact your Bizerba consultant or Bizerba Service.
-
Page 407: Enter Gateway Address
Instruction manual GLM-I Interfaces 30.5.3 Enter gateway address The gateway address is the address of the node via which the partner can be accessed outside of the local network. The gateway address is allocated by the network administrator. This must not be changed at a later date.
-
Page 408: Outgoing Connections
Interfaces Instruction manual GLM-I 30.6 Outgoing connections 30.6.1 Send data The device can send data and commands via the AEDP channel, the system bus or TCP/ IP to other devices. Use the following table to determine which data are sent via which channel to which device: <Connecting parame-…
-
Page 409
Instruction manual GLM-I Interfaces Example: Data transmission from device to EDP system and two external total print- Illustration 75: Example system EDP, system bus address 1 Channel A, bus type e.g. AEDP Device, system bus address 2 Channel B, bus type, e.g. standard system bus… -
Page 410
Interfaces Instruction manual GLM-I Illustration 76: Data transmission 38.019.129.001 en… -
Page 411: Specify The Connection Parameters
«Port No.»: Only for TCP/IP. Port number of the connected device. The port number can be used as an access number for a specific serv- ice. For connections to Bizerba labeling systems, the port num- ber 1045 is preset. «Socket»: Cannot be input.
-
Page 412
Interfaces Instruction manual GLM-I «Synchronization»: Only for TCP/IP. The following settings are possible: – «no»: If the application dialog can guarantee that after each initiatively sent telegram the sender waits for the logic GxNet acknowledgement, an additional synchronization is not required. -
Page 413: Assign Package-Synchronous Data (Psv_Pck Wdout-Flag)
Instruction manual GLM-I Interfaces 30.6.3 Assign package-synchronous data (PSV_PCK WDout-flag) In the «PSV_PCK WDout flag» table, for each channel you have to determine whether sin- gle package data, the different totals and/or statistics reports are operated via these chan- nels.
-
Page 414: Select Send Single Package Data To Higher-Ranking Edp System
Interfaces Instruction manual GLM-I 30.6.5 Select Send single package data to higher-ranking EDP sys- tem (content of PSV_DATA) In the «Contents of PSV_DATA» table (package-synchronous data), select the single pack- age data you want sent to the higher-ranking EDP system.
-
Page 415: Only Send Valid Or Also Faulty Package Data To The Higher-Ranking
Instruction manual GLM-I Interfaces 30.6.7 Only send valid or also faulty package data to the higher-rank- ing EDP system This is where you determine whether package-synchronous data are sent to the higher- ranking EDP system for all packages or only for valid packages. The following settings are possible: «Valid»:…
-
Page 416: Incoming Connections
Interfaces Instruction manual GLM-I 30.7 Incoming connections 30.7.1 Set receiving level for remote printing If print jobs are stored temporarily in a total printer, this is where you can set the number of print jobs you want saved (receiving level). This can be necessary, if, for example, total la- bels for boxes are printed on a separate total printer (see picture), or if there are several boxes between the box machine and the total printer and «Ack.
-
Page 417: Set Confirmation For Remote Printing
Instruction manual GLM-I Interfaces 30.7.2 Set confirmation for remote printing On remotely operated devices (e.g. total printer), you can determine whether the automatic labeler should continue with labeling after a print order has been sent. The following set- tings are possible: «Ack.
-
Page 418: Set Error Message For Remote Printing
Interfaces Instruction manual GLM-I 30.7.4 Set error message for remote printing On remotely-operated devices (e.g. total printer), you can determine whether the master device receives negative confirmation in the event of an error. The following settings are possible: «ErrMsg»: The master devices receives negative confirmation in the event of an error.
-
Page 419: E-Mails
Instruction manual GLM-I Interfaces 30.9 E-mails 30.9.1 Creating E-mail address book Enter the name and email addresses of the people you want to send emails to in the email address book. You can save up to five email addresses for each recipient.
-
Page 420: E-Mail Configuration
Instruction manual GLM-I 30.9.3 E-mail configuration To send e-mails, the device has to be configured appropriately, see page 418. Configura- tion is usually handled by Bizerba Service. The configuration table contains the following entries: «Protocol»: – «SMTP»: E-mail function is activated with SMTP protocol.
-
Page 421: Send E-Mail
Instruction manual GLM-I Interfaces 30.9.4 Send e-mail The device is configured to send e-mails, see page 418. The email address book is not empty. Mode level: 5 <Interfaces> / <Ethernet> / <Emails> / <Send email> Select the recipient using the cursor keys.
-
Page 422: Select Year Formatting Via Interface
Interfaces Instruction manual GLM-I Application example: This function enables you to close the connection, for example, to a higher-ranking EDP system by switching off the respective transmission channel. You can operate the device afterwards independently. Mode level: 2 <Printer + interface> / <Send chan. active?>…
-
Page 423: Accessories
Instruction manual GLM-I Accessories Accessories 31.1 Package guidance The device may be equipped with an adjustable package guidance (alignment rails). Un- der certain circumstances, packages of critical dimensions must be laterally guided during transport to avoid toppling over. For this reason, optional package guidances can be mounted onto the conveyor belts.
-
Page 424: Lateral Package Guidance
Accessories Instruction manual GLM-I 31.2.2 Lateral package guidance For lateral package guidance the alignment rail is pre-set and the alignment rail is set ac- cordingly to the package width. Illustration 79: Lateral package guidance When changing the package width the alignment rail B must be set.
-
Page 425: Defining Operating Mode Of Guide Rails
Instruction manual GLM-I Accessories 31.3.2 Defining operating mode of guide rails The following operating modes are available for the motorized guide rails: «One-sid.» The outer guide rail remains fixed. To adjust the relative pack- age width, only one guide rail is moved by means of a motor.
-
Page 426: Entering The Package Width
Accessories Instruction manual GLM-I 31.3.4 Entering the package width Here you may enter the package width for motorized guide rail adjustment or modify a package width called up with the PLU or automatic labeler data. If package width is man- aged in the automatic labeler data, the entered value can be saved in the database if re- quired.
-
Page 427: Guide Rail Adjustment
Instruction manual GLM-I Accessories 31.3.6 Guide rail adjustment The motorized guide rails can be adjusted using a tilt lever. The front and rear guide rail can be adjusted separately. The rear guide rail is adjusted using the tilt lever A, the front guide rail is adjusted using the tilt lever B.
-
Page 428
Accessories Instruction manual GLM-I After manually adjusting the guide rail, bring titling lever back to position Without guide rail adjustment: Tilt lever in position In case of lateral alignment of packages, see page 422, one guide rail is fixed and the oth- er one’s position is changed by means of a motor. -
Page 429: Removing Motorized Guide Rails
Instruction manual GLM-I Accessories 31.3.7 Removing motorized guide rails The motorized guide rails can be removed and remounted in order to clean the guide rails themselves or conveyor belts and belt units. Illustration 82: Remove guide rails Removing guide rails: –…
-
Page 430: Guide Rail Calibration
Accessories Instruction manual GLM-I 31.3.8 Guide rail calibration First calibration or re-calibration of the motorized guide rails is necessary in the following cases: – At first commissioning of the device. – After adjustment of the fixed guide rail. – If the device was switched off during device adjustment.
-
Page 431: Operating The Metal Detector
Instruction manual GLM-I Accessories 31.4.3 Operating the metal detector Metal detectors generate strong magnetic fields. DANGER The magnetic field of the metal detector affects cardiac pacemak- ers! Mortal danger! The pacemaker sends no or incorrect impulses. – Persons with pacemakers must not stay near a metal detector.
-
Page 432: Package Ejector Description
Accessories Instruction manual GLM-I 31.5.1 Package ejector description The flaps of the package ejector that are provided with transport rollers are controlled pneumatically by means of compressed air cylinders. For this reason, the package ejector is connected to the compressed air supply of the device. The permissible max. force at the flaps of the package ejector is 75 N.
-
Page 433: Settings
Instruction manual GLM-I Accessories 31.5.3 Settings The following settings can be made for the package ejector: – Polarity, see page 266 – Activation criteria, see page 267 – Delay time, see page 268 – Parameter of control and container light barrier, see page 268 –…
-
Page 434: Adjusting Pusher Lengthwise To Conveying Direction
Accessories Instruction manual GLM-I 31.6.1 Adjusting pusher lengthwise to conveying direction The pusher can be moved lengthwise to the conveying direction. To do so, loosen the four fastening screws , move the pusher to the desired position and tighten the screws.
-
Page 435: Belts
Required settings The swivel-mounted labeling conveyor has to activated by the Bizerba service once. To be able to work with the swivel-mounted conveyor, the weighing belt has to be set to the <Weighing Start/Stop> operating mode, see page 264.
-
Page 436
Accessories Instruction manual GLM-I The V belts of the device have to be activated by the Bizerba service once. Illustration 86: V belt, side view Adjustment unit with crank handle Front part of V belt Tilt lever for belt change… -
Page 437: Oblique Adjustment Of V Belts
Instruction manual GLM-I Accessories 31.8.1 Oblique adjustment of V belts The optimal inclination of V belts depends on the product. Find out the best adjustment by performing tests with the product to be labeled. Indicator field Crank Illustration 87: Adjustment unit of V belt Press <Stop>.
-
Page 438: Label Dispenser
Accessories Instruction manual GLM-I The pressure of the label pressure roller can be increased by inserting washers. Up to three mounting rails can be mounted (see figure on the left). If the labeler position changes, the label pressure roller can be fastened to one of the mounting rails depending on the labeler position.
-
Page 439
The label dispenser can be configured by means of a formula sent by the device at first commissioning or when labels of a different size are used. If required, the Bizerba service will program and configure the de- vice accordingly. -
Page 440: Inserting The Label Roll
Accessories Instruction manual GLM-I 31.10.1 Inserting the label roll Before inserting a new label roll, set the label dispenser to «PAUSE» or switch it off using the mains switch. Illustration 91: Insert label roll Remove the outside guide disk Insert the new label roll with labels facing outside.
-
Page 441
Instruction manual GLM-I Accessories Remove labels from the backing paper that protrudes beyond the dispenser tongue Feed label strip around dispenser tongue and pass it through the auxiliary rolls the draw roller Lift the counterpressure roll and pass the label strip between the draw roller… -
Page 442: Specifications For The Label Dispenser
Accessories Instruction manual GLM-I 31.10.2 Specifications for the label dispenser Specifications for the label dispenser are made via the display and operating unit. Illustration 92: Display and operating unit Key functions <START – STOP> This key is used to switch on or off the device. In the subme- nus, a test dispensing process can be activated by pressing this key.
-
Page 443: Display
Instruction manual GLM-I Accessories 31.10.3 Display The display shows the various parameters and the status. After switching on, the program version number and program date are displayed. This function disappears after a few sec- onds or can be deleted by confirming it us- ing a key.
-
Page 444: Error Messages
Accessories Instruction manual GLM-I 31.10.4 Error messages The label dispenser automatically generates an error message at label roll end. After inserting the new label roll, press the <START – STOP> key until the label dis- penser changes to the «READY» mode.
-
Page 445: Setting Label Parameters
Instruction manual GLM-I Accessories 31.10.5 Setting label parameters Label positioning This parameter determines the label posi- tion on the package. Change this value by pressing the <+> or <-> key. Illustration 97: Label positioning If the product sensor is located at 100 mm in front of the dispenser tongue and the label shall be placed at a distance of 37.5 mm from the product leading edge, the value must be…
-
Page 446: Saving Label Settings
Accessories Instruction manual GLM-I Label length This parameter determines the feed motion length that the label dispenser needs to find a space between two labels. If the label dis- penser does not find any space within the Illustration 100: Label length entered length, it stops and an audible «RUN-OUT»…
-
Page 447: Calling Up Saved Label Settings
Instruction manual GLM-I Accessories 31.10.7 Calling up saved label settings Saved label settings can be called up at any time. By pressing the <UP> or <DOWN> keys, call up the «CALL NO.» parameter. Call the next label number using the <+> key or the previous label number using the <->key.
-
Page 448: Troubleshooting
Prior to trouble shooting, make sure that the label dispenser has been cleaned to rule out that glue and label residues cause the malfunction. Only qualified personnel or Bizerba service technicians may carry out works on the device. Wrinkled-up label…
-
Page 449
Instruction manual GLM-I Accessories Problem Possible cause Possible solution Imprecise scanning. Product sensor incorrectly Adjust product sensor. set. Product sensor incorrectly Position product sensor correct- positioned. Distance between dis- Excessive distance. Position label dispenser closer penser tongue and to the product. -
Page 450: Writing Unit For Rfid Labels
With the label printer, optionally, data can be transmitted to RFID labels (RFID = Radio Frequency Identification, or: Smart Label). This is currently only possible for RFID labels with UHF transponders. When purchasing RFID labels, ask Bizerba Service which RFID labels types have been tested by Bizerba. Labels with UHF transponders UHF labels have a semi-conductor chip incorporated in special positions that transmit and receive in a frequency range of 865-920 MHz.
-
Page 451: Scanner
Instruction manual GLM-I Accessories 31.12 Scanner WARNING Scanner operate using laser radiation. Risk of injuries to the eyes. – Do not look directly into the laser beam. – Avoid reflection from laser beams on reflecting surfaces (e.g. watch, jewelry). In order to read a barcode you can connect a scanner (barcode reading device) to your device.
-
Page 452: Configure Scanning Behavior
Accessories Instruction manual GLM-I 31.12.1 Configure scanning behavior Set user restricted guidance You determine in which cases the user has to perform a scan. The following settings are possible: <Scan. not compulsory>: User restricted guidance is switched off. In the event of an er- ror, the scan code, or corrected code content is entered man- ually.
-
Page 453: List Printer
Send print job to a computer. «EPSON FX80 (re- Simple thermal or matrix printer with reduced scope of duced)» function. «GLP58» Bizerba GLP 58 industry printer. «CUSTOM PLUS-S-0004 Special printer driver, standard. Standard» «CUSTOM PLUS-S-0004 Special printer driver, BIZERBA. BIZERBA»…
-
Page 454: Enter Paper Size
Accessories Instruction manual GLM-I 31.13.2 Enter paper size Mode level: 5 <Etc> / <List printer> The following settings are possible: – <Paper length> – <Upper page margin> – <Lower page margin> Press the required softkey. Enter value and confirm input.
-
Page 455
Instruction manual GLM-I Accessories The following functions are available: – Define or edit tendency control parameter tables, see page 454 – Delete tendency control parameter tables, see page 455 – Directly call up tendency control parameter tables, see page 455 –… -
Page 456: Principle Of The Tendency Control
The configuration of the database is not subject of this documentation. Please contact your Bizerba consultant or Bizerba Service for further in- formation. «Target weight»: The package weight that should be attained with the help of the tendency control.
-
Page 457: Editing The Tendency Control Parameter Table
Instruction manual GLM-I Accessories To open an existing tendency control parameter table for editing, enter and confirm the tendency control parameter number of the desired table, see page 77. 31.14.4 Editing the tendency control parameter table Tendency control parameter tables are edited the same way as generally described for ta- bles.
-
Page 458: Code Checker
Accessories Instruction manual GLM-I 31.15 Code checker WARNING Code checkers use laser beams. Risk of injuries to the eyes. – Do not look directly into the laser beam. – Avoid reflection from laser beams on reflecting surfaces (e.g. watch, jewelry).
-
Page 459: Selecting Packages To Be Checked
Instruction manual GLM-I Accessories 31.15.1 Selecting packages to be checked Select the packages whose bar code has to be checked. The following settings are possi- ble: «Off»: No code check at all. «All packages»: The labels of all labeled packages are checked.
-
Page 460: Technical Data
Technical data Instruction manual GLM-I Technical data 32.1 Dimensions 32.1.1 GLM-I 40 Illustration 106: Dimensions (example) 38.019.129.001 en…
-
Page 461: Glm-I 70/100
Instruction manual GLM-I Technical data 32.1.2 GLM-I 70/100 Illustration 107: Dimensions (example) Infeed con- Separation Metal detector Weighing Labeling Belt widths veyor conveyor conveyor conveyor conveyor (BB) (ZB) (VB) (MB) (WB) (EB) 400 mm 400 mm 910 mm 400 mm…
-
Page 462: Glm-I 150
Technical data Instruction manual GLM-I 32.1.3 GLM-I 150 Illustration 108: Dimensions (example) Infeed Separa- Metal detec- Weighing Labeling Other label- Belt conveyor tion con- tor conveyor conveyor conveyor 1 ing convey- widths veyor (ZB) (MB) (WB) (EB1) (BB) (VB) 500 mm…
-
Page 463: Glm-I 170
Instruction manual GLM-I Technical data 32.1.4 GLM-I 170 Illustration 109: Dimensions (example) Infeed con- Metal detec- Separation Weighing Transfer Labeling veyor tor conveyor conveyor conveyor conveyor conveyor (ZB) (MB) (VB) (WB) (ÜB) (EB) 200 mm 800 mm 200 mm 250 mm…
-
Page 464: Printer
Technical data Instruction manual GLM-I 32.2 Printer The labeler can be equipped with a 80 mm or a 160 mm thermal or thermal transfer print- er. Depending on the printer version there are two differently wide labeler housings. Printer version…
-
Page 465: Label Roll, Take-Up Roll, Labels
Roll width D 32,5–96 mm 32,5–178 mm Label distance F 2 mm Label dimensions Special sizes possible. For further information please contact your Bizerba consultant or Bizerba Service. Labeler Printer Label width x label height [mm] Comment D x E minimum max.
-
Page 466: Compressed Air Supply
Technical data Instruction manual GLM-I Labeler Printer Label width x label height [mm] Comment D x E minimum max. with max. with labeler 80 labeler 160 Piston labeler Platen 40 x 40 86 x 100 100 x 100 Printer, EcoMotion…
-
Page 467: Power Supply
Instruction manual GLM-I Technical data The rotary arm labeler does not require any customer-sided com- pressed air supply. The vacuum for the rotating labeler arm is gener- ated by a vacuum pump in the device. Depending on the version, the devices are equipped with a compressed air reducer with water separator.
-
Page 468: Protection Type
Labels There are labels for different temperature ranges. For – further information please contact your Bizerba consul- tant or Bizerba Service. Exter- The threshold values of the respective manufacturer apply. nal de- vices 32.6…
-
Page 469: Display And Operating Units
Instruction manual GLM-I Technical data – PDF417 with AI – GS1 DataBar Omni – GS1 DataBar Expanded – Composite-C-Components – UPC-A-Code – ITF-14 – EAN-D3-Code – EPC 96 – QR-Code, as of program version 12.00 32.9 Display and operating units…
-
Page 470: Scale Data
Technical data Instruction manual GLM-I Interfaces on GT-12C System bus SB: for connection to Bizerba system network, connector: D-Sub 9- pin (socket). EDP 1: for software download, RS232, RS422, TTY, connector: D-Sub 9-pin (socket). Ethernet: Connector: 10 base T, TCP/IP 32.10…
-
Page 471: Package Weights
Instruction manual GLM-I Technical data 32.11.1 Package weights The package weights depend on the scale installed and are displayed on the verification display, see page 128. 32.12 Labeling performance The labeling performance of a device is dependent on the belt speed set, the weight, length and bearing surface (rocking effect) of the packages, as well as a smooth package infeed.
-
Page 472: Appendix
Font set Eastern Europe2, ASCII 144 — 255 Font set Greek, ASCII 144 — 255 Font set Cyrillic, ASCII 144 — 255 Overview: Font sizes Overview: AI identifiers in GS1-128 Overview: Transfer data Bizerba Service Oil: EU safety data sheet 38.019.129.001 en…
-
Page 473: Overview: List Formats
Instruction manual GLM-I Appendix Overview: List formats You can output different weight, item and database lists to a connected list printer. The fol- lowing overview describes the formats and contents of the various lists. General information about lists – If a package or a complete item is re-weighed, the respective weight, prefixed with a minus sign is highlighted and printed in the list.
-
Page 474: Weight Lists
Appendix Instruction manual GLM-I Weight lists To print the weight lists correctly, activate the single numerator and if necessary the Total1-numerator as well. List 1 Header field: Text field 1 and date 1. Columns: Successive printing of all weight values of a product across four columns with numerator.
-
Page 475
Instruction manual GLM-I Appendix Totals: Weight totals of printed total labels with total type (for example: *1 for total 1, *T for daily total). When total 1 is printed with to- tal1 numerator. Page break: On PLU change and after printing the daily total. -
Page 476
Appendix Instruction manual GLM-I Illustration 114: Example of list 6 List 7 Header field: Text field 1 and 2, PLU number and date 1. Columns: Successive printing of all weight values and prices belonging to a PLU, in two columns with numerator. -
Page 477
Instruction manual GLM-I Appendix Illustration 115: Example of list 7 List 8 Header field: Text field 1 and date 1. Columns: Successive printing of PLU number, PLU text, weight and price, in one column. Totals: Weight totals of printed total labels. For total 1 add overall num- ber of labeled packages. -
Page 478
Appendix Instruction manual GLM-I List 11 Header field: Text field 1 and 2, date 1 to 3, PLU number, batch number, de- vice number. Columns: Successive printing of all weight values, in three columns with numerator. Totals: Weight totals of printed totals 1 and 2 with total type. When to- tal 1 is printed with total1 numerator. -
Page 479
Instruction manual GLM-I Appendix Illustration 118: Example of list 12 List 13 As list 8, but additional column for secondary price. When configured correspondingly, the conversion rate in printed in the list header, see page 159. Illustration 119: Example of list 13… -
Page 480: Item Lists
Appendix Instruction manual GLM-I Item lists After labeling an item containing the same products, the device can print an item list on the list printer parallel to printing the totals label. To print the item lists correctly, activate the total1 numerator, and if nec- essary, the total2 numerator as well.
-
Page 481
Instruction manual GLM-I Appendix Illustration 120: Example of list 3 List 4 Header field: Text field 1 and 2, PLU number, date 2. Columns: The total1 numerator (=item number) and the weight total are printed for each item. Totals: Weight total for each item (see columns), at the end of the item list, parallel to printing the total label for total 2: Overall piece number and total weight. -
Page 482
Appendix Instruction manual GLM-I Illustration 121: Example of list 4 List 5 Header field: Text field 1 and 2, PLU number, date 2. Columns: The total1 numerator (=item number) and the weight total are printed for each item. Totals: Weight total for each item (see columns), at the end of the item… -
Page 483
Instruction manual GLM-I Appendix Illustration 122: Example of list 5 List 9 Header field: Text field 1, date 1. Columns: Print successive number, PLU text and weight. Totals: Weight total and pallet number (=total2 numerator) for each pal- let. Page break: On PLU change, after total 2 is printed. -
Page 484
Appendix Instruction manual GLM-I Illustration 123: Example of list 9 38.019.129.001 en… -
Page 485: Database Lists
Instruction manual GLM-I Appendix Database lists Using the database lists, you print the price and weight totals of the PLU labeled per cus- tomer during a particular labeling period. In comparison to the weight and item lists, print- ing does not take place in parallel to labeling. After specifying the list number, you have to start the printing job separately.
-
Page 486
Appendix Instruction manual GLM-I Illustration 125: Example of list 14 38.019.129.001 en… -
Page 487: Overview: Font Set
Instruction manual GLM-I Appendix Overview: Font set Font set Western Europe, ASCII 032 — 127 38.019.129.001 en…
-
Page 488
Appendix Instruction manual GLM-I Font set Western Europe, ASCII 144 — 255 38.019.129.001 en… -
Page 489: Font Set Eastern Europe1, Ascii
Instruction manual GLM-I Appendix Font set Eastern Europe1, ASCII 144 — 255 38.019.129.001 en…
-
Page 490: Font Set Eastern Europe2, Ascii
Appendix Instruction manual GLM-I Font set Eastern Europe2, ASCII 144 — 255 38.019.129.001 en…
-
Page 491: Font Set Greek, Ascii
Instruction manual GLM-I Appendix Font set Greek, ASCII 144 — 255 38.019.129.001 en…
-
Page 492: Font Set Cyrillic, Ascii
Appendix Instruction manual GLM-I Font set Cyrillic, ASCII 144 — 255 38.019.129.001 en…
-
Page 493: Overview: Font Sizes
Instruction manual GLM-I Appendix Overview: Font sizes The following table contains text samples showing the supported font sizes. Allocate the font size you want in the text editor via the softkey <Character size>, on page 171. The character size description is composed as follows:…
-
Page 494
Appendix Instruction manual GLM-I Font size no. Format Original size on label 19×7-19-2-2-0 23×9-23-2-2-0 23×9-23-2-3-0 27×17-27-2-1-0 27×10-27-2-2-0 23×9-23-3-3-0 27×17-27-3-2-0 27×10-27-3-2-0 27×17-27-3-3-0 27×17-27-4-4-0 27×17-27-7-7-0 12×6-12-1-1-0 15×6-15-1-1-0 9×5-9-2-2-0 23×9-23-1-1-0 27×17-27-1-1-0 23×9-23-2-2-0 12×6-12-2-2-0 15×6-15-2-2-0 19×7-19-2-2-0 19×7-19-1-1-0 27×10-27-1-1-0 15×6-15-1-2-0 Character record is incomplete, only suitable for nu- 27×15-27-1-1-0 merical values. -
Page 495
Instruction manual GLM-I Appendix Font size no. Format Original size on label 27×10-27-1-1-0 27×17-27-2-3-0 15×6-15-1-1-0 38.019.129.001 en… -
Page 496: Overview: Ai Identifiers In Gs1-128
Appendix Instruction manual GLM-I Overview: AI identifiers in GS1-128 Code contents Code structure proposal max. num./ digits alpha AI 00 Dispatch unit number Constant {0} X1: Designation of the package Code substr.1{7-digit} X2-X8: bbn of sender Numerator{9digits} X9-X17: Serial number…
-
Page 497
Instruction manual GLM-I Appendix Code contents Code structure proposal max. num./ digits alpha AI 97 Internal — Wholesale and retail Code substr.1{12-digit} trade AI 98 Internal — Wholesale and retail Code substr.1{12-digit} trade AI 99 Bilaterally agreed texts Simple text 10{0 characters} 30 AI 240 Additional product informations Code substr.1{6-digit}… -
Page 498
Appendix Instruction manual GLM-I Code contents Code structure proposal max. num./ digits alpha AI 420 Zip code of the receiver when Code substr. 3{5-digit} dispatching domestically AI 421 Zip code of the receiver with Code substr. 2{3-digit} n3 + n3 + an..9 prefixed ISO country doe Code substr. -
Page 499: Overview: Transfer Data
Instruction manual GLM-I Appendix Overview: Transfer data Transfer data <Add.data to <Contents of <Send if data <Add. data to PSV_PCK> PSV_DATA> is mod.> statistics> «Country» «Labeling mode» «Label language» «Date 1» «Date 2» «Date 3» «Date 1 coded» «Date 2 coded»…
-
Page 500
Appendix Instruction manual GLM-I Transfer data <Add.data to <Contents of <Send if data <Add. data to PSV_PCK> PSV_DATA> is mod.> statistics> «Fixed price» or. «Unit price» «Special unit price» «Code sub- string 1″ to»Code sub- string 7» «Text 1» to»Text 20″… -
Page 501
Instruction manual GLM-I Appendix Transfer data <Add.data to <Contents of <Send if data <Add. data to PSV_PCK> PSV_DATA> is mod.> statistics> «Print 2nd price» «Print.of conv.rate» «Print.o. secondary *» «Conversion rate» «Print.of year» «Ext. weight totals» «Time Date 1» to»Time Date 3″… -
Page 502
Appendix Instruction manual GLM-I Transfer data <Add.data to <Contents of <Send if data <Add. data to PSV_PCK> PSV_DATA> is mod.> statistics> «Label distance» «Ref. point lab. distan.» «Error flags» «LOCK-Info» «UNLOCK-Info» «Max. pckg. height» «Operator language» «Formatted label contents» «Signature»… -
Page 503: Bizerba Service Oil: Eu Safety Data Sheet
Instruction manual GLM-I Appendix Bizerba Service Oil: EU safety data sheet 1. Product name: Bizerba Service Oil Article no.: 94008900022 Manufacturer: Bizerba GmbH & Co. KG, 72336 Balingen Post box 100164 72301 Balingen/Germany Emergency call: Phone 07433-120 2. Composition/ data on components Chemical characteriza- Synth.
-
Page 504
Appendix Instruction manual GLM-I Requirements to storage None rooms and containers: Merging information: Incompatible with oxidation agents Further data: Store in original container at room temperature. 8. Exposition limit / Personal protective equipment Add. note for designing Omitted technical plants:… -
Page 505
Instruction manual GLM-I Appendix Hazardous decomposi- Unknown tion products: Further data: none 11. Data on toxicology The product was not checked. Information is based upon products with similar forma- tion. Acute toxicology: oral: > 2 g/kg rat (literature value). Chronical toxicology:…
Download Instruction manual of Bizerba GLM-I Label Maker for Free or View it Online on All-Guides.com.

1

2

3

4

5

6

7

8

9

10

11

12

13

14

15

16

17

18

19

20

21

22

23

24

25

26

27

28

29

30

31

32

33

34

35

36

37

38

39

40

41

42

43

44

45

46

47

48

49

50

51

52

53

54

55

56

57

58

59

60

61

62

63

64

65

66

67

68

69

70

71

72

73

74

75

76

77

78

79

80

81

82

83

84

85

86

87

88

89

90

91

92

93

94

95

96

97

98

99

100

101

102

103

104

105

106

107

108

109

110

111

112

113

114

115

116

117

118

119

120

121

122

123

124

125

126

127

128

129

130

131

132

133

134

135

136

137

138

139

140

141

142

143

144

145

146

147

148

149

150

151

152

153

154

155

156

157

158

159

160

161

162

163

164

165

166

167

168

169

170

171

172

173

174

175

176

177

178

179

180

181

182

183

184

185

186

187

188

189

190

191

192

193

194

195

196

197

198

199

200

201

202

203

204

205

206

207

208

209

210

211

212

213

214

215

216

217

218

219

220

221

222

223

224

225

226

227

228

229

230

231

232

233

234

235

236

237

238

239

240

241

242

243

244

245

246

247

248

249

250

251

252

253

254

255

256

257

258

259

260

261

262

263

264

265

266

267

268

269

270

271

272

273

274

275

276

277

278

279

280

281

282

283

284

285

286

287

288

289

290

291

292

293

294

295

296

297

298

299

300

301

302

303

304

305

306

307

308

309

310

311

312

313

314

315

316

317

318

319

320

321

322

323

324

325

326

327

328

329

330

331

332

333

334

335

336

337

338

339

340

341

342

343

344

345

346

347

348

349

350

351

352

353

354

355

356

357

358

359

360

361

362

363

364

365

366

367

368

369

370

371

372

373

374

375

376

377

378

379

380

381

382

383

384

385

386

387

388

389

390

391

392

393

394

395

396

397

398

399

400

401

402

403

404

405

406

407

408

409

410

411

412

413

414

415

416

417

418

419

420

421

422

423

424

425

426

427

428

429

430

431

432

433

434

435

436

437

438

439

440

441

442

443

444

445

446

447

448

449

450

451

452

453

454

455

456

457

458

459

460

461

462

463

464

465

466

467

468

469

470

471

472

473

474

475

476

477

478

479

480

481

482

483

484

485

486

487

488

489

490

491

492

493

494

495

496

497

498

499

500

501

502

503

504

505

Automatic labeler GLM-I
Instruction manual
as of program version 11
.20, menu type 1
38.019.129.001 en
Bizerba GLM-I 40 Label Maker PDF User Guides and Manuals for Free Download: Found (1) Manuals for Bizerba GLM-I 40 Device Model (Operating Instructions Manual)
More Label Maker Device Models:
-
Epson
ProofPlus TM-H6000III
EnglishUser’s Manual. . . . . . . . . . . . . . . . . . . . 1Bedienungsanleitung . . . . . . . . . . . . . . . 9Gebruikershandleiding . . . . . . . . . . . . . 15Manuel d’utilisation . . . . . . . . . . . . . . . 21Manual do utilizador . . . . . …
ProofPlus TM-H6000III Printer, 60
-
Intermec
EasyCoder PD41
EasyCoder® PD41/PD42EasyLAN Ethernet Interface Installation InstructionsThese instructions tell you how to install the EasyLAN Ethernet Interface Board in a EasyCoder PD41/PD42 printer. The kit includes the following:• EasyLAN Ethernet Interface BoardRequired ToolsTo install the interface board in your printer, you …
EasyCoder PD41 Barcode Reader, 4
-
TSC
TA300 Series
Quick Installation Guide Printer Overview Note: The interface picture here is for reference only. Please refer to the product specification for the interfaces availability. Loading the Ribbon (1) Open the printer top cover by pressing the top cover open tabs located on each …
TA300 Series Printer, 2
-
Afinia
L801
IncludedRewinderBase platePower supplyPower CordThumbOperating InstructionsAssembly instructions1.2.3.4.5.Included:RewinderBase platePower supplyPower CordThumbnutsOperating InstructionsAssembly instructions1.Install base plateLift front of printer and slide base plate into place, aligning front feet ofStandoffs on …
L801 Printer Accessories, 6
Recommended Documentation:
Table of Contents for Bizerba GLM-I 40:
-
$ERXWWKHVHLQVWUXFWLRQV 2SHUDWLQJLQVWUXFWLRQV*/0, HQ +RZVDIHW\ZDUQLQJVDUHGLVSOD\HG 7KHVLJQDOZRUGDERYHWKHV\PEROLQGLFDWHVWKHULVNOHYHO ‘$1*(5 6RXUFHRIGDQJHUZLWKKLJKULVNZLWKGLUHFWWKUHDWHQLQJGDQJHUIRU SHUVRQQHO 5HVXOWLQJLQ ± &ULWLFDOLQMXULHV ± 6HULRXVKHDOWKGDPDJH ± 0HDVXUHV�
-
2SHUDWLRQ 2SHUDWLQJLQVWUXFWLRQV*/0, HQ &DOOLQJXSDUWLFOHYLD3/8QXPEHUDQGFXVWRPHUQXPEHULI DYDLODEOH 7KHDUWLFOHFDQEHVDYHGLQWKHGDWDEDVHDVIROORZV ± RQO\XQGHURQH3/8QXPEHU ± XQGHUDIL[HGFRPELQDWLRQRI3/8DQGFXVWRPHUQXPEHU 7KHFRQILJXUDWLRQRIWKHGDWDEDVHLVQRWVXEMHFWRIWKLVGRFXPHQWDWLRQ )RUIXUWKHULQIRUPDWLRQSOHDVHFRQWDFW\RXU%L]HUEDFRQVXOWDQW
-
0DLQWHQDQFH 2SHUDWLQJLQVWUXFWLRQV*/0, HQ &$87,21 $XWRPDWLFDOO\VWDUWLQJFRPSRQHQWV ‘XULQJDXWRPDWLFRSHUDWLRQFRPSRQHQWVFDQVZLWFKRQDQGRIIDX WRPDWLFDOO\6HULRXVLQMXULHVDQGGDPDJHWRSURSHUW\PD\UHVXOW IURPWKLV ± :HDUFORVHO\ILWWLQJFORWKHVDQGDKDLUQHW ± ‘RQRWZHDUQHFNODFHVWLHVHWF ± .HHSILQJHUVDQGKDQGVDZD\IURPPRYLQJSDUWV ± 6ZLWFK
-
2SHUDWLQJHOHPHQWV 2SHUDWLQJLQVWUXFWLRQV*/0, HQ 5HFRUGLQJSDUDPHWHUQXPEHU 1HZDQGH[LVWLQJSDUDPHWHUQXPEHUVFDQEHUHFRUGHGDVGHVFULEHGLQWKHIROORZLQJH[DP SOHWKDWVKRZVKRZWRVDYHDGDWHWH[W ,OOXVWUDWLRQ([DPSOHIRUDFFHVVLQJSDUDPHWHUQXPEHUV6DYLQJGDWHWH[W 7KHIROORZLQJIXQFWLRQVDUHDYDLODEOH ± 5HFRUGLQJUHTXLUHGSDUDPHWHUQXPEHUIRUNH\ERDUG
-
2SHUDWLQJHOHPHQWV 2SHUDWLQJLQVWUXFWLRQV*/0, HQ .H\IXQFWLRQV (VF!4XLWHGLWRU QG!$FWLYDWHWRHQWHUDFKDUDFWHULQGLFDWHGRQWRSOHIWRQD OHWWHUNH\ 6KLIW!$FWLYDWHWRHQWHUFDSLWDOOHWWHURUWKHFKDUDFWHUVLQGLFD WHGRQQXPHULFNH\VDWOHIWERWWRP7KHFKDUDFWHUVDWOHIWERWWRP GRRQO\DSSHDUE\HQWHULQJWKHIROO
-
3UHSDUDWRU\ZRUN 2SHUDWLQJLQVWUXFWLRQV*/0, HQ 6HWWLQJODEHOZLGWK 7KHDLUMHWRUVWDPSODEHOHUFDQEHDGMXVWHGWRWKHUHVSHFWLYHODEHOZLGWK3URFHHGDVIRO ORZV ,OOXVWUDWLRQ6HWWLQJODEHOLQJV\VWHP 2SHQWKHULJKWVLGHGRRURIWKHODEHO
-
2SHUDWLQJHOHPHQWV 2SHUDWLQJLQVWUXFWLRQV*/0, HQ &DOOXSWH[WHGLWRU 0RGHOHYHOORFDORUJOREDO 0RGHOHYHO7H[W!7H[WHGLWRUORFDO! RU 0RGHOHYHO7H[W!7H[WHGLWRU! 7KHWH[WHGLWRUDSSHDUV /RDGLQJWH[WLQWR(GLWRU 7H[WHGLWRULVRSHQ /RDG! (QWHUWH[WQXPEHUDQG�
-
2SHUDWLQJHOHPHQWV 2SHUDWLQJLQVWUXFWLRQV*/0, HQ 6HOHFWLQJGLVSOD\IRUPDW 7KHGLVSOD\IRUPDWGHILQHVZKLFKFRQWHQWVDUHVKRZQRQWKHVFUHHQ7KHIROORZLQJVHWWLQJV DUHSRVVLEOH //DUJHGLDJUGLV SOD\! ,QWKHPLGGOHRIWKHVFUHHQWKHVWDWLVWLFVLVGLVSOD\HGJUDSKLFDO O\ //DUJHZHLJKWGLV SOD\! ,QWKHPLGGOHRIWKHVFUHHQWKHVL]HVHOHFWH
-
(TXLSPHQWGHVFULSWLRQ 2SHUDWLQJLQVWUXFWLRQV*/0, HQ (WKHUQHWQHWZRUN /LQHVRIGLIIHUHQWSURJUDPYHUVLRQVFDQEHLQVWDOOHGZLWKLQWKHVDPH(WKHUQHWQHWZRUN)RU WKLVLWLVHVVHQWLDOWKDWQRGLVWULEXWHGGDWDEDVHLVXVHG7KHVDPHSURJUDPYHUVLRQPXVWEH LQVWDOOHGZLWKLQRQHOLQH ,OOXVWUDWLRQ3URJUDPYHUVLRQVLQ(WKHUQ
Questions, Opinions and Exploitation Impressions:
You can ask a question, express your opinion or share our experience of Bizerba GLM-I 40 device using right now.