-
Contents
-
Table of Contents
-
Bookmarks
Quick Links
IT Istruzioni d’uso
EN Instructions for use
FR Notice d’emploi
DE Gebrauchsanleitung
ES Instrucciones de uso
PT Instruções para uso
NL Gebruiksaanwijzing
DK Brugsanvisning
FI Käyttöohjeet
CZ Návod na použití
SK Návod na použitie
HU Használati útmutató
SL Navodila za uporab
RU Инструкции по пользованию
TR Kullanim klavuzu
EL Οδηγιεσ χρησεωσ
A
R
d
h g
î ¢ ¨
Related Manuals for Peg-Perego Primo Viaggio tri-fix
Summary of Contents for Peg-Perego Primo Viaggio tri-fix
ребенок может самостоятельно сидеть.
Инструкция по эксплуатации
1• Кресло «Primo Viaggio Tri-Fix ISIP» оборудовано системой
Ganciomatic, позволяющей прикреплять и отсоединять
его в автомобиле от оснований Isofix Basе или
«Adjustable Base», и вне автомобиля — от прогулочных
колясок или шасси Peg-Perego. Для крепления «Primo
Viaggio Tri-Fix ISIP» (к основаниям «Isofix Base», «Adjustable
Base», прогулочным коляскам или шасси Peg-Perego)
установите кресло в соответствии с креплениями и
сместите его вниз двумя руками до щелчка.
2• Для отсоединения «Primo Viaggio Tri-Fix ISIP» (от
оснований «Isofix Base», «Adjustable Base», прогулочных
колясок или шасси Peg-Perego) необходимо перевести
ручку в транспортное положение, сместить рычаг на
спинке вверх и одновременно поднять кресло.
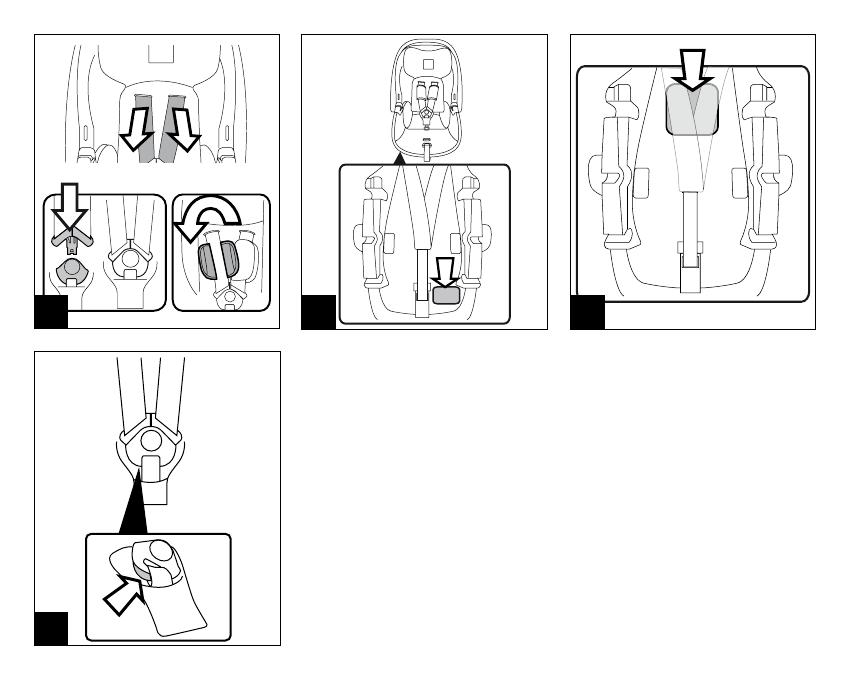
3• Для крепления ремня безопасности наложите две лямки
друг на друга и вставьте их в пряжку лямки, проходящей
между ногами, до щелчка.
4• Для отсоединения ремня безопасности нажмите
красную кнопку на пряжке лямки, проходящей между
ногами.
5• Для изменения высоты ремня: расстегните ремень
с задней стороны (рис. а) и извлеките бретельки
из отверстий; установите их с передней стороны в
отверстие, соответствующее росту ребенка (рис. b).
6• Чтобы ослабить натяжение ремня, вставьте палец в
петлю сиденья (рис. а), нажмите металлическую кнопку и
одновременно с этим другой рукой сместите бретельки
вверх (рис. b).
Чтобы ремень плотно прилегал к ребенку, потяните на
себя ремень (рис. с), обращая внимание на то, чтобы не
затягивать его слишком туго, оставляя небольшой зазор.
7• Кресло имеет три отверстия для регулировки высоты
ремня, их можно выбирать в зависимости от роста
ребенка. Ремень не должен находиться ни слишком
высоко, ни слишком низко относительно плеч ребенка.
Правильное положение — это когда плечи ребенка
расположены немного выше отверстия.
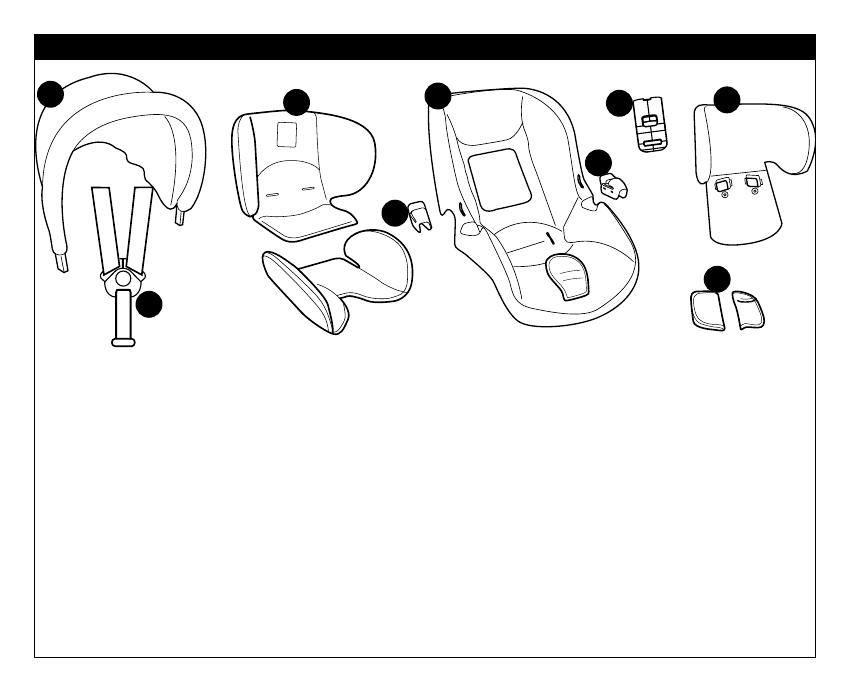
Кресло поставляется вместе с: вставкой-редуктором,
двумя защитными деталями для плеч и защитной
деталью для ног.
8• Для установки защитной прокладки для ног необходимо
сначала отсоединить ремень вставки для разделения
ног, находящийся под сиденьем.
9• и затем продеть его через подкладку.
1 0• Для установки двух защитных деталей для плеч
расстегните застежку-липучку так, как показано на
рисунке.
1 1• Для установки вставки-редуктора необходимо
пропустить ремни безопасности (1) и центральный
ремешок (2) в прорези редуктора. На рисунке В
показано правильное положение вставки-редуктора.
ВНИМАНИЕ: когда ребенок подрастет, снимите вставку-
редуктор.
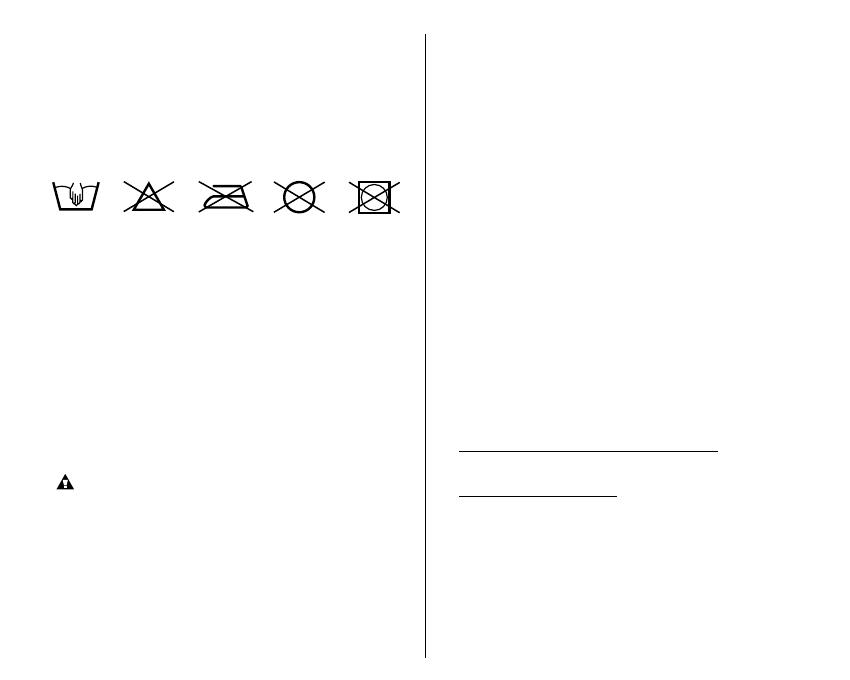
1 2• Ручка кресла регулируется в четырех положениях;
для ее смещения нажмите две круглые кнопки,
расположенные на ручке, и одновременно
приведите ее в нужное вам положение, до щелчка
позиционирования.
• Положение А: это положение ручки, когда кресло
установлено в автомобиле; Положение В: это положение
ручки для ручной перевозки и для крепления кресла
к основанию, к прогулочным коляскам и к шасси;
Положение C: это положение, в котором кресло может
качаться; Положение D: это положение, в котором
кресло не может качаться.
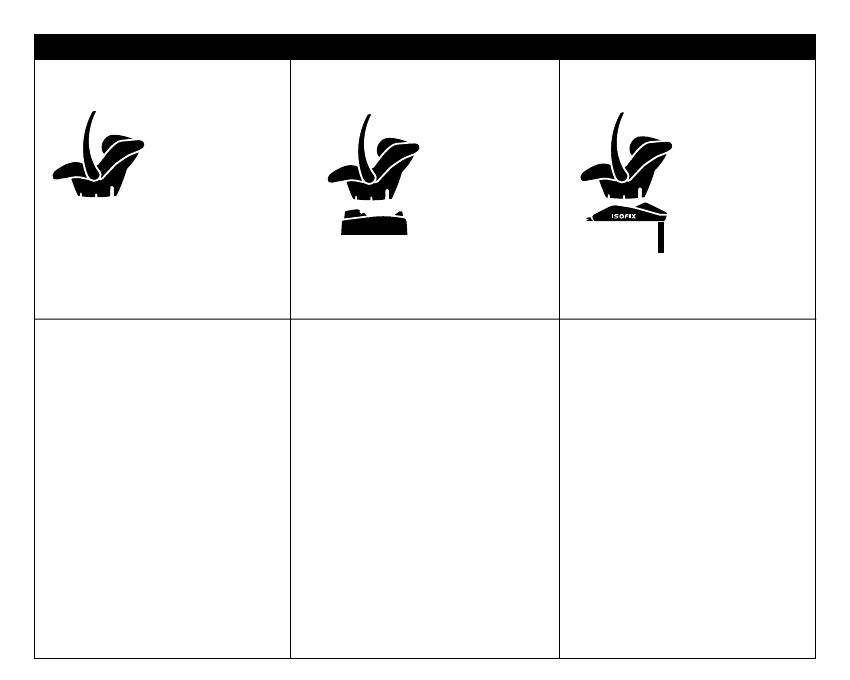
1 3• Для установки капота вставьте его крепления в гнезда
автомобильного кресла и пропустите заднюю часть
капота за спинку.
1 4• Капот имеет две регулировки, для опускания или
подъема капота сместите его назад или вперед. Для
снятия капота нажмите на его крепления и вместе с
этим поднимите капот.
•
ВАЖНО: Нельзя использовать капот для
подъема автомобильного кресла, так как он может
отсоединиться.
Инструкции по эксплуатации в
автомобиле
Установите кресло с ребенком на сиденье автомобиля, и
83

K
IT Istruzioni d’uso
EN Instructions for use
FR Notice d’emploi
DE Gebrauchsanleitung
ES Instrucciones de uso
PT Instruções para uso
NL Gebruiksaanwijzing
DK Brugsanvisning
FI Käyttöohjeet
CZ Návod na použití
SK Návod na použitie
HU Használati útmutató
SL Navodila za uporabo
RU Инструкции по пользованию
TR Kullanım kılavuzu
EL Οδηγιεσ χρησεωσ
RA hgd
LF
click
B
A
A
B
1 2 3
4
5
6
B
A
A
B
C
D
B
A
A
7 8 9
10 11 12

B
A
13 14 15
16 17 18
A
B
C
2423
1
2
3
2
1
3
19 20 21
22
C
B
A
1608
25
28
26 27
7
6
5
7
8
3
2
1
9
4
Primo Viaggio Tri-Fix K
IT• Ricambi disponibili in piú colori da specificare nella richiesta.
EN• Spare parts available in different colours to be specified when ordering.
FR• Pièces de rechange disponibles en plusieurs couleurs à spécifier dans la demande.
DE• Ersatzteile in mehr Farben vorhanden, die in der Anfrage spezifiziert werden müssen.
ES• Repuestos disponibles en otros colores que se especificarán en el pedido.
PT• Peças de reposição disponíveis em cores alternativas a serem especificadas no pedido.
NL• Reserveonderdelen verkrijgbaar in meerdere kleuren, bij bestelling te specificeren.
DK• Reservedele kan leveres i flere farver som bør specificeres ved bestillingen.
FI• Varaosia saatavana eri värisinä: ilmoita väri tilauksessa.
CZ• U náhradních dílů, které jsou k dispozici ve více barvách, je nutné na objednávce specifikovat příslušnou barvu.
SK• Pri náhradných dieloch, ktoré sú k dispozícii vo viacerých farbách, je potrebné pri objednávke špecifikovať želanú farbu.
HU• A tartalék alkatrészek különböző színekben elérhetők, melyeket rendeléskor kell kiválasztani.
SL• Rezervni deli so na voljo v več barvah, ki jih je treba navesti pri naročilu.
RU• Запчасти имеются различных цветов, необходимый указать в запросе.
TR• Siparişte belirtilen değişik renklerdeki yedek parçalari mevcuttur.
EL• Ανταλλακτικά διαθέσιμα σε διάψορα χρώματα. Προσδιορίστε όταν παραγγείλετε.
RA• r¨v Hgy¢hV lj‘tVM td •g‘HK lOjg…m ¢¥F jP¬¢¬£h Uk¬ Hg¨gF.
1) BCAASI*
2) MUCI0084N
3) BRIASI*
4) BSAKAP*
5) SPST6341DNF
6) SPST6341SNF
7) SPST6850GL
 ASPI0151GLNF
9) BSPKAP*

8
• Categoria “Universale” .
• Il seggiolino auto «Primo Viaggio
Tri-Fix K» viene fissato in auto con
la cintura di sicurezza a tre punti.
IT_Italiano
Primo Viaggio
Tri-Fix K
Primo Viaggio
Tri-Fix K
+
adjustable
base
Primo Viaggio
Tri-Fix K
+
isofix
base
• Categoria “Universale” .
• La base Adjuistable Base viene
fissata in auto con la cintura di
sicurezza a tre punti e rimane in
auto pronta per l’uso.
• Il seggiolino-auto «Primo Viaggio
Tri-Fix K» si aggancia alla
«Adjustable Base» e fissato con la
cintura di sicurezza.
• Consultare il manuale istruzioni di
Adjuistable Base per le istruzioni
di fissaggio in auto.
• Categoria “Semi-Universale” classe E.
• La base «Isofix Base» con sistema di
fissaggio Isofix, viene fissata in auto
agli attacchi Isofix posizionati tra
la seduta del sedile e lo schienale
dell’auto.
• Il seggiolino auto «Primo Viaggio Tri-
Fix K» si aggancia alla base.
• Consultare il manuale istruzioni
di «Isofix Base» per le istruzioni di
fissaggio in auto.

9
Grazie per aver scelto un prodotto
Peg-Pérego.
Caratteristiche prodotto
• «Primo Viaggio Tri-Fix K» seggiolino di sicurezza per auto,
gruppo 0+, è stato sottoposto a tutti i test di sicurezza e
omologato secondo la normativa Europea in vigore ECE
R44/04, per bambini di peso da 0-13 kg (0-12/14 mesi).
• IMPORTANTE: «Primo Viaggio Tri-Fix K», gruppo
0+, deve essere installato in senso contrario a quello
di marcia, su sedili sprovvisti di airbag. Non installare
“Primo Viaggio Tri-Fix K” su sedili rivolti in direzione
opposta o trasversalmente al senso comune di marcia
del veicolo.
• «Primo Viaggio Tri-Fix K» ha “Adjustable Side Impact
Protection System”: maggior protezione agli impatti laterali
con il “sistema simultaneo” di regolazione poggiatesta-
cinture.
• «Primo Viaggio Tri-Fix K» è omologato per essere fissato in
auto senza base e a scelta con due tipi di base (l’uso della
base in auto garantisce maggior sicurezza): «Adjustable
Base» o «Isofix Base» (assicurarsi che l’autoveicolo sia
predisposto al sistema Isofix; vedere anche l’elenco dei
modelli delle auto fornito insieme al prodotto).
AVVERTENZA
• Leggere attentamente le istruzioni prima dell’uso
e conservarle nell’apposita sede per riutilizzarle
in futuro. La mancata scrupolosa osservanza delle
istruzioni di installazione del seggiolino-auto
comporterebbe dei rischi al vostro bambino.
• Non lasciare mai il bambino incustodito.
• Utilizzare sempre il sistema di ritenuta.
• Le operazioni di montaggio e di installazione devono
essere effettuate da adulti.
• Evitare di introdurre le dita nei meccanismi.
• Installare questo seggiolino-auto gruppo 0+ in auto in
senso contrario alla direzione di marcia.
• Causa pericolo di morte o lesioni gravi, non installare
questo seggiolino auto su sedili passeggero dotati di
airbag.
• Causa pericolo airbag, disattivare gli airbag circostanti la
postazione del seggiolino auto.
• Nel caso di sedili girevoli o riposizionabili si raccomanda di
installare questo seggiolino-auto in senso opposto al senso
di marcia.
• In auto prestare particolare attenzione a bagagli o altri
oggetti che possono causare lesioni al bambino nel
seggiolino-auto in caso di incidente.
• Non utilizzare metodologie di installazione diverse da
quelle indicate, pericolo di distacco dal sedile.
• Seggiolino-auto, gruppo 0+, categoria “Universale”
omologato secondo la normativa Europea ECE R44/04
per bambini di peso da 0-13 kg (0-12/14 mesi). Adatto alla
maggior parte dei sedili delle autovetture, ma non a tutti.
• Seggiolino auto, gruppo 0+, con base Isofix categoria
Semiuniversale di classe E.
• Il seggiolino-auto può essere correttamente installato se
nel manuale d’uso e manutenzione del veicolo è indicata la
compatibilità con sistemi di ritenuta “Universali” di gruppo
0+.
• Questo seggiolino-auto è classificato “Universale”
secondo criteri di omologazione più severi rispetto ai
modelli precedenti che non dispongono dell’etichetta di
omologazione.
• Il seggiolino-auto puó essere utilizzato solo su veicoli
approvati, dotati di cintura a tre punti statica o con
avvolgitore, omologati secondo il regolamento UN/ECE
n°16 o normative equivalenti. Non é consentito usare la
cintura a due punti o addominale.
• Per l’installazione del seggiolino-auto, far passare la
cintura della vettura a tre punti nelle sedi apposite del
seggiolino contraddistinte dal colore azzurro. Non utilizzare
metodologie di installazione diverse da quelle indicate,
pericolo di distacco dal sedile.
• Assicurarsi che la cintura a tre punti del veicolo per fissare
il seggiolino-auto sia sempre tesa e non attorcigliata, si
raccomanda di sostituirla in caso di sollecitazioni eccessive
IT_Italiano

10
dovute ad un incidente.
• Se la vettura é in movimento, non togliere mai il bambino
dal seggiolino-auto.
• Prestare attenzione che il seggiolino-auto rimanga
bloccato da una parte mobile del sedile o da una portiera.
• Per evitare il rischio di caduta, utilizzare sempre la cintura
di sicurezza del seggiolino-auto anche per il trasporto fuori
dalla vettura. Regolare l’altezza e la tensione delle bretelle
verificando che siano aderenti al corpo del bambino senza
stringere troppo; verificare che la cintura di sicurezza non
sia attorcigliata e che il bambino non la sganci da solo.
• Il seggiolino-auto non sostituisce il lettino, se il bambino ha
bisogno di dormire è importante metterlo sdraiato.
• Non lasciare il seggiolino-auto nella vettura sotto
l’esposizione del sole, alcune parti potrebbero essersi
surriscaldate e nuocere alla pelle delicata del bambino,
controllare prima di collocare il bambino.
• Non utilizzare il seggiolino-auto senza il rivestimento di
tessuto, tale rivestimento non puó essere sostituito da uno
non approvato dal costruttore in quanto costituisce parte
integrante del seggiolino e della sicurezza.
• In caso di dubbi, rivolgersi al costruttore o al rivenditore di
questo seggiolino-auto.
• Non staccare le etichette adesive e cucite; potrebbero
rendere il prodotto non conforme ai sensi di norma.
• Non utilizzare il seggiolino-auto se presenta rotture o pezzi
mancanti, se è di seconda mano, o se è stato sottoposto
a sollecitazioni violente in un incidente perchè potrebbe
avere subito dei danni strutturali estremamente pericolosi.
• Non effettuare modifiche al prodotto.
• Per eventuali riparazioni, sostituzioni di pezzi e informazioni
sul prodotto, contattare il servizio assistenza post-vendita.
Le varie informazioni sono all’ultima pagina di questo
manuale.
• Non utilizzare il seggiolino-auto dopo cinque anni dalla
data di produzione indicata sulla scocca; a causa del
naturale invecchiamento dei materiali potrebbe non essere
più conforme ai sensi di norma.
• L’utilizzo del seggiolino-auto per neonati prematuri con
meno di 37 settimane di gestazione, potrebbe comportare
al neonato problemi di respirazione stando seduti nel
seggiolino-auto. É opportuno consultare il medico prima di
lasciare l’ospedale.
• Non utilizzare accessori che non siano approvati dal
costruttore o dalle competenti autorità.
AVVERTENZA:
PER L’UTILIZZO COME SDRAIETTA
• Non utilizzare la sdraietta quando il bambino è in
grado di stare seduto da solo.
• Questa sdraietta non è progettata per periodi di sonno
prolungati.
• E ‘pericoloso utilizzare la sdraietta su una superficie
elevata, ad esempio un tavolo.
Istruzioni d’uso
1• «Primo Viaggio Tri-Fix K» è dotato di Sistema Ganciomatic,
per essere agganciato e sganciato in auto a «Isofix Base»
o ad «Adjustable Base» e fuori dall’auto ai passeggini o ai
carrelli Peg-Pérego. Per agganciare «Primo Viaggio Tri-Fix K»
(a «Isofix Base», a «Adjustable Base», ai passeggini o ai carrelli
Peg-Pérego) posizionarlo in corrispondenza degli agganci e
spingerlo verso il basso con entrambe le mani fino al click.
2• Per sganciare «Primo Viaggio Tri-Fix K» (da «Isofix Base», a
«Adjustable Base», ai passeggini o ai carrelli Peg-Pérego),
occorre portare il maniglione nella posizione di trasporto,
spingere la leva posta sullo schienale verso l’alto e
contemporaneamente sollevare il seggiolino.
3• Per agganciare il cinturino di sicurezza sovrapporre le due
bretelle e inserirle nella fibbia del cinturino spartigambe
fino al click.
4• Per sganciare il cinturino di sicurezza premere il pulsante
rosso sulla fibbia del cinturino spartigambe.
5• Per allentare la tensione della cintura, infilare il dito
nell’asola della seduta (fig. a), premere il bottone metallico
e contemporaneamente con l’altra mano tirare in su le
bretelle (fig. b).
6• Per far aderire le bretelle del cinturino di sicurezza al
bambino, tirare verso di sé la cintura di regolazione
centrale come in figura, facendo attenzione a non stringere
troppo le bretelle al bambino, lasciando un minimo di

11
gioco.
7• Le bretelle del cinturino di sicurezza e il poggiatesta «Side
Impact Protection» sono regolabili simultaneamente in
altezza in 5 posizioni per seguire la crescita del bambino.
Per regolare l’altezza, premere il pulsante posteriore del
regolatore di altezza (posto sullo schienale del seggiolino)
e contemporaneamente alzare o abbassare nella posizione
desiderata, assicurandosi del giusto posizionamento dal
click. Prima di regolare l’altezza del cinturino di sicurezza e
del poggiatesta allentare la tensione delle bretelle.
8• La corretta regolazione del poggiatesta è dato dalla
corretta posizione delle bretelle; le spalle del bambino
devono essere appena sopra al punto di passaggio delle
bretelle.
9• Il seggiolino viene fornito di un cuscino riduttore
anatomico per il neonato, da togliere quando il bambino è
più grande.
10• Il maniglione del seggiolino ha quattro regolazioni;
per ruotarlo premere i due pulsanti rotondi posti sul
maniglione e contemporaneamente posizionarlo
nella posizione desiderata, fino a sentire il click di
posizionamento.
• Posizione A: è la posizione del maniglione in auto;
Posizione B: è la posizione del maniglione per il trasporto a
mano e per l’aggancio alla base, ai passeggini e ai carrelli;
Posizione C: è la posizione che permette al seggiolino di
dondolare; Posizione D: è la posizione che permette al
seggiolino di non dondolare.
11• Per montare la capottina, inserire gli attacchi di questa
nelle sedi del seggiolino e sistemare la parte posteriore
della capottina dietro lo schienale.
12• La capottina ha due regoazioni, per abbassare o alzare la
capottina, spingerla indietro o tirarla in avanti. Per togliere
la capottina, premere sui pulsanti degli attacchi di questa e
contemporaneamente alzarla.
• IMPORTANTE: La capottina non deve essere usata per
sollevare il seggiolino, pericolo di distacco.
Istruzioni d’uso in auto
13• Sistemare il seggiolino-auto con il vostro bambino sul
sedile, ricordandovi di assicurarlo con il cinturino di
sicurezza.
• Il seggiolino, per avere una corretta posizione in auto,
deve essere parallelo al suolo; quindi se necessario, usare
asciugamani arrotolati da posizionare sul sedile, sotto al
seggiolino.
14• Infilare la cinghia della cintura di sicurezza dell’auto nelle
due guide laterali del seggiolino, assicurandosi che sia ben
tesa e agganciare la fibbia della cintura dell’auto al sedile
come in figura.
15• Impugnare nuovamente la cintura di sicurezza dell’auto
e farla passare dietro lo schienale del seggiolino-auto
inserendola nella guida posteriore come in figura.
16• In auto il maniglione deve essere abbassato totalmente in
avanti in prossimità dello schienale del sedile auto come in
figura. Posizionare il maniglione in avanti assicurandosi del
giusto posizionamento dal “click”. Verificare che la cintura
risulti ben tesa e bloccata per offrire un’adeguata sicurezza.
Sfoderabilità
Per rimuovere il rivestimento del seggiolino auto Primo
Viaggio Tri-Fix K:
• per maggiore comodità togliere la capottina.
• Premere il bottone metallico posto nel centro del
seggiolino per allungare le bretelle del cinturino di
sicurezza;
• premere il pulsante rosso sulla fibbia dello spartigambe per
sganciare il cinturino di sicurezza.
17• rimuovere gli spallacci (Fig. a);
• sfilare le cinture dallo schienale dal davanti (Fig. b);
18• Aprire il cinturino (punto 4).
Per estrarre il cinturino, basta farlo passare dall’ asola della
sacca, come in figura.
19 • Sfilare la fodera del poggiatesta, prima dalla parte bassa e
poi con cura, dalle due alette laterali;
ATTENZIONE A NON ROMPERE LE PARTI IN
POLISTIROLO (EPS).
20 • sfilare le quattro alette di fissaggio dell’imbottitura dal
bordo del seggiolino-auto;
• rimuovere i due coperchi delle guide laterali per la cintura
dell’auto;
21 • sfilare l’imbottitura in sequenza, come in figura.
12
Manutenzione dell’imbottitura
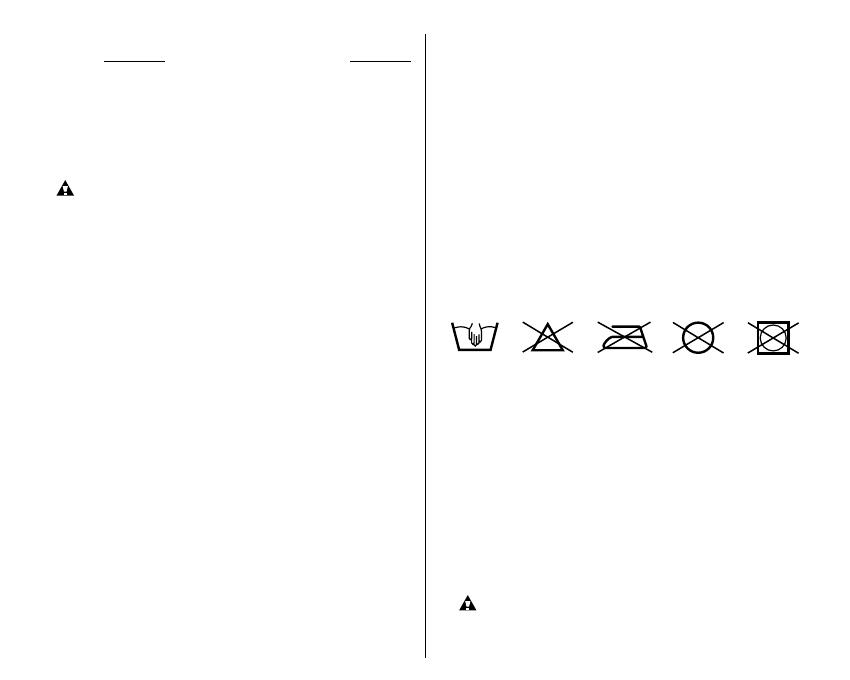
• spazzolare le parti in tessuto per allontanare la polvere
e lavare a mano a una temperatura massima di 30° non
torcere;
• non candeggiare al cloro;
• non stirare;
• non lavare a secco;
• non smacchiare con solventi e non asciugare a mezzo di
asciugabiancheria a tamburo rotativo.
Vestizione
• Per rivestire il seggiolino Primo Viaggio Tri-Fix K:
22 • calzare l’imbottitura, in sequenza come in figura:
— calzare dall’alto la sacca
— inserire prima le alette laterali del poggiatesta con
attenzione
_ poi farla passare nella parte bassa del poggiatesta.
23 • inserire le quattro alette di fissaggio dell’imbottitura nel
bordo del seggiolino-auto;
• posizionare i due coperchi delle guide laterali per la cintura
dell’auto con le fessure rivolte all’interno del seggiolino-
auto e assicurarsi del corretto aggancio;
24 • Per calzare la fodera del poggiatesta partire dalle due alette
laterali e infine calzare la parte bassa (Fig. a);
• Far passare il cinturino nell’ asola della sacca (Fig. b) ed
inserirlo nello spartigambe (Fig. c).
25 • IMPORTANTE: il cinturino non deve essere
attorcigliato.
• Inserire le cinture nello schienale, come in figura (Fig. a).
Agganciare il cinturino di sicurezza dal davanti (Fig. b).
Agganciare gli spallacci dotati di velcro (Fig. c).
Numeri di serie
26• Primo Viaggio Tri-Fix K riporta sotto la parte anteriore della
seduta, informazioni relative a: nome del prodotto, data di
produzione e numerazione seriale dello stesso.
27• Primo Viaggio Tri-Fix K riporta sotto la parte posteriore della
seduta l’ etichetta di omologazione.
28• Data di produzione del cinturino.
Questi elementi sono utili al consumatore nel caso in cui il
prodotto dovesse presentare delle problematiche.
Pulizia del prodotto
• Il vostro prodotto necessita un minimo di manutenzione.
Le operazioni di pulizia e manutenzione devono essere
effettuate solo da adulti.
• Si raccomanda di tenere pulite tutte le parti in movimento.
• Periodicamente pulire le parti in plastica con un panno
umido, non usare solventi o altri prodotti simili.
• Spazzolare le parti in tessuto per allontanare la polvere.
• Non pulire il dispositivo di assorbimento d’urto in
polistirolo con solventi o altri prodotti simili.
• Proteggere il prodotto da agenti atmosferici, acqua,
pioggia o neve; l’esposizione continua e prolungata al sole
potrebbe causare cambiamenti di colore in molti materiali.
• Conservare il prodotto in un posto asciutto.
Come leggere l’etichetta di
omologazione
In questo paragrafo vi spieghiamo come leggere l’etichetta
di omologazione (etichetta arancione).
• L’etichetta è doppia perchè questo seggiolino-auto è
omologato per essere fissato in auto in due modi:
• cintura a tre punti statica o con avvolgitore, (la scritta
UNIVERSAL indica la compatibilità del seggiolino-auto su
veicoli dotati di questo tipo di cintura)
• sistemi di aggancio ISOFIX (la scritta SEMI-UNIVERSAL classe
E indica la compatibilità del seggiolino-auto con veicoli
equipaggiati con questo sistema)
• In alto all’etichetta c’è il marchio dell’azienda produttrice e
il nome del prodotto.
• La lettera E in un cerchio: indica il marchio di
omologazione Europea e il numero definisce il paese che
ha rilasciato l’omologazione (1: Germania, 2: Francia, 3:
Italia, 4: Paesi Bassi, 11: Gran Bretagna e 24: Irlanda).
• Numero di omologazione: se inizia con 04 vuol dire che è
il quarto emendamento (quello attualmente in vigore) del

13
regolamento R44.
• Normativa di riferimento: ECE R44/04.
• Numero progressivo di produzione: personalizza ogni
seggiolino, dal rilascio dell’omologazione ognuno è
contraddistinto dal proprio numero.
PEG-PÉREGO S.p.A.
Peg-Pérego S.p.A. è certificata ISO 9001. La
certificazione offre ai clienti e ai consumatori
la garanzia di una trasparenza e fiducia nel
modo di lavorare dell’impresa.
Peg Pérego potrà apportare in qualunque
momento modifiche ai modelli descritti in
questa pubblicazione, per ragioni di natura tecnica o
commerciale.Peg Pérego è a disposizione dei suoi
Consumatori per soddisfare al meglio ogni loro esigenza.
Per questo, conoscere il parere dei ns. Clienti, è per noi
estremamente importante e prezioso. Le saremo quindi
molto grati se, dopo aver utilizzato un ns. prodotto, vorrà
compilare il QUESTIONARIO SODDISFAZIONE
CONSUMATORE, segnalando eventuali osservazioni o
suggerimenti, che troverà nel nostro sito internet:
www.pegperego.com
Servizio assistenza Peg-Pérego
Se fortuitamente parti del modello vengono perse o
danneggiate, usare solo pezzi di ricambio originali Peg
Pérego. Per eventuali riparazioni, sostituzioni, informazioni
sui prodotti, vendita di ricambi originali e accessori,
contatta il Servizio Assistenza Peg Pérego indicando,
qualora fosse presente, il numero seriale del prodotto.
tel. 0039/039/60.88.213
numero verde: 800/147.414 (contattabile da rete fissa)
sito internet www.pegperego.com
14
• “Universal” category.
• The «Primo Viaggio Tri-Fix K» car
safety seat is attached to the car
using a three-point seat belt.
EN_English
Primo Viaggio
Tri-Fix K
Primo Viaggio
Tri-Fix K
+
adjustable
base
Primo Viaggio
Tri-Fix K
+
isofix
base
• “Universal” category.
• The «Adjustable Base» is installed in
the car using the three-point seat
belt and remains in the car ready
for use.
• The «Primo Viaggio Tri-Fix K»
safety seat attaches to the
«Adjustable Base» and is secured
with the car seat belt.
• See the «Adjustable Base»
instruction manual for the car
installation procedure.
• “Semi-Universal” category class E.
• The «Isofix Base» with Isofix fixing
system is installed in the car
using the Isofix attachments
located between the car seat and
backrest.
• The «Primo Viaggio Tri-Fix K» car
safety seat attaches to the base.
• See the «Isofix Base» instruction
manual for the car installation
procedure.

15
Thank you for choosing a Peg-Pérego
product.
Product characteristics
• The «Primo Viaggio Tri-Fix K» group 0+ car safety seat has
been subjected to all safety tests and is approved under
European standard ECE R44/04, for children of weight from
0 to 13 kg (0 to 12-14 months).
• IMPORTANT: «Primo Viaggio Tri-Fix K», group
0+, must be installed facing opposite to the normal
forward movement of the car, on seats without
airbags. Do not install “Primo Viaggio Tri-Fix K” on
seats that face backwards or sideways.
• «Primo Viaggio Tri-Fix K» has an “Adjustable Side Impact
Protection System”: this offers improved protection against
side impacts with the “simultaneous system” for headrest-
harness adjustment.
• «Primo Viaggio Tri-Fix K» is approved for installation in
cars without a base support or with two types of base as
required (the use of a seat base offers improved safety):
«Adjustable Base» or «Isofix Base» (check that the vehicle is
fitted with the Isofix system -a list of car models fitted with
the system is provided with the product).
WARNING
• Read the instructions carefully before use and keep
them in the holder provided for future reference.
Failure to closely follow the installation instructions
for the car safety seat will put your child at risk.
• Never leave the child unattended.
• Always use the restraint system.
• The assembly and installation operations must be
conducted by adults.
• Avoid inserting fingers into the mechanisms.
• Install this group 0+ car safety seat facing opposite to the
normal forward movement of the vehicle.
• Death or serious injury can result if this car safety seat is
installed on seats with airbags.
• Eliminate danger by disabling airbags surrounding the
position of the car safety seat.
• In the case of rotating or movable seats it is important
to install this safety seat facing opposite to the normal
forward movement of the vehicle.
• When travelling take special care to make sure that
luggage or other objects do not injure the child in the
safety seat in the case of accidents.
• Do not use installation methods different from those indicated.
This would result in the risk of detachment from the seat.
• Car safety seat, group 0+, “Universal” approved under
European standard ECE R44/04 for children of weight from
0 to 13 kg (0 to 12/14 months). Suitable for installation on
the majority of vehicle seats, but not all.
• Group 0+ child car seat with class E semi-universal Isofix base.
• The car safety seat can be correctly installed if the vehicle’s
use and maintenance manual indicates compatibility with
“Universal” group 0+ restraint systems.
• This safety seat is classed as “Universal” in compliance with
stricter approval criteria than previous models that do not
have approval labels.
• The safety seat can only be used in approved vehicles, fitted
with static or inertia-reel three-point seat belts, approved
under regulation UN/ECE no. 16 or equivalent standards. It
must not be used with two-point or lap seat belts.
• To install the car safety seat, pass the three-point seat belt
through the slots in the safety seat indicated with light
blue markings. Do not use installation methods different
from those indicated. This would result in the risk of
detachment from the seat.
• Ensure that the three-point car seat belt fixing the safety
seat is always taut and not twisted. It should be replaced in
the case of heavy stress as a result of an accident.
• Never remove the child from the seat while the vehicle is
in motion.
• Make sure that the safety seat is protected from any mobile
parts of the car seat or doors.
• To avoid the risk of falling always use the safety seat harness
even for transport outside the vehicle. Adjust the height and
tension of the straps ensuring that they are snug to the child’s
EN_English

16
body without constricting him/her too much. Check that the
harness is not twisted and that the child does not release it.
• The safety seat is not a substitute for a cot and if the child
needs to sleep it is important to lie him/her down.
• Do not leave the car safety seat in the car exposed to the sun.
Some parts might heat up and be harmful to the delicate skin
of the child -check before placing the child in the seat.
• Do not use the safety seat without its fabric covering, which
cannot be replaced with one not approved by the manufacturer
since it is an integral part of the safety seat and the safety system.
• If in doubt refer to the manufacturer or retailer of the safety seat.
• Do not remove the adhesive and stitched labels since
this might make the product non compliant with legal
requirements.
• Do not use the safety seat if it has signs of breakage or
missing parts, is second hand, or if it has been subjected
to violent stress in an accident, because it might have
suffered extremely dangerous structural damage.
• Do not modify the product.
• For any repairs, replacement parts and information about
the product, contact the after-sales assistance service.
Contact information is provided on the last page of this
manual.
• Do not use this car safety seat after five years from the
date of production indicated on the structure. The natural
ageing of the materials may mean that it is no longer
compliant with standards.
• The use of the safety seat for premature infants born at
less than 37 weeks could cause respiration problems for
the infant seated in the safety seat. It is advisable to seek
medical advice before leaving the hospital.
• Do not use accessories not approved by the manufacturer
or by the competent authorities.
WARNING: FOR USE AS A RECLINER.
• Do not use the reclined cradle once your child can sit
unaided.
• This reclined cradle is not intended for prolonged
periods of sleeping.
• It is dangerous to use this reclined cradle on an
elevated surface, e.g. a table.
Instructions for use
1• «Primo Viaggio Tri-Fix K» is provided with the Ganciomatic
System for in-car attachment and detachment from an
«Isofix Base» or «Adjustable Base» and outside the vehicle to
Peg-Pérego strollers and chassis. To attach «Primo Viaggio
Tri-Fix K» (to an «Isofix Base», «Adjustable Base«, or Peg-Pérego
stroller or chassis) align it with the attachment points and
push down with both hands until it clicks into place.
2• To release «Primo Viaggio Tri-Fix K» (from an «Isofix Base»,
«Adjustable Base«, or Peg-Pérego stroller or chassis) raise
the handle to the transport position, push the lever on the
backrest upwards and at the same time raise the safety seat.
3• To engage the safety harness, put the two shoulder straps
on and insert them into the buckle of the crotch strap until
they click into place.
4• To release the safety harness press the red button on the
crotch strap buckle.
5• To slacken the harness, insert a finger into the seat slot (fig. a),
press the metal button and at the same time pull the shoulder
straps upwards with the other hand (fig. b).
6• To tighten the shoulder straps on the child, pull the central
adjustment strap towards you as shown in the figure,
taking care not to over-tighten the straps and leaving
minimal room to manoeuvre.
7• The shoulder straps of the safety harness and the “Side
Impact Protection” headrest can be adjusted simultaneously
to 5 different heights so as to follow the growth of the
child. To adjust the height, press the rear height adjustment
button (on the safety seat backrest) and at the same time
raise or lower to the required position, ensuring that it clicks
into place. Slacken the shoulder straps before adjusting the
height of the safety harness and the headrest.
8• The correct position of the headrest is defined by the correct
position of the shoulder straps. The child’s shoulders must
be just above the point of passage of the shoulder straps.
9• The seat is equipped with an anatomic padded cushion for
newborns, to be removed when the child is older.
10• The safety seat handle has four fixed positions. To rotate it press
the two round buttons on the handle and simultaneously
move it to the required angle. Ensure it clicks into position.
• Position A: the in-car position; Position B: the position for
17
transport by hand and for attachment to a base, stroller or
chassis; Position C: allows the safety seat to rock; Position D:
stops the safety seat from rocking.
11• To fit the hood, insert the hood attachments into the slots
on the safety seat and arrange the rear part of the hood
behind the backrest.
12• The hood has two positions. To raise or lower the hood push
it back or pull it forward. To remove the hood, press the
buttons on its attachment points and at the same time lift it
upwards.
• IMPORTANT: the hood must not be used to lift the
safety seat because it might detach.
Instructions for in-car use
13• Fit the car safety seat with the child on the car seat,
remembering to secure the child with the safety harness.
• The correct position of the safety seat in the car is parallel
with the ground, and so if necessary used rolled towels
under the safety seat to adjust the position.
14• Insert the webbing of the car seat belt into the two lateral
guides on the safety seat, ensuring that it is taut, and engage
the buckle of the car seat belt as shown in the figure.
15• Take hold of the car seat belt again and pass it behind the
backrest of the safety seat, inserting it into the rear guide
as shown in the figure.
16• In the car the handle must be fully lowered forward towards
the car seat backrest as shown in the figure. The correct
forward position is reached when it clicks into position. Check
that the seat belt is taut and locked to ensure adequate safety.
Removability
To remove the lining of the Primo Viaggio Tri-Fix K car seat:
• remove the hood for added comfort:
• Press the metal button positioned on the centre of the seat
to stretch the straps of the safety strap;
• press the red button on the leg divider to release the safety
strap.
17• remove the shoulder straps (Fig. a);
• from the front, remove the straps from the backrest (Fig. b);
18• Open the strap (point 4).
To remove the strap, simply slip it through the opening in
the bag, as shown in the figure.
19• slide on the headrest cover from the bottom first and then,
carefully, from the two side tabs;
BE CAREFUL NOT TO BREAK POLYSTYRENE (EPS)
PARTS
20• remove the four installation tabs of the padding from the
edge of the car seat;
• remove the two covers of the lateral guides for the belt of
the car;
21• remove the padding in sequence, as shown.
Padding cleaning instructions
• Brush the fabric parts to remove dust and hand wash at a
maximum temperature of 30° without wringing.
• Do not use chlorine bleach.
• Do not iron.
• Do not dry clean.
• Do not remove stains with solvents and do not tumble dry.
Lining
• To replace the lining of the Primo Viaggio Tri-Fix K car seat:
22• slide the padding on in sequence, as shown: — slide the
sack on from the top — first put the lateral tabs of the
headrest carefully _ then slide it into the bottom of the
headrest.
23• insert the four installation tabs of the padding from the
edge of the car seat;
• place the two covers of the lateral guides for the belt of
the car with the slots facing the inside of the car seat and
make sure that it is attached correctly;
24• To slide on the headrest cover from the two lateral tabs
and slide on the bottom (Fig. a);
• Slip the strap through the opening in the bag (Fig. b) and
insert it into the leg divider (Fig. c).
25• IMPORTANT: the strap must not be twisted.
• Insert the straps in the backrest, as shown (Fig. a) from the
front (Fig. b) Attach the shoulder straps with Velcro (Fig. c).

18
Serial numbers
26• The following information can be found under the front
of the seat of the Primo Viaggio Tri-Fix K : product name,
production date and serial number.
27• The approval label can be found under the back of the seat
of the Primo Viaggio Tri-Fix K.
28• Harness production date.
In the event of problems with the product, these details
will be of use to customers.
Product cleaning
• This product requires a small amount of maintenance.
Cleaning and maintenance must only be carried out by
adults.
•
It is advisable to keep all the moving parts clean.
• Clean the plastic parts periodically with a damp cloth. Do
not use solvents or similar substances.
• Brush the fabric parts to remove dust.
• Do not clean the polystyrene shock absorbing device with
solvents or other similar products.
• Protect the product from atmospheric agents: humidity,
rain or snow. Extended exposure to sunshine can cause
colour changes in many materials.
• Store the product in a dry environment.
How to read the approval label
This paragraph explains how to interpret the approval label
(orange label).
• The label is double because this car safety seat is approved
for two types of installation in cars:
• three-point seat belt with inertia reel (the term UNIVERSAL
indicates compatibility of the safety seat with vehicles
fitted with this type of belt);
• ISOFIX attachment systems (the term SEMI-UNIVERSAL
class E indicates compatibility of the safety seat with
vehicles fitted with this system).
• The top of the label displays the trademark of the
manufacturing company and the name of the product.
• The letter E in a circle indicates the European approval
mark and the number indicates the country that issued the
approval (1: Germany, 2: France, 3: Italy, 4: The Netherlands,
11: Great Britain, and 24: Ireland).
• Approval number: if it starts with 04 this indicates
the fourth amendment (the one currently in force) of
Regulation R44.
• Reference standard: ECE R44/04.
• Production serial number: on issue of approval each safety
seat is personalized with its own number.
PEG-PÉREGO S.p.A.
Peg-Pérego S.p.A. is an ISO 9001 certified
company. This certification is a guarantee for
customers and consumers of the transparency
and trustworthiness of the company’s procedures
and working methods. Peg Pérego can make
changes at any time to the models described in
this publication for technical or commercial reasons. Peg Pérego
is at the disposal of its customers and consumers to ensure that
all their demands and queries are fully satisfied. It is a key part of
our policy to ensure we are always aware of our customers‘ views
and requirements. We would therefore be very grateful if, after
using a Peg Pérego product, you take the time to fill in our
CUSTOMER SATISFACTION QUESTIONNAIRE, making a note of
any comments or suggestions you might have. You can find the
questionnaire on the Peg Pérego website: www.pegperego.com
Peg-Pérego after-sales service
If any parts of the item get lost or damaged, only
use genuine Peg Pérego spare parts. For any repairs,
replacements, information on the products and sales of
genuine spare parts and accessories, contact the Peg
Pérego Assistance Service and state the serial number of
the product, if present.
tel. 0039/039/60.88.213
fax 0039/039/33.09.992
website www.pegperego.com

19
• Catégorie « Universel ».
• Le siège-auto «Primo Viaggio
Tri-Fix K» se fixe dans la voiture à
l’aide de la ceinture de sécurité à
trois points.
FR_Français
Primo Viaggio
Tri-Fix K
Primo Viaggio
Tri-Fix K
+
adjustable
base
Primo Viaggio
Tri-Fix K
+
isofix
base
• Catégorie « Universel ».
• La base réglable «Adjustable Base»
se fixe dans la voiture à l’aide
de la ceinture de sécurité à trois
points. Elle reste installée dans le
véhicule, prête à l’emploi.
• Le siège-auto «Primo Viaggio Tri-
Fix K» se fixe à la base «Adjustable
Base» à l’aide des ceintures de
sécurité.
• Consulter le manuel
d’instructions de «Adjustable
Base» pour prendre connaissance
des instructions de montage
dans l’automobile.
• Catégorie « Semi-Universel »,
classe E.
• La base «Isofix Base», dotée du
système de fixation Isofix, est
fixée aux crochets Isofix de
l’automobile, situés entre l’assise
et le dossier.
• La siège-auto «Primo Viaggio Tri-
Fix K» s’accroche à la base.
• Consulter le manuel d’instructions
de «Isofix Base» pour prendre
connaissance des instructions de
montage dans l’automobile.

20
Merci d’avoir choisi un produit
Peg-Pérego.
Caractéristiques du produit
• Pour la sécurité de l’enfant en voiture, le siège-auto «Primo
Viaggio Tri-Fix K», groupe 0+, a été soumis à l’ensemble
des tests de sécurité et a été homologué conformément
à la norme européenne en vigueur ECE R44/04, pour des
enfants de 0 à 13 kg (0-12/14 mois).
• IMPORTANT : «Primo Viaggio Tri-Fix K», groupe 0+,
doit être fixé dans le sens contraire à la marche sur des
sièges passagers non équipés d’airbag. Ne pas installer
«Primo Viaggio Tri-Fix K» sur des sièges tournés dans
la direction opposée ou placés transversalement par
rapport au sens de marche habituel du véhicule.
• «Primo Viaggio Tri-Fix K» est équipé du système réglable
de protection contre les impacts latéraux Adjustable Side
Impact Protection System : protection accrue contre les
impacts latéraux grâce au « système simultané » de réglage
de l’appui-tête et des ceintures.
• «Primo Viaggio Tri-Fix K» est homologué pour une fixation
dans l’automobile sans base et, au choix, avec deux types
de base (l’utilisation de la base dans la voiture garantit
une plus grande sécurité) : «Adjustable Base» ou «Isofix
Base» (s’assurer que l’automobile puisse accueillir le
système Isofix ; consulter également la liste des modèles
d’automobile fournie avec le produit).
AVERTISSEMENT
• Avant l’utilisation, lire les instructions attentivement
et les conserver dans l’emplacement prévu à cet effet
pour toute référence ultérieure. Le non respect des
instructions d’installation du siège-auto peut faire
courir des risques à l’enfant.
• Ne jamais laisser un enfant sans surveillance.
• Toujours utiliser le système de retenue.
• Les opérations de montage et d’installation du véhicule
doivent être effectuées par des adultes.
• Éviter de mettre les doigts dans les mécanismes.
• Installer ce siège-auto du groupe 0+ dans l’automobile
dans le sens contraire à la marche.
• Ne pas installer ce siège-auto sur des sièges passagers
équipés d’airbag, en raison d’un danger de mort ou d’un
risque de lésions graves.
• L’airbag peut représenter un danger : désactiver les airbags
situés à proximité du siège-auto.
• Dans le cas de sièges pivotants ou positionnables, il
est recommandé d’installer ce siège-auto dans le sens
contraire à la marche.
• Prêter une attention particulière aux bagages ou autres
objets présents dans l’habitacle. En cas d’accident, ils
peuvent causer des lésions à l’enfant installé dans le siège-
auto.
• Ne pas utiliser de systèmes d’installation différents de ceux
indiqués ; le siège-auto pourrait se décrocher du siège.
• Siège-auto du groupe 0+, catégorie « semi-universel »,
classe e, homologué conformément à la norme
européenne ece r44/04 pour les enfants de 0 à 13 kg
(0-12/14 mois). Adapté à la majeure partie des sièges
d’automobiles, mais pas à tous.
• Siège-auto, groupe 0+, avec base isofix catégorie « semi-
universel », classe e.
• Le siège-auto peut être installé correctement si le manuel
d’utilisation et d’entretien du véhicule indique que ce
dernier est compatible avec des systèmes de retenue
« universels » du groupe 0+.
• Ce siège-auto a été classé dans la catégorie « universel »
selon des critères d’homologation plus sévères que ceux
utilisés pour des modèles précédents, qui ne disposent pas
de l’étiquette d’homologation.
• Le siège-auto ne doit être utilisé que sur des véhicules
approuvés, équipés de ceintures de sécurité à trois points,
statiques ou avec enrouleur, homologués conformément
au règlement un/ece n°16 ou toute norme équivalente.
L’utilisation de la ceinture de sécurité à deux points ou
ventrale n’est pas autorisée.
• Lors de l’installation du siège-auto, faire passer la ceinture
à trois points de l’automobile dans les passants du siège-
FR_Français
/
Благодарим вас за то, что вы выбрали продукцию компании Peg-Pеrego.
Инструкция для автокресла Peg-Perego Primo Viaggio i-Size
Инструкция для базы Peg-Perego Base i-Size
Содержание
1 Xарактеристики изделия
2 Предупреждение
3 Компоненты изделия
4 Использование с базой
5 Использование без базы
6 Снятие мягкой обивки
7 Серийные номера
8 Чистка и уход
9 Использование базы
Xарактеристики изделия
- Подходит для детей ростом от 40 до 83 см и весом максимум 13 кг.
- Не устанавливайте это автокресло на пассажирские сиденья со включенными подушками безопасности. Выключайте подушку безопасности, прежде чем установить автокресло. Использование этого автокресла на сиденьях со включенными подушками безопасности может стать причиной серьезных травм или смерти в случае аварии.
- Это система пассивной безопасности для детей «i-Size». Она одобрена согласно ECE 129 (i-Size) к эксплуатации на «i-Size-совместимых» сиденьях автомобиля в соответствии с указаниями производителей автомобилей, приведенными в руководстве пользователя автомобиля. В случае сомнений обратитесь к производителю системы пассивной безопасности для детей, к продавцу либо см. руководство пользователя автомобиля.
- Использование автомобильного кресла для детей, родившихся менее чем через 37 недель беременности, может затруднить дыхание для сидящего в нем новорожденного. Рекомендуем посоветоваться с врачом до выхода из роддома.
- Автокресло можно использовать только в одобренных автомобилях, оборудованных статическими трехточечными ремнями безопасности или трехточечными ремнями безопасности, оснащенными инерционной катушкой, и сертифицированных согласно стандарту UN/ECE R16 или аналогичным нормативам. Запрещается использовать автокресло с двухточечными или поясными ремнями безопасности.
- При использовании с базой Base i-Size эту систему пассивной безопасности можно устанавливать в автомобилях на позициях, утвержденных как сиденья с isofix (более подробные сведения см. в руководстве пользователя), в зависимости от категории и структуры детского автокресла.
- См. список моделей автомобилей и сидений, оснащенных системами креплений isofix (см. внутри), которые одобрены производителем системы пассивной безопасности. Обратитесь к производителю системы пассивной безопасности или продавцу, если у вас есть сомнения либо вам нужна дополнительная информация об установке базы Base i-Size в определенных автомобилях.
- Это автокресло выпускается с регулируемой системой защиты от бокового удара (Adjustable Side Impact Protection): она обеспечивает улучшенную защиту от боковых ударов с помощью «синхронной системы» регулирования ремней подголовника.
- Это автокресло одобрено для установки в автомобиле без базы или с базой Base i-Size.
Предупреждение
- Внимательно прочтите инструкции перед эксплуатацией, и храните их в специально отведенном месте для их последующего использования. Нетщательное соблюдение инструкций по установке автомобильного кресла может стать причиной опасности для вашего ребенка.
- Операции по сборке и установке изделия должны выполнять только взрослые.
- Всегда используйте автокресло при перевозке ребенка в автомобиле.Запрещается вынимать ребенка из автокресла в движущемся автомобиле.
- Ни в коем случае не оставляйте ребенка одного без надзора в машине, даже на короткое время. Температура внутри машины может быстро меняться и стать опасной для ребенка в автомобиле. сомнений обратитесь к производителю или продавцу этого автокресла.
- Устанавливайте автокресло в направлении, противоположном обычному направлению движения автомобиля.
- Устанавливайте автокресло только на сиденья, расположенные по направлению движения. Если в автомобиле имеются поворотные или переустанавливаемые сиденья, установите их по направлению движения.
- Не устанавливайте это автокресло на пассажирские сиденья со включенными подушками безопасности. Выключайте подушку безопасности, прежде чем установить автокресло. Использование этого автокресла на сиденьях со включенными подушками безопасности может стать причиной серьезных травм или смерти в случае аварии.
- Убедитесь, что детское автокресло не блокируется движущимися частями сиденья или дверью.
- Скрупулезно соблюдайте инструкции по установке; не применяйте другие методы установки, помимо рекомендованных, поскольку это может привести к отсоединению автокресла.
- При эксплуатации данного автокресла всегда используйте ремни безопасности.
- Отрегулируйте высоту и натяжение ремней, убедившись в том, что они прилегают к телу ребенка, но не слишком туго. Проверьте, не перекручен ли ремень безопасности сиденья, и не сможет ли ребенок его отстегнуть.
- Во избежание опасности падения всегда пристегивайте ремень безопасности автомобильного кресла даже для перевозки вне автомобиля.
- Автомобильное кресло не заменяет кроватку, если ребенку надо поспать, то очень важно уложить его.
- Не используйте детское автокресло в таких случаях: оно сломано, отсутствуют компоненты, изделие подвергалось значительным ударным нагрузкам в результате аварии, поскольку это может привести к повреждению его структуры — невидимому, но чрезвычайно опасному.
- Не используйте автомобильное кресло без тканой обивки. Обивку нельзя заменять другой, не утвержденной изготовителем кресла, так как она является неотъемлемой частью кресла и обеспечивает его безопасность.
- Не удаляйте и не меняйте белые полистироловые части под сиденьем, в спинке или защитных боковинах, поскольку они важны для обеспечения безопасности.
- Не оставляйте автомобильное кресло в автомобиле подсолнцем, так как некоторые детали могут перегреться и повредить нежную детскую кожу. Проверьте температуру кресла до того, как вы поместите в него ребенка.
- Не вносите изменения в изделие.
- Не отсоединяйте липкие и пришитые этикетки. Их отсутствие может вызвать несоответствие изделия требованиям стандарта.
- Для выполнения ремонта, замены деталей и получения справок об изделии вы можете обращаться в службу послепродажного обслуживания. Ее реквизиты приведены на последней странице этого руководства.
- Не используйте принадлежности, не одобренные изготовителем или компетентными властями.
- В случае приобретения изделия с рук удостоверьтесь, что это недавно выпущенная модель, продается с инструкциями, и все ее компоненты полностью функциональны. Устаревшее изделие может не соответствовать стандартам безопасности из-за старения материалов и обновления нормативных требований. При наличии сомнений обратитесь в центр клиентского обслуживания производителя изделия.
- Убедитесь, что в салоне автомобиля отсутствует багаж или незакрепленные предметы. В случае аварии они могут нанести травмы пассажирам и водителю.
- Это изделие нуждается только в минимальном уходе и очистке. Эти процедуры должны осуществлять взрослые.
- Рекомендуется содержать все движущиеся части в чистоте.
- Периодически очищайте пластиковые части влажной тканью. Не используйте растворители или подобные вещества.
- Не чистите полистироловое ударопоглощающее устройство растворителями или другими подобными продуктами.
- Почистите тканевые детали щеткой, чтобы удалить пыль. При стирке тканевых деталей соблюдайте инструкции по стирке на этикетке.
- Защищайте изделие от воздействия атмосферных осадков: влажности, дождя или снега. Длительное воздействие солнечных лучей может привести к изменению цвета многих материалов.
- Храните изделие в сухом месте.
- Предупреждение: использование кресла в качестве откидной люльки.
- Не пользуйтесь откидной люлькой, когда ваш ребенок уже может сидеть без посторонней помощи.
- Данная откидная люлька не предназначена для сна в течение продолжительных периодов времени.
- Опасно использовать эту откидную люльку на возвышенной поверхности, например, на столе.

Компоненты изделия
Рассмотрите содержимое упаковки и при отсутствии каких-либо компонентов обратитесь в сервисную службу.

В комплект детского автокресла входят:
a) Капюшон
b) Ручка
c) Tri-Stage Cushion
d) Подголовник
e) Кнопка высвобождения ремней безопасности
f) Ремешок регулировки натяжения ремней безопасности
g) 3-точечные ремни безопасности с плечевыми лямками
h) Рычаг для отсоединения от базы
i) Кнопка регулировки высоты подголовника
l) Отсек для руководства пользователя
m) Подголовник с покрытием из ударопоглощающего пенопропилена
n) Корпус с покрытием из ударопоглощающего пенополистирола (EPS)
Автокресло готово к использованию: сборка не требуется.
Использование с базой

Автокресло Primo Viaggio i-Size оснащено системой Ganciomatic System для крепления и снятия в автомобиле с базой Base i-Size. Для крепления автокресла Primo Viaggio i-Plus на базе Base i-Size совместите его с креплениями и нажмите вниз, пока автокресло не встанет на место со щелчком рис. a. Убедитесь, что красные/зеленые индикаторы в задней части базы находятся в зеленом положении рис. b

Нажмите две кнопки на ручке и поверните ее так, чтобы упереть в сиденье автомобиля.

Чтобы отсоединить автокресло Primo Viaggio i-Size от базы Base i-Size, поверните ручку в положение для переноски и нажмите рычаг на спинке вверх, одновременно подымая автокресло.

Ручка автокресла имеет четыре фиксированных положения. Чтобы повернуть ее, нажмите две кнопки на ручке и установите ее под нужным углом. Убедитесь, что она защелкнулась в нужном положении.

- Положение A: положение в автомашине.
- Положение В: положение для ручной транспортировки и для установки на основании, на коляске или на шасси.
- Положение С: это положение опоры.
- Положение D: препятствует качанию автокресла
Использование без базы

Важно! Автокресло следует устанавливать параллельно земле. При необходимости положите в угол сиденья автомобиля под автокресло свернутые полотенца. Устанавливая автокресло с сидящим в нем ребенком, не забудьте закрепить ребенка ремнями. Полностью опустите ручку автокресла (точка 4 — положение A).

Пропустите нижнюю часть ремня безопасности автомобиля в две направляющие на ручке автокресла рис. a и застегните его рис. b, убедившись в том, что он натянут, как показано на рисунке. Возьмите верхнюю часть ремня безопасности автомобиля и пропустите его за спинкой автокресла рис. c.

7 Вставьте ремень в заднюю направляющую рис. a. Затяните ремень безопасности автомобиля рис. b. Теперь автокресло установлено и закреплено.

Для расстегивания ремней нажмите на красную кнопку на пряжке лямки, проходящей между ногами, рис. а и извлеките ремни. Чтобы застегнуть ремни, установите язычки двух плечевых ремней в нужное положение и вставьте их в пряжку лямки, проходящей между ногами, до защелкивания на месте рис. b.

Чтобы ослабить ремни, вставьте палец в отверстие сиденья 1, удерживая нажатой металлическую кнопку, а другой рукой потяните ремни 2.

Чтобы натянуть ремни для плотного прилегания к телу ребенка, потяните центральный регулировочный ремень на себя. Внимание! Не затягивайте ремни слишком сильно, обязательно оставьте небольшое свободное пространство.

Важно! Зимой не следует пристегивать в автокресле ребенка в объемной тяжелой одежде или помещать одеяло между телом ребенка и ремнями. Это может стать причиной неправильного положения ремней безопасности и серьезных последствий в случае аварии. Используйте одеяло или одобренную Peg-Perego принадлежность для защиты ребенка от непогоды.

Ремни и подголовник с защитой от бокового удара можно одновременно регулировать по высоте в 5 различных положениях в соответствии с ростом ребенка. Для регулировки по высоте откройте дверь автомобиля, чтобы получить доступ к отверстию в спинке сиденья, и нажмите кнопку на задней части регулятора высоты (стрелка 1), одновременно поднимая либо опуская сиденье в нужное положение, удостоверившись, что оно правильно расположено и со щелчком встало на место (стрелка 2). Прежде чем регулировать высоту ремней и подголовника, ослабьте ремни.

Подголовник можно установить в 6 различных положений.

Ремни безопасности расположены на правильной высоте, если отверстия на спинке, в которые входят ремни, расположены на уровне плеч ребенка или немного ниже (зеленая зона), как показано на рисунке. Удостоверьтесь, что ремни не находятся в красной зоне.

Это автокресло оснащено состоящей из 3 отдельных подушек системой Tri Stage Cushion, которая делает его пригодным даже для самых крошечных малышей.
A: уменьшитель подголовника;
B: подушка-уменьшитель спинки;
C: подушка-уменьшитель для маленького сиденья.
Не используйте систему Tri Stage Cushion для детей весом более 9 кг.

Специальная форма корпуса поможет убаюкать вашегоребенка. Для нежного укачивания переведите ручку в положение переноски, как показано рис. a. Чтобы избежать наклонов автокресла и остановить покачивание, зафиксируйте ручку за спинкой автокресла рис. b.

Капюшон создает тень и уют для малыша. Расстегните молнию и опустите капюшон, чтобы закрыть большую область автокресла. Важно! Запрещается поднимать автокресло за капюшон, так как он может отсоединиться.

Чтобы снять капюшон: отстегните 5 кнопок по нижнему краю капюшона

Отстегните резинки за ручкой 1, поднимите капюшон и снимите его, потянув вверх 2.

Снятие мягкой обивки
Для снятия системы Tri Stage Cushion выполните такие действия: отстегните две кнопки рис. a, крепящие уменьшитель подголовника к подушке уменьшителя спинки, и вытяните ее рис. b. Снимите уменьшитель подголовника с подголовника автокресла, отстегнув две резинки с задней его части рис. c.

Наконец, отстегните резинки и снимите подушку уменьшитель для сиденья и снимите ее с ремня между ног.

Снимите плечевые накладки рис. a; откройте отсек на задней поверхности автокресла и вытяните ремни вперед рис. b.

Отстегните четыре резинки обивки под ручкой рис. a, вытяните ремень, проходящий между ног рис. b, и снимите обивку полностью.

Снимите обивку подголовника сначала снизу, а затем аккуратно с двух сторон.

Соблюдайте осторожность, чтобы не повредить детали из полистирола (EPP-EPS). Последовательно снимите мягкую обивку, как показано на рисунке.
Уход за подкладкой:
очищайте тканевые вставки от пыли
- При стирке точно следуйте инструкциям на этикетке, вшитой в чехол изделия
- не отбеливайте в хлорке
- не гладьте утюгом
- не чистите сухим способом в химчистке; не используйте растворитель для выведения пятен
- не сушите в сушилке для белья с вращающимся барабаном
Надевание обивки на автокресло
Выполните действия, показанные на рисунках с 20 по 24 в обратном порядке.
Серийные номера
На нижней поверхности автокресла расположена сертификационная табличка и еще одна наклейка, на которой указана следующая информация: название изделия, дата производства и серийный номер.

Дата производства указана на ремнях. В случае возникновения проблем с изделием эти сведения могут понадобиться покупателям.

Чистка изделия
- Ваше изделие нуждается в несложном уходе. Операции чистки и ухода должны выполнять только взрослые
- Рекомендуется содержать в чистоте все движущиеся части
- Периодически очищайте пластмассовые детали влажной тряпкой, не пользуйтесь растворителями и сходными веществами
- Почистите щеткой тканые части, чтобы удалить пыль
- Не чистите ударопоглощающее устройство из полистирола растворителями или сходными с ними веществами
- Защитите изделие от атмосферных осадков — воды, снега или дождя. Постоянная и продолжительнаяподверженность солнечным лучам может вызвать цветовые изменения многих материалов
- Храните изделие в сухом месте
PEG-PEREGO S.p.A.
В компании Peg-Pérego SpA внедрена система управления качеством, сертифицированная TÜV Italia Srl по стандарту ISO 9001.
Компания Peg-Perego имеет право вносить в любой момент изменения в модели, описанные в настоящем издании, по причинам технического или коммерческого характера Служба обслуживания Peg-Perego В случае утери или порчи аксессуаров, применяйте только фирменные запасные части производства компании Peg Pérego.
Для выполнения ремонта, замены запасных частей и получения информации об устройстве обращайтесь в службу послепродажного обслуживания Peg Pérego, сообщив, при его наличии, серийный номер продукта:
Срок службы: 3 года.
Использование базы
Совместимость изделия
• «Base i-Size» — это база для автокресла, используемая в сочетании с автокреслом Primo Viaggio i-Size и Viaggio FF105.
Характеристики изделия
• Основание «Base i-Size» следует устанавливать на сиденьях автомобиля, расположенных по направлению движения. Не устанавливайте основание «Base i-Size» на сиденьях с подушками безопасности или сиденьях, расположенных обратно или перпендикулярно направлению движения автомобиля.
• Использование основания «Base i-Size» гарантирует более высокий уровень безопасности и удобство установки детских автокресел Primo Viaggio i-Size и Viaggio FF105 Peg-Pérego.
Внимание!
- Перед эксплуатацией внимательно прочитайте инструкции и храните их в держателе для использования в дальнейшем. Несоблюдение инструкций при установке автокресла может быть опасным для вашего ребенка.
- Эта база является системой пассивной безопасности для маленьких детей «i-Size». Она сертифицирована в соответствии с требованиями стандарта № 129 и пригодна для «i-Size-совместимых» автокресел в соответствии с указаниями производителя автомобиля, приведенными в инструкции по эксплуатации и техническому обслуживанию автомобиля.
- Не устанавливайте эту базу на пассажирские сиденья со включенными подушками безопасности. Выключайте подушку безопасности, прежде чем установить базу. Использование этой базы на сиденьях со включенными подушками безопасности может стать причиной серьезных травм или смерти в случае аварии.
- Базу Base i-Size можно устанавливать в автомобилях на позициях, утвержденных как сиденья с isofix (более подробные сведения см. в инструкции по эксплуатации), в зависимости от категории и размера детского автокресла.
- См. список моделей автомобилей и сидений, оснащенных системами креплений isofix (см. внутри), которые одобрены производителем системы пассивной безопасности.
- Обратитесь к производителю системы пассивной безопасности или продавцу, если у вас есть сомнения либо вам нужна дополнительная информация об установке базы Base i-Size в определенных автомобилях.
- Для получения дополнительных сведений свяжитесь с отделом по работе с покупателями PegPerego по адресу assistenza@pegperego.com.
- Ни в коем случае не оставляйте ребенка одного без надзора в машине, даже на короткое время. Температура внутри машины может быстро меняться и стать опасной для ребенка в автомобиле. сомнений обратитесь к производителю или продавцу этого автокресла.
- Не используйте детское автокресло в таких случаях: оно сломано, отсутствуют компоненты, изделие подвергалось значительным ударным нагрузкам в результате аварии, поскольку это может привести к повреждению его структуры — невидимому, но чрезвычайно опасному.
- В случае приобретения изделия с рук удостоверьтесь, что это недавно выпущенная модель, продается с инструкциями, и все ее компоненты полностью функциональны. Устаревшее изделие может не соответствовать стандартам безопасности из-за старения материалов и обновления нормативных требований. При наличии сомнений обратитесь в центр клиентского обслуживания производителя изделия.
- Чтобы проверить совместимость автомобиля с детскими системами пассивной безопасности isofix, см. инструкции по эксплуатации и техническому обслуживанию вашего автомобиля.
- В случае каких-либо сомнений обратитесь к производителю или продавцу этого детского автокресла.
- Операции по сборке и установке изделия должны выполнять только взрослые.
- Не допускайте попадания пальцев в механизмы.
- Установка этого основания для автокресла на сиденья, оборудованные подушками безопасности, может привести к смерти или серьезным травмам.
- Ввиду риска смерти или серьезной травмы выключайте подушки безопасности в непосредственной близости к сиденью, на которое устанавливается автокресло.
- При поездках уделяйте особое внимание размещению багажа и других предметов в автомобиле, чтобы они не травмировали ребенка в автокресле в случае аварии.
- Не применяйте другие методы установки, отличающиеся от указанных, поскольку это может привести к отсоединению основания от сиденья.
- Не удаляйте наклейки, поскольку это может нарушить соответствие изделия требованиям стандартов.
- Не используйте это основание в таких случаях: оно сломано, отсутствуют компоненты, изделие приобретено из вторых рук, его происхождение неизвестно или оно подвергалось значительным ударным нагрузкам в результате аварии, поскольку это может привести к разрушению его структуры.
- Не вносите изменения в изделие.
- Для ремонта, замены компонентов и получения информации об изделии обращайтесь в службу послепродажного обслуживания. Соответствующая информация приведена на последней странице этого руководства.
Инструкции по использованию в автомобиле
Проверьте расположение креплений isofix и логотипов isofix или i-Size на сиденьях вашего автомобиля.

Выдвиньте крепления isofix на базе, нажимая на рычаг, как показано на рисунке, чтобы облегчить фиксацию основания.

Вытяните поддерживающую опору из-под базы и поверните наружу рис. a. Разместите базу на сиденье автомобиля, как показано на рисунке, совместив крепления isofix рис. b.

Нажмите на базу в направлении креплений isofix сиденья автомобиля, чтобы она со щелчком встала на место (проверьте, нет ли помех вблизи креплений, поскольку такие помехи могут стать причиной неисправности креплений).

Важно! Два индикатора по бокам базы Base i-Size сменят цвет с красного на зеленый, указывая, что база подсоединена правильно.
Важно! По завершении процедуры попробуйте подвигать сиденье, чтобы убедиться в том, что крепления isofix правильно сцеплены с разъемами.
Потяните рукоятку на базе и придвиньте базу как можно плотнее к сиденью автомобиля. Важно! Вы можете убедиться в том, что база установлена правильно, ориентируясь на индикатор возле зеленой ручки, который также имеет зеленый цвет, если установка правильная, и красный — если база установлена неправильно; в последнем случае требуется повторить процедуру установки, пока индикатор не станет зеленым.

Отрегулируйте высоту поддерживающей опоры, нажимая рычаг на основании опоры, пока она не коснется пола в салоне автомобиля (важно, чтобы опора стояла на полу автомобиля, даже если при этом база будет немного приподнята над сиденьем автомобиля). После выполнения этих инструкций база «Base i-Size» в автомобиле готова к эксплуатации. При наличии отсеков для хранения в полу автомобиля в том месте, куда упирается опора базы, откройте крышку отсека и уприте опору в основание отсека.

Установка на основание автокресла Primo Viaggio i-Size
Посадите ребенка в автокресло, не забыв застегнуть ремни безопасности. Подымите кресло за ручку (в направлении, противоположном обычному направлению движения автомобиля) и закрепите его на основании, обеими руками нажимая на кресло, чтобы оно со щелчком встало на место. Важно! Два индикатора в передней части базы сменят цвет с красного на зеленый, указывая, что она подсоединена правильно. Важно! По завершении процедуры попробуйте подвигать автокресло, чтобы убедиться в том, что крепления isofix правильно сцеплены с разъемами.

При установке в автомобиле ручка всегда должна быть полностью повернута вперед, близко к спинке сиденья автомобиля, как показано на рисунке. Нажмите две кнопки на ручке, поворачивая ее в нужное положение относительно сиденья, как показано на рисунке, пока ручка со щелчком не зафиксируется в нужной позиции.

Чтобы отсоединить автокресло от базы, поверните ручку в положение для переноски и нажмите рычаг на спинке вверх, одновременно подымая автокресло. Установка на основание автокресла Viaggio FF105

Закрепите Viaggio FF105 в положении лицом вперед, установив его на основание I-Size Base на точки крепления, и нажмите до щелчка рис. a. Убедитесь, что красные/зеленые индикаторы около ножек базы находятся в зеленом положении рис. b.

Чтобы отсоединить Viaggio FF105 от основания i-Size Base, потяните за рычаг, который находится спереди под сиденьем, и одновременно поднимите автокресло.

Чтобы снять Base i-Size с сиденья автомобиля
Чтобы снять базу с сиденья автомобиля, отсоедините крепления isofix от разъемов автомобиля, подняв ручку на базе рис. a и потянув базу вперед в направлении движения автомобиля рис. b. Когда появятся боковые рычаги, отцепите кресло, как показано на рисунке рис. c.

Потяните за ручку и задвиньте крепления обратно в базу рис. c. Поверните поддерживающую опору и задвиньте ее в корпус базы рис. d.

Серийные номера
Название изделия Base i-Size, дата изготовления и серийный номер находятся на основании, на подставке для ног рис. a. Сертификационная табличка базы i-Size расположена в верхней части базы рис. b» Эту информацию следует указывать в любых претензиях.

Чистка и уход
- Ваше изделие нуждается в несложном уходе. Операции чистки и ухода должны выполнять только взрослые
- Периодически очищайте пластмассовые детали влажной тряпкой, не пользуйтесь растворителями и сходными веществами
- Защитите изделие от атмосферных осадков — воды, снега или дождя. Постоянная и продолжительная подверженность солнечным лучам может вызвать цветовые изменения многих материалов
- Храните изделие в сухом месте
ребенок может самостоятельно сидеть.
Инструкция по эксплуатации
1• Кресло «Primo Viaggio Tri-Fix ISIP» оборудовано системой
Ganciomatic, позволяющей прикреплять и отсоединять
его в автомобиле от оснований Isofix Basе или
«Adjustable Base», и вне автомобиля — от прогулочных
колясок или шасси Peg-Perego. Для крепления «Primo
Viaggio Tri-Fix ISIP» (к основаниям «Isofix Base», «Adjustable
Base», прогулочным коляскам или шасси Peg-Perego)
установите кресло в соответствии с креплениями и
сместите его вниз двумя руками до щелчка.
2• Для отсоединения «Primo Viaggio Tri-Fix ISIP» (от
оснований «Isofix Base», «Adjustable Base», прогулочных
колясок или шасси Peg-Perego) необходимо перевести
ручку в транспортное положение, сместить рычаг на
спинке вверх и одновременно поднять кресло.
3• Для крепления ремня безопасности наложите две лямки
друг на друга и вставьте их в пряжку лямки, проходящей
между ногами, до щелчка.
4• Для отсоединения ремня безопасности нажмите
красную кнопку на пряжке лямки, проходящей между
ногами.
5• Для изменения высоты ремня: расстегните ремень
с задней стороны (рис. а) и извлеките бретельки
из отверстий; установите их с передней стороны в
отверстие, соответствующее росту ребенка (рис. b).
6• Чтобы ослабить натяжение ремня, вставьте палец в
петлю сиденья (рис. а), нажмите металлическую кнопку и
одновременно с этим другой рукой сместите бретельки
вверх (рис. b).
Чтобы ремень плотно прилегал к ребенку, потяните на
себя ремень (рис. с), обращая внимание на то, чтобы не
затягивать его слишком туго, оставляя небольшой зазор.
7• Кресло имеет три отверстия для регулировки высоты
ремня, их можно выбирать в зависимости от роста
ребенка. Ремень не должен находиться ни слишком
высоко, ни слишком низко относительно плеч ребенка.
Правильное положение — это когда плечи ребенка
расположены немного выше отверстия.
Кресло поставляется вместе с: вставкой-редуктором,
двумя защитными деталями для плеч и защитной
деталью для ног.
8• Для установки защитной прокладки для ног необходимо
сначала отсоединить ремень вставки для разделения
ног, находящийся под сиденьем.
9• и затем продеть его через подкладку.
1 0• Для установки двух защитных деталей для плеч
расстегните застежку-липучку так, как показано на
рисунке.
1 1• Для установки вставки-редуктора необходимо
пропустить ремни безопасности (1) и центральный
ремешок (2) в прорези редуктора. На рисунке В
показано правильное положение вставки-редуктора.
ВНИМАНИЕ: когда ребенок подрастет, снимите вставку-
редуктор.
1 2• Ручка кресла регулируется в четырех положениях;
для ее смещения нажмите две круглые кнопки,
расположенные на ручке, и одновременно
приведите ее в нужное вам положение, до щелчка
позиционирования.
• Положение А: это положение ручки, когда кресло
установлено в автомобиле; Положение В: это положение
ручки для ручной перевозки и для крепления кресла
к основанию, к прогулочным коляскам и к шасси;
Положение C: это положение, в котором кресло может
качаться; Положение D: это положение, в котором
кресло не может качаться.
1 3• Для установки капота вставьте его крепления в гнезда
автомобильного кресла и пропустите заднюю часть
капота за спинку.
1 4• Капот имеет две регулировки, для опускания или
подъема капота сместите его назад или вперед. Для
снятия капота нажмите на его крепления и вместе с
этим поднимите капот.
•
ВАЖНО: Нельзя использовать капот для
подъема автомобильного кресла, так как он может
отсоединиться.
Инструкции по эксплуатации в
автомобиле
Установите кресло с ребенком на сиденье автомобиля, и
83
 Loading…
![]()
|
IT |
Istruzioni d’uso |
|
EN |
Instructions for use |
|
FR |
Notice d’emploi |
|
DE |
Gebrauchsanleitung |
|
ES |
Instrucciones de uso |
|
PT |
Instruções para uso |
|
NL |
Gebruiksaanwijzing |
|
DK |
Brugsanvisning |
|
FI |
Käyttöohjeet |
|
CZ |
Návod na použití |
LF |
|
SK |
Návod na použitie |
|
|
HU Használati útmutató |
||
|
SL |
Navodila za uporabo |
|
|
RU |
Инструкции по пользованию |
|
|
TR |
Kullanım kılavuzu |
|
|
EL |
Οδηγιεσ χρησεωσ |
|
|
hgdRA |

 K
K
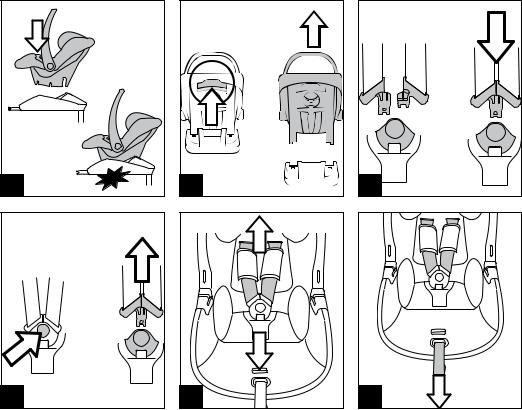
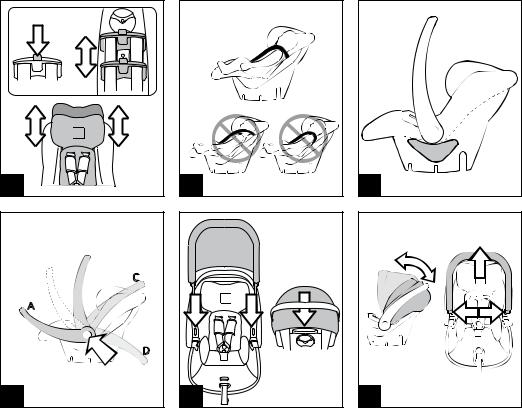

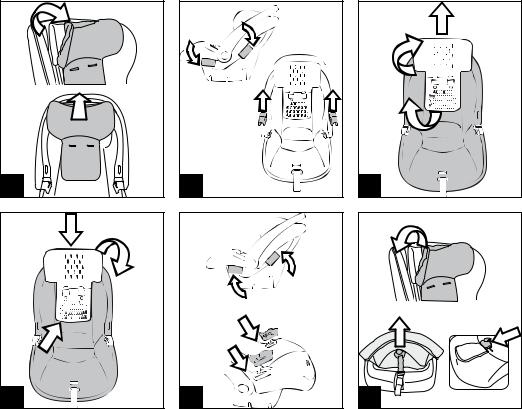
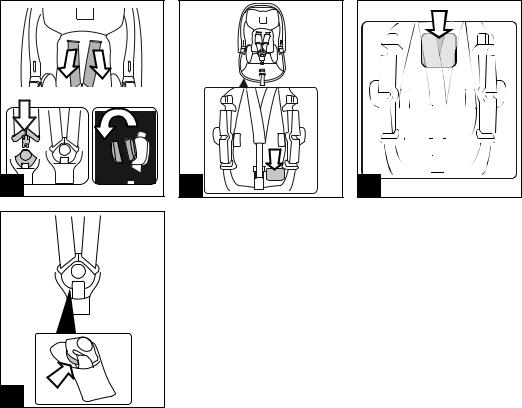
|
A |
||
|
B |
||
|
C |
||
|
25 |
26 |
27 |
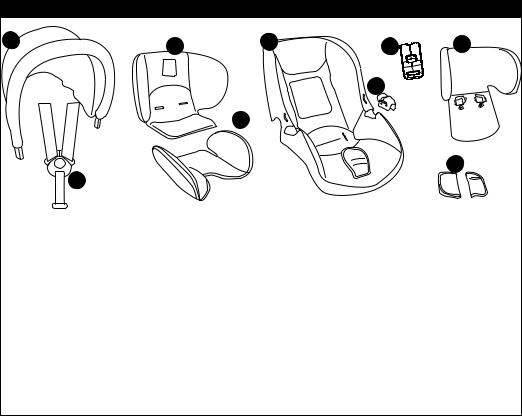
Primo Viaggio Tri-Fix K
5 
9
|
2 |
|||
|
1) BCAASI* |
|||
|
2) MUCI0084N |
|||
|
IT• |
Ricambi disponibili in piú colori da specificare nella richiesta. |
3) BRIASI* |
|
|
4) BSAKAP* |
|||
|
EN• |
Spare parts available in different colours to be specified when ordering. |
||
|
5) SPST6341DNF |
|||
|
FR• |
Pièces de rechange disponibles en plusieurs couleurs à spécifier dans la demande. |
||
|
6) SPST6341SNF |
|||
|
DE• |
Ersatzteile in mehr Farben vorhanden, die in der Anfrage spezifiziert werden müssen. |
||
|
7) SPST6850GL |
|||
|
ES• |
Repuestos disponibles en otros colores que se especificarán en el pedido. |
||
|
|
|||
|
PT• |
Peças de reposição disponíveis em cores alternativas a serem especificadas no pedido. |
||
|
9) BSPKAP* |
|||
|
NL• |
Reserveonderdelen verkrijgbaar in meerdere kleuren, bij bestelling te specificeren. |
||
|
DK• |
Reservedele kan leveres i flere farver som bør specificeres ved bestillingen. |
||
|
FI• |
Varaosia saatavana eri värisinä: ilmoita väri tilauksessa. |
||
|
CZ• |
U náhradních dílů, které jsou k dispozici ve více barvách, je nutné na objednávce specifikovat příslušnou barvu. |
||
|
SK• |
Pri náhradných dieloch, ktoré sú k dispozícii vo viacerých farbách, je potrebné pri objednávke špecifikovať želanú farbu. |
||
|
HU• A tartalék alkatrészek különböző színekben elérhetők, melyeket rendeléskor kell kiválasztani. |
|||
|
SL• |
Rezervni deli so na voljo v več barvah, ki jih je treba navesti pri naročilu. |
||
|
RU• Запчасти имеются различных цветов, необходимый указать в запросе. |
|||
|
TR• |
Siparişte belirtilen değişik renklerdeki yedek parçalari mevcuttur. |
||
|
EL• |
Ανταλλακτικά διαθέσιμα σε διάψορα χρώματα. Προσδιορίστε όταν παραγγείλετε. |
||
|
•r¨vRAHgy¢hVlj‘tVMtd•g‘HKm…lOjg¢¥FjP¬¢¬£hUk¬.Hg¨gF |
7
IT_Italiano
|
Primo Viaggio |
Primo Viaggio |
Primo Viaggio |
|
|
Tri-Fix K |
Tri-Fix K |
Tri-Fix K |
|
|
+ |
+ |
||
|
adjustable |
isofix |
||
|
base |
base |
||
|
• Categoria “Universale” . |
• Categoria “Universale” . |
• Categoria “Semi-Universale” classe E. |
|
• Il seggiolino auto «Primo Viaggio |
• La base Adjuistable Base viene |
• La base «Isofix Base» con sistema di |
|
Tri-Fix K» viene fissato in auto con |
fissata in auto con la cintura di |
fissaggio Isofix, viene fissata in auto |
|
la cintura di sicurezza a tre punti. |
sicurezza a tre punti e rimane in |
agli attacchi Isofix posizionati tra |
|
auto pronta per l’uso. |
la seduta del sedile e lo schienale |
|
|
• Il seggiolino-auto «Primo Viaggio |
dell’auto. |
|
|
Tri-Fix K» si aggancia alla |
• Il seggiolino auto «Primo Viaggio Tri- |
|
|
«Adjustable Base» e fissato con la |
Fix K» si aggancia alla base. |
|
|
cintura di sicurezza. |
• Consultare il manuale istruzioni |
|
|
• Consultare il manuale istruzioni di |
di «Isofix Base» per le istruzioni di |
|
|
Adjuistable Base per le istruzioni |
fissaggio in auto. |
|
|
di fissaggio in auto. |
8

IT_Italiano
Grazie per aver scelto un prodotto Peg-Pérego.
Caratteristiche prodotto
•«Primo Viaggio Tri-Fix K» seggiolino di sicurezza per auto, gruppo 0+, è stato sottoposto a tutti i test di sicurezza e omologato secondo la normativa Europea in vigore ECE R44/04, per bambini di peso da 0-13 kg (0-12/14 mesi).
• IMPORTANTE: «Primo Viaggio Tri-Fix K», gruppo 0+, deve essere installato in senso contrario a quello di marcia, su sedili sprovvisti di airbag. Non installare “Primo Viaggio Tri-Fix K” su sedili rivolti in direzione opposta o trasversalmente al senso comune di marcia del veicolo.
•«Primo Viaggio Tri-Fix K» ha “Adjustable Side Impact Protection System”: maggior protezione agli impatti laterali con il “sistema simultaneo” di regolazione poggiatestacinture.
•«Primo Viaggio Tri-Fix K» è omologato per essere fissato in auto senza base e a scelta con due tipi di base (l’uso della base in auto garantisce maggior sicurezza): «Adjustable Base» o «Isofix Base» (assicurarsi che l’autoveicolo sia predisposto al sistema Isofix; vedere anche l’elenco dei modelli delle auto fornito insieme al prodotto).
 AVVERTENZA
•Leggere attentamente le istruzioni prima dell’uso e conservarle nell’apposita sede per riutilizzarle in futuro. La mancata scrupolosa osservanza delle istruzioni di installazione del seggiolino-auto comporterebbe dei rischi al vostro bambino.
•Non lasciare mai il bambino incustodito.
•Utilizzare sempre il sistema di ritenuta.
•Le operazioni di montaggio e di installazione devono essere effettuate da adulti.
•Evitare di introdurre le dita nei meccanismi.
•Installare questo seggiolino-auto gruppo 0+ in auto in
9
senso contrario alla direzione di marcia.
•Causa pericolo di morte o lesioni gravi, non installare questo seggiolino auto su sedili passeggero dotati di airbag.
•Causa pericolo airbag, disattivare gli airbag circostanti la postazione del seggiolino auto.
•Nel caso di sedili girevoli o riposizionabili si raccomanda di installare questo seggiolino-auto in senso opposto al senso di marcia.
•In auto prestare particolare attenzione a bagagli o altri oggetti che possono causare lesioni al bambino nel seggiolino-auto in caso di incidente.
•Non utilizzare metodologie di installazione diverse da quelle indicate, pericolo di distacco dal sedile.
•Seggiolino-auto, gruppo 0+, categoria “Universale” omologato secondo la normativa Europea ECE R44/04 per bambini di peso da 0-13 kg (0-12/14 mesi). Adatto alla maggior parte dei sedili delle autovetture, ma non a tutti.
•Seggiolino auto, gruppo 0+, con base Isofix categoria Semiuniversale di classe E.
•Il seggiolino-auto può essere correttamente installato se nel manuale d’uso e manutenzione del veicolo è indicata la compatibilità con sistemi di ritenuta “Universali” di gruppo 0+.
•Questo seggiolino-auto è classificato “Universale” secondo criteri di omologazione più severi rispetto ai modelli precedenti che non dispongono dell’etichetta di omologazione.
•Il seggiolino-auto puó essere utilizzato solo su veicoli approvati, dotati di cintura a tre punti statica o con avvolgitore, omologati secondo il regolamento UN/ECE n°16 o normative equivalenti. Non é consentito usare la cintura a due punti o addominale.
•Per l’installazione del seggiolino-auto, far passare la cintura della vettura a tre punti nelle sedi apposite del
seggiolino contraddistinte dal colore azzurro. Non utilizzare metodologie di installazione diverse da quelle indicate, pericolo di distacco dal sedile.
•Assicurarsi che la cintura a tre punti del veicolo per fissare il seggiolino-auto sia sempre tesa e non attorcigliata, si raccomanda di sostituirla in caso di sollecitazioni eccessive

dovute ad un incidente.
•Se la vettura é in movimento, non togliere mai il bambino dal seggiolino-auto.
•Prestare attenzione che il seggiolino-auto rimanga bloccato da una parte mobile del sedile o da una portiera.
•Per evitare il rischio di caduta, utilizzare sempre la cintura di sicurezza del seggiolino-auto anche per il trasporto fuori dalla vettura. Regolare l’altezza e la tensione delle bretelle verificando che siano aderenti al corpo del bambino senza stringere troppo; verificare che la cintura di sicurezza non sia attorcigliata e che il bambino non la sganci da solo.
•Il seggiolino-auto non sostituisce il lettino, se il bambino ha bisogno di dormire è importante metterlo sdraiato.
•Non lasciare il seggiolino-auto nella vettura sotto l’esposizione del sole, alcune parti potrebbero essersi surriscaldate e nuocere alla pelle delicata del bambino, controllare prima di collocare il bambino.
•Non utilizzare il seggiolino-auto senza il rivestimento di tessuto, tale rivestimento non puó essere sostituito da uno non approvato dal costruttore in quanto costituisce parte integrante del seggiolino e della sicurezza.
•In caso di dubbi, rivolgersi al costruttore o al rivenditore di questo seggiolino-auto.
•Non staccare le etichette adesive e cucite; potrebbero rendere il prodotto non conforme ai sensi di norma.
•Non utilizzare il seggiolino-auto se presenta rotture o pezzi mancanti, se è di seconda mano, o se è stato sottoposto
a sollecitazioni violente in un incidente perchè potrebbe avere subito dei danni strutturali estremamente pericolosi.
•Non effettuare modifiche al prodotto.
•Per eventuali riparazioni, sostituzioni di pezzi e informazioni sul prodotto, contattare il servizio assistenza post-vendita. Le varie informazioni sono all’ultima pagina di questo manuale.
•Non utilizzare il seggiolino-auto dopo cinque anni dalla data di produzione indicata sulla scocca; a causa del naturale invecchiamento dei materiali potrebbe non essere più conforme ai sensi di norma.
•L’utilizzo del seggiolino-auto per neonati prematuri con meno di 37 settimane di gestazione, potrebbe comportare al neonato problemi di respirazione stando seduti nel
10
seggiolino-auto. É opportuno consultare il medico prima di lasciare l’ospedale.
•Non utilizzare accessori che non siano approvati dal costruttore o dalle competenti autorità.
 AVVERTENZA:
PER L’UTILIZZO COME SDRAIETTA
•Non utilizzare la sdraietta quando il bambino è in grado di stare seduto da solo.
•Questa sdraietta non è progettata per periodi di sonno prolungati.
•E ‘pericoloso utilizzare la sdraietta su una superficie elevata, ad esempio un tavolo.
Istruzioni d’uso
1• «Primo Viaggio Tri-Fix K» è dotato di Sistema Ganciomatic, per essere agganciato e sganciato in auto a «Isofix Base» o ad «Adjustable Base» e fuori dall’auto ai passeggini o ai
carrelli Peg-Pérego. Per agganciare «Primo Viaggio Tri-Fix K» (a «Isofix Base», a «Adjustable Base», ai passeggini o ai carrelli Peg-Pérego) posizionarlo in corrispondenza degli agganci e spingerlo verso il basso con entrambe le mani fino al click.
2• Per sganciare «Primo Viaggio Tri-Fix K» (da «Isofix Base», a «Adjustable Base», ai passeggini o ai carrelli Peg-Pérego), occorre portare il maniglione nella posizione di trasporto, spingere la leva posta sullo schienale verso l’alto e contemporaneamente sollevare il seggiolino.
3• Per agganciare il cinturino di sicurezza sovrapporre le due bretelle e inserirle nella fibbia del cinturino spartigambe fino al click.
4• Per sganciare il cinturino di sicurezza premere il pulsante rosso sulla fibbia del cinturino spartigambe.
5• Per allentare la tensione della cintura, infilare il dito nell’asola della seduta (fig. a), premere il bottone metallico e contemporaneamente con l’altra mano tirare in su le bretelle (fig. b).
6• Per far aderire le bretelle del cinturino di sicurezza al bambino, tirare verso di sé la cintura di regolazione centrale come in figura, facendo attenzione a non stringere troppo le bretelle al bambino, lasciando un minimo di
![]()
gioco.
7• Le bretelle del cinturino di sicurezza e il poggiatesta «Side Impact Protection» sono regolabili simultaneamente in altezza in 5 posizioni per seguire la crescita del bambino. Per regolare l’altezza, premere il pulsante posteriore del regolatore di altezza (posto sullo schienale del seggiolino) e contemporaneamente alzare o abbassare nella posizione desiderata, assicurandosi del giusto posizionamento dal click. Prima di regolare l’altezza del cinturino di sicurezza e del poggiatesta allentare la tensione delle bretelle.
8• La corretta regolazione del poggiatesta è dato dalla corretta posizione delle bretelle; le spalle del bambino devono essere appena sopra al punto di passaggio delle bretelle.
9• Il seggiolino viene fornito di un cuscino riduttore anatomico per il neonato, da togliere quando il bambino è più grande.
10• Il maniglione del seggiolino ha quattro regolazioni; per ruotarlo premere i due pulsanti rotondi posti sul maniglione e contemporaneamente posizionarlo nella posizione desiderata, fino a sentire il click di posizionamento.
•Posizione A: è la posizione del maniglione in auto; Posizione B: è la posizione del maniglione per il trasporto a mano e per l’aggancio alla base, ai passeggini e ai carrelli; Posizione C: è la posizione che permette al seggiolino di
dondolare; Posizione D: è la posizione che permette al seggiolino di non dondolare.
11• Per montare la capottina, inserire gli attacchi di questa nelle sedi del seggiolino e sistemare la parte posteriore della capottina dietro lo schienale.
12• La capottina ha due regoazioni, per abbassare o alzare la capottina, spingerla indietro o tirarla in avanti. Per togliere la capottina, premere sui pulsanti degli attacchi di questa e contemporaneamente alzarla.
• IMPORTANTE: La capottina non deve essere usata per sollevare il seggiolino, pericolo di distacco.
Istruzioni d’uso in auto
13• Sistemare il seggiolino-auto con il vostro bambino sul sedile, ricordandovi di assicurarlo con il cinturino di
sicurezza.
•Il seggiolino, per avere una corretta posizione in auto, deve essere parallelo al suolo; quindi se necessario, usare asciugamani arrotolati da posizionare sul sedile, sotto al seggiolino.
14• Infilare la cinghia della cintura di sicurezza dell’auto nelle due guide laterali del seggiolino, assicurandosi che sia ben tesa e agganciare la fibbia della cintura dell’auto al sedile come in figura.
15• Impugnare nuovamente la cintura di sicurezza dell’auto e farla passare dietro lo schienale del seggiolino-auto inserendola nella guida posteriore come in figura.
16• In auto il maniglione deve essere abbassato totalmente in avanti in prossimità dello schienale del sedile auto come in figura. Posizionare il maniglione in avanti assicurandosi del giusto posizionamento dal “click”. Verificare che la cintura risulti ben tesa e bloccata per offrire un’adeguata sicurezza.
Sfoderabilità
Per rimuovere il rivestimento del seggiolino auto Primo Viaggio Tri-Fix K:
•per maggiore comodità togliere la capottina.
•Premere il bottone metallico posto nel centro del seggiolino per allungare le bretelle del cinturino di sicurezza;
•premere il pulsante rosso sulla fibbia dello spartigambe per sganciare il cinturino di sicurezza.
17• rimuovere gli spallacci (Fig. a);
• sfilare le cinture dallo schienale dal davanti (Fig. b); 18• Aprire il cinturino (punto 4).
Per estrarre il cinturino, basta farlo passare dall’ asola della sacca, come in figura.
19• Sfilare la fodera del poggiatesta, prima dalla parte bassa e poi con cura, dalle due alette laterali;
ATTENZIONE A NON ROMPERE LE PARTI IN POLISTIROLO (EPS).
20• sfilare le quattro alette di fissaggio dell’imbottitura dal bordo del seggiolino-auto;
•rimuovere i due coperchi delle guide laterali per la cintura dell’auto;
21• sfilare l’imbottitura in sequenza, come in figura.
11

Manutenzione dell’imbottitura
•spazzolare le parti in tessuto per allontanare la polvere e lavare a mano a una temperatura massima di 30° non torcere;
•non candeggiare al cloro;
•non stirare;
•non lavare a secco;
•non smacchiare con solventi e non asciugare a mezzo di asciugabiancheria a tamburo rotativo.
Vestizione
• Per rivestire il seggiolino Primo Viaggio Tri-Fix K: 22• calzare l’imbottitura, in sequenza come in figura:
—calzare dall’alto la sacca
—inserire prima le alette laterali del poggiatesta con attenzione
_ poi farla passare nella parte bassa del poggiatesta.
23• inserire le quattro alette di fissaggio dell’imbottitura nel bordo del seggiolino-auto;
•posizionare i due coperchi delle guide laterali per la cintura dell’auto con le fessure rivolte all’interno del seggiolinoauto e assicurarsi del corretto aggancio;
24• Per calzare la fodera del poggiatesta partire dalle due alette laterali e infine calzare la parte bassa (Fig. a);
•Far passare il cinturino nell’ asola della sacca (Fig. b) ed inserirlo nello spartigambe (Fig. c).
25•  IMPORTANTE: il cinturino non deve essere attorcigliato.
•Inserire le cinture nello schienale, come in figura (Fig. a). Agganciare il cinturino di sicurezza dal davanti (Fig. b). Agganciare gli spallacci dotati di velcro (Fig. c).
Numeri di serie
26• Primo Viaggio Tri-Fix K riporta sotto la parte anteriore della seduta, informazioni relative a: nome del prodotto, data di produzione e numerazione seriale dello stesso.
27• Primo Viaggio Tri-Fix K riporta sotto la parte posteriore della
seduta l’ etichetta di omologazione. 28• Data di produzione del cinturino.
Questi elementi sono utili al consumatore nel caso in cui il prodotto dovesse presentare delle problematiche.
Pulizia del prodotto
•Il vostro prodotto necessita un minimo di manutenzione. Le operazioni di pulizia e manutenzione devono essere effettuate solo da adulti.
•Si raccomanda di tenere pulite tutte le parti in movimento.
•Periodicamente pulire le parti in plastica con un panno umido, non usare solventi o altri prodotti simili.
•Spazzolare le parti in tessuto per allontanare la polvere.
•Non pulire il dispositivo di assorbimento d’urto in polistirolo con solventi o altri prodotti simili.
•Proteggere il prodotto da agenti atmosferici, acqua, pioggia o neve; l’esposizione continua e prolungata al sole potrebbe causare cambiamenti di colore in molti materiali.
•Conservare il prodotto in un posto asciutto.
Come leggere l’etichetta di omologazione
In questo paragrafo vi spieghiamo come leggere l’etichetta di omologazione (etichetta arancione).
•L’etichetta è doppia perchè questo seggiolino-auto è omologato per essere fissato in auto in due modi:
•cintura a tre punti statica o con avvolgitore, (la scritta UNIVERSAL indica la compatibilità del seggiolino-auto su veicoli dotati di questo tipo di cintura)
•sistemi di aggancio ISOFIX (la scritta SEMI-UNIVERSAL classe E indica la compatibilità del seggiolino-auto con veicoli equipaggiati con questo sistema)
•In alto all’etichetta c’è il marchio dell’azienda produttrice e il nome del prodotto.
•La lettera E in un cerchio: indica il marchio di omologazione Europea e il numero definisce il paese che ha rilasciato l’omologazione (1: Germania, 2: Francia, 3: Italia, 4: Paesi Bassi, 11: Gran Bretagna e 24: Irlanda).
•Numero di omologazione: se inizia con 04 vuol dire che è il quarto emendamento (quello attualmente in vigore) del
12

regolamento R44.
•Normativa di riferimento: ECE R44/04.
•Numero progressivo di produzione: personalizza ogni seggiolino, dal rilascio dell’omologazione ognuno è contraddistinto dal proprio numero.
PEG-PÉREGO S.p.A.
Peg-Pérego S.p.A. è certificata ISO 9001. La certificazione offre ai clienti e ai consumatori la garanzia di una trasparenza e fiducia nel modo di lavorare dell’impresa.
Peg Pérego potrà apportare in qualunque momento modifiche ai modelli descritti in
questa pubblicazione, per ragioni di natura tecnica o commerciale.Peg Pérego è a disposizione dei suoi Consumatori per soddisfare al meglio ogni loro esigenza. Per questo, conoscere il parere dei ns. Clienti, è per noi estremamente importante e prezioso. Le saremo quindi molto grati se, dopo aver utilizzato un ns. prodotto, vorrà compilare il QUESTIONARIO SODDISFAZIONE CONSUMATORE, segnalando eventuali osservazioni o suggerimenti, che troverà nel nostro sito internet: www.pegperego.com
Servizio assistenza Peg-Pérego
Se fortuitamente parti del modello vengono perse o danneggiate, usare solo pezzi di ricambio originali Peg Pérego. Per eventuali riparazioni, sostituzioni, informazioni sui prodotti, vendita di ricambi originali e accessori, contatta il Servizio Assistenza Peg Pérego indicando, qualora fosse presente, il numero seriale del prodotto.
tel. 0039/039/60.88.213
numero verde: 800/147.414 (contattabile da rete fissa) fax 0039/039/33.09.992 e-mail assistenza@pegperego.it sito internet www.pegperego.com
13

EN_English
|
Primo Viaggio |
Primo Viaggio |
Primo Viaggio |
|
|
Tri-Fix K |
Tri-Fix K |
Tri-Fix K |
|
|
+ |
+ |
||
|
adjustable |
isofix |
||
|
base |
base |
||
|
• “Universal” category. |
• “Universal” category. |
• “Semi-Universal” category class E. |
|
• The «Primo Viaggio Tri-Fix K» car |
• The «Adjustable Base» is installed in |
• The «Isofix Base» with Isofix fixing |
|
safety seat is attached to the car |
the car using the three-point seat |
system is installed in the car |
|
using a three-point seat belt. |
belt and remains in the car ready |
using the Isofix attachments |
|
for use. |
located between the car seat and |
|
|
• The «Primo Viaggio Tri-Fix K» |
backrest. |
|
|
safety seat attaches to the |
• The «Primo Viaggio Tri-Fix K» car |
|
|
«Adjustable Base» and is secured |
safety seat attaches to the base. |
|
|
with the car seat belt. |
• See the «Isofix Base» instruction |
|
|
• See the «Adjustable Base» |
manual for the car installation |
|
|
instruction manual for the car |
procedure. |
|
|
installation procedure. |
14

EN_English
Thank you for choosing a Peg-Pérego product.
Product characteristics
•The «Primo Viaggio Tri-Fix K» group 0+ car safety seat has been subjected to all safety tests and is approved under European standard ECE R44/04, for children of weight from 0 to 13 kg (0 to 12-14 months).
• IMPORTANT: «Primo Viaggio Tri-Fix K», group
0+, must be installed facing opposite to the normal forward movement of the car, on seats without airbags. Do not install “Primo Viaggio Tri-Fix K” on seats that face backwards or sideways.
•«Primo Viaggio Tri-Fix K» has an “Adjustable Side Impact Protection System”: this offers improved protection against side impacts with the “simultaneous system” for headrestharness adjustment.
•«Primo Viaggio Tri-Fix K» is approved for installation in cars without a base support or with two types of base as required (the use of a seat base offers improved safety): «Adjustable Base» or «Isofix Base» (check that the vehicle is fitted with the Isofix system -a list of car models fitted with the system is provided with the product).
 WARNING
•Read the instructions carefully before use and keep them in the holder provided for future reference. Failure to closely follow the installation instructions for the car safety seat will put your child at risk.
•Never leave the child unattended.
•Always use the restraint system.
•The assembly and installation operations must be conducted by adults.
•Avoid inserting fingers into the mechanisms.
•Install this group 0+ car safety seat facing opposite to the normal forward movement of the vehicle.
•Death or serious injury can result if this car safety seat is
15
installed on seats with airbags.
•Eliminate danger by disabling airbags surrounding the position of the car safety seat.
•In the case of rotating or movable seats it is important to install this safety seat facing opposite to the normal forward movement of the vehicle.
•When travelling take special care to make sure that luggage or other objects do not injure the child in the safety seat in the case of accidents.
•Do not use installation methods different from those indicated. This would result in the risk of detachment from the seat.
•Car safety seat, group 0+, “Universal” approved under European standard ECE R44/04 for children of weight from 0 to 13 kg (0 to 12/14 months). Suitable for installation on the majority of vehicle seats, but not all.
•Group 0+ child car seat with class E semi-universal Isofix base.
•The car safety seat can be correctly installed if the vehicle’s use and maintenance manual indicates compatibility with “Universal” group 0+ restraint systems.
•This safety seat is classed as “Universal” in compliance with stricter approval criteria than previous models that do not have approval labels.
•The safety seat can only be used in approved vehicles, fitted with static or inertia-reel three-point seat belts, approved under regulation UN/ECE no. 16 or equivalent standards. It must not be used with two-point or lap seat belts.
•To install the car safety seat, pass the three-point seat belt through the slots in the safety seat indicated with light blue markings. Do not use installation methods different from those indicated. This would result in the risk of detachment from the seat.
•Ensure that the three-point car seat belt fixing the safety seat is always taut and not twisted. It should be replaced in the case of heavy stress as a result of an accident.
•Never remove the child from the seat while the vehicle is in motion.
•Make sure that the safety seat is protected from any mobile parts of the car seat or doors.
•To avoid the risk of falling always use the safety seat harness even for transport outside the vehicle. Adjust the height and tension of the straps ensuring that they are snug to the child’s

body without constricting him/her too much. Check that the harness is not twisted and that the child does not release it.
•The safety seat is not a substitute for a cot and if the child needs to sleep it is important to lie him/her down.
•Do not leave the car safety seat in the car exposed to the sun. Some parts might heat up and be harmful to the delicate skin of the child -check before placing the child in the seat.
•Do not use the safety seat without its fabric covering, which cannot be replaced with one not approved by the manufacturer since it is an integral part of the safety seat and the safety system.
•If in doubt refer to the manufacturer or retailer of the safety seat.
•Do not remove the adhesive and stitched labels since this might make the product non compliant with legal requirements.
•Do not use the safety seat if it has signs of breakage or missing parts, is second hand, or if it has been subjected to violent stress in an accident, because it might have suffered extremely dangerous structural damage.
•Do not modify the product.
•For any repairs, replacement parts and information about the product, contact the after-sales assistance service. Contact information is provided on the last page of this manual.
•Do not use this car safety seat after five years from the date of production indicated on the structure. The natural ageing of the materials may mean that it is no longer compliant with standards.
•The use of the safety seat for premature infants born at less than 37 weeks could cause respiration problems for the infant seated in the safety seat. It is advisable to seek medical advice before leaving the hospital.
•Do not use accessories not approved by the manufacturer or by the competent authorities.
 WARNING: FOR USE AS A RECLINER.
•Do not use the reclined cradle once your child can sit unaided.
•This reclined cradle is not intended for prolonged periods of sleeping.
•It is dangerous to use this reclined cradle on an elevated surface, e.g. a table.
Instructions for use
1• «Primo Viaggio Tri-Fix K» is provided with the Ganciomatic System for in-car attachment and detachment from an «Isofix Base» or «Adjustable Base» and outside the vehicle to Peg-Pérego strollers and chassis. To attach «Primo Viaggio Tri-Fix K» (to an «Isofix Base», «Adjustable Base», or Peg-Pérego stroller or chassis) align it with the attachment points and push down with both hands until it clicks into place.
2• To release «Primo Viaggio Tri-Fix K» (from an «Isofix Base», «Adjustable Base», or Peg-Pérego stroller or chassis) raise the handle to the transport position, push the lever on the backrest upwards and at the same time raise the safety seat.
3• To engage the safety harness, put the two shoulder straps on and insert them into the buckle of the crotch strap until they click into place.
4• To release the safety harness press the red button on the crotch strap buckle.
5• To slacken the harness, insert a finger into the seat slot (fig. a), press the metal button and at the same time pull the shoulder straps upwards with the other hand (fig. b).
6• To tighten the shoulder straps on the child, pull the central adjustment strap towards you as shown in the figure, taking care not to over-tighten the straps and leaving minimal room to manoeuvre.
7• The shoulder straps of the safety harness and the “Side Impact Protection” headrest can be adjusted simultaneously to 5 different heights so as to follow the growth of the child. To adjust the height, press the rear height adjustment button (on the safety seat backrest) and at the same time raise or lower to the required position, ensuring that it clicks into place. Slacken the shoulder straps before adjusting the height of the safety harness and the headrest.
8• The correct position of the headrest is defined by the correct position of the shoulder straps. The child’s shoulders must be just above the point of passage of the shoulder straps.
9• The seat is equipped with an anatomic padded cushion for newborns, to be removed when the child is older.
10• The safety seat handle has four fixed positions. To rotate it press the two round buttons on the handle and simultaneously move it to the required angle. Ensure it clicks into position.
• Position A: the in-car position; Position B: the position for
16
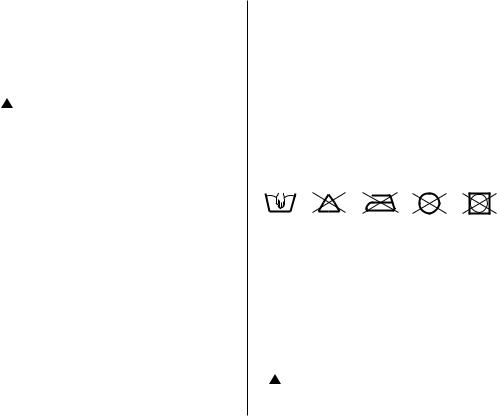
transport by hand and for attachment to a base, stroller or chassis; Position C: allows the safety seat to rock; Position D: stops the safety seat from rocking.
11• To fit the hood, insert the hood attachments into the slots on the safety seat and arrange the rear part of the hood behind the backrest.
12• The hood has two positions. To raise or lower the hood push it back or pull it forward. To remove the hood, press the buttons on its attachment points and at the same time lift it upwards.
•  IMPORTANT: the hood must not be used to lift the safety seat because it might detach.
Instructions for in-car use
13• Fit the car safety seat with the child on the car seat, remembering to secure the child with the safety harness.
•The correct position of the safety seat in the car is parallel with the ground, and so if necessary used rolled towels under the safety seat to adjust the position.
14• Insert the webbing of the car seat belt into the two lateral guides on the safety seat, ensuring that it is taut, and engage the buckle of the car seat belt as shown in the figure.
15• Take hold of the car seat belt again and pass it behind the backrest of the safety seat, inserting it into the rear guide as shown in the figure.
16• In the car the handle must be fully lowered forward towards the car seat backrest as shown in the figure. The correct forward position is reached when it clicks into position. Check that the seat belt is taut and locked to ensure adequate safety.
Removability
To remove the lining of the Primo Viaggio Tri-Fix K car seat:
•remove the hood for added comfort:
•Press the metal button positioned on the centre of the seat to stretch the straps of the safety strap;
•press the red button on the leg divider to release the safety strap.
17• remove the shoulder straps (Fig. a);
• from the front, remove the straps from the backrest (Fig. b); 18• Open the strap (point 4).
To remove the strap, simply slip it through the opening in
the bag, as shown in the figure.
19• slide on the headrest cover from the bottom first and then, carefully, from the two side tabs;
BE CAREFUL NOT TO BREAK POLYSTYRENE (EPS) PARTS
20• remove the four installation tabs of the padding from the edge of the car seat;
•remove the two covers of the lateral guides for the belt of the car;
21• remove the padding in sequence, as shown.
Padding cleaning instructions
•Brush the fabric parts to remove dust and hand wash at a maximum temperature of 30° without wringing.
•Do not use chlorine bleach.
•Do not iron.
•Do not dry clean.
•Do not remove stains with solvents and do not tumble dry.
Lining
•To replace the lining of the Primo Viaggio Tri-Fix K car seat: 22• slide the padding on in sequence, as shown: — slide the
sack on from the top — first put the lateral tabs of the headrest carefully _ then slide it into the bottom of the headrest.
23• insert the four installation tabs of the padding from the edge of the car seat;
•place the two covers of the lateral guides for the belt of the car with the slots facing the inside of the car seat and make sure that it is attached correctly;
24• To slide on the headrest cover from the two lateral tabs and slide on the bottom (Fig. a);
• Slip the strap through the opening in the bag (Fig. b) and insert it into the leg divider (Fig. c).
25•  IMPORTANT: the strap must not be twisted.
• Insert the straps in the backrest, as shown (Fig. a) from the front (Fig. b) Attach the shoulder straps with Velcro (Fig. c).
17

Serial numbers
26• The following information can be found under the front of the seat of the Primo Viaggio Tri-Fix K : product name, production date and serial number.
27• The approval label can be found under the back of the seat of the Primo Viaggio Tri-Fix K.
28• Harness production date.
In the event of problems with the product, these details will be of use to customers.
Product cleaning
•This product requires a small amount of maintenance. Cleaning and maintenance must only be carried out by adults.
•It is advisable to keep all the moving parts clean.
•Clean the plastic parts periodically with a damp cloth. Do not use solvents or similar substances.
•Brush the fabric parts to remove dust.
•Do not clean the polystyrene shock absorbing device with solvents or other similar products.
•Protect the product from atmospheric agents: humidity, rain or snow. Extended exposure to sunshine can cause colour changes in many materials.
•Store the product in a dry environment.
How to read the approval label
This paragraph explains how to interpret the approval label (orange label).
•The label is double because this car safety seat is approved for two types of installation in cars:
•three-point seat belt with inertia reel (the term UNIVERSAL indicates compatibility of the safety seat with vehicles fitted with this type of belt);
•ISOFIX attachment systems (the term SEMI-UNIVERSAL class E indicates compatibility of the safety seat with vehicles fitted with this system).
•The top of the label displays the trademark of the manufacturing company and the name of the product.
•The letter E in a circle indicates the European approval mark and the number indicates the country that issued the approval (1: Germany, 2: France, 3: Italy, 4: The Netherlands,
18
11: Great Britain, and 24: Ireland).
•Approval number: if it starts with 04 this indicates the fourth amendment (the one currently in force) of Regulation R44.
•Reference standard: ECE R44/04.
•Production serial number: on issue of approval each safety seat is personalized with its own number.
PEG-PÉREGO S.p.A.
Peg-Pérego S.p.A. is an ISO 9001 certified company. This certification is a guarantee for customers and consumers of the transparency and trustworthiness of the company’s procedures and working methods. Peg Pérego can make changes at any time to the models described in
this publication for technical or commercial reasons. Peg Pérego is at the disposal of its customers and consumers to ensure that all their demands and queries are fully satisfied. It is a key part of our policy to ensure we are always aware of our customers’ views and requirements. We would therefore be very grateful if, after using a Peg Pérego product, you take the time to fill in our CUSTOMER SATISFACTION QUESTIONNAIRE, making a note of any comments or suggestions you might have. You can find the questionnaire on the Peg Pérego website: www.pegperego.com
Peg-Pérego after-sales service
If any parts of the item get lost or damaged, only use genuine Peg Pérego spare parts. For any repairs,
replacements, information on the products and sales of genuine spare parts and accessories, contact the Peg Pérego Assistance Service and state the serial number of the product, if present.
tel. 0039/039/60.88.213 fax 0039/039/33.09.992
e-mail assistenza@pegperego.it website www.pegperego.com

FR_Français
|
Primo Viaggio |
Primo Viaggio |
Primo Viaggio |
|
|
Tri-Fix K |
Tri-Fix K |
Tri-Fix K |
|
|
+ |
+ |
||
|
adjustable |
isofix |
||
|
base |
base |
||
|
• Catégorie « Universel ». |
• Catégorie « Universel ». |
• Catégorie « Semi-Universel », |
|
• Le siège-auto «Primo Viaggio |
• La base réglable «Adjustable Base» |
classe E. |
|
Tri-Fix K» se fixe dans la voiture à |
se fixe dans la voiture à l’aide |
• La base «Isofix Base», dotée du |
|
l’aide de la ceinture de sécurité à |
de la ceinture de sécurité à trois |
système de fixation Isofix, est |
|
trois points. |
points. Elle reste installée dans le |
fixée aux crochets Isofix de |
|
véhicule, prête à l’emploi. |
l’automobile, situés entre l’assise |
|
|
• Le siège-auto «Primo Viaggio Tri- |
et le dossier. |
|
|
Fix K» se fixe à la base «Adjustable |
• La siège-auto «Primo Viaggio Tri- |
|
|
Base» à l’aide des ceintures de |
Fix K» s’accroche à la base. |
|
|
sécurité. |
• Consulter le manuel d’instructions |
|
|
• Consulter le manuel |
de «Isofix Base» pour prendre |
|
|
d’instructions de «Adjustable |
connaissance des instructions de |
|
|
Base» pour prendre connaissance |
montage dans l’automobile. |
|
|
des instructions de montage |
||
|
dans l’automobile. |
19

FR_Français
Merci d’avoir choisi un produit
Peg-Pérego.
Caractéristiques du produit
•Pour la sécurité de l’enfant en voiture, le siège-auto «Primo Viaggio Tri-Fix K», groupe 0+, a été soumis à l’ensemble des tests de sécurité et a été homologué conformément à la norme européenne en vigueur ECE R44/04, pour des enfants de 0 à 13 kg (0-12/14 mois).
• IMPORTANT : «Primo Viaggio Tri-Fix K», groupe 0+, doit être fixé dans le sens contraire à la marche sur des sièges passagers non équipés d’airbag. Ne pas installer «Primo Viaggio Tri-Fix K» sur des sièges tournés dans la direction opposée ou placés transversalement par rapport au sens de marche habituel du véhicule.
•«Primo Viaggio Tri-Fix K» est équipé du système réglable de protection contre les impacts latéraux Adjustable Side Impact Protection System : protection accrue contre les impacts latéraux grâce au « système simultané » de réglage de l’appui-tête et des ceintures.
•«Primo Viaggio Tri-Fix K» est homologué pour une fixation dans l’automobile sans base et, au choix, avec deux types de base (l’utilisation de la base dans la voiture garantit une plus grande sécurité) : «Adjustable Base» ou «Isofix Base» (s’assurer que l’automobile puisse accueillir le système Isofix ; consulter également la liste des modèles d’automobile fournie avec le produit).
 AVERTISSEMENT
•Avant l’utilisation, lire les instructions attentivement et les conserver dans l’emplacement prévu à cet effet pour toute référence ultérieure. Le non respect des instructions d’installation du siège-auto peut faire courir des risques à l’enfant.
•Ne jamais laisser un enfant sans surveillance.
•Toujours utiliser le système de retenue.
•Les opérations de montage et d’installation du véhicule
20
doivent être effectuées par des adultes.
•Éviter de mettre les doigts dans les mécanismes.
•Installer ce siège-auto du groupe 0+ dans l’automobile dans le sens contraire à la marche.
•Ne pas installer ce siège-auto sur des sièges passagers équipés d’airbag, en raison d’un danger de mort ou d’un risque de lésions graves.
•L’airbag peut représenter un danger : désactiver les airbags situés à proximité du siège-auto.
•Dans le cas de sièges pivotants ou positionnables, il est recommandé d’installer ce siège-auto dans le sens contraire à la marche.
•Prêter une attention particulière aux bagages ou autres objets présents dans l’habitacle. En cas d’accident, ils peuvent causer des lésions à l’enfant installé dans le siègeauto.
•Ne pas utiliser de systèmes d’installation différents de ceux indiqués ; le siège-auto pourrait se décrocher du siège.
•Siège-auto du groupe 0+, catégorie « semi-universel », classe e, homologué conformément à la norme européenne ece r44/04 pour les enfants de 0 à 13 kg (0-12/14 mois). Adapté à la majeure partie des sièges d’automobiles, mais pas à tous.
•Siège-auto, groupe 0+, avec base isofix catégorie « semiuniversel », classe e.
•Le siège-auto peut être installé correctement si le manuel d’utilisation et d’entretien du véhicule indique que ce dernier est compatible avec des systèmes de retenue « universels » du groupe 0+.
•Ce siège-auto a été classé dans la catégorie « universel » selon des critères d’homologation plus sévères que ceux utilisés pour des modèles précédents, qui ne disposent pas de l’étiquette d’homologation.
•Le siège-auto ne doit être utilisé que sur des véhicules approuvés, équipés de ceintures de sécurité à trois points, statiques ou avec enrouleur, homologués conformément au règlement un/ece n°16 ou toute norme équivalente. L’utilisation de la ceinture de sécurité à deux points ou ventrale n’est pas autorisée.
•Lors de l’installation du siège-auto, faire passer la ceinture à trois points de l’automobile dans les passants du siège-
![]()
auto prévus à cet effet, marqués en bleu. Ne pas utiliser de systèmes d’installation différents de ceux indiqués ; le siège-auto pourrait se décrocher du siège.
•S’assurer que la ceinture à trois points du véhicule utilisée pour fixer le siège-auto est toujours tendue et non vrillée. La remplacer en cas de sollicitations excessives suite à un accident.
•Ne jamais retirer l’enfant du siège-auto lorsque le véhicule est en mouvement.
•Prendre garde à ce que le siège-auto ne soit pas bloqué par une partie mobile du siège ou par une portière.
•Pour éviter le risque de chute, toujours utiliser la ceinture de sécurité du siège-auto, même lors du transport à l’extérieur du véhicule. Régler la hauteur et la tension des bretelles et vérifier qu’elles adhèrent au corps de l’enfant sans trop le serrer ; s’assurer que la ceinture de sécurité n’est pas vrillée et que l’enfant ne la détache pas tout seul.
•Le siège-auto ne remplace pas un lit pour enfant. Si l’enfant a besoin de dormir, il est important de le coucher.
•Ne pas laisser le siège-auto dans le véhicule exposé au soleil ; certaines parties pourraient chauffer et brûler la peau délicate de l’enfant. Contrôler le siège-auto avant d’y installer l’enfant.
•Ne pas utiliser le siège-auto sans sa housse en tissu. Cette housse ne peut être remplacée par une autre housse non approuvée par le fabricant. Elle fait partie intégrante du siège-auto et constitue une garantie de sécurité.
•En cas de doute, s’adresser au fabricant ou au revendeur du siège-auto.
•Ne pas détacher les étiquettes adhésives ou cousues. Le produit pourrait ne plus être conforme aux normes en vigueur.
•Ne pas utiliser ce siège-auto si des pièces sont cassées ou manquantes. Ne pas l’utiliser s’il a été acheté d’occasion ou s’il a été soumis à des sollicitations violentes lors
d’un accident : des dommages structurels extrêmement dangereux pourraient avoir été occasionnés.
•Ne pas apporter de modifications au produit.
•Pour toute réparation, remplacement de pièces et demande d’information sur le produit, contacter le service d’assistance après-vente. Les diverses informations à ce
21
sujet figurent à la dernière page de ce manuel.
•Ne plus utiliser ce siège-auto cinq ans après sa date de fabrication indiquée sur la coque : du fait du vieillissement naturel des matériaux, il pourrait ne plus être conforme aux normes en vigueur.
•L’utilisation du siège-auto pour des nouveaux-nés prématurés de moins de 37 semaines de gestation pourrait entraîner, du fait de la position assise dans le siège-auto, des problèmes de respiration pour le nouveauné. Il convient de consulter un médecin avant de quitter l’hôpital.
•Ne pas utiliser d’accessoires n’ayant pas été approuvés par le fabricant ou les autorités compétentes.
AVERTISSEMENT:
UTILISER COMME TRANSAT
•À la maison, ne pas utiliser le transat dés lors que l’enfant tient assis tout seul.
•Ce transat n’est pas prévu pour de longues périodes de sommeil.
•Il est dangereux de poser ce transat sur une surface en hauteur, par exemple une table.
Instructions d’utilisation
1• Grâce au Système Ganciomatic, «Primo Viaggio Tri-Fix K» peut être monté sur la base Isofix et sur la base «Adjustable Base» dans l’automobile. Hors du véhicule, il peut aussi être monté sur les poussettes et les châssis Peg-Pérego. Pour accrocher «Primo Viaggio Tri-Fix K» (à «Isofix Base» ou «Adjustable Base», aux poussettes ou châssis Peg-Pérego), le positionner en correspondance des fixations et le pousser vers le bas des deux mains, jusqu’à entendre le déclic.
2• Pour décrocher «Primo Viaggio Tri-Fix K» (d’»Isofix Base» ou d’»Adjustable Base», des poussettes ou des châssis PegPérego), mettre la poignée dans la position de transport et pousser le levier situé sur le dossier vers le haut, tout en soulevant le siège-auto.
3• Pour accrocher la ceinture de sécurité, superposer les deux bretelles et les faire passer dans la boucle de la sangle

d’entrejambe, jusqu’à entendre le déclic.
4• Pour décrocher la ceinture de sécurité, appuyer sur le bouton rouge situé sur la boucle de la sangle d’entrejambe.
5• Pour desserrer la ceinture, passer le doigt dans l’ouverture de l’assise (fig. a) et appuyer sur le bouton métallique. Dans le même temps, tirer de l’autre main les bretelles vers le haut (fig. b).
6• Pour faire adhérer les bretelles de la ceinture de sécurité au corps de l’enfant, tirer vers soi la sangle de réglage centrale, comme indiqué sur la figure, en faisant attention de ne pas trop serrer les bretelles sur le corps de l’enfant et de laisser un minimum de jeu.
7• La hauteur des bretelles de la ceinture de sécurité et de l’appui-tête Side Impact Protection peut être réglée simultanément suivant 5 positions pour s’adapter à la
croissance de l’enfant. Pour régler la hauteur, appuyer sur le bouton situé à l’arrière du dispositif de réglage (situé sur le dossier du siège-auto) et, dans le même temps, relever ou abaisser la ceinture de sécurité et l’appui-tête dans la position souhaitée. Le déclic indique un positionnement correct. Desserrer les bretelles avant de régler la hauteur de la ceinture de sécurité et de l’appui-tête.
8• Le bon réglage de l’appui-tête dépend de la position correcte des bretelles ; les épaules de l’enfant doivent se situer juste au-dessus du point de passage des bretelles.
9• Le siège-auto est fourni avec un coussin réducteur anatomique pour le nouveau-né, qui doit être supprimé lorsque le bébé est plus grand.
10• La poignée du siège-auto est dotée de quatre positions de réglage ; pour la déplacer, appuyer sur les deux boutons ronds situés sur la poignée et, dans le même temps, la mettre dans la position souhaitée. Le déclic indique un positionnement correct.
•Position A : position de la poignée lorsque le siège-auto est installé dans l’automobile; Position B : position de la poignée pour le transport du siège-auto à la main et pour l’accrocher à la base, aux poussettes et aux châssis; Position C : position qui permet de bercer l’enfant dans le siègeauto; Position D : position qui empêche le balancement du siège-auto.
11• Pour monter la capote, insérer ses fixations dans les logements du siège-auto prévus à cet effet et placer l’arrière de la capote derrière le dossier.
12• La capote peut être réglée suivant deux positions. Pour abaisser ou relever la capote, la pousser vers l’arrière ou la tirer en avant. Pour enlever la capote, appuyer sur les boutons de ses fixations tout en la relevant.
•  IMPORTANT : ne pas soulever le siège-auto en le saisissant par la capote ; celle-ci pourrait se décrocher.
Instructions d’utilisation dans le véhicule
13• Installer le siège-auto avec l’enfant sur le siège du véhicule, en gardant à l’esprit de l’attacher avec la ceinture de sécurité.
•Pour obtenir une position correcte dans le véhicule, le siège-auto doit être parallèle au sol ; si nécessaire, placer des serviettes de toilette enroulées sous le siège-auto.
14• Insérer la ceinture de sécurité du véhicule dans les deux passants latéraux du siège-auto. S’assurer qu’elle est convenablement tendue et la boucler, comme indiqué sur la figure.
15• Se saisir à nouveau de la ceinture de sécurité du véhicule et la faire passer derrière le dossier du siège-auto, en l’insérant dans le passant postérieur, comme indiqué sur la figure.
16• Dans l’automobile, abaisser complètement la poignée vers l’avant, jusqu’à ce qu’elle se trouve à proximité du dossier du véhicule, comme indiqué sur la figure. Déplacer la poignée vers l’avant ; le déclic garantit un positionnement correct. Vérifier que la ceinture est tendue et bloquée, de manière à assurer un niveau de sécurité approprié.
Déhoussage
Pour enlever la housse du siège-auto Primo Viaggio Tri-Fix K:
•pour faciliter l’opération, enlever la capote.
•appuyer sur le bouton en métal situé au centre du siègeauto pour allonger les bretelles du harnais de sécurité ;
•appuyer sur le bouton rouge situé sur la boucle de la sangle d’entrejambes pour décrocher le harnais de
22
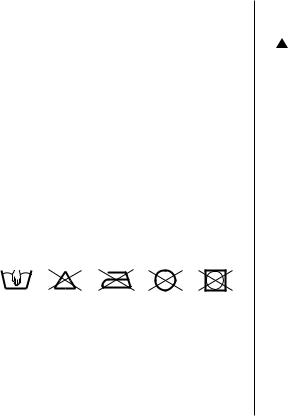
sécurité;
17• enlever les épaulières (Fig. a) ;
• enlever le harnais du dossier par le devant (Fig. b) ; 18• Ouvrir la ceinture (point 4).
Pour extraire la ceinture, il suffit de la faire passer par la fente du sac, comme le montre la figure.
19• enlever la housse de l’appuie-tête, d’abord par le bas, puis en faisant attention, par les deux ailettes latérales ;
ATTENTION À NE PAS CASSER LES PARTIES EN POLYSTYRÈNE (EPS).
20• enlever les quatre ailettes de fixation du rembourrage par le bord du siège-auto ;
•enlever les deux couvercles des passants latéraux pour la ceinture de sécurité de la voiture ;
21• enlever le rembourrage dans l’ordre indiqué sur la figure.
Entretien du rembourrage
•brosser les éléments en tissu pour retirer la poussière et laver à la main à une température maximale de 30° ; ne pas tordre ;
•ne pas utiliser de chlore ;
•ne pas repasser ;
•ne pas laver à sec ;
•ne pas détacher à l’aide de solvants et ne pas sécher dans un sèche-linge à tambour rotatif.
Habillage
• Pour rehousser le siège-auto Primo Viaggio Tri-Fix K : 22• enfiler le rembourrage dans l’ordre indiqué sur la figure.
— enfiler le sac par le haut – mettre d’abord les ailettes latérales de l’appuie-tête en faisant bien attention _ puis le faire passe dans la partie basse de l’appuie-tête.
23• introduire les quatre ailettes de fixation du rembourrage au bord du siège-auto ;
•positionner les deux couvercles des passants latéraux pour la ceinture de sécurité avec les fissures tournées vers
l’intérieur du siège-auto et vérifier que tout s’accroche bien;
24• Pour enfiler la housse de l’appuie-tête partir des deux ailettes latérales et enfiler enfin la partie basse (Fig. a) ;
• Faire passer la ceinture dans la fente du sac (Fig. b) et l’introduire dans la sangle entrejambes (Fig. c).
25•  IMPORTANT : le harnais ne doit pas être tordu.
• Introduire les ceintures sur le dossier, comme sur la figure (Fig. a) par le devant (Fig. b). Accrocher les épaulières dotées de velcro (Fig. c).
Numéros de série
26• Les informations suivantes sont indiquées sous la partie avant de l’assise de Primo Viaggio Tri-Fix K: nom du produit, date de production et numéro de série du produit.
27• L’étiquette d’homologation est placée sous la partie arrière de l’assise de Primo Viaggio Tri-Fix K.
28• Date de production de la ceinture.
Ces informations sont utiles au client au cas où des problèmes apparaîtraient sur le produit.
Nettoyage du produit
•Ce produit requiert un entretien minimum. Les opérations de nettoyage et d’entretien doivent être effectuées uniquement par des adultes.
•Il est recommandé de garder bien propres toutes les parties en mouvement.
•Nettoyer périodiquement les parties en plastique avec un linge humide ; ne pas utiliser de solvants ou tout produit similaire.
•Épousseter les éléments en tissu pour chasser la poussière.
•Ne pas nettoyer le dispositif d’absorption des chocs en polystyrène avec des solvants ou autres produits similaires.
•Protéger le produit des agents atmosphériques (eau, pluie ou neige) ; une exposition continue et prolongée au soleil peut provoquer la décoloration de nombreux matériaux.
•Conserver le produit dans un endroit sec.
Comment lire l’étiquette d’homologation
Dans cette section, il est expliqué comment lire l’étiquette d’homologation (étiquette orange).
23

•L’étiquette figure en double dans la mesure où ce siègeauto est homologué pour être fixé dans le véhicule de deux façons différentes :
•ceinture à trois points statique ou avec enrouleur (la mention « UNIVERSAL » indique la compatibilité du siègeauto avec des véhicules équipés de ce type de ceinture) ;
•systèmes de fixation ISOFIX (la mention « SEMIUNIVERSAL », classe E, indique que le siège-auto est compatible avec les véhicules équipés de ce système).
•Dans la partie supérieure de l’étiquette, figurent la marque du fabricant et la dénomination du produit.
•La lettre E entourée d’un cercle indique la marque d’homologation européenne et le numéro indique le pays qui a délivré l’homologation (1 : Allemagne ; 2 : France ; 3 : Italie ; 4 : Pays-Bas ; 11 : Grande Bretagne ; 24 : Irlande).
•Numéro d’homologation : s’il commence par 04, cela signifie qu’il fait référence au quatrième amendement (actuellement en vigueur) du règlement R44.
•Norme de référence : ECE R44/04.
•Numéro de production progressif : il permet de personnaliser le siège-auto ; dès la délivrance de l’homologation, sur chaque produit figure un numéro différent.
PEG-PÉREGO S.p.A.
Peg-Pérego S.p.A. est certifiée ISO 9001. La certification offre à la clientèle une garantie de transparence et représente un gage de confiance dans la façon de travailler de l’entreprise. Peg-Pérego se réserve le droit de procéder à tout moment à des modifications
sur les modèles décrits dans cet ouvrage, pour des raisons de nature technique ou commerciale. Peg-Pérego est à la disposition de sa clientèle pour satisfaire au mieux chacune de ses exigences. En cela, il est très important et précieux pour nous de connaître l’opinion de notre clientèle. Nous vous saurions donc gré, après avoir utilisé un de nos produits, de remplir le QUESTIONNAIRE DE SATISFACTION CLIENT, en nous faisant part de toute observation ou suggestion éventuelle. Vous trouverez ce questionnaire sur notre site Internet, à l’adresse www.pegperego.com
24
Service d’assistance Peg-Pérego
En cas de perte de pièces ou de rupture de l’une d’elles, utiliser exclusivement des pièces de rechange originales Peg-Pérego. Pour toute réparation, remplacement, informations sur les produits, vente de pièces détachées d’origine et accessoires, contactez le service après-vente Peg Pérego en indiquant, si présent, le numéro de série du produit.
tél. 0039/039/60.88.213 fax 0039/039/33.09.992
e-mail assistenza@pegperego.it site Internet www.pegperego.com

DE_Deutsch
|
Primo Viaggio |
Primo Viaggio |
Primo Viaggio |
|
|
Tri-Fix K |
Tri-Fix K |
Tri-Fix K |
|
|
+ |
+ |
||
|
adjustable |
isofix |
||
|
base |
base |
||
|
• Kategorie „Universal“. |
• Kategorie „Universal“. |
• Kategorie „Semi-Universal“ Klasse E. |
|
• Der Autositz «Primo Viaggio Tri-Fix |
• Das Basisteil «Adjustable Base» |
• Die Basis «Isofix Base» mit Isofix- |
|
K» wird mit dem Sicherheitsgurt |
wird an drei Stellen mit dem |
Befestigungssystem wird im Auto |
|
an drei Stellen im Auto befestigt. |
Sicherheitsgurt im Auto befestigt |
an den Isofix-Verbindungsstücken |
|
und bleibt gebrauchsfertig im |
befestigt, die zwischen der |
|
|
Auto. |
Sitzfläche und der Rückenlehne |
|
|
• Der Autositz «Primo Viaggio Tri- |
des Sitzes angebracht sind. |
|
|
Fix K» wird an der «Adjustable |
• Der Autositz «Primo Viaggio Tri-Fix |
|
|
Base» eingehakt und mit dem |
K» wird in die Basis eingeklinkt. |
|
|
Sicherheitsgurt befestigt. |
• Bitte beachten Sie für die |
|
|
• Bitte beachten Sie für die |
Befestigung im Auto die |
|
|
Befestigung im Auto die |
Gebrauchsanweisungen von «Isofix |
|
|
Gebrauchsanweisungen von |
Base». |
|
|
«Adjustable Base». |
25

DE_Deutsch
Vielen Dank, dass Sie sich für ein Produkt Peg-Pérego entschieden haben.
Produkteigenschaften
•«Primo Viaggio Tri-Fix K» Sicherheits-Autositz, Gruppe 0+, wurde allen Sicherheitstests unterzogen und ist zugelassen nach der geltenden europäischen Norm ECE R44/04 für Kinder mit einem Gewicht von 0-13 kg (0-12/14 Monate).
• WICHTIG: «Primo Viaggio Tri-Fix K», Gruppe 0+, muss gegen die Fahrtrichtung installiert werden, auf Sitzen ohne Airbag. «Primo Viaggio Tri-Fix K» nicht auf Sitzen entgegen oder quer zur Fahrtrichtung befestigen.
•«Primo Viaggio Tri-Fix K» ist mit dem „Adjustable Side Impact Protection System“ ausgerüstet: Mehr Schutz bei seitlichem Aufprall mit dem „Simultansystem“ dank der Regulierung Kopfstütze-Sicherheitsgurten.
•«Primo Viaggio Tri-Fix K» ist zugelassen für die Befestigung im Auto ohne Basisteil und nach Wunsch mit zwei unterschiedlichen Basis-Teilen (die Verwendung einer Basis im Auto garantiert mehr Sicherheit): «Adjustable Base» oder «Isofix Base» (stellen Sie fest, ob das Fahrzeug für das Isofix-System ausgerüstet ist; kontrollieren Sie es anhand der Liste der Automodelle, die zusammen mit dem Produkt geliefert wurde).
 WARNUNG
•Vor Gebrauch die Gebrauchsanweisungen genau durchlesen und sie zum späteren Gebrauch im dafür vorgesehenen Fach aufbewahren. Wenn Sie die Installationsanweisungen für den Autositz
nicht gewissenhaft befolgen, kann dies für Ihr Kind schwerwiegende Folgen haben.
•Lassen Sie Ihr Kind nie unbeaufsichtigt.
•Benutzen Sie stets das Haltesystem.
•Die Montage und die Installation muss von Erwachsenen
26
ausgeführt werden.
•Aufpassen, dass man nicht die Finger in der Mechanik einklemmt.
•Diesen Autositz Gruppe 0+ im Auto gegen die Fahrtrichtung installieren.
•Wegen Todesgefahr oder weil schwere Verletzungen verursacht werden können diesen Autositz nicht auf Beifahrersitzen mit Airbag installieren!
•Wegen Gefahr durch Airbag die Airbags rings um den Kinder-Autositz deaktivieren.
•Bei drehbaren oder verstellbaren Sitzen diese Basis für Kinder-Autositz unbedingt gegen die Fahrtrichtung installieren.
•Aufpassen, dass im Auto bei einem Unfall keine Gepäckstücke oder andere Gegenstände das Kind im Autositz verletzen können.
•Zur Installation keine Methoden verwenden, die von den Gebrauchsanweisungen abweichen, da sich der Kindersitz vom Fahrzeugsitz lösen könnte.
•Autositz, Gruppe 0+, Kategorie „Universal“, zugelassen nach europäischer Regelung ECE R44/04 für Kinder mit einem Gewicht von 0-13 kg (0-12/14 Monate). Passt auf die meisten Fahrzeugsitze, aber nicht auf alle.
•Autositz, Altersgruppe 0+, mit Basisteil Isofix Kategorie semi-universal, Klasse E.
•Der Autositz kann korrekt installiert werden, wenn in der Gebrauchsund Wartungsanleitung des Fahrzeugs steht, dass das Auto mit „Universalen“ Halterungssystemen der Gruppe 0+ kompatibel ist.
•Dieser Autositz ist als „Universal“ eingestuft, nach Zulassungskriterien, die strenger sind als bei den vorhergehenden Modellen, die keine Zulassungsetikette aufweisen.
•Der Autositz darf nur auf getesteten Fahrzeugen verwendet werden, die mit statischem 3-Punkt- Sicherheitsgurt oder mit 3-Punkt-Sicherheitsgurt mit automatischer Aufwicklung ausgestattet sind und die eine Zulassung gemäß Regelung UN/ECE Nr. 16 oder nach gleichwertigen Gesetzgebungen besitzen. 2-Punkte- Sicherheitsgurt oder Bauchgurt sind nicht zulässig.
•Um den Autositz zu installieren, den Sicherheitsgurt des

Autos an drei Stellen durch die hellblau gekennzeichneten Öffnungen ziehen. Zur Installation keine Methoden verwenden, die von den Gebrauchsanweisungen abweichen, da sich der Kindersitz vom Autositz lösen könnte.
•Sicherstellen, dass der 3-Punkte-Sicherheitsgurt des Fahrzeugs zum Befestigen des Autositzes immer straff sitzt und nicht verwickelt ist. Nach überdurchschnittlicher Beanspruchung durch einen Unfall müssen Sie den Sicherheitsgurt ersetzen.
•Nehmen Sie das Kind nie aus dem Autositz, solange das Fahrzeug in Bewegung ist.
•Aufpassen, dass der Autositz nicht durch einen beweglichen Teil des Sitzes oder durch eine Autotür blockiert wird.
•Damit das Kind nicht herausfallen kann, den Sicherheitsgurt des Autositzes immer benutzen, auch für den Transport außerhalb des Fahrzeugs. Die Höhe und die Spannung der Riemen einstellen. Dabei kontrollieren, dass sie am Körper des Kindes anliegen, ohne ihn einzuengen. Sicherstellen, dass der Sicherheitsgurt nicht verwickelt ist und dass das Kind ihn nicht selbständig lösen kann.
•Der Autositz eignet sich nicht als Ersatz für das Bettchen; braucht das Kind Schlaf, so muss man es hinlegen.
•Lassen Sie den Autositz nicht unter Sonnenbestrahlung im Fahrzeug, denn einige Teile könnten zu heiß werden und die zarte Haut des Kindes verwunden. Prüfen Sie den Autositz auf heiße Teile, bevor sie das Kind hineinsetzen.
•Verwenden Sie den Autositz nicht ohne Stoffbezug. Der Bezug darf nicht durch einen anderen, der nicht vom Hersteller geprüft wurde, ersetzt werden, denn er ist Bestandteil des Autositzes und dient der Sicherheit.
•Wenden Sie sich im Zweifelsfall an den Hersteller oder an den Verkäufer dieses Autositzes.
•Aufgeklebte und angenähte Etiketten nicht entfernen, da sonst das Produkt eventuell nicht mehr den gesetzlichen Vorschriften entspricht.
•Den Autositz nicht verwenden, wenn er beschädigt oder unvollständig ist, wenn er aus zweiter Hand stammt oder wenn er bei einem Unfall starken Belastungen ausgesetzt war, da er äußerst gefährliche strukturelle Schäden erlitten
27
haben könnte.
•Keine Änderungen am Produkt vornehmen.
•Wenden Sie sich für Reparaturen, Ersatzteile und Produktinformationen an den Kundendienst. Die verschiedenen Informationen finden Sie auf der letzten Seite dieser Gebrauchsanweisung.
•Den Autositz nicht mehr verwenden, wenn seit dem Produktionsdatum (siehe Angabe auf dem Gestell) fünf Jahre verstrichen sind. Aufgrund der natürlichen Alterung des Materials könnte er nicht mehr den gesetzlichen Bestimmungen entsprechen.
•Die Verwendung des Autositzes bei Frühgeborenen nach weniger als 37 Wochen Schwangerschaft könnten beim Säugling durch die Sitzposition im Autositz
Atembeschwerden auslösen. Bitte Fragen Sie den Arzt um Rat, bevor Sie das Krankenhaus verlassen.
•Keine Zubehöre verwenden, die nicht vom Hersteller oder von den zuständigen Behörden gutgeheißen wurden.
 WARNUNG:
ZUR VERWENDUNG ALS WIPPE.
•Benutzen Sie die verstellbare Wippe nicht weiter, wenn Ihr Kind ohne Hilfe sitzen kann.
•Diese verstellbare Wippe ist nicht für längeres Schlafen bestimmt.
•Das Aufstellen der verstellbaren Wippe auf hohen Flächen, z.B. Tisch oder Arbeitsfläche, ist gefährlich.
Gebrauchsanweisungen
1• «Primo Viaggio Tri-Fix K» ist mit dem Ganciomatic-System ausgerüstet, mit dem der Kindersitz im Auto auf «Isofix Base» oder «Adjustable Base» und außerhalb des Autos auf Peg-Pérego Sportwagen und Untergestelle passt. Zum Festmachen (an «Isofix Base», «Adjustable Base», an Sportwagen oder Untergestellen Peg-Pérego) «Primo Viaggio Tri-Fix K» auf der Höhe der Haken platzieren und
mit beiden Händen nach unten drücken, bis Sie ein Klicken hören.
2• Zum Lösen des «Primo Viaggio Tri-Fix K» (von «Isofix Base», «Adjustable Base», Sportwagen oder Untergestellen Peg-

Pérego) den Griff in die Transportstellung biegen, den Hebel am Rückenteil nach oben drücken und gleichzeitig den Sitz hochheben.
3• Zum Festmachen des Sicherheitsgurts die beiden Riemen übereinander legen und in die Schnalle des Beintrenngurts stecken, bis Sie ein Klicken hören.
4• Zum Lösen des Sicherheitsgurts den roten Knopf auf der Schnalle des Beintrenngurts drücken.
5• Zur Lockerung der Gurte, mit einem Finger auf die Wipptaste am vorderen Rand der Sitzfläche drücken (Abb. a), und mit der anderen Hand gleichzeitig die Schultergurte hochziehen (Abb. b).
6• Um die Riemen des Sicherheitsgurts fester anzuziehen, den mittleren Gurt, der zur Regulierung dient, nach vorn ziehen (siehe Abbildung). Dabei aufpassen, dass Sie die Riemen nicht zu satt anziehen, sondern dem Kind etwas Bewegungsfreiheit lassen.
7• Die Riemen des Sicherheitsgurts und die Kopfstütze „Side Impact Protection“ sind simultan in fünf Positionen höhenverstellbar, um sie dem Wachstum des Kindes anzupassen. Um die Höhe zu verstellen, den hinteren
Knopf der Höheneinstellung (am Rückenteil des Autositzes) drücken und gleichzeitig nach oben ziehen oder nach unten drücken, um die gewünschte Position zu erreichen. Die Stellung ist korrekt, sobald Sie ein Klicken hören. Bevor Sie die Höhe des Sicherheitsgurts und der Kopfstütze einstellen, die Spannung der Riemen lockern.
8• Die korrekte Einstellung der Kopfstütze ist abhängig von der korrekten Position der Riemen; die Schultern des Kindes müssen knapp über der Öffnung liegen, durch die die Riemen verlaufen.
9• Der Autositz wird mit einem anatomischen Sitzverkleinerer für Säuglinge geliefert, der entfernt wird, wenn das Kind größer geworden ist.
10• Der Griff des Autositzes besitzt vier Einstellungen. Zum Drehen die beiden Knöpfe auf dem Griff drücken und diesen gleichzeitig in die erwünschte Position biegen, bis er einrastet.
•Position A: Position des Griffs im Auto; Position B: Position des Griffs für den Transport von Hand und um den Autositz an der Basis, am Sportwagen und am Untergestell
einzuklinken; Position C: Schaukel-Position; Position D: Position, in der der Autositz nicht schaukeln kann.
11• Zum Befestigen des Verdecks die Verbindungsstücke des Verdecks in die Öffnungen des Autositzes stecken und den hinteren Teil des Verdecks über das Rückenteil ziehen.
12• Das Verdeck hat zwei Einstellungen; zum Herunterklappen oder Hochklappen das Verdeck nach hinten drücken oder nach vorn ziehen. Zum Entfernen des Verdecks die Knöpfe der Verbindungsstücke drücken und gleichzeitig das Verdeck hochziehen.
• WICHTIG: Das Verdeck darf nicht verwendet werden, um den Autositz hochzuheben, da es sich lösen könnte.
Anweisungen für den Gebrauch im Auto
13• Den Autositz mit dem Kind auf den Fahrzeugsitz stellen; vergessen Sie nicht, das Kind mit dem Sicherheitsriemen zu sichern.
•Für eine korrekte Stellung im Auto muss der Autositz parallel zum Boden stehen. Falls nötig zusammengerollte Handtücher zwischen dem Fahrzeugsitz und dem Autositz platzieren.
14• Den Riemen des Auto-Sicherheitsgurts in die beiden seitlichen Schienen des Autositzes einführen. Dabei aufpassen, dass der Auto-Sicherheitsgurt straff gespannt ist, dann die Schnalle des Auto-Sicherheitsgurts am Fahrzeugsitz festmachen (siehe Abbildung).
15• Den Auto-Sicherheitsgurt von Neuem fassen und hinter der Rückenlehne des Autositzes durchziehen; dabei durch die Schiene auf der Rückseite führen (siehe Abbildung).
16• Der Griff muss im Auto ganz nach vorn zur Rückenlehne geklappt werden (siehe Abbildung). Den Griff nach vorn biegen, bis Sie ein Klicken hören. Stellen Sie sicher, dass der Gurt straff gespannt und blockiert ist, damit er angemessene Sicherheit garantiert.
Entfernen des Bezugs
Um den Bezug des Autokindersitzes Primo Viaggio Tri-Fix K abzuziehen:
• für bequemeres Vorgehen, das Verdeck entfernen.
28
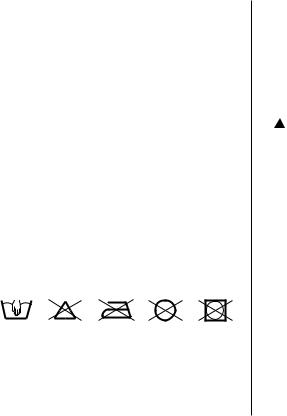
•Den Metallknopf in der Mitte des Kindersitzes betätigen, um die Gurte des Sicherheitsgurts zu verlängern;
•die rote Taste auf dem Gurtschloss des Schrittgurtes betätigen, um den Sicherheitsgurt zu lösen.
17• die Schulterpolster entfernen (Abb. a);
• die Gurte von vorn aus der Rückenlehne ziehen (Abb. b); 18• Den Sicherheitsgurt öffnen (Punkt 4).
Um den Sicherheitsgurt herauszuziehen, diesen durch die Öse des Sacks führen, wie in der Abbildung dargestellt.
19• das Futter der Kopfstütze zuerst vom unteren Teil und dann vorsichtig von den beiden Seitenteilen abziehen;
DARAUF ACHTEN, DIE TEILE AUS STYROPOR (EPS) NICHT ZU BESCHÄDIGEN.
20• die vier Befestigungen der Polsterung vom Rand des Autokindersitzes entfernen;
•die beiden Abdeckungen der seitlichen Führungen für den Sicherheitsgurt des Autos entfernen;
21• der Reihe nach die Polsterung entfernen wie in der Abbildung dargestellt.
Pflege der Polsterung
•die Stoffbereiche abbürsten, um den Staub zu entfernen. Waschen nur von Hand bei einer maximalen Temperatur von 30° C. Nicht auswringen oder schleudern;
•nicht mit Bleichmittel behandeln;
•nicht bügeln;
•keine Trockenwäsche anwenden
•nicht mit Fleckenlöser behandeln und nicht im Drehtrommeltrockner trocknen.
Anbringen des Bezugs
•Um den Bezug auf dem Autokindersitz Primo Viaggio TriFix K anzubringen:
22• die Polsterung der Reihe nach aufziehen, wie in der Abbildung dargestellt. — den Überzug von oben aufziehen und dabei zuerst die Seitenteile der Kopfstütze vorsichtig anbringen und dann zum unteren Teil der Kopfstütze
übergehen.
23• die vier Befestigungen der Polsterung am Rand des Autokindersitzes anbringen;
•die beiden Abdeckungen der seitlichen Führungen für den Sicherheitsgurt des Autos mit den Schlitzen zur Innenseite des Autokindersitzes positionieren und die korrekte Befestigung überprüfen;
24• Zum Aufziehen des Futters der Kopfstütze mit den beiden Seitenteilen beginnen und schließlich den unteren Teil aufziehen (Abb. a);
• Den Sicherheitsgurt durch die Öse des Sacks (Abb. b) führen und in den Schrittgurt (Abb. c) einführen.
25•  WICHTIG: der Gurt darf nicht verdreht sein.
• die Gurte von vorn in die Rückenlehne einführen, wie in der Abbildung dargestellt (Abb. b). Die mit Klettverschluss versehenen Schulterpolster anbringen (Abb. c).
Seriennummern
26• Am Primo Viaggio Tri-Fix K finden Sie vorne unter dem Sitz folgende Angaben: Produktname, Herstellungsdatum und Seriennummer des Kindersitzes.
27• Auf der Rückseite des Primo Viaggio Tri-Fix K finden Sie das Prüfzertifikat.
28• Herstellungsdatum des Sicherheitsgurtes.
Für den Benutzer sind diese Informationen bei eventuellen Problemen mit dem Produkt wichtig.
Reinigung
•Ihr Produkt braucht nur geringe Wartung. Reinigung und Wartung dürfen nur von Erwachsenen durchgeführt werden.
•Es wird empfohlen, alle beweglichen Teile sauber zu halten.
•Regelmäßig die Kunststoffteile mit einem feuchten Tuch reinigen, keine Lösungsmittel oder ähnliche Produkte verwenden.
•Stoffteile mit einer Bürste von Staub befreien.
•Den Stoßdämpfer aus Styropor nie mit Lösungsmitteln oder anderen ähnlichen Produkten reinigen.
•Das Produkt vor Witterung schützen, vor Wasser, Regen
29

oder Schnee; wird das Produkt wiederholt und über längere Zeit der Sonne ausgesetzt, können die Farben vieler Materialien verblassen.
• Das Produkt trocken aufbewahren.
Bedeutung der Zulassungsetikette
In diesem Abschnitt erklären wir Ihnen die Bedeutung der Aufschriften auf der Zulassungsetikette (orange Etikette).
•Die Etikette ist doppelt, da dieser Autositz die Zulassung für zwei verschiedene Befestigungsarten im Auto besitzt:
•Statischer 3-Punkte-Sicherheitsgurt oder 3-Punkte- Sicherheitsgurt mit automatischer Aufwicklung (die Aufschrift UNIVERSAL bedeutet, dass der Autositz mit Fahrzeugen, die mit diesen Sicherheitsgurten ausgerüstet sind, kompatibel ist)
•Schnappvorrichtungssysteme ISOFIX (die Aufschrift SEMI-UNIVERSAL Klasse E bedeutet, dass der Autositz mit Fahrzeugen, die mit diesem System ausgerüstet sind, kompatibel ist)
•Im oberen Teil der Etikette steht das Markenzeichen der Herstellerfirma und der Produktname.
•Der Buchstabe E in einem Kreis: gibt die europäische Zulassungsmarke an. Die Zahl definiert das Land, das die Zulassung ausgestellt hat (1: Deutschland, 2: Frankreich, 3: Italien, 4: Holland, 11: England, 24: Irland).
•Zulassungsnummer: beginnt sie mit 04, bedeutet dies, dass es sich um die vierte Änderung (die momentan geltende) der Vorschrift R44 handelt.
•Bezugsvorschrift: ECE R44/04.
•Progressive Produktionsnummer: Personalisiert jeden Sitz. Jeder Sitz ist nach der Ausstellung der Zulassung durch eine eigene Nummer gekennzeichnet.
PEG-PÉREGO S.p.A.
Peg-Pérego S.p.A. ist gemäß ISO 9001 zertifiziert. Die Zertifizierung garantiert den Kunden und Verbrauchern Transparenz und ermöglicht das Vertrauen in die Arbeitsweise des Unternehmens. Peg Pérego kann zu jedem beliebigen Zeitpunkt Änderungen an
den in dieser Veröffentlichung beschriebenen Modellen
30
sowohl aus technischen, als auch aus kommerziellen Gründen vornehmen. Peg Pérego steht den Verbrauchern zur Verfügung, um deren Anforderungen auf das Bestmöglichste gerecht zu werden. Demnach ist es ausgesprochen wichtig und wertvoll für uns, über die Meinung unserer Kunden Bescheid zu wissen. Wir bitten Sie daher, das FORMULAR ÜBER DIE KONSUMENTENZUFRIEDENHEIT auszufüllen, nachdem Sie unsere Produkte ausprobiert haben. Das Formular ist unter folgender Internetadresse abrufbar: www.pegperego.com.
Kundendienst Peg-Pérego
Sollten Teile des Modells verloren gehen oder beschädigt werden, ersetzen Sie diese bitte ausschließlich durch originale Peg Perego-Teile. Für Reparaturen, Ersatzteile, Produktinformationen und Anbieter von originalen Ersatzteilen und Zubehör wenden Sie sich bitte an den Peg Perego Kundendienst. Halten Sie hierfür, wenn möglich, die Seriennummer des betreffenden Produktes bereit.
Tel. 0039/039/60.88.213
Fax 0039/039/33.09.992 E-Mail assistenza@pegperego.it
Webseite www.pegperego.com
![]()
ES_Español
|
Primo Viaggio |
Primo Viaggio |
Primo Viaggio |
|
|
Tri-Fix K |
Tri-Fix K |
Tri-Fix K |
|
|
+ |
+ |
||
|
adjustable |
isofix |
||
|
base |
base |
||
|
• Categoría “Universal”. |
• Categoría “Universal”. |
• Categoría “Semi-Universal” clase E. |
|
• La silla de auto «Primo Viaggio Tri- |
• La base «Adjustable Base» se |
• La base «Isofix Base» con sistema |
|
Fix K» se instala en el coche con |
instala en el coche con el |
de acoplamiento Isofix, se instala |
|
el cinturón de seguridad de tres |
cinturón de seguridad de tres |
en el coche con los enganches |
|
puntos. |
puntos y queda fijada al coche |
Isofix que se hallan entre el |
|
lista para su uso. |
asiento y el respaldo del coche. |
|
|
• La silla de auto «Primo Viaggio Tri- |
• La silla de auto «Primo Viaggio Tri- |
|
|
Fix K» se acopla a la «Adjustable |
Fix K» se acopla a la base. |
|
|
Base» y se instala con el cinturón |
• Consultar el manual de |
|
|
de seguridad. |
instrucciones de «Isofix Base» para |
|
|
• Consultar el manual de |
la instalación en el coche. |
|
|
instrucciones de «Adjustable Base» |
||
|
para la instalación en el coche. |
31

ES_Español
Le agradecemos haber elegido un producto Peg-Pérego.
Características del producto
•«Primo Viaggio Tri-Fix K», la silla de seguridad del grupo 0+ para automóviles, ha sido sometida a todas las pruebas de seguridad y está homologada según la normativa europea en vigor ECE R44/04, con un rango de peso del bebé entre 0-13 kg (0-12/14 meses).
• IMPORTANTE: «Primo Viaggio Tri-Fix K», grupo 0+, debe orientarse en sentido contrario a la marcha y ubicarse en asientos que no estén dotados de airbag. No instalar “Primo Viaggio Tri-Fix K” en asientos que estén girados en sentido contrario o transversal a la dirección de la marcha del vehículo.
•«Primo Viaggio Tri-Fix K» dispone de “Adjustable Side Impact Protection System”: mayor protección frente a impactos laterales con el “sistema simultáneo” de regulación reposacabezas-cinturones.
•«Primo Viaggio Tri-Fix K» cuya homologación también permite su instalación en el coche sin la base, dispone de dos tipos de base (cuyo uso garantiza una mayor
seguridad): «Adjustable Base» o «Isofix Base» (asegurarse de que el vehículo esté predispuesto para una instalación del sistema Isofix. Véase también el listado de los modelos de coches que se entrega junto con el producto).
 ADVERTENCIA
•Leer detenidamente las instrucciones antes del uso y guardarlas para futuras consultas. La inobservancia de las instrucciones de instalación de la silla de auto podría comportar riesgos para su bebé.
•Nunca deje solo a su hijo.
•Siempre utilice el sistema de sujeción.
•Las operaciones de montaje e instalación deben realizarse por adultos.
•Evitar introducir los dedos en los dispositivos.
32
•Instalar esta silla de auto, grupo 0+, en sentido contrario a la marcha del coche.
•No instalar esta silla de auto en asientos dotados de airbag a fin de prevenir un peligro de muerte y posibles lesiones graves.
•Para prevenir el peligro del airbag, desactivar los airbag del asiento donde se haya ubicado la silla de auto.
•En caso de asientos giratorios o que puedan quitarse, se aconseja instalar esta silla de auto en sentido contrario a la marcha.
•En el coche, prestar especial atención a las maletas u otros objetos que puedan causar en caso de accidentes lesiones al niño estando en la silla de auto.
•No seguir el método de instalación indicado puede alterar la adhesión de la silla al asiento.
•Silla de auto, grupo 0+, categoría “Universal” está homologada según la normativa europea ECE R44/04, con un rango de peso del bebé entre 0-13 kg (0-12/14 meses). Se adapta a la mayoría de los asientos de los vehículos, pero no a todos.
•Silla de auto, grupo 0+, con base Isofix categoría Semiuniversal de clase E.
•La silla de auto puede instalarse correctamente si en el manual de uso y mantenimiento del vehículo se indicada la compatibilidad con sistemas de retención “Universales” del grupo 0+.
•Esta silla de auto se ha clasificado como “Universal” atendiendo a los criterios de homologación más severos respecto de otros modelos anteriores que no disponen de dicha homologación.
•La silla de auto puede utilizarse sólo en vehículos aprobados, dotados de cinturón de tres puntos estático o con enrollador y homologados según el reglamento UN/ ECE n°16 o según normativas equivalentes. No se permite el uso del cinturón de dos puntos o abdominal.
•Para instalar la silla de auto, pasar el cinturón del coche de tres puntos por los respectivos alojamientos de la silla evidenciados con el color azul. No seguir el método de instalación indicado puede alterar la adhesión de la silla al asiento.
•Para instalar la silla de auto, asegurarse de que el cinturón

de tres puntos del vehículo esté siempre tensado y no enredado y, sustituirlo si ha ejercido grandes esfuerzos en caso de accidente.
•Si el vehículo está en movimiento, no quitar nunca al niño de la silla de auto.
•Prestar atención a que ninguna parte móvil del asiento o la puerta del coche bloqueen la silla de auto.
•Para evitar el riesgo de caída, utilizar siempre el cinturón de seguridad de la silla de auto incluso para el transporte fuera del coche. Regular la altura y el tensado de los tirantes
de modo que abracen al cuerpo del niño sin apretarle demasiado; comprobar que el cinturón de seguridad no esté enredado ni que el niño pueda quitárselo solo.
•La silla de auto no sustituye la cuna, de modo que si el niño necesita dormir déjelo reposar en posición estirada.
•Una exposición prolongada de la silla de auto al sol podría recalentarla y dañar la delicada piel del niño; controlar antes de acomodar al niño.
•No utilizar la silla de auto sin su tapizado; no sustituirlo por otro que no esté autorizado por el fabricante ya que constituye un componente de la silla y de su seguridad.
•En caso de dudas, diríjase al fabricante o al distribuidor de este producto.
•No quite las etiquetas adhesivas o permanentes ya que el producto puede que no sea conforme a lo dispuesto en la ley.
•No utilizar la silla de auto si presenta roturas o faltan piezas o si es de segunda mano o si ha sido sometida a esfuerzos violentos en un accidente, pues podría haberse dañado gravemente la estructura.
•No modificar el producto.
•Para realizar las eventuales reparaciones, sustituciones de piezas y obtener información sobre el producto,
contactar con el departamento de asistencia postventa. Las informaciones figuran en la última página de este manual.
•No utilizar la silla de auto una vez transcuridos cinco años a partir de la fecha de fabricación que se indica en el chasis ya que el envejecimiento natural de los materiales podría no respetar lo dispuesto en la ley.
•La utilización de la silla de auto para recién nacidos prematuros con menos de 37 semanas de gestación podría
33
comportar al recién nacido problemas de respiración al estar sentado en la silla de auto. Por ello, conviene consultar el médico antes de salir del hospital.
•No utilizar accesorios que no hayan sido autorizados por el fabricante o por las autoridades competentes.
 ADVERTENCIA:
PARA USO COMO SILLÓN RECLINABLE
•Una vez que pueda sentarse solo, no utilice el mecedor.
•No se recomienda que los niños duerman durante muchas horas en el mecedor.
•Es peligroso utilizar el mecedor en superficies altas, como por ejemplo en una mesa.
Instrucciones de uso
1• «Primo Viaggio Tri-Fix K» dispone del Sistema Ganciomatic para poder engancharse y desengancharse, en el coche, a «Isofix Base» o a «Adjustable Base» y, fuera del coche, a las sillas de paseo o a los carritos Peg-Pérego. Para enganchar «Primo Viaggio Tri-Fix K» (a «Isofix Base», a «Adjustable Base», a las sillas de paseo o a los carritos Peg-Pérego) hay que colocarla de manera que se acople a los enganches y empujarla hacia abajo con ambas manos hasta oír un “clic”.
2• Para desenganchar «Primo Viaggio Tri-Fix K» (de «Isofix Base», de «Adjustable Base», de las sillas de paseo o de los carritos Peg-Pérego) hay que poner la empuñadura en la posición de transporte, empujar hacia arriba la palanca que está detrás del respaldo y levantar simultáneamente la silla.
3• Para enganchar la correa de seguridad hay que superponer los dos tirantes y meterlos en la hebilla de la correa de la tira entrepiernas hasta oír un “clic”.
4• Para desenganchar la correa de seguridad, pulsar el botón rojo sobre la hebilla de la tira entrepiernas.
5• Para aflojar la tensión del cinturón, meter el dedo en la ranura del asiento (fig. a), pulsar el botón metálico y tirar simultáneamente con la otra mano las correas hacia arriba (fig. b).
6• Para que se ajusten al niño los tirantes de la correa de seguridad, tirar hacia sí del cinturón de regulación central
![]()
|
IT |
Istruzioni d’uso |
|
EN |
Instructions for use |
|
FR |
Notice d’emploi |
|
DE |
Gebrauchsanleitung |
|
ES |
Instrucciones de uso |
|
PT |
Instruções para uso |
|
NL |
Gebruiksaanwijzing |
|
DK |
Brugsanvisning |
|
FI |
Käyttöohjeet |
|
CZ |
Návod na použití |
LF |
|
SK |
Návod na použitie |
|
|
HU Használati útmutató |
||
|
SL |
Navodila za uporabo |
|
|
RU |
Инструкции по пользованию |
|
|
TR |
Kullanım kılavuzu |
|
|
EL |
Οδηγιεσ χρησεωσ |
|
|
hgdRA |
K
|
A |
||
|
B |
||
|
C |
||
|
25 |
26 |
27 |
Primo Viaggio Tri-Fix K
5
9
|
2 |
|||
|
1) BCAASI* |
|||
|
2) MUCI0084N |
|||
|
IT• |
Ricambi disponibili in piú colori da specificare nella richiesta. |
3) BRIASI* |
|
|
4) BSAKAP* |
|||
|
EN• |
Spare parts available in different colours to be specified when ordering. |
||
|
5) SPST6341DNF |
|||
|
FR• |
Pièces de rechange disponibles en plusieurs couleurs à spécifier dans la demande. |
||
|
6) SPST6341SNF |
|||
|
DE• |
Ersatzteile in mehr Farben vorhanden, die in der Anfrage spezifiziert werden müssen. |
||
|
7) SPST6850GL |
|||
|
ES• |
Repuestos disponibles en otros colores que se especificarán en el pedido. |
||
|
|
|||
|
PT• |
Peças de reposição disponíveis em cores alternativas a serem especificadas no pedido. |
||
|
9) BSPKAP* |
|||
|
NL• |
Reserveonderdelen verkrijgbaar in meerdere kleuren, bij bestelling te specificeren. |
||
|
DK• |
Reservedele kan leveres i flere farver som bør specificeres ved bestillingen. |
||
|
FI• |
Varaosia saatavana eri värisinä: ilmoita väri tilauksessa. |
||
|
CZ• |
U náhradních dílů, které jsou k dispozici ve více barvách, je nutné na objednávce specifikovat příslušnou barvu. |
||
|
SK• |
Pri náhradných dieloch, ktoré sú k dispozícii vo viacerých farbách, je potrebné pri objednávke špecifikovať želanú farbu. |
||
|
HU• A tartalék alkatrészek különböző színekben elérhetők, melyeket rendeléskor kell kiválasztani. |
|||
|
SL• |
Rezervni deli so na voljo v več barvah, ki jih je treba navesti pri naročilu. |
||
|
RU• Запчасти имеются различных цветов, необходимый указать в запросе. |
|||
|
TR• |
Siparişte belirtilen değişik renklerdeki yedek parçalari mevcuttur. |
||
|
EL• |
Ανταλλακτικά διαθέσιμα σε διάψορα χρώματα. Προσδιορίστε όταν παραγγείλετε. |
||
|
•r¨vRAHgy¢hVlj‘tVMtd•g‘HKm…lOjg¢¥FjP¬¢¬£hUk¬.Hg¨gF |
7
IT_Italiano
|
Primo Viaggio |
Primo Viaggio |
Primo Viaggio |
|
|
Tri-Fix K |
Tri-Fix K |
Tri-Fix K |
|
|
+ |
+ |
||
|
adjustable |
isofix |
||
|
base |
base |
||
|
• Categoria “Universale” . |
• Categoria “Universale” . |
• Categoria “Semi-Universale” classe E. |
|
• Il seggiolino auto «Primo Viaggio |
• La base Adjuistable Base viene |
• La base «Isofix Base» con sistema di |
|
Tri-Fix K» viene fissato in auto con |
fissata in auto con la cintura di |
fissaggio Isofix, viene fissata in auto |
|
la cintura di sicurezza a tre punti. |
sicurezza a tre punti e rimane in |
agli attacchi Isofix posizionati tra |
|
auto pronta per l’uso. |
la seduta del sedile e lo schienale |
|
|
• Il seggiolino-auto «Primo Viaggio |
dell’auto. |
|
|
Tri-Fix K» si aggancia alla |
• Il seggiolino auto «Primo Viaggio Tri- |
|
|
«Adjustable Base» e fissato con la |
Fix K» si aggancia alla base. |
|
|
cintura di sicurezza. |
• Consultare il manuale istruzioni |
|
|
• Consultare il manuale istruzioni di |
di «Isofix Base» per le istruzioni di |
|
|
Adjuistable Base per le istruzioni |
fissaggio in auto. |
|
|
di fissaggio in auto. |
8
IT_Italiano
Grazie per aver scelto un prodotto Peg-Pérego.
Caratteristiche prodotto
•«Primo Viaggio Tri-Fix K» seggiolino di sicurezza per auto, gruppo 0+, è stato sottoposto a tutti i test di sicurezza e omologato secondo la normativa Europea in vigore ECE R44/04, per bambini di peso da 0-13 kg (0-12/14 mesi).
• IMPORTANTE: «Primo Viaggio Tri-Fix K», gruppo 0+, deve essere installato in senso contrario a quello di marcia, su sedili sprovvisti di airbag. Non installare “Primo Viaggio Tri-Fix K” su sedili rivolti in direzione opposta o trasversalmente al senso comune di marcia del veicolo.
•«Primo Viaggio Tri-Fix K» ha “Adjustable Side Impact Protection System”: maggior protezione agli impatti laterali con il “sistema simultaneo” di regolazione poggiatestacinture.
•«Primo Viaggio Tri-Fix K» è omologato per essere fissato in auto senza base e a scelta con due tipi di base (l’uso della base in auto garantisce maggior sicurezza): «Adjustable Base» o «Isofix Base» (assicurarsi che l’autoveicolo sia predisposto al sistema Isofix; vedere anche l’elenco dei modelli delle auto fornito insieme al prodotto).
AVVERTENZA
•Leggere attentamente le istruzioni prima dell’uso e conservarle nell’apposita sede per riutilizzarle in futuro. La mancata scrupolosa osservanza delle istruzioni di installazione del seggiolino-auto comporterebbe dei rischi al vostro bambino.
•Non lasciare mai il bambino incustodito.
•Utilizzare sempre il sistema di ritenuta.
•Le operazioni di montaggio e di installazione devono essere effettuate da adulti.
•Evitare di introdurre le dita nei meccanismi.
•Installare questo seggiolino-auto gruppo 0+ in auto in
9
senso contrario alla direzione di marcia.
•Causa pericolo di morte o lesioni gravi, non installare questo seggiolino auto su sedili passeggero dotati di airbag.
•Causa pericolo airbag, disattivare gli airbag circostanti la postazione del seggiolino auto.
•Nel caso di sedili girevoli o riposizionabili si raccomanda di installare questo seggiolino-auto in senso opposto al senso di marcia.
•In auto prestare particolare attenzione a bagagli o altri oggetti che possono causare lesioni al bambino nel seggiolino-auto in caso di incidente.
•Non utilizzare metodologie di installazione diverse da quelle indicate, pericolo di distacco dal sedile.
•Seggiolino-auto, gruppo 0+, categoria “Universale” omologato secondo la normativa Europea ECE R44/04 per bambini di peso da 0-13 kg (0-12/14 mesi). Adatto alla maggior parte dei sedili delle autovetture, ma non a tutti.
•Seggiolino auto, gruppo 0+, con base Isofix categoria Semiuniversale di classe E.
•Il seggiolino-auto può essere correttamente installato se nel manuale d’uso e manutenzione del veicolo è indicata la compatibilità con sistemi di ritenuta “Universali” di gruppo 0+.
•Questo seggiolino-auto è classificato “Universale” secondo criteri di omologazione più severi rispetto ai modelli precedenti che non dispongono dell’etichetta di omologazione.
•Il seggiolino-auto puó essere utilizzato solo su veicoli approvati, dotati di cintura a tre punti statica o con avvolgitore, omologati secondo il regolamento UN/ECE n°16 o normative equivalenti. Non é consentito usare la cintura a due punti o addominale.
•Per l’installazione del seggiolino-auto, far passare la cintura della vettura a tre punti nelle sedi apposite del
seggiolino contraddistinte dal colore azzurro. Non utilizzare metodologie di installazione diverse da quelle indicate, pericolo di distacco dal sedile.
•Assicurarsi che la cintura a tre punti del veicolo per fissare il seggiolino-auto sia sempre tesa e non attorcigliata, si raccomanda di sostituirla in caso di sollecitazioni eccessive
dovute ad un incidente.
•Se la vettura é in movimento, non togliere mai il bambino dal seggiolino-auto.
•Prestare attenzione che il seggiolino-auto rimanga bloccato da una parte mobile del sedile o da una portiera.
•Per evitare il rischio di caduta, utilizzare sempre la cintura di sicurezza del seggiolino-auto anche per il trasporto fuori dalla vettura. Regolare l’altezza e la tensione delle bretelle verificando che siano aderenti al corpo del bambino senza stringere troppo; verificare che la cintura di sicurezza non sia attorcigliata e che il bambino non la sganci da solo.
•Il seggiolino-auto non sostituisce il lettino, se il bambino ha bisogno di dormire è importante metterlo sdraiato.
•Non lasciare il seggiolino-auto nella vettura sotto l’esposizione del sole, alcune parti potrebbero essersi surriscaldate e nuocere alla pelle delicata del bambino, controllare prima di collocare il bambino.
•Non utilizzare il seggiolino-auto senza il rivestimento di tessuto, tale rivestimento non puó essere sostituito da uno non approvato dal costruttore in quanto costituisce parte integrante del seggiolino e della sicurezza.
•In caso di dubbi, rivolgersi al costruttore o al rivenditore di questo seggiolino-auto.
•Non staccare le etichette adesive e cucite; potrebbero rendere il prodotto non conforme ai sensi di norma.
•Non utilizzare il seggiolino-auto se presenta rotture o pezzi mancanti, se è di seconda mano, o se è stato sottoposto
a sollecitazioni violente in un incidente perchè potrebbe avere subito dei danni strutturali estremamente pericolosi.
•Non effettuare modifiche al prodotto.
•Per eventuali riparazioni, sostituzioni di pezzi e informazioni sul prodotto, contattare il servizio assistenza post-vendita. Le varie informazioni sono all’ultima pagina di questo manuale.
•Non utilizzare il seggiolino-auto dopo cinque anni dalla data di produzione indicata sulla scocca; a causa del naturale invecchiamento dei materiali potrebbe non essere più conforme ai sensi di norma.
•L’utilizzo del seggiolino-auto per neonati prematuri con meno di 37 settimane di gestazione, potrebbe comportare al neonato problemi di respirazione stando seduti nel
10
seggiolino-auto. É opportuno consultare il medico prima di lasciare l’ospedale.
•Non utilizzare accessori che non siano approvati dal costruttore o dalle competenti autorità.
AVVERTENZA:
PER L’UTILIZZO COME SDRAIETTA
•Non utilizzare la sdraietta quando il bambino è in grado di stare seduto da solo.
•Questa sdraietta non è progettata per periodi di sonno prolungati.
•E ‘pericoloso utilizzare la sdraietta su una superficie elevata, ad esempio un tavolo.
Istruzioni d’uso
1• «Primo Viaggio Tri-Fix K» è dotato di Sistema Ganciomatic, per essere agganciato e sganciato in auto a «Isofix Base» o ad «Adjustable Base» e fuori dall’auto ai passeggini o ai
carrelli Peg-Pérego. Per agganciare «Primo Viaggio Tri-Fix K» (a «Isofix Base», a «Adjustable Base», ai passeggini o ai carrelli Peg-Pérego) posizionarlo in corrispondenza degli agganci e spingerlo verso il basso con entrambe le mani fino al click.
2• Per sganciare «Primo Viaggio Tri-Fix K» (da «Isofix Base», a «Adjustable Base», ai passeggini o ai carrelli Peg-Pérego), occorre portare il maniglione nella posizione di trasporto, spingere la leva posta sullo schienale verso l’alto e contemporaneamente sollevare il seggiolino.
3• Per agganciare il cinturino di sicurezza sovrapporre le due bretelle e inserirle nella fibbia del cinturino spartigambe fino al click.
4• Per sganciare il cinturino di sicurezza premere il pulsante rosso sulla fibbia del cinturino spartigambe.
5• Per allentare la tensione della cintura, infilare il dito nell’asola della seduta (fig. a), premere il bottone metallico e contemporaneamente con l’altra mano tirare in su le bretelle (fig. b).
6• Per far aderire le bretelle del cinturino di sicurezza al bambino, tirare verso di sé la cintura di regolazione centrale come in figura, facendo attenzione a non stringere troppo le bretelle al bambino, lasciando un minimo di
![]()
gioco.
7• Le bretelle del cinturino di sicurezza e il poggiatesta «Side Impact Protection» sono regolabili simultaneamente in altezza in 5 posizioni per seguire la crescita del bambino. Per regolare l’altezza, premere il pulsante posteriore del regolatore di altezza (posto sullo schienale del seggiolino) e contemporaneamente alzare o abbassare nella posizione desiderata, assicurandosi del giusto posizionamento dal click. Prima di regolare l’altezza del cinturino di sicurezza e del poggiatesta allentare la tensione delle bretelle.
8• La corretta regolazione del poggiatesta è dato dalla corretta posizione delle bretelle; le spalle del bambino devono essere appena sopra al punto di passaggio delle bretelle.
9• Il seggiolino viene fornito di un cuscino riduttore anatomico per il neonato, da togliere quando il bambino è più grande.
10• Il maniglione del seggiolino ha quattro regolazioni; per ruotarlo premere i due pulsanti rotondi posti sul maniglione e contemporaneamente posizionarlo nella posizione desiderata, fino a sentire il click di posizionamento.
•Posizione A: è la posizione del maniglione in auto; Posizione B: è la posizione del maniglione per il trasporto a mano e per l’aggancio alla base, ai passeggini e ai carrelli; Posizione C: è la posizione che permette al seggiolino di
dondolare; Posizione D: è la posizione che permette al seggiolino di non dondolare.
11• Per montare la capottina, inserire gli attacchi di questa nelle sedi del seggiolino e sistemare la parte posteriore della capottina dietro lo schienale.
12• La capottina ha due regoazioni, per abbassare o alzare la capottina, spingerla indietro o tirarla in avanti. Per togliere la capottina, premere sui pulsanti degli attacchi di questa e contemporaneamente alzarla.
•IMPORTANTE: La capottina non deve essere usata per sollevare il seggiolino, pericolo di distacco.
Istruzioni d’uso in auto
13• Sistemare il seggiolino-auto con il vostro bambino sul sedile, ricordandovi di assicurarlo con il cinturino di
sicurezza.
•Il seggiolino, per avere una corretta posizione in auto, deve essere parallelo al suolo; quindi se necessario, usare asciugamani arrotolati da posizionare sul sedile, sotto al seggiolino.
14• Infilare la cinghia della cintura di sicurezza dell’auto nelle due guide laterali del seggiolino, assicurandosi che sia ben tesa e agganciare la fibbia della cintura dell’auto al sedile come in figura.
15• Impugnare nuovamente la cintura di sicurezza dell’auto e farla passare dietro lo schienale del seggiolino-auto inserendola nella guida posteriore come in figura.
16• In auto il maniglione deve essere abbassato totalmente in avanti in prossimità dello schienale del sedile auto come in figura. Posizionare il maniglione in avanti assicurandosi del giusto posizionamento dal “click”. Verificare che la cintura risulti ben tesa e bloccata per offrire un’adeguata sicurezza.
Sfoderabilità
Per rimuovere il rivestimento del seggiolino auto Primo Viaggio Tri-Fix K:
•per maggiore comodità togliere la capottina.
•Premere il bottone metallico posto nel centro del seggiolino per allungare le bretelle del cinturino di sicurezza;
•premere il pulsante rosso sulla fibbia dello spartigambe per sganciare il cinturino di sicurezza.
17• rimuovere gli spallacci (Fig. a);
• sfilare le cinture dallo schienale dal davanti (Fig. b); 18• Aprire il cinturino (punto 4).
Per estrarre il cinturino, basta farlo passare dall’ asola della sacca, come in figura.
19• Sfilare la fodera del poggiatesta, prima dalla parte bassa e poi con cura, dalle due alette laterali;
ATTENZIONE A NON ROMPERE LE PARTI IN POLISTIROLO (EPS).
20• sfilare le quattro alette di fissaggio dell’imbottitura dal bordo del seggiolino-auto;
•rimuovere i due coperchi delle guide laterali per la cintura dell’auto;
21• sfilare l’imbottitura in sequenza, come in figura.
11
Manutenzione dell’imbottitura
•spazzolare le parti in tessuto per allontanare la polvere e lavare a mano a una temperatura massima di 30° non torcere;
•non candeggiare al cloro;
•non stirare;
•non lavare a secco;
•non smacchiare con solventi e non asciugare a mezzo di asciugabiancheria a tamburo rotativo.
Vestizione
• Per rivestire il seggiolino Primo Viaggio Tri-Fix K: 22• calzare l’imbottitura, in sequenza come in figura:
—calzare dall’alto la sacca
—inserire prima le alette laterali del poggiatesta con attenzione
_ poi farla passare nella parte bassa del poggiatesta.
23• inserire le quattro alette di fissaggio dell’imbottitura nel bordo del seggiolino-auto;
•posizionare i due coperchi delle guide laterali per la cintura dell’auto con le fessure rivolte all’interno del seggiolinoauto e assicurarsi del corretto aggancio;
24• Per calzare la fodera del poggiatesta partire dalle due alette laterali e infine calzare la parte bassa (Fig. a);
•Far passare il cinturino nell’ asola della sacca (Fig. b) ed inserirlo nello spartigambe (Fig. c).
25• IMPORTANTE: il cinturino non deve essere attorcigliato.
•Inserire le cinture nello schienale, come in figura (Fig. a). Agganciare il cinturino di sicurezza dal davanti (Fig. b). Agganciare gli spallacci dotati di velcro (Fig. c).
Numeri di serie
26• Primo Viaggio Tri-Fix K riporta sotto la parte anteriore della seduta, informazioni relative a: nome del prodotto, data di produzione e numerazione seriale dello stesso.
27• Primo Viaggio Tri-Fix K riporta sotto la parte posteriore della
seduta l’ etichetta di omologazione. 28• Data di produzione del cinturino.
Questi elementi sono utili al consumatore nel caso in cui il prodotto dovesse presentare delle problematiche.
Pulizia del prodotto
•Il vostro prodotto necessita un minimo di manutenzione. Le operazioni di pulizia e manutenzione devono essere effettuate solo da adulti.
•Si raccomanda di tenere pulite tutte le parti in movimento.
•Periodicamente pulire le parti in plastica con un panno umido, non usare solventi o altri prodotti simili.
•Spazzolare le parti in tessuto per allontanare la polvere.
•Non pulire il dispositivo di assorbimento d’urto in polistirolo con solventi o altri prodotti simili.
•Proteggere il prodotto da agenti atmosferici, acqua, pioggia o neve; l’esposizione continua e prolungata al sole potrebbe causare cambiamenti di colore in molti materiali.
•Conservare il prodotto in un posto asciutto.
Come leggere l’etichetta di omologazione
In questo paragrafo vi spieghiamo come leggere l’etichetta di omologazione (etichetta arancione).
•L’etichetta è doppia perchè questo seggiolino-auto è omologato per essere fissato in auto in due modi:
•cintura a tre punti statica o con avvolgitore, (la scritta UNIVERSAL indica la compatibilità del seggiolino-auto su veicoli dotati di questo tipo di cintura)
•sistemi di aggancio ISOFIX (la scritta SEMI-UNIVERSAL classe E indica la compatibilità del seggiolino-auto con veicoli equipaggiati con questo sistema)
•In alto all’etichetta c’è il marchio dell’azienda produttrice e il nome del prodotto.
•La lettera E in un cerchio: indica il marchio di omologazione Europea e il numero definisce il paese che ha rilasciato l’omologazione (1: Germania, 2: Francia, 3: Italia, 4: Paesi Bassi, 11: Gran Bretagna e 24: Irlanda).
•Numero di omologazione: se inizia con 04 vuol dire che è il quarto emendamento (quello attualmente in vigore) del
12
regolamento R44.
•Normativa di riferimento: ECE R44/04.
•Numero progressivo di produzione: personalizza ogni seggiolino, dal rilascio dell’omologazione ognuno è contraddistinto dal proprio numero.
PEG-PÉREGO S.p.A.
Peg-Pérego S.p.A. è certificata ISO 9001. La certificazione offre ai clienti e ai consumatori la garanzia di una trasparenza e fiducia nel modo di lavorare dell’impresa.
Peg Pérego potrà apportare in qualunque momento modifiche ai modelli descritti in
questa pubblicazione, per ragioni di natura tecnica o commerciale.Peg Pérego è a disposizione dei suoi Consumatori per soddisfare al meglio ogni loro esigenza. Per questo, conoscere il parere dei ns. Clienti, è per noi estremamente importante e prezioso. Le saremo quindi molto grati se, dopo aver utilizzato un ns. prodotto, vorrà compilare il QUESTIONARIO SODDISFAZIONE CONSUMATORE, segnalando eventuali osservazioni o suggerimenti, che troverà nel nostro sito internet: www.pegperego.com
Servizio assistenza Peg-Pérego
Se fortuitamente parti del modello vengono perse o danneggiate, usare solo pezzi di ricambio originali Peg Pérego. Per eventuali riparazioni, sostituzioni, informazioni sui prodotti, vendita di ricambi originali e accessori, contatta il Servizio Assistenza Peg Pérego indicando, qualora fosse presente, il numero seriale del prodotto.
tel. 0039/039/60.88.213
numero verde: 800/147.414 (contattabile da rete fissa) fax 0039/039/33.09.992 e-mail assistenza@pegperego.it sito internet www.pegperego.com
13
EN_English
|
Primo Viaggio |
Primo Viaggio |
Primo Viaggio |
|
|
Tri-Fix K |
Tri-Fix K |
Tri-Fix K |
|
|
+ |
+ |
||
|
adjustable |
isofix |
||
|
base |
base |
||
|
• “Universal” category. |
• “Universal” category. |
• “Semi-Universal” category class E. |
|
• The «Primo Viaggio Tri-Fix K» car |
• The «Adjustable Base» is installed in |
• The «Isofix Base» with Isofix fixing |
|
safety seat is attached to the car |
the car using the three-point seat |
system is installed in the car |
|
using a three-point seat belt. |
belt and remains in the car ready |
using the Isofix attachments |
|
for use. |
located between the car seat and |
|
|
• The «Primo Viaggio Tri-Fix K» |
backrest. |
|
|
safety seat attaches to the |
• The «Primo Viaggio Tri-Fix K» car |
|
|
«Adjustable Base» and is secured |
safety seat attaches to the base. |
|
|
with the car seat belt. |
• See the «Isofix Base» instruction |
|
|
• See the «Adjustable Base» |
manual for the car installation |
|
|
instruction manual for the car |
procedure. |
|
|
installation procedure. |
14
EN_English
Thank you for choosing a Peg-Pérego product.
Product characteristics
•The «Primo Viaggio Tri-Fix K» group 0+ car safety seat has been subjected to all safety tests and is approved under European standard ECE R44/04, for children of weight from 0 to 13 kg (0 to 12-14 months).
• IMPORTANT: «Primo Viaggio Tri-Fix K», group
0+, must be installed facing opposite to the normal forward movement of the car, on seats without airbags. Do not install “Primo Viaggio Tri-Fix K” on seats that face backwards or sideways.
•«Primo Viaggio Tri-Fix K» has an “Adjustable Side Impact Protection System”: this offers improved protection against side impacts with the “simultaneous system” for headrestharness adjustment.
•«Primo Viaggio Tri-Fix K» is approved for installation in cars without a base support or with two types of base as required (the use of a seat base offers improved safety): «Adjustable Base» or «Isofix Base» (check that the vehicle is fitted with the Isofix system -a list of car models fitted with the system is provided with the product).
WARNING
•Read the instructions carefully before use and keep them in the holder provided for future reference. Failure to closely follow the installation instructions for the car safety seat will put your child at risk.
•Never leave the child unattended.
•Always use the restraint system.
•The assembly and installation operations must be conducted by adults.
•Avoid inserting fingers into the mechanisms.
•Install this group 0+ car safety seat facing opposite to the normal forward movement of the vehicle.
•Death or serious injury can result if this car safety seat is
15
installed on seats with airbags.
•Eliminate danger by disabling airbags surrounding the position of the car safety seat.
•In the case of rotating or movable seats it is important to install this safety seat facing opposite to the normal forward movement of the vehicle.
•When travelling take special care to make sure that luggage or other objects do not injure the child in the safety seat in the case of accidents.
•Do not use installation methods different from those indicated. This would result in the risk of detachment from the seat.
•Car safety seat, group 0+, “Universal” approved under European standard ECE R44/04 for children of weight from 0 to 13 kg (0 to 12/14 months). Suitable for installation on the majority of vehicle seats, but not all.
•Group 0+ child car seat with class E semi-universal Isofix base.
•The car safety seat can be correctly installed if the vehicle’s use and maintenance manual indicates compatibility with “Universal” group 0+ restraint systems.
•This safety seat is classed as “Universal” in compliance with stricter approval criteria than previous models that do not have approval labels.
•The safety seat can only be used in approved vehicles, fitted with static or inertia-reel three-point seat belts, approved under regulation UN/ECE no. 16 or equivalent standards. It must not be used with two-point or lap seat belts.
•To install the car safety seat, pass the three-point seat belt through the slots in the safety seat indicated with light blue markings. Do not use installation methods different from those indicated. This would result in the risk of detachment from the seat.
•Ensure that the three-point car seat belt fixing the safety seat is always taut and not twisted. It should be replaced in the case of heavy stress as a result of an accident.
•Never remove the child from the seat while the vehicle is in motion.
•Make sure that the safety seat is protected from any mobile parts of the car seat or doors.
•To avoid the risk of falling always use the safety seat harness even for transport outside the vehicle. Adjust the height and tension of the straps ensuring that they are snug to the child’s
body without constricting him/her too much. Check that the harness is not twisted and that the child does not release it.
•The safety seat is not a substitute for a cot and if the child needs to sleep it is important to lie him/her down.
•Do not leave the car safety seat in the car exposed to the sun. Some parts might heat up and be harmful to the delicate skin of the child -check before placing the child in the seat.
•Do not use the safety seat without its fabric covering, which cannot be replaced with one not approved by the manufacturer since it is an integral part of the safety seat and the safety system.
•If in doubt refer to the manufacturer or retailer of the safety seat.
•Do not remove the adhesive and stitched labels since this might make the product non compliant with legal requirements.
•Do not use the safety seat if it has signs of breakage or missing parts, is second hand, or if it has been subjected to violent stress in an accident, because it might have suffered extremely dangerous structural damage.
•Do not modify the product.
•For any repairs, replacement parts and information about the product, contact the after-sales assistance service. Contact information is provided on the last page of this manual.
•Do not use this car safety seat after five years from the date of production indicated on the structure. The natural ageing of the materials may mean that it is no longer compliant with standards.
•The use of the safety seat for premature infants born at less than 37 weeks could cause respiration problems for the infant seated in the safety seat. It is advisable to seek medical advice before leaving the hospital.
•Do not use accessories not approved by the manufacturer or by the competent authorities.
WARNING: FOR USE AS A RECLINER.
•Do not use the reclined cradle once your child can sit unaided.
•This reclined cradle is not intended for prolonged periods of sleeping.
•It is dangerous to use this reclined cradle on an elevated surface, e.g. a table.
Instructions for use
1• «Primo Viaggio Tri-Fix K» is provided with the Ganciomatic System for in-car attachment and detachment from an «Isofix Base» or «Adjustable Base» and outside the vehicle to Peg-Pérego strollers and chassis. To attach «Primo Viaggio Tri-Fix K» (to an «Isofix Base», «Adjustable Base», or Peg-Pérego stroller or chassis) align it with the attachment points and push down with both hands until it clicks into place.
2• To release «Primo Viaggio Tri-Fix K» (from an «Isofix Base», «Adjustable Base», or Peg-Pérego stroller or chassis) raise the handle to the transport position, push the lever on the backrest upwards and at the same time raise the safety seat.
3• To engage the safety harness, put the two shoulder straps on and insert them into the buckle of the crotch strap until they click into place.
4• To release the safety harness press the red button on the crotch strap buckle.
5• To slacken the harness, insert a finger into the seat slot (fig. a), press the metal button and at the same time pull the shoulder straps upwards with the other hand (fig. b).
6• To tighten the shoulder straps on the child, pull the central adjustment strap towards you as shown in the figure, taking care not to over-tighten the straps and leaving minimal room to manoeuvre.
7• The shoulder straps of the safety harness and the “Side Impact Protection” headrest can be adjusted simultaneously to 5 different heights so as to follow the growth of the child. To adjust the height, press the rear height adjustment button (on the safety seat backrest) and at the same time raise or lower to the required position, ensuring that it clicks into place. Slacken the shoulder straps before adjusting the height of the safety harness and the headrest.
8• The correct position of the headrest is defined by the correct position of the shoulder straps. The child’s shoulders must be just above the point of passage of the shoulder straps.
9• The seat is equipped with an anatomic padded cushion for newborns, to be removed when the child is older.
10• The safety seat handle has four fixed positions. To rotate it press the two round buttons on the handle and simultaneously move it to the required angle. Ensure it clicks into position.
• Position A: the in-car position; Position B: the position for
16
transport by hand and for attachment to a base, stroller or chassis; Position C: allows the safety seat to rock; Position D: stops the safety seat from rocking.
11• To fit the hood, insert the hood attachments into the slots on the safety seat and arrange the rear part of the hood behind the backrest.
12• The hood has two positions. To raise or lower the hood push it back or pull it forward. To remove the hood, press the buttons on its attachment points and at the same time lift it upwards.
• IMPORTANT: the hood must not be used to lift the safety seat because it might detach.
Instructions for in-car use
13• Fit the car safety seat with the child on the car seat, remembering to secure the child with the safety harness.
•The correct position of the safety seat in the car is parallel with the ground, and so if necessary used rolled towels under the safety seat to adjust the position.
14• Insert the webbing of the car seat belt into the two lateral guides on the safety seat, ensuring that it is taut, and engage the buckle of the car seat belt as shown in the figure.
15• Take hold of the car seat belt again and pass it behind the backrest of the safety seat, inserting it into the rear guide as shown in the figure.
16• In the car the handle must be fully lowered forward towards the car seat backrest as shown in the figure. The correct forward position is reached when it clicks into position. Check that the seat belt is taut and locked to ensure adequate safety.
Removability
To remove the lining of the Primo Viaggio Tri-Fix K car seat:
•remove the hood for added comfort:
•Press the metal button positioned on the centre of the seat to stretch the straps of the safety strap;
•press the red button on the leg divider to release the safety strap.
17• remove the shoulder straps (Fig. a);
• from the front, remove the straps from the backrest (Fig. b); 18• Open the strap (point 4).
To remove the strap, simply slip it through the opening in
the bag, as shown in the figure.
19• slide on the headrest cover from the bottom first and then, carefully, from the two side tabs;
BE CAREFUL NOT TO BREAK POLYSTYRENE (EPS) PARTS
20• remove the four installation tabs of the padding from the edge of the car seat;
•remove the two covers of the lateral guides for the belt of the car;
21• remove the padding in sequence, as shown.
Padding cleaning instructions
•Brush the fabric parts to remove dust and hand wash at a maximum temperature of 30° without wringing.
•Do not use chlorine bleach.
•Do not iron.
•Do not dry clean.
•Do not remove stains with solvents and do not tumble dry.
Lining
•To replace the lining of the Primo Viaggio Tri-Fix K car seat: 22• slide the padding on in sequence, as shown: — slide the
sack on from the top — first put the lateral tabs of the headrest carefully _ then slide it into the bottom of the headrest.
23• insert the four installation tabs of the padding from the edge of the car seat;
•place the two covers of the lateral guides for the belt of the car with the slots facing the inside of the car seat and make sure that it is attached correctly;
24• To slide on the headrest cover from the two lateral tabs and slide on the bottom (Fig. a);
• Slip the strap through the opening in the bag (Fig. b) and insert it into the leg divider (Fig. c).
25• IMPORTANT: the strap must not be twisted.
• Insert the straps in the backrest, as shown (Fig. a) from the front (Fig. b) Attach the shoulder straps with Velcro (Fig. c).
17
Serial numbers
26• The following information can be found under the front of the seat of the Primo Viaggio Tri-Fix K : product name, production date and serial number.
27• The approval label can be found under the back of the seat of the Primo Viaggio Tri-Fix K.
28• Harness production date.
In the event of problems with the product, these details will be of use to customers.
Product cleaning
•This product requires a small amount of maintenance. Cleaning and maintenance must only be carried out by adults.
•It is advisable to keep all the moving parts clean.
•Clean the plastic parts periodically with a damp cloth. Do not use solvents or similar substances.
•Brush the fabric parts to remove dust.
•Do not clean the polystyrene shock absorbing device with solvents or other similar products.
•Protect the product from atmospheric agents: humidity, rain or snow. Extended exposure to sunshine can cause colour changes in many materials.
•Store the product in a dry environment.
How to read the approval label
This paragraph explains how to interpret the approval label (orange label).
•The label is double because this car safety seat is approved for two types of installation in cars:
•three-point seat belt with inertia reel (the term UNIVERSAL indicates compatibility of the safety seat with vehicles fitted with this type of belt);
•ISOFIX attachment systems (the term SEMI-UNIVERSAL class E indicates compatibility of the safety seat with vehicles fitted with this system).
•The top of the label displays the trademark of the manufacturing company and the name of the product.
•The letter E in a circle indicates the European approval mark and the number indicates the country that issued the approval (1: Germany, 2: France, 3: Italy, 4: The Netherlands,
18
11: Great Britain, and 24: Ireland).
•Approval number: if it starts with 04 this indicates the fourth amendment (the one currently in force) of Regulation R44.
•Reference standard: ECE R44/04.
•Production serial number: on issue of approval each safety seat is personalized with its own number.
PEG-PÉREGO S.p.A.
Peg-Pérego S.p.A. is an ISO 9001 certified company. This certification is a guarantee for customers and consumers of the transparency and trustworthiness of the company’s procedures and working methods. Peg Pérego can make changes at any time to the models described in
this publication for technical or commercial reasons. Peg Pérego is at the disposal of its customers and consumers to ensure that all their demands and queries are fully satisfied. It is a key part of our policy to ensure we are always aware of our customers’ views and requirements. We would therefore be very grateful if, after using a Peg Pérego product, you take the time to fill in our CUSTOMER SATISFACTION QUESTIONNAIRE, making a note of any comments or suggestions you might have. You can find the questionnaire on the Peg Pérego website: www.pegperego.com
Peg-Pérego after-sales service
If any parts of the item get lost or damaged, only use genuine Peg Pérego spare parts. For any repairs,
replacements, information on the products and sales of genuine spare parts and accessories, contact the Peg Pérego Assistance Service and state the serial number of the product, if present.
tel. 0039/039/60.88.213 fax 0039/039/33.09.992
e-mail assistenza@pegperego.it website www.pegperego.com
FR_Français
|
Primo Viaggio |
Primo Viaggio |
Primo Viaggio |
|
|
Tri-Fix K |
Tri-Fix K |
Tri-Fix K |
|
|
+ |
+ |
||
|
adjustable |
isofix |
||
|
base |
base |
||
|
• Catégorie « Universel ». |
• Catégorie « Universel ». |
• Catégorie « Semi-Universel », |
|
• Le siège-auto «Primo Viaggio |
• La base réglable «Adjustable Base» |
classe E. |
|
Tri-Fix K» se fixe dans la voiture à |
se fixe dans la voiture à l’aide |
• La base «Isofix Base», dotée du |
|
l’aide de la ceinture de sécurité à |
de la ceinture de sécurité à trois |
système de fixation Isofix, est |
|
trois points. |
points. Elle reste installée dans le |
fixée aux crochets Isofix de |
|
véhicule, prête à l’emploi. |
l’automobile, situés entre l’assise |
|
|
• Le siège-auto «Primo Viaggio Tri- |
et le dossier. |
|
|
Fix K» se fixe à la base «Adjustable |
• La siège-auto «Primo Viaggio Tri- |
|
|
Base» à l’aide des ceintures de |
Fix K» s’accroche à la base. |
|
|
sécurité. |
• Consulter le manuel d’instructions |
|
|
• Consulter le manuel |
de «Isofix Base» pour prendre |
|
|
d’instructions de «Adjustable |
connaissance des instructions de |
|
|
Base» pour prendre connaissance |
montage dans l’automobile. |
|
|
des instructions de montage |
||
|
dans l’automobile. |
19
FR_Français
Merci d’avoir choisi un produit
Peg-Pérego.
Caractéristiques du produit
•Pour la sécurité de l’enfant en voiture, le siège-auto «Primo Viaggio Tri-Fix K», groupe 0+, a été soumis à l’ensemble des tests de sécurité et a été homologué conformément à la norme européenne en vigueur ECE R44/04, pour des enfants de 0 à 13 kg (0-12/14 mois).
• IMPORTANT : «Primo Viaggio Tri-Fix K», groupe 0+, doit être fixé dans le sens contraire à la marche sur des sièges passagers non équipés d’airbag. Ne pas installer «Primo Viaggio Tri-Fix K» sur des sièges tournés dans la direction opposée ou placés transversalement par rapport au sens de marche habituel du véhicule.
•«Primo Viaggio Tri-Fix K» est équipé du système réglable de protection contre les impacts latéraux Adjustable Side Impact Protection System : protection accrue contre les impacts latéraux grâce au « système simultané » de réglage de l’appui-tête et des ceintures.
•«Primo Viaggio Tri-Fix K» est homologué pour une fixation dans l’automobile sans base et, au choix, avec deux types de base (l’utilisation de la base dans la voiture garantit une plus grande sécurité) : «Adjustable Base» ou «Isofix Base» (s’assurer que l’automobile puisse accueillir le système Isofix ; consulter également la liste des modèles d’automobile fournie avec le produit).
AVERTISSEMENT
•Avant l’utilisation, lire les instructions attentivement et les conserver dans l’emplacement prévu à cet effet pour toute référence ultérieure. Le non respect des instructions d’installation du siège-auto peut faire courir des risques à l’enfant.
•Ne jamais laisser un enfant sans surveillance.
•Toujours utiliser le système de retenue.
•Les opérations de montage et d’installation du véhicule
20
doivent être effectuées par des adultes.
•Éviter de mettre les doigts dans les mécanismes.
•Installer ce siège-auto du groupe 0+ dans l’automobile dans le sens contraire à la marche.
•Ne pas installer ce siège-auto sur des sièges passagers équipés d’airbag, en raison d’un danger de mort ou d’un risque de lésions graves.
•L’airbag peut représenter un danger : désactiver les airbags situés à proximité du siège-auto.
•Dans le cas de sièges pivotants ou positionnables, il est recommandé d’installer ce siège-auto dans le sens contraire à la marche.
•Prêter une attention particulière aux bagages ou autres objets présents dans l’habitacle. En cas d’accident, ils peuvent causer des lésions à l’enfant installé dans le siègeauto.
•Ne pas utiliser de systèmes d’installation différents de ceux indiqués ; le siège-auto pourrait se décrocher du siège.
•Siège-auto du groupe 0+, catégorie « semi-universel », classe e, homologué conformément à la norme européenne ece r44/04 pour les enfants de 0 à 13 kg (0-12/14 mois). Adapté à la majeure partie des sièges d’automobiles, mais pas à tous.
•Siège-auto, groupe 0+, avec base isofix catégorie « semiuniversel », classe e.
•Le siège-auto peut être installé correctement si le manuel d’utilisation et d’entretien du véhicule indique que ce dernier est compatible avec des systèmes de retenue « universels » du groupe 0+.
•Ce siège-auto a été classé dans la catégorie « universel » selon des critères d’homologation plus sévères que ceux utilisés pour des modèles précédents, qui ne disposent pas de l’étiquette d’homologation.
•Le siège-auto ne doit être utilisé que sur des véhicules approuvés, équipés de ceintures de sécurité à trois points, statiques ou avec enrouleur, homologués conformément au règlement un/ece n°16 ou toute norme équivalente. L’utilisation de la ceinture de sécurité à deux points ou ventrale n’est pas autorisée.
•Lors de l’installation du siège-auto, faire passer la ceinture à trois points de l’automobile dans les passants du siège-
![]()
auto prévus à cet effet, marqués en bleu. Ne pas utiliser de systèmes d’installation différents de ceux indiqués ; le siège-auto pourrait se décrocher du siège.
•S’assurer que la ceinture à trois points du véhicule utilisée pour fixer le siège-auto est toujours tendue et non vrillée. La remplacer en cas de sollicitations excessives suite à un accident.
•Ne jamais retirer l’enfant du siège-auto lorsque le véhicule est en mouvement.
•Prendre garde à ce que le siège-auto ne soit pas bloqué par une partie mobile du siège ou par une portière.
•Pour éviter le risque de chute, toujours utiliser la ceinture de sécurité du siège-auto, même lors du transport à l’extérieur du véhicule. Régler la hauteur et la tension des bretelles et vérifier qu’elles adhèrent au corps de l’enfant sans trop le serrer ; s’assurer que la ceinture de sécurité n’est pas vrillée et que l’enfant ne la détache pas tout seul.
•Le siège-auto ne remplace pas un lit pour enfant. Si l’enfant a besoin de dormir, il est important de le coucher.
•Ne pas laisser le siège-auto dans le véhicule exposé au soleil ; certaines parties pourraient chauffer et brûler la peau délicate de l’enfant. Contrôler le siège-auto avant d’y installer l’enfant.
•Ne pas utiliser le siège-auto sans sa housse en tissu. Cette housse ne peut être remplacée par une autre housse non approuvée par le fabricant. Elle fait partie intégrante du siège-auto et constitue une garantie de sécurité.
•En cas de doute, s’adresser au fabricant ou au revendeur du siège-auto.
•Ne pas détacher les étiquettes adhésives ou cousues. Le produit pourrait ne plus être conforme aux normes en vigueur.
•Ne pas utiliser ce siège-auto si des pièces sont cassées ou manquantes. Ne pas l’utiliser s’il a été acheté d’occasion ou s’il a été soumis à des sollicitations violentes lors
d’un accident : des dommages structurels extrêmement dangereux pourraient avoir été occasionnés.
•Ne pas apporter de modifications au produit.
•Pour toute réparation, remplacement de pièces et demande d’information sur le produit, contacter le service d’assistance après-vente. Les diverses informations à ce
21
sujet figurent à la dernière page de ce manuel.
•Ne plus utiliser ce siège-auto cinq ans après sa date de fabrication indiquée sur la coque : du fait du vieillissement naturel des matériaux, il pourrait ne plus être conforme aux normes en vigueur.
•L’utilisation du siège-auto pour des nouveaux-nés prématurés de moins de 37 semaines de gestation pourrait entraîner, du fait de la position assise dans le siège-auto, des problèmes de respiration pour le nouveauné. Il convient de consulter un médecin avant de quitter l’hôpital.
•Ne pas utiliser d’accessoires n’ayant pas été approuvés par le fabricant ou les autorités compétentes.
AVERTISSEMENT:
UTILISER COMME TRANSAT
•À la maison, ne pas utiliser le transat dés lors que l’enfant tient assis tout seul.
•Ce transat n’est pas prévu pour de longues périodes de sommeil.
•Il est dangereux de poser ce transat sur une surface en hauteur, par exemple une table.
Instructions d’utilisation
1• Grâce au Système Ganciomatic, «Primo Viaggio Tri-Fix K» peut être monté sur la base Isofix et sur la base «Adjustable Base» dans l’automobile. Hors du véhicule, il peut aussi être monté sur les poussettes et les châssis Peg-Pérego. Pour accrocher «Primo Viaggio Tri-Fix K» (à «Isofix Base» ou «Adjustable Base», aux poussettes ou châssis Peg-Pérego), le positionner en correspondance des fixations et le pousser vers le bas des deux mains, jusqu’à entendre le déclic.
2• Pour décrocher «Primo Viaggio Tri-Fix K» (d’»Isofix Base» ou d’»Adjustable Base», des poussettes ou des châssis PegPérego), mettre la poignée dans la position de transport et pousser le levier situé sur le dossier vers le haut, tout en soulevant le siège-auto.
3• Pour accrocher la ceinture de sécurité, superposer les deux bretelles et les faire passer dans la boucle de la sangle
d’entrejambe, jusqu’à entendre le déclic.
4• Pour décrocher la ceinture de sécurité, appuyer sur le bouton rouge situé sur la boucle de la sangle d’entrejambe.
5• Pour desserrer la ceinture, passer le doigt dans l’ouverture de l’assise (fig. a) et appuyer sur le bouton métallique. Dans le même temps, tirer de l’autre main les bretelles vers le haut (fig. b).
6• Pour faire adhérer les bretelles de la ceinture de sécurité au corps de l’enfant, tirer vers soi la sangle de réglage centrale, comme indiqué sur la figure, en faisant attention de ne pas trop serrer les bretelles sur le corps de l’enfant et de laisser un minimum de jeu.
7• La hauteur des bretelles de la ceinture de sécurité et de l’appui-tête Side Impact Protection peut être réglée simultanément suivant 5 positions pour s’adapter à la
croissance de l’enfant. Pour régler la hauteur, appuyer sur le bouton situé à l’arrière du dispositif de réglage (situé sur le dossier du siège-auto) et, dans le même temps, relever ou abaisser la ceinture de sécurité et l’appui-tête dans la position souhaitée. Le déclic indique un positionnement correct. Desserrer les bretelles avant de régler la hauteur de la ceinture de sécurité et de l’appui-tête.
8• Le bon réglage de l’appui-tête dépend de la position correcte des bretelles ; les épaules de l’enfant doivent se situer juste au-dessus du point de passage des bretelles.
9• Le siège-auto est fourni avec un coussin réducteur anatomique pour le nouveau-né, qui doit être supprimé lorsque le bébé est plus grand.
10• La poignée du siège-auto est dotée de quatre positions de réglage ; pour la déplacer, appuyer sur les deux boutons ronds situés sur la poignée et, dans le même temps, la mettre dans la position souhaitée. Le déclic indique un positionnement correct.
•Position A : position de la poignée lorsque le siège-auto est installé dans l’automobile; Position B : position de la poignée pour le transport du siège-auto à la main et pour l’accrocher à la base, aux poussettes et aux châssis; Position C : position qui permet de bercer l’enfant dans le siègeauto; Position D : position qui empêche le balancement du siège-auto.
11• Pour monter la capote, insérer ses fixations dans les logements du siège-auto prévus à cet effet et placer l’arrière de la capote derrière le dossier.
12• La capote peut être réglée suivant deux positions. Pour abaisser ou relever la capote, la pousser vers l’arrière ou la tirer en avant. Pour enlever la capote, appuyer sur les boutons de ses fixations tout en la relevant.
• IMPORTANT : ne pas soulever le siège-auto en le saisissant par la capote ; celle-ci pourrait se décrocher.
Instructions d’utilisation dans le véhicule
13• Installer le siège-auto avec l’enfant sur le siège du véhicule, en gardant à l’esprit de l’attacher avec la ceinture de sécurité.
•Pour obtenir une position correcte dans le véhicule, le siège-auto doit être parallèle au sol ; si nécessaire, placer des serviettes de toilette enroulées sous le siège-auto.
14• Insérer la ceinture de sécurité du véhicule dans les deux passants latéraux du siège-auto. S’assurer qu’elle est convenablement tendue et la boucler, comme indiqué sur la figure.
15• Se saisir à nouveau de la ceinture de sécurité du véhicule et la faire passer derrière le dossier du siège-auto, en l’insérant dans le passant postérieur, comme indiqué sur la figure.
16• Dans l’automobile, abaisser complètement la poignée vers l’avant, jusqu’à ce qu’elle se trouve à proximité du dossier du véhicule, comme indiqué sur la figure. Déplacer la poignée vers l’avant ; le déclic garantit un positionnement correct. Vérifier que la ceinture est tendue et bloquée, de manière à assurer un niveau de sécurité approprié.
Déhoussage
Pour enlever la housse du siège-auto Primo Viaggio Tri-Fix K:
•pour faciliter l’opération, enlever la capote.
•appuyer sur le bouton en métal situé au centre du siègeauto pour allonger les bretelles du harnais de sécurité ;
•appuyer sur le bouton rouge situé sur la boucle de la sangle d’entrejambes pour décrocher le harnais de
22
sécurité;
17• enlever les épaulières (Fig. a) ;
• enlever le harnais du dossier par le devant (Fig. b) ; 18• Ouvrir la ceinture (point 4).
Pour extraire la ceinture, il suffit de la faire passer par la fente du sac, comme le montre la figure.
19• enlever la housse de l’appuie-tête, d’abord par le bas, puis en faisant attention, par les deux ailettes latérales ;
ATTENTION À NE PAS CASSER LES PARTIES EN POLYSTYRÈNE (EPS).
20• enlever les quatre ailettes de fixation du rembourrage par le bord du siège-auto ;
•enlever les deux couvercles des passants latéraux pour la ceinture de sécurité de la voiture ;
21• enlever le rembourrage dans l’ordre indiqué sur la figure.
Entretien du rembourrage
•brosser les éléments en tissu pour retirer la poussière et laver à la main à une température maximale de 30° ; ne pas tordre ;
•ne pas utiliser de chlore ;
•ne pas repasser ;
•ne pas laver à sec ;
•ne pas détacher à l’aide de solvants et ne pas sécher dans un sèche-linge à tambour rotatif.
Habillage
• Pour rehousser le siège-auto Primo Viaggio Tri-Fix K : 22• enfiler le rembourrage dans l’ordre indiqué sur la figure.
— enfiler le sac par le haut – mettre d’abord les ailettes latérales de l’appuie-tête en faisant bien attention _ puis le faire passe dans la partie basse de l’appuie-tête.
23• introduire les quatre ailettes de fixation du rembourrage au bord du siège-auto ;
•positionner les deux couvercles des passants latéraux pour la ceinture de sécurité avec les fissures tournées vers
l’intérieur du siège-auto et vérifier que tout s’accroche bien;
24• Pour enfiler la housse de l’appuie-tête partir des deux ailettes latérales et enfiler enfin la partie basse (Fig. a) ;
• Faire passer la ceinture dans la fente du sac (Fig. b) et l’introduire dans la sangle entrejambes (Fig. c).
25• IMPORTANT : le harnais ne doit pas être tordu.
• Introduire les ceintures sur le dossier, comme sur la figure (Fig. a) par le devant (Fig. b). Accrocher les épaulières dotées de velcro (Fig. c).
Numéros de série
26• Les informations suivantes sont indiquées sous la partie avant de l’assise de Primo Viaggio Tri-Fix K: nom du produit, date de production et numéro de série du produit.
27• L’étiquette d’homologation est placée sous la partie arrière de l’assise de Primo Viaggio Tri-Fix K.
28• Date de production de la ceinture.
Ces informations sont utiles au client au cas où des problèmes apparaîtraient sur le produit.
Nettoyage du produit
•Ce produit requiert un entretien minimum. Les opérations de nettoyage et d’entretien doivent être effectuées uniquement par des adultes.
•Il est recommandé de garder bien propres toutes les parties en mouvement.
•Nettoyer périodiquement les parties en plastique avec un linge humide ; ne pas utiliser de solvants ou tout produit similaire.
•Épousseter les éléments en tissu pour chasser la poussière.
•Ne pas nettoyer le dispositif d’absorption des chocs en polystyrène avec des solvants ou autres produits similaires.
•Protéger le produit des agents atmosphériques (eau, pluie ou neige) ; une exposition continue et prolongée au soleil peut provoquer la décoloration de nombreux matériaux.
•Conserver le produit dans un endroit sec.
Comment lire l’étiquette d’homologation
Dans cette section, il est expliqué comment lire l’étiquette d’homologation (étiquette orange).
23
•L’étiquette figure en double dans la mesure où ce siègeauto est homologué pour être fixé dans le véhicule de deux façons différentes :
•ceinture à trois points statique ou avec enrouleur (la mention « UNIVERSAL » indique la compatibilité du siègeauto avec des véhicules équipés de ce type de ceinture) ;
•systèmes de fixation ISOFIX (la mention « SEMIUNIVERSAL », classe E, indique que le siège-auto est compatible avec les véhicules équipés de ce système).
•Dans la partie supérieure de l’étiquette, figurent la marque du fabricant et la dénomination du produit.
•La lettre E entourée d’un cercle indique la marque d’homologation européenne et le numéro indique le pays qui a délivré l’homologation (1 : Allemagne ; 2 : France ; 3 : Italie ; 4 : Pays-Bas ; 11 : Grande Bretagne ; 24 : Irlande).
•Numéro d’homologation : s’il commence par 04, cela signifie qu’il fait référence au quatrième amendement (actuellement en vigueur) du règlement R44.
•Norme de référence : ECE R44/04.
•Numéro de production progressif : il permet de personnaliser le siège-auto ; dès la délivrance de l’homologation, sur chaque produit figure un numéro différent.
PEG-PÉREGO S.p.A.
Peg-Pérego S.p.A. est certifiée ISO 9001. La certification offre à la clientèle une garantie de transparence et représente un gage de confiance dans la façon de travailler de l’entreprise. Peg-Pérego se réserve le droit de procéder à tout moment à des modifications
sur les modèles décrits dans cet ouvrage, pour des raisons de nature technique ou commerciale. Peg-Pérego est à la disposition de sa clientèle pour satisfaire au mieux chacune de ses exigences. En cela, il est très important et précieux pour nous de connaître l’opinion de notre clientèle. Nous vous saurions donc gré, après avoir utilisé un de nos produits, de remplir le QUESTIONNAIRE DE SATISFACTION CLIENT, en nous faisant part de toute observation ou suggestion éventuelle. Vous trouverez ce questionnaire sur notre site Internet, à l’adresse www.pegperego.com
24
Service d’assistance Peg-Pérego
En cas de perte de pièces ou de rupture de l’une d’elles, utiliser exclusivement des pièces de rechange originales Peg-Pérego. Pour toute réparation, remplacement, informations sur les produits, vente de pièces détachées d’origine et accessoires, contactez le service après-vente Peg Pérego en indiquant, si présent, le numéro de série du produit.
tél. 0039/039/60.88.213 fax 0039/039/33.09.992
e-mail assistenza@pegperego.it site Internet www.pegperego.com
DE_Deutsch
|
Primo Viaggio |
Primo Viaggio |
Primo Viaggio |
|
|
Tri-Fix K |
Tri-Fix K |
Tri-Fix K |
|
|
+ |
+ |
||
|
adjustable |
isofix |
||
|
base |
base |
||
|
• Kategorie „Universal“. |
• Kategorie „Universal“. |
• Kategorie „Semi-Universal“ Klasse E. |
|
• Der Autositz «Primo Viaggio Tri-Fix |
• Das Basisteil «Adjustable Base» |
• Die Basis «Isofix Base» mit Isofix- |
|
K» wird mit dem Sicherheitsgurt |
wird an drei Stellen mit dem |
Befestigungssystem wird im Auto |
|
an drei Stellen im Auto befestigt. |
Sicherheitsgurt im Auto befestigt |
an den Isofix-Verbindungsstücken |
|
und bleibt gebrauchsfertig im |
befestigt, die zwischen der |
|
|
Auto. |
Sitzfläche und der Rückenlehne |
|
|
• Der Autositz «Primo Viaggio Tri- |
des Sitzes angebracht sind. |
|
|
Fix K» wird an der «Adjustable |
• Der Autositz «Primo Viaggio Tri-Fix |
|
|
Base» eingehakt und mit dem |
K» wird in die Basis eingeklinkt. |
|
|
Sicherheitsgurt befestigt. |
• Bitte beachten Sie für die |
|
|
• Bitte beachten Sie für die |
Befestigung im Auto die |
|
|
Befestigung im Auto die |
Gebrauchsanweisungen von «Isofix |
|
|
Gebrauchsanweisungen von |
Base». |
|
|
«Adjustable Base». |
25
DE_Deutsch
Vielen Dank, dass Sie sich für ein Produkt Peg-Pérego entschieden haben.
Produkteigenschaften
•«Primo Viaggio Tri-Fix K» Sicherheits-Autositz, Gruppe 0+, wurde allen Sicherheitstests unterzogen und ist zugelassen nach der geltenden europäischen Norm ECE R44/04 für Kinder mit einem Gewicht von 0-13 kg (0-12/14 Monate).
• WICHTIG: «Primo Viaggio Tri-Fix K», Gruppe 0+, muss gegen die Fahrtrichtung installiert werden, auf Sitzen ohne Airbag. «Primo Viaggio Tri-Fix K» nicht auf Sitzen entgegen oder quer zur Fahrtrichtung befestigen.
•«Primo Viaggio Tri-Fix K» ist mit dem „Adjustable Side Impact Protection System“ ausgerüstet: Mehr Schutz bei seitlichem Aufprall mit dem „Simultansystem“ dank der Regulierung Kopfstütze-Sicherheitsgurten.
•«Primo Viaggio Tri-Fix K» ist zugelassen für die Befestigung im Auto ohne Basisteil und nach Wunsch mit zwei unterschiedlichen Basis-Teilen (die Verwendung einer Basis im Auto garantiert mehr Sicherheit): «Adjustable Base» oder «Isofix Base» (stellen Sie fest, ob das Fahrzeug für das Isofix-System ausgerüstet ist; kontrollieren Sie es anhand der Liste der Automodelle, die zusammen mit dem Produkt geliefert wurde).
WARNUNG
•Vor Gebrauch die Gebrauchsanweisungen genau durchlesen und sie zum späteren Gebrauch im dafür vorgesehenen Fach aufbewahren. Wenn Sie die Installationsanweisungen für den Autositz
nicht gewissenhaft befolgen, kann dies für Ihr Kind schwerwiegende Folgen haben.
•Lassen Sie Ihr Kind nie unbeaufsichtigt.
•Benutzen Sie stets das Haltesystem.
•Die Montage und die Installation muss von Erwachsenen
26
ausgeführt werden.
•Aufpassen, dass man nicht die Finger in der Mechanik einklemmt.
•Diesen Autositz Gruppe 0+ im Auto gegen die Fahrtrichtung installieren.
•Wegen Todesgefahr oder weil schwere Verletzungen verursacht werden können diesen Autositz nicht auf Beifahrersitzen mit Airbag installieren!
•Wegen Gefahr durch Airbag die Airbags rings um den Kinder-Autositz deaktivieren.
•Bei drehbaren oder verstellbaren Sitzen diese Basis für Kinder-Autositz unbedingt gegen die Fahrtrichtung installieren.
•Aufpassen, dass im Auto bei einem Unfall keine Gepäckstücke oder andere Gegenstände das Kind im Autositz verletzen können.
•Zur Installation keine Methoden verwenden, die von den Gebrauchsanweisungen abweichen, da sich der Kindersitz vom Fahrzeugsitz lösen könnte.
•Autositz, Gruppe 0+, Kategorie „Universal“, zugelassen nach europäischer Regelung ECE R44/04 für Kinder mit einem Gewicht von 0-13 kg (0-12/14 Monate). Passt auf die meisten Fahrzeugsitze, aber nicht auf alle.
•Autositz, Altersgruppe 0+, mit Basisteil Isofix Kategorie semi-universal, Klasse E.
•Der Autositz kann korrekt installiert werden, wenn in der Gebrauchsund Wartungsanleitung des Fahrzeugs steht, dass das Auto mit „Universalen“ Halterungssystemen der Gruppe 0+ kompatibel ist.
•Dieser Autositz ist als „Universal“ eingestuft, nach Zulassungskriterien, die strenger sind als bei den vorhergehenden Modellen, die keine Zulassungsetikette aufweisen.
•Der Autositz darf nur auf getesteten Fahrzeugen verwendet werden, die mit statischem 3-Punkt- Sicherheitsgurt oder mit 3-Punkt-Sicherheitsgurt mit automatischer Aufwicklung ausgestattet sind und die eine Zulassung gemäß Regelung UN/ECE Nr. 16 oder nach gleichwertigen Gesetzgebungen besitzen. 2-Punkte- Sicherheitsgurt oder Bauchgurt sind nicht zulässig.
•Um den Autositz zu installieren, den Sicherheitsgurt des
Autos an drei Stellen durch die hellblau gekennzeichneten Öffnungen ziehen. Zur Installation keine Methoden verwenden, die von den Gebrauchsanweisungen abweichen, da sich der Kindersitz vom Autositz lösen könnte.
•Sicherstellen, dass der 3-Punkte-Sicherheitsgurt des Fahrzeugs zum Befestigen des Autositzes immer straff sitzt und nicht verwickelt ist. Nach überdurchschnittlicher Beanspruchung durch einen Unfall müssen Sie den Sicherheitsgurt ersetzen.
•Nehmen Sie das Kind nie aus dem Autositz, solange das Fahrzeug in Bewegung ist.
•Aufpassen, dass der Autositz nicht durch einen beweglichen Teil des Sitzes oder durch eine Autotür blockiert wird.
•Damit das Kind nicht herausfallen kann, den Sicherheitsgurt des Autositzes immer benutzen, auch für den Transport außerhalb des Fahrzeugs. Die Höhe und die Spannung der Riemen einstellen. Dabei kontrollieren, dass sie am Körper des Kindes anliegen, ohne ihn einzuengen. Sicherstellen, dass der Sicherheitsgurt nicht verwickelt ist und dass das Kind ihn nicht selbständig lösen kann.
•Der Autositz eignet sich nicht als Ersatz für das Bettchen; braucht das Kind Schlaf, so muss man es hinlegen.
•Lassen Sie den Autositz nicht unter Sonnenbestrahlung im Fahrzeug, denn einige Teile könnten zu heiß werden und die zarte Haut des Kindes verwunden. Prüfen Sie den Autositz auf heiße Teile, bevor sie das Kind hineinsetzen.
•Verwenden Sie den Autositz nicht ohne Stoffbezug. Der Bezug darf nicht durch einen anderen, der nicht vom Hersteller geprüft wurde, ersetzt werden, denn er ist Bestandteil des Autositzes und dient der Sicherheit.
•Wenden Sie sich im Zweifelsfall an den Hersteller oder an den Verkäufer dieses Autositzes.
•Aufgeklebte und angenähte Etiketten nicht entfernen, da sonst das Produkt eventuell nicht mehr den gesetzlichen Vorschriften entspricht.
•Den Autositz nicht verwenden, wenn er beschädigt oder unvollständig ist, wenn er aus zweiter Hand stammt oder wenn er bei einem Unfall starken Belastungen ausgesetzt war, da er äußerst gefährliche strukturelle Schäden erlitten
27
haben könnte.
•Keine Änderungen am Produkt vornehmen.
•Wenden Sie sich für Reparaturen, Ersatzteile und Produktinformationen an den Kundendienst. Die verschiedenen Informationen finden Sie auf der letzten Seite dieser Gebrauchsanweisung.
•Den Autositz nicht mehr verwenden, wenn seit dem Produktionsdatum (siehe Angabe auf dem Gestell) fünf Jahre verstrichen sind. Aufgrund der natürlichen Alterung des Materials könnte er nicht mehr den gesetzlichen Bestimmungen entsprechen.
•Die Verwendung des Autositzes bei Frühgeborenen nach weniger als 37 Wochen Schwangerschaft könnten beim Säugling durch die Sitzposition im Autositz
Atembeschwerden auslösen. Bitte Fragen Sie den Arzt um Rat, bevor Sie das Krankenhaus verlassen.
•Keine Zubehöre verwenden, die nicht vom Hersteller oder von den zuständigen Behörden gutgeheißen wurden.
WARNUNG:
ZUR VERWENDUNG ALS WIPPE.
•Benutzen Sie die verstellbare Wippe nicht weiter, wenn Ihr Kind ohne Hilfe sitzen kann.
•Diese verstellbare Wippe ist nicht für längeres Schlafen bestimmt.
•Das Aufstellen der verstellbaren Wippe auf hohen Flächen, z.B. Tisch oder Arbeitsfläche, ist gefährlich.
Gebrauchsanweisungen
1• «Primo Viaggio Tri-Fix K» ist mit dem Ganciomatic-System ausgerüstet, mit dem der Kindersitz im Auto auf «Isofix Base» oder «Adjustable Base» und außerhalb des Autos auf Peg-Pérego Sportwagen und Untergestelle passt. Zum Festmachen (an «Isofix Base», «Adjustable Base», an Sportwagen oder Untergestellen Peg-Pérego) «Primo Viaggio Tri-Fix K» auf der Höhe der Haken platzieren und
mit beiden Händen nach unten drücken, bis Sie ein Klicken hören.
2• Zum Lösen des «Primo Viaggio Tri-Fix K» (von «Isofix Base», «Adjustable Base», Sportwagen oder Untergestellen Peg-
Pérego) den Griff in die Transportstellung biegen, den Hebel am Rückenteil nach oben drücken und gleichzeitig den Sitz hochheben.
3• Zum Festmachen des Sicherheitsgurts die beiden Riemen übereinander legen und in die Schnalle des Beintrenngurts stecken, bis Sie ein Klicken hören.
4• Zum Lösen des Sicherheitsgurts den roten Knopf auf der Schnalle des Beintrenngurts drücken.
5• Zur Lockerung der Gurte, mit einem Finger auf die Wipptaste am vorderen Rand der Sitzfläche drücken (Abb. a), und mit der anderen Hand gleichzeitig die Schultergurte hochziehen (Abb. b).
6• Um die Riemen des Sicherheitsgurts fester anzuziehen, den mittleren Gurt, der zur Regulierung dient, nach vorn ziehen (siehe Abbildung). Dabei aufpassen, dass Sie die Riemen nicht zu satt anziehen, sondern dem Kind etwas Bewegungsfreiheit lassen.
7• Die Riemen des Sicherheitsgurts und die Kopfstütze „Side Impact Protection“ sind simultan in fünf Positionen höhenverstellbar, um sie dem Wachstum des Kindes anzupassen. Um die Höhe zu verstellen, den hinteren
Knopf der Höheneinstellung (am Rückenteil des Autositzes) drücken und gleichzeitig nach oben ziehen oder nach unten drücken, um die gewünschte Position zu erreichen. Die Stellung ist korrekt, sobald Sie ein Klicken hören. Bevor Sie die Höhe des Sicherheitsgurts und der Kopfstütze einstellen, die Spannung der Riemen lockern.
8• Die korrekte Einstellung der Kopfstütze ist abhängig von der korrekten Position der Riemen; die Schultern des Kindes müssen knapp über der Öffnung liegen, durch die die Riemen verlaufen.
9• Der Autositz wird mit einem anatomischen Sitzverkleinerer für Säuglinge geliefert, der entfernt wird, wenn das Kind größer geworden ist.
10• Der Griff des Autositzes besitzt vier Einstellungen. Zum Drehen die beiden Knöpfe auf dem Griff drücken und diesen gleichzeitig in die erwünschte Position biegen, bis er einrastet.
•Position A: Position des Griffs im Auto; Position B: Position des Griffs für den Transport von Hand und um den Autositz an der Basis, am Sportwagen und am Untergestell
einzuklinken; Position C: Schaukel-Position; Position D: Position, in der der Autositz nicht schaukeln kann.
11• Zum Befestigen des Verdecks die Verbindungsstücke des Verdecks in die Öffnungen des Autositzes stecken und den hinteren Teil des Verdecks über das Rückenteil ziehen.
12• Das Verdeck hat zwei Einstellungen; zum Herunterklappen oder Hochklappen das Verdeck nach hinten drücken oder nach vorn ziehen. Zum Entfernen des Verdecks die Knöpfe der Verbindungsstücke drücken und gleichzeitig das Verdeck hochziehen.
• WICHTIG: Das Verdeck darf nicht verwendet werden, um den Autositz hochzuheben, da es sich lösen könnte.
Anweisungen für den Gebrauch im Auto
13• Den Autositz mit dem Kind auf den Fahrzeugsitz stellen; vergessen Sie nicht, das Kind mit dem Sicherheitsriemen zu sichern.
•Für eine korrekte Stellung im Auto muss der Autositz parallel zum Boden stehen. Falls nötig zusammengerollte Handtücher zwischen dem Fahrzeugsitz und dem Autositz platzieren.
14• Den Riemen des Auto-Sicherheitsgurts in die beiden seitlichen Schienen des Autositzes einführen. Dabei aufpassen, dass der Auto-Sicherheitsgurt straff gespannt ist, dann die Schnalle des Auto-Sicherheitsgurts am Fahrzeugsitz festmachen (siehe Abbildung).
15• Den Auto-Sicherheitsgurt von Neuem fassen und hinter der Rückenlehne des Autositzes durchziehen; dabei durch die Schiene auf der Rückseite führen (siehe Abbildung).
16• Der Griff muss im Auto ganz nach vorn zur Rückenlehne geklappt werden (siehe Abbildung). Den Griff nach vorn biegen, bis Sie ein Klicken hören. Stellen Sie sicher, dass der Gurt straff gespannt und blockiert ist, damit er angemessene Sicherheit garantiert.
Entfernen des Bezugs
Um den Bezug des Autokindersitzes Primo Viaggio Tri-Fix K abzuziehen:
• für bequemeres Vorgehen, das Verdeck entfernen.
28
•Den Metallknopf in der Mitte des Kindersitzes betätigen, um die Gurte des Sicherheitsgurts zu verlängern;
•die rote Taste auf dem Gurtschloss des Schrittgurtes betätigen, um den Sicherheitsgurt zu lösen.
17• die Schulterpolster entfernen (Abb. a);
• die Gurte von vorn aus der Rückenlehne ziehen (Abb. b); 18• Den Sicherheitsgurt öffnen (Punkt 4).
Um den Sicherheitsgurt herauszuziehen, diesen durch die Öse des Sacks führen, wie in der Abbildung dargestellt.
19• das Futter der Kopfstütze zuerst vom unteren Teil und dann vorsichtig von den beiden Seitenteilen abziehen;
DARAUF ACHTEN, DIE TEILE AUS STYROPOR (EPS) NICHT ZU BESCHÄDIGEN.
20• die vier Befestigungen der Polsterung vom Rand des Autokindersitzes entfernen;
•die beiden Abdeckungen der seitlichen Führungen für den Sicherheitsgurt des Autos entfernen;
21• der Reihe nach die Polsterung entfernen wie in der Abbildung dargestellt.
Pflege der Polsterung
•die Stoffbereiche abbürsten, um den Staub zu entfernen. Waschen nur von Hand bei einer maximalen Temperatur von 30° C. Nicht auswringen oder schleudern;
•nicht mit Bleichmittel behandeln;
•nicht bügeln;
•keine Trockenwäsche anwenden
•nicht mit Fleckenlöser behandeln und nicht im Drehtrommeltrockner trocknen.
Anbringen des Bezugs
•Um den Bezug auf dem Autokindersitz Primo Viaggio TriFix K anzubringen:
22• die Polsterung der Reihe nach aufziehen, wie in der Abbildung dargestellt. — den Überzug von oben aufziehen und dabei zuerst die Seitenteile der Kopfstütze vorsichtig anbringen und dann zum unteren Teil der Kopfstütze
übergehen.
23• die vier Befestigungen der Polsterung am Rand des Autokindersitzes anbringen;
•die beiden Abdeckungen der seitlichen Führungen für den Sicherheitsgurt des Autos mit den Schlitzen zur Innenseite des Autokindersitzes positionieren und die korrekte Befestigung überprüfen;
24• Zum Aufziehen des Futters der Kopfstütze mit den beiden Seitenteilen beginnen und schließlich den unteren Teil aufziehen (Abb. a);
• Den Sicherheitsgurt durch die Öse des Sacks (Abb. b) führen und in den Schrittgurt (Abb. c) einführen.
25• WICHTIG: der Gurt darf nicht verdreht sein.
• die Gurte von vorn in die Rückenlehne einführen, wie in der Abbildung dargestellt (Abb. b). Die mit Klettverschluss versehenen Schulterpolster anbringen (Abb. c).
Seriennummern
26• Am Primo Viaggio Tri-Fix K finden Sie vorne unter dem Sitz folgende Angaben: Produktname, Herstellungsdatum und Seriennummer des Kindersitzes.
27• Auf der Rückseite des Primo Viaggio Tri-Fix K finden Sie das Prüfzertifikat.
28• Herstellungsdatum des Sicherheitsgurtes.
Für den Benutzer sind diese Informationen bei eventuellen Problemen mit dem Produkt wichtig.
Reinigung
•Ihr Produkt braucht nur geringe Wartung. Reinigung und Wartung dürfen nur von Erwachsenen durchgeführt werden.
•Es wird empfohlen, alle beweglichen Teile sauber zu halten.
•Regelmäßig die Kunststoffteile mit einem feuchten Tuch reinigen, keine Lösungsmittel oder ähnliche Produkte verwenden.
•Stoffteile mit einer Bürste von Staub befreien.
•Den Stoßdämpfer aus Styropor nie mit Lösungsmitteln oder anderen ähnlichen Produkten reinigen.
•Das Produkt vor Witterung schützen, vor Wasser, Regen
29
oder Schnee; wird das Produkt wiederholt und über längere Zeit der Sonne ausgesetzt, können die Farben vieler Materialien verblassen.
• Das Produkt trocken aufbewahren.
Bedeutung der Zulassungsetikette
In diesem Abschnitt erklären wir Ihnen die Bedeutung der Aufschriften auf der Zulassungsetikette (orange Etikette).
•Die Etikette ist doppelt, da dieser Autositz die Zulassung für zwei verschiedene Befestigungsarten im Auto besitzt:
•Statischer 3-Punkte-Sicherheitsgurt oder 3-Punkte- Sicherheitsgurt mit automatischer Aufwicklung (die Aufschrift UNIVERSAL bedeutet, dass der Autositz mit Fahrzeugen, die mit diesen Sicherheitsgurten ausgerüstet sind, kompatibel ist)
•Schnappvorrichtungssysteme ISOFIX (die Aufschrift SEMI-UNIVERSAL Klasse E bedeutet, dass der Autositz mit Fahrzeugen, die mit diesem System ausgerüstet sind, kompatibel ist)
•Im oberen Teil der Etikette steht das Markenzeichen der Herstellerfirma und der Produktname.
•Der Buchstabe E in einem Kreis: gibt die europäische Zulassungsmarke an. Die Zahl definiert das Land, das die Zulassung ausgestellt hat (1: Deutschland, 2: Frankreich, 3: Italien, 4: Holland, 11: England, 24: Irland).
•Zulassungsnummer: beginnt sie mit 04, bedeutet dies, dass es sich um die vierte Änderung (die momentan geltende) der Vorschrift R44 handelt.
•Bezugsvorschrift: ECE R44/04.
•Progressive Produktionsnummer: Personalisiert jeden Sitz. Jeder Sitz ist nach der Ausstellung der Zulassung durch eine eigene Nummer gekennzeichnet.
PEG-PÉREGO S.p.A.
Peg-Pérego S.p.A. ist gemäß ISO 9001 zertifiziert. Die Zertifizierung garantiert den Kunden und Verbrauchern Transparenz und ermöglicht das Vertrauen in die Arbeitsweise des Unternehmens. Peg Pérego kann zu jedem beliebigen Zeitpunkt Änderungen an
den in dieser Veröffentlichung beschriebenen Modellen
30
sowohl aus technischen, als auch aus kommerziellen Gründen vornehmen. Peg Pérego steht den Verbrauchern zur Verfügung, um deren Anforderungen auf das Bestmöglichste gerecht zu werden. Demnach ist es ausgesprochen wichtig und wertvoll für uns, über die Meinung unserer Kunden Bescheid zu wissen. Wir bitten Sie daher, das FORMULAR ÜBER DIE KONSUMENTENZUFRIEDENHEIT auszufüllen, nachdem Sie unsere Produkte ausprobiert haben. Das Formular ist unter folgender Internetadresse abrufbar: www.pegperego.com.
Kundendienst Peg-Pérego
Sollten Teile des Modells verloren gehen oder beschädigt werden, ersetzen Sie diese bitte ausschließlich durch originale Peg Perego-Teile. Für Reparaturen, Ersatzteile, Produktinformationen und Anbieter von originalen Ersatzteilen und Zubehör wenden Sie sich bitte an den Peg Perego Kundendienst. Halten Sie hierfür, wenn möglich, die Seriennummer des betreffenden Produktes bereit.
Tel. 0039/039/60.88.213
Fax 0039/039/33.09.992 E-Mail assistenza@pegperego.it
Webseite www.pegperego.com
![]()
ES_Español
|
Primo Viaggio |
Primo Viaggio |
Primo Viaggio |
|
|
Tri-Fix K |
Tri-Fix K |
Tri-Fix K |
|
|
+ |
+ |
||
|
adjustable |
isofix |
||
|
base |
base |
||
|
• Categoría “Universal”. |
• Categoría “Universal”. |
• Categoría “Semi-Universal” clase E. |
|
• La silla de auto «Primo Viaggio Tri- |
• La base «Adjustable Base» se |
• La base «Isofix Base» con sistema |
|
Fix K» se instala en el coche con |
instala en el coche con el |
de acoplamiento Isofix, se instala |
|
el cinturón de seguridad de tres |
cinturón de seguridad de tres |
en el coche con los enganches |
|
puntos. |
puntos y queda fijada al coche |
Isofix que se hallan entre el |
|
lista para su uso. |
asiento y el respaldo del coche. |
|
|
• La silla de auto «Primo Viaggio Tri- |
• La silla de auto «Primo Viaggio Tri- |
|
|
Fix K» se acopla a la «Adjustable |
Fix K» se acopla a la base. |
|
|
Base» y se instala con el cinturón |
• Consultar el manual de |
|
|
de seguridad. |
instrucciones de «Isofix Base» para |
|
|
• Consultar el manual de |
la instalación en el coche. |
|
|
instrucciones de «Adjustable Base» |
||
|
para la instalación en el coche. |
31
ES_Español
Le agradecemos haber elegido un producto Peg-Pérego.
Características del producto
•«Primo Viaggio Tri-Fix K», la silla de seguridad del grupo 0+ para automóviles, ha sido sometida a todas las pruebas de seguridad y está homologada según la normativa europea en vigor ECE R44/04, con un rango de peso del bebé entre 0-13 kg (0-12/14 meses).
• IMPORTANTE: «Primo Viaggio Tri-Fix K», grupo 0+, debe orientarse en sentido contrario a la marcha y ubicarse en asientos que no estén dotados de airbag. No instalar “Primo Viaggio Tri-Fix K” en asientos que estén girados en sentido contrario o transversal a la dirección de la marcha del vehículo.
•«Primo Viaggio Tri-Fix K» dispone de “Adjustable Side Impact Protection System”: mayor protección frente a impactos laterales con el “sistema simultáneo” de regulación reposacabezas-cinturones.
•«Primo Viaggio Tri-Fix K» cuya homologación también permite su instalación en el coche sin la base, dispone de dos tipos de base (cuyo uso garantiza una mayor
seguridad): «Adjustable Base» o «Isofix Base» (asegurarse de que el vehículo esté predispuesto para una instalación del sistema Isofix. Véase también el listado de los modelos de coches que se entrega junto con el producto).
ADVERTENCIA
•Leer detenidamente las instrucciones antes del uso y guardarlas para futuras consultas. La inobservancia de las instrucciones de instalación de la silla de auto podría comportar riesgos para su bebé.
•Nunca deje solo a su hijo.
•Siempre utilice el sistema de sujeción.
•Las operaciones de montaje e instalación deben realizarse por adultos.
•Evitar introducir los dedos en los dispositivos.
32
•Instalar esta silla de auto, grupo 0+, en sentido contrario a la marcha del coche.
•No instalar esta silla de auto en asientos dotados de airbag a fin de prevenir un peligro de muerte y posibles lesiones graves.
•Para prevenir el peligro del airbag, desactivar los airbag del asiento donde se haya ubicado la silla de auto.
•En caso de asientos giratorios o que puedan quitarse, se aconseja instalar esta silla de auto en sentido contrario a la marcha.
•En el coche, prestar especial atención a las maletas u otros objetos que puedan causar en caso de accidentes lesiones al niño estando en la silla de auto.
•No seguir el método de instalación indicado puede alterar la adhesión de la silla al asiento.
•Silla de auto, grupo 0+, categoría “Universal” está homologada según la normativa europea ECE R44/04, con un rango de peso del bebé entre 0-13 kg (0-12/14 meses). Se adapta a la mayoría de los asientos de los vehículos, pero no a todos.
•Silla de auto, grupo 0+, con base Isofix categoría Semiuniversal de clase E.
•La silla de auto puede instalarse correctamente si en el manual de uso y mantenimiento del vehículo se indicada la compatibilidad con sistemas de retención “Universales” del grupo 0+.
•Esta silla de auto se ha clasificado como “Universal” atendiendo a los criterios de homologación más severos respecto de otros modelos anteriores que no disponen de dicha homologación.
•La silla de auto puede utilizarse sólo en vehículos aprobados, dotados de cinturón de tres puntos estático o con enrollador y homologados según el reglamento UN/ ECE n°16 o según normativas equivalentes. No se permite el uso del cinturón de dos puntos o abdominal.
•Para instalar la silla de auto, pasar el cinturón del coche de tres puntos por los respectivos alojamientos de la silla evidenciados con el color azul. No seguir el método de instalación indicado puede alterar la adhesión de la silla al asiento.
•Para instalar la silla de auto, asegurarse de que el cinturón
de tres puntos del vehículo esté siempre tensado y no enredado y, sustituirlo si ha ejercido grandes esfuerzos en caso de accidente.
•Si el vehículo está en movimiento, no quitar nunca al niño de la silla de auto.
•Prestar atención a que ninguna parte móvil del asiento o la puerta del coche bloqueen la silla de auto.
•Para evitar el riesgo de caída, utilizar siempre el cinturón de seguridad de la silla de auto incluso para el transporte fuera del coche. Regular la altura y el tensado de los tirantes
de modo que abracen al cuerpo del niño sin apretarle demasiado; comprobar que el cinturón de seguridad no esté enredado ni que el niño pueda quitárselo solo.
•La silla de auto no sustituye la cuna, de modo que si el niño necesita dormir déjelo reposar en posición estirada.
•Una exposición prolongada de la silla de auto al sol podría recalentarla y dañar la delicada piel del niño; controlar antes de acomodar al niño.
•No utilizar la silla de auto sin su tapizado; no sustituirlo por otro que no esté autorizado por el fabricante ya que constituye un componente de la silla y de su seguridad.
•En caso de dudas, diríjase al fabricante o al distribuidor de este producto.
•No quite las etiquetas adhesivas o permanentes ya que el producto puede que no sea conforme a lo dispuesto en la ley.
•No utilizar la silla de auto si presenta roturas o faltan piezas o si es de segunda mano o si ha sido sometida a esfuerzos violentos en un accidente, pues podría haberse dañado gravemente la estructura.
•No modificar el producto.
•Para realizar las eventuales reparaciones, sustituciones de piezas y obtener información sobre el producto,
contactar con el departamento de asistencia postventa. Las informaciones figuran en la última página de este manual.
•No utilizar la silla de auto una vez transcuridos cinco años a partir de la fecha de fabricación que se indica en el chasis ya que el envejecimiento natural de los materiales podría no respetar lo dispuesto en la ley.
•La utilización de la silla de auto para recién nacidos prematuros con menos de 37 semanas de gestación podría
33
comportar al recién nacido problemas de respiración al estar sentado en la silla de auto. Por ello, conviene consultar el médico antes de salir del hospital.
•No utilizar accesorios que no hayan sido autorizados por el fabricante o por las autoridades competentes.
ADVERTENCIA:
PARA USO COMO SILLÓN RECLINABLE
•Una vez que pueda sentarse solo, no utilice el mecedor.
•No se recomienda que los niños duerman durante muchas horas en el mecedor.
•Es peligroso utilizar el mecedor en superficies altas, como por ejemplo en una mesa.
Instrucciones de uso
1• «Primo Viaggio Tri-Fix K» dispone del Sistema Ganciomatic para poder engancharse y desengancharse, en el coche, a «Isofix Base» o a «Adjustable Base» y, fuera del coche, a las sillas de paseo o a los carritos Peg-Pérego. Para enganchar «Primo Viaggio Tri-Fix K» (a «Isofix Base», a «Adjustable Base», a las sillas de paseo o a los carritos Peg-Pérego) hay que colocarla de manera que se acople a los enganches y empujarla hacia abajo con ambas manos hasta oír un “clic”.
2• Para desenganchar «Primo Viaggio Tri-Fix K» (de «Isofix Base», de «Adjustable Base», de las sillas de paseo o de los carritos Peg-Pérego) hay que poner la empuñadura en la posición de transporte, empujar hacia arriba la palanca que está detrás del respaldo y levantar simultáneamente la silla.
3• Para enganchar la correa de seguridad hay que superponer los dos tirantes y meterlos en la hebilla de la correa de la tira entrepiernas hasta oír un “clic”.
4• Para desenganchar la correa de seguridad, pulsar el botón rojo sobre la hebilla de la tira entrepiernas.
5• Para aflojar la tensión del cinturón, meter el dedo en la ranura del asiento (fig. a), pulsar el botón metálico y tirar simultáneamente con la otra mano las correas hacia arriba (fig. b).
6• Para que se ajusten al niño los tirantes de la correa de seguridad, tirar hacia sí del cinturón de regulación central
Loading…