
-
Contents
-
Table of Contents
-
Bookmarks
Quick Links
IP Office 9.0
1608/1616 Phone User Guide
15-601040 Issue 07g — (03 April 2014)
Related Manuals for Avaya 1608
Summary of Contents for Avaya 1608
-
Page 1
IP Office 9.0 1608/1616 Phone User Guide 15-601040 Issue 07g — (03 April 2014) -
Page 2
Concurrent User License (CU). End User may install and use the Software on multiple Designated Processors or one or more Servers, so long as only the licensed number of Units are accessing and using the Software at any given time. A “Unit” means the unit on which Avaya, at its sole discretion, bases the pricing of its licenses and can be, without limitation, an agent, port or user, an e-mail or voice mail account in the name of a person or corporate function (e.g., webmaster or helpdesk), or a directory entry in the administrative database utilized by the… -
Page 3
Each Product has its own ordering code. Note that each instance of a Product must be separately licensed and ordered. “Instance” means one unique copy of the Software. For example, if the end user customer or Avaya channel partner would like to install two instances of the same type of Products, then two Products of that type must be ordered. -
Page 4
Contact Avaya Support See the Avaya Support website: http://support.avaya.com for product notices and articles, or to report a problem with your Avaya product. For a list of support telephone numbers and contact addresses, go to the Avaya Support website: http://support.avaya.com, scroll to the bottom of the page, and select Contact Avaya Support. -
Page 5: Table Of Contents
…………..16 Conference Calls 1.7 Labels …………..17 8.1 Starting a Conference …………..62 1.8 IP Phone Features (1608 and 1616) …………..17 8.2 Adding a Call to a Conference …………..62 1.9 The Main Phone Menus …………..18 8.3 Viewing Conference Details …………..
-
Page 6
18.8 Group Membership …………..159 16.2.12 Flash Hook …………….131 18.9 Group Service Status …………..159 16.2.13 Group BLF …………….131 18.10 Mobile Twinning …………..160 1608/1616 Phone User Guide Page 6 IP Office 9.0 15-601040 Issue 07g (03 April 2014) -
Page 7
22.25 Mobile Twinning …………..192 22.26 Park Call …………..193 22.27 Park Slot Number …………..193 22.28 Ringing Line Preference …………..193 22.29 Short Codes …………..193 1608/1616 Phone User Guide Page 7 IP Office 9.0 15-601040 Issue 07g (03 April 2014) -
Page 9: Introduction
Chapter 1. Introduction 1608/1616 Phone User Guide Page 9 IP Office 9.0 15-601040 Issue 07g (03 April 2014)
-
Page 11: Important Safety Information
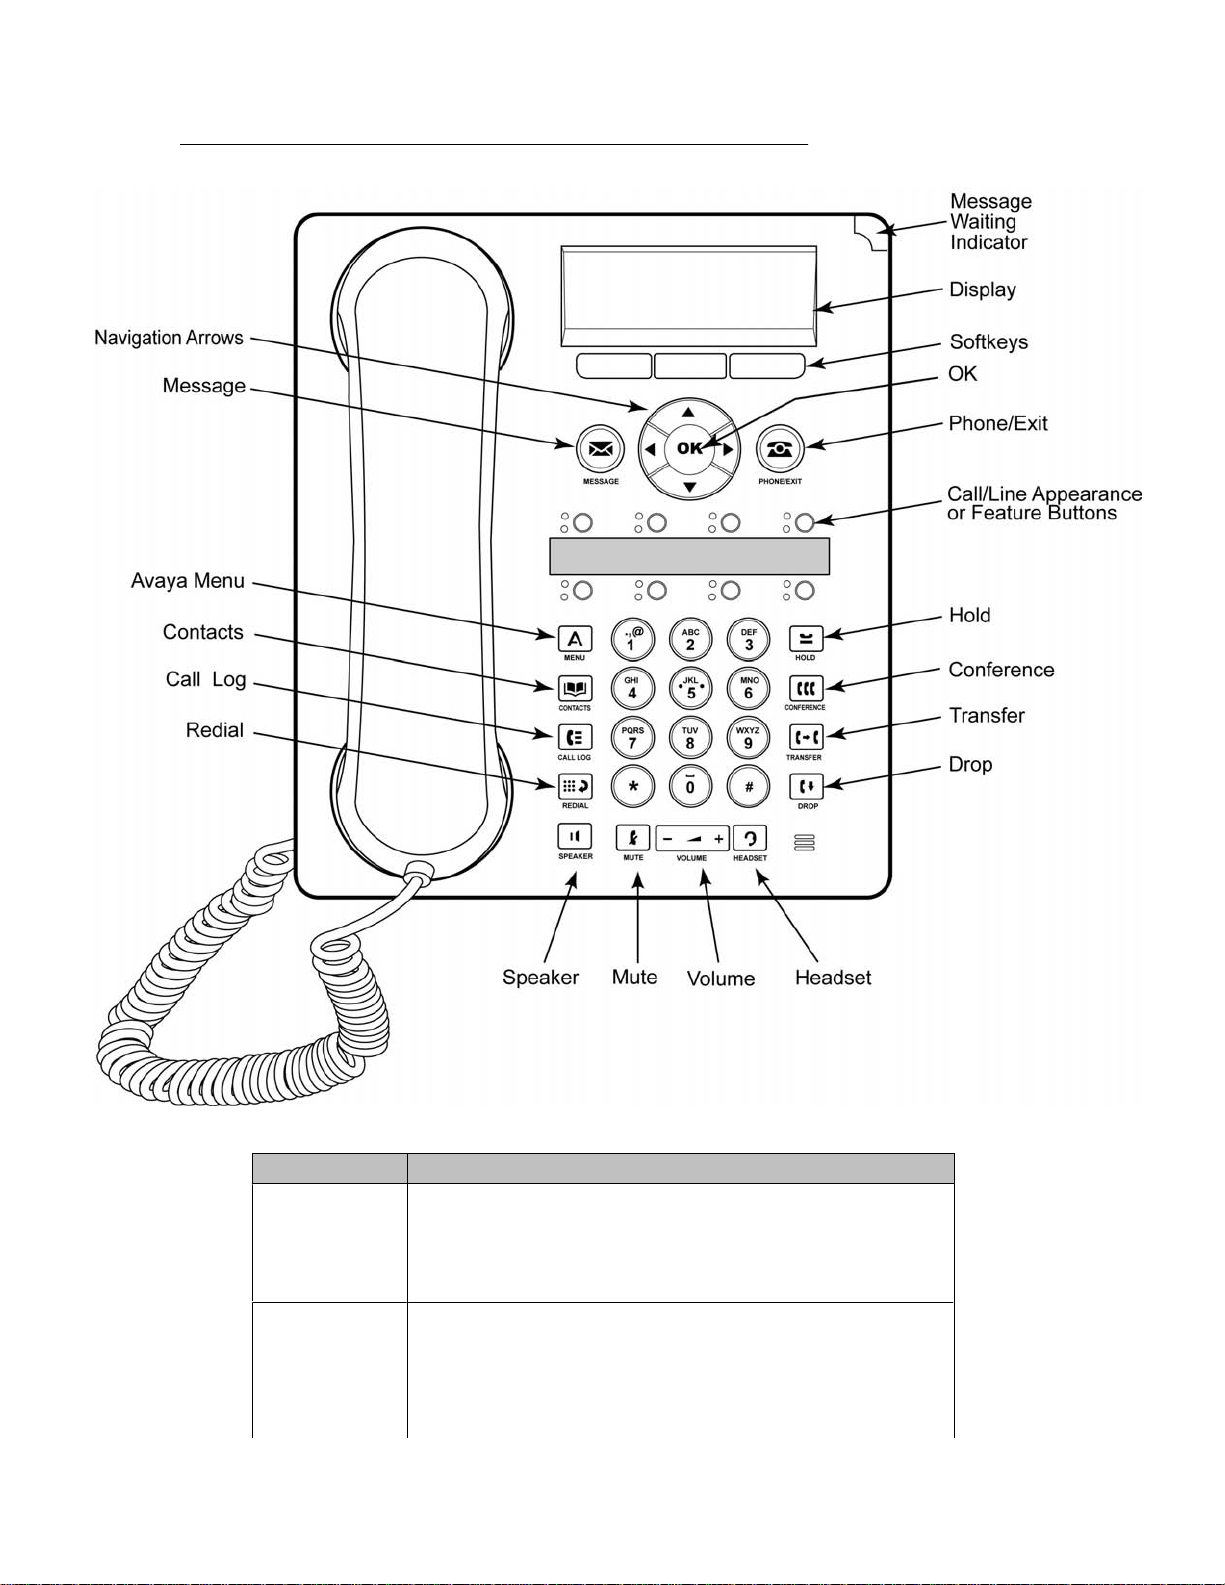
Introduction: 1. Introduction This guide is for 1608 and 1616 phones when being used on an Avaya IP Office telephone system running in IP Office Essential Edition, Preferred Edition, Advanced Edition or Server Edition mode. 1616 Telephone 1608 Telephone 1.1 Important Safety Information Warning: This handset may pickup small metal objects such as metal pins or staples.
-
Page 12: 08 Phones
The microphone is located at the bottom right of the keypad. · The phone includes a headset socket for connection of phone headsets. · The 1608 and 1616 phones are connect to the telephone system via the IP data network and so have some additional options, see…
-
Page 13: 16 Phones
The microphone is located at the bottom right of the keypad. · The phone includes a headset socket for connection of phone headsets. · The 1608 and 1616 phones are connect to the telephone system via the IP data network and so have some additional options, see…
-
Page 14: Button Modules
· When used with buttons modules, the 1616 must use a separate power supply unit. It cannot use Power over Ethernet (PoE) to drive the phone and the button modules. · The button module used for 1416 phones is not interchangeable with that used for 1616 phones and vice versa. 1608/1616 Phone User Guide Page 14 IP Office 9.0…
-
Page 15: Phone Keys
These button represent calls that you can make or receive. Feature Buttons — Those key not configured as appearance keys can be used for other functions. · 1608/1616 Phone User Guide Page 15 IP Office 9.0 15-601040 Issue 07g (03 April 2014)
-
Page 16: The Phone Stand
This peg can be reversed to more securely anchor the handset when the stand places the phone in an upright position. On the 1416 and 1616 phones, the angle of the phone display can also be adjusted as shown below. 1608/1616 Phone User Guide Page 16 IP Office 9.0…
-
Page 17: Labels
1.8 IP Phone Features (1608 and 1616) The 1608 and 1616 phones connect to the phone system using an IP connection and support a number of additional features: · The phone uses a 10/100 Ethernet connection to connect to the telephone system via the IP network.
-
Page 18: The Main Phone Menus
The action of each button is normally set by the system administrator. However you can also use the self-administer menu to select and assign actions to the buttons. 1608/1616 Phone User Guide Page 18 IP Office 9.0 15-601040 Issue 07g (03 April 2014)
-
Page 19
You can also use the left arrow key to switch between the Appearance menu , Features menu and Button Features menu. 1608/1616 Phone User Guide Page 19 IP Office 9.0 15-601040 Issue 07g (03 April 2014) -
Page 20: Other Menus
Visual Voice menu diagram shows a summary of the menu options. 1608/1616 Phone User Guide Page 20 IP Office 9.0 15-601040 Issue 07g (03 April 2014)
-
Page 21: Phone Status Letters
· S = System Alarm If you are configured as a system administrator , an S in the phone’s display indicates a system alarm 1608/1616 Phone User Guide Page 21 IP Office 9.0 15-601040 Issue 07g (03 April 2014)
-
Page 22: Appearance Buttons/Menu
Those buttons that have not been configured as appearance buttons can be used as feature buttons 1608/1616 Phone User Guide Page 22 IP Office 9.0 15-601040 Issue 07g (03 April 2014)
-
Page 23: Using The Appearance Menu
To access these, press the >> double-arrow soft key and select the required function. 1608/1616 Phone User Guide Page 23 IP Office 9.0 15-601040 Issue 07g (03 April 2014)
-
Page 24: Call Apperance Buttons
Red off. Inaccessible The button pressed is not accessible. The call is still dialing, ringing or cannot be bridged into. Green broken flash. 1608/1616 Phone User Guide Page 24 IP Office 9.0 15-601040 Issue 07g (03 April 2014)
-
Page 25
The call that you made or received on the call appearance has been put on hold by the other party. Holding You have put the call on hold. 1608/1616 Phone User Guide Page 25 IP Office 9.0 15-601040 Issue 07g (03 April 2014) -
Page 26: Bridged Appearance Buttons
Green flash. Red off. Inaccessible The button pressed is not useable. The call is still dialing, ringing or cannot be bridged into. Green broken flash. 1608/1616 Phone User Guide Page 26 IP Office 9.0 15-601040 Issue 07g (03 April 2014)
-
Page 27
If the other user puts their call on the matching call appearance on hold, your bridged appearance will indicate the held call. You can retrieve the held call by pressing the Pickup soft key or pressing the bridged appearance button. 1608/1616 Phone User Guide Page 27 IP Office 9.0… -
Page 28: Call Coverage Buttons
The user has answered the call requiring coverage. Green on. Red off. On Hold Here The covered call has been put on hold by the call coverage button user. Green fast flash. 1608/1616 Phone User Guide Page 28 IP Office 9.0 15-601040 Issue 07g (03 April 2014)
-
Page 29
If the call is from another internal user and they put the call on hold, the held state is indicated. You can retrieve the call from hold by pressing the call coverage button again. 1608/1616 Phone User Guide Page 29 IP Office 9.0… -
Page 30: Line Appearance Buttons
Green flash. Red off. Inaccessible The button pressed is not accessible. The call is still dialing, ringing, routing or cannot be Green broken bridged into. flash. 1608/1616 Phone User Guide Page 30 IP Office 9.0 15-601040 Issue 07g (03 April 2014)
-
Page 31: Making Calls
Chapter 2. Making Calls 1608/1616 Phone User Guide Page 31 IP Office 9.0 15-601040 Issue 07g (03 April 2014)
-
Page 32: 2. Making Calls
If the call is external and no external line is currently available, the message WAITING FOR LINE is displayed. The display will indicate when the call is connected to the destination or to an outgoing line. 1608/1616 Phone User Guide Page 32 IP Office 9.0…
-
Page 33: En-Bloc Dialing
En-Bloc Dial. 5. Use the left and right arrow keys to change the setting or use the indicated soft key. 1608/1616 Phone User Guide Page 33 IP Office 9.0 15-601040 Issue 07g (03 April 2014)
-
Page 34: Call Soft Key Options
Quiet the ringer for the current alerting call. The call will continue alerting until either answered or it goes to voicemail. · Pickup Answer the call that is held or alerting another user. · ToVM Send an alerting call to your voicemail. 1608/1616 Phone User Guide Page 34 IP Office 9.0 15-601040 Issue 07g (03 April 2014)
-
Page 35: Calling A Person From The Contacts List
2. Press the Call soft key or OK to call the number displayed in the call record. 1608/1616 Phone User Guide Page 35 IP Office 9.0 15-601040 Issue 07g (03 April 2014)
-
Page 36: Redialling A Previous Number
Feature Button self-administer function can be used to assign a feature button as a page button using the Group Paging action. 1608/1616 Phone User Guide Page 36 IP Office 9.0 15-601040 Issue 07g (03 April 2014)
-
Page 37: Withholding Your Number
Access Control Your system administrator can configure whether you can access this menu option. See Menu Access Control 1608/1616 Phone User Guide Page 37 IP Office 9.0 15-601040 Issue 07g (03 April 2014)
-
Page 38: Adjust The Call Volume
HEADSET key is lit. Pressing the key again will end the call. · If the call is connected on the phone’s handset, replacing the handset will end the call. 1608/1616 Phone User Guide Page 38 IP Office 9.0 15-601040 Issue 07g (03 April 2014)
-
Page 39: Answering Calls
Chapter 3. Answering Calls 1608/1616 Phone User Guide Page 39 IP Office 9.0 15-601040 Issue 07g (03 April 2014)
-
Page 40: 3. Answering Calls
1. This guide assumed that auto hold is enabled (the default). The system administrator can disable auto hold for the system, in which case calls are automatically disconnected rather than held. 1608/1616 Phone User Guide Page 40 IP Office 9.0…
-
Page 41: Divert A Call To Voicemail
Access Control Your system administrator can configure whether you can access this menu option. See Menu Access Control 1608/1616 Phone User Guide Page 41 IP Office 9.0 15-601040 Issue 07g (03 April 2014)
-
Page 42: Call Pickup
Pickup a call ringing a user’s extension number (N). · Pickup a Group Members Call: *53*N# Pickup a call ringing the members of a group (N). This does not necessarily have to be a group call. 1608/1616 Phone User Guide Page 42 IP Office 9.0…
-
Page 43: Redialling
Chapter 4. Redialling 1608/1616 Phone User Guide Page 43 IP Office 9.0 15-601040 Issue 07g (03 April 2014)
-
Page 44: Redial A Call (One Mode)
10 most recent outgoing calls. 2. Press the Call soft key or OK to call the number displayed in the call record. 3. Continue in the same way as for a normal dialed call. 1608/1616 Phone User Guide Page 44 IP Office 9.0…
-
Page 45: Selecting Your Redial Mode
6. Use either the Change soft key or the left or right arrow keys to change the mode. 7. When the required mode is displayed, press the Done soft key. 1608/1616 Phone User Guide Page 45 IP Office 9.0 15-601040 Issue 07g (03 April 2014)
-
Page 46: View Call Details
5. Using the telephone keypad and the Bksp soft key you can edit the name and the number. 6. When the name and number are set as required, press the Save soft key. To return without saving the name and number, press the Cancel soft key. 1608/1616 Phone User Guide Page 46 IP Office 9.0…
-
Page 47: Holding And Parking Calls
Chapter 5. Holding and Parking Calls 1608/1616 Phone User Guide Page 47 IP Office 9.0 15-601040 Issue 07g (03 April 2014)
-
Page 48: 5. Holding And Parking Calls
… can be used with conference calls..can be used to start or add calls to a conference..the call is assigned a unique ID. 1608/1616 Phone User Guide Page 48 IP Office 9.0 15-601040 Issue 07g (03 April 2014)
-
Page 49: Holding Calls
· You can press the >> double-arrow soft key. · Press the Pickup soft key to take the call off hold. 1608/1616 Phone User Guide Page 49 IP Office 9.0 15-601040 Issue 07g (03 April 2014)
-
Page 50: Switching Between Calls
Note: If you are the only internal user in the conference, depending on your telephone systems configuration, dropping yourself might end the conference. Consult your system administrator for details. 1608/1616 Phone User Guide Page 50 IP Office 9.0 15-601040 Issue 07g (03 April 2014)
-
Page 51: Parking Calls
Parks the held call using the park number dialed in place of N. · Unpark Call: *38*N# Unpark the call parked using the park number N. 1608/1616 Phone User Guide Page 51 IP Office 9.0 15-601040 Issue 07g (03 April 2014)
-
Page 52: Park Using The Menu
Your system administrator can configure whether you can access this menu option. See Menu Access Control Access Control Your system administrator can configure whether you can access this menu option. See Menu Access Control 1608/1616 Phone User Guide Page 52 IP Office 9.0 15-601040 Issue 07g (03 April 2014)
-
Page 53: Park & Page
3. Dial * and then press Dir. Select the required user or hunt group from the directory and press Page. To Unpark a Call 1. Dial the park slot number that was assigned to the parked call. 1608/1616 Phone User Guide Page 53 IP Office 9.0…
-
Page 54: Ip Office 9.0
1608/1616 Phone User Guide Page 54 IP Office 9.0 15-601040 Issue 07g (03 April 2014)
-
Page 55: 1608/1616 Phone User Guide
Chapter 6. Transferring Calls 1608/1616 Phone User Guide Page 55 IP Office 9.0 15-601040 Issue 07g (03 April 2014)
-
Page 56: Transferring Calls
Complete to connect the two calls. Held calls that are not pending transfer will not be affected. Moreover, it is not possible to have more than one call ‘on hold pending transfer.’ 1608/1616 Phone User Guide Page 56 IP Office 9.0…
-
Page 57: Transfer To Your Mobile Phone
2. If necessary, use the p up and down q arrow keys to highlight Transfer to Mobile. Press Select. Access Control Your system administrator can configure whether you can access this menu option. See Menu Access Control 1608/1616 Phone User Guide Page 57 IP Office 9.0 15-601040 Issue 07g (03 April 2014)
-
Page 59: Account Codes
Chapter 7. Account Codes 1608/1616 Phone User Guide Page 59 IP Office 9.0 15-601040 Issue 07g (03 April 2014)
-
Page 60: Forced Account Code Entry
Access to the enter account code menu can be assigned to a feature button configured with the Account Code Entry action. The button can also be preset with a specific account code. 1608/1616 Phone User Guide Page 60 IP Office 9.0 15-601040 Issue 07g (03 April 2014)
-
Page 61: Conference Calls
Chapter 8. Conference Calls 1608/1616 Phone User Guide Page 61 IP Office 9.0 15-601040 Issue 07g (03 April 2014)
-
Page 62: Starting A Conference
5. If they do not want to join the call or do not answer, press DROP and then press the appearance key of the held call (fast green flash). 1608/1616 Phone User Guide Page 62 IP Office 9.0 15-601040 Issue 07g (03 April 2014)
-
Page 63: Viewing Conference Details
Warning: This only applies to conference calls hosted by your own telephone system. Holding your call to a conference hosted on another telephone system may cause that conference to hear your system’s music on hold. 1608/1616 Phone User Guide Page 63 IP Office 9.0…
-
Page 65: Headset/Handsfree Operation
Chapter 9. Headset/Handsfree Operation 1608/1616 Phone User Guide Page 65 IP Office 9.0 15-601040 Issue 07g (03 April 2014)
-
Page 66: Headset Operation
Headset Operation Settings You can adjust the following headset settings: Headset Volume · Default Audio Path · Headset Automatic Gain Control On/Off · 1608/1616 Phone User Guide Page 66 IP Office 9.0 15-601040 Issue 07g (03 April 2014)
-
Page 67: Headset Volume
On/Off soft key. 6. When completed, press the Done soft key. 7. Press the Exit soft key to exit the menus. 1608/1616 Phone User Guide Page 67 IP Office 9.0 15-601040 Issue 07g (03 April 2014)
-
Page 68: Handsfree Speaker Operation
Handsfree Operation Settings You can adjust the following handsfree settings: Speaker Volume · Default Audio Path · Speaker Automatic Gain Control On/Off · 1608/1616 Phone User Guide Page 68 IP Office 9.0 15-601040 Issue 07g (03 April 2014)
-
Page 69: Speaker Volume
On/Off soft key. 6. When completed, press the Done soft key. 7. Press the Exit soft key to exit the menus. 1608/1616 Phone User Guide Page 69 IP Office 9.0 15-601040 Issue 07g (03 April 2014)
-
Page 71: Contacts/Directory
Chapter 10. Contacts/Directory 1608/1616 Phone User Guide Page 71 IP Office 9.0 15-601040 Issue 07g (03 April 2014)
-
Page 72: 10. Contacts/Directory
3. The system administrator can set users and hunt groups as Ex Directory. Those users and hunt groups are then not included in the directory. 1608/1616 Phone User Guide Page 72 IP Office 9.0…
-
Page 73: Viewing Contacts Details
It is also present for external directory entries if you have been setup as a system phone user by the system administrator. Edit · Edit the name and number. Delete · Delete the name and number. 1608/1616 Phone User Guide Page 73 IP Office 9.0 15-601040 Issue 07g (03 April 2014)
-
Page 74: Make A Call From The Directory
· To view additional details about the currently displayed name, press the Details key. · When the required entry is displayed, press Select. 3. You will be returned to the menu in which you selected the Dir soft key. 1608/1616 Phone User Guide Page 74 IP Office 9.0…
-
Page 75: Adding A New Contact
· External directory contacts imported by the system cannot be edited. · However, if a local entry is created with the same name or number as an imported entry, the imported entry is discarded in favor of the local one. 1608/1616 Phone User Guide Page 75 IP Office 9.0…
-
Page 76: Add A Contact From The Call Log
5. Using the telephone keypad and the Bksp soft key you can edit the name and the number. 6. When the name and number are set as required, press the Save soft key. To return without saving the name and number, press the Cancel soft key. 1608/1616 Phone User Guide Page 76 IP Office 9.0…
-
Page 77: Editing A Contact
· External directory contacts imported by the system cannot be edited. · However, if a local entry is created with the same name or number as an imported entry, the imported entry is discarded in favor of the local one. 1608/1616 Phone User Guide Page 77 IP Office 9.0…
-
Page 78: Deleting A Contact
· External directory contacts imported by the system cannot be edited. · However, if a local entry is created with the same name or number as an imported entry, the imported entry is discarded in favor of the local one. 1608/1616 Phone User Guide Page 78 IP Office 9.0…
-
Page 79: Call Log
Chapter 11. Call Log 1608/1616 Phone User Guide Page 79 IP Office 9.0 15-601040 Issue 07g (03 April 2014)
-
Page 80: 11. Call Log
2. The call log on other types of phones is a local call log maintained by that phone. It will not move with you when you hot desk and it will be lost if the phone is restarted. 3. The redial function uses the outgoing call records stored in the call log. 1608/1616 Phone User Guide Page 80 IP Office 9.0…
-
Page 81: Using The Call Log
2. Press the Call soft key or OK to call the number displayed in the call record. 1608/1616 Phone User Guide Page 81 IP Office 9.0 15-601040 Issue 07g (03 April 2014)
-
Page 82: Viewing Call Details
Add the name and number to your personal directory. You can edit the details before they are added. · Back Go back to the normal call screen to select another call record. 1608/1616 Phone User Guide Page 82 IP Office 9.0…
-
Page 83: Deleting A Record
2. Press the More soft key. 3. Press the Del All soft key to delete all your call log records. 1608/1616 Phone User Guide Page 83 IP Office 9.0 15-601040 Issue 07g (03 April 2014)
-
Page 84: Adding A Record To Your Contacts
5. Using the telephone keypad and the Bksp soft key you can edit the name and the number. 6. When the name and number are set as required, press the Save soft key. To return without saving the name and number, press the Cancel soft key. 1608/1616 Phone User Guide Page 84 IP Office 9.0…
-
Page 85: Voicemail
Chapter 12. Voicemail 1608/1616 Phone User Guide Page 85 IP Office 9.0 15-601040 Issue 07g (03 April 2014)
-
Page 86: Message Waiting Indication
The Message Waiting Indicator (MWI) indicates new messages in the voicemail mailbox. It remains lit until you play each new message. The system administrator can also configure it so that you receive new message waiting indication for a hunt group or hunt groups. 1608/1616 Phone User Guide Page 86 IP Office 9.0 15-601040 Issue 07g (03 April 2014)
-
Page 87: Checking Messages
(24 hours for embedded voicemail, 30 days for Voicemail Pro). For voicemail messages on a Voicemail Pro system, the system administrator can customize the delay and can also apply automatic deletion times to new and saved messages. 1608/1616 Phone User Guide Page 87 IP Office 9.0…
-
Page 88: Sending A Message
Switch between the different sets of available soft key functions. · Others Add other extension numbers to which you want to send the message. · Record Record the message again. 1608/1616 Phone User Guide Page 88 IP Office 9.0 15-601040 Issue 07g (03 April 2014)
-
Page 89: Mailbox Greeting
Intuity voicemail allows a number of greeting to be recorded and then used for different call types (internal, external, etc). These greetings are setup and recorded through the mailbox voice prompt interface or using the one-X Portal for IP Office application. 1608/1616 Phone User Guide Page 89 IP Office 9.0…
-
Page 90: Mailbox Name
Switch between the different sets of available soft key functions. · Submit Submit the new recording as your mailbox name. · Delete Delete your current mailbox name. The voicemail will use the default name. 1608/1616 Phone User Guide Page 90 IP Office 9.0 15-601040 Issue 07g (03 April 2014)
-
Page 91: Email Mode
5. When the required setting is displayed, press the Select soft key. To exit without changing the setting, press the Exit soft key. Access Control Your system administrator can configure whether you can access this menu option. See Menu Access Control 1608/1616 Phone User Guide Page 91 IP Office 9.0 15-601040 Issue 07g (03 April 2014)
-
Page 92: Changing Your Voicemail Code
Voicemail. 2. Press the Select soft key. 3. Press the On or Off soft key to change the setting. 1608/1616 Phone User Guide Page 92 IP Office 9.0 15-601040 Issue 07g (03 April 2014)
-
Page 93: Transfer To Voicemail
6. You will now see the visual voice menu Access Control Your system administrator can configure whether you can access this menu option. See Menu Access Control 1608/1616 Phone User Guide Page 93 IP Office 9.0 15-601040 Issue 07g (03 April 2014)
-
Page 95: Logging In/Out
Chapter 13. Logging In/Out 1608/1616 Phone User Guide Page 95 IP Office 9.0 15-601040 Issue 07g (03 April 2014)
-
Page 96: 13. Logging In/Out
Login to a phone using your extension number (N) and login code (P). · Log Out: *36 Log yourself out from the phone where you are currently logged in. 1608/1616 Phone User Guide Page 96 IP Office 9.0 15-601040 Issue 07g (03 April 2014)
-
Page 97: Logging In
2. The login menu is displayed. Enter your extension number. 3. Press the Next soft key. Enter your login code. 4. Press the Done soft key. 1608/1616 Phone User Guide Page 97 IP Office 9.0 15-601040 Issue 07g (03 April 2014)
-
Page 98: Logout
5. The phone is now locked as indicated by the display. Access Control Your system administrator can configure whether you can access this menu option. See Menu Access Control 1608/1616 Phone User Guide Page 98 IP Office 9.0 15-601040 Issue 07g (03 April 2014)
-
Page 99: Auto Lock
1. Press the Unlock soft key. 2. Enter your login code. 3. Press the Done soft key. 1608/1616 Phone User Guide Page 99 IP Office 9.0 15-601040 Issue 07g (03 April 2014)
-
Page 100: Changing Your Login Code
3. Press the Select soft key. 4. Press the Log Out soft key. 5. The phone now displays the menu for unregistered phone log in 1608/1616 Phone User Guide Page 100 IP Office 9.0 15-601040 Issue 07g (03 April 2014)
-
Page 101: Redirecting Calls
Chapter 14. Redirecting Calls 1608/1616 Phone User Guide Page 101 IP Office 9.0 15-601040 Issue 07g (03 April 2014)
-
Page 102: 14. Redirecting Calls
Internal External Voicemail Follow Me Follow Me To Follow Me Here Forward Forward on Busy Forward on No Answer Forward Unconditional Do Not Disturb Twinning 1608/1616 Phone User Guide Page 102 IP Office 9.0 15-601040 Issue 07g (03 April 2014)
-
Page 103: Follow Me
· Cancel All Forwarding: *00 Switch off any forwarding. Includes forward unconditional, forward on busy, forward on no answer, follow me and do not disturb. 1608/1616 Phone User Guide Page 103 IP Office 9.0 15-601040 Issue 07g (03 April 2014)
-
Page 104: Follow Me To (Features Menu)
· To change the destination of the setting, press the Edit soft key. Access Control Your system administrator can configure whether you can access this menu option. See Menu Access Control 1608/1616 Phone User Guide Page 104 IP Office 9.0 15-601040 Issue 07g (03 April 2014)
-
Page 105: Follow Me Here (Features Menu)
· Press the Save soft key to set the follow me here. Access Control Your system administrator can configure whether you can access this menu option. See Menu Access Control 1608/1616 Phone User Guide Page 105 IP Office 9.0 15-601040 Issue 07g (03 April 2014)
-
Page 106: Forwarding Calls
, the telephone system will attempt to redirect forwarded calls to voicemail if they are still unanswered after having rung for your no answer time (default 15 seconds). This is not always possible for calls that have been forwarded to an external number. 1608/1616 Phone User Guide Page 106 IP Office 9.0…
-
Page 107: Default Short Codes
· Switch Forward On Busy On: *03 · Switch Forward On Busy Off: *04 · Switch Forward on No Answer On: *05 · Switch Forward on No Answer Off: *06 1608/1616 Phone User Guide Page 107 IP Office 9.0 15-601040 Issue 07g (03 April 2014)
-
Page 108: Forward Unconditional (Status Menu)
· Select edit to change the number to which calls are forwarded. Access Control Your system administrator can configure whether you can access this menu option. See Menu Access Control 1608/1616 Phone User Guide Page 108 IP Office 9.0 15-601040 Issue 07g (03 April 2014)
-
Page 109: Forward Unconditional (Features Menu)
Only, External and Group, Non Group Calls and All Calls. Access Control Your system administrator can configure whether you can access this menu option. See Menu Access Control 1608/1616 Phone User Guide Page 109 IP Office 9.0 15-601040 Issue 07g (03 April 2014)
-
Page 110: Forward On No Answer (Status Menu)
Selecting Change will set a forward on busy/no answer destination, it will not change the forward unconditional destination. Access Control Your system administrator can configure whether you can access this menu option. See Menu Access Control 1608/1616 Phone User Guide Page 110 IP Office 9.0 15-601040 Issue 07g (03 April 2014)
-
Page 111: Forward On Busy (Status Menu)
Selecting Change will set a forward on busy/no answer destination, it will not change the forward unconditional destination. Access Control Your system administrator can configure whether you can access this menu option. See Menu Access Control 1608/1616 Phone User Guide Page 111 IP Office 9.0 15-601040 Issue 07g (03 April 2014)
-
Page 112: Forward On Busy/No Answer (Features Menu)
Selecting Change will set a forward on busy/no answer destination, it will not change the forward unconditional destination. Access Control Your system administrator can configure whether you can access this menu option. See Menu Access Control 1608/1616 Phone User Guide Page 112 IP Office 9.0 15-601040 Issue 07g (03 April 2014)
-
Page 113: Do Not Disturb
· Cancel All Forwarding: *00 Switch off any forwarding. Includes forward unconditional, forward on busy, forward on no answer, follow me and do not disturb. 1608/1616 Phone User Guide Page 113 IP Office 9.0 15-601040 Issue 07g (03 April 2014)
-
Page 114: Dnd On/Off (Features Menu)
· use the Delete soft key to delete the number shown. Access Control Your system administrator can configure whether you can access this menu option. See Menu Access Control 1608/1616 Phone User Guide Page 114 IP Office 9.0 15-601040 Issue 07g (03 April 2014)
-
Page 115: Twinning
Using the phone menus you can switch use of mobile twinning on/off and change the destination number for twinned calls. 1608/1616 Phone User Guide Page 115 IP Office 9.0…
-
Page 116: Mobile Twinning Control
7. When a number has been entered, you can access the Enable and Disable soft keys to turn use of mobile twinning on or off. The Clear soft key removes the existing twinning number in order to allow entry of a new number. 1608/1616 Phone User Guide Page 116 IP Office 9.0…
-
Page 117: Transfering A Call To Your Mobile Phone
3. To turn twinning off, press the Off soft key. Alternatively, to access the mobile twinning settings, press the Details soft key. See Mobile Twinning Control 1608/1616 Phone User Guide Page 117 IP Office 9.0 15-601040 Issue 07g (03 April 2014)
-
Page 119: Groups
Chapter 15. Groups 1608/1616 Phone User Guide Page 119 IP Office 9.0 15-601040 Issue 07g (03 April 2014)
-
Page 120: 15. Groups
Set a hunt group into night service status by entering its extension number (N). · Night Service Status Off: *21*N# Take a hunt group out of night service status by entering its extension number (N). 1608/1616 Phone User Guide Page 120 IP Office 9.0…
-
Page 121: Group Membership
The system administrator is able to configure if you can access the Membership, State and Fallback options of a group. If you are not configured for any groups then the Group menu is not shown. 1608/1616 Phone User Guide Page 121 IP Office 9.0…
-
Page 122: Group Membership On/Off (Features Menu)
The system administrator is able to configure if you can access the Membership, State and Fallback options of a group. If you are not configured for any groups then the Group menu is not shown. 1608/1616 Phone User Guide Page 122 IP Office 9.0…
-
Page 123: Group Service Status And Fallback
The system administrator is able to configure if you can access the Membership, State and Fallback options of a group. If you are not configured for any groups then the Group menu is not shown. 1608/1616 Phone User Guide Page 123 IP Office 9.0…
-
Page 124: Changing The Group Service Status (Features Menu)
The system administrator is able to configure if you can access the Membership, State and Fallback options of a group. If you are not configured for any groups then the Group menu is not shown. 1608/1616 Phone User Guide Page 124 IP Office 9.0…
-
Page 125: Changing The Group Service Status (Status Menu)
The system administrator is able to configure if you can access the Membership, State and Fallback options of a group. If you are not configured for any groups then the Group menu is not shown. 1608/1616 Phone User Guide Page 125 IP Office 9.0…
-
Page 126: Changing The Group Fallback
The system administrator is able to configure if you can access the Membership, State and Fallback options of a group. If you are not configured for any groups then the Group menu is not shown. 1608/1616 Phone User Guide Page 126 IP Office 9.0…
-
Page 127: Button Features
Chapter 16. Button Features 1608/1616 Phone User Guide Page 127 IP Office 9.0 15-601040 Issue 07g (03 April 2014)
-
Page 128: Programming A Button
11.Repeat the process to program another button or press Back and then Exit to finish. Access Control Your system administrator can configure whether you can access this menu option. See Menu Access Control 1608/1616 Phone User Guide Page 128 IP Office 9.0 15-601040 Issue 07g (03 April 2014)
-
Page 129: Features
CPark · Some actions are not supported on all phones. However they may be set for users who hot desk between different types of phone. 1608/1616 Phone User Guide Page 129 IP Office 9.0 15-601040 Issue 07g (03 April 2014)
-
Page 130: Abbreviated Dial
The button can be setup with a target user number or left blank for number entry when the button is pressed. The button can be pressed again to unpark the call. Status Button — Parked Call Green flash. 1608/1616 Phone User Guide Page 130 IP Office 9.0 15-601040 Issue 07g (03 April 2014)
-
Page 131: Call Pickup
IP address. 16.2.18 Send All Calls A button configured with this action can be used to switch do not disturb on or off. Status Button 1608/1616 Phone User Guide Page 131 IP Office 9.0 15-601040 Issue 07g (03 April 2014)
-
Page 132: Suppress Digits
· Acquire — Seize the user’s current call. · Intrude — Join the user’s current call, turning it into a conference call. · Listen — Start silent monitoring of the user’s call. 1608/1616 Phone User Guide Page 132 IP Office 9.0…
-
Page 133: Phone Settings
Chapter 17. Phone Settings 1608/1616 Phone User Guide Page 133 IP Office 9.0 15-601040 Issue 07g (03 April 2014)
-
Page 134: 17. Phone Settings
· Headset Volume Ring Sound · · Speaker Volume Ringer Volume · · · Automatic Gain Control Internal Auto Answer · Default Audio Path · 1608/1616 Phone User Guide Page 134 IP Office 9.0 15-601040 Issue 07g (03 April 2014)
-
Page 135: Mobile Twinning
Access Control Your system administrator can configure whether you can access this menu option. See Menu Access Control 1608/1616 Phone User Guide Page 135 IP Office 9.0 15-601040 Issue 07g (03 April 2014)
-
Page 136: Redial Mode
6. Use either the Change soft key or the left or right arrow keys to change the mode. 7. When the required mode is displayed, press the Done soft key. 1608/1616 Phone User Guide Page 136 IP Office 9.0 15-601040 Issue 07g (03 April 2014)
-
Page 137: En-Bloc Dialing
Lock the phone after the indicated number of minutes. 8. Press the Done soft key. Access Control Your system administrator can configure whether you can access this menu option. See Menu Access Control 1608/1616 Phone User Guide Page 137 IP Office 9.0 15-601040 Issue 07g (03 April 2014)
-
Page 138: Ringer Controls
Disable Ringer. 5. Press the Change soft key to change the setting. Selecting On will turn the ringer off. 1608/1616 Phone User Guide Page 138 IP Office 9.0 15-601040 Issue 07g (03 April 2014)
-
Page 139: Visual Alerting
5. Press the Change soft key to change the setting. · Ring Use normal ringing. · Abbr Use a single non-repeated ring (abbreviated ring). · Off No ring. 1608/1616 Phone User Guide Page 139 IP Office 9.0 15-601040 Issue 07g (03 April 2014)
-
Page 140: Ring Sound
· To leave the menu without making any changes press the Cancel soft key. 4. When completed, press the Done soft key. 5. Press the Exit soft key to exit the menus. 1608/1616 Phone User Guide Page 140 IP Office 9.0…
-
Page 141: Ringer Volume
Access Control Your system administrator can configure whether you can access this menu option. See Menu Access Control 1608/1616 Phone User Guide Page 141 IP Office 9.0 15-601040 Issue 07g (03 April 2014)
-
Page 142: Display Controls
6. When completed, press the Done soft key. 7. Press the Exit soft key to exit the menus. 1608/1616 Phone User Guide Page 142 IP Office 9.0 15-601040 Issue 07g (03 April 2014)
-
Page 143: Call Timer Display
Show Last Call Duration. 4. Press Change to change the setting between On or Off. 5. Press the Save soft key. 1608/1616 Phone User Guide Page 143 IP Office 9.0 15-601040 Issue 07g (03 April 2014)
-
Page 144: Display Language
7. To select the language currently displayed, press the Select soft key or OK. 8. When completed, press the Done soft key. 9. Press the Exit soft key to exit the menus. 1608/1616 Phone User Guide Page 144 IP Office 9.0…
-
Page 145: Display Name
On/Off soft key to change the setting. 6. When completed, press the Done soft key. 7. Press the Exit soft key to exit the menus. 1608/1616 Phone User Guide Page 145 IP Office 9.0 15-601040 Issue 07g (03 April 2014)
-
Page 146: Auto Show Call Waiting
Do not use the inactivity timer. · 30 / 60 Apply the inactivity timer after the selected number of seconds. 6. Press the Done soft key. 1608/1616 Phone User Guide Page 146 IP Office 9.0 15-601040 Issue 07g (03 April 2014)
-
Page 147: Volume And Sound
· Automatic Gain Control Switch automatic gain control on or off. Note The system administrator can set your phone to reset its volume after each call. 1608/1616 Phone User Guide Page 147 IP Office 9.0 15-601040 Issue 07g (03 April 2014)
-
Page 148: Button Clicks
2. Use the + plus and – minus keys to adjust the volume. 3. The display will return to normal after a few seconds. 1608/1616 Phone User Guide Page 148 IP Office 9.0 15-601040 Issue 07g (03 April 2014)
-
Page 149: Speaker Volume
Change soft key to change the setting. 6. When completed, press the Done soft key. 7. Press the Exit soft key to exit the menus. 1608/1616 Phone User Guide Page 149 IP Office 9.0 15-601040 Issue 07g (03 April 2014)
-
Page 150: Backup/Restore
3. Press the Select soft key. 4. Press the Backup soft key. Access Control This option is only available if your system administrator has configured backup/restore operation. 1608/1616 Phone User Guide Page 150 IP Office 9.0 15-601040 Issue 07g (03 April 2014)
-
Page 151: Restore
Manual Restore. 5. Press the Restore soft key. Access Control This option is only available if your system administrator has configured backup/restore operation. 1608/1616 Phone User Guide Page 151 IP Office 9.0 15-601040 Issue 07g (03 April 2014)
-
Page 152: Viewing Information
7. To return to the parent menu, press the Back soft key. 1608/1616 Phone User Guide Page 152 IP Office 9.0 15-601040 Issue 07g (03 April 2014)
-
Page 153
Phone Settings: Viewing Information The diagram below summarizes the information accessible through the menu. 1608/1616 Phone User Guide Page 153 IP Office 9.0 15-601040 Issue 07g (03 April 2014) -
Page 155: Status Menu
Chapter 18. Status Menu 1608/1616 Phone User Guide Page 155 IP Office 9.0 15-601040 Issue 07g (03 April 2014)
-
Page 156: Do Not Disturb
· To change the destination of the setting, press the Edit soft key. Access Control Your system administrator can configure whether you can access this menu option. See Menu Access Control 1608/1616 Phone User Guide Page 156 IP Office 9.0 15-601040 Issue 07g (03 April 2014)
-
Page 157: Follow Me Here
Selecting Change will set a forward on busy/no answer destination, it will not change the forward unconditional destination. Access Control Your system administrator can configure whether you can access this menu option. See Menu Access Control 1608/1616 Phone User Guide Page 157 IP Office 9.0 15-601040 Issue 07g (03 April 2014)
-
Page 158: Forward On No Answer
· Select edit to change the number to which calls are forwarded. Access Control Your system administrator can configure whether you can access this menu option. See Menu Access Control 1608/1616 Phone User Guide Page 158 IP Office 9.0 15-601040 Issue 07g (03 April 2014)
-
Page 159: Forwarded Here
The system administrator is able to configure if you can access the Membership, State and Fallback options of a group. If you are not configured for any groups then the Group menu is not shown. 1608/1616 Phone User Guide Page 159 IP Office 9.0…
-
Page 160: Mobile Twinning
There is an error in the date or time being used by the system. Selecting Admin will take you to the system administration menu where you can change the date time 1608/1616 Phone User Guide Page 160 IP Office 9.0 15-601040 Issue 07g (03 April 2014)
-
Page 161
Chapter 19. Short Codes 1608/1616 Phone User Guide Page 161 IP Office 9.0 15-601040 Issue 07g (03 April 2014) -
Page 162
· Cancel All Forwarding: *00 Switch off any forwarding. Includes forward unconditional, forward on busy, forward on no answer, follow me and do not disturb. 1608/1616 Phone User Guide Page 162 IP Office 9.0 15-601040 Issue 07g (03 April 2014) -
Page 163: Hunt Group
Have voicemail ring your phone when you have any new messages. It will call when you use the phone. · Voicemail Ringback Off: *49 Switch off ringback. 1608/1616 Phone User Guide Page 163 IP Office 9.0 15-601040 Issue 07g (03 April 2014)
-
Page 165
Chapter 20. System Administration 1608/1616 Phone User Guide Page 165 IP Office 9.0 15-601040 Issue 07g (03 April 2014) -
Page 166: Checking The System And Software Version
8. Press the Select soft key or the OK button or the right arrow key. 9. You can now scroll through information about the system including its IP address and license key serial number. 1608/1616 Phone User Guide Page 166 IP Office 9.0…
-
Page 167: Checking The Time Settings
10.When a complete valid date has been entered, the display will confirm that by showing the full date and the Done soft key option. 11.To set the date as the new date to be used by the telephone system press the Done soft key. 1608/1616 Phone User Guide Page 167 IP Office 9.0…
-
Page 168: Setting The Time
· To change the offset from between positive or negative press the +/- soft key. 10.When a valid offset has been entered, the Done soft key is displayed. 11.To apply the offset to the current telephone system time press the Done soft key. 1608/1616 Phone User Guide Page 168 IP Office 9.0…
-
Page 169: System Shutdown
Only proceed is you are sure. If you are not sure press the Back soft key. 11.If you press the Confirm soft key, the telephone system will switch itself to a shutdown state. This will disconnect all current calls and services. 1608/1616 Phone User Guide Page 169 IP Office 9.0…
-
Page 170: Memory Card Management
· Copy (IP500 V2) This option is available on systems where both a System and Option memory card are active. It copies the contents of the System card to the Option card. 1608/1616 Phone User Guide Page 170 IP Office 9.0…
-
Page 171: System Alarms
There is an error in the date or time being used by the system. Selecting Admin will take you to the system administration menu where you can change the date time 1608/1616 Phone User Guide Page 171 IP Office 9.0 15-601040 Issue 07g (03 April 2014)
-
Page 173: The Phone Menus
Chapter 21. The Phone Menus 1608/1616 Phone User Guide Page 173 IP Office 9.0 15-601040 Issue 07g (03 April 2014)
-
Page 174
System Admin Menu · This menu is only available to a user who has been configured as a ‘system phone’ user by the system maintainer. 1608/1616 Phone User Guide Page 174 IP Office 9.0 15-601040 Issue 07g (03 April 2014) -
Page 175: Features Menu
Access Control The system administrator controls whether you can access some of the menus. Others are only available if certain perquisites are met: 1608/1616 Phone User Guide Page 175 IP Office 9.0 15-601040 Issue 07g (03 April 2014)
-
Page 176
· The Mobile Twinning options are only shown if you have been configured to use mobile twinning. · The System Admin option is only shown if you have been configured as a ‘System Phone’ user. 1608/1616 Phone User Guide Page 176 IP Office 9.0… -
Page 177: Self-Administer Menu
The Phone Menus: Features Menu 21.2 Self-Administer Menu This menu is accessed by pressing the Features soft key and selecting Phone User and then Self-Administer. 1608/1616 Phone User Guide Page 177 IP Office 9.0 15-601040 Issue 07g (03 April 2014)
-
Page 178: Visual Voice Menu
The Email option is only available if configured by the system administrator. Hunt group mailbox access is only available if configured by the system administrator. 1608/1616 Phone User Guide Page 178 IP Office 9.0…
-
Page 179: Status Menu
The Phone Menus: Visual Voice Menu 21.4 Status Menu This menu is accessed by pressing the Status soft key. 1608/1616 Phone User Guide Page 179 IP Office 9.0 15-601040 Issue 07g (03 April 2014)
-
Page 180: Phone A-Menu
It is used mainly for phone specific settings rather than your user settings. It can also be used to view details of the phones software. The following options are not used and are not included in this documentation; Go to Incoming Call. 1608/1616 Phone User Guide Page 180 IP Office 9.0…
-
Page 181: Call Log Menu
The Phone Menus: Phone A-Menu 21.6 Call Log Menu This menu is accessed by pressing the key. The diagram below summarizes the structure of the menu. 1608/1616 Phone User Guide Page 181 IP Office 9.0 15-601040 Issue 07g (03 April 2014)
-
Page 182: Contacts Menu
21.7 Contacts Menu This menu is accessed by pressing the key. This menu is used to access your own personal contacts and the system directory of contacts. 1608/1616 Phone User Guide Page 182 IP Office 9.0 15-601040 Issue 07g (03 April 2014)
-
Page 183: Redial Menu
This menu is only used when you set your redial mode to List. The numbers (up to 10) shown come from your outgoing call log. 1608/1616 Phone User Guide Page 183 IP Office 9.0 15-601040 Issue 07g (03 April 2014)
-
Page 184: Phone Locked Menu
· None of the menus for your user settings can be accessed. · To unlock the phone requires your login code if you have configured a login code 1608/1616 Phone User Guide Page 184 IP Office 9.0 15-601040 Issue 07g (03 April 2014)
-
Page 185: System Admin Menu
The Phone Menus: Phone Locked Menu 21.10 System Admin Menu This menu is only available to users who have been configured as a system phone user. 1608/1616 Phone User Guide Page 185 IP Office 9.0 15-601040 Issue 07g (03 April 2014)
-
Page 186: Error Screens
This should only last a few seconds. However if the system administrator has done this to install new phone software it may take several minutes and should not be interrupted. 1608 and 1616 only. 21.12 Menu Access Control Some menu options are dynamic and only appear when appropriate.
-
Page 187
The System Admin option is only shown if you have been configured as a ‘System Phone’ user. Note that restricting menu access does not restrict access using available short codes and programmable buttons. However, those can also be removed or added by your system administrator. 1608/1616 Phone User Guide Page 187 IP Office 9.0… -
Page 189: Glossary
Chapter 22. Glossary 1608/1616 Phone User Guide Page 189 IP Office 9.0 15-601040 Issue 07g (03 April 2014)
-
Page 190: Abbreviated Ring
· You can still use the phone to make outgoing calls. When you go off-hook you will hear broken dial tone. · N = No Calls (Do Not Disturb) An N is shown on your phone’s display when you have do not disturb enabled. 1608/1616 Phone User Guide Page 190 IP Office 9.0…
-
Page 191: Do Not Disturb Exceptions
· D = Diverting (Forwarding) Calls A D is shown on your phone’s display when you have forward unconditional enabled. 1608/1616 Phone User Guide Page 191 IP Office 9.0…
-
Page 192: Group
If you have been configured as a mobile twinning user, you can switch use of mobile twinning on or off through the phone’s menus, transfer calls to a mobile phone and can also change the number to which you are twinned. 1608/1616 Phone User Guide Page 192 IP Office 9.0…
-
Page 193: Small Community Network
Twinning is a process whereby your calls ring on two phones. Twinning is only available if configured by the system administrator. There are two methods of twinning supported, internal twinning mobile twinning 1608/1616 Phone User Guide Page 193 IP Office 9.0 15-601040 Issue 07g (03 April 2014)
-
Page 195: Document History
Chapter 23. Document History 1608/1616 Phone User Guide Page 195 IP Office 9.0 15-601040 Issue 07g (03 April 2014)
-
Page 196
13th March 2014 · Additional notes for Park & Page. 25th March 2014 · Note regarding need for power supply unit to phone when using button modules. 1608/1616 Phone User Guide Page 196 IP Office 9.0 15-601040 Issue 07g (03 April 2014) -
Page 197: Index
72, 75, 77, 78 Lights Make call 35, 74 Call Coverage Appearance 28 Menu Call Coverage Button Indication 28 Display Call Coverage Button State 28 Call Waiting 1608/1616 Phone User Guide Page 197 IP Office 9.0 15-601040 Issue 07g (03 April 2014)
-
Page 198
20, 178 Forward 108, 109, 158 Message waiting lamp 139 Membership status 121, 159 Missed 35, 76, 81, 82, 83, 84 Missed 20, 80 Missed calls 1608/1616 Phone User Guide Page 198 IP Office 9.0 15-601040 Issue 07g (03 April 2014) -
Page 199
Ringer 141, 148 S 21 Speaker 69, 149 SBM32 14 Select 24, 26, 28, 30 Waiting Call 146 Self Admin Withhold Number 37, 135 Menu 1608/1616 Phone User Guide Page 199 IP Office 9.0 15-601040 Issue 07g (03 April 2014) -
Page 201
1608/1616 Phone User Guide Page 201 IP Office 9.0 15-601040 Issue 07g (03 April 2014) -
Page 202
Template: 29th August 2013 Performance figures and data quoted in this document are typical, and must be specifically confirmed in writing by Avaya before they become applicable to any particular order or contract. The company reserves the right to make alterations or amendments to the detailed specifications at its discretion.
Avaya one-X Deskphone Value
Edition is a family of cost effective
IP Telephones that deliver familiar
features at an attractive price
point for the customer with basic
communications needs.
Designed with the reliability you expect
from Avaya, one-X Deskphone Value
Edition telephones provide critical
features and capabilities not often
found in competitively priced models.
Avaya one-X Deskphone Value Edition
combines traditional telephone
features such as LED lights and fixed
feature buttons (e.g. conference,
transfer, hold) with the latest in
user experience features such
as softkeys, a navigation wheel
and a context sensitive user
interface in select models.
It also offers as a standard:
2-way speakerphones, backlit
displays and multi-line capabilities.
Avaya one-X Deskphone Value Edition
models feature a stylish design and
are a sharp addition to any retail store,
branch, or corporate office.
The Avaya 1608 IP Telephone is
designed for the Everyday user.
Everyday users typically rely on several
forms of communication including
voice and email – and while they
require a quality telephone, they rarely
receive more that five or six calls per
day. Cubicle workers and sales staff
within a retail store are examples of
Everyday users for whom the 1608
delivers a productivity-enhancing
telephone.
The Avaya 1608 supports 8 line
appearances / feature keys. Each of
the buttons includes dual LED’s (red,
green) providing explicit status for the
user. For a familiar look and feel, the
1608 includes several fixed feature
keys for common telephone tasks
including conference, transfer, drop,
hold, mute. In addition, the 1608
includes a high quality full duplex
speakerphone, and supports a broad
portfolio of Avaya wired and wireless
headsets through its integrated
headset jack.
The 1608 features a context sensitive
user interface along with three softkeys
and a four-way navigation cluster
– ideal for scrolling through the local
contacts list or call logs. The display
on the 1608 measures three lines by
24 characters and is backlit for easier
viewing in all lighting conditions.
Avaya one-X
®
Deskphone
Value Edition
1608, 1608-I* IP Telephones
Avaya one-X is a portfolio of communications solutions that deliver
a powerful and consistent communications experience for the
end user – across a variety of devices and interfaces. Avaya one-X
solutions provide Intelligent Access to Intelligent Communications
driving enhanced productivity and competitive advantage.
produCt brIef
avaya.com

Avaya one-X™ Deskphone Value Edition
IP-телефон 1608
Руководство пользователя
16-601446RU
Вопрос 1
Июль 2007

Содержание
Юридическая информация ………………………………………………………… 5
Знакомство с IP-телефоном 1608 ………………………………………………. 7
Обзор ……………………………………………………………………………………………………….. 7
Общие сведения об индикаторах ……………………………………………………………… 10
Общие сведения о значках ………………………………………………………………………. 11
Общие сведения о прокрутке и перемещении …………………………………………… 12
Общие сведения о бумажных метках ……………………………………………………….. 12
Общие сведения о входе в систему телефона ………………………… 12
Вход в систему телефона ………………………………………………………………………… 12
Выход из системы телефона ……………………………………………………………………. 12
Выполнение вызова ………………………………………………………………… 13
Удаление номера ……………………………………………………………………………………. 13
Повторный набор номера ………………………………………………………………………… 13
Вызов абонента из списка контактов ………………………………………………………… 13
Вызов абонента из журнала вызовов ……………………………………………………….. 13
Ответ на вызов ………………………………………………………………………… 13
Передача входящего вызова непосредственно на голосовую
почту ………………………………………………………………………………………… 14
Игнорирование входящего вызова …………………………………………. 14
Отключение звука при вызове ………………………………………………… 14
Помещение вызова на удержание …………………………………………… 15
Передача вызова ……………………………………………………………………… 15
Общие сведения о вызовах конференц—связи ………………………… 15
Выполнение вызова конференц—связи ……………………………………………………… 16
Добавление абонента на удержании к сеансу конференц—связи ………………… 16
Помещение вызова конференц—связи на удержание …………………………………. 16
Просмотр информации о вызове конференц—связи …………………………………… 16
Исключение последнего абонента, добавленного в вызов конференц—связи ….
17
Исключение абонента из вызова конференц—связи …………………………………… 17
Отключение звука абонента в вызове конференц—связи ……………………………. 17
Получение сообщений …………………………………………………………….. 17
Вход в систему голосовой почты ……………………………………………………………… 17
Общие сведения о вызовах по параллельной линии ……………… 17
Ответ на вызов по параллельной линии …………………………………………………… 18
Присоединение к вызову по параллельной линии …………………………………….. 18
Выполнение исходящего вызова по параллельной линии …………………………. 18
Общие сведения о совместно используемой линии ……………….. 18
Ответ на вызов по совместно используемой линии …………………………………… 19
Присоединение к вызову по совместно используемой линии …………………….. 19
Содержание
2 Avaya one-X™ Deskphone Value Edition IP-телефон 1608 Руководство пользователя

Выполнение исходящего вызова по совместно используемой линии …………. 19
Общие сведения о контактах …………………………………………………… 19
Просмотр информации о контактах ………………………………………………………….. 19
Добавление нового контакта ……………………………………………………………………. 20
Изменение контакта ………………………………………………………………………………… 20
Удаление контакта ………………………………………………………………………………….. 20
Общие сведения о журнале вызовов ………………………………………. 21
Просмотр журнала вызовов ……………………………………………………………………… 21
Просмотр информации в журнале вызовов ………………………………………………. 21
Добавление записи из журнала вызовов в список контактов ……………………… 21
Удаление записи из журнала вызовов ………………………………………………………. 22
Удаление всех записей из журнала вызовов …………………………………………….. 22
Включение и выключение протоколирования вызовов ………………………………. 22
Общие сведения о дополнительных функциях телефона ………. 23
Пересылка вызовов …………………………………………………………………………………. 23
Передача всех вызовов …………………………………………………………………………… 24
Вызов абонента из каталога организации …………………………………………………. 24
Активация добавочного номера для сотового телефона (EC500) ………………. 24
Общие сведения о меню «Features» (Функции) ……………………….. 25
Доступ к меню «Features» (Функции) ………………………………………………………….. 25
Общие сведения о меню Avaya ……………………………………………….. 25
Настройка яркости и контрастности экрана ………………………………………………. 26
Изменение шаблона звонка ……………………………………………………………………… 26
Включение и отключение звуков нажатия кнопок ………………………………………. 26
Включение и выключение звуковых сигналов об ошибках …………………………. 26
Включение и выключение таймера вызовов ……………………………………………… 27
Включение и выключение визуальных предупреждений ……………………………. 27
Настройка параметров повторного набора ……………………………………………….. 27
Установка источника звука ………………………………………………………………………. 27
Включение и выключение предупреждения о входящих вызовах ………………. 28
Установка автоматического управления коэффициентом усиления …………… 28
Изменение языка …………………………………………………………………………………….. 28
Просмотр информации о сети ………………………………………………………………….. 29
Указатель …………………………………………………………………………………. 31
Содержание
Вопрос 1 Июль 2007 3

Содержание
4 Avaya one-X™ Deskphone Value Edition IP-телефон 1608 Руководство пользователя

Юридическая информация
© Avaya Inc.
Все права защищены.
Уведомление
Не смотря на то, что были приложены все усилия, чтобы информация в данном
документе на время его печати была полной и правильной, компания Avaya Inc. не
несет ответственности за любые ошибки. Изменения и исправления могут быть
внесены в следующих версиях данного документа.
Примечание.
Использование сотового, мобильного или GSM-телефона, а также радиостанции
двухсторонней связи вблизи IP-телефона Avaya может вызывать помехи.
Исчерпывающую юридическую информацию см. в полной версии документа –
«Avaya Legal Page for Hardware Documentation» (Юридическая страница Avaya для
документации на оборудование), номер документа: 03-600759.
Для просмотра данного документа посетите веб—сайт http://www.avaya.com/support
и введите номер документа в поле поиска.
Отказ от обязательств по содержанию документации
Компания Avaya Inc. не несет ответственности за любые изменения, дополнения
или удаления, сделанные в оригинальной опубликованной версии данного
документа, если эти изменения, дополнения или удаления не были выполнены
компанией Avaya. Клиент и/или Конечный пользователь согласен освободить от
материальной ответственности компанию Avaya, а ее агентов, служащих и
работников от всех претензий, исков, требований и судебных решений,
возникающих из—за или в связи с изменениями, дополнениями или удалениями
информации в данной документации в пределах, сделанных Клиентом или
Конечным пользователем.
Отказ от обязательств по содержанию ссылок
Компания Avaya Inc. не несет ответственности за содержание и достоверность веб—
сайтов, на которые имеются ссылки в данной документации, и наличие какой—либо
ссылки не означает, что компания рекомендует описываемые или предлагаемые на
соответствующих веб—сайтах продукты, услуги или информацию. Компания Avaya
не может гарантировать, что эти ссылки будут предоставлять запрашиваемую
информацию в любой момент, так как компания Avaya Inc. не контролирует
страницы, на которые указывают эти ссылки.
Гарантия
Корпорация Avaya предоставляет ограниченную гарантию на данный продукт. Для
получения условий ограниченной гарантии обратитесь к соглашению о продаже.
Кроме того, стандартный текст гарантии Avaya, а также информация относительно
поддержки данного продукта в течение гарантийного срока, доступны на веб—сайте
по следующему адресу:
http://www.avaya.com/support
Авторские права
Продукт защищен законом об авторских правах и другими законами, относящимися
к защите прав собственности, кроме особо оговоренных случаев.
Несанкционированное воспроизведение, передача и использование продукта
Юридическая информация
Вопрос 1 Июль 2007 5

является правонарушением, наказываемым в соответствии с уголовными и
гражданскими нормами применимого права.
Поддержка Avaya
Компания Avaya предоставляет номер телефона, по которому можно сообщить о
проблемах или задать вопросы о продукте. Номер телефона службы поддержки:
1-800-242-2121 (США). Дополнительные номера телефонов службы поддержки см.
на веб—сайте компании Avaya:
http://www.avaya.com/support
6 Avaya one-X™ Deskphone Value Edition IP-телефон 1608 Руководство пользователя

Знакомство с IP-телефоном 1608
IP-телефон 1608 – это многолинейный IP-телефон, предназначенный для
использования в системах обработки вызовов Avaya Communication Manager или
Avaya Distributed Office. IP-телефон 1608 поддерживает множество возможностей и
функций, включая экран «Phone» (Телефон) для просмотра вызовов и управления
ими, список «Call Log» (Журнал вызовов), список «Contacts» (Контакты), меню
параметров и настроек, позволяющих настроить телефон, а также доступ к
голосовой почте.
В телефоне могут быть доступны не все функции и возможности, описанные в
данном руководстве пользователя. Если окажется, что какая—либо функция или
возможность недоступны, обратитесь к администратору системы.
Знакомство с IP-телефоном 1608
Вопрос 1 Июль 2007 7
Обзор
Описания кнопок и функций IP-телефона 1608
Название Описание
Message Waiting
Indicator
Светящийся красный индикатор в правом верхнем углу
телефона указывает на наличие новых сообщений голосовой
почты. Если включен параметр «Visual Alerting» (Визуальный
сигнал), этот индикатор мигает при получении входящего
вызова.
Phone Display Экран телефона, состоящий из трех строк. Когда телефон
находится в режиме ожидания, на верхней строке отображается
значок с числом пропущенных вызовов, могут также
отображаться значки пересылки вызовов, «Send All
Calls» (Передача всех вызовов) или EC500, если эти функции
включены. В верхней строке также отображаются дата, время и
Обзор
8 Avaya one-X™ Deskphone Value Edition IP-телефон 1608 Руководство пользователя

Название Описание
основной добавочный номер. Кроме того, в верхней строке
отображаются системные сообщения. В средней строке
отображается информация, относящаяся к приложению. В
нижней строке отображаются названия программных клавиш.
Softkeys Нажмите программную клавишу для выбора соответствующей
функции. Названия программных клавиш обозначают действия,
выполняемые программными клавишами. Названия и действия
зависят от выбранного объекта.
Message Нажмите кнопку Message (Сообщение) для прямого
подключения к системе голосовой почты.
Navigation
Arrows
Стрелки перемещения вверх и вниз позволяют выполнять
прокрутку в списках. С помощью стрелок перемещения вправо
и влево можно перемещаться между элементами приложения,
перемещать курсор при вводе текста, а также включать или
выключать параметры.
OK Нажмите кнопку OK для быстрого вызова действия. Например,
при выборе записи журнала вызовов нажатием кнопки OK
осуществляется набор номера.
Phone/Exit Кнопка Phone/Exit (Телефон/Выход) позволяет просматривать
вызовы и управлять ими. Например, при просмотре меню
нажатием кнопки Phone/Exit (Телефон) осуществляется
возврат к режиму просмотра вызовов.
Avaya Menu Для доступа к меню Avaya нажмите кнопку A. В меню Avaya
представлены параметры, позволяющие настроить телефон,
установить протоколирование вызовов, выбрать язык экрана,
просмотреть информацию о сети и выйти из системы.
Contacts Нажмите кнопку Contacts (Контакты) для просмотра записей в
списке контактов.
Call Log Нажмите кнопку Call Log (Журнал вызовов) для просмотра
списка исходящих, входящих и пропущенных вызовов. При
наличии непринятых вызовов горит значок на кнопке «Call
Log» (Журнал вызовов).
Redial Нажмите кнопку Redial (Повторный набор) для набора
последнего набранного номера или для отображения списка
последних набранных номеров, в котором можно выбрать
номер для повторного набора. Дополнительную информацию
см. в разделе Настройка параметров повторного набора.
Hold Нажмите кнопку Hold (Удержание) для установки активного
вызова на удержание.
Conference Нажмите кнопку Conference (Конференц—связь) для
добавления другого абонента к существующему вызову.
Transfer Нажмите кнопку Transfer (Передача) для передачи вызова на
другой номер.
Drop Нажмите кнопку Drop (Сброс) для отключения активного
вызова. При выполнении вызова конференц—связи нажмите
кнопку Drop (Сброс) для исключения абонента из вызова
конференц—связи. Дополнительную информацию см. в
разделах Исключение последнего абонента, добавленного в
вызов конференц—связи или Исключение абонента из вызова
конференц—связи.
Volume С помощью + или — на клавише Volume (Громкость) можно
настраивать громкость телефонной трубки, головного
Знакомство с IP-телефоном 1608
Вопрос 1 Июль 2007 9

Название Описание
телефона или динамика, когда эти компоненты активны. Для
настройки громкости звонка нажмите «+» или «-» на клавише
громкости, когда телефонная трубка, головной телефон или
динамик не используются.
Headset Нажмите кнопку Headset (Головной телефон) для
использования головного телефона, если он подключен. С
телефоном совместимы только кабели головного телефона
HIS.
Mute Нажмите кнопку Mute (Без звука) для отключения звука
текущего вызова. Для отключения беззвучного режима нажмите
кнопку «Mute» (Без звука) еще раз.
Speaker Нажмите кнопку Speaker (Динамик), чтобы воспользоваться
громкой связью. Для отключения динамика при выполнении
вызова поднимите телефонную трубку или нажмите кнопку
Headset (Головной телефон).
Call/Line
Appearance
Buttons and
Feature Buttons
На телефоне находятся 8 кнопок, которые можно настроить как
кнопки вызова/линии или функциональные кнопки. Нажмите
кнопку вызова/линии для выполнения вызова, ответа на вызов
или возобновления работы с вызовом на удержании. Нажмите
кнопку с названием функции для включения или выключения
этой функции. Функциональные кнопки предоставляют доступ к
функциям системы управления вызовами Avaya, которые
определены для вашего добавочного номера. Зеленый
индикатор рядом с каждой функциональной кнопкой
показывает, включена сейчас функция или нет. Если индикатор
светится, функция включена. Функциональные кнопки
предоставляют доступ к функциям, которые отображаются в
меню. Дополнительную информацию о функциях меню см. в
разделе Общие сведения о меню «Features» (Функции).
Дополнительную информацию о функциональных кнопках см. в
разделе Общие сведения о дополнительных функциях
телефона.
Общие сведения об индикаторах
Рядом с каждой кнопкой вызова/линии и функциональной кнопкой находятся два
индикатора (зеленый и красный), которые указывают на состояние вызова/линии
или функции. Состояние, определяемое индикатором (горит, мигает и не горит),
описывается в следующих таблицах.
Таблица 1. Индикаторы кнопки вызова/линии
Индикатор Описание
Горит зеленый
индикатор
Вызов/линия активны.
Мигает зеленый
индикатор (с
низкой частотой)
Звонок для вызова/линии.
Мигает зеленый
индикатор (с
высокой частотой)
Вызов/линия на удержании.
Общие сведения об индикаторах
10 Avaya one-X™ Deskphone Value Edition IP-телефон 1608 Руководство пользователя
Индикатор Описание
Мигает зеленый
индикатор (с очень
высокой частотой)
Задержка конференц—связи или перевода.
Горит красный
индикатор
Вызов/линия выбраны и будут использованы при вашей
занятости. Красный индикатор продолжает гореть, пока вы
используете вызов/линию.
Не горит Вызов/линия доступны.
Таблица 2. Индикаторы функциональных кнопок
Индикатор Описание
Горит зеленый
индикатор
Функция активна.
Мигает зеленый
индикатор
Задержка функции (идет обработка запроса, ответ еще не
получен).
Мигает красный
индикатор
Функция отображается на экране телефона.
Не горит Функция неактивна.
Примечание.
В зависимости от системы обработки вызовов индикаторы функциональных кнопок
могут показывать другие состояния.
Общие сведения о значках
Значки на экране телефона предназначены для отображения состояния вызова и
выборов перемещения. Информацию о значках, отображаемых на экране
телефона, см. в следующей таблице.
Таблица 3. Значки на экране телефона
Значок Описание
#X Число пропущенных вызовов, где # – число таких вызовов.
Активна функция «Call forward» (Пересылка вызовов), «Send All
Calls» (Передача всех вызовов) или «EC500». (Эти функции доступны,
если администратор установил их для вашего телефона).
Сигнал о входящем вызове.
Вызов активен.
Вызов на удержании.
Вызов на «мягком» удержании (при использовании функции «Конференц—
связь» или «Передача«).
Вызов конференц—связи активен.
Вызов конференц—связи на удержании.
Для получения дополнительных параметров выполните прокрутку влево.
Для получения дополнительных параметров выполните прокрутку
вправо.
Знакомство с IP-телефоном 1608
Вопрос 1 Июль 2007 11
 Loading…
-
Contents
-
Table of Contents
-
Bookmarks
Quick Links
Avaya 1608/1608-I IP Deskphone User
Guide
16-601446
Issue 2
February 2010
Related Manuals for Avaya 1608
Summary of Contents for Avaya 1608
-
Page 1
Avaya 1608/1608-I IP Deskphone User Guide 16-601446 Issue 2 February 2010… -
Page 2
Customer or End User. Link disclaimer Avaya Inc. is not responsible for the contents or reliability of any linked Web sites referenced elsewhere within this documentation, and Avaya does not necessarily endorse the products, services, or information described or offered within them. -
Page 3: Table Of Contents
Chapter 1: Introduction to the 1608/1608-I IP Telephone…5 Overview of phone buttons and features…6 LEDs…8 Icons in the telephone display…9 Scrolling and navigation…10 Paper labels…10 Chapter 2: Logging in to and out of your telephone…11 Logging in to your telephone…11 Logging out of your telephone…11…
-
Page 4
Turning the call timer on or off…45 Turning visual alerting on or off…45 Setting redial options…46 Setting the audio path…46 Turning show incoming call on or off…47 Setting automatic gain control…47 Changing the language…48 Viewing network information…48 Index…49 Avaya 1608/1608-I IP Deskphone User Guide February 2010… -
Page 5: Chapter 1: Introduction To The 1608/1608-I Ip Telephone
Chapter 1: Introduction to the 1608/1608-I IP Telephone The 1608/1608–I telephone is a multiline IP telephone for use with Avaya Communication Manager or Avaya Distributed Office call processing systems. The 1608/1608- IP telephone puts convenient features and capabilities at your fingertips, including a phone screen to view and manage your calls, a contacts list, a call log, a menu of options and settings to customize your phone, and access to your voice mail.
-
Page 6: Overview Of Phone Buttons And Features
Introduction to the 1608/1608-I IP Telephone Overview of phone buttons and features Name Message Waiting Indicator Phone Display Avaya 1608/1608-I IP Deskphone User Guide Description An illuminated red light in the upper-right corner of your phone indicates you have voicemail messages waiting. If Visual Alerting is enabled, this light flashes when you receive an incoming call.
-
Page 7
For example, if you are viewing a menu, pressing the Phone/Exit button switches the phone display back to the call view. Press the A button to access the Avaya menu. The Avaya menu provides options that allow you to customize phone settings, configure call logging, select the display language, view network information, and log out. -
Page 8: Leds
Press a labeled feature button to enable or disable that feature. The feature buttons provide access to the Avaya call management system features that have been administered for your extension. The green LED next to each feature button indicates if the feature is currently on or off.
-
Page 9: Icons In The Telephone Display
Icons are provided in the phone display to indicate the state of a call and navigation choices. The icons that appear in the phone display are described in the following table. Icon Avaya 1608/1608-I IP Deskphone User Guide Description Call/line appearance is on hold.
-
Page 10: Scrolling And Navigation
Introduction to the 1608/1608-I IP Telephone Icon Scrolling and navigation To navigate through the options and features on your telephone display, use the navigation arrows to scroll and the OK button to select lines or options. A navigation icon appears in the phone display to indicate that you can scroll to more options or information.
-
Page 11: Chapter 2: Logging In To And Out Of Your Telephone
2. Scroll down to select Log Out. Note: Log Out is not available if you are on a call. 3. Press the OK button or the Select softkey. 4. Press the Select softkey again to confirm. Avaya 1608/1608-I IP Deskphone User Guide February 2010…
-
Page 12
Logging in to and out of your telephone Avaya 1608/1608-I IP Deskphone User Guide February 2010… -
Page 13: Chapter 3: Making Calls
2. Press the OK button or the Call softkey. Setting redial options Avaya 1608/1608-I IP Deskphone User Guide on page 46 for information on redial settings. February 2010…
-
Page 14: Calling A Person From The Contacts List
2. Scroll to the left or right to view a separate list of all, missed, answered, or outgoing calls. 3. Scroll up or down to select the person or number you want to call. 4. Press the Call softkey or the OK button. Avaya 1608/1608-I IP Deskphone User Guide February 2010…
-
Page 15: Chapter 4: Handling Calls
If Auto Hold is not enabled, you must put your active call on hold before answering the incoming call; otherwise, you will drop the active call when you answer the other one. Avaya 1608/1608-I IP Deskphone User Guide incoming call. incoming call.
-
Page 16: Sending An Incoming Call Directly To Voice Mail
1. Press the Mute button during a call so that the other person cannot hear you. 2. Press the Mute button again to unmute the call. Putting a call on hold 1. Press the Hold button to put your active call on hold. Avaya 1608/1608-I IP Deskphone User Guide February 2010…
-
Page 17: Transferring A Call
The fast blinking green LED next to the call/line appearance button indicates the call is on hold. If the active call is on a line appearance on an Avaya Distributed Office system, the red LED will also be on. 2. To resume the call when there is more than one call on hold, do one of the following: •…
-
Page 18
Handling calls Avaya 1608/1608-I IP Deskphone User Guide February 2010… -
Page 19: Chapter 5: Conference Calls
The very fast blinking green LED next to the call/line appearance button indicates the call is being conferenced. If the active call is on a line appearance on an Avaya Distributed Office system, the red LED will also be on.
-
Page 20: Putting A Conference Call On Hold
Dropping the last person added from a conference call While active on a conference call, press the Drop button. Avaya 1608/1608-I IP Deskphone User Guide choose the call/line appearance button for the call that is on soft hold. February 2010…
-
Page 21: Dropping A Person From A Conference Call
1. From the Phone screen, select the Details softkey (if available) during a conference call. 2. Scroll to the person you want to silence. 3. Press the Silence softkey. Avaya 1608/1608-I IP Deskphone User Guide Dropping a person from a conference call February 2010…
-
Page 22
Conference calls Avaya 1608/1608-I IP Deskphone User Guide February 2010… -
Page 23: Chapter 6: Getting Your Messages
Contact your system administrator with any questions. Logging into your voice mail 1. To log in to your voice mail, press the Message button. 2. Follow the voice prompts from your voice mail system. Avaya 1608/1608-I IP Deskphone User Guide February 2010…
-
Page 24
Getting your messages Avaya 1608/1608-I IP Deskphone User Guide February 2010… -
Page 25: Chapter 7: Bridged Call Appearances
Joining a call on a bridged call appearance 1. Scroll to the call in progress that you want to join. 2. Press the call/line appearance button for the bridged call appearance, or press the Bridge softkey. Avaya 1608/1608-I IP Deskphone User Guide February 2010…
-
Page 26: Making An Outgoing Call On A Bridged Call Appearance
1. Press the call/line appearance button associated with the bridged call appearance. 2. Dial the telephone number, or call the person from the contacts list, or call the person from the call log. Avaya 1608/1608-I IP Deskphone User Guide February 2010…
-
Page 27: Chapter 8: Shared Line Appearances
Chapter 8: Shared line appearances If your call processing system is an Avaya Distributed Office system and depending on how it is configured, your phone may show shared line appearances on the display screen in addition to your own lines. A shared line appearance is a line that is shared among multiple users.
-
Page 28: Making An Outgoing Call On A Shared Line Appearance
1. Press the call/line button associated with the shared line appearance. 2. Dial the telephone number, or call the person from the contacts list, or call the person from the call log. Avaya 1608/1608-I IP Deskphone User Guide February 2010…
-
Page 29: Chapter 9: Contacts
Press the number key that corresponds to the letter or number you want to enter until the letter or number is displayed. b. Pause before entering the next character if the characters are on the same key. Avaya 1608/1608-I IP Deskphone User Guide on page 14. Calling…
-
Page 30: Editing A Contact
Deleting a contact 1. Press the Contacts button. 2. Scroll to the contact you want to delete. 3. Press More > Delete . 4. Press the Delete softkey again to confirm. Avaya 1608/1608-I IP Deskphone User Guide Note: February 2010…
-
Page 31
Deleting a contact Note: If you press the Cancel softkey prior to pressing the Delete softkey, your contact information will not be removed. Avaya 1608/1608-I IP Deskphone User Guide February 2010… -
Page 32
Contacts Avaya 1608/1608-I IP Deskphone User Guide February 2010… -
Page 33: Chapter 10: Call Log
4. Scroll down to view the date and time of the call. 5. Press the Back softkey to return to the list view. Avaya 1608/1608-I IP Deskphone User Guide Turning call logging on or off on page 35 for information about…
-
Page 34: Adding An Entry From The Call Log To Your Contacts List
However, if you are viewing the All calls list, pressing the DelAll softkey deletes all calls from the call log. 1. Press the Call Log button. 2. Select the list you want to delete. Avaya 1608/1608-I IP Deskphone User Guide February 2010…
-
Page 35: Turning Call Logging On Or Off
Log Line Calls must be turned on in order for Log Answered by Others to operate. 8. Press the On or Off softkeys, the OK button, or the right or left navigation arrow to turn call logging on or off. Avaya 1608/1608-I IP Deskphone User Guide Turning call logging on or off February 2010…
-
Page 36
Call log Avaya 1608/1608-I IP Deskphone User Guide February 2010… -
Page 37: Chapter 11: Advanced Telephone Features
Chapter 11: Advanced telephone features Avaya call management systems provide many advanced telephone features such as Directory, Call Forwarding, and Abbreviated Dial buttons. These features are administered on the feature buttons on your telephone. The features are identified on the associated paper labels.
-
Page 38: Send All Calls
The Extension to Cellular (EC500) feature allows you to have incoming calls ring on your office telephone and your cell phone at the same time. This allows you to answer office calls while Avaya 1608/1608-I IP Deskphone User Guide February 2010…
-
Page 39
The green LED next to the feature button turns on. 2. To turn the feature off, press the EC500 feature button. The green LED next to the feature button turns off. Avaya 1608/1608-I IP Deskphone User Guide Activating Extension to Cellular (EC500) February 2010… -
Page 40
Advanced telephone features Avaya 1608/1608-I IP Deskphone User Guide February 2010… -
Page 41: Chapter 12: Features Menu
If the light is on, the feature is on. The red LED next to the Feature button blinks while the feature label is displayed on the screen. Avaya 1608/1608-I IP Deskphone User Guide on page 37 for more information about the features that can…
-
Page 42
Features menu Avaya 1608/1608-I IP Deskphone User Guide February 2010… -
Page 43: Chapter 13: Avaya Menu
Chapter 13: Avaya Menu You can use the Avaya Menu to adjust and customize phone settings, configure call logging, select the display language, view network settings, and log out. The Avaya Menu has six sub-menus: Screen/Sound Call Settings Applications Advanced…
-
Page 44: Changing The Ring Pattern
3. Press the Select softkey or the OK button. 4. Select Button Clicks. 5. Press the On or Off softkeys, the OK button, or the right or left navigation arrow to turn sounds on or off. Avaya 1608/1608-I IP Deskphone User Guide February 2010…
-
Page 45: Turning Error Tones On Or Off
When the Visual Alerting option is turned on, incoming calls cause the LED in the top right corner of the phone to flash. You can turn Visual Alerting on or off. 1. Press the A button. 2. Scroll to Call Settings. Avaya 1608/1608-I IP Deskphone User Guide Turning error tones on or off February 2010…
-
Page 46: Setting Redial Options
2. Scroll to Call Settings. 3. Press the Select softkey or the OK button. 4. Select Audio Path. 5. Press the Change softkey or the OK button to toggle between Headset and Speaker. Avaya 1608/1608-I IP Deskphone User Guide February 2010…
-
Page 47: Turning Show Incoming Call On Or Off
9. Press the On or Off softkeys, the OK button, or the right or left navigation arrow to turn automatic gain control on or off. Avaya 1608/1608-I IP Deskphone User Guide Turning show incoming call on or off February 2010…
-
Page 48: Changing The Language
Viewing network information 1. Press the A button. 2. Scroll to Network Information. 3. Select Audio Parameters, IP Parameters, Quality of Service, Interfaces, or Miscellaneous. 4. Press the View softkey or the OK button. Avaya 1608/1608-I IP Deskphone User Guide February 2010…
-
Page 49: Index
… call settings configuring audio path … configuring visual alerts … Call Settings configuring call timers … Avaya 1608/1608-I IP Deskphone User Guide Index configuring show incoming call … redial options … Call Timers configuring … call/line appearance button LEDs about …
-
Page 50
Language changing … LEDs about … legal notices … logging in to your telephone … Avaya 1608/1608-I IP Deskphone User Guide logging out of telephone … logging out of your telephone … making calls … muting calls … navigation arrows right and left …
This manual is also suitable for:
1608-i
Интернет-магазин оборудования «AVAYAMARKET».
Являясь официальным партнёром AVAYA, мы выполняем заказы на поставку оборудования, услуг по интеграции и обслуживанию.
«AVAYAMARKET» ориентирован на регулярные и разовые закупки юридическими лицами. Большинство товаров находится на нашем собственном складе, что существенно ускоряет процесс покупки оборудования.

AVAYA серии 9600
-
Полное Руководство пользователя для Телефонов AVAYA серии 9600 -
Полное Руководство пользователя IP-телефон 9608 и 9611G -
Краткое руководство для AVAYA 9608 -
Краткое руководство для AVAYA 9611 -
Краткое руководство для AVAYA 9620 -
Краткое руководство для AVAYA 9621 -
Краткое руководство для AVAYA 9630 -
Краткое руководство для AVAYA 9640 -
Краткое руководство для AVAYA 9641 -
Краткое руководство для AVAYA 9650
AVAYA 374x DECT
-
Полное Руководство пользователя для Телефонов AVAYA 374x DECT -
Краткое руководство для AVAYA 3720 -
Краткое руководство для AVAYA 3725 -
Краткое руководство для AVAYA 3740
AVAYA E129
-
Полное Руководство пользователя для Телефонов AVAYA E129 -
Краткое руководство для AVAYA E129
AVAYA серии 9500
-
Полное Руководство пользователя для Телефонов AVAYA серии 9500 -
Краткое руководство для AVAYA 9504 -
Краткое руководство для AVAYA 9508
AVAYA серии 1600
-
Краткое руководство для AVAYA1603 -
Краткое руководство для AVAYA1608 -
Краткое руководство для AVAYA1616
AVAYA серии 2400
-
Краткое руководство для AVAYA 2402 -
Краткое руководство для AVAYA 2410 -
Краткое руководство для AVAYA 2420
Другие модели AVAYA
-
Краткое руководство для AVAYA 4400 -
Краткое руководство для AVAYA 4601 -
Краткое руководство для AVAYA 4602 -
Краткое руководство для AVAYA 4610 -
Краткое руководство для AVAYA 4620 -
Краткое руководство для AVAYA 4621 -
Краткое руководство для AVAYA 4625 -
Краткое руководство для AVAYA 5402 -
Краткое руководство для AVAYA 5410 -
Краткое руководство для AVAYA 5420 -
Краткое руководство для AVAYA 5601 -
Краткое руководство для AVAYA 5602 -
Краткое руководство для AVAYA 5610 -
Краткое руководство для AVAYA 5620 -
Краткое руководство для AVAYA 5621 -
Краткое руководство для AVAYA 6400
- Телефонные аппараты AVAYA
- Телефонные аппараты
AVAYA серии 9600
Полное Руководство пользователя для Телефонов AVAYA серии 9600
Полное Руководство пользователя IP-телефон 9608 и 9611G
Краткое руководство для AVAYA 9608
Краткое руководство для AVAYA 9611
Краткое руководство для AVAYA 9620
Краткое руководство для AVAYA 9621
Краткое руководство для AVAYA 9630
Краткое руководство для AVAYA 9640
Краткое руководство для AVAYA 9641
Краткое руководство для AVAYA 9650
AVAYA 374x DECT
Полное Руководство пользователя для Телефонов AVAYA 374x DECT
Краткое руководство для AVAYA 3720
Краткое руководство для AVAYA 3725
Краткое руководство для AVAYA 3740
Полное Руководство пользователя для Телефонов AVAYA E129
Краткое руководство для AVAYA E129
AVAYA серии 9500
Полное Руководство пользователя для Телефонов AVAYA серии 9500


Инструкции и файлы
| Файл | Страниц | Формат | Размер | Действие |
 |
34
pdf
432.08KB
Чтобы ознакомиться с инструкцией выберите файл в списке, который вы хотите скачать, нажмите на кнопку «Загрузить» и вы перейдете на страницу, где необходимо будет ввести код с картинки. При правильном ответе на месте картинки появится кнопка для получения файла.
Если в поле с файлом есть кнопка «Просмотр», это значит, что можно просмотреть инструкцию онлайн, без необходимости скачивать ее на компьютер.
В случае если материал по вашему не полный или нужна дополнительная информация по этому устройству, например драйвер, дополнительные файлы например, прошивка или микропрограмма, то вы можете задать вопрос модераторм и участникам нашего сообщества, которые постараются оперативно отреагировать на ваш вопрос.
Также вы можете просмотривать инструкции на своем устройстве Android
Если у вас отсутствует техническая возможность для скачивания Инструкция по эксплуатации для Avaya 1608/1608-I
вы можете прочесть документ прямо на нашем сайте или
Скачать Avaya 1608/1608-I Инструкция по эксплуатации
Краткое содержание страницы № 1
Avaya one-X™ Deskphone Value Edition
1608 IP Telephone
User Guide
16-601446
Issue 1
July 2007
Краткое содержание страницы № 2
Contents Contents Notices ……………………………………………………………………………………….. 5 Introduction to the 1608 IP Telephone ………………………………………….. 7 Overview …………………………………………………………………………………………………… 7 About LEDs ……………………………………………………………………………………………….. 9 About Icons ……………..
Краткое содержание страницы № 3
Contents About Contacts …………………………………………………………………………. 17 Viewing contacts details …………………………………………………………………………….. 17 Adding a new contact ………………………………………………………………………………… 17 Editing a contact ……………………………………………………………………………………….. 18 Deleting a contact ………
Краткое содержание страницы № 4
Contents 4 Avaya one-X™ Deskphone Value Edition 1608 IP Telephone User Guide
Краткое содержание страницы № 5
Notices Notices © Avaya Inc. All Rights Reserved. Notice While reasonable efforts were made to ensure that the information in this document was complete and accurate at the time of printing, Avaya Inc. can assume no liability for any errors. Changes and corrections to the information in this document may be incorporated in future releases. Note: Using a cell, mobile, or GSM phone, or a two-way radio in close proximity to an Avaya IP Phone might cause interference. For full legal page informati
Краткое содержание страницы № 6
http://www.avaya.com/support 6 Avaya one-X™ Deskphone Value Edition 1608 IP Telephone User Guide
Краткое содержание страницы № 7
Introduction to the 1608 IP Telephone Introduction to the 1608 IP Telephone The 1608 IP telephone is a multiline IP telephone for use with Avaya Communication Manager or Avaya Distributed Office call processing systems. The 1608 IP telephone puts convenient features and capabilities at your fingertips, including a Phone screen to view and manage your calls, a Contacts list, a Call Log, a menu of options and settings to customize your phone, and access to your voice mail. Not all functions and fe
Краткое содержание страницы № 8
Overview 1608 IP Telephone Button/Feature Descriptions Name Description Message Waiting An illuminated red light in the upper-right corner of your phone Indicator indicates you have voicemail messages waiting. If Visual Alerting is enabled, this light flashes when you receive an incoming call. Phone Display There are three lines in the phone display. When the phone is idle, the top line shows the missed call icon with number of calls missed and either the call forwarding icon, the Send All Calls
Краткое содержание страницы № 9
Introduction to the 1608 IP Telephone Name Description Mute Press the Mute button to mute a call in progress. To take a call off mute, press Mute again. Speaker Press the Speaker button to use the speakerphone. To take a call off speakerphone, lift the handset or press the Headset button. Call/Line There are 8 buttons that can be programmed as either call/line Appearance appearance buttons or feature buttons. Press a call/line appearance Buttons and button to make or answer a call or resume a ca
Краткое содержание страницы № 10
About Icons About Icons Icons are provided in the phone display to indicate the state of a call and navigation choices. The icons that appear in the phone display are described in the following table. Table 3. Icons in the Telephone Display Icon Description #X Number of calls missed, where # represents the number. Call forward, Send All Calls, or EC500 is active. (These features are available if they have been administered for your telephone.) Incoming call is ringing. Call is active. Call is o
Краткое содержание страницы № 11
About Logging in to Your Telephone About Logging in to Your Telephone Logging in and out maintains your contacts and personal options if you share a telephone with other users, or if you want to use the same extension from another phone. Logging out also prevents unauthorized use of your telephone during an absence. Note: Call log information is lost after you log out. Logging in to your telephone Log in from the initial screen that prompts you for your extension. 1. Enter your extension. 2. P
Краткое содержание страницы № 12
Calling a person from the contacts list Calling a person from the contacts list 1. Press the Contacts button. 2. Scroll up or down to select the person or number you want to call. 3. Press the OK button or the Call softkey. Calling a person from the call log 1. Press the Call Log button. 2. Scroll to the left or right to view a separate list of all, missed, answered, or outgoing calls. 3. Scroll up or down to select the person or number you want to call. 4. Press the OK button or the Call soft
Краткое содержание страницы № 13
Muting a Call Muting a Call If a call is on mute and you switch between the handset, headset, or speakerphone, the mute will be turned off. When the Mute button light is on, the call is muted. 1. Press the Mute button during a call so that the other person cannot hear you. 2. Press the Mute button again to unmute the call. Putting a Call on Hold 1. Press the Hold button to put your active call on hold. Note: The fast blinking green LED next to the call/line appearance button indicates the call
Краткое содержание страницы № 14
Making a conference call Making a conference call 1. While active on a call, press the Conference button. Note: The very fast blinking green LED next to the call/line appearance button indicates the call is being conferenced. If the active call is on a line appearance on an Avaya Distributed Office system, the red LED will also be on. 2. Dial the telephone number, or call the person from the contacts list, or call the person from the call log. 3. Press the Conference button or the Join softkey
Краткое содержание страницы № 15
Getting Your Messages Dropping a person from a conference call 1. From the Phone screen, select the Details softkey (if available) during a conference call. 2. Scroll to the person you want to drop. 3. Press the Drop button. Silencing a person on a conference call Only people calling from external numbers can be silenced on a conference call. 1. From the Phone screen, select the Details softkey (if available) during a conference call. 2. Scroll to the person you want to silence. 3. Press the S
Краткое содержание страницы № 16
Joining a call on a bridged call appearance Joining a call on a bridged call appearance You can join an existing call on a bridged call appearance. 1. Scroll to the call in progress that you want to join. 2. Press the call/line appearance button for the bridged call appearance, or press the Bridge softkey. Making an outgoing call on a bridged call appearance When you make a call on a bridged call appearance, you are using another person’s call appearance. The caller ID may show the call as c
Краткое содержание страницы № 17
About Contacts Joining a call on a shared line appearance You can join an existing call on a shared line appearance. 1. Scroll to the call in progress that you want to join. 2. Press the call/line appearance button for the shared line appearance, or press the Join softkey. Making an outgoing call on a shared line appearance If you have any questions about how the name or extension displays to the person you are calling when you make a call on a shared line appearance, contact your system admin
Краткое содержание страницы № 18
Editing a contact 3. Press the New softkey. 4. Enter the name using the dialpad. To enter characters using the dialpad: a. Repeatedly press the number key that corresponds to the letter or number you want to enter until the letter or number is displayed. b. Pause before entering the next character if the characters are on the same key. c. To enter a space, press 0. d. Enter remaining letters or numbers. e. Press the Bksp softkey to delete the last character. Note: If you want to remove a lette
Краткое содержание страницы № 19
About the Call Log Viewing the call log 1. Press the Call Log button. Note: You can go to the top of the list by pressing the Call Log button again. 2. Scroll to the right or left to view separate lists of all, missed, answered, or outgoing calls. Viewing call log details 1. Press the Call Log button. 2. Scroll to the number you want to view. 3. Press the Details softkey to view the name. 4. Scroll down to view the number and call duration. 5. Scroll down to view the date and time of the cal
Краткое содержание страницы № 20
Forwarding a call Calls is turned on, but you do not want line calls that are answered by others to appear as missed calls in your call log, turn on Log Answered by Others. Configured in this way, the line calls that are answered by others will appear as answered calls in your call log. To include calls only on your primary lines in your call log, turn off Log Bridged Calls and Log Line Calls. 1. Press the A button. 2. Select Applications. 3. Press the Select softkey. 4. Select Call Log. 5. Pres
Посмотреть инструкция для Avaya Deskphone 1608-I бесплатно. Руководство относится к категории Телефоны, 1 человек(а) дали ему среднюю оценку 7.1. Руководство доступно на следующих языках: английский. У вас есть вопрос о Avaya Deskphone 1608-I или вам нужна помощь? Задайте свой вопрос здесь
- Contents
- Chapter 1: Introduction to the 1608/1608-I IP Telephone
- Chapter 2: Logging in to and out of your telephone
- Chapter 3: Making calls
- Chapter 4: Handling calls
- Chapter 5: Conference calls
- Chapter 6: Getting your messages
- Chapter 7: Bridged call appearances
- Chapter 8: Shared line appearances
- Chapter 9: Contacts
- Chapter 10: Call log
- Chapter 11: Advanced telephone features
- Chapter 12: Features menu
- Chapter 13: Avaya Menu
- Index
Нужна помощь?
У вас есть вопрос о Avaya а ответа нет в руководстве? Задайте свой вопрос здесь Дай исчерпывающее описание проблемы и четко задайте свой вопрос. Чем детальнее описание проблемы или вопроса, тем легче будет другим пользователям Avaya предоставить вам исчерпывающий ответ.
Ольга • 4-7-2022Нет комментариев
какой пароль необходимо ввести
Ответить на вопрос
Виктор • 25-1-2022Нет комментариев
как получить мак адрес телефона Avaya 1608-i
Ответить на вопрос
Ксения • 6-10-2021Нет комментариев
Как настроить время и дату?
Ответить на вопрос
Количество вопросов: 3
![]()
Главная
| Avaya | |
| Deskphone 1608-I | |
| Телефон | |
| английский | |
| Руководство пользователя (PDF) |
Не можете найти ответ на свой вопрос в руководстве? Вы можете найти ответ на свой вопрос ниже, в разделе часто задаваемых вопросов о Avaya Deskphone 1608-I.
Инструкция Avaya Deskphone 1608-I доступно в русский?
Не нашли свой вопрос? Задайте свой вопрос здесь
Нет результатов

Avaya 1616-I
инструкция100 страниц(ы)

Avaya J139
инструкция198 страниц(ы)

Alcatel-Lucent 8029 Premium DeskPhone
инструкция56 страниц(ы)

Avaya J159
инструкция198 страниц(ы)

Avaya J179
инструкция467 страниц(ы)

Avaya 9630
инструкция76 страниц(ы)

Avaya 9620
инструкция76 страниц(ы)

Avaya J189
инструкция175 страниц(ы)

Avaya 9650
инструкция76 страниц(ы)

Avaya 9640
инструкция25 страниц(ы)
Посмотреть все Avaya руководства Посмотреть все Avaya Телефон руководства
Краткое содержание страницы № 1
Avaya one-X™ Deskphone Value Edition
1608 IP Telephone
User Guide
16-601446
Issue 1
July 2007
Краткое содержание страницы № 2
Contents Contents Notices ……………………………………………………………………………………….. 5 Introduction to the 1608 IP Telephone ………………………………………….. 7 Overview …………………………………………………………………………………………………… 7 About LEDs ……………………………………………………………………………………………….. 9 About Icons ……………..
Краткое содержание страницы № 3
Contents About Contacts …………………………………………………………………………. 17 Viewing contacts details …………………………………………………………………………….. 17 Adding a new contact ………………………………………………………………………………… 17 Editing a contact ……………………………………………………………………………………….. 18 Deleting a contact ………
Краткое содержание страницы № 4
Contents 4 Avaya one-X™ Deskphone Value Edition 1608 IP Telephone User Guide
Краткое содержание страницы № 5
Notices Notices © Avaya Inc. All Rights Reserved. Notice While reasonable efforts were made to ensure that the information in this document was complete and accurate at the time of printing, Avaya Inc. can assume no liability for any errors. Changes and corrections to the information in this document may be incorporated in future releases. Note: Using a cell, mobile, or GSM phone, or a two-way radio in close proximity to an Avaya IP Phone might cause interference. For full legal page informati
Краткое содержание страницы № 6
http://www.avaya.com/support 6 Avaya one-X™ Deskphone Value Edition 1608 IP Telephone User Guide
Краткое содержание страницы № 7
Introduction to the 1608 IP Telephone Introduction to the 1608 IP Telephone The 1608 IP telephone is a multiline IP telephone for use with Avaya Communication Manager or Avaya Distributed Office call processing systems. The 1608 IP telephone puts convenient features and capabilities at your fingertips, including a Phone screen to view and manage your calls, a Contacts list, a Call Log, a menu of options and settings to customize your phone, and access to your voice mail. Not all functions and fe
Краткое содержание страницы № 8
Overview 1608 IP Telephone Button/Feature Descriptions Name Description Message Waiting An illuminated red light in the upper-right corner of your phone Indicator indicates you have voicemail messages waiting. If Visual Alerting is enabled, this light flashes when you receive an incoming call. Phone Display There are three lines in the phone display. When the phone is idle, the top line shows the missed call icon with number of calls missed and either the call forwarding icon, the Send All Calls
Краткое содержание страницы № 9
Introduction to the 1608 IP Telephone Name Description Mute Press the Mute button to mute a call in progress. To take a call off mute, press Mute again. Speaker Press the Speaker button to use the speakerphone. To take a call off speakerphone, lift the handset or press the Headset button. Call/Line There are 8 buttons that can be programmed as either call/line Appearance appearance buttons or feature buttons. Press a call/line appearance Buttons and button to make or answer a call or resume a ca
Краткое содержание страницы № 10
About Icons About Icons Icons are provided in the phone display to indicate the state of a call and navigation choices. The icons that appear in the phone display are described in the following table. Table 3. Icons in the Telephone Display Icon Description #X Number of calls missed, where # represents the number. Call forward, Send All Calls, or EC500 is active. (These features are available if they have been administered for your telephone.) Incoming call is ringing. Call is active. Call is o
Краткое содержание страницы № 11
About Logging in to Your Telephone About Logging in to Your Telephone Logging in and out maintains your contacts and personal options if you share a telephone with other users, or if you want to use the same extension from another phone. Logging out also prevents unauthorized use of your telephone during an absence. Note: Call log information is lost after you log out. Logging in to your telephone Log in from the initial screen that prompts you for your extension. 1. Enter your extension. 2. P
Краткое содержание страницы № 12
Calling a person from the contacts list Calling a person from the contacts list 1. Press the Contacts button. 2. Scroll up or down to select the person or number you want to call. 3. Press the OK button or the Call softkey. Calling a person from the call log 1. Press the Call Log button. 2. Scroll to the left or right to view a separate list of all, missed, answered, or outgoing calls. 3. Scroll up or down to select the person or number you want to call. 4. Press the OK button or the Call soft
Краткое содержание страницы № 13
Muting a Call Muting a Call If a call is on mute and you switch between the handset, headset, or speakerphone, the mute will be turned off. When the Mute button light is on, the call is muted. 1. Press the Mute button during a call so that the other person cannot hear you. 2. Press the Mute button again to unmute the call. Putting a Call on Hold 1. Press the Hold button to put your active call on hold. Note: The fast blinking green LED next to the call/line appearance button indicates the call
Краткое содержание страницы № 14
Making a conference call Making a conference call 1. While active on a call, press the Conference button. Note: The very fast blinking green LED next to the call/line appearance button indicates the call is being conferenced. If the active call is on a line appearance on an Avaya Distributed Office system, the red LED will also be on. 2. Dial the telephone number, or call the person from the contacts list, or call the person from the call log. 3. Press the Conference button or the Join softkey
Краткое содержание страницы № 15
Getting Your Messages Dropping a person from a conference call 1. From the Phone screen, select the Details softkey (if available) during a conference call. 2. Scroll to the person you want to drop. 3. Press the Drop button. Silencing a person on a conference call Only people calling from external numbers can be silenced on a conference call. 1. From the Phone screen, select the Details softkey (if available) during a conference call. 2. Scroll to the person you want to silence. 3. Press the S
Краткое содержание страницы № 16
Joining a call on a bridged call appearance Joining a call on a bridged call appearance You can join an existing call on a bridged call appearance. 1. Scroll to the call in progress that you want to join. 2. Press the call/line appearance button for the bridged call appearance, or press the Bridge softkey. Making an outgoing call on a bridged call appearance When you make a call on a bridged call appearance, you are using another person’s call appearance. The caller ID may show the call as c
Краткое содержание страницы № 17
About Contacts Joining a call on a shared line appearance You can join an existing call on a shared line appearance. 1. Scroll to the call in progress that you want to join. 2. Press the call/line appearance button for the shared line appearance, or press the Join softkey. Making an outgoing call on a shared line appearance If you have any questions about how the name or extension displays to the person you are calling when you make a call on a shared line appearance, contact your system admin
Краткое содержание страницы № 18
Editing a contact 3. Press the New softkey. 4. Enter the name using the dialpad. To enter characters using the dialpad: a. Repeatedly press the number key that corresponds to the letter or number you want to enter until the letter or number is displayed. b. Pause before entering the next character if the characters are on the same key. c. To enter a space, press 0. d. Enter remaining letters or numbers. e. Press the Bksp softkey to delete the last character. Note: If you want to remove a lette
Краткое содержание страницы № 19
About the Call Log Viewing the call log 1. Press the Call Log button. Note: You can go to the top of the list by pressing the Call Log button again. 2. Scroll to the right or left to view separate lists of all, missed, answered, or outgoing calls. Viewing call log details 1. Press the Call Log button. 2. Scroll to the number you want to view. 3. Press the Details softkey to view the name. 4. Scroll down to view the number and call duration. 5. Scroll down to view the date and time of the cal
Краткое содержание страницы № 20
Forwarding a call Calls is turned on, but you do not want line calls that are answered by others to appear as missed calls in your call log, turn on Log Answered by Others. Configured in this way, the line calls that are answered by others will appear as answered calls in your call log. To include calls only on your primary lines in your call log, turn off Log Bridged Calls and Log Line Calls. 1. Press the A button. 2. Select Applications. 3. Press the Select softkey. 4. Select Call Log. 5. Pres