
Руководство на английском языке по ремонту и техническому обслуживанию Audi 100/200 1989-1991 годов выпуска с бензиновыми двигателями.
- Автор: —
- Издательство: Bentley Publishing Group
- Год издания: —
- Страниц: —
- Формат: PDF
- Размер: 135,4 Mb
Руководство по ремонту и техническому обслуживанию Audi 100/200 1990-1994 годов выпуска со всеми типами кузовов и двигателей.
- Автор: —
- Издательство: Арус
- Год издания: —
- Страниц: 252
- Формат: PDF
- Размер: 65,8 Mb
Руководство по техническому обслуживанию и ремонту автомобилей Audi 100 и Audi A6 1991-1997 годов выпуска с бензиновыми и дизельными двигателями.
- Автор: А. Легг, М. Кумбс
- Издательство: Алфамер Паблишинг
- Год издания: 2007
- Страниц: 384
- Формат: PDF
- Размер: 240,2 Mb

Мультимедийное руководство по ремонту и эксплуатации Audi 100 1982-1990 годов выпуска.
- Автор: —
- Издательство: —
- Год издания: —
- Страниц: —
- Формат: multimedia
- Размер: 78,2 Mb

Мультимедийное руководство по ремонту и эксплуатации Audi 100 и Audi A6 1990-1997 годов выпуска.
- Автор: —
- Издательство: —
- Год издания: —
- Страниц: —
- Формат: multimedia
- Размер: 176,5 mb
Руководство по техническому обслуживанию и ремонту автомобилей Audi 100 1991-1994 и Audi A6 1994-1997 годов выпуска с бензиновыми и дизельными двигателями.
- Автор: —
- Издательство: Легион-Автодата
- Год издания: —
- Страниц: 388
- Формат: —
- Размер: —
Руководство по ремонту и эксплуатации автомобиля Audi 100 1982-1990 годов выпуска с дизельными двигателями.
- Автор: —
- Издательство: Гуси-Лебеди
- Год издания: 2012
- Страниц: 257
- Формат: PDF
- Размер: 279,7 Mb

Руководство по ремонту и эксплуатации Audi 100/100 Avant/100 Quattro и Audi A6 Avant/A6 Quattro 1990-1997 годов выпуска с бензиновыми и дизельными двигателями.
- Автор: —
- Издательство: Монолит
- Год издания: —
- Страниц: 439
- Формат: —
- Размер: —
Руководство по ремонту и эксплуатации Audi 100 1983-1991 годов выпуска.
- Автор: —
- Издательство: Ассоциация Независимых Издателей
- Год издания: 1998
- Страниц: 233
- Формат: —
- Размер: —
Руководство по техническому обслуживанию и ремонту Audi 100 и Audi 100 Avant с 1990 года выпуска.
- Автор: Дитер Корп, Томас Лаутеншлагер
- Издательство: АСТ
- Год издания: 2003
- Страниц: 289
- Формат: DjVu
- Размер: 19,8 Mb
Руководство по эксплуатации, ремонту и техническому обслуживанию Audi 100 и Audi A6 1990-1997 годов выпуска с бензиновыми и дизельными двигателями.
- Автор: —
- Издательство: Атласы автомобилей
- Год издания: —
- Страниц: 256
- Формат: —
- Размер: —
Руководство по ремонту и техническому обслуживанию Audi 100/200 1982-1990 годов выпуска.
- Автор: —
- Издательство: Арус
- Год издания: —
- Страниц: 216
- Формат: —
- Размер: —


Разархивировать и запустить exeшник


Здравия! Нашёл руководство, а скачать не могу. Выдаёт ошибку
Добрый вечер, по ссылке, сверху, иконка загрузки, с ее помощью скачивает)
Печально, но не качается. Что то про вирусы пишет, типа не удалось проверить и спрашивает «все равно скачать?» Я нажимаю да, а в ответ тишина
Через браузер скачивание происходит, через приложение драйва действительно не хочет
Благодарю. Сейчас попытаюсь
Polarnik94
Через браузер скачивание происходит, через приложение драйва действительно не хочет
Все получилось.


спасибо, я вот как раз искал, очень вовремя нашел)

- Руководства по ремонту
- Руководство по ремонту Audi 100 82-92 г.в.
Общая информация об автомобиле.
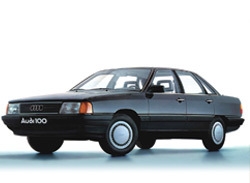
Автомобиль Audi 100 относится к среднему классу и имеет цельнометаллический несущий кузов типа седан или универсал.
На автомобилях устанавливается целая гамма четырех- и пятицилиндровых бензиновых двигателей от 1,8-литрового мощностью 100 л.с. до 2,23-литрового с турбонаддувом мощностью 200 л.с.
Кроме бензиновых двигателей, для Audi 100 существует семейство дизельных моторов.
На автомобиль устанавливают четырех- и пятиступенчатые коробки передач или автоматическую трехступенчатую.
Базовая модель автомобиля имеет переднеприводную компоновку, но существует и модификация с полным приводом.
Рулевое управление – реечного типа, есть модификации с усилителем рулевого управления.
Ремонт Ауди 100 производится в специализированных мастерских, но ремонт также возможен и своими руками. Для проведения ремонтных работ вы можете воспользоваться данным руководством, представленным онлайн, а также скачать его.
Тормозная система – двухконтурная с гидроприводом, передние тормоза – дисковые, задние могут быть барабанные или дисковые (в зависимости от мощности двигателя). В зависимости от комплектации автомобиль может быть оснащен АБС (антиблокировочной системой). У всех модификаций в системе тормозов установлен усилитель. Информацию про ремонт Audi 100 смотрите в соотвествующем разделе.
На автомобиле применена травмобезопасная рулевая колонка, часть автомобилей (в зависимости от комплектации) оборудована надувной подушкой безопасности для водителя.
Автомобиль имеет исключительный с точки зрения аэродинамики кузов (у седана коэффициент Сх=0,3, у универсала Сх=0,34). Достигнуто это благодаря плавным обводам кузова, без резких переходов, большому наклону ветрового и заднего стекол, а также оригинальной конструкции боковых окон. Стекла боковых окон установлены на рамках дверей снаружи, заподлицо со стойками кузова. Такая конструкция была впервые в мире применена на серийном автомобиле.
Большое внимание при разработке кузова уделялось коррозионной стойкости. Наиболее подверженные коррозии детали выполнены из цинкрометалла; детали, не несущие нагрузок, изготавливаются из пластика.
↓ Комментарии ↓
1. Органы управления и приборы
1.0 Органы управления и приборы
1.1. Блок контрольных ламп комбинации приборов
1.2 Стеклоподъемники с электроприводом
1.3 Наружное зеркало заднего вида с электроприводом
1.4 Внутреннее зеркало заднего вида
1.5 Капот
1.6 Передние сиденья с механической регулировкой
1.7 Передние сиденья с электроприводом
1.8 Перевозка длинномерных предметов
1.9. Запуск двигателя
1.10 Меры предосторожности при остановке двигателя
1.11 Круиз-контроль
1.12 Отопление и вентиляция
1.13 Панель управления кондиционером
1.14 Бортовой компьютер
1.15 Управление бортовым компьютером на моделях выпуска до января 1988 г.
1.16 Блокировка внутренней ручки замка задней двери
1.17 Обкатка автомобиля
1.18 Проверка автомобиля перед выездом
1.19 Замена эксплуатационных жидкостей и смазочных материалов
1.20. Техобслуживание автомобилей выпуска до августа 1985 г.
1.21. Техобслуживание автомобилей выпуска с августа 1985 г.
1.22 Периодичность смазывания узлов автомобиля
2. Технические характеристики
2.0 Технические характеристики
2.2 Технические характеристики автомобилей
2.3 Технические характеристики бензиновых двигателей
2.4 Технические характеристики дизельных двигателей
2.5 Эксплуатационные жидкости
2.6 Моменты затяжки ответственных резьбовых соединений
2.7 Тарировочные данные карбюраторов
2.8 Номинальные и ремонтные размеры деталей и пределы допустимых износов
3. Двигатели
3.0 Двигатели
3.1 Снятие и установка двигателя
3.2. Разборка и сборка двигателя
3.3. Пятицилиндровые двигатели
3.4. Разборка и сборка двигателя
3.5. Дизельный двигатель
4. Система охлаждения
4.0 Система охлаждения
4.1 Замена охлаждающей жидкости
4.2 Замена и проверка термостата
4.3 Снятие и установка водяного насоса
4.4 Проверка и замена датчика включения электровентилятора
4.5 Замена датчика температуры охлаждающей жидкости
4.6 Снятие и установка радиатора системы охлаждения
5. Выхлопная система
5.0 Выхлопная система
5.1 Снятие и установка системы выпуска
5.2 Замена лямбда-зонда
6. Система питания
6.0 Система питания
6.1. Система питания карбюраторных двигателей
6.2. Система питания двигателей с впрыском топлива
6.3. Система питания дизельного двигателя
6.4. Регулировки карбюратора Pierburg 1B3
6.5. Регулировки карбюратора Pierburg 2Е2
6.6. Регулировка частоты вращения пуска двигателя
7. Трансмиссия
7.0 Трансмиссия
7.1. Техническая характеристика
7.2. Механический привод выключения сцепления
7.3. Гидравлический привод
7.4 Коробка передач
7.5. Привод передних колес
7.6. Четырехступенчатая коробка передач типа 014
7.7. Пятиступенчатая коробка передач типа 013 или 093
7.8. Пятиступенчатая коробка передач типов 016 и 012
7.9. Механизм управления переключением передач КП типа 016
7.10. Автоматическая коробка передач
8. Ходовая часть
8.0 Ходовая часть
8.1. Телескопическая стойка
8.2. Задняя подвеска
9. Рулевое управление
9.0 Рулевое управление
9.1 Техническая характеристика
9.2 Рулевое колесо
9.3. Рулевая колонка
9.4 Механизм рулевого управления
9.5 Регулировка механизма рулевого управления
9.6 Рулевая тяга
9.7 Насос гидроусилителя рулевого управления
9.8 Проверка давления нагнетания насоса гидроусилителя рулевого управления
9.9 Прокачка системы гидроусилителя рулевого управления
9.10 Приводной ремень насоса гидроусилителя
10. Тормозная система
10.0 Тормозная система
10.1 Технические характеристики
10.2 Регулировка положения педали тормоза
10.3 Главный цилиндр тормоза
10.4 Тормозной механизм переднего колеса марки Teves
10.5 Тормозной механизм переднего колеса марки GIRLING
10.6 Тормозной диск
10.7 Корпус скобы и поршень
10.8 Барабанный тормозной механизм заднего колеса
10.9 Тормозной барабан
10.10 Колесный тормозной цилиндр
10.11 Дисковый тормозной механизм заднего колеса
10.12 Регулятор давления
10.13. Стояночный тормоз
10.14 Антиблокировочная система тормозов (АБС)
10.15 Прокачка тормозной системы
11. Кузов
11.0 Кузов
11.1 Снятие и установка переднего буфера
11.2 Снятие и установка облицовки радиатора
11.3 Снятие и установка капота
11.4 Регулировка троса замка капота
11.5 Замена локаря
11.6 Переднее крыло
11.7 Замена молдинга
11.8 Замена уплотнителя стекла двери
11.9 Обивка двери (автомобили выпуска до декабря 1987 г.)
11.10 Замена стекла двери и стеклоподъемника
11.11 Снятие и установка двери
11.12 Наружная ручка двери
11.13 Замок двери
11.14 Регулировка замка двери
11.15 Снятие и установка стеклоподъемника с электроприводом
11.16 Снятие и установка наружного зеркала заднего вида
11.17 Замена отражающего элемента наружного зеркала заднего вида
11.18 Ремонт токообогревательного элемента заднего стекла
11.19 Снятие и установка заднего буфера
11.20 Снятие и установка крышки багажного отделения
11.21 Снятие и установка замка крышки багажного отделения
11.22 Замена задней декоративной накладки с нишей под номерной знак
11.23 Снятие и установка центральной консоли
11.24 Очистка водостоков (на моделях, оснащенных люком)
11.25 Снятие и установка отопителя
12. Электрооборудование
12.0 Электрооборудование
12.1 Предохранители, реле и блоки управления
12.2. Генератор
12.3. Стартер
12.4. Освещение и световая сигнализация
12.5 Система зажигания
12.6. Транзисторная система зажигания
12.7. Электронная система зажигания
12.8 Бесконтактная система зажигания FEI
12.9. Электрические схемы
Audi 100 C3 (44) Avant с бензиновыми 4-х цилиндровыми двигателями: DR/DS/NP 1.8 л (1781 см³) 75-90 л.с./55-66 кВт и пятицилиндровыми WH 1.9 л (1921 см³) 100 л.с./74 кВт, KP/RT 2.0 л (1994 см³) 115 л.с./85 кВт, WC 2.1 л (2144 см³) 136 л.с./100 кВт, KU 2.2 л (2226 см³) 138 л.с./101 кВт, NF 2.3 л (2309 см³) 136 л.с./100 кВт; Настоящее руководство является пособием по техобслуживанию и ремонту автомобилей среднего класса (E) Ауди «100» С3, «100 CC», «100 CS», «100 CD», «100 2,0 E», «100 2,2 E», «100 Avant», «100 Avant CC», «100 Avant CD», «100 Avant 2,0 E», «100 Avant 2,2 E», «100 Avant 2,3 E» с цельнометаллическими несущими кузовами четырёхдверный седан и пятидверный универсал «Авант» передне- и полноприводные Quattro модели третьего поколения выпуска с 1982 по 1991 год предназначается для работников центров и станций технического обслуживания и ремонтных мастерских, а также для технически подготовленных автомобилистов, приводятся детальные технические характеристики всех агрегатов, механизмов и систем и даются рекомендации по выполнению работ, электросхемы. В приложении I изложены рекомендации по эксплуатации и техническому обслуживанию автомобиля, а в приложении II дается таблица соответствия горюче-смазочных материалов отечественного производства с зарубежными аналогами. В приложении III изложены общие требования к ремонту автомобиля и справочные размеры кузова
ЕСЛИ ВЫ ВИДИТЕ ОШИБКУ 406 Not Acceptable и не видите документ, то скорей всего у Вас IP РФ и его надо сменить, на любой другой страны, с помощью VPN ( Scribd и SlideShare блокируют посетителей с Российским IP).
Audi 100 C3 (44) видео замена передних и задних стоек амортизаторов (Ауди 100 С3 82-91)
Audi 100 C3 (44) общая информация (Ауди 100 С3/44 1982-1991)
Задняя подвеска
Задняя подвеска независимая, рычажная с упругой соединительной поперечиной, с продольными рычагами, приваренными к поперечине, с гидравлическими телескопическими амортизаторами двухстороннего действия, винтовыми цилиндрическими пружинами и тягой Панара, воспринимающей боковые нагрузки на подвеску.
Рычаги подвески присоединены к кронштейнам кузова через резинометаллические шарниры. На автомобилях с регулятором положения кузова по высоте имеется стабилизатор поперечной устойчивости, установленный внутри балки задней подвески.
Пружины задней подвески
Цвет меток Модели автомобилей
Белая Автомобили с 4-цилиндровыми двигателями
Коричневая Автомобили с 5-цилиндровыми двигателями
Оранжевая Универсалы
Синяя Автомобили с усиленной подвеской
Зеленая Седаны с регулятором положения кузова
Желтая Универсалы с регулятором положения кузова
Амортизаторы
Гидравлические телескопические амортизаторы двухстороннего действия.
Марка амортизаторов Boge.
Снятие и установка узла задней подвески (амортизатор в сборе с пружиной)
• Снимите правое или левое заднее колесо.
• Вывесите заднюю часть автомобиля с помощью передвижного домкрата.
• Отверните болт крепления нижнего конца амортизатора. Болт крепления нижнего конца амортизатора задней подвески
• Отверните гайки крепления верхней опоры амортизатора.
• На автомобилях с регулятором положения кузова слейте масло из системы, вывернув штуцер выпуска воздуха распределителя, и отсоедините трубопровод гидросистемы регулятора от амортизатора.
• Снимите узел подвески.
Установку узла подвески производите в порядке обратном снятию. При этом замените болт крепления нижнего конца амортизатора и затяните резьбовые соединения требуемым моментом.
Разборка и сборка узла подвески
Разборка
— Снимите узел подвески, как указано выше
• Сожмите пружину задней подвески с помощью приспособления 1403.
• Отверните гайку штока амортизатора.
• Снимите с амортизатора опорное кольцо, верхнюю опору, верхнюю опорную чашку пружины и пружину.
• На автомобилях с задней подвеской без регулятора положения кузова снимите буфер, защитный кожух и нижнюю опорную чашку пружины (обратите внимание на то, что на автомобилях с усиленной подвеской буфер имеет распорную втулку).
• На автомобилях с регулятором положения кузова снимите насадку штуцера трубопровода регулятора, шайбу, буфер, защитный кожух и нижнюю опорную тарелку пружины. Затем снимите со штока амортизатора два уплотнительных кольца.
Сборка
Сборку узла подвески производите в порядке, обратном разборке, учитывая следующее:
— устанавливайте пружину подвески и ее верхнюю и нижнюю опорные чашки, как показано на рисунке;
— на автомобилях с регулятором положения кузова надвиньте на шток поршня насадку штуцера трубопровода резьбовой частью в сторону отверстия в верхней опорной чашке пружины;
— проверьте правильность посадки уплотнительных колец;
замените самоконтрящуюся гайку штока амортизатора;
— затяните резьбовые соединения требуемым моментом.
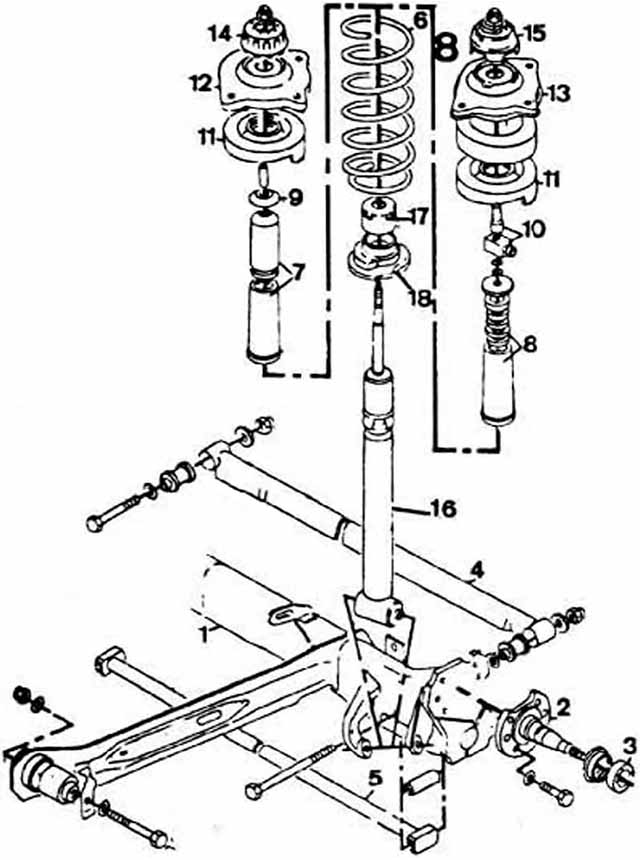
Детали задней подвески:
1 — балка заднем подвески; 2 — ступица колеса; 3 — подшипник ступицы; 4 — тяга Панара; 5 — стабилизатор поперечной устойчивости; 6 — пружина подвески; 7 — буфер; 8 — буфер на автомобилях с регулятором положения кузова; 9 — распорная втулка на автомобилях с усиленной подтеской; 10 — насадка для штуцера трубопровода на автомобилях с регулятором положения кузова; I I — верхняя опорная чашка пружины; 12 — верхняя опора ; 13 — верхняя опора амортизатора на автомобилях с регулятором положения кузова; 14 — опорное кольцо; 15 — опорное кольцо на автомобилях с регулятором положения кузова; 16 — амортизатор; 17 — защитный колпачок; 18 — нижняя опорная чашка пружины
Моменты затяжки основных резьбовых соединений, кГс/м
Гайка крепления верхнего конца амортизатора: 2,0.
Гайка крепления верхней опоры 3.5.
Гайка крепления нижнего конца амортизатора: 9,0.
Гайка болта крепления тяги Панара: 9,0.
Болт и гайка крепления продольных рычагов к кузову: 9,5.
Гайка крепления ступицы колеса — см. подраздел «Регулировка зазора подшипниках ступицы заднего колеса».
Болт крепления колеса: 9,0.
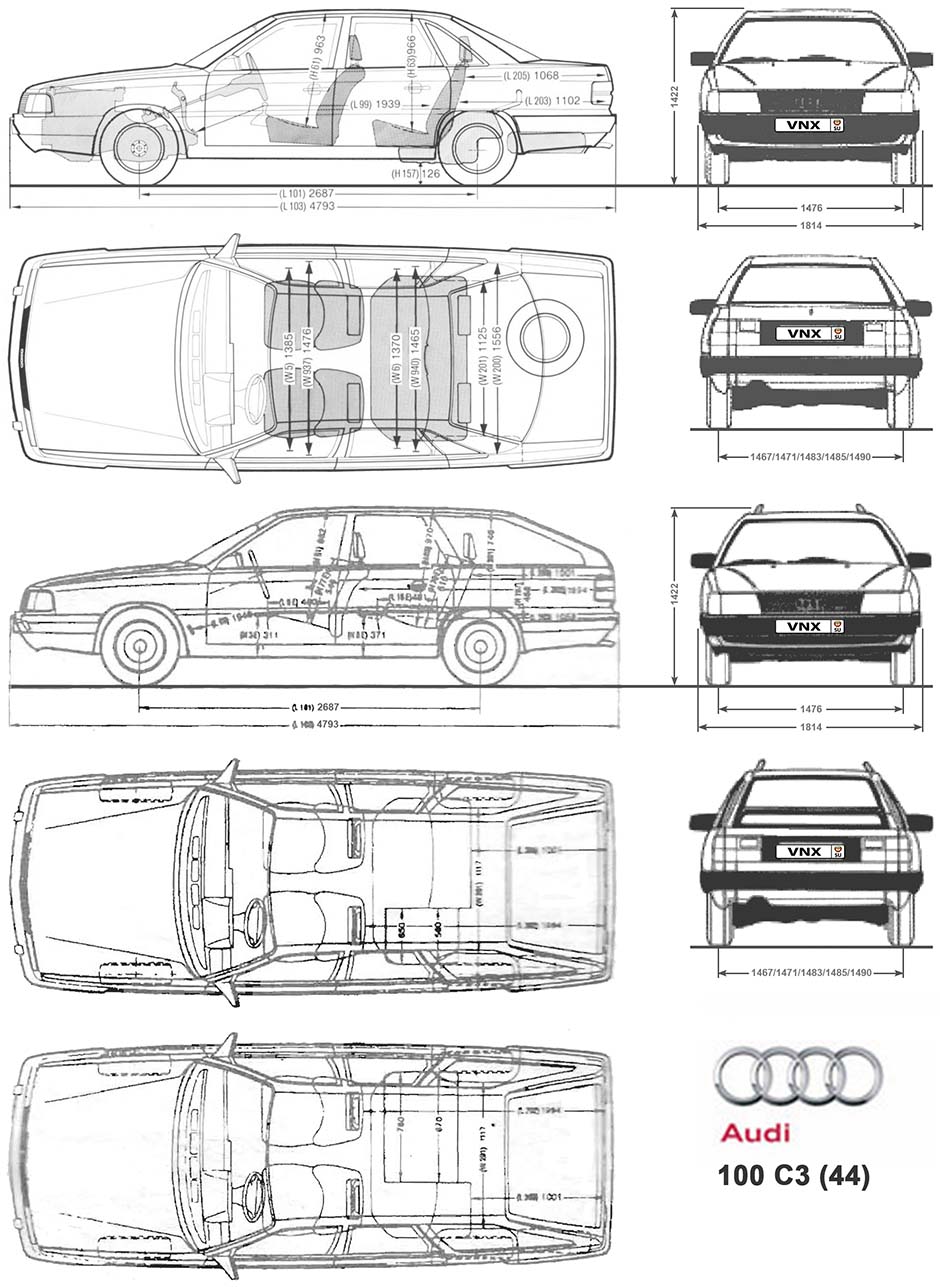
| № | Спецификация / Specs | Данные |
| Габариты (мм/mm) и масса (кг/kg) / Dimensions and Weight | ||
| 1 | Длина / Length | 4793 |
| 2 | Ширина (без/с зеркалами) / Width | 1814 |
| 3 | Высота (загружен/пустой) / Height | 1422 |
| 4 | Колёсная база / Wheelbase | 2687 |
| 5 | Дорожный просвет (клиренс) / Ground clearance | 127 |
| 6 | Снаряжённая масса / Total (curb) weight | 1059 |
| Полная масса / Gross (max.) weight | 1580 | |
|
Двигатель / Engine |
||
| 7 | Тип / Engine Type, Code | Бензиновый, жидкостного охлаждения, четырехтактный, DR |
| 8 | Количество цилиндров / Cylinder arrangement: Total number of cylinders, of valves | 4-цилиндровый, рядный, 8V, SOHC с верхним расположением одного распредвала |
| 9 | Диаметр цилиндра / Bore | 81.0 мм |
| 10 | Ход поршня / Stroke | 86.4 мм |
| 11 | Объём / Engine displacement | 1781 см³ |
| 12 | Система питания / Fuel supply, Aspiration | Карбюратор Pierburg 1ВЗ 026 120 015В |
| Атмосферный | ||
| 13 | Степень сжатия / Compression ratio | 8.75:1 |
| 14 | Максимальная мощность / Max. output power kW (HP) at rpm | 55 кВт (75 л.с.) при 4600 об/мин |
| 15 | Максимальный крутящий момент / Max. torque N·m at rpm | 138 Нм при 2500 об/мин |
|
Трансмиссия / Transmission |
||
| 16 | Сцепление / Clutch type | 210 мм Однодисковое, сухое, с диафрагменной нажимной пружиной и гасителем крутильных колебаний, постоянно замкнутого типа |
| 17 | КПП / Transmission type | 014 II QN МКПП 4 четырёхступенчатая механическая, двухвальная, с синхронизаторами на всех передачах переднего хода |
О Книге
- Название: Автомобиль Audi 100 1983-91 Руководство по ремонту, Инструкция по эксплуатации
- Бензиновые двигатели: DR/DS/NP 1.8 л (1781 см³) 75-90 л.с./55-66 кВт, WH 1.9 л (1921 см³) 100 л.с./74 кВт, KP/RT 2.0 л (1994 см³) 115 л.с./85 кВт, WC 2.1 л (2144 см³) 136 л.с./100 кВт, KU 2.2 л (2226 см³) 138 л.с./101 кВт, NF 2.3 л (2309 см³) 136 л.с./100 кВт
- Выпуск с 1982 года
- Серия: «Ремонт Автомобилей»
- Год издания: 1998
- Автор: Коллектив авторов
- Издательство: «Ассоциация независимых издателей»
- Формат: PDF
- Страниц в книге: 234
- Размер: 65.54 МБ
- Язык: Русский
- Количество электросхем: более 40

- Manuals
- Brands
- Audi Manuals
- Automobile
- 100 Quattro
- Owner’s manual
-
Contents
-
Table of Contents
-
Bookmarks
Quick Links
1990
Audi 100
Audi 100 quattro
Owner’s
Manual
Related Manuals for Audi 100 Quattro
Summary of Contents for Audi 100 Quattro
-
Page 1
1990 Audi 100 Audi 100 quattro Owner’s Manual… -
Page 3
Where generations of dedicated Audi craftsmen exercise a lineage of Audi thought, technique and pride. As a descendant of the finest motorcars in Germany, Audi began as an image in the minds of these craftsmen and was the nurtured in their hands. This proud heritage originated with the prominent coach builders of the Auto Union- Horch, Audi, Wanderer &DKW. -
Page 4
Your Owner’s Manual Volkswagen Canada, Inc. Customer Assistance applies to all Audi 100 and Audi 100 In addition to this Owner’s Manual, your Assistance a la Clientele Audi 100/Audi 100 quattro comes with quattro models currently sold in the USA §… -
Page 5: Table Of Contents
Lifting vehicle ……..150 and minimize pollution……84 symbols ……….6 Trailer towing ……..85 TECHNICAL DESCRIPTION CONTROLS AND EQUIPMENT Driving your Audi 100quattro….87 Engine transmission ……151 Keys, central locking system….. 7,8 Suspension, brakes, steering, body .152 VEHICLE CARE Anti-theft alarm system …… 11 Emission control system….153…
-
Page 6: And Controls
INSTRUMENT PANEL AND CONTROLS INSTRUMENT PANEL AND CONTROLS…
-
Page 7
8 – Emergency flasher switch lever ……65 19 – Parking brake lever……….37 9 – Windshield wiper/washer lever……..64 20 – Differential lock (Audi 100 quattro) ……61 Trip computer function control switch …..56 21 – Horn …………..160 Air bag 10 –… -
Page 8: Warning And Indicator Light Symbols
INSTRUMENT PANEL AND CONTROLS WARNING AND INDICATOR LIGHT SYMBOLS *where applicable WARNING if one of the lights marked with «STOP» comes on suddenly while driving, move a safe distance off the road. Turn off the engine, turn the emergency flasher on and use other warning devices to alert other motorists.
-
Page 9
B. If you should lose a key, provide engine and use of vehicle systems your Audi dealer with the key number to All keys can be inserted into locks either such as power windows, power obtain a duplicate key. -
Page 10
CONTROLS AND EQUIPMENT CENTRAL LOCKING SYST When you unlock the driver’s or front The central locking system locks or un- passenger’s door with the key from locks doors and the rear lid simulta- the outside or raise the locking knob neously. -
Page 11
CONTROLS AND EQUIPMENT To lock, unlock and open doors from the inside WARNING § § To lock or unlock depress or raise Locking doors from the inside the locking knob on the window sill of the can help prevent inadvertent door front doors. -
Page 12
CONTROLS AND EQUIPMENT If the rear lid is closed with lock slot in vertical position, luggage WARNING § compartment can only be opened with When closing the rear lid of the the master key: Wagon/Avant always check whether § Insert key in lock slot. the catch has engaged properly by §… -
Page 13: Luggage Compartment
CONTROLS AND EQUIPMENT HEATED DOOR LOCKS* ANTI-THEFT ALARM SYSTEM The anti-theft alarm system triggers an On vehicles with heated front door locks acoustic alarm and switches on the the heating in the lock cylinder is The rear lid can be opened separately emergency flasher if it senses unaut- activated by briefly pulling the door with the key even when the system is…
-
Page 14
CONTROLS AND EQUIPMENT POWER WINDOWS § Safety switch S serves to activate the switches in the rear doors. § To open the left front door window push the rear of switch 1 briefly. The window will open fully and quickly for the driver’s convenience. -
Page 15
CONTROLS AND EQUIPMENT MIRRORS Adjust the outside and inside mirrors If the electrical adjustment of the mirror before driving and after adjusting your should not respond, the mirrors can still seat to proper driving position. It is be adjusted by pushing lightly on the edge of the mirror glass. -
Page 16
CONTROLS AND EQUIPMENT To ensure the best possible anti-glare effect, the lever should be pointing forwards when the basic mirror setting is made. Daylight driving – lever to front Night driving – lever to rear Inside day-night mirror You can adjust the day-night mirror from clear daylight visibility to non-glare visibility at night by moving the lever at the bottom of the mirror. -
Page 17: Safety Belts
If belts do not work properly, see belt, the shoulder belt should be on your lap. your Audi dealer. § positioned midway over the shoulder — § The lap belt must be worn low never across the neck.
-
Page 18
An unrestrained child could also short, a special lap belt adapter is be injured by striking the interior, or available from your Audi dealer. by being ejected from the vehicle during a sudden maneuver or impact When purchasing a child restraint,… -
Page 19
CONTROLS AND EQUIPMENT § Improperly or Inadequately instated Children of average size of about child restraint systems can increase 6 or 7 years of age may use available safety belts. Always make sure that the risk of injury to children in the shoulder portion of a three point accidents, therefore always carefully belt is positioned midway over the… -
Page 20
CONTROLS AND EQUIPMENT Belt warning system A chime and a warning light are interconnected with the driver’s safety belt. Every time the ignition is turned on, the safety belt warning light will come on for about six seconds as a reminder to buckle up. -
Page 21
CONTROLS AND EQUIPMENT § Belts should fit snugly across the pelvis and chest. Make sure any slack is wound up on the retractor. § Adjust height of belt anchorage, if necessary. Do not wear shoulder part of belt under your arm or otherwise out of position. -
Page 22
CONTROLS AND EQUIPMENT WARNING During pregnancy Safety systems § To reduce the risk of injury m an Pregnant women should always wear accident, position the lap belt as low safety belts. The lap belt must be worn The vehicle is equipped with the «ten» as possible across the pelvis. -
Page 23
Depending upon the child restraint system to be fitted, additional anchorage points may be required for USA vehicles. Audi 100 sedans can be fitted with three anchorage points on the filler panel for In the Avant models the three anchor… -
Page 24: Head Restraints
CONTROLS AND EQUIPMENT HEAD RESTRAINTS To ensure proper installation the anchor WARNING fittings or fitting assemblies should be Do not drive the vehicle without the installed or repositioned by your Audi head restraints provided. Head dealer. restraints are designed to help reduce injuries.
-
Page 25
CONTROLS AND EQUIPMENT SEATS WARNING To reduce the risk of serious persona) injury in an accident, front seat passengers must never ride in a moving vehicle with the seatback reclined. The risk of personal injury will increase with increasing rearward angle of the seatback. -
Page 26
CONTROLS AND EQUIPMENT 4 – Height adjustment Switch A § Shift your body weight forward and — seat cushion rises at front pull lever on outer side of seat upwards. down — seat cushion lowers at front § Raise the seat by shifting your body weight forward and lower the seat by Switch B shifting your weight backward. -
Page 27
«OFF» position. Have your Audi dealer locate and correct the With doors closed, hold recall button problem. Until then, use switches on depressed until seat has reached the outboard side of seat only. -
Page 28
CONTROLS AND EQUIPMENT WARNING The armrest can restrict the driver’s movement when it is pulled down. Therefore fold up the armrest when driving in urban traffic. Armrest for car telephone* – see page Center arm rest § To fold up, swing the armrest up until it locks in place. -
Page 29
§ the radio. Even small objects can obstruct Suitable headphones can be obtained the rear vision necessary for safe from Audi dealers. driving. § With certain types of radio there is a Stored articles chafing against headphone connection on the filler panel… -
Page 30
CONTROLS AND EQ UIPMENT SKI SACK* By using the ski sack , you can transport skis or other long objects safely and without soiling or damaging the vehicle interior. Loading the ski sack The ski sack is accessible from the rear seat, §… -
Page 31
CONTROLS AND EQUIPMENT Removing reinstalling center armrest § The center armrest can be taken out for convenience when using the ski sack. § Push aside the backrest upholstery on each side of the armrest to expose the armrest mountings. § Press back the catch (arrow) on each side and lift out the armrest. -
Page 32
CONTROLS AND EQ UIPMENT LUGGAGE COMPARTM Cargo weight should be located in the luggage compartment as far forward as possible. WARNING § help prevent poisonous exhaust gas from being drawn into the vehicle, always keep the rear lid closed while driving. Therefore, do not transport objects larger than those fitting safely into the luggage area. -
Page 33
CONTROLS AND EQUIPMENT To fold cover § Pull both ends of the rod out of the recesses and push cover in evenly in a straight line towards seatback until stop. To remove § Fold rear seatback forward. § Push down both covers on guide rails. -
Page 34
CONTROLS AND EQUIPMENT WARNING To remove § § The luggage compartment cover Fold cargo floor forward. § between the rear seat and the rear Unscrew upper screw window must not be used for storage, mountings on each side under the cargo even for small and light items. -
Page 35: Pedals
§ It should always be possible to For replacement your Audi dealer will be depress the clutch and accelerator glad to help you choose suitable floor pedals fully. mats for your vehicle.
-
Page 36
Keep in mind that the braking distance increases very rapidly as the speed WARNING increases. At 60 mph or 100 km/h, for example, it is not twice but four times Failure of one brake circuit wit! impair longer than at 30 mph or 50 km/h. Tire… -
Page 37
CONTROLS AND EQUIPMENT Anti-lock brake system (ABS Every time the engine is started, the ABS Conditions affecting braking switches on automatically. efficiency The ABS contributes effectively to vehicle control, since it prevents the wheels from The ABS can be switched off and on by Moisture or road salt locking when the brakes are applied. -
Page 38
Front spoiler increase, one of the brake circuits may must be «broken in» during the initial 100 have failed, Should this happen, you will If you install a front spoiler on your to 150 miles (150 to 200 kilometers) of… -
Page 39
CONTROLS AND EQUIPMENT WARNING § Release the parking brake fully. A partially engaged brake will overheat the rear brakes, reduce their effective- ness and cause excessive wear. § Always set the parking brake when parking your vehicle. Move the selector lever «P»… -
Page 40
CONTROLS AND EQUIPMENT MANUAL TRANSMISSION Reverse The five forward gears and the reverse gear are arranged as illustrated. Only shift into Reverse when the Drive in 5th gear for optimum fuel vehicle is not moving. economy when cruising. However if more To engage Reverse, move lever to right, acceleration is required (when passing press down and pull back. -
Page 41
Shift out of the Park position, before Automatic Shift Lock releasing the parking brake. Your Audi is equipped with an Automatic When the vehicle is parked on a steep Shift Lock (ASL). The ASL is an hill, shifting out of Park may be a little electromechanical device that locks the harder. -
Page 42
To tomatic clutches in the transmission. § engage this gear depress the selector Your Audi with Automatic Transmission Never have any driving position lever first. In «1» the transmission will cannot be started by pushing or engaged when checking under the stay in first gear and will not upshift. -
Page 43
CONTROLS AND EQUIPMENT § Do not leave the selector lever in the Never shift into Reverse (R) or Stopping § Neutral position or any driving position. Park (P) when the vehicle is in motion. When stopping briefly, at a traffic §… -
Page 44: Steering Lock/Ignition Starter Switch
CONTROLS AND EQUIPMENT STEERING LOCK/ IGNITION/ STARTER SWITCH Switch positions Before the starter can be operated again — Ignition off/steering can be locked. the key must be turned back to position 1. Pull out the key and turn steering The non-repeat lock in the ignition switch wheel until it locks.
-
Page 45: Starting Procedures
CONTROLS AND EQUIPMENT STARTING PROCEDURES STOPPING ENGINE WARNING Manual Transmission Do not stop engine immediately after § hard or extended driving. Keep engine Fasten safety bells before driving. Start with gearshift lever in Neutral, § running for about two minutes to clutch pedal depressed, so that the Never start or let the engine run in prevent excessive heat build-up.
-
Page 46: Instrument Cluster
CONTROLS AND EQUIPMENT INSTRUMENT CLUSTER page page page 1 — Coolant temperature gauge ..45 5 — Fuel gauge ……… 46 Instrument illumination….46 2 — Digital clock …….. 45 6 — Engine oil temperature gauge..46 Auto-Check System knob..53 3 — Tachometer …….. 45 7 — Engine oil pressure gauge ..
-
Page 47
CONTROLS AND EQUIPMENT 1 – Coolant temperature gauge WARNINGS and further details see To set the clock accurately to the second: § page 54 and 113. When the ignition is switched on the Turn the knob to the right and hold until the clock reads one minute before needle in the coolant temperature gauge the time to beset. -
Page 48
Audi dealer. See also pages 49 The last digit in red indicates 1/10 of a started, you can drive on to the next Audi and 55. mile or kilometer. dealer but do not run engine at high When starting your vehicle, the voltage speeds. -
Page 49: Warning/Indicators Lights
CONTROLS AND EQUIPMENT WARNING/ INDICATOR LIGHTS § Your vehicle is equipped with several WARNING The engine compartment of any § important indicator and warning devices motor vehicle is a potentially hazard- Whenever stalled or stopped for monitor continued reliable pus area. Before you check anything repair, move the vehicle a safe operation of your vehicle.
-
Page 50
This could coolant level damage the engine. Turn the engine off and contact the nearest Audi dealer for assistance. The oil pressure warning light is not If the light flashes when driving, either the an indicator for low engine oil level. -
Page 51
If the light does not go out, or if it comes because the cooling system is still on while driving with unlocked differential operative. However, since the battery is (Audi 100 quattro) and the ABS switch longer charged, switch on, there may be a malfunction in the unnecessary electrical equipment and system. -
Page 52
Avoid driving the vehicle If the brake warning light does not light and have it towed to the nearest Audi drive as this would cause serious up when turning the ignition on, or setting damage to the hydraulic system. -
Page 53
System. Continue driving with reduced Vehicles having this indicator light are power and have the cause corrected equipped with an on-board diagnostic promptly by an Audi dealer or a qualified system. This system monitors the various workshop. components of your Emission Control. -
Page 54: Auto-Check System
In the event of multiple malfunctions, the devices to alert motorists. Contact your Malfunctions or urgent repairs are audibly Audi dealer or a qualified workshop. symbols will appear successively in two- signaled as well as displayed by red or second intervals.
-
Page 55
CONTROLS AND EQUIPMENT When checking the symbols, other symbols will appear which are not described in this section because they do not apply to your particular car. Switching off the yellow symbols On USA models, the yellow symbols in the display can be switched off and then on again by pushing the check button. -
Page 56
CONTROLS AND EQUIPMENT § Displays The engine compartment of any motor vehicle potentially In case of a malfunction or component — Coolant temperature/ hazardous area. Before you check failure, the acoustic warning will sound coolant level anything in the engine compartment, and the following symbols can appear. -
Page 57
46. conditioner. See your Audi dealer promptly to locate Make it a habit to have the engine oil and correct the problem. The battery may level checked with every fuel filling. -
Page 58: Trip Computer
CONTROLS AND EQUIPMENT TRIP COMPUTER * A triangular indicator along bottom and top rims of the display window identifies the selected function by pointing to the respective symbol. The «Reset» touch control on the bottom of the switch serves several functions. By depressing »Reset»…
-
Page 59
100 feet or 30 meters. and smooth driving can be covered with zero after a driving distance of 100 feet… -
Page 60
To delete stored data, stored data, push «Reset». of driving time between points, depress push «Reset». The display will show «0.0» «Reset» for two seconds for zero. for about 100 feet or 30 meters. Driving time alert While driving, computer will automatically switch to the «driving time»… -
Page 61: Switches
CONTROLS AND EQUIPMENT SWITCHES From position 0, roll thumbwheel upward When the rear window defogger is to activate the heating elements. switched on, the outside mirrors with electric remote control are electrically Select the desired temperature setting heated at the same time (see page 13). between positions 1–6.
-
Page 62
CONTROLS AND EQUIPMENT 4 – Anti-lock brake system (ABS) General hints § The ABS can be switched off and on by Under certain difficult road conditions, such as gravel or fresh snow depressing this switch. on top of ice, when extreme caution and When the ABS is switched off. -
Page 63
Imminent danger of getting system and the differential lock checked stuck. The lock in the rear differentia! can be by your Audi dealer. engaged and disengaged manually with Refer to page 87 for more details. When the rear axle differential is locked,… -
Page 64
CONTROLS AND EQUIPMENT LIGHT SWITCH / TURN SIGNAL / HEADLIGHT DIMMER SWITCH LEVER B – Turn signal / headlight dimmer Headlight dimmer switch lever With headlights on (lever A in position 2), With ignition on: you can switch to high beam, low beam or flash signal other motorists by operating long lever as follows: Turn signals… -
Page 65: Cruise Control
CONTROLS AND EQUIPMENT CRUISE CONTROL When the cruise control is switched The cruise control is operated with sliding on, do not shift into Neutral without button pressure button declutching! The engine will rev up positioned at the end of the turn signal/headlight dimmer switch lever.
-
Page 66: Emergency Flasher
CONTROLS AND EQUIPMENT WINDWSHIELD WIPER AND WASHER SWITCH LEVER / EMERGENCY FLASHER SWITCH LEVER Windshield Rear window wiper and washer (Wagon/Avant only) Brief wiping: Push lever away from the steering wheel Pushing the lever from position 0 (OFF) and release – the wiper will operate down allows the wipers to operate for as approx.
-
Page 67
CONTROLS AND EQUIPMENT WARNING WARNING § Worn or dirty wiper blades will Move the vehicle a safe distance off reduce visibility, making driving the road when stalled or stopped for hazardous. Clean blades regularly to repairs. Do not park or operate the remove road film and carwash wax vehicle in areas where the hot exhaust buildup. -
Page 68
If desired. 1 – Outlets over full width of windshield in doubt, consult your Audi dealer. § 2 – Side window defroster/defogger Maximum heating output and fast defrosting can be obtained only after… -
Page 69
CONTROLS AND EQUIPMENT B – Temperature Control D – Switch for air conditioner (A/C) Control fully to left- maximum cooling. Depressing the switch turns the air Control fully to right-maximum heating. conditioner on or off. The temperature can be regulated over When the air conditioner is switched on, the full range. -
Page 70
CONTROLS AND EQUIPMENT Defogging or defrosting of windshield Warming up interior quickly Outside airventilation § and side windows: Turn fan control A to IIII. You get maximum outside airflow from § § Turn fan control A to vents 3 and 4 when the air distribution Turn temperature control B all the §… -
Page 71
I and IIII. § conditioner should be checked and, if windshield fogging up inside will be Set air distribution control C as desi- necessary, serviced by your Audi dealer. reduced. § red. § §… -
Page 72: Control System
CONTROLS AND EQUIPMENT Electronic climate control system We recommend pushing the AUTO buttons and selecting an all season setting of approximately 75 °F (23 °C). At this setting, a comfortable inside temperature is reached quickly. Only when extreme weather conditions exist, adjust the temperature accordingly.
-
Page 73
CONTROLS AND EQUIPMENT ECON – This setting is recommended OUTSIDE TEMP – The outside air The following settings can be selected as only when fuel economy is desired and it temperature is displayed when the needed: AUTO, , ECON and BI-LEV. is not necessary to cool the interior of the OUTSIDE TEMP button is pushed. -
Page 74
For quickest cooling of a hot interior, ratures are automatically adjusted. Adjust have your Audi dealer locate and correct leave windows open for a few minutes to the airflow direction by moving the vent the cause promptly. -
Page 75
CONTROLS AND EQUIPMENT SLIDING / PROP-UP ROOF * Manually-operated sliding roof To open the sliding roof WARNING Open and close the sliding roof using the Press the button and turn the handle left. As a safety precaution, always keep handle located above the windshield. To close the sliding roof the handle folded back in its recess after use. -
Page 76
§ Turn crank handle and close the To close, depress front half (2) of roof. rocker switch until sliding roof is comple- Have your Audi dealer locate and correct tely closed. the cause of the malfunction. -
Page 77
CONTROLS AND EQUIPMENT INTERIOR LIGHTS Reading lights Vehicles with electric sliding/prop-up Dome light roof Switch (A) positions Vehicles without electric sliding/prop- The light housing is located above the up roof – Door contact switch windshield. In this switch position the light The light housing is located above the Switch positions windshield. -
Page 78: Telephone
CONTROLS AND EQ UIPMENT TELEPHONE* Armrest positions The car telepho ne is installed in the When using the telephone from the rear When using the telephone from the front center armrest. seats, the armrest should be set to seats, the armrest should be set to position 2.
-
Page 79
The socket of the cigarette lighter may be used for 12-volt appliances with maxi- Luggage compartment light mum consumption of up to 100 watts, lights up when the rear lid is open. such as hand spot light, small vacuum cleaner, etc. -
Page 80
CONTROLS AND EQ UIPMENT ASHTRAYS GLOVE COMPARTMENT Front Rear The glove compartment is illuminated To empty: Open the ashtray and remove To em pty: Open the ashtray, push down and lockable. § in direction of arrow. and swing the ashtray out. To open, pull the handle in direction To reinstall: Push ashtray into housing. -
Page 81
When the lid is opened a li ght comes on. glare. Should you wish to use the storage tray for other objects e.g. the remote control unit for opening garage door, ask your Audi dealer to remove the coin holder. here applicable… -
Page 82: Roof Rack
Only install a roof rack specifically de- ting items such as bicycles, skis, surf bo- signed for this vehicle. ards etc. can be obtained from your Audi § These roof racks are the basis for a dealer.
-
Page 83
§ ously at moderate speed for the first § not let engine labor. Shift 100 miles (160 kilometers). Avoid high engine speed. § down when engine no longer runs From 600 to 900 miles New brake pads and linings do smoothly. -
Page 84: Operate Your Vehicle Safely
Keep air intake slot between eng A lot has gone into the manufacturing of First things first… § hood and windshield free of snow your Audi, including advanced Turn the engine off before you at- ice, so that the heater and the winds hield…
-
Page 85
VEHICLE OPERATION § When stopped or parked, always set In the driver’s seat On the road § § the parking brake. Move the selector Check operation of horn. Always drive defensively. Expect the § lever to «P» (Automatic transmission) or unexpected. -
Page 86: Operate Your Vehicle Economically And Minimize Pollution
Have your vehicle serviced by an ption is normal but tends to be higher Do not drive longer than necessary authorized Audi dealer at the specified when the engine is new. The use of qua- in the lower gears. By upshifting early…
-
Page 87: Trailer Towing
If you tow a trailer, your Audi may require correct hitch. Do not use a bumper hitch. more frequent maintenance due to the The hitch must be installed in a way not extra load.
-
Page 88
VEHICLE OPERATION Avoid jerky starts or sudden acceleration. Before you tow a trailer Trailer-lowin g tips Slow down in crosswinds and on rough Correct and even load distribution. All Your vehicle handles differently when roads. Be especially careful when pas- objects inside the trailer should be held towing a trailer because of the additional sing other vehicles and trucks. -
Page 89: Driving Your Audi 100Quattro
The Audi 100 quattro all-wheel drive Snow chains can improve both road Audi 100 quattro are less likely to spin system has the following advantages traction and braking when driving in se- under the same conditions.
-
Page 90
The Audi 100 quattro is not an off-road differential. vehicle as it does not have enough When traveling on dry roads, your Audi On wet roads, do not drive your Audi 100 ground clearance. 100 quattro does not drive differently quattro too… -
Page 91
VEHICLE OPERATION Replacing wheels and tires Note All four wheels on the Audi 100 quattro Differential Lock and A must always have the same rolling radi- The differential lock is to be used only us. However, differently worn tires do not… -
Page 92
VEHICLE CARE FUEL TANK For refueling the lockable fu el filler cap Do not fill the fuel tank too quickly, can be hooked to the fuel tank flap as otherwise the fuel may foam up and illustrated left. cause the nozzle to switch off too soon. Trouble-free refueling depends on the As soon as the nozzle switches off auto- correct use of the filler nozzle. -
Page 93
VEHICLE CARE FUEL SUPPLY Your vehicle is equipped with a cataly- important to prevent engine «knock», Seasonally adjusted gasoline tic converter and requires unleaded which reduces performance and may Many gasolines are blended to perform fuel. For maximum engine performance, cause engine damage. -
Page 94
Damage or malfunction due to poor fuel line brands that include these deposit quality is not covered by the Audi New control additives. Vehicle Limited W arranty. If gasolines with additives are not avai- lable, contact your Audi dealer about pro- per fuel additives. -
Page 95
See also warnings on emission controls will be damaged. page 100 and 102. The fuel system must be drained while observing all environmental regulations. It is best to have this performed by your authorized Audi dealer. -
Page 96
CLEANING PRODUCTS EXTERIOR Washing and waxing Any automobile is subjected to abuse WARNING The paint on your Audi is very durable § from industrial fumes, corrosive road sal Cleaning agents may be poiso- but must be protected from losing its abandoned lollipops, muddy dog feet, nous. -
Page 97
Wipe everything dry with a chamois Touch-up paint job. If the polish you are using does not to avoid water spots. contain wax, apply hard wax after Your Audi dealer has touch-up paint for When having your vehicle washed at an polishing. minor scratches stone chips. -
Page 98
Clean all windows regularly to remove guide rails and lubricate with silicone exert corrosive effects. If left on too long, spray at le ast once a year. See your Audi road film and car-wash wax buildup. Use brake metal dust can cause pitting. Wash dealer… -
Page 99
VEHICLE CARE INTERIOR Grease, tar or oil stains can be removed Glass Safety belts with a clean cloth or sponge soaked with Use the same cleaning agents as for Keep belts clean. Very dirty belts may all-purpose cleaner or with a solvent type exterior and polish dry. -
Page 100: Engine Compartment
All body cavities which could be affected haust manifold, exhaust pipes, cataly- The lower body shell of your Audi is by corrosion have been given a thorough tic converter or heat shields. During thoroughly protected against corrosion.
-
Page 101
Audi dealers other motorists. In addition, it is necessary to perform an because they have the expertise, the oil change 6 months after each Mainte- Always observe environmental regula-… -
Page 102
If in doubt about any familiar with these or other proce- specially trained workshop personnel in servicing, have it done by your Audi dures with respect to the vehicle, or order to assure proper performance, are uncertain as to how to proceed. -
Page 103
VEHICLE CARE ENGINE HOOD WARNING Should you notice at any time while driving that the hood is not secured properly, stop at once and close it. § § In front of vehicle, open hood by To unlock engine hood, pull the depressing the safety catch under hood release lever on left under dashboard. -
Page 104
VEHICLE CARE ENGINE COMPARTMENT lways exercise extreme caution when working under the engine hood WARNING § Before you check anything in the engine compartment, stop the engine, fully set the parking brake and remove the ignition key. § Do not work on your car if you are tired or ill, under emotional stress or under the influence of drugs, medica- tion or alcohol. -
Page 105
VEHICLE CARE § § Always disconnect the battery Always exercise extreme caution ground strap if you must work n the o prevent neckties, jewelry, long hair fuel system or the electrical s stem. or loose clothing from getting caught Never smoke or work near heaters or in the fan blades, the V-belts, or any other fire hazards if you must work other moving engine parts. -
Page 106
«API Service SF/SG» Power steering and Brake booster Engine oils are graded according to their Audi Hydraulic oil No. G 002000 or equi- viscosity. The proper grade to be used in valent. your engine depends on existing climatic Lubricant additives or seasonal conditions. -
Page 107
After turning off the engine, wait a few minutes for the oil to return to the oil pan. § Pull out dipstick and wipe it cl with a rag Always heed WARNINGS on page 100 and 102. -
Page 108
«max» marking. Otherwise, the excess oil may be drawn in through the crankcase breather into the exhaust system. The oil would then burn in the catalytic converter and cause damage. Always heed WARNINGS on page 100 and 102… -
Page 109
§ Recycle used engine oil by taking it to a used engine oil collection faci- lity in your area, or contact a service station. Always heed WARNINGS on page 100 and 102… -
Page 110
Remove old oil filter element and discard. § Lightly coat seal of new filter ele- ment with oil. § Screw on filter element and hand- tighten according manufacturer’s instructions on the carton or on the filter element. Always heed WARNINGS on page 100 and 102… -
Page 111: Transmission Oil
VEHICLE CARE AUTOMATIC TRANSMISSION FLIUD / MANUAL TRANSMISSION OIL To obtain an accurate reading, the The automatic transmission may be damaged by even a tiny speck of dirt. vehicle must be on level ground, and the Only use lint free rags to wipe the fluid must have reached operating tem- dipstick.
-
Page 112
We recommend that you have the air cleaner serviced by your Audi dealer or a qualified workshop. Note The paper filter element must never be cleaned or soaked with gasoline, clea- ning solvents or oil. -
Page 113
Turn off the engine and check the the system. fluid level immediately. The fluid level should be between the MAX and MIN mark (see illustration), top up with Audi Hydraulic Oil G 002000 or equivalent. Both the power steering and the brake WARNING §… -
Page 114: Brake Fluid
DOT 4 brake fluid that meets SAE rear partition of the engine compartment specification J 1703 and conforms to ry 2 years. Your Audi dealer will per- on the left side as seen in driving Federal Motor Vehicle Safety Stan- form this service for you.
-
Page 115: Cooling System
Only use quality phosphate-free antifre- rally requires little attention. eze containing ethylene glycol. Such anti- freeze is available at your Audi dealer. The cooling system has been filled at the WARNING factory with a permanent coolant which does not need to be changed. The cool-…
-
Page 116
Increasing antifreeze result. by your authorized Audi dealer. It is not coolant to more than 60 % is not only sufficient merely to add coolant. uneconomical, it is also detrimental to Adding coolant In a sealed system, losses can only engine cooling. -
Page 117
Tensioning and replacing of V-belts Screw cap on again tightly. necessary – see page 136. should be performed by your Audi de- § aler or a qualified workshop. The speed of the radiator fan does… -
Page 118: Battery
If the fluid level is below the «min» mark, the seat. let your Audi dealer correct the condition. Always heed WARNINGS on page 102.
-
Page 119
§ equipment. tances only. Let your Audi dealer test the Charge battery in a well ventilated battery’s capacity before winter sets in. A area. Keep away from open flame or Slow batte… -
Page 120
VEHICLE CARE § Connect charge r cables. The terminals and connections should be Charger cables m ust be connected kept clean and greased with silicone To reinstall battery in vehicle § POSITIVE (+) to POSITIVE (+) and spray or petroleum jelly. Make sure the Place battery in vehicle and tighten NEGATIVE (-) to NEGATIVE (-). -
Page 121
VEHICLE CARE WINDSHIELD / REAR WINDOW WASHER CONTAINER illing the container To add washer fluid just lift the fill er cap by the small tongue. The containers can be filled to the top. Since clear water is usually not adequate for cleaning the glass, add a cleani solution to the water. -
Page 122
If the blades are very dirty, for example with insects, carefully clean the blades with a sponge or a soft brush. Replace your wiper blades once or twice a year. See your authorized Audi dealer for replacement blades. Removing wiper blades Note §… -
Page 123: Tires/Wheels
Incorrect tire pressures cause te speeds and with caution for the first increased tire wear and adversely af- 100 miles (160 kilometers). fect road holding of the vehicle, lea- Wheel balancing ding to loss of control and personal…
-
Page 124
The rotation direction must not be reversed. Therefore, these tires cannot be changed diagonally. If in doubt, discuss any unusual tire wear with your Audi dealer’s service depart- ment. After rotation adjust tire pressure and torque wheel bolts diagonally to 80 ft lb/… -
Page 125
.12 inches (3 stay the same. This also applies to Audi recommended § mm). Store removed tires in a cool, dry alternate replacement tires. -
Page 126
The secure fit of the wheels and first 100 miles or 160 kilometers. struction an d tread type, Different tires on… -
Page 127
§ welt as a tire graded 100. The relative Federal Motor Vehicle Safety Standard Only radial ply winter tires must be performance of tires depends on actual No. 109. Grades B and A represent installed. -
Page 128
This applies also to the cold tire inflation pressures required for Do not drive a vehicle equipped with Audi 100quattro. the regular radial ply tires. snow tires at prolonged high speed. §… -
Page 129: Difficult Operating Conditions
States and Canada require that auto- delivery and return shipment program. ons. This also applies to the frequency mobiles meet specific emission regula- For details consult your Audi dealer or and the extent of service requirements as tions and safety standards. Therefore, write to: stated in the Maintenance brochure.
-
Page 130: Winter Driving
– see page 104. dling; this also applies to vehicles with Audi dealer, before the cold weather § all-wheel drive-see pages 87 and 125. starts-see page 116.
-
Page 131: Accessories
These parts and accessories have be- new-car condition. For this reason, en specially evaluated with respect to please observe the following points when suitability for use with the Audi 100. installing additional accessories, if parts have replaced modifications are made to the vehicle: §…
-
Page 132: Jack And Tools
DO-IT-YOURSELF SERVICE JACK AND TOOLS § Do not raise the vehicle using a bumper jack. The bumper system would be damaged. Also, the jack may slip which could cause persona! injury. § Do not support your car on cinder blocks, bricks or other props that may crumble under continuous load.
-
Page 133
DO-IT-YOURSELF SERVICE WARNING The screw driver handle must not be used to loosen or tighten wheel bolts. A plastic pin is provided to make it easier to change a wheel. Inserting the pin in the bolt hole assures that the holes in the wheel are in line with the threaded holes in the wheel hub. -
Page 134: Compact Spare Wheel
DO-IT-YOURSELF SERVICE COMPACT SPARE WHEEL § § The spare should be returned to Do not put a snow chain on your the storag e area as soon as the stan- compact spare tire. Because of the dard road tire can be repaired or smaller tire size, the chain wilt not fit replaced.
-
Page 135: Changing A Wheel
DO-IT-YOURSELF SERVICE CHANGING A WHEEL WARNING § If you have a flat fire, move a safe distance off the road. Turn off the en- gine, switch the emergency flasher on and use other warning devices to alert other motorists. § Passengers must not remain in the vehicle when jacked up.
-
Page 136
DO-IT-YOURSELF SERVICE § Step 4 Step 5 ust the jack at an angle so that § § the jack base is slightly under the vehicle, Securely place jack under the jack Unscrew the wheel bolt nearest the and the longer portion of the jack base point closest to the wheel to be changed. -
Page 137
DO-IT-YOURSELF SERVICE Step 7 Step 8 § § Then go crosswise from one bolt to Fully lower the vehicle and remove another tightening them firmly with the jack. § lug wrench. Correct the air pressure of the tire Correct tightness of the wheel bolts is you have just put on. -
Page 138
It is good planning to keep a lights and accessories and remove suppl y of spare fuses on hand. They are the ignition key to avoid damaging the available at your Audi dealer. electrical system. § § Replace the blown fuse, which can… -
Page 139
…….. 30 Fuel pump ……..Instrument cluster, electric License plate light, glove mirrors, Auto-check system* ) Audi 100 quattro compartment light, engine trip computer*……. 5 ) Canada models only compartment light, illumination Engine timing I ……10 for electronic climate control Engine timing II …… -
Page 140
Bulbs can be Front side marker light bulbs § § ned from any Audi dealer. Open engine hood and prop up. Open engine hood and prop up. In § ould contain, at least, the follow Disconnect wire connector. -
Page 141
DO-IT-YOURSELF SERVICE § Turn bulb holder counter-clockwise Tail lights in fender Front turn signal light bulbs § § and pull out. Open trunk lid. § Remove both Philips screws § Press defective bulb into holder, turn pull out lamp housing. Loosen both knurled screws and §… -
Page 142
DO-IT-YOURSELF SER VICE Tail lights in side panel (Wagon/Avant) § Open rear lid. § Remove left or right side trim. § Remove compact spare wheel on the left, first aid kit and warning triangle on the right. § Reach into the space between the trim and side panel, push in tabs (see arrows in figure B 43-236 on previous page) and remove base plate. -
Page 143
DO-IT-YOURSELF SERVICE License plate light bulbs § Front interior dome light Open trunk lid. § Backup light an d rear fog light in § Carefully insert flat blade Remove screws and lens cap. trunk lid or rear lid (Wagon/Avant) § screwdriver betwe en right side edge of §… -
Page 144
DO-IT-YOURSELF SERVICE Reading light bulbs § Engine compartment light Pull down hand grip and remove the Luggage compartment light § now visible Phillips screws. § Squeeze both sides of transparent § Insert a screwdriver between edge With screw driver, carefully pry of plastic cover (arrows) and remove. -
Page 145
DO-IT-YOURSELF SERVICE HEADLIGHT ADJUSTMENT The proper headlight beam alignment is very important to traffic safety. The headlight adjustment should therefore only be done with a special appliance. Open engine hood The he adlight beams can be adjusted with the knurled screws A and B. A –… -
Page 146: Replacing The Radio
They are the most The speakers are specially designed for connectors, speakers, familiar with the technical features of your the acoustics of the Audi 100 and antenna suppressor vehicle. They also offer Original Audi produce excel lent sound. The system is designed for Original Audi Radios.
-
Page 147: Emergency Starting
DO-IT-YOURSELF SERVICE EMERGENCY STARTING Starting with jumper cables Starting by pushing or towing WARNING Vehicles with automatic transmission § cannot be started by pushing or Always shield your eyes and towing. avoid leaning over the battery when- ever possible. Vehicles with manual transmission §…
-
Page 148
DO-IT-YOURSELF SERVICE Applying a higher voltage bo oster Hook-up of jumper cables battery will additionally cause expen- and starti sive damage to sensitive electronic Connect clamp of plus-cable (red) components, such as relays, radio, emergency start assist car telephone, etc. §… -
Page 149
DO-IT-YOURSELF SERVICE When assisting another vehicle to start: Connect clamp of plus-cable to positive terminal discharged battery. Connect clamp on opposite end of cable to the emergency start assist (+) terminal. Connect clamp of minus-cable to the en gine block. Connect clamp o n opposite end cable to a bare metal part… -
Page 150: Emergency Towing
30 miles or 50 kilometers. § When using a conventional sling type gear the Audi 100 must be towed with front wheels off the ground to avoid damage to the vehicle. § If a vehicle with automatic transmis-…
-
Page 151
DO-IT-YOURSELF SERVICE Rear hook-up All Audi 100 models cannot be towed by lifting rear with conventional sling-type equipment. Towing of the Audi 100 quattro models The hook-u p procedures are as outlined for vehicles with front-wheel drive. The differential lock should be disen- gaged to allow the rear wheels to turn freely in corners. -
Page 152: Lifting Vehicle
DO-IT-YOURSELF SER VICE LIFTING VEHICLE The vehicle should never be lifted jacked up from underneath the engine oil pan, the transmission housing, or the front or rear axle. This could lead to serious damage. The same lifting points as illustrated for the hoist also apply when using a floor jack.
-
Page 153
TECHNICAL DESCRIPTION ENGINE TRANSMISSION § § Four-stroke gasoline engine in front Paper element air cleaner. Automatic transmission § § of axle. Exhaust emission control system Hydrodynamic torque converter and § Five cylinder in line. with activated charcoal filter in the fuel planetary gearing with three forward and §… -
Page 154
TECHNICAL DESCRIPTION SUSPENSION BRAKES STEERING, BODY / CHASSIS Front-wheel drive Front wheel suspension Steering § § Hydraulic power-assisted dual Front- a nd all-wheel drive Power assisted rack and pinion § diagonal brake circuits with disc brakes, steering with energy absorbing steering Independent wheel s uspension. -
Page 155: Emission Control System
Warranty otherwise fuel can reach the catalytic booklet. converter. This could result in over- heating of the converter, requiring its Your Audi is equipped with an emission replacement. control system, which contains the follo- wing major components:…
-
Page 156
TECHNICAL DESCRIPTION To assure efficient operati on of the Emission Control System: WARNING Undercoating § Have your vehicle maintained Starting Do not apply additional undercoating properly and in accordance with the or rustproofing on or near the exhaust Do not leave engine idling unattended service recommendations as descry- manifold, exhaust pipes, catalytic con- after starting. -
Page 157: Digital Electronic Ignition
TECHNICAL DESCRIPTION DIGITAL ELECTRONIC IGNITION Your engine is equipped with a digital he combustion process in the engine is electronic ignition system with knock monitored b y a knock sensor. If engine sensor. The system is capable of knock (ping ing) occurs, the timing for the adjusting ignition…
-
Page 158: All-Wheel Drive
TECHNICAL DESCRIPTION THE CONCEPT OF THE ALL-WHEEL DRIVE…
-
Page 159
TECHNICAL DESCRIPTION Your Audi 100 quattro is exemplary in the If one wheel should start to slip and begin How it works world of passenger vehicles. The so- to lose traction, a differential will normally The illustration on previous page shows… -
Page 160
TECHNICAL DESCRIPTION The Torsen center differential uses a torque distribution entirely set of worm gears which are designed to mechanical and fully automatic. The lock automatically when the vehicle is on torque split can be varied up to a ratio of a slippery surface. -
Page 161
TECHNICAL DESCRIPTION SAFETY SYSTEM “ten” Your vehicle is equipped with the unique Audi safety system «ten» which pretensions the safety belt for the driver and front seat passenger. The system functions automatically to reduce slack in the safety belt webbing… -
Page 162
(see page 51), and an driver and the steering wheel. Audi dealer. If you do not do this, the air inflatable Air bag equipped with a gas ge- A fully inflated Air bag in combination ag may not function properly in case of nerator located inside the steering wheel. -
Page 163
Audi dealer. personal injury. § The Air bag system must be re- placed by your Audi dealer no later than 10 years after the date of manu- facture. -
Page 164
Since spark plug specifications may § change for technical reasons during a Engine, spark plugs and the ignition Spark plugs are replaced during the Audi current model year, we recommend that system are matched. To avoid faulty scheduled Maintenance service. If you… -
Page 165
When replacing a belt, it is not sufficient to use just any belt of the same size. For for compressor A/C ….12.5×915 safe operatio n, use only Original Audi V- for power steering….12.5×96 belts specially de signed for your vehicle. -
Page 166
“max” on the dipstick is ….Approx 1 qt. /1 liter to the ground, such as spoilers or exhaust system components. Be sure to avoid damage. Audi 100 quattro Wagon/Avant only 6JR15 light alloy wheels… -
Page 167: Weights
TECHNICAL DATA WEIGHTS Weights Roof weight WARNING The vehicle capacity weight (max . load The maximum perm ble ro weigh § he actual g ross axle weight ra- is listed inside the fuel tank flap. 165 lb/75 kg. Only use roof r ks wh ting a…
-
Page 168: Vehicle Identification
TECHNICAL DATA VEHICLE IDENTIFICATION The engine number The vehicle identification number The i dentification label (VIN) is stamped on the left side of the engine is located on the inside of the luggage is located on the left bottom part of the block, just below the cylinder head.
-
Page 169: Service Manuals
Audi Service Manuals Order form Audi Service Manuals are available from Mail to: Audi Service Manuals Audi Dealers in the United States and Robert Bentley. Inc. Canada. Manuals can also be ordered 1000 Massachusetts Avenue directly from: Cambridge, MA 02138…
-
Page 170
CONSUMER INFORMATION… -
Page 171
CONSUMER INFORMATION Audi service manuals are published as Audi 4000S,4000CS,and Coupe GT Audi 5000S and 5000CS 1984-1987 models soon possible after model 1984-1988 models including quattro and quattro Turbo introduction. Please call toll free 1-800- Gasoline, Turbo, and Turbo Diesel… -
Page 172
GAS STATION INFORMATION LOCATION OF SERVICE POINTS… -
Page 173
GAS STATION INFORMATION 1 – Hood release, see page 101. 2 – Fuse box, see page 136. 3 – Coolant expansion tank, see page 113. 4 – Engine oil dipstick – difference between «Min» and «‘Max» marks is about 1 U.S. quart or 1 liter. 5 –… -
Page 174: Alphabetical Index
ALPHABETICAL INDEX page page page ccessories and modifications ..129 Cigarette lighter……..77 Emergency towing ……148 Air bag system……51,160 Cleaning products ……94 Emission Control System…. 51,153 Air cleaner ……..110 Climate controls ……67, 70 – Malfunction indicator light …. 51 Air conditioner ……
-
Page 175
ALPHABETICAL INDEX page page page eadphone connection …… Maintenance……..Rear seats……..Head restraints ……..22 Maintenance booklet……2 Rear view mirrors……. 13 Heated door locks ……11 Manual transmission ….38, 151 Rear window defogger……. 59 Heated washer jets ….. 64,119 Manual transmission Oil… -
Page 176
ALPHABETICAL INDEX page page Technical description ….151-161 Washer reservoir……119 Telephone ………. 76 Weights ……….Ten ……….. 159 Wheels ……….121 Temperature gauge……45 Wheel changing ……. 133 Tires……….121 Windows……..12, 96 Tire specification ……125 Windshield washer Tools……….130 fluid container…….. -
Page 177
NOTES… -
Page 178
NOTES… -
Page 179
Text, illustrations and specifications in this manual are based on information available at the time of printing. © 1989. AH rights reserved. May not be reproduced or translated in whole or in part without the written consent of AUDI AG. -
Page 180
Audi 100 Audi 100 quattro Nordamerika/english 7.89…
This manual is also suitable for:
1990 100