Xonar DSX

Регистрация устройства поможет вам управлять его гарантией, получать техническую поддержку и отслеживать статус ремонта.
Регистрация продукта
Руководства пользователя
Версия E11099
1.7 MB
Xonar DSX User’s Manual (English)
Версия q9616
905.21 KB
Quick Start Guide for Xonar DSX
Added Arabic and CE/FCC/YEEE LOGO certifications.
Версия E8903
1.81 MB
Xonar DSX User Manual
Версия U8463
775.02 KB
Xonar DSX Quick Start Quide(European Language)
Add Croatian language
Версия U7081
929.43 KB
Xonar DSX Quick Start Guide (European Version)
Версия A7081
2.43 MB
Xonar DSX Quick Start Guide (Asian Version)
-
Contents
-
Table of Contents
-
Troubleshooting
-
Bookmarks
Quick Links
Xonar DSX
7.1 PCIE Audio card
User manual
Related Manuals for Asus Xonar DSX
Summary of Contents for Asus Xonar DSX
-
Page 1
Xonar DSX 7.1 PCIE Audio card User manual… -
Page 2
Product warranty or service will not be extended if: (1) the product is repaired, modified or altered, unless such repair, modification of alteration is authorized in writing by ASUS; or (2) the serial number of the product is defaced or missing. -
Page 3: Table Of Contents
Introduction ………………1 Package contents …………..1 System requirements …………1 Specifications summary …………2 Xonar DSX card layout …………..4 Installing the hardware …………..6 Installing the audio card …………6 Connecting to a TV tuner card ……….7 Installing software …………….
-
Page 4: Notices
Notices Federal Communications Commission Statement This device complies with Part 15 of the FCC Rules. Operation is subject to the following two conditions: • This device may not cause harmful interference, and • This device must accept any interference received including interference that may cause undesired operation.
-
Page 5: Safety Information
Check local regulations for disposal of electronic products. Trademarks Xonar and ASUS logo are trademarks of ASUSTek Computer Inc. “Dolby” and “Dolby Digital Live”, “Dolby Pro Logic IIx”, “Dolby Virtual Speaker”, “Dolby Headphone” are trademarks of Dolby Laboratories. “DTS” and “DTS CONNECT”, “DTS Interactive”, “DTS Neo: PC”…
-
Page 7: Introduction
Introduction Package contents • ASUS Xonar DSX PCIE audio card • S/PDIF TOSLINK optical adapter x1 • Low Profile Bracket x1 • Support CD • Quick Start Guide System requirements • One PCIE 1.0 (or higher) compatible slot for the audio card •…
-
Page 8: Specifications Summary
Bus Compatibility PCI Express PCI Express v1.0 or above bus compatible Main Chipset Audio Processor ASUS AV66 High-Performance Sound Processor (Max. 192KHz/24bit) D-A Converter of Digital Sources: Wolfson WM8776*1 (108dB SNR, Max. 192kHz/24bit) Wolfson WM8766*1 (103dB SNR, Max. 192kHz/24bit) A-D Converter for Analog Inputs: Wolfson WM8776*1 (102dB SNR, Max.
-
Page 9
2.0&1.0, ® ® DirectSound HW, DirectSound SW, A3D 10, OpenAL ® ® ® generic modes, 128 3D sounds processing capability Accessories Accessories — Low profile bracket -S/PDIF TOSLINK optical adapter *Specifications are subject to change without notice. ASUS Xonar DSX… -
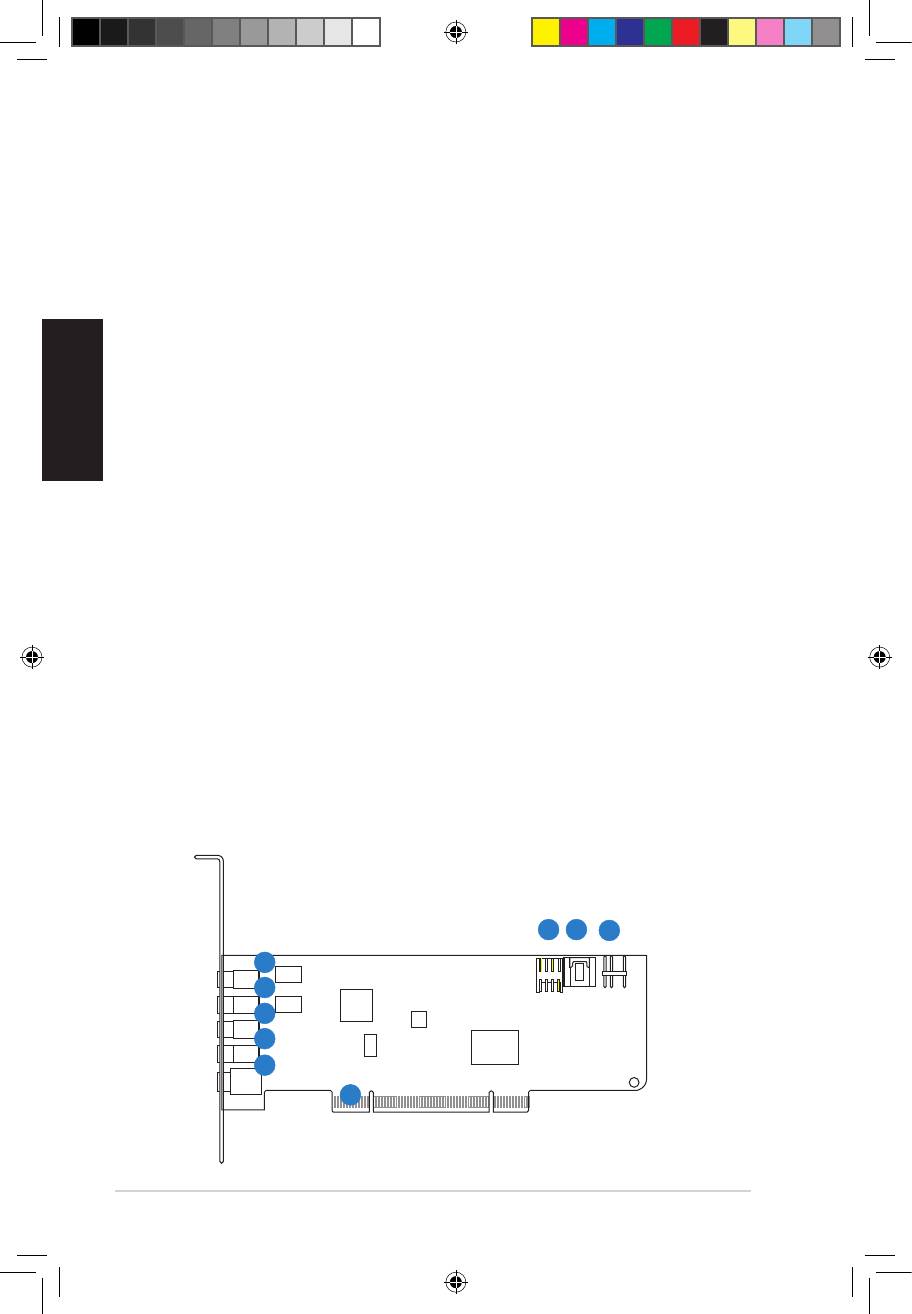
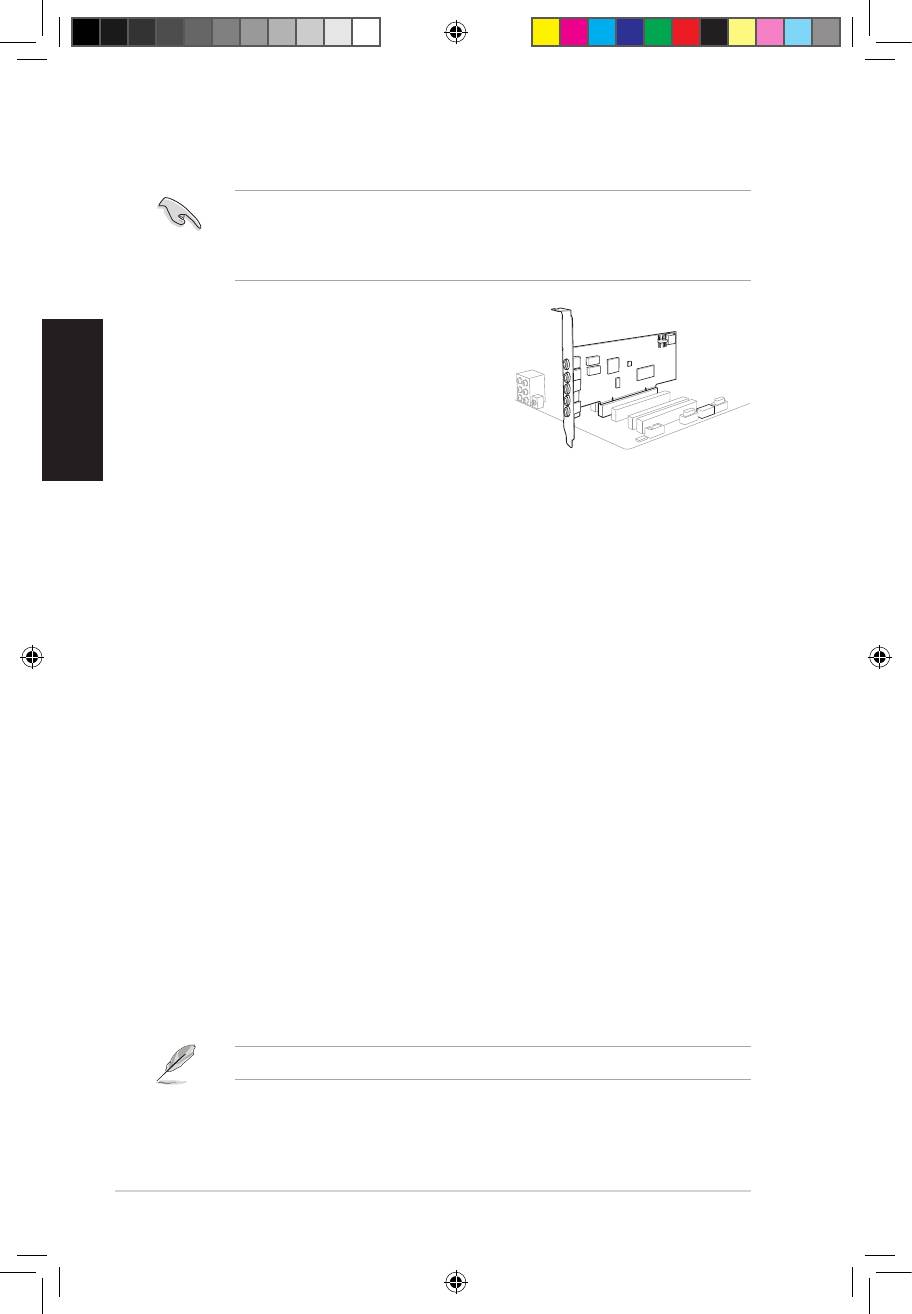
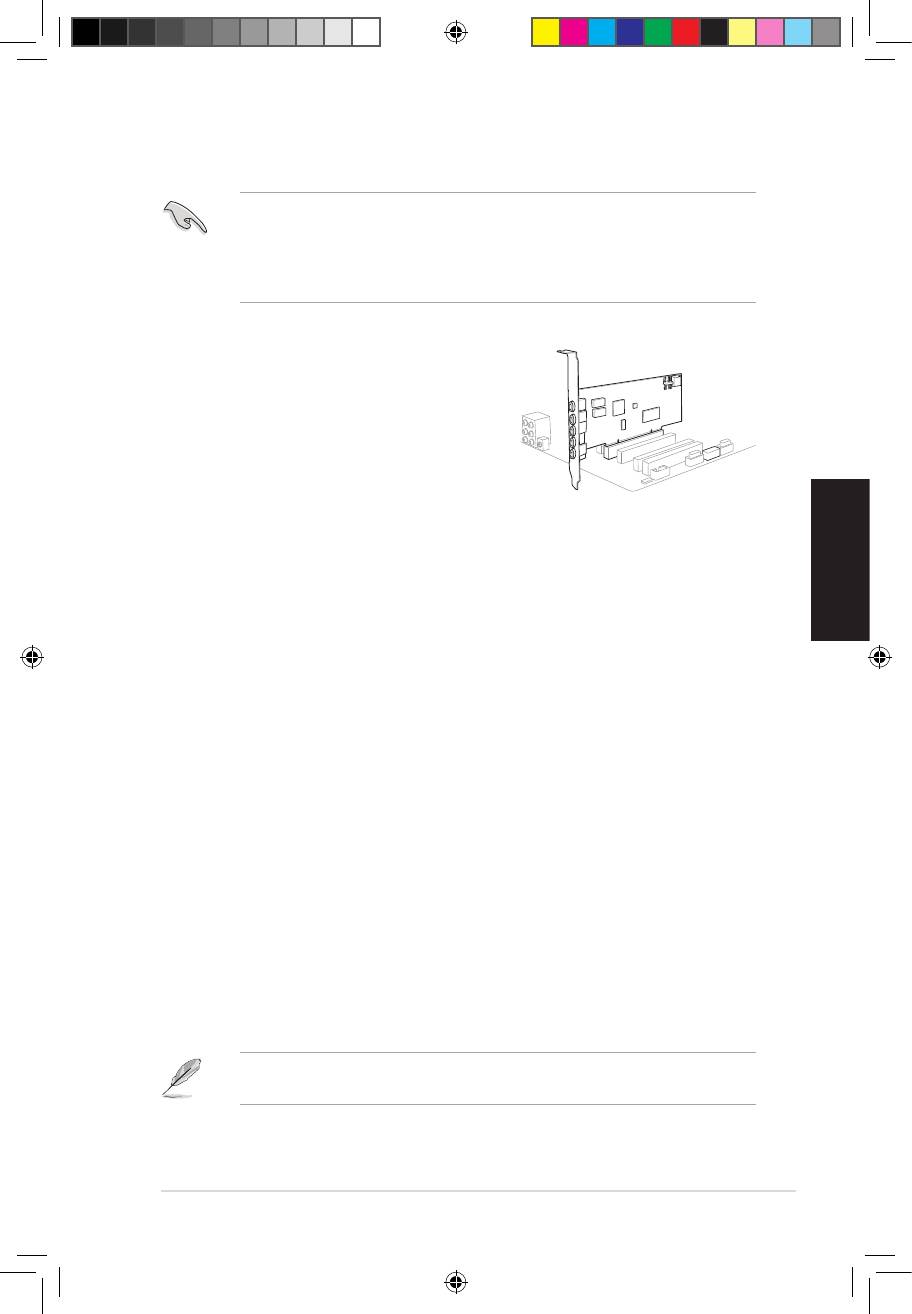
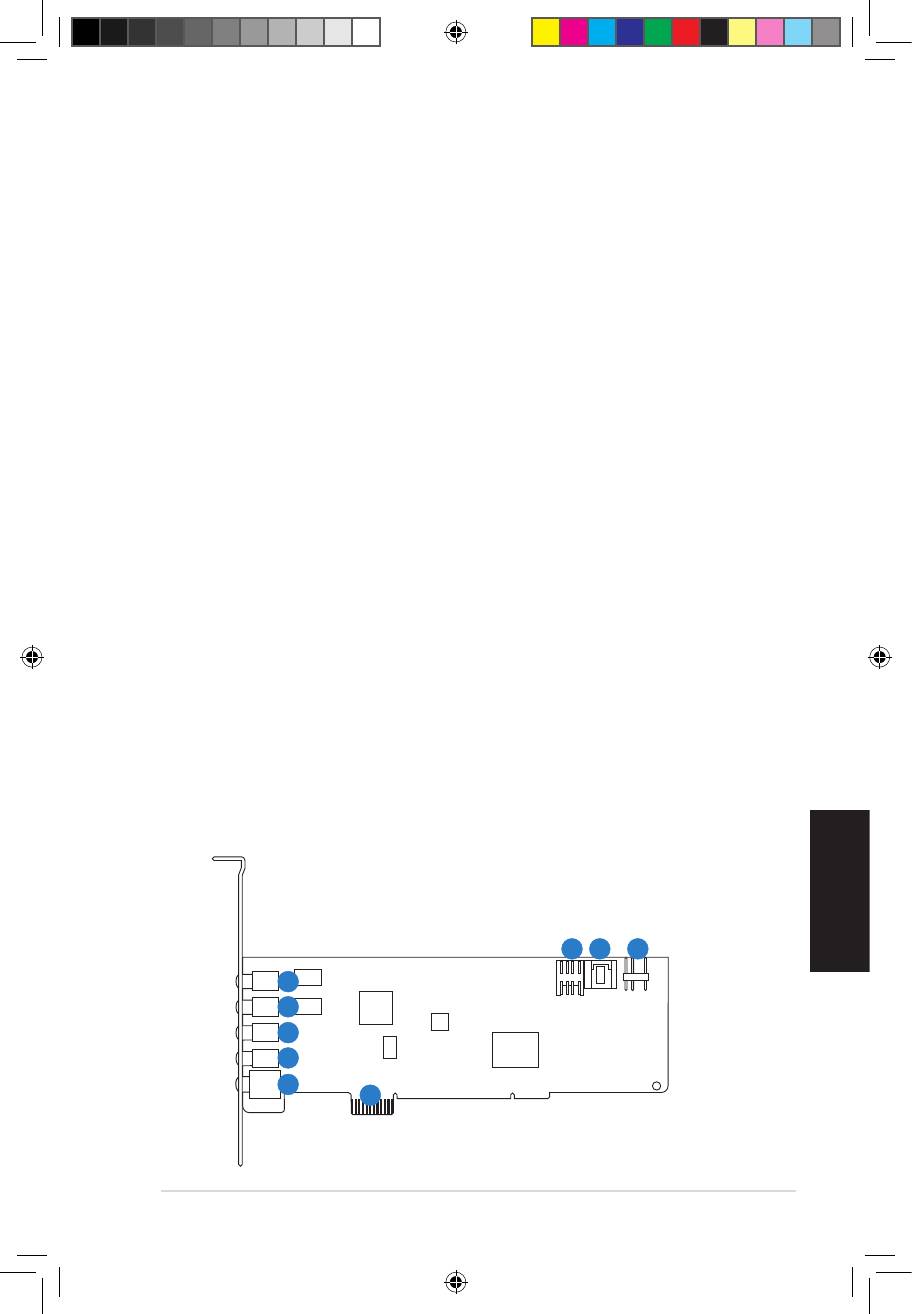
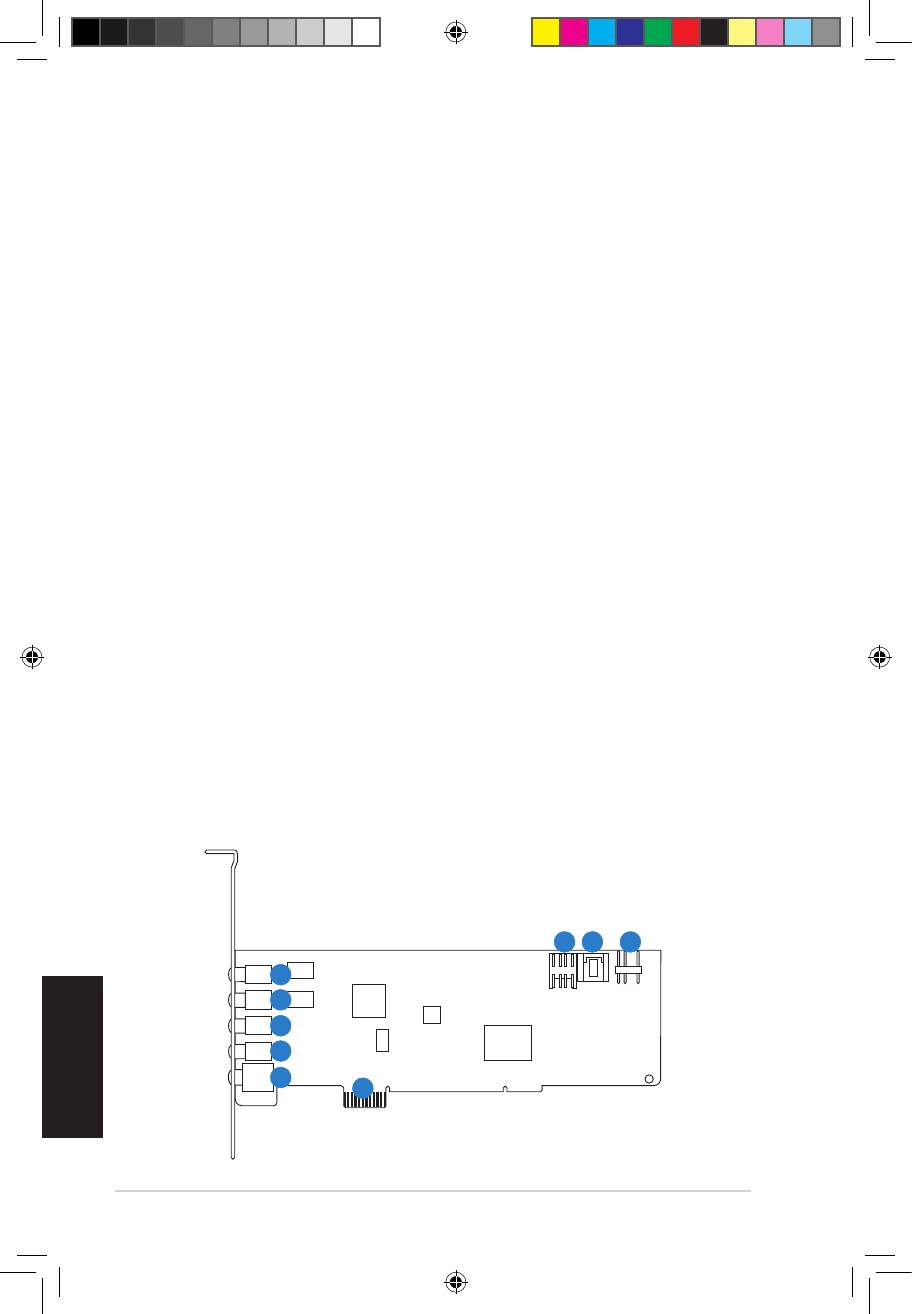
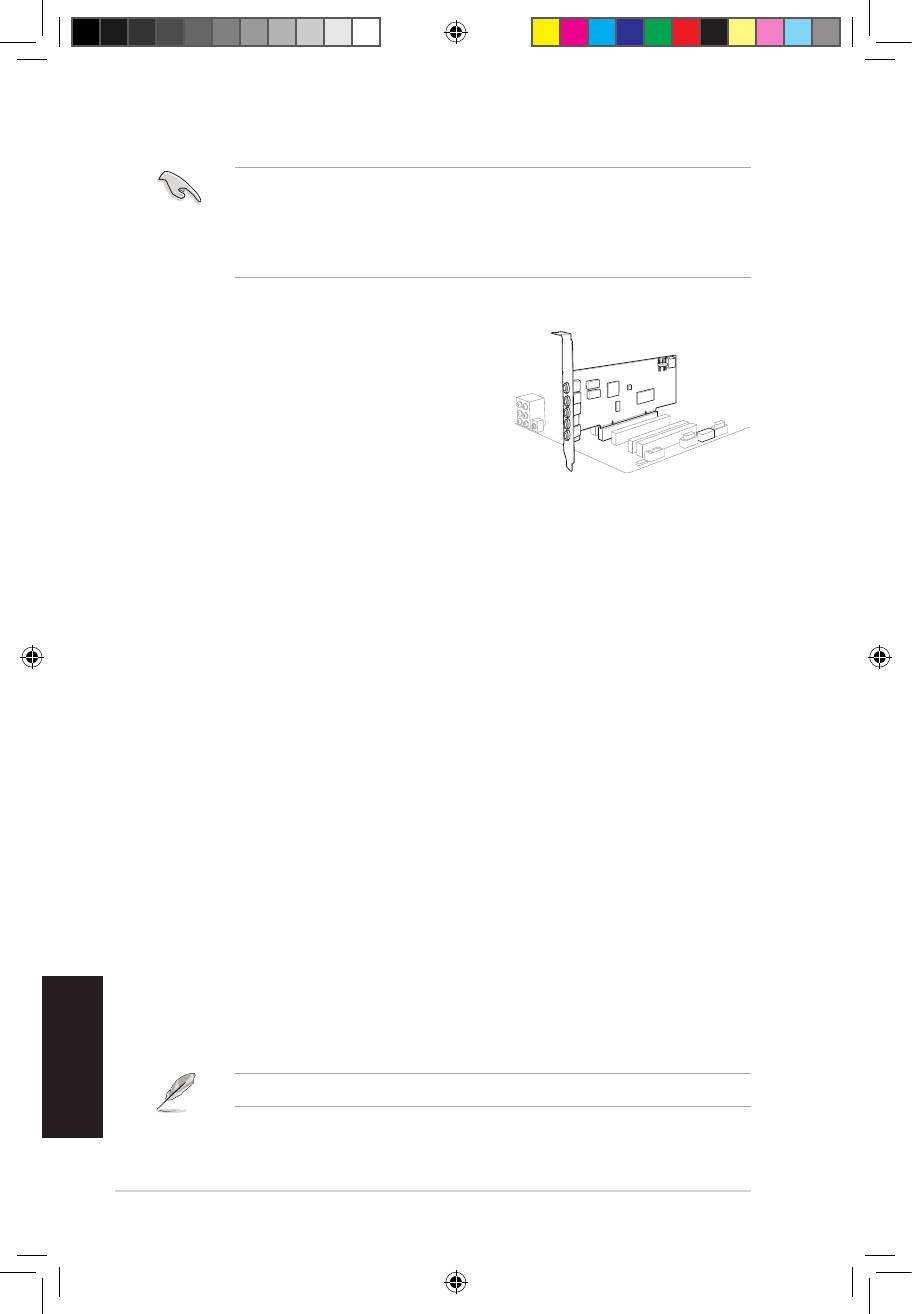
Page 10: Xonar Dsx Card Layout
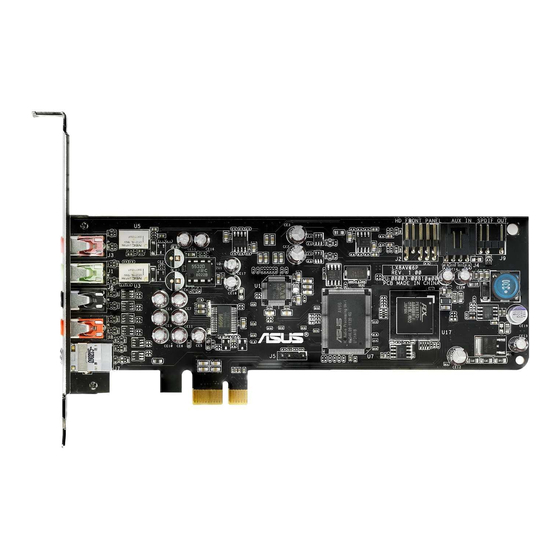
Xonar DSX card layout Audio ports ASUS Xonar DSX…
-
Page 11
PC system. (To monitor your TV tuner card’s audio from this Aux-In, you must enable the “monitor” function for Aux-In in the Xonar DSX Audio Center‘s recording mixer.) S/PDIF Out header Connects to the graphics card with HDMI support. -
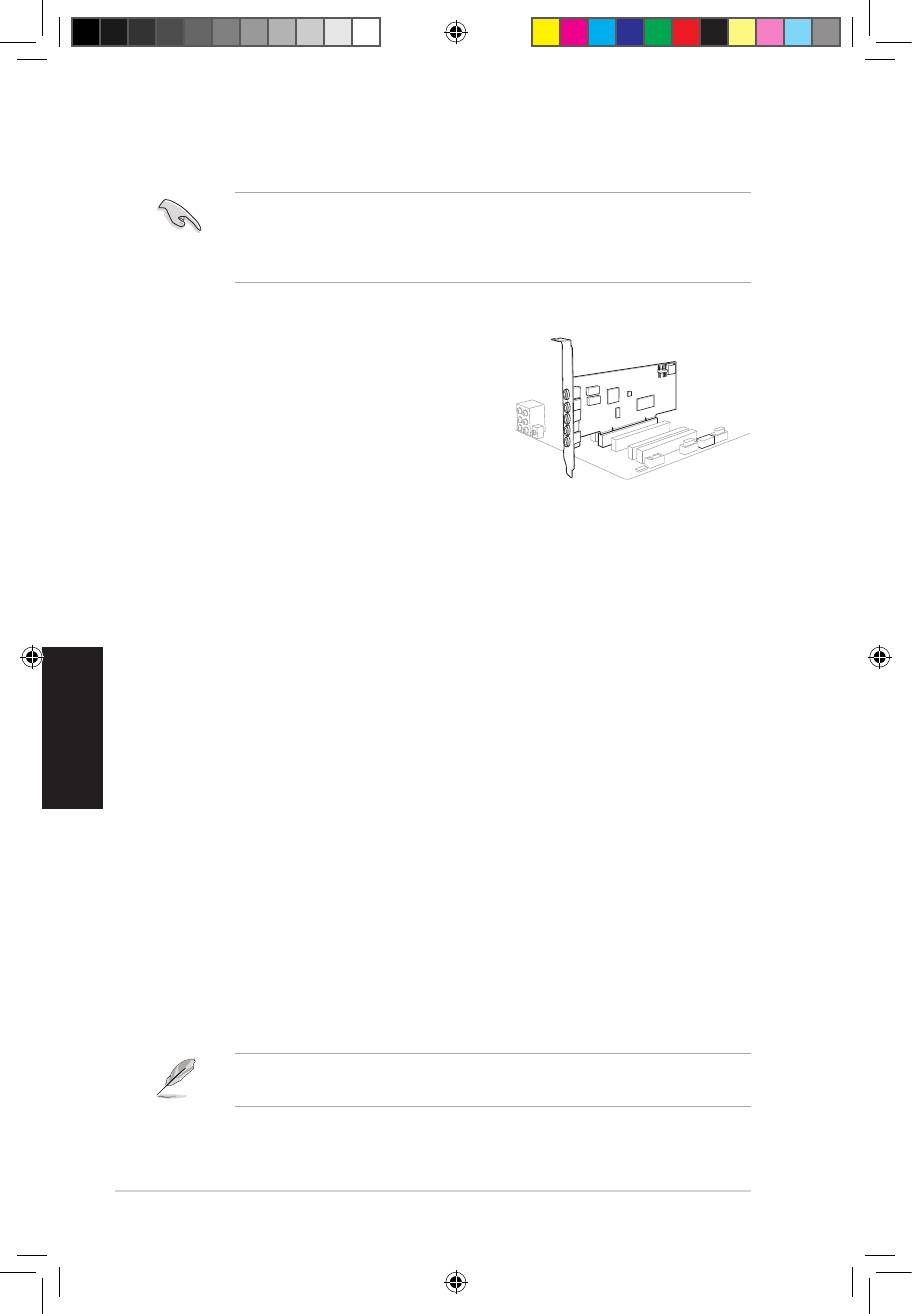
Page 12: Installing The Hardware
Touch the metal back or side panel of the computer to avoid static electricity. Remove the chassis cover. Remove the metal bracket from an available PCIE slot for the Xonar DSX audio card. Carefully insert the audio card into the PCIE slot. Ensure the audio card sits properly in place.
-
Page 13: Connecting To A Tv Tuner Card
Connecting to a TV tuner card If you have a traditional PCIE or PCIE TV tuner card on your PC, you may need to connect it to the Xonar DSX card to send the tuner card’s sound to your PC speakers.
-
Page 14: Installing Software
Ensure that you have installed the audio card driver before installing the Xonar DSX driver. Otherwise, driver installation error may occur. After you have installed the Xonar DSX card, turn on your computer. Windows automatically detects the audio card and searches for device ®…
-
Page 15: Connecting Speakers And Peripherals
Connecting speakers and peripherals Connecting digital speaker systems (Home Theater) The Xonar DSX supports DTS Interactive technologies, which transcode any audio, including games and music, into industry-standard DTS surround bit- streams. This makes playback through your home theater system possible, creating an immersive and impressive cinema surround sound experience.
-
Page 16: Connecting Stereo Headphones
Connecting stereo headphones 5.2.1 Connecting Stereo Headphones Headphone Out Item Description Front Out/Headphone The Front Out jack has a built-in high-quality amplifier to drive headphones. Connect your stereo headphones directly to this jack. Jack ASUS Xonar DSX…
-
Page 17
Connect the front-channel 3.5mm plug of your 5.1 headphones into this jack. Side Surround Out Connect the surround-channel 3.5mm plug of your 5.1 headphone into this jack. Center/Subwoofer Out Connect the Center/Bass-channel 3.5mm plug of your 5.1 headphone into this jack. ASUS Xonar DSX… -
Page 18: Connecting Analog Speaker Systems
Connects to the “Center” and “subwoofer” input ports of the analog amplifier with the mini-jack to RCA cable. Back Surround Out Connects to the “left back” and “right back” input ports of the analog amplifier with the mini-jack to RCA cable. ASUS Xonar DSX…
-
Page 19
5.3.2 Connecting 2/2.1 channel speakers 2 Speakers 2.1 Speakers Item Description Front Out/Headphone Connect the 2/2.1 speaker set’s 3.5mm plug into this Front Out jack. Jack ASUS Xonar DSX… -
Page 20
4.1 Speakers Item Description Front Out Connects to the Front input port of the 4/4.1 speakers with the mini- jack cable. Side Surround Out Connects to the Surround input port of the 4/4.1 speakers with the mini-jack cable. ASUS Xonar DSX… -
Page 21
Side Surround Out Connects to the Surround input port of the 5.1 speakers with the mini-jack cable. Center/Subwoofer Connects to the Center/Subwoofer input port of the 5.1 speakers with the mini-jack cable.. 5.3.5 Connecting 6.1/7.1 Channel Speakers 6.1 Speakers ASUS Xonar DSX… -
Page 22
Connects to the Surround input port of the 6.1/7.1 speakers with the mini-jack cable. Center/Subwoofer Connects to the Center/Subwoofer input port of the 6.1/7.1 speakers with the mini-jack cable. Back Surround Out Connects to the Back Surround input port of the 6.1/7.1 speakers with the mini-jack cable. ASUS Xonar DSX… -
Page 23: Connecting Microphone
Connect the microphone’s 3.5mm plug into this Mic-In jack for voice communication, recording, or karaoke. Jack Headphone Jack The Front Out jack has a built-in high-quality amplifier to drive headphones. Connect your stereo headphones directly to this jack. ASUS Xonar DSX…
-
Page 24: Connecting Line-In Audio Sources
Connect the 3.5mm plug of the CD/MP3 Player or any other Line level analog audio sources into this Line-In jack for sound recording or real-time Dolby sound processing through the Monitoring path (See the “Mixer” section of the driver guide). ASUS Xonar DSX…
-
Page 25: Xonar Audio Center
Programs > ASUS Xonar DSX Audio > Xonar DSX Audio Center. The Xonar Audio Center is the Graphic User Interface (GUI) for the Xonar DSX driver. You can control the functions and features of the Xonar DSX driver on the Xonar Audio Center. The following picture shows a basic overview of the Xonar Audio Center.
-
Page 26
Item Description Support link Clicking this button will lead you to the ASUS official website. Display Area This display area shows the 10-band signal meter, volume level, and the status of the Dolby/DTS technologies, EQ, and DSP modes. Note: this area just displays information, but is not used to alter settings. -
Page 27: Main Setting
The sample rate determines the number of audio samples per second that the Digital-to-Analog Converters (DAC) and S/PDIF digital interface will output. The Xonar DSX card can support sample rates up to 192KHz (44.1K, 48K, 96K, 192KHz). Usually audio CDs and MP3 files are 44.1KHz; DVD-Video uses 48KHz;…
-
Page 28
2 speakers (or 2.1), 4 speakers (or 4.1), 5.1 speakers, 7.1 speakers, Front Panel Headphone and Front Panel 2 speakers (or 2.1). Xonar DSX will play the channels and do the proper 3D/DTS sound processing accordingly. Select the correct speaker type for your connected speakers. -
Page 29
6.2.3 SPDIF Out / DTS Interactive Xonar DSX is capable of outputting DTS Interactive, which are real-time encoders that transcode any audio, including games and music, into industry-standard DTS Digital bit-streams on-the-fly. This is ideal for playback through a home theater system, creating an immersive and impressive cinema surround sound experience. -
Page 30
Here are some typical suggestions: -MP3, WMA, AAC, CD, VCD, 2D games => 2 channels -DVD-Video with Dolby Digital or DTS 5.1 => 6 channels -DVD-Video with Dolby Digital EX or DTS ES => 8 channels -3D games => 8 channels ASUS Xonar DSX… -
Page 31
Drag speaker or You can drag each speaker or listener to a different relative position “virtually” using only your mouse. The Xonar DSX card will process listener it and virtualize each speaker position in real-time. The Subwoofer has no directional sounds, and hence can be moved only closer or further away. -
Page 32
The dimension parameter fades sounds to the front or rear of the listener. Music Mode Music mode is the default mode for regular music playback. In this mode, you can adjust the Center Width and Dimension parameters. Movie Mode Movie mode is a preset optimized for movie audio. ASUS Xonar DSX… -
Page 33: Mixer/Volume
The mixer page is designed to control the volume for playback and recording on the Xonar DSX. In addition, the Xonar DSX also provides a high-quality digital monitoring function for hearing the recorded audio from the speakers. You can also process the input signals with all playback sound effects such as DTS technology.
-
Page 34
Enabling “Microphone Boost” will increase a volume gain to boost microphone input signals. If you connect your microphone to the front panel audio module, enable “Front Panel Microphone”. For typical low-cost PC microphone, it’s recommended to enable this function. (continued on the next page) ASUS Xonar DSX… -
Page 35
Aux: recording from Aux-In for typically TV-tuner card audio or other sound sources Line-In: recording from Line-in jack for external audio devices WAVE: recording from digital wave audio you are playing on Reset Click to reset all volume controls to the default settings. ASUS Xonar DSX… -
Page 36: Effects
Clicking this button will apply the environment effect that you select from the pull-down menu on the right side. There are another 23 options in this menu. Environment size There are three size settings for each environment: Large, Medium, and Small. ASUS Xonar DSX…
-
Page 37
Key in a name for your own “User Defined” equalizer setting Add / save Click this “+” button to save the parameters into User Defined list Delete Click this “–” button to delete the parameters from User Defined list ASUS Xonar DSX… -
Page 38: Karaoke
Karaoke The Xonar DSX provides powerful features for Karaoke, including Key-Shifting, Vocal Cancellation, and Microphone Echo. Microphone Echo can generate natural echo effects on your singing voice just like a karaoke machine. Key-Shifting can change the pitch of Karaoke background music, and Vocal Cancellation can reduce the original vocal in songs and keep the music and symphony for karaoke.
-
Page 39
Wave, Aux, and Mic with microphone echo effect. Click OK to accept it or Cancel if you want to enable it later. Checking Don’t remind me again and this message will not show up again. ASUS Xonar DSX… -
Page 40: Flexbass
Select the speaker type that you connected. If your speaker type cannot perform low-frequency signals (bass), select “Small” speaker option type and Xonar DSX will filter out the bass signals and send them to the subwoofer channel. If those speakers are full-range, you can select the “Large” speaker type.
-
Page 41: Smart Volume Normalization
(for example, 10dB below full scale) after you turn on SVN. Please note that for lower volume music 2, it will become louder when you turn on SVN; and for higher volume music 1, it will become quieter. 0dB (Full-scale) Music 1 -10 dB Music 2 SVN On SVN Off ASUS Xonar DSX…
-
Page 42
It will be lit red if the volume is muted. SVN display When SVN is enabled, “Smart Volume” will be lit up at the bottom of the volume meter and the volume meter will show the level. ASUS Xonar DSX… -
Page 43: Ds3D Gx And Dsp Modes
DS3D GX on the Xonar Audio Center, and disable the function after the games. In addition, Xonar DSX also offers a Hi-Fi mode for hi-fidelity playback without any effect processing to keep the original audio fidelity. Every time you turn on Hi-Fi mode, Xonar DSX will clear all sound effects.
-
Page 44
DirectSound 3D Hardware extensions for lots of DirectX/ DirectSound3D games on Windows Vista and XP. Hi-Fi Mode This mode is set for Hi-Fidelity playback, where all effects will be cleared to keep the original digital data and analog output quality as high as possible. ASUS Xonar DSX… -
Page 45: Vocalfx
It emulates different background environment effects when you chat online. Magic Voice Changes your voice pitch to different types for disguising your real voice or just for fun in online chatting. App List You can add VOIP application into VOIP application List. ASUS Xonar DSX…
-
Page 46
For VOIP Press App List If you don’t see the VOIP application of yours in the list, press Add.(Make sure the Skype and MSN Messenger are the latest version) Look for the application’s location and Open it. ASUS Xonar DSX… -
Page 47
Make sure the GX function is enabled. Click “OK” to accept it, or “Cancel” if you want to enable it later. Check “Don’t remind me again” if you don’t want to see this message pop up next time. ASUS Xonar DSX… -
Page 48: Troubleshooting And Faqs
I cannot find the Xonar DSX Audio Center Instructions: Make sure you have installed the driver Locate the Xonar DSX Audio Center icon in the system tray on the bottom right-hand corner of the screen. Double-click the icon to open the Xonar DSX Audio Center utility.
-
Page 49
Go to the sound and audio device of Windows Control Panel to check if the playback default device is set to Xonar DSX Audio Device, instead of other onboard AC97 or HDA codec device. If it’s not, please set it to Xonar DSX Audio Device and restart your applications. -
Page 50: [Faq]
Q4: Does the Xonar DSX support EAX on Vista? Answer: Yes, Xonar DSX can support EAX2.0 not only on Windows XP but also on Vista through innovative DirectSound3D Game EXtensions v2.5 (DS3D GX 2.5) technology.
-
Page 51
Q6: What is the most important benefit of the Xonar DSX for musicians? Answer: Ultimate Fidelity: Xonar DSX has the highest quality of audio in/out for the cleanest sound production. Duplex HD: Supports audio sampling rates up to 24bit/192KHz for outputs and 24bit/96KHz for inputs. -
Page 52
Live, Cakewalk, CoolEdit, Soundforge, etc.) to convert the sounds into 48KHz files. Please note that the frequency meter on Xonar DSX Audio Center panel will not take effect either when the playback source is 96KHz or 192KHz sample rate to prevent any processing distortion.

22
Краткое руководство для ASUS Xonar DSX
Русский
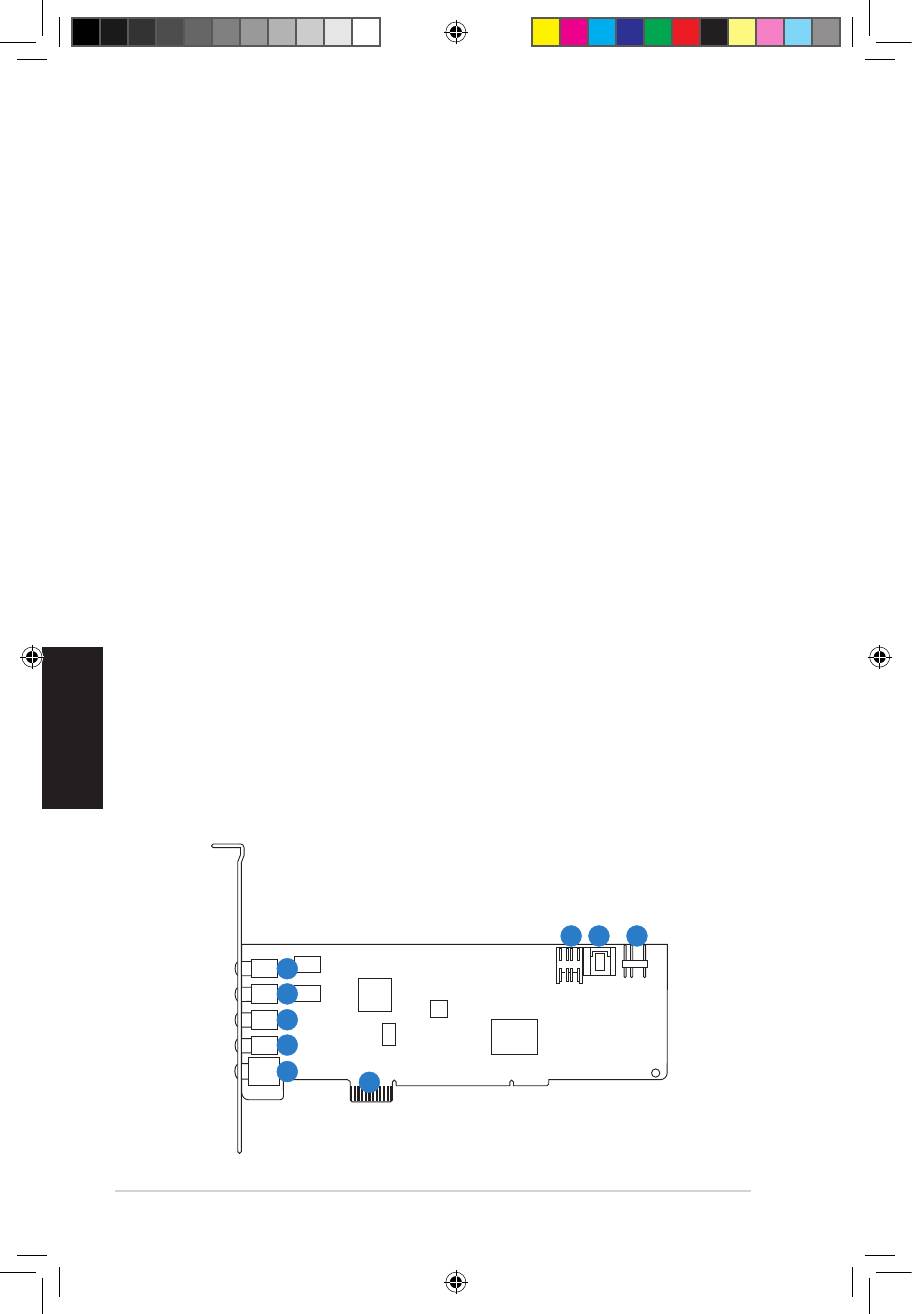
Нет Элемент
Описание
1
Разъем для микрофона
Подключение внешнего микрофона гарнитуры для голосового
ввода. Имеется встроенный, высококачественный предварительный
усилитель для микрофона.
1
Аудиовход
Подключение аналоговых устройств (например MP3-плееры,
проигрыватели компакт-дисков, музыкальных синтезаторы и другие
источники звука) для записи / обработки звука. (Через конвертер
102dB SNR A-D)
2
Выход для наушников /
передних колонок
Подключение наушников или 2/2.1 — канальной акустической
системы. Подключение передних колонок для многоканальных
акустических систем.
3
Выход на боковые
колонки
Подключение тыловых колонок 4/4.1/5.1/7.1 — канальной
акустической системы.
4
Выход центрального
канала/сабвуфера
Подключение центрального канала/сабвуфера 5.1/6.1/7.1 — канальной
акустической системы.
5
Выход на тыловые
колонки
Подключение тыловых колонок 6.1/7.1 — канальной акустической
системы.
5
S/PDIF-выход
Оптический TOSLINK цифровой выход. Подключение к внешнему
цифровому декодеру или цифровой акустической системе,
домашнему кинотеатру, AV-ресиверу для вывода цифрового звука, в
форматах PCM, Dolby Digital, DTS и WMA-Pro и т.д
6
Аудиоразъемы для
передней панели
Аудиовыход для передней панели позволяет подключать
аудиоустройства непосредственно к разъемам на передней панели.
Поддерживается подключение наушников и микрофона
7
Аудиовход
Обычно подключается к аналоговому аудиовыходу ТВ-тюнера или
другого источника звука внутри компьютера. (Для контроля звука
ТВ-тюнера, подключенного к Aux-In, Вам нужно включить функцию
“monitor” для Aux-In в микшере аудиоцентра Xonar DSX)
8
S/PDIF-выход
Подключение видеокарты с HDMI.
9
Разъем PCI Express
Вставляется в слот PCI Express материнской платы.
Раздел: Музыкальное Оборудование
Тип: Звуковая Карта
Характеристики, спецификации
Возможность вывода многоканального звука:
есть
Максимальная частота ЦАП (стерео):
192 кГц
Входных аналоговых каналов:
2
Входных разъемов jack 3.5 мм:
1
Выходных аналоговых каналов:
8
Выходных аналоговых разъемов:
4
Цифровые интерфейсы S/PDIF:
оптический выход
Разъем для подключения к передней панели ПК:
есть
Поддержка технологии «EAX»:
v. 5
Поддержка технологии «ASIO»:
v. 2.0
Инструкция к Звуковой Карте Asus xonar dsx
U7081
First Edition V1
January 2012
Xonar DSX
7.1 PCIE Audio card
Quick Start Guide
U7081_Xonar DSX_QSG.indb 1 12.01.2012 18:27:14 Uhr
Table of content
English ………………………………………………………………………………….. 1
Français ………………………………………………………………………………….. 6
Deutsch ………………………………………………………………………………….. 9
Italiano ………………………………………………………………………………… 12
Español ………………………………………………………………………………… 15
Português ……………………………………………………………………………… 18
Pyccкий
……………………………………………………………………………….. 21
Türkçe ………………………………………………………………………………… 24
U7081_Xonar DSX_QSG.indb 2 12.01.2012 18:27:14 Uhr
1. Package contents
Check your ASUS Xonar DSX audio card package for the following items:
• ASUS Xonar DSX PCIE audio card
• S/PDIF TOSLINK optical adapter x1
• Low Prole Bracket x1
English
• Support CD
• Quick Start Guide
2. System requirements
To ensure a successful installation of the Xonar DSX card, your computer must meet the
following requirements:
• One PCIE 1.0 (or higher) compatible slot for the audio card
®
®
• Microsoft
Windows
Vista (32/64bit) / XP (32/64bit) / MCE2005
®
®
®
• Intel
Pentium
4 1.4 GHz or AMD
Athlon 1400 CPU or faster CPU
• 256 MB (or above) DRAM system memory
• 60 MB available HDD space for driver installation package
• CD-ROM drive (or DVD-ROM drive ) for software installation
• High-quality headphones, powered analog speakers, or a Dolby Digital or DTS
decoder, to enjoy the ultra-high delity sound of the card
3. Hardware introduction
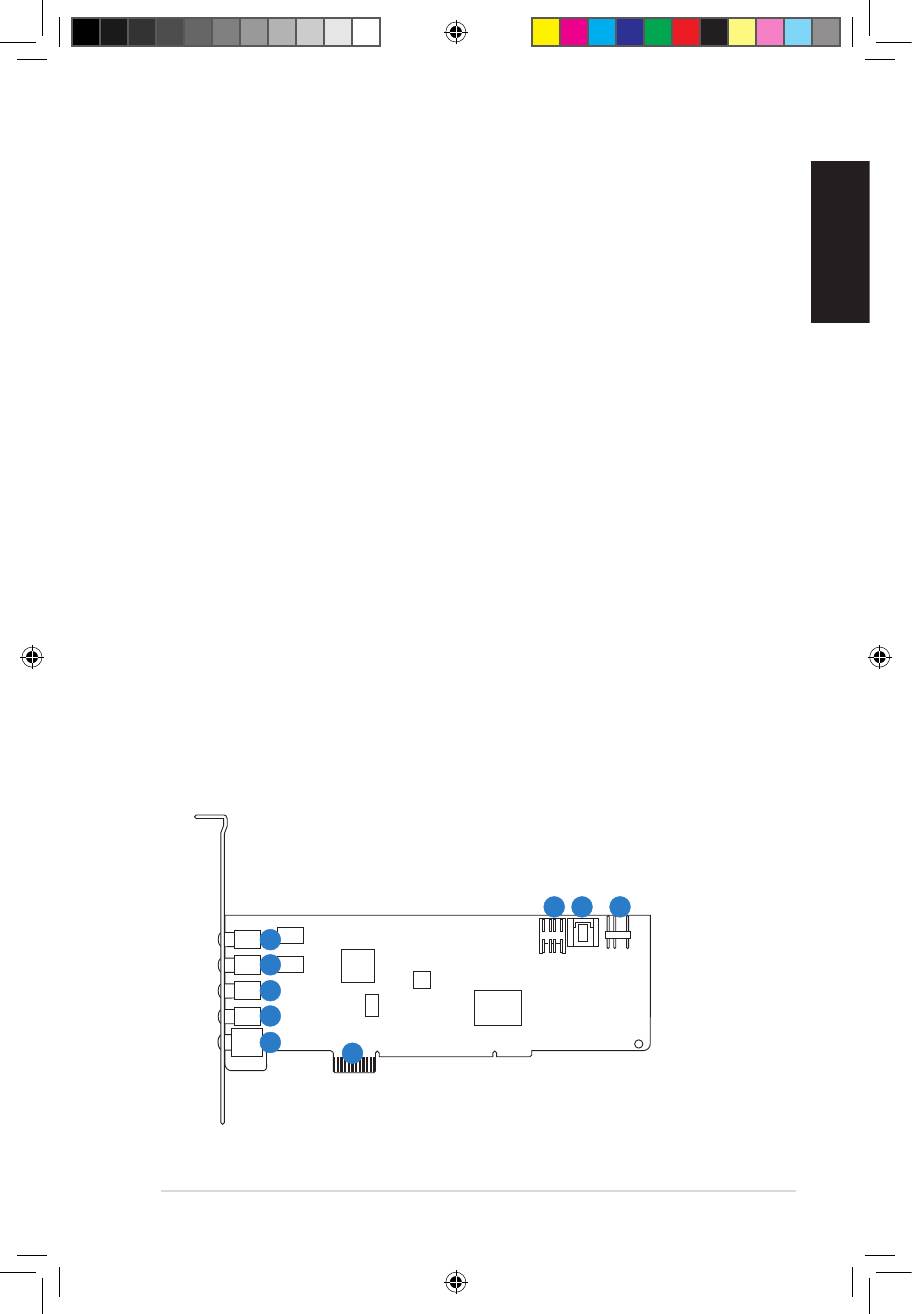
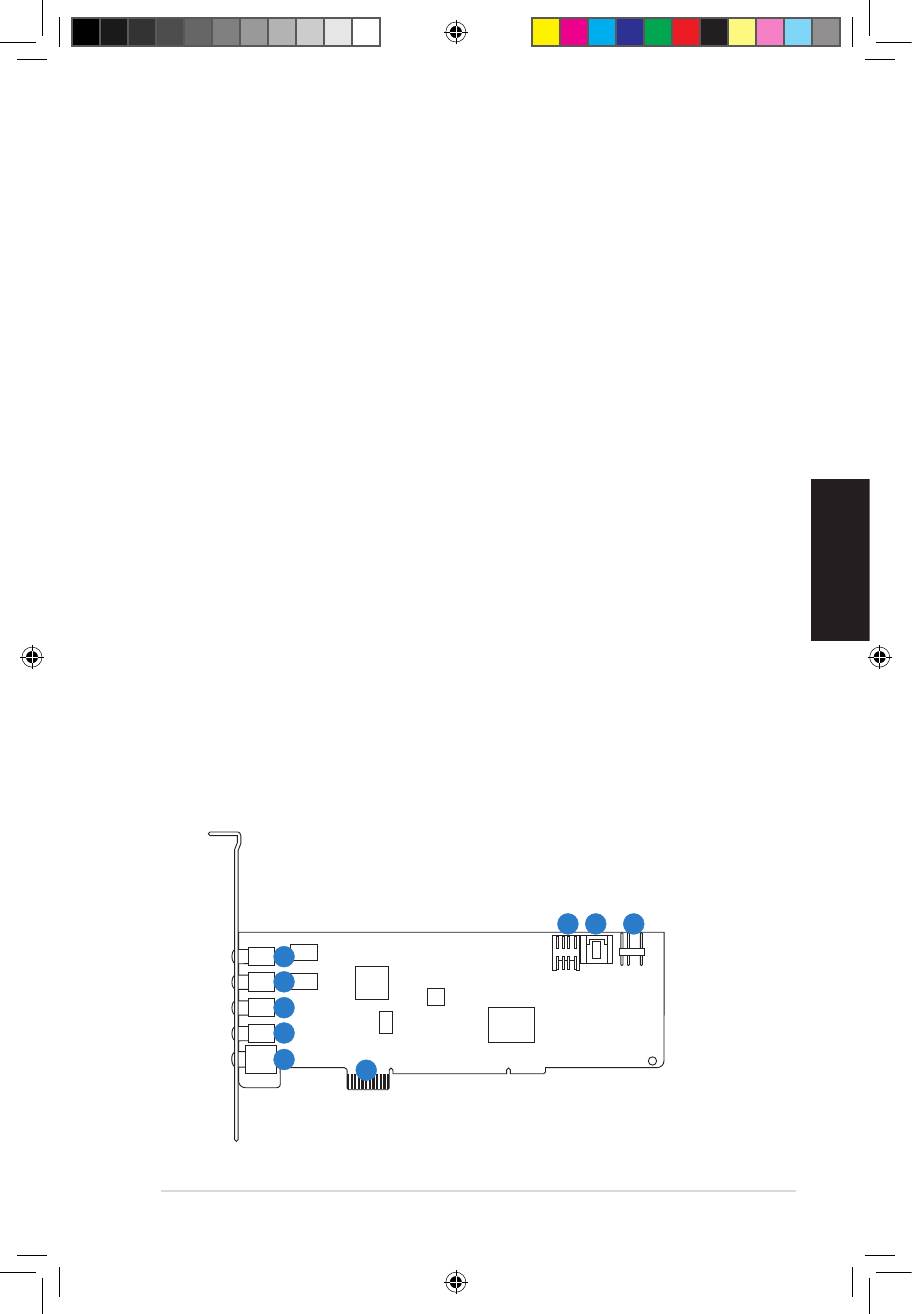
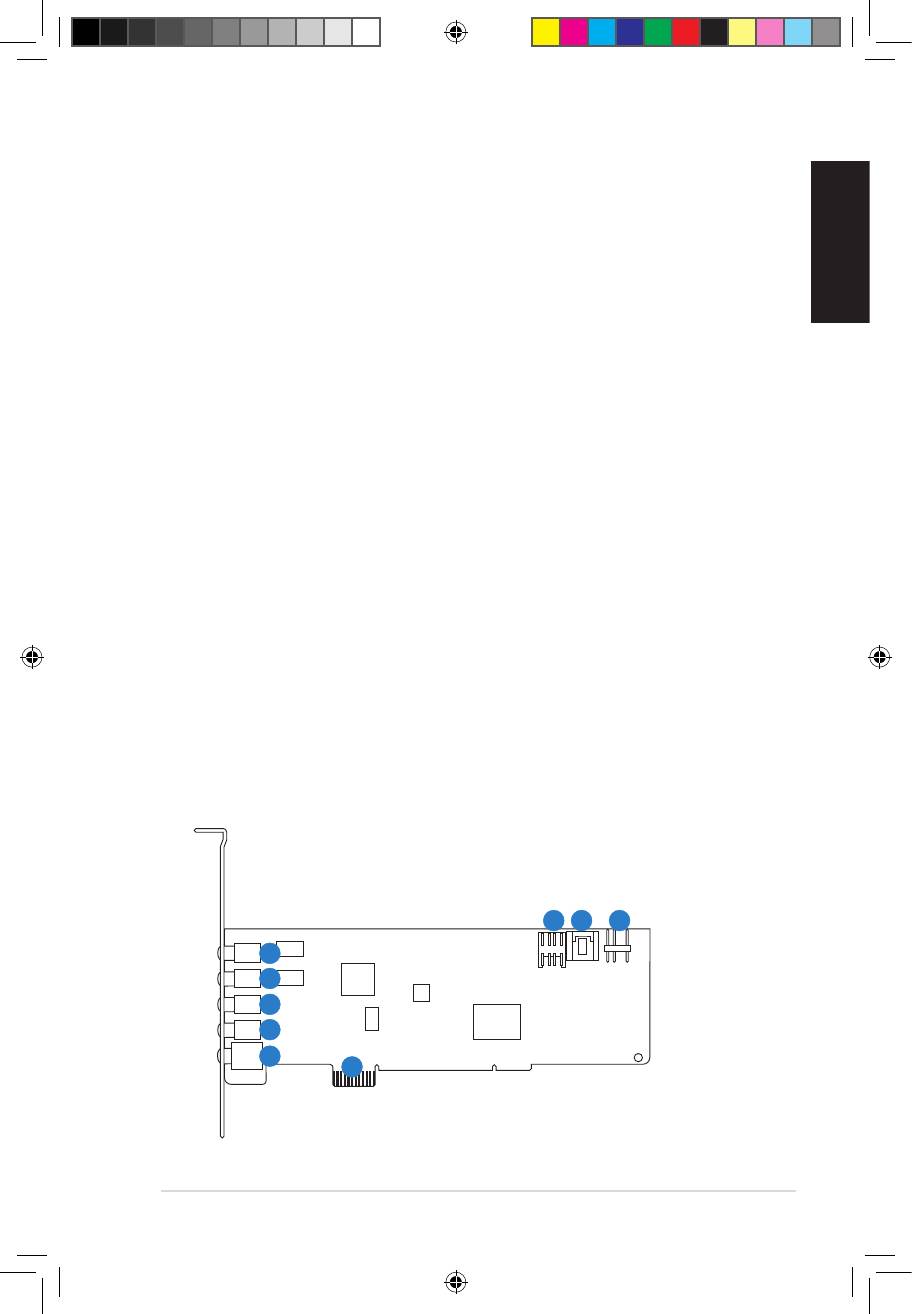
3.1 Xonar DSX card layout
6
7 8
1
2
3
4
5
9
ASUS Xonar DSX Quick Start Guide
3
U7081_Xonar DSX_QSG.indb 3 12.01.2012 18:27:15 Uhr
English
4
ASUS Xonar DSX Quick Start Guide
No Item Description
1 Microphone In port
Connect your external PC microphone to this 3.5mm port for
voice input. Built-in high-quality Microphone pre-amplier.
1 Line In port
Connect analog devices like MP3 players, CD players, music
synthesizers and other line-level sound sources to this 3.5mm
port for audio recording or processing. (Through Ultra-high
delity 102dB SNR A-D converter)
2 Headphone/Front Out
Connect your headphones or 2/2.1 channel speakers to this
port
3.5mm port. For multi-channel speaker systems, connects to the
front left/right input on the powered speakers.
3 Side Surround Out port
Connects to the surround channel input on 4/4.1/5.1/6.1/7.1
powered analog speakers.
4 Center/Subwoofer Out
Connects to the center/subwoofer input on 5.1/6.1/7.1 powered
port
analog speakers.
5 Rear/back Surround
Connects to the Back Surround input on 6.1/7.1 powered analog
Out port
speakers.
5 S/PDIF Out port
Optical TOSLINK digital output port. Connects to external digital
decoder or digital speaker systems, Home Theater systems, AV
receivers for outputting digital audio including PCM, DTS Digital,
DTS, WMA-Pro, etc.
6 Front panel audio
Intel HDA front-panel compatible and supports HP jack-
header
detection and automatically switch audio output from the back
panel to the front panel.
Supports both front-panel and sound card mic input mixing
7 Aux Input Header
Usually connects to the Analog Audio output of TV tuner card
or other sound source inside your PC system. (To monitor your
TV tuner card’s audio from this Aux-In, you must enable the
“monitor” function for Aux-In in the Xonar DSX Audio Center‘s
recording mixer.)
8 S/PDIF Out header
Connects to the graphics card with HDMI support.
9 PCI Express Bus Golden
Insert into the PCI Express slot on your motherboard.
Fingers
U7081_Xonar DSX_QSG.indb 4 12.01.2012 18:27:16 Uhr
English
ASUS Xonar DSX Quick Start Guide
5
3.2 Card installation
Before you proceed with the following installation steps, it’s recommended that you
disable your onboard audio device in your BIOS settings, or uninstall any other audio
cards on your PC. (For BIOS setting or uninstallation of other sound cards, refer to the
user manuals of your motherboard and audio card.)
Installing the Xonar DSX card
1. Power OFF the computer, the monitor, and all
other peripheral devices connected to your
computer.
2. Unplug the computer power cord from your
computer and power outlet.
3. Touch the metal back or side panel of the
computer to avoid static electricity.
4. Remove the chassis cover.
5. Remove the metal bracket from an available PCIE slot for the Xonar DSX audio
card.
6. Carefully insert the audio card into the PCIE slot. Ensure the audio card sits
properly in place.
7. Secure the audio card with screws and the metal bracket.
8. Put back the chassis cover.
9. Reconnect all cables.
10. Plug the power cord to the computer and to a power outlet.
11. Power ON the computer.
4. Driver installation
Installing the Xonar DSX card driver
®
1. After you have installed the Xonar DSX card, turn on your computer. Windows
automatically detects the audio card and searches for device drivers. When
prompted for the drivers, click Cancel.
2. Insert the support CD into the optical drive. If Autorun is enabled in your system,
the setup starts automatically. If not, run setup.exe from your support CD.
3. Follow the onscreen instructions to nish the installation.
The version and content of the support CD are subject to change without notice.
U7081_Xonar DSX_QSG.indb 5 12.01.2012 18:27:17 Uhr
Français
Français
6
ASUS Xonar DSX — Guide de démarrage rapide
Français
Français
1. Contenu de la boîte
Vériez que la boîte de votre carte son ASUS Xonar DSX contient bien les éléments suivants :
• Carte son PCIE ASUS Xonar DSX
• Adaptateur S/PDIF TOSLINK optique x1
• Support demi-hauteur x1
• CD de support
• Guide de démarrage rapide
2. Pré-requis système
Avant d’installer la carte son Xonar DSX, assurez-vous que votre ordinateur puisse
satisfaire aux critères suivants :
• Un slot PCIE 1.0 (ou supérieur) pour la carte son
®
®
• Microsoft
Windows
Vista (32/64bits) / XP (32/64bits) / MCE2005
®
®
• Un processeur Intel
Pentium
4 1.4GHz ou AMD Athlon 1400 ou supérieur
• Mémoire DRAM de 256 Mo (ou plus)
• 60 Mo d’espace disque disponible pour l’installation du pilote
• Un lecteur de CD-ROM (ou DVD-ROM) pour l’installation des logiciels
• Des écouteurs de haute qualité, des haut-parleurs analogiques alimentés, ou un
décodeur Dolby Digital ou DTS pour proter pleinement de la qualité audio délivrée
par la carte son
3. Introduction au matériel
3.1 Diagramme de la carte Xonar DSX
6
7
8
1
2
3
4
5
9
U7081_Xonar DSX_QSG.indb 6 12.01.2012 18:27:18 Uhr
ASUS Xonar DSX — Guide de démarrage rapide
7
Français
Français
Français
Français
N° Élément Description
1 Port d’entrée
Connectez le port microphone externe de votre PC sur ce jack
microphone
3.5mm. Intègre un préamplicateur de microphone de haute
qualité.
1 Port d’entrée audio
Connectez des périphériques analogiques (lecteur MP3, lecteur
CD, etc) ou autres sources audio sur ce jack 3.5mm. (Via un
convertisseur numérique-analogique avec un rapport signal /
bruit de 118 dB)
2 Port casque/sortie de
Connectez le câble audio droit (rouge) de votre système de
signal avant
haut-parleurs 2/2.1 sur ce port. Pour les système de haut-parleurs
multi-canaux, se connecte au port d’entrée de signal avant
droit/gauche.
3 Port de sortie Surround
Se connecte au port d’entrée Surround des systèmes de haut-
latéral
parleurs analogiques alimentés 4/4.1/5.1/6.1/7.1.
4 Port de sortie centre/
Se connecte au port d’entrée centre/caisson de basse des
caisson de basse
systèmes de haut-parleurs analogiques alimentés 5.1/6.1/7.1.
5 Port de sortie Surround
Se connecte au port d’entrée Surround arrière des systèmes de
arrière
haut-parleurs analogiques alimentés 6.1/7.1
5 Port de sortie S/PDIF
Port de sortie numérique TOSLINK. Se connecte à un décodeur
numérique externe, un home cinéma, un système de haut-
parleurs numériques ou un récepteur pour la transmission d’un
signal audio numérique supportant les technologies PCM, DTS
Digital, DTS, WMA-Pro, etc.
6 En-tête audio pour
Compatible Intel HDA et supporte la détection des ports audio
panneau avant
du système de haut-parleur et la réaectation du signal audio du
panneau arrière vers le panneau avant
Supporte le mixage micro à partir de la carte son ou du port
audio du panneau avant.
7 En-tête d’entrée
Se connecte généralement au port de sortie audio analogique
auxiliaire
d’une carte tuner TV ou tout autre source audio interne du PC.
(Pour surveiller les signaux audio de votre carte tuner TV depuis
ce port, vous devrez activer la fonction de surveillance du port
“Aux-In” à partir de l’utilitaire audio Xonar DSX Audio Center.)
8 En-tête sortie S/PDIF
Se connecte à une carte graphique avec support HDMI.
9 Connecteurs dorés PCI
S’insèrent sur un slot PCI Express de la carte mère.
Express
U7081_Xonar DSX_QSG.indb 7 12.01.2012 18:27:19 Uhr
3.2 Installation de la carteInstallation de la carte
Avant de continuer, il est recommandé de désactiver le chipset audio embarqué
dans le BIOS ou de désinstaller les autres cartes audio de votre système. (Pour les
options du BIOS ou la désinstallation d’autres cartes son, référez-vous aux manuels
d’utilisation de la carte mère et de la carte audio)
Installer la carte son Xonar DSX Xonar DSX
1. Éteignez l’ordinateur, le moniteur et tous les
Français
périphériques connectés au PC.
2. Débranchez le cordon d’alimentation de
l’ordinateur et de la prise électrique.
3. Touchez l’arrière métallique ou le panneau
Français
latéral du châssis de l’ordinateur pour vous
décharger de l’électricité statique.
4. Retirez le panneau latéral du châssis.
5. Retirez les caches métalliques d’un slot PCIE pour pouvoir installer la carte Xonar pour pouvoir installer la carte Xonarpour pouvoir installer la carte Xonar Xonar
DSX.
6. Insérez délicatement la carte son sur le slot PCIE. Assurez-vous que la carte est bienInsérez délicatement la carte son sur le slot PCIE. Assurez-vous que la carte est bien PCIE. Assurez-vous que la carte est bienAssurez-vous que la carte est bien
en place.
7. Sécurisez la carte à l’aide de vis ou des caches métalliques.
8. Replacez le panneau latéral du châssis.Replacez le panneau latéral du châssis.
9. Reconnectez tous les câbles.Reconnectez tous les câbles.
10. Reliez le cordon d’alimentation à l’ordinateur et à une prise électrique.Reliez le cordon d’alimentation à l’ordinateur et à une prise électrique.
11. Allumez l’ordinateur.
4. Installation du �iloteInstallation du �ilote
Installer le pilote de la carte Xonar DSX Xonar DSX
®
1. Une fois la carte son installée, allumez votre PC. WindowsUne fois la carte son installée, allumez votre PC. Windows son installée, allumez votre PC. Windowsinstallée, allumez votre PC. Windows
détectera
automatiquement la carte son et lancera la recherche du pilote approprié. Lorsque
la fenêtre d’installation du pilote apparaît, cliquez sur Annuler.
2. Insérez le CD de support dans votre lecteur optique. Si l’Exécution automatiqueInsérez le CD de support dans votre lecteur optique. Si l’Exécution automatique
est activée, le processus de conguration démarre automatiquement. Si ce n’est
pas le cas, cliquez sur le chier setup.exe contenu dans le CD de support.
3. Suivez les instructions à l’écran pour terminer l’installation.
La version et le contenu du CD de support peuvent être modiés sans avis préalable.
8
ASUS Xonar DSX — Guide de démarrage rapide
U7081_Xonar DSX_QSG.indb 8 12.01.2012 18:27:21 Uhr
1. Verpackungsinhalt
Überprüfen Sie Ihre ASUS Xonar DSX Audio-Kartenverpackung auf folgenden Inhalt:
• ASUS Xonar DSX PCIE-Audio-Karte
• 1x S/PDIF TOSLINK optischer Adapter
• 1x ache Klemme
• Support-CD
• Schnellstartanleitung
2. Systemanforderungen
Um eine erfolgreiche Installation der Xonar DS-Karte sicherzustellen, muss Ihr Computer Xonar DS-Karte sicherzustellen, muss Ihr Computersicherzustellen, muss Ihr Computer
folgende Anforderungen erfüllen:
• Ein PCIE 1.0 (oder höher) -kompatibler Steckplatz für die Audio-Karte
Deutsch
®
®
• Microsoft
Windows
Vista (32/64Bit) / XP (32/64Bit) / MCE2005
®
®
®
• Intel
Pentium
4 1,4 GHz oder AMD
Athlon 1400-Prozessor oder höher
• 256 MB (oder mehr) DRAM-Systemspeicher
Deutsch
• 60 MB freier Festplattenspeicher für die Treiberinstallation
• CD-ROM-Laufwerk (oder DVD-ROM-Laufwerk) für die Software-Installation
• Hochwertige Kopfhörer, aktive Analoglautsprecher oder ein Dolby Digital-oder DTS-
Decoder, um den HiFi-Sound der Karte zu genießen
3. Hardware-Erklärung
3.1 Xonar DSX-Kartenansicht
6
7 8
1
2
3
4
5
9
ASUS Xonar DSX-Schnellstartanleitung
9
U7081_Xonar DSX_QSG.indb 9 12.01.2012 18:27:22 Uhr
Deutsch
Deutsch
10
ASUS Xonar DSX-Schnellstartanleitung
Deutsch
Deutsch
Nr. Element Beschreibung
1 Mikrofoneingang
Schließen Sie Ihr externes PC-Mikrofon zur Spracheingabe an
diesem Anschluss an. Eingebauter Mikrofonvorverstärker.
1 Line In-Port
Anschluss für analoge Geräte, z.B. MP3—Player, CD—Player,
Musiksynthesizer und andere Line-Tonwiedergabegeräte, um
Tonaufnahmen oder Tonberechnung durchzuführen. (Über Ultra
HiFi 118dB SNR A-D-Konverter)
2 Kopfhörer-/Front-
Verbinden Sie Ihren Kopfhörer oder Ihre 2/2.1-Kanal-Lautsprecher
Ausgang
mit diesem 3,5mm-Anschluss. BeiMehrkanalsystemenverbindenSieBei Mehrkanalsystemen verbinden Sie
diesen Ausgang mit den linken/rechten Frontlautsprecheranschluss
der aktiven Lauftsprechers..
3 Seiten-Surround-
Anschluss für den Surround—Kanal—Eingang an aktiven
Ausgang
4/4.1/5.1/6.1/7.1-Analoglautsprechern.
4 Center/Subwoofer-
Anschluss für den Center/Subwoofer—Eingang an aktiven
Ausgang
5.1/6.1/7.1-Amaloglautsprechern.
5 Rück-Surround-
Anschluss für die Rückseitigen—Eingänge an aktiven 6.1/7.1—
Ausgang
Analoglautsprechern.
5 S/PDIF-Ausgang
Optischer TOSLINK-Digitalausgang. Anschluss für einen externen
Digitaldekoder oder -Lautsprechersystem, Heimkinosystem, AV-
Receiver zur Ausgabe von digitalen Audio, eingeschlossen PCM,
DTS Digital, DTS, WMA-Pro, usw.
6 Frontpanel-Blenden-
Intel HDA Frontpanel-konform und unterstützt HP-
Anschluss
Buchsenerkennung und schaltet automatisch die
Audio-Ausgabe von den rückseitigen Anschlüssen zum
Frontpanel um. Unterstützt Frontpanel und Sound-Karten-
Mikrofoneingangsmixer.
7 Aux-Eingangsanschluss
Normalerweise der Anschluss für den analogen Tonausgang
der TV-Tunerkarte oder anderen Tonausgabegeräten in Ihrem
PC-System. (Um den Ton Ihrer TV-Tunerkarte von diesem
Anschluss zu überwachen, müssen Sie für Aux-In die Funktion
„Überwachen“ im Xonar DS Audio Center-Aufnahme-Mixer
aktivieren.)
8 S/PDIF-
Verbindet den Grakkartenausgang mit der HDMI-Unterstützung
Ausgangsanschluss
9 PCI Express Bus-
Stecken Sie die Goldkontakte in den PCI-Express-Steckplatz auf
Goldkontakte
dem Motherboard.
U7081_Xonar DSX_QSG.indb 10 12.01.2012 18:27:23 Uhr
ASUS Xonar DSX-Schnellstartanleitung
11
Deutsch
Deutsch
Deutsch
Deutsch
3.2 Karte Installieren
Bevor Siemit den folgenden Installationsschritten fortfahren, empfehlen wir Ihnen,
dass Sie Ihr Onboard-Audio-Gerät in den BIOS-Einstellungen deaktivieren oder
jede andere Audio-Karte in Ihrem PC deinstallieren. (Für die BIOS-Einstellungen
oder die Deinstallation anderer Audio-Karten beziehen Sie sich bitte auf die
Benutzerhandbücher des Motherboards oder der Audio-Karte)
Installieren der Xonar DSX-Karte
1. Schalten Sie den Computer, den Monitor und
alle anderen am Computer angeschlossenen
Peripheriegeräte aus.
2. Ziehen Sie das Netzkabel des Computers aus
der Steckdose heraus.
3. Berühren Sie das Metallgehäuse oder den
Metallrahmen, um statische Auadungen zu
vermeiden.
4. Entfernen Sie die Gehäuseabdeckung.
5. Entfernen Sie die Metallklemme von einem freien PCIE-Steckplatz für die Xonar
DSX-Audio-Karte.
6. Stecken Sie die Karte vorsichtig in den PCIE-Steckplatz. Vergewissern Sie sich, dass
die karte richtig im Steckplatz eingesteckt ist.
7. Sichern Sie die Karte mit Schrauben und der Metallklemme.
8. Bringen Sie die Gehäuseabdeckung wieder an.
9. Schließen Sie alle Kabel wieder an.
10. Stecken Sie das Netzkabel in eine Steckdose.
11. Schalten Sie den Computer wieder ein.
4. TreiberinstallationTreiberinstallation
Installieren der Xonar DSX-Kartentreiber
1. Nachdem Sie die Xonar DSX-Karte installiert haben, schalten Sie Ihren Computer
®
ein. Windows
erkennt die Audio-Karte automatisch und sucht nach den
Gerätetreibern. Wenn Sie nach den Treibern gefragt werden, klicken Sie auf
Abbrechen.
2. Legen Sie die Support-CD in das optische Laufwerk. Wenn Autorun in Ihren
Computer aktiviert ist, startet die Installation automatisch, wenn nicht, dann
führen Sie auf der Support-CD die Datei setup.exe aus.
3. Folgen Sie den Bildschirmanweisungen, um die Installation abzuschließen.
Die Version und der Inhalt der Support-CD können ohne vorherige Ankündigung
geändert werden.
U7081_Xonar DSX_QSG.indb 11 12.01.2012 18:27:26 Uhr
Italiano
12
ASUS Xonar DSX — Guida Rapida
1. Contenuto della Confezione
Controllare che nella confezione della scheda audio ASUS Xonar DSX siano contenuti i
seguenti articoli:
• Scheda Audio Xonar DSX PCIE ASUS
• 1 x Adattatore Ottico TOSLINK S/PDIF
• 1 x Staa a Basso Prolo
• CD di Supporto
• Guida Rapida
2. Requisiti di Sistema
Per garantire una corretta installazione della scheda Xonar DSX, il computer deve soddisfare
i seguenti requisiti:
• Uno slot PCIE 1.0 (o superiore) compatibile per la scheda audio.
®
®
• Microsoft
Windows
Vista (32/64bit) / XP (32/64bit) / MCE2005
®
®
®
• CPU Intel
Pentium
4 1.4 GHz o AMD
Athlon 1400 CPU più potente.
• Memoria di sistema DRAM da 256 MB (o superiore).
• Spazio libero su HDD da 60 MB per il pacchetto di installazione driver.
• Drive CD-ROM (o DVD-ROM) per installazione software.
• Cue di alta qualità, altoparlanti analogici alimentati o decodicatore Dolby Digital
o DTS decoder, per una riproduzione audio ad altissima fedeltà.
3. Descrizione Hardware
3.1 Layout Scheda Xonar DSX
6
7 8
1
2
3
4
5
9
U7081_Xonar DSX_QSG.indb 12 12.01.2012 18:27:27 Uhr
Italiano
ASUS Xonar DSX — Guida Rapida
13
No Elemento Descrizione
1 Porta Ingresso
Collegare il microfono esterno del PC a questa porta da 3.5mm
Microfono
per l’ ingresso vocale. Pre-amplicatore integrato di alta qualità
per microfono.
1 Porta Linea
Collegare dispositivi analogici, come lettori MP3, lettori di CD,
d’ingresso
sintetizzatori musicali e altre sorgenti audio a livello di linea a questa
porta da 3.5mm per registrazioni o elaborazioni audio (tramite
convertitore Ultra-high delity da 102dB SNR A-D).
2 Porta Uscita Cue/
Collegare le cue o altoparlanti a 2/2.1 canali a questa porta
Frontale
da 3.5mm. Per sistemi di altoparlanti multicanale, collega all’
ingresso di destra/sinistra e frontale su altoparlanti alimentati.
3 Porta Uscita Surround
Collega all’ingresso del canale surround su altoparlanti analogici
Laterale
alimentati 4/4.1/5.1/6.1/7.1.
4 Porta Uscita Centro/
Collega l’ingresso centro/subwoofer su altoparlanti analogici
Subwoofer
alimentati 5.1/6.1/7.1.
5 Porta Uscita Surround
Collega l’ingresso Surround Posteriore su altoparlanti analogici
Posteriore
alimentati 6.1/7.1.
5 Porta Uscita S/PDIF
Porta uscita digitale ottica TOSLINK. Collega ad un decodicatore
digitale esterno o a sistemi di altoparlanti digitali, sistemi Home
Theater, ricevitori AV per l’uscita audio digitale, fra cui PCM, Dolby
Digital, DTS, WMA-Pro, ecc.
6 Header audio pannello
Compatibilità con pannello frontale Intel HDA, supporto
frontale
rilevamento jack HP e cambio automatico dell’uscita audio
dal pannello posteriore a quello frontale. Supporto mixing
dell’ingresso mic della scheda graca e del pannello frontale.
7 Header Ingresso Aux
Di solito, collega all’uscita Audio Analogica della scheda
di sintonizzazione TV o ad altra sorgente audio all’interno
del sistema del PC (per monitorare l’audio della scheda di
sintonizzazione TV dall’ingresso Audio, si deve attivare la
funzione “monitor” per Aux-In nel mixer da registrazione del
Centro Audio Xonar DS).
8 Header Uscita S/PDIF
Collega alla scheda graca con il supporto HDMI.
9 Dentelli dorati Bus PCI
Da inserire nello slot PCI Express della scheda madre.
Express
U7081_Xonar DSX_QSG.indb 13 12.01.2012 18:27:28 Uhr
3.2 Installazione della Scheda
Prima di iniziare l’installazione, si consiglia di disattivare il dispositivo audio sulla scheda
madre, nelle impostazioni del BIOS, o di disinstallare tutte le altre schede audio sul PC.
Per le impostazioni del BIOS o la rimozione di altre schede audio, consultare il manuale
utente della scheda madre e della scheda audio.
Procedura di Installazione della Scheda Xonar DSX
1. SPEGNERE computer, monitor e tutte le altre
periferiche collegate al computer.
2. Disinserire il cavo di alimentazione del
computer dal computer e dalla presa di
corrente.
3. Toccare il pannello laterale o posteriore in
metallo del computer per evitare elettricità
statica.
4. Rimuovere la copertura del telaio.
5. Rimuovere la staa metallica da uno slot libero PCIE per la scheda audio Xonar
DSX.
6. Inserire delicatamente la scheda audio nello slot PCIE. Assicurarsi che la scheda audio
sia correttamente installata.
7. Fissare la scheda audio con le viti e la staa di metallo.
8. Rimontare la copertura del telaio.
Italiano
9. Ricollegare tutti i cavi.
10. Inserire il cavo di alimentazione al computer e ad una presa a muro
11. ACCENDERE il computer.
4. Installazione Driver
Installazione Driver della Scheda Xonar DSX
®
1. Dopo aver installato la scheda Xonar DSX, accendere il computer. Windows
rileva
automaticamente la scheda audio ed inizia la ricerca dei driver del dispositivo. Alla
richiesta dei driver, cliccare Cancel (Annulla).
2. Inserire il CD di supporto nell’unità ottica.Se nel sistema è attivata la funzione di
esecuzione automatica, l’installazione ha inizio automaticamente. In caso contrario,
eseguire setup.exe dal CD di supporto.
3. Seguire le istruzioni sullo schermo per completare l’installazione.
La versione e il contenuto del CD di supporto sono soggetti a variazioni senza
obbligo di preavviso.
14
ASUS Xonar DSX — Guida Rapida
U7081_Xonar DSX_QSG.indb 14 12.01.2012 18:27:30 Uhr
1. Contenido del �aquete
Revise el paquete de la tarjeta de audio ASUS Xonar DSX para comprobar que contiene
los siguientes elementos:
• Tarjeta de Audio PCIE ASUS Xonar DSX
• Adaptador óptico TOSLINK S/PDIF x1
• Soporte de Bajo Perl x1
• CD de soporte
• Guía de inicio rápido
2. Requisitos del sistema
Para garantizar la instalación correcta de la tarjeta Xonar DSX, su PC debe cumplir los
siguientes requisitos:
• Tener una ranura compatible con PCI Express 1.0 (o superior) para la tarjeta de audio
®
®
• Microsoft
Windows
Vista (32/64bit) / XP (32/64bit) / MCE2005
®
®
• Procesador Intel
Pentium
4 a 1,4 GHz o AMD Athlon 1400, o un procesador más
rápido
• Memoria de sistema DRAM de 256 MB como mínimo
• Espacio en disco duro de, al menos, 60 MB para el paquete de instalación del
controlador
• Unidad de CD-ROM (o DVD-ROM) para instalar el software
• Auriculares de alta calidad, altavoces analógicos alimentados o altavoces digitales
con descodicador Dolby Digital para disfrutar de los sonidos de muy alta delidad
que proporciona la tarjeta
3. Introducción al hardware
3.1 Diseño de la tarjeta Xonar DSX
Español
6
7 8
1
2
3
4
5
9
ASUS Xonar DSX — Guía de inicio rápido
15
U7081_Xonar DSX_QSG.indb 15 12.01.2012 18:27:31 Uhr
Español
16
ASUS Xonar DSX — Guía de inicio rápido
Nº Elemento DescriPCIEón
1 Puerto Entrada de
Conecte el micrófono externo de su PC a este puerto de 3,5mm
micrófono
para la entrada de voz. Preamplicador de micrófono de alta
calidad integrado.
1 Puerto Entrada de línea
Conecte dispositivos analógicos como reproductores MP3,
reproductores de CD, sintetizadores de música y otras fuentes de
sonido de nivel de línea a este puerto de 3,5 mm para grabar o
procesar audio. (A través del convertidor A-D SNR de 102 db y de
muy alta delidad)
2 Puerto para
Conecte sus auriculares o altavoces de canal 2/2.1 a este puerto
Auriculares/ Salida
de 3,5mm. Para los sistemas de altavoces multicanal, se conecta
Frontal
a la entrada frontal izquierda/derecha de los altavoces que estén
encendidos.
3 Puerto de Salida Lateral
Conecta a la entrada del canal de sonido envolvente en altavoces
de Sonido Envolvente
analógicos con sistemas 4/4.1/5.1/6.1/7.1.
4 Puerto de Salida
Conecta a la entrada central/altavoz de graves en altavoces
Central/Altavoz de
analógicos con sistemas 5.1/6.1/7.1.
Graves
5 Puerto de Salida
Conecta a la entrada Posterior de sonido Envolvente en altavoces
Posterior/Trasero de
analógicos con sistemas 6.1/7.1.
Sonido Envolvente
5 Puerto Salida S/PDIF
Puerto de salida digital óptico TOSLINK. Permite conectar un
descodicador digital externo o sistemas de altavoces digitales,
sistemas de Cine en casa, receptores de AV para enviar señales de
audio digitales como PCM, Dolby Digital, DTS, WMA-Pro, etc.
6 Base de conexiones de
Compatible con el panel frontal HDA Intel y soporta la
audio del panel frontal
detección de conexión HP y el cambio automático de la
salida de audio desde el panel posterior al panel frontal.
Soporta la mezcla de entrada de sonido desde el micrófono de la
tarjeta de sonido y del panel frontal.
7 Base de conexiones de
Normalmente permite conectar la salida Audio analógico de la
entrada auxiliar
tarjeta de sintonización de TV u otra fuente de sonido de su PC.
Para controlar el audio de la tarjeta de sintonización de TV desde
esta entrada auxiliar, debe habilitar la función “monitor” para
dicha entrada en el mezclador de grabación del centro de audio
de Xonar DSX.
8 Conector de salida
Para conectarse a la tarjeta gráca con funcionalidad HDMI.
S/PDIF
9 Contactos dorados del
Insertar en la ranura PCIE Express de la placa base.
bus PCIE
U7081_Xonar DSX_QSG.indb 16 12.01.2012 18:27:32 Uhr
Español
ASUS Xonar DSX — Guía de inicio rápido
17
Antes de continuar con los siguientes pasos de instalación, es recomendable
deshabilitar el dispositivo de audio integrado en la conguración del BIOS o
desinstalar cualquier otra tarjeta de audio de su PC. Para obtener información sobre
la conguración del BIOS o la desinstalación de otras tarjetas de sonido, consulte los
manuales de usuario de la placa base y la tarjeta de audio.
Instalar la tarjeta Xonar DSX
1. APAGUE el equipo, el monitor y todos
los dispositivos periféricos conectados al
primero.
2. Desenchufe el cable de alimentación del
equipo y de la toma de corriente eléctrica.
3. Toque el panel posterior o lateral metálico del
equipo para descargar la electricidad estática.
4. Retire la tapa del chasis.
5. Extraiga el soporte de metal de una ranura PCIE que esté disponible para la
instalación de la tarjeta de sonido Xonar DSX.
6. Inserte con cuidado la tarjeta de sonido en la ranura PCIE.
7. Asegure la tarjeta de audio con los tornillos y el cierre metálico.
8. Conecte el cable de alimentación de la fuente de alimentación al conector de
alimentación de la tarjeta de audio.
9. Vuelva a colocar la tapa del chasis.
10. Conecte de nuevo todos los cables.
11. Enchufe el cable de alimentación a su PC y a una toma de corriente eléctrica.
12. ENCIENDA el equipo.
4. Instalar el controlador
Instalar el controlador de la tarjeta Xonar DSX
®
1. Una vez instalada la tarjeta Xonar DSX, apague el equipo. Windows
detectará
la tarjeta de audio y buscará los controlares del dispositivo automáticamente.
Cuando el sistema le pregunte por los controladores, haga clic en Cancelar.
2. Inserte el CD de soporte en la unidad óptica. Si la función de ejecución automática
está habilitada en el sistema, la instalación se iniciará automáticamente. En caso
contrario, ejecute el programa setup.exe desde el CD de soporte.
3. Siga las instrucciones en pantalla para nalizar la instalación.
La versión y contenido del CD de soporte están sujetos a cambio sin previo aviso.
U7081_Xonar DSX_QSG.indb 17 12.01.2012 18:27:34 Uhr
Português
18
Guia de instalação rápida ASUS Xonar DSX
1. Conteúdo da embalagem
Verique se a embalagem da sua placa de áudio ASUS Xonar DSX contém os seguintes
itens:
• Placa de áudio PCIE ASUS Xonar DSX
• 1x adaptador óptico S/PDIF TOSLINK
• Suporte de baixo perl x1
• CD de suporte
• Guia de consulta rápida
2. Requisitos do sistema
Para garantir uma correcta instalação da placa Xonar DSX, o seu computador deve
satisfazer os seguintes requisitos:
• Uma ranhura PCI Express 1.0 (ou acima) compatível para a placa de áudio
• Microsoft® Windows® Vista (32/64bit) / XP (32/64bit) / MCE2005
• CPU Intel® Pentium® 4 de 1,4 GHz ou AMD Athlon 1400 ou acima
• 256 MB de memória DRAM do sistema (ou superior)
• 60 MB de espaço disponível no disco rígido para instalação do controlador
• Unidade de CD-ROM (ou de DVD-ROM) para instalação do software
• Auscultadores de alta qualidade, altifalantes analógicos ou digitais com
descodicadores Dolby Digital para poder desfrutar de um som de ultra alta
delidade
3. Introdução ao hardware
3.1 Esquema da placa Xonar DSX
6
7 8
1
2
3
4
5
9
U7081_Xonar DSX_QSG.indb 18 12.01.2012 18:27:36 Uhr
Português
Guia de instalação rápida ASUS Xonar DSX
19
Nº Item Descrição
1 Porta de entrada de
Ligue o seu microfone de PC externo a esta porta de 3.5mm para
microfone
entrada de voz. Pré-amplicador interno de microfone de alta
qualidade.
1 Porta de entrada de
Ligue dispositivos analógicos como leitores de MP3, leitores de
linha
CD, sintetizadores e outras fontes de áudio de nível de linha a
esta porta de 3.5mm para gravação ou processamento de áudio.
(Através do conversor 102dB SNR A-D de ultra alta delidade)
2 Porta de saída frontal/
Ligue os seus auscultadores ou altifalantes de 2/2.1 canais a esta
auscultadores
porta de 3.5mm. Para sistemas de altifalantes multi-canal, liga à
entrada frontal esquerda/direita dos altifalantes amplicados.
3 Porta de saída Surround
Liga à entrada de canal surround em altifalantes 4/4.1/5.1/6.1/7.1
lateral
analógicos amplicados.
4 Porta de saída central/
Liga à entrada central/subwoofer em altifalantes 5.1/6.1/7.1
Subwoofer
analógicos amplicados.
5 Porta de saída traseira/
Liga à entrada traseira/surround em altifalantes 6.1/7.1
Surround
analógicos amplicados.
5 Porta de saída S/PDIF
Porta de saída óptica digital TOSLINK. Liga a descodicadores
digitais ou sistemas de altifalantes digitais, sistemas de cinema
em casa, receptores AV para saída de áudio digital incluindo
PCM, Dolby Digital, DTS, WMA-Pro, etc.
6 Conector de áudio do
Compatível com painel frontal Intel HDA e suporta a detecção
painel frontal
de cha HP e a mudança automática da saída de áudio do painel
traseiro para o painel frontal.
Suporta a mistura da entrada de microfone do painel frontal e da
placa de áudio.
7 Conector de entrada
Liga normalmente à saída de áudio analógico da placa de TV ou
Auxiliar
outra fonte de áudio no sistema do PC. (Para controlar o áudio
da sua placa de TV a partir desta entrada Auxiliar, deve activar
a função “monitor” para a entrada Auxiliar no misturador de
gravação do Xonar DSX Audio Center.)
8 Ficha de Saída S/PDIF
Liga à placa gráca com suporte HDMI.
9 Contactos dourados PCI
Insira na ranhura PCI Express da placa principal.
Express
U7081_Xonar DSX_QSG.indb 19 12.01.2012 18:27:37 Uhr
Antes de prosseguir com os passos de instalação seguintes, recomendamos que
desactive o seu dispositivo de áudio incorporado nas denições do BIOS, ou
desinstale outras placas de áudio do seu PC. (Para congurar o BIOS ou desinstalar
outras placas de áudio, consulte os manuais do utilizador da sua placa principal e da
placa de áudio)
Instalar a placa Xonar DSX
1. Desligue o computador, o monitor e todos os
outros periféricos ligados ao computador.
2. Desligue o cabo de alimentação do
computador do próprio computador e da
tomada eléctrica.
3. Toque na parte metálica traseira ou no painel
lateral do computador para evitar a electricidade estática.
4. Remova a tampa do computador.
5. Retire o suporte metálico de uma ranhura PCIE disponível para a placa de áudio
Xonar DSX.
6. Insira cuidadosamente a placa de áudio na ranhura PCIE.
7. Fixe a placa de áudio com os parafusos o suporte metálico.
8. Ligue o cabo da fonte de alimentação ao conector de alimentação da placa de
áudio.
9. Reponha a tampa do computador.
10. Volte a ligar todos os cabos.
11. Ligue o cabo de alimentação ao computador e à tomada eléctrica.
12. Ligue o computador.
4. Instalação do controlador
Instalar o controlador da placa Xonar DSX
®
1. Depois de instalar a placa Xonar DSX, ligue o seu computador. O Windows
detecta
automaticamente a placa de áudio e procura os controladores do dispositivo.
Quando solicitados os controladores, clique em Cancelar.
2. Insira o CD de suporte na unidade óptica. Se a Reprodução automática estiver
Português
activada no seu sistema, a conguração inicia automaticamente. Caso contrário,
execute setup.exe a partir do CD de suporte.
3. Siga as instruções no ecrã para concluir a instalação.
A versão e o conteúdo do CD de suporte estão sujeitos a alterações sem aviso prévio.
20
Guia de instalação rápida ASUS Xonar DSX
U7081_Xonar DSX_QSG.indb 20 12.01.2012 18:27:39 Uhr
1. Комплектпоставки
В комплект поставки аудиокарты ASUS Xonar DSX входит следующее:
• Аудиокарта ASUS Xonar DSX PCIE
• Оптический адаптер S/PDIF TOSLINK x 1
Русский
• Низкопрофильный кронштейн x1
• Компакт-диск с драйверами
• Краткое руководство
2. Системныетребования
Для успешной установки Xonar DSX Ваш компьютер должен соответствовать следующим
требованиям:
• Один слот PCIE 1.0 (или выше) для аудиокарты
• Microsoft Windows Vista (32/64бит) / XP (32/64бит) / MCE2005
• Процессор Intel Pentium 4 1.4ГГц или AMD Athlon 1400 или более быстрый
• 256 MБ (или больше) системной памяти
• 60 МБ свободного пространства на жестком диске для установки драйверов
• CD-ROM (DVD-ROM) привод для установки программного обеспечения
• Высококачественные наушники, активные аналоговые колонки или декодер Dolby Digital
3. Знакомствособорудованием
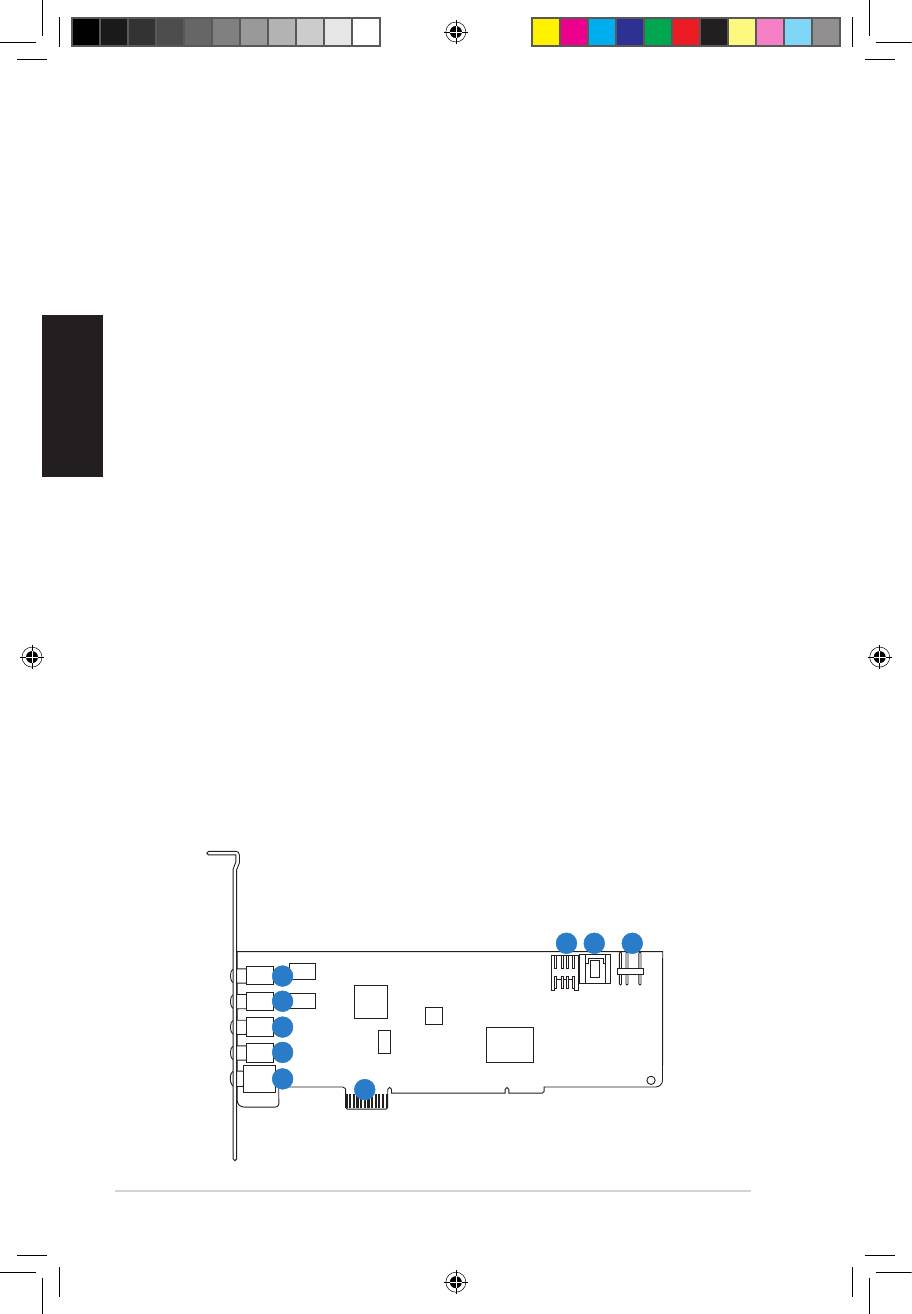
3.1 ЭлементыXonarDSX
6
7 8
1
2
3
4
5
9
Краткое руководство для ASUS Xonar DSX
21
U7081_Xonar DSX_QSG.indb 21 12.01.2012 18:27:40 Uhr
Русский
22
Краткое руководство для ASUS Xonar DSX
Нет Элемент Описание
1 Разъемдлямикрофона
Подключение внешнего микрофона гарнитуры для голосового
ввода. Имеется встроенный, высококачественный предварительный
усилитель для микрофона.
1 Аудиовход
Подключение аналоговых устройств (например MP3-плееры,
проигрыватели компакт-дисков, музыкальных синтезаторы и другие
источники звука) для записи / обработки звука. (Через конвертер
102dB SNR A-D)
2 Выходдлянаушников/
Подключение наушников или 2/2.1 — канальной акустической
переднихколонок
системы. Подключение передних колонок для многоканальных
акустических систем.
3 Выходнабоковые
Подключение тыловых колонок 4/4.1/5.1/7.1 — канальной
колонки
акустической системы.
4 Выходцентрального
Подключение центрального канала/сабвуфера 5.1/6.1/7.1 — канальной
канала/сабвуфера
акустической системы.
5 Выходнатыловые
Подключение тыловых колонок 6.1/7.1 — канальной акустической
колонки
системы.
5 S/PDIF-выход
Оптический TOSLINK цифровой выход. Подключение к внешнему
цифровому декодеру или цифровой акустической системе,
домашнему кинотеатру, AV-ресиверу для вывода цифрового звука, в
форматах PCM, Dolby Digital, DTS и WMA-Pro и т.д
6 Аудиоразъемыдля
Аудиовыход для передней панели позволяет подключать
переднейпанели
аудиоустройства непосредственно к разъемам на передней панели.
Поддерживается подключение наушников и микрофона
7 Аудиовход
Обычно подключается к аналоговому аудиовыходу ТВ-тюнера или
другого источника звука внутри компьютера. (Для контроля звука
ТВ-тюнера, подключенного к Aux-In, Вам нужно включить функцию
“monitor” для Aux-In в микшере аудиоцентра Xonar DSX)
8 S/PDIF-выход
Подключение видеокарты с HDMI.
9 РазъемPCIExpress
Вставляется в слот PCI Express материнской платы.
U7081_Xonar DSX_QSG.indb 22 12.01.2012 18:27:41 Uhr

Русский
Краткое руководство для ASUS Xonar DSX
23
3.2 Установкакарты
Перед установкой аудиокарты, отключите встроенную аудиокарту в BIOS, или извлеките
из компьютера любые другие аудиокарты. (Инструкции по настройке BIOS или извлечению
других аудиокарт, смотрите в руководствах материнской платы и аудиокарты.)
УстановкакартыXonarDSX
1. Выключить компьютер, монитор и все другие
подключенные к компьютеру периферийные
устройства.
2. Отключите шнур питания компьютера от
розетки.
3. Во избежание повреждения компонентов
статическим электричеством, перед установкой
коснитесь заземленного металлического объекта, например задней или боковой панели
компьютера.
4. Снимите крышку с системного блока.
5. Снимите металлическую крышку свободного слота PCIE.
6. Осторожно вставьте аудиокарту в слот PCIE. Убедитесь, что аудиокарта встала на
место.
7. Закрепите карту к корпусу винтом.
8. Наденьте крышку на системный блок.
9. Подключите все кабели.
10. Подключите шнур питания компьютера к розетке.
11. Включите компьютер.
4. Установкадрайверов
УстановкадрайверадляXonarDSX
1. После установки аудиокарты, включите компьютер. Windows обнаружит аудиокарту и
начнет поиск драйверов. При появлении окна с предложением найти драйвера нажмите
Cancel.
2. Вставьте Support CD в оптический привод. Если автозапуск включен, появится мастер
установки. Если нет, запустите setup.exe с компакт-диска.
3. Следуйте инструкциям на экране для завершения установки.
Версия и содержимое ПО на компакт-диске может изменяться без уведомления.
U7081_Xonar DSX_QSG.indb 23 12.01.2012 18:27:42 Uhr
Türkçe
Türkçe
24
ASUS Xonar DSX Hızlı Başlangıç Kılavuzu
Türkçe
Türkçe
1. Paket içeriği
ASUS Xonar Esence STX ses kartı paketinizde aşağıdaki öğelerin bulunup bulunmadığını
denetleyin:
• ASUS Xonar DSX PCIE ses kartı
• 1 adet S/PDIF TOSLINK optik bağdaştırıcı
• Düşük Prolli Destek x1
• Destek CD’si
• Hızlı Başlangıç Kılavuzu
2. Sistem gereksinimleri
Xonar Esence STX kartının başarılı bir şekilde kurulması için, bilgisayarınız aşağıdaki
gereksinimleri karşılamalıdır:
• Ses kartı için bir adet PCI Express 1.0 (veya üstü) uyumlu yuva
®
• Microsoft® Windows
Vista (32/64bit) / XP (32/64bit) / MCE2005
• Intel® Pentium® 4 1.4GHz veya AMD Athlon 1400 CPU veya daha hızlı CPU
• 256 MB (veya üzeri) DRAM sistem belleği
• Sürücü kurulum paketi için 60 MB kullanılabilir HDD alanı
• Yazılım kurulumu için CD-ROM sürücüsü (veya DVD-ROM sürücüsü)
• Kartın Yüksek Gerçeklikteki seslerinin keyni sürmek için yüksek kalitede kulaklık,
elektrikli analog hoparlörler veya Dolby Dijital dekoderli dijital hoparlörler
3. Donanıma genel bakış
3.1 Xoner Esence STX kart düzeni
6
7 8
1
2
3
4
5
9
U7081_Xonar DSX_QSG.indb 24 12.01.2012 18:27:44 Uhr
ASUS Xonar DSX Hızlı Başlangıç Kılavuzu
25
Türkçe
Türkçe
Türkçe
Türkçe
No Öğe Açıklama
1 Mikrofon Giriş portu
Harici PC mikrofonunuzu ses girişi için olan bu 3,5mm’lik porta
bağlayın. Yerleşik yüksek kalitede Mikrofon ön amplikatörü.
1 Hat Giriş portu
Ses kaydetmek veya işlemek için MP3 çalar, CD çalar, müzik
synthesizer’ı ve diğer hat düzeyi ses kaynaklarını bu 3,5mm porta
bağlayın. (Ultra yüksek gerçeklikli 102dB SNR A-D dönüştürücü
ile)
2 Kulaklık/Ön Çıkış portu
Kulaklıklarınızı veya 2/2.1 kanallı hoparlörlerinizi bu 3,5mm
porta bağlayın. Çok kanallı hoparlör sistemlerinde, elektrikli
hoparlörlerin ön sol/sağ girişine bağlanır.
3 Yan Surround Çıkış
4/4.1/5.1/6.1/7.1 elektrikli analog hoparlörlerin surround kanal
portu
girişine bağlanır.
4 Merkez/Subwoofer
5.1/6.1/7.1 elektrikli analog hoparlörlerin merkez/subwoofer
Çıkış portu
girişine bağlanır.
5 Arka/geri Surround
6.1/7.1 elektrikli analog hoparlörlerin Arka Surround girişine
Çıkış portu
bağlanır.
5 S/PDIF Çıkış portu
Optik TOSLINK dijital çıkış portu. Harici dijital dekoder veya
dijital hoparlör sistemlerine, Ev Sinema sistemlerine, PCM, Dolby
Digital, DTS, WMA-Pro, vs. gibi dijital ses çıkışı AV alıcılarına
bağlanır.
6 Ön panel ses başlığı
Intel HDA ön panel uyumludur ve HP jak algılama ile arka
panelden ön panele otomatik ses çıkışı geçişini destekler.
Hem ön panel, hem ses kartı mikrofon girişi karıştırmayı destekler
7 Aux Giriş Başlığı
Genellikle TV tarayıcı kartının Analog Ses çıkışına ya da PC
sisteminizdeki diğer ses kartlarına bağlanır. (TV tarayıcı kartınızın
sesini bu Aux-In’den izlemek için, Xonar DSX Ses Merkezinin kayıt
mikserinde “izleme” işlevini etkinleştirmeniz gerekir.
8 S/PDIF Çıkış başlığı
HDMI destekli grak kartına bağlanır.
9 PCIE Express Veriyolu
Anakartınız üzerindeki PCIE Express yuvasına takın.
Altın
U7081_Xonar DSX_QSG.indb 25 12.01.2012 18:27:44 Uhr
Aşağıdaki kurulum adımlarına devam etmeden önce, BIOS ayarlarınızdan cihaz
üstü ses aygıtınızı devre dışı bırakmanız ya da PC’nizdeki diğer tüm ses kartlarını
kaldırmanız önerilir. (BIOS ayarı veya diğer ses kartlarının kaldırılması için, ana
kartınızın ve ses kartınızın kullanım kılavuzlarına başvurun)
Xonar DSX kartının takılması
1. Bilgisayarı, monitörü ve bilgisayara bağlanan
diğer tüm çevrebirim aygıtlarını KAPATIN.
Türkçe
2. Bilgisayarın güç kablosunu bilgisayarınızdan
ve güç prizinden çıkarın.
3. Statik elektrikten kaçınmak için bilgisayarın
metal arka kısma veya yan panele dokunun.
Türkçe
4. Şasi kapağını çıkarın.
5. Xonar DSX STX ses kartı için kullanılabilir bir PCIE yuvasından metal desteği çıkarın.
6. Ses kartını dikkatle PCIE yuvasına yerleştirin.
7. Ses kartını vidalarla ve metal bilezikle sabitleyin.
8. Güç beslemesinin güç kablosunu ses kartının güç konektörüne bağlayın.
9. Şasi kapağını geri koyun.
10. Tüm kabloları yeniden bağlayın.
11. Güç kablosunu bilgisayara ve güç çıkışına takın.
12. Bilgisayarı AÇIN.
4. Sürücü kurulumu
Xonar DSX kartı sürücüsünün yüklenmesi
®
1. Xonar DSX kartını taktıktan sonra bilgisayarınızı açın. Windows
, ses kartını
otomatik olarak algılar ve aygıt sürücülerini arar. Sürücüler sorulduğunda, İptal’i
tıklatın.
2. Destek CD’sini optik sürücüye yerleştirin. Sisteminizde Otomatik Çalıştır özelliği
etkinse, kur otomatik olarak başlar. Değilse, destek CD’nizden setup.exe dosyasını
çalıştırın.
3. Kurulumu tamamlamak için ekrandaki yönergelerini izleyin.
Destek CD’sinin sürümü ve içeriği önceden haber verilmeden değiştirilebilir.
26
ASUS Xonar DSX Hızlı Başlangıç Kılavuzu
U7081_Xonar DSX_QSG.indb 26 12.01.2012 18:27:47 Uhr
Аннотации для Звуковой Карты Asus xonar dsx в формате PDF
Топ 10 инструкций
Другие инструкции
![]()
1.Комплект поставки
В комплект поставки аудиокарты ASUS Xonar DSX входит следующее:
•Аудиокарта ASUS Xonar DSX PCIE
•Оптический адаптер S/PDIF TOSLINK x 1
•Низкопрофильный кронштейн x1
•Компакт-диск с драйверами
•Краткое руководство
2.Системные требования
Для успешной установки Xonar DSX Ваш компьютер должен соответствовать следующим требованиям:
•Один слот PCIE 1.0 (или выше) для аудиокарты
•Microsoft Windows Vista (32/64бит) / XP (32/64бит) / MCE2005
•Процессор Intel Pentium 4 1.4ГГц или AMD Athlon 1400 или более быстрый
•256 MБ (или больше) системной памяти
•60 МБ свободного пространства на жестком диске для установки драйверов
•CD-ROM (DVD-ROM) привод для установки программного обеспечения
•Высококачественные наушники, активные аналоговые колонки или декодер Dolby Digital
3.Знакомство с оборудованием
3.1Элементы Xonar DSX
6 7 8

 1
1 

 2
2 

 3
3

 4
4
5
9
Русский
|
Краткое руководство для ASUS Xonar DSX |
21 |