Последнее обновление: 06.09.2023
-
Глава 1. Введение в ASP.NET Core
-
Что такое ASP.NET Core
-
Первое приложение на ASP.NET Core с .NET CLI
-
Первое приложение в Visual Studio
-
-
Глава 2. Основы в ASP.NET Core
-
Создание и запуск приложения. WebApplication и WebApplicationBuilder
-
Конвейер обработки запроса и middleware
-
Метод Run и определение терминального middleware
-
HttpResponse. Отправка ответа
-
HttpRequest. Получение данных запроса
-
Отправка файлов
-
Отправка форм
-
Переадресация
-
Отправка и получение json
-
Создание простейшего API
-
Загрузка файлов на сервер
-
Метод Use
-
Создание ветки конвейера. UseWhen и MapWhen
-
Метод Map
-
Классы middleware
-
Построение конвейера обработки запроса
-
IWebHostEnvironment и окружение
-
-
Глава 3. Dependency Injection
-
Внедрение зависимостей и IServiceCollection
-
Создание сервисов
-
Получение зависимостей
-
Жизненный цикл зависимостей
-
Применение сервисов в классах middleware
-
Scoped-сервисы в singleton-объектах
-
Множественная регистрация сервисов
-
-
Глава 4. Маршрутизация
-
Конечные точки. Метод Map
-
Параметры маршрута
-
Ограничения маршрутов
-
Создание ограничений маршрутов
-
Передача зависимостей в конечные точки
-
Сопоставление запроса с конечной точкой
-
Сочетание конечных точек с другими middleware
-
Получение параметров строки запроса
-
-
Глава 5. Статические файлы
-
Установка каталога статических файлов. UseStaticFiles
-
Работа со статическими файлами
-
-
Глава 6. Конфигурация
-
Основы конфигурации
-
Нефайловые провайдеры конфигурации
-
Конфигурация в файлах JSON, XML и Ini
-
Конфигурация по умолчанию и объединение конфигураций
-
Анализ конфигурации
-
Создание провайдера конфгурации
-
Проекция конфигурации на классы
-
Передача конфигурации через IOptions
-
-
Глава 7. Логгирование
-
Ведение лога и ILogger
-
Фабрика логгера и провайдеры логгирования
-
Конфигурация и фильтрация логгирования
-
Создание провайдера логгирования
-
-
Глава 8. Состояние приложения. Куки. Сессии
-
HttpContext.Items
-
Куки
-
Сессии
-
-
Глава 9. Обработка ошибок
-
Обработка исключений
-
Обработка ошибок HTTP
-
-
Глава 10. Results API
-
Введение в Results API
-
Отправка текста и json в Results API
-
Переадресация в Results API
-
Отправка статусных кодов в Results API
-
Отправка файлов в Results API
-
Определение своего типа IResult
-
-
Глава 11. Web API
-
Пример приложения Web API
-
-
Глава 12. Работа с базой данных и Entity Framework
-
Подключение Entity Framework
-
Основные операции с данными в Entity Framework Core
-
-
Глава 13. Аутентификация и авторизация
-
Введение в аутентификацию и авторизацию
-
Аутентификация с помощью JWT-токенов
-
Авторизация с помощью JWT-токенов в клиенте JavaScript
-
Аутентификация с помощью куки
-
HttpContext.User, ClaimPrincipal и ClaimsIdentity
-
ClaimPrincipal и объекты Claim
-
Авторизация по ролям
-
Авторизация на основе Claims
-
Создание ограничений для авторизации
-
-
Глава 14. CORS и кросс-доменные запросы
-
Подключение CORS в приложении
-
Конфигурация CORS
-
Политики CORS
-
Глобальная и локальная настройка CORS
-
-
Глава 15. URL Rewriting
-
Введение в URL Rewriting
-
Правила IIS для URL Rewriting
-
Применение правил Apache для URL Rewriting
-
Создание правил URL Rewriting
-
-
Глава 16. Клиентская разработка
-
Бандлинг и минификация
-
Пакетный менеджер Libman
-
Пакетный менеджер NPM
-
-
Глава 17. Кэширование
-
Кэширование с помощью MemoryCache
-
Распределенное кэширование. Redis
-
Сжатие ответа
-
Кэширование статических файлов
-
Кэширование ответа и OutputCache
-
-
Глава 18. Мониторинг работоспособности приложения
-
Health Check Middleware
-
- Глава 1. Введение в ASP.NET Core
- Что такое ASP.NET Core
- Начало работы с ASP.NET Core
- Начало работы с ASP.NET Core
- Глава 2. Основы в ASP.NET Core
- Создание и запуск приложения. WebApplication и WebApplicationBuilder
- Конвейер обработки запроса и middleware
- Метод Run и определение терминального middleware
- HttpResponse. Отправка ответа
- HttpRequest. Получение данных запроса
- Отправка файлов
- Отправка форм
- Переадресация
- Отправка и получение json
- Создание простейшего API
- Загрузка файлов на сервер
- Метод Use
- Создание ветки конвейера. UseWhen и MapWhen
- Метод Map
- Классы middleware
- Построение конвейера обработки запроса
- IWebHostEnvironment и окружение
- Глава 3. Dependency Injection
- Внедрение зависимостей и IServiceCollection
- Создание сервисов
- Получение зависимостей
- Жизненный цикл зависимостей
- Применение сервисов в классах middleware
- Scoped-сервисы в singleton-объектах
- Множественная регистрация сервисов
- Глава 4. Маршрутизация
- Конечные точки. Метод Map
- Параметры маршрута
- Ограничения маршрутов
- Создание ограничений маршрутов
- Передача зависимостей в конечные точки
- Сопоставление запроса с конечной точкой
- Сочетание конечных точек с другими middleware
- Получение параметров строки запроса
- Глава 5. Статические файлы
- Установка каталога статических файлов. UseStaticFiles
- Работа со статическими файлами
- Глава 6. Конфигурация
- Основы конфигурации
- Нефайловые провайдеры конфигурации
- Конфигурация в файлах JSON, XML и Ini
- Конфигурация по умолчанию и объединение конфигураций
- Анализ конфигурации
- Создание провайдера конфгурации
- Проекция конфигурации на классы
- Передача конфигурации через IOptions
- Глава 7. Логгирование
- Ведение лога и ILogger
- Фабрика логгера и провайдеры логгирования
- Конфигурация и фильтрация логгирования
- Создание провайдера логгирования
- Глава 8. Состояние приложения. Куки. Сессии
- HttpContext.Items
- Куки
- Сессии
- Глава 9. Обработка ошибок
- Обработка исключений
- Обработка ошибок HTTP
- Глава 10. Results API
- Введение в Results API
- Отправка текста и json в Results API
- Переадресация в Results API
- Отправка статусных кодов в Results API
- Отправка файлов в Results API
- Определение своего типа IResult
- Глава 11. Web API
- Пример приложения Web API
- Глава 12. Работа с базой данных и Entity Framework
- Подключение Entity Framework
- Основные операции с данными в Entity Framework Core
- Глава 13. Аутентификация и авторизация
- Введение в аутентификацию и авторизацию
- Аутентификация с помощью JWT-токенов
- Авторизация с помощью JWT-токенов в клиенте JavaScript
- Аутентификация с помощью куки
- HttpContext.User, ClaimPrincipal и ClaimsIdentity
- ClaimPrincipal и объекты Claim
- Авторизация по ролям
- Авторизация на основе Claims
- Создание ограничений для авторизации
- Глава 14. CORS и кросс-доменные запросы
- Подключение CORS в приложении
- Конфигурация CORS
- Политики CORS
- Глобальная и локальная настройка CORS
- Глава 15. URL Rewriting
- Введение в URL Rewriting
- Правила IIS для URL Rewriting
- Применение правил Apache для URL Rewriting
- Создание правил URL Rewriting
- Глава 16. Клиентская разработка
- Бандлинг и минификация
- Пакетный менеджер Libman
- Пакетный менеджер NPM
- Глава 17. Кэширование
- Кэширование с помощью MemoryCache
- Распределенное кэширование. Redis
- Сжатие ответа
- Кэширование статических файлов
- Кэширование ответа и OutputCache
- Глава 18. Мониторинг работоспособности приложения
- Health Check Middleware
Время на прочтение
5 мин
Количество просмотров 95K
ASP.NET Core — новейший фреймворк для кроссплатформенной веб разработки. Пока его популярность (как и количество вакансий) только начинает набирать обороты самое время узнать о нем побольше. Ну а для того, чтобы все знания не испарились сразу после прочтения — добавим существенную практическую часть. Создадим простое приложение, для тестирования прочитанного.
Если вы считаете, что уже достаточно круты в новом фреймворке — можете попробовать пройти тест до того, как прочтете статью. Линк. Весь код проекта можно посмотреть на гитхабе.
Первая часть включает:
- Что такое .NET Core и ASP.NET Core?
- Основы создания приложения и его структура
- Добавление новых элементов, скаффолдинг
- Основы встроенного Dependency Injection
- Деплоймент в Azure
Разберемся в терминах. Один из наиболее не понятных моментов — это зависимость между старым фреймворком ASP.NET MVC и новым ASP.NET Core, а также в чем отличия .NET и .NET Core. Начнем с последнего. .NET Core — это общая платформа для разработки программного обеспечения. Фактически это еще одна реализация стандарта .NET (другие реализации — .NET, Mono). Отличия и особенности этой реализации (.NET Core) в том, что она:
- С открытым исходным кодом
- Кроссплатформенная
- Гибкая в установке — может быть внутри приложения и можно поставить несколько версий на одной и той же машине
- Все сценарии работы поддерживаются с помощью консольных инструментов
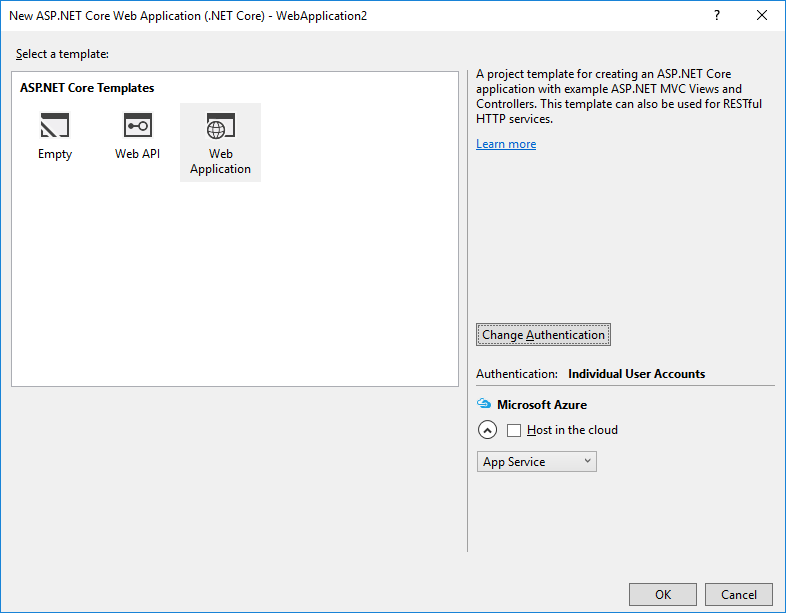
Перейдем к ASP.NET Core. Это новый фреймворк от Microsoft для разработки Веб приложений, который появился вследствие редизайна ранее существующего фреймворка ASP.NET MVC. Нужно понимать, что ASP.NET Core не обязательно должен базироваться на .NET Core. Можно создать ASP.NET Core приложение на основе старого доброго .NET. Такая опция есть в стандартном диалоге создания нового проекта:
В чем же тогда особенности и отличия ASP.NET Core от предыдущего ASP.NET? Некоторые из них это:
- Возможность намного лучше контролировать нужные модули, сборки. Например, нет жесткой привязки к IIS, System.Web.dll
- Встроенный функционал для внедрения зависимостей
- Открытый исходный код
Кроме того, Core приложение теперь унифицировано с другими типами приложений. Теперь, оно таким же образом включает метод Main, который вызывается при запуске приложения, а тот в свою очередь просто запускает Веб часть. Минимальное приложение выглядит примерно таким образом:
public class Program
    {
        public static void Main(string[] args)
        {
            var host = new WebHostBuilder()
                .UseKestrel()
                .UseStartup<Startup>()
                .Build();

            host.Run();
        }
    }

public class Startup
{
    public void ConfigureServices(IServiceCollection services)
    {
    }

    public void Configure(IApplicationBuilder app)
    {
    }
}
Класс Statup можно, в какой-то степени, охарактеризовать как новый вариант Global.asax (Это класс для глобальной настройки всего приложения в предыдущей версии ASP.NET). Грубо говоря, можно сказать, что метод ConfigureServices нужен для конфигурации контейнера для внедрения зависимостей и его сервисов, а метод Configure для конфигурации конвейера обработки запросов.
Приступим к практической реализации
Для того, чтобы лучше понять все новшества, создадим ASP.NET Core приложение на основе .NET Core.
Чтобы облегчить себе жизнь, выберем Web Application и поменяем аутентификацию на Individual User Accounts. Таким образом Visual Studio уже сгенерирует весь нужный код для базового приложения.
Рассмотрим детальней что же нового появилось в ASP.NET Core. С точки зрения разработки вся концепция осталась прежней. Структура проекта базируется на паттерне MVC. Для работы с данными по умолчанию используем Entity Framework, логика описана в классах-контроллерах, на уровне представлений используем синтаксис cshtml + новая фишка tag helpers.
Проверим классы Program.cs и Startup.cs, они действительно выглядят такими же, как было описано выше. Конечно класс Startup не совсем пуст, а уже вмещает функционал для считывания конфигурации, настройки базового логирования, маршрутизации и привязку на нашу модель базы данных.
Дополним модель базы данных сущностями для создания и прохождения тестов. Будем использовать следующие сущности: Набор тестовых вопросов — TestPackage, Сам вопрос (тест) — TestItem, Результат теста — TestResult. Пример можно посмотреть тут. Радует, что EntityFramework Core уже поддерживает большинство функционала и можно полноценно пользоваться Code First миграциями.
Добавляем логику
Теперь, когда у нас есть модель базы данных, мы можем приступить к созданию логики для нашего приложения. Самый простой способ создания админки — это механизм scaffolding. Для этого, кликаем правой кнопкой мыши по папке контроллеров и выбираем Add → New Scaffold Item:
Выбираем «MVC Controller с представлениями, с использованием Entity Framework». Этот шаблон позволяет нам быстро создать контроллер и вьюхи для управления одной конкретной моделью. Проделаем такой трюк для TestPackage и TestItem. В результате у нас есть готовый прототип админки для нашей системы. Можно запустить проект и зайти на страницы этих контроллеров, просто добавить его имя без слова Controller в конец адреса, например, /testpackages. Конечно в ней еще не все идеально, поэтому нужно допилить некоторые моменты и сделать их более удобными.
После создания модели и простого функционала для работы с ней, можно перейти к самому процессу прохождения тестов. В общем, все выглядит просто. Сервер присылает вопрос, варианты, мы отсылаем назад ответ. Сервер сохраняет его. В конце теста показываем результат. Добавим код для этого поведения.
В общем, все что нужно для теста у нас есть.
Основы Dependency Injection в ASP.NET Core
Важным новшеством новой версии ASP.NET так же является встроенный механизм внедрения зависимостей. В 2016 году уже никого не удивишь тем, что механизм внедрения зависимостей можно перенести внутрь фреймворка. Мало какое серьёзное приложение пишут без использование этого подхода. DI в ASP.NET Core реализован достаточно базово, но в то же время позволяет решить большинство задач управления зависимостями.
Конфигурация контейнера осуществляется в методе ConfigureServices класса Startup. Пример:
            // Add framework services.
            services.AddDbContext<ApplicationDbContext>(options =>
                options.UseSqlServer(Configuration.GetConnectionString("DefaultConnection")));

            services.AddIdentity<ApplicationUser, IdentityRole<Guid>>()
                .AddEntityFrameworkStores<ApplicationDbContext, Guid>()
                .AddDefaultTokenProviders();

            services.AddMvc();

            // Add application services.
            services.AddTransient<IEmailSender, AuthMessageSender>();
            services.AddTransient<ISmsSender, AuthMessageSender>();
Можно заметить, что для контекста базы данных и Identity фреймворка есть дополнительные, не типичные методы их регистрации. Это позволяет более гибко их сконфигурировать. В этот подход регистрации сервисов очень красиво вписываются extension-методы.
После регистрации сервисов, самый легкий способ получить из в коде (например, в контроллерах) — это просто добавить параметр конструктора типа, который был зарегистрирован. Такие контроллеры по умолчанию создаются скаффолдингом.
Деплой
Одним из самых простых способов деплоймента остается Microsoft Azure. Нам достаточно самых базовых настроек для полноценной работы. Развертывание сайта на сервере все так же просто — с помощью нескольких кликов, начиная с контекстного меню на файле проекта.
Выводы
Пока не известно будущее «классического» .NET фреймворка, так как он, все же, является более стабильным и проверенным, поэтому может существовать еще довольно долго (привет, Python 2), хотя возможна и ситуация быстрой миграции большинства девелоперов на Core версии (не такой уже .NET и старый — 14 лет всего лишь).
Очень радует стабильность текущей версии фреймворков и инструментов. Хотя они и не идеальны, но главное, что можно полноценно писать код. Фреймворки Microsoft, как всегда, подкупают тем, что если ты был знаком с предыдущей версией, то уже знаешь больше половины следующей. Для хорошего ASP.NET девелопера, можно начинать писать на Core вообще не читая документацию, хотя многие вещи будут не понятны. Правда потом, сложно писать на обычном ASP.NET, к хорошему быстро привыкают.
Также удивляет количество вопросов на StackOverflow. Вопросы, что касаются основных вещей уже отлично гуглятся с приставкой ASP.NET Core. Часто ответы на них ведуть на Github и на дискуссии разработчиков самого фреймворка, что для мира .NET является совсем новым опытом. Очень необычными и интересным.
Исходники
Пройти тест
#Руководства
-
0
Что делать, если сайт нужен был вчера, но писать его еще даже не начали? Самое время воспользоваться ASP.NET Web Forms!
vlada_maestro / shutterstock
Пишет о программировании, в свободное время создаёт игры. Мечтает открыть свою студию и выпускать ламповые RPG.
ASP.NET Web Forms позволяет даже новичку быстро создать простой сайт. Если не планировать очень широкий функционал, то вполне можно справиться и за час.
Рассказываем, как это сделать, шаг за шагом.
Для начала создайте проект ASP.NET:
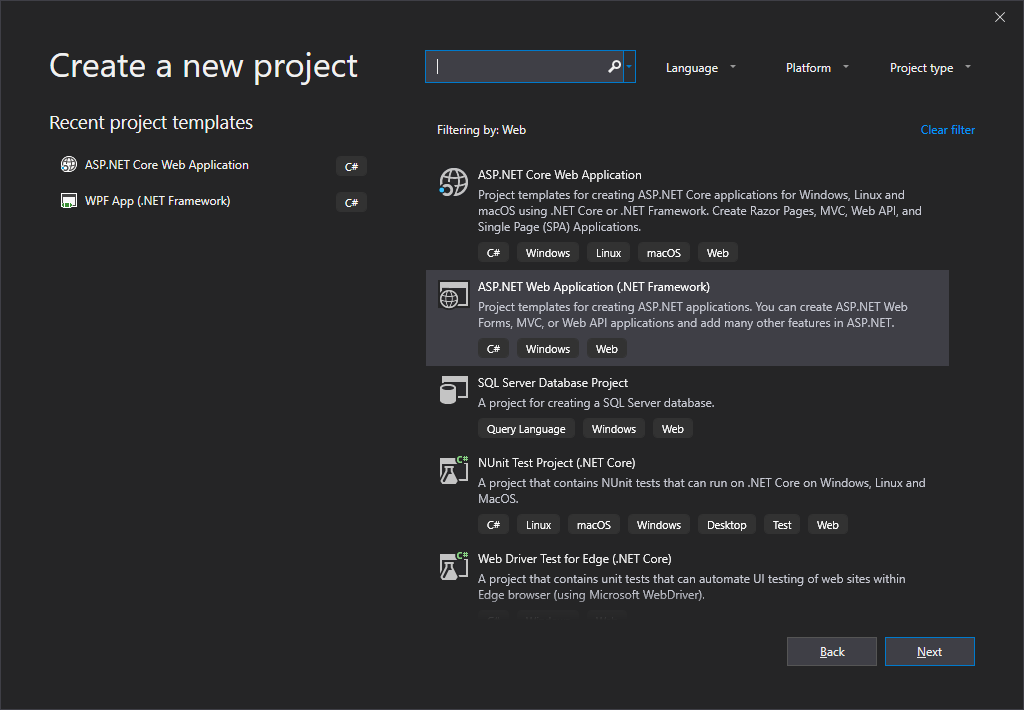
Затем укажите его имя:
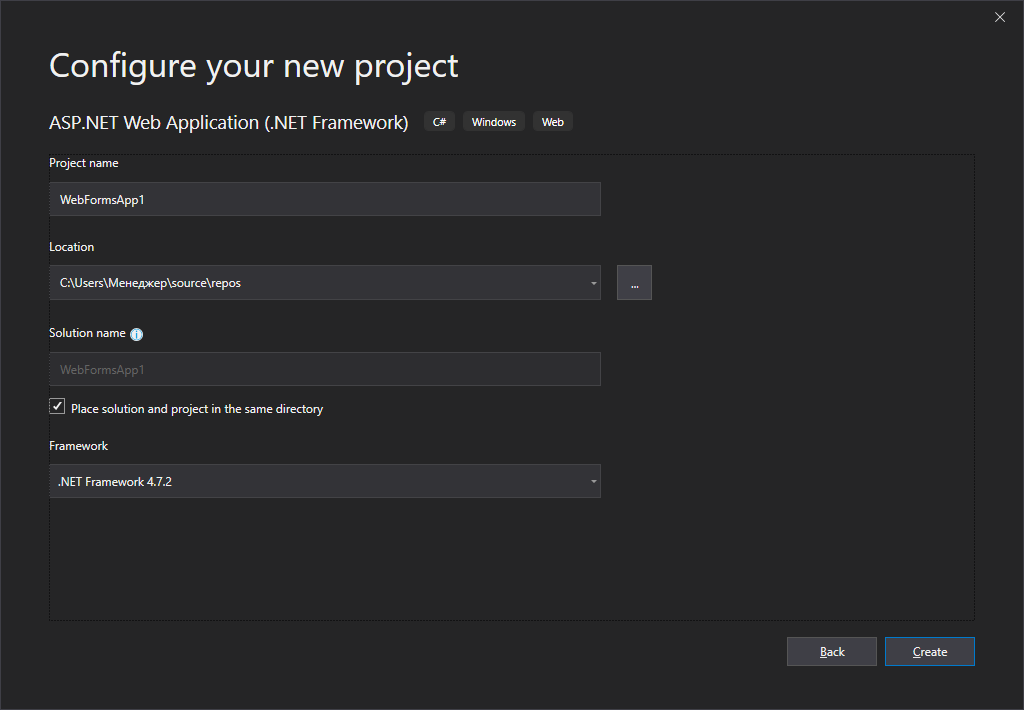
А потом выберите модель Web Forms:
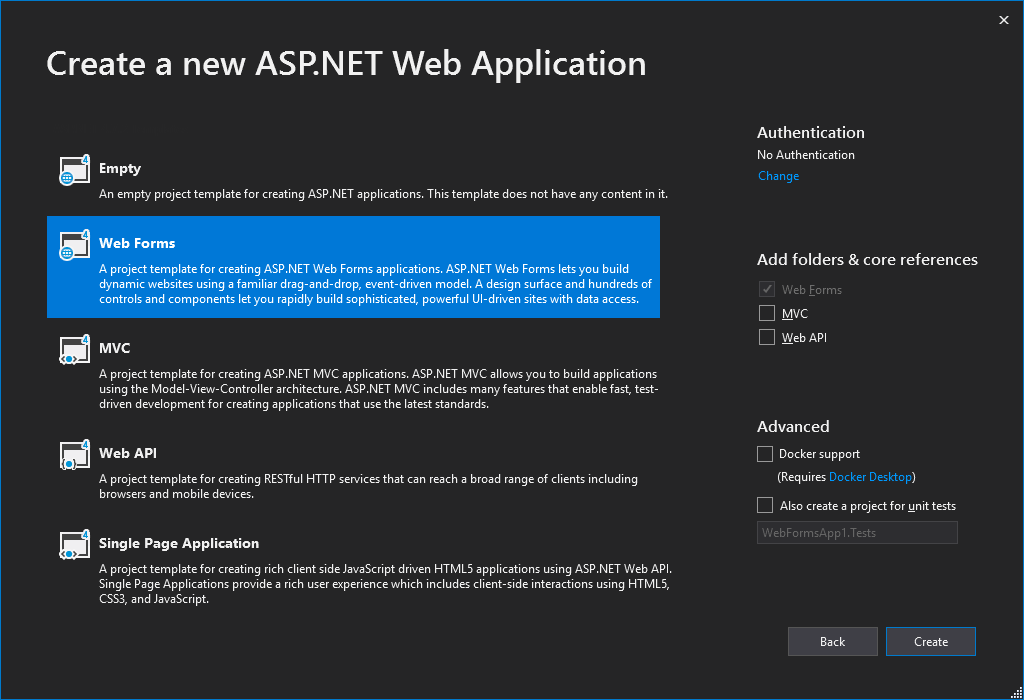
Как только Visual Studio подготовит шаблон проекта, его можно будет запустить, чтобы проверить. Для этого нажмите кнопку IIS Express:
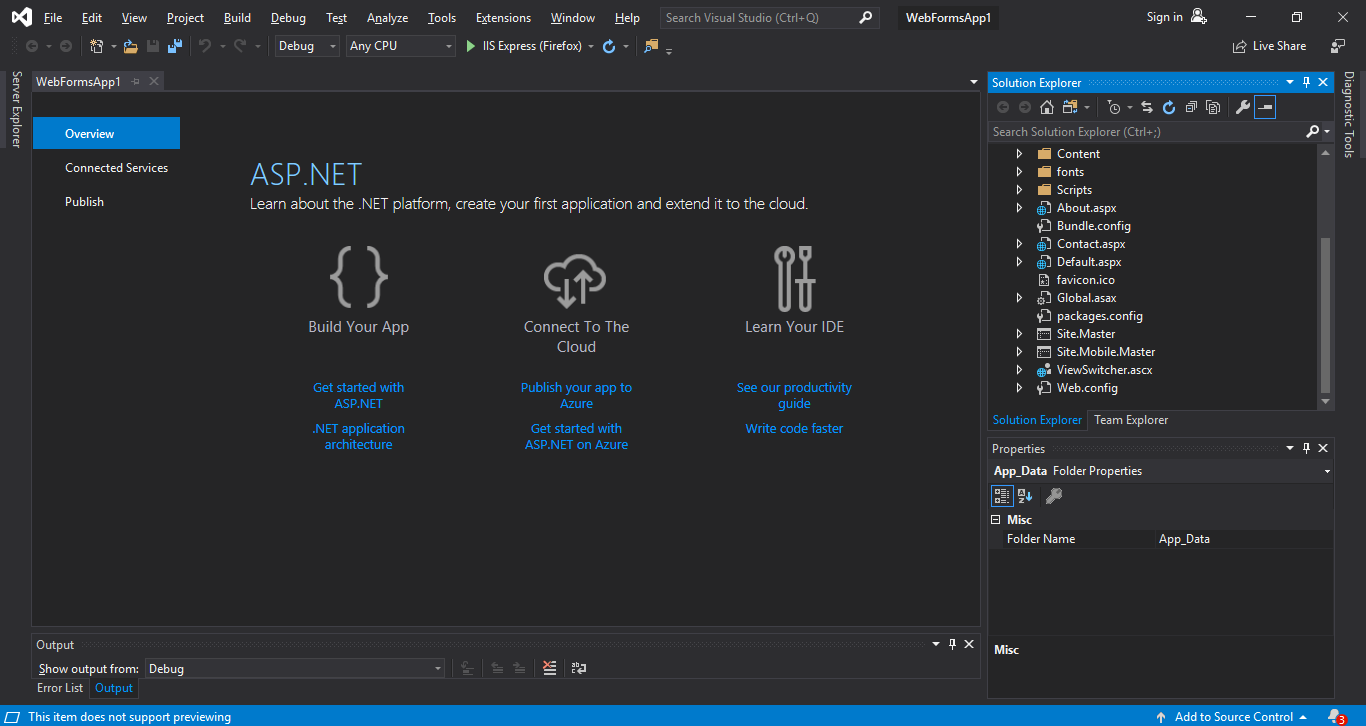
Visual Studio скомпилирует все файлы, запустит сайт и откроет его в браузере по умолчанию. Если сайт не открылся, на него можно перейти самостоятельно. Для этого в трее найдите иконку IIS Express и посмотрите там адрес сайта. Он должен быть примерно таким: http://localhost:5000 (цифры в конце могут отличаться).
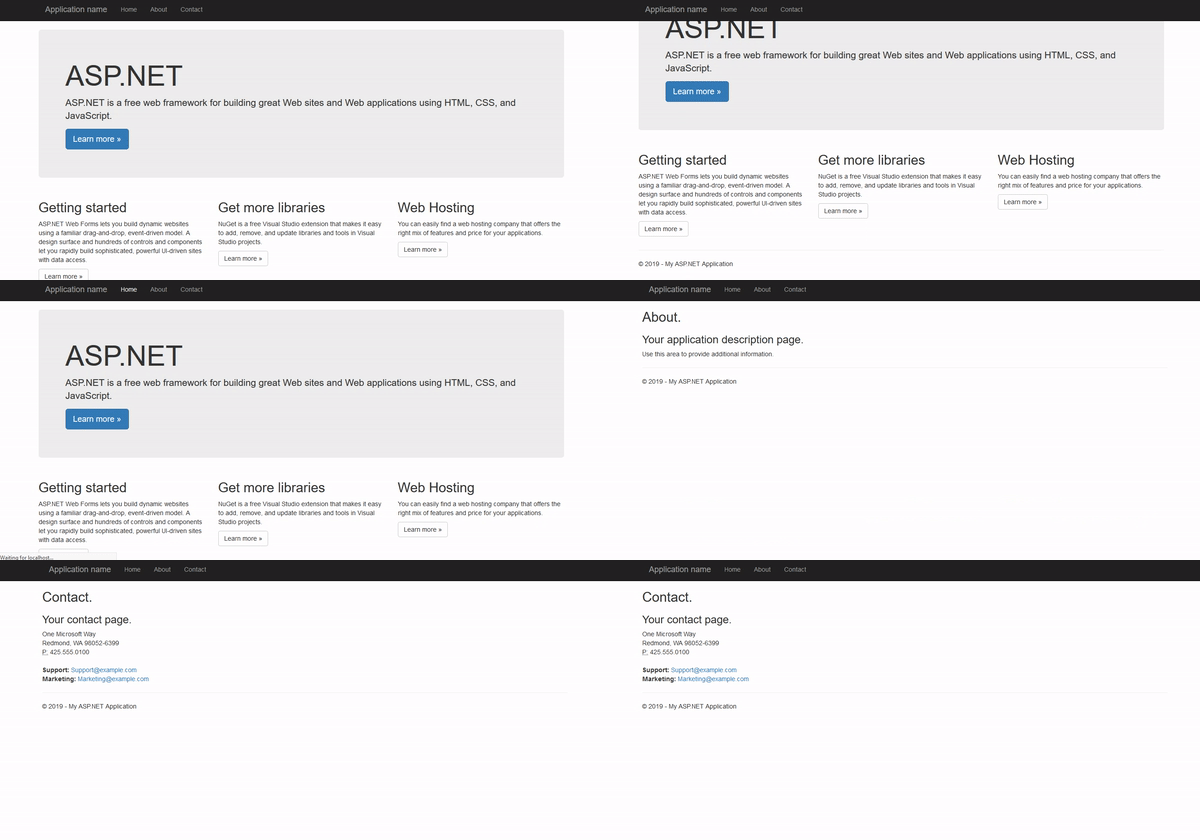
Вот как выглядит шаблон сайта:
Тут уже есть несколько страниц и немного стилей. Каждая страница состоит из трех файлов:
- Page.aspx. Файл с HTML-кодом страницы.
- Page.aspx.cs. Класс, который отвечает за логику работы страницы.
- Page.aspx.designer.cs. Класс, который служит прослойкой между HTML и C#.
Вот как выглядит About.aspx этого проекта:
<%@ Page Title="About" Language="C#" MasterPageFile="~/Site.Master" AutoEventWireup="true" CodeBehind="About.aspx.cs" Inherits="WebFormsApp1.About" %> <!--информация о файле-->

<asp:Content ID="BodyContent" ContentPlaceHolderID="MainContent" runat="server">
	<h2><%: Title %>.</h2><!--Вывод свойства-->
	<h3>Your application description page.</h3>
	<p>Use this area to provide additional information.</p>
	<p><%: Text %></p><!--Вывод свойства-->
</asp:Content>
А вот класс, который занимается логикой:
namespace WebFormsApp1
{
	public partial class About : Page //Класс
	{
		public string Text; //Свойство
		protected void Page_Load(object sender, EventArgs e) //Метод, который запускается при загрузке страницы
		{
			Text = "Hello, World!"; //При загрузке задается значение свойству Text
		}
	}
}
В About.aspx находится только фрагмент готовой страницы. Остальная часть располагается в файле Site.Master или Site.Mobile.Master. Контент из тега <asp:Content> (About.aspx) встраивается на место тега <asp:ContentPlaceHolder> (Site.Master) с идентичным ID:
<asp:ContentPlaceHolder ID="MainContent"
runat="server"></asp:ContentPlaceHolder>
Так на одной странице может быть несколько таких плейсхолдеров с разными ID: MainContent, RelevantArticles, Comments и так далее. Это позволяет легко управлять отдельными блоками страницы (как при использовании функции include () в PHP).
Чтобы создать другие страницы, нажмите правой кнопкой на название проекта и в контекстном меню выберите Add —> Web Form:
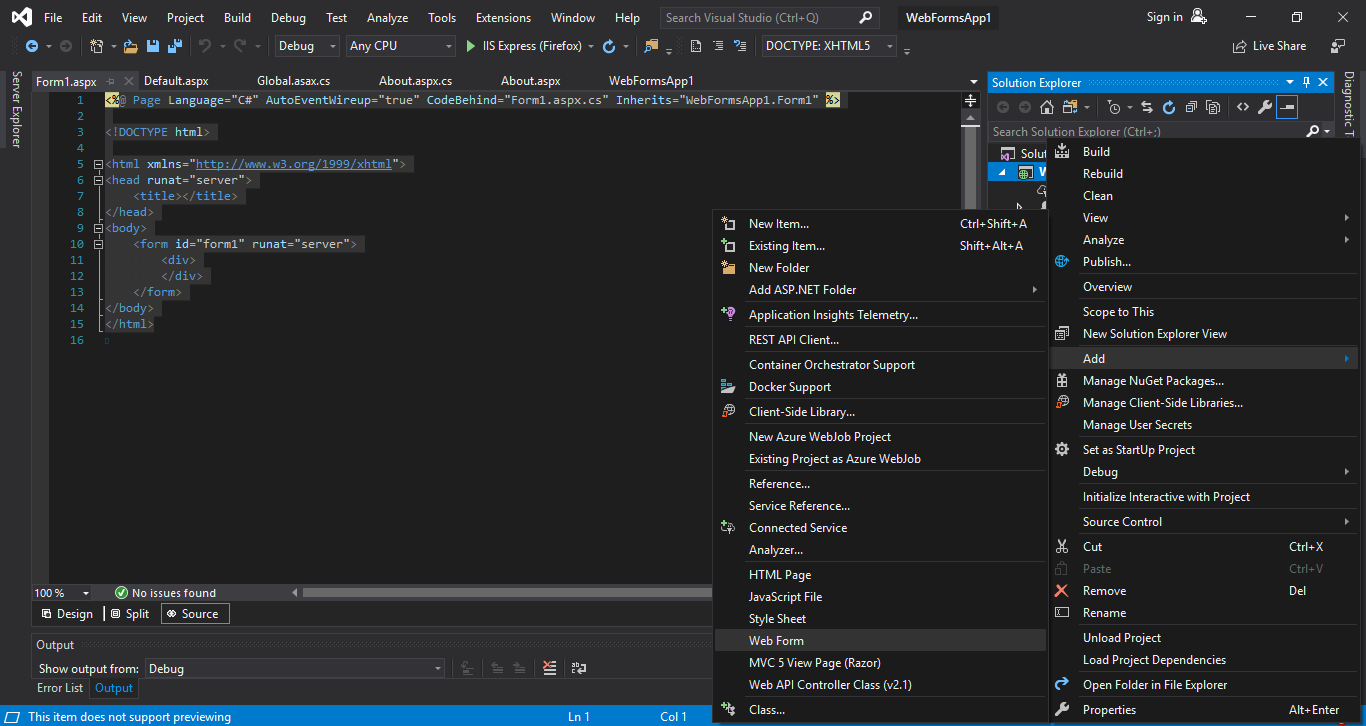
Будет создана страница с таким кодом:
<%@ Page Language="C#" AutoEventWireup="true" CodeBehind="Form1.aspx.cs" Inherits="WebFormsApp1.Form1" %>

<!DOCTYPE html>

<html xmlns="http://www.w3.org/1999/xhtml">
	<head runat="server">
		<title></title>
	</head>
	<body>
		<form id="form1" runat="server">
			<div>
			</div>
		</form>
	</body>
</html>
В этой странице нет тега <asp:Content>, поэтому шаблон из файла Site.Master отображаться не будет. Чтобы изменить это, можно скопировать код из About.aspx.
Меню находится в Site.Master:
<ul class="nav navbar-nav">
	<li><a runat="server" href="~/">Home</a></li>
	<li><a runat="server" href="~/About">About</a></li>
	<li><a runat="server" href="~/Contact">Contact</a></li>
	<li><a runat="server" href="~/Form1">Form1</a></li>
</ul>
В начале ссылки ставится знак «~», а название файла указывается без расширения.
Обратите внимание, что в других файлах знак тильды в начале ставить не нужно.
Допустим, есть такая строка:
Если ее вывести, то пользователь увидит текст «<b>Hello, World!</b>», а не жирный шрифт. Чтобы передать в HTML-код строку вместе с тегом, нужно использовать не обычный тип string, а HtmlString:
HtmlString PageContent = new HtmlString("<b>Hello, World!</b>");
Дальше нужно получить данные из URL. Например, в ссылке /Article? id=1 хранится свойство id, которое необходимо, чтобы выбрать из базы данных статью с определенным идентификатором.
Получить это свойство можно с помощью статического класса Request (в нем хранятся и другие данные о запросе пользователя):
Request.QueryString["id"]
Перед тем как использовать значение, нужно проверить, существует ли оно, а потом привести его к необходимому типу:
if (!string.IsNullOrEmpty(Request.QueryString["id"])) //Если значение не пустое
{
	try
	{
		int id = Convert.ToInt32(Request.QueryString["id"]); //Попытка конвертировать строку в число
	}
	catch (Exception exc)
	{

	}
}
Теперь значение можно использовать, чтобы открывать статьи по ссылке.
Описанного выше достаточно, чтобы добавить возможность получать и выводить статьи из базы данных. Для этого создайте класс Article:
public class Article
{
	public int ID;
	public string Title;
	public string Text;

	public Article()
	{
		this.ID = 0;
		this.Title = "No such article";
		this.Text = "Wrong article ID!";
	}

	public Article(int id, string title, string text)
	{
		this.ID = id;
		this.Title = title;
		this.Text = text;
	}
}
Затем добавьте таблицу в базе данных с идентичными полями:
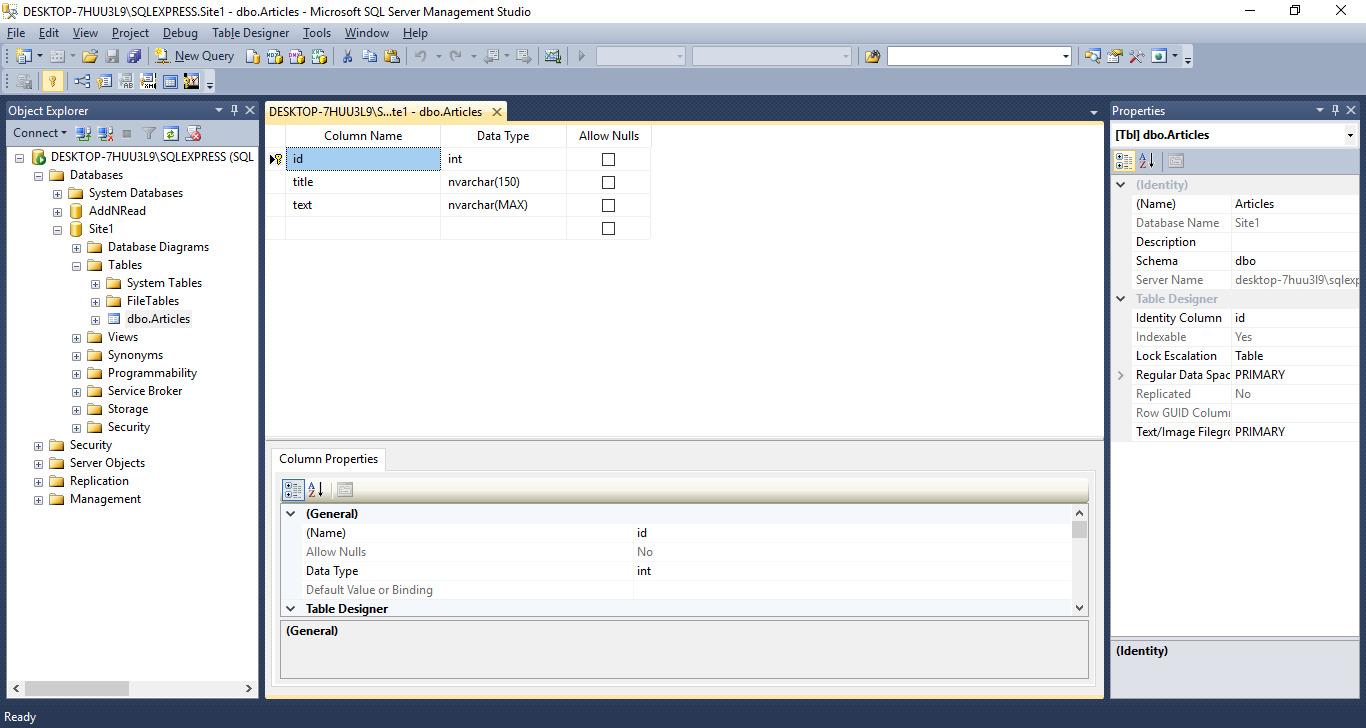
Теперь можно создать класс для получения данных из СУБД:
public static class Database
{
	private static readonly string cs = @"Data Source=.\SQLEXPRESS;Initial Catalog=Site1;Integrated Security=True;"; //Строка с данными о подключении

	public static List<Article> Load() //Метод для получения списка статей
	{
		List<Article> articles = new List<Article>(); //Создание пустого списка

		using (SqlConnection connection = new SqlConnection(cs)) //Создание подключения
		{
			try
			{
				connection.Open();
				SqlCommand command = new SqlCommand("SELECT * FROM articles", connection); //Команда для получения списка статей

				using (SqlDataReader reader = command.ExecuteReader()) //Выполнение запроса
				{
					if (reader.HasRows)
					{
						while (reader.Read()) //Чтение всех полученных записей
						{
							articles.Add(new Article(reader.GetInt32(0), reader.GetString(1), reader.GetString(2))); //Добавление статьи в список
						}
					}
				}
			}
			catch (Exception exc)
			{

			}

		}

		return articles; //Возвращение списка
	}

	public static Article Load(int id) //Метод загрузки конкретной статьи
	{
		Article article = new Article();

		using (SqlConnection connection = new SqlConnection(cs))
		{
			try
			{
				connection.Open();
				SqlCommand command = new SqlCommand("SELECT * FROM articles WHERE id = @id", connection);

				command.Parameters.Add(new SqlParameter("@id", id));

				using(SqlDataReader reader = command.ExecuteReader())
				{
					if (reader.HasRows)
					{
						reader.Read();
						article = new Article(reader.GetInt32(0), reader.GetString(1), reader.GetString(2));
					}
				}
			}
			catch (Exception exc)
			{

			}

		}
		return article;
	}
}
Теперь можно перейти в код страницы и добавить получение и вывод статей в методе Page_OnLoad ():
if (!string.IsNullOrEmpty(Request.QueryString["id"])) //Если есть id в url
{
	Article article = new Article();
	try
	{
		int id = Convert.ToInt32(Request.QueryString["id"]); //Получение ID
		article = Database.Load(id); //Загрузка статьи

		Title = article.Title; //Вывод информации
		PageContent = new HtmlString(article.Text);

	}
	catch (Exception exc)
	{

	}
}
else //Если нет id, то выводится список статей
{
	Title = "Articles";

	List<Article> articles = Database.Load();
	if (articles.Count >= 1)
	{
		string text = "";
		foreach (Article article in articles)
		{
			text += $"<a href='?id={article.ID}'>{article.Title}</a><br>";
		}
		PageContent = new HtmlString(text);
	}
	else
	{
		PageContent = new HtmlString("There are no articles yet!");
	}
}
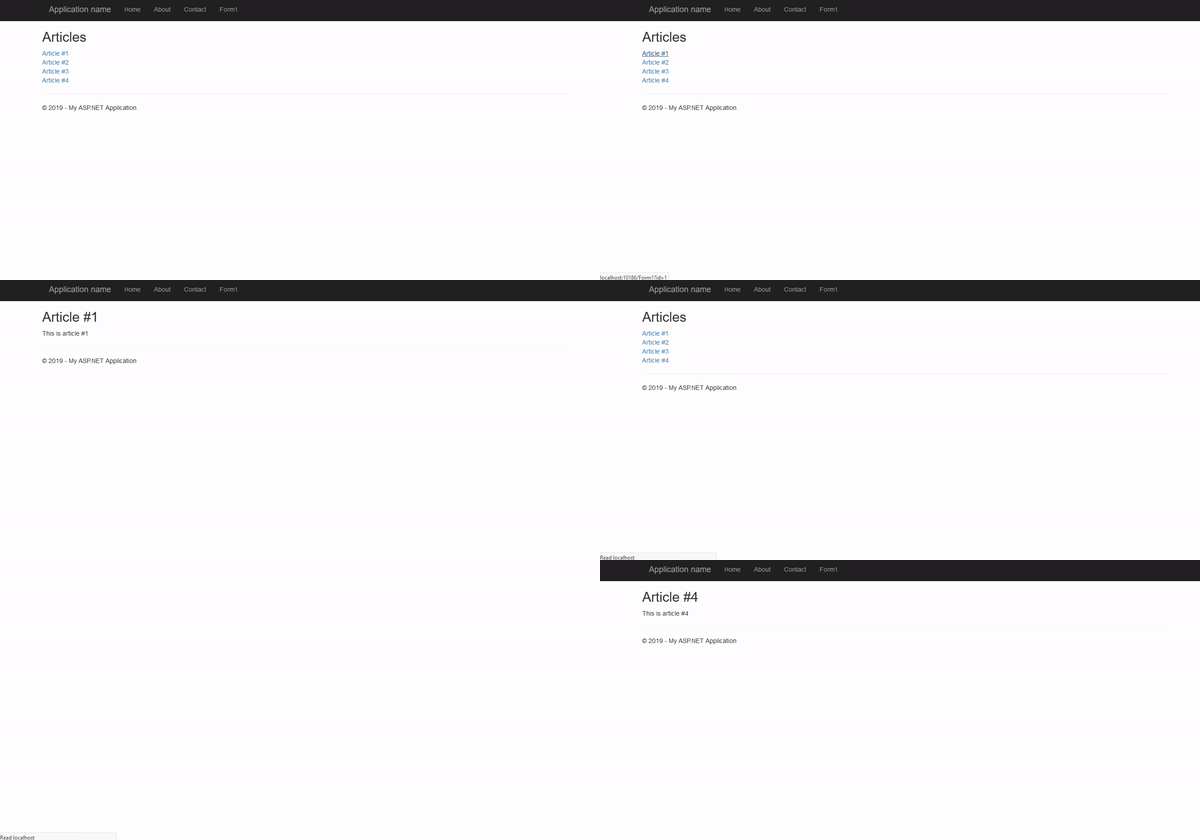
Вот как это работает:
Вот так примерно за час создается простой сайт с подключением к базе данных и выводом статей. Основная логика готова, но, чтобы выложить его в сеть, нужно еще позаботиться:
- о внешнем виде;
- ограничении количества выводимых статей;
- админской панели;
- наполнении страниц и других важных вещах.

Как зарабатывать больше с помощью нейросетей?
Бесплатный вебинар: 15 экспертов, 7 топ-нейросетей. Научитесь использовать ИИ в своей работе и увеличьте доход.
Узнать больше
Introduction
Several years ago, I got the “Pro ASP.NET Web API” book. This article is the offshoot of ideas from this book, a little CQRS, and my own experience developing client-server systems.
In this article, I’ll be covering:
- How to create a REST API from scratch using .NET Core, EF Core, AutoMapper, and XUnit
- How to be sure that the API works after changes
- How to simplify the development and support of the REST API system as much as possible
Why ASP.NET Core?
ASP.NET Core provides many improvements over the ASP.NET MVC/Web API. Firstly, it is now one framework and not two. I really like it because it is convenient and there is less confusion. Secondly, we have logging and DI containers without any additional libraries, which saves me time and allows me to concentrate on writing better code instead of choosing and analyzing the best libraries.
What Are Query Processors?
A query processor is an approach when all business logic relating to one entity of the system is encapsulated in one service and any access or actions with this entity are performed through this service. This service is usually called {EntityPluralName}QueryProcessor. If necessary, a query processor includes CRUD (create, read, update, delete) methods for this entity. Depending on the requirements, not all methods may be implemented. To give a specific example, let’s take a look at ChangePassword. If the method of a query processor requires input data, then only the required data should be provided. Usually, for each method, a separate query class is created, and in simple cases, it is possible (but not desirable) to reuse the query class.
Our Aim
In this article, I’ll show you how to make an API for a small cost management system, including basic settings for authentication and access control, but I will not go into the authentication subsystem. I will cover the whole business logic of the system with modular tests and create at least one integration test for each API method on an example of one entity.
Requirements for the developed system: The user can add, edit, delete his expenses and can see only their expenses.
The entire code of this system is available at on Github.
So, let’s start designing our small but very useful system.
API Layers
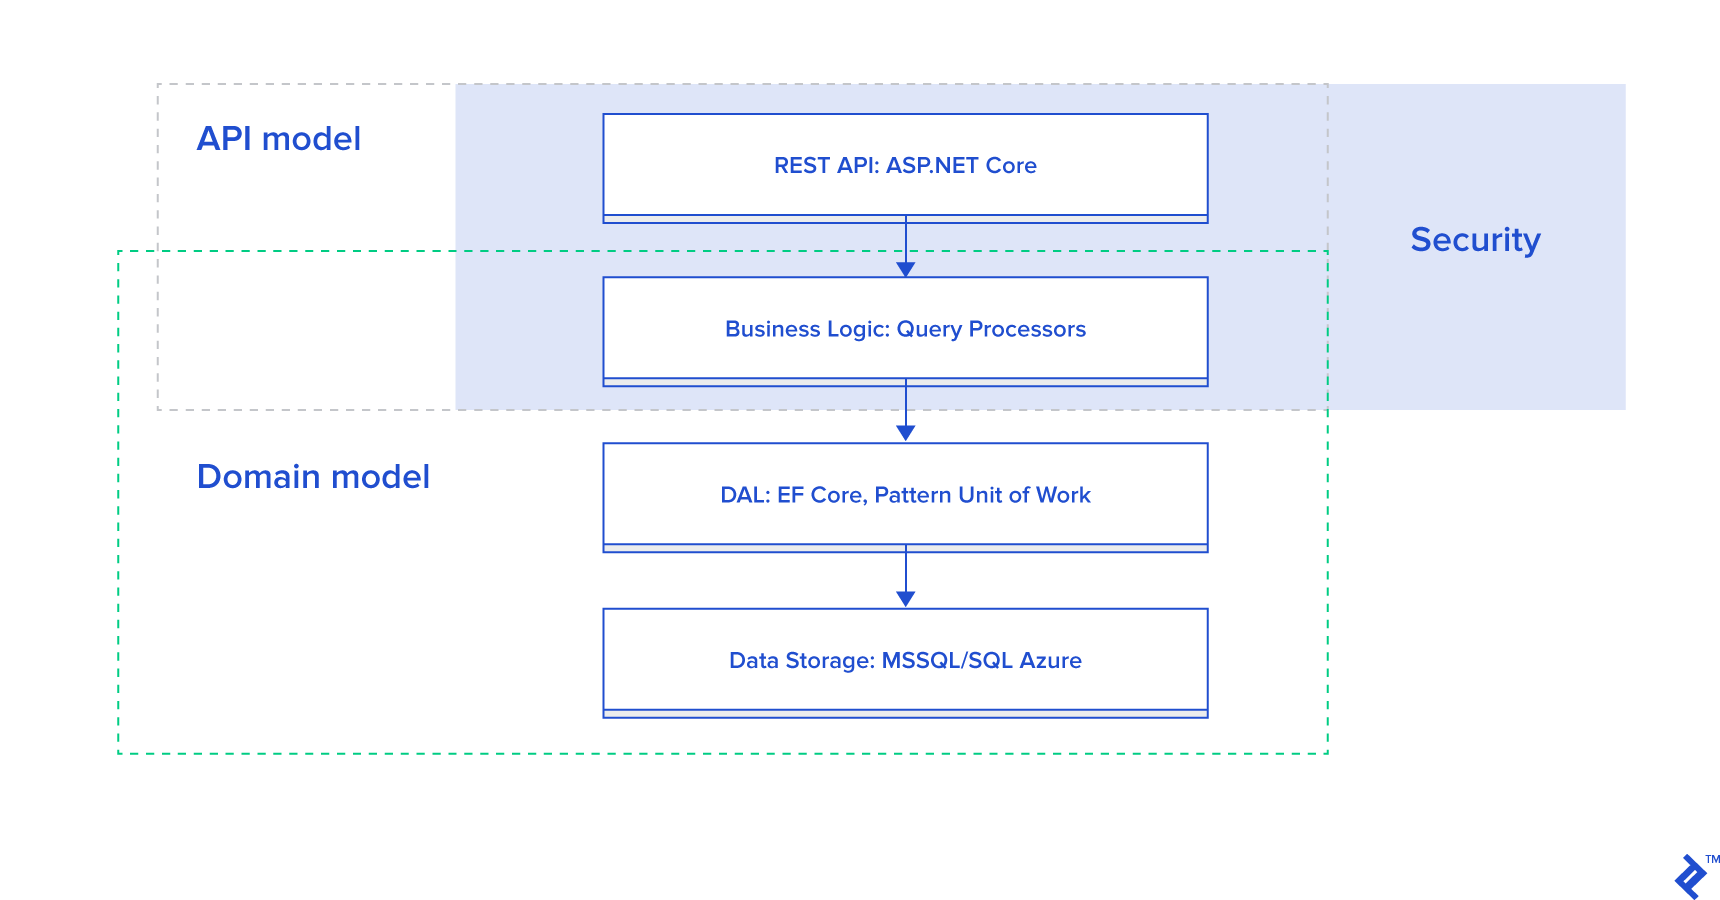
The diagram shows that the system will have four layers:
- Database — Here we store data and nothing more, no logic.
- DAL — To access the data, we use the Unit of Work pattern and, in the implementation, we use the ORM EF Core with code first and migration patterns.
- Business logic — to encapsulate business logic, we use query processors, only this layer processes business logic. The exception is the simplest validation such as mandatory fields, which will be executed by means of filters in the API.
- REST API — The actual interface through which clients can work with our API will be implemented through ASP.NET Core. Route configurations are determined by attributes.
In addition to the described layers, we have several important concepts. The first is the separation of data models. The client data model is mainly used in the REST API layer. It converts queries to domain models and vice versa from a domain model to a client data model, but query models can also be used in query processors. The conversion is done using AutoMapper.
Project Structure
I used VS 2017 Professional to create the project. I usually share the source code and tests on different folders. It’s comfortable, it looks good, the tests in CI run conveniently, and it seems that Microsoft recommends doing it this way:
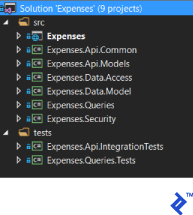
Project Description:
| Project | Description |
|---|---|
| Expenses | Project for controllers, mapping between domain model and API model, API configuration |
| Expenses.Api.Common | At this point, there are collected exception classes that are interpreted in a certain way by filters to return correct HTTP codes with errors to the user |
| Expenses.Api.Models | Project for API models |
| Expenses.Data.Access | Project for interfaces and implementation of the Unit of Work pattern |
| Expenses.Data.Model | Project for domain model |
| Expenses.Queries | Project for query processors and query-specific classes |
| Expenses.Security | Project for the interface and implementation of the current user’s security context |
References between projects:
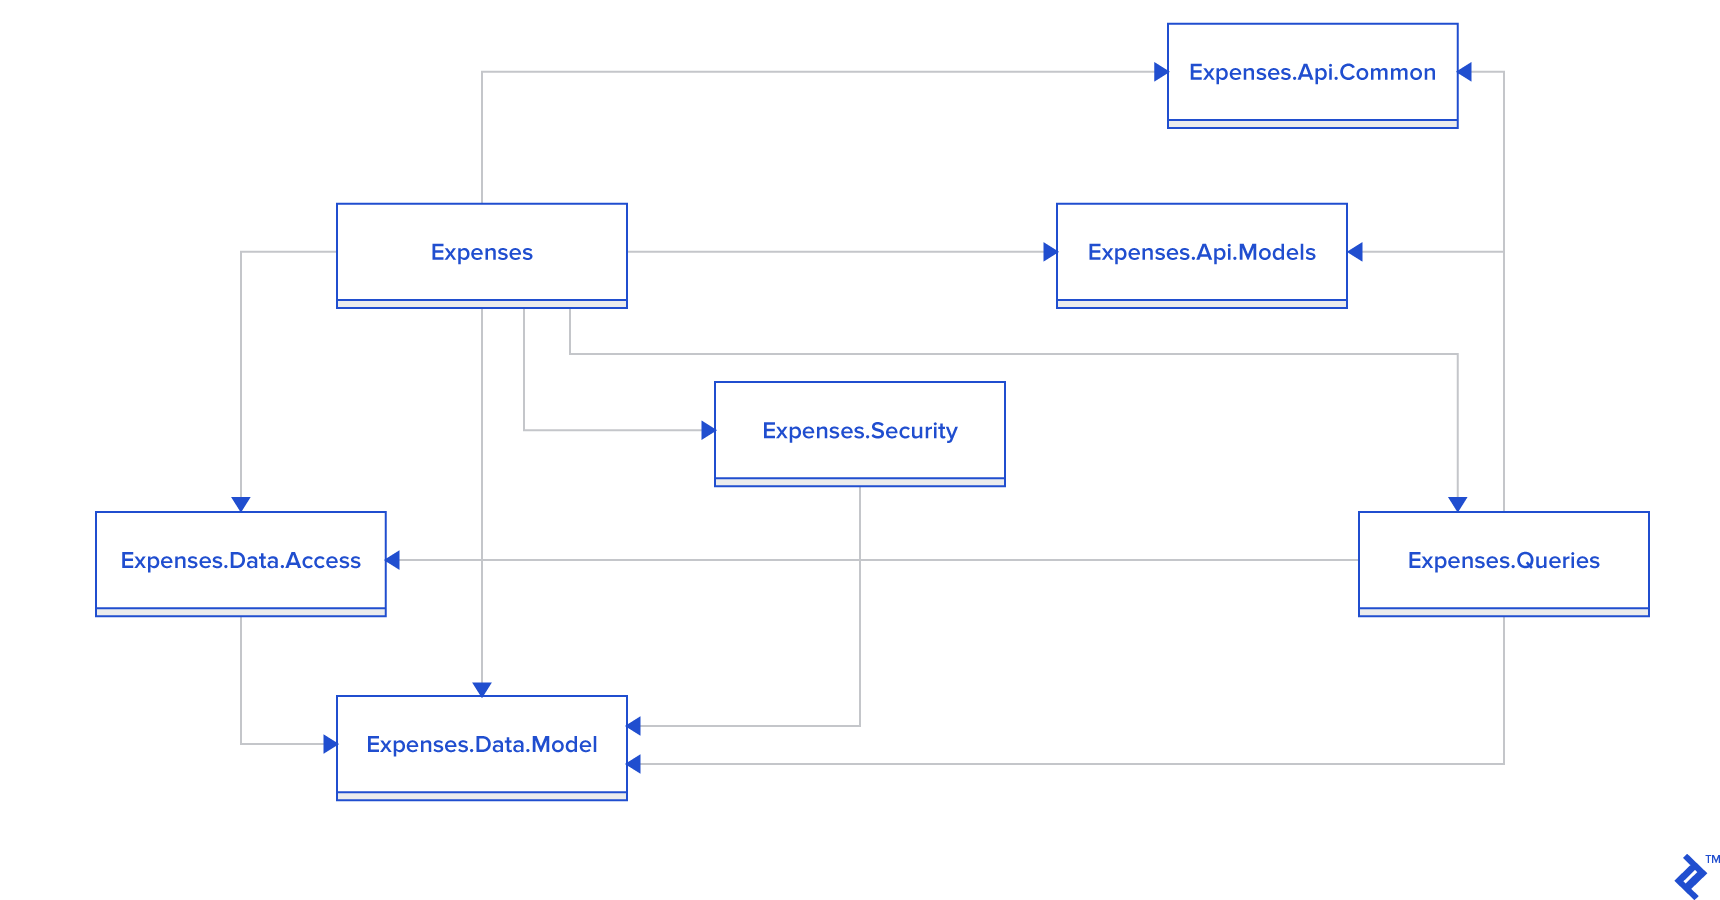
Expenses created from the template:

Other projects in the src folder by template:

All projects in the tests folder by template:

Implementation
This article will not describe the part associated with the UI, though it is implemented.
The first step was to develop a data model that is located in the assembly
Expenses.Data.Model:
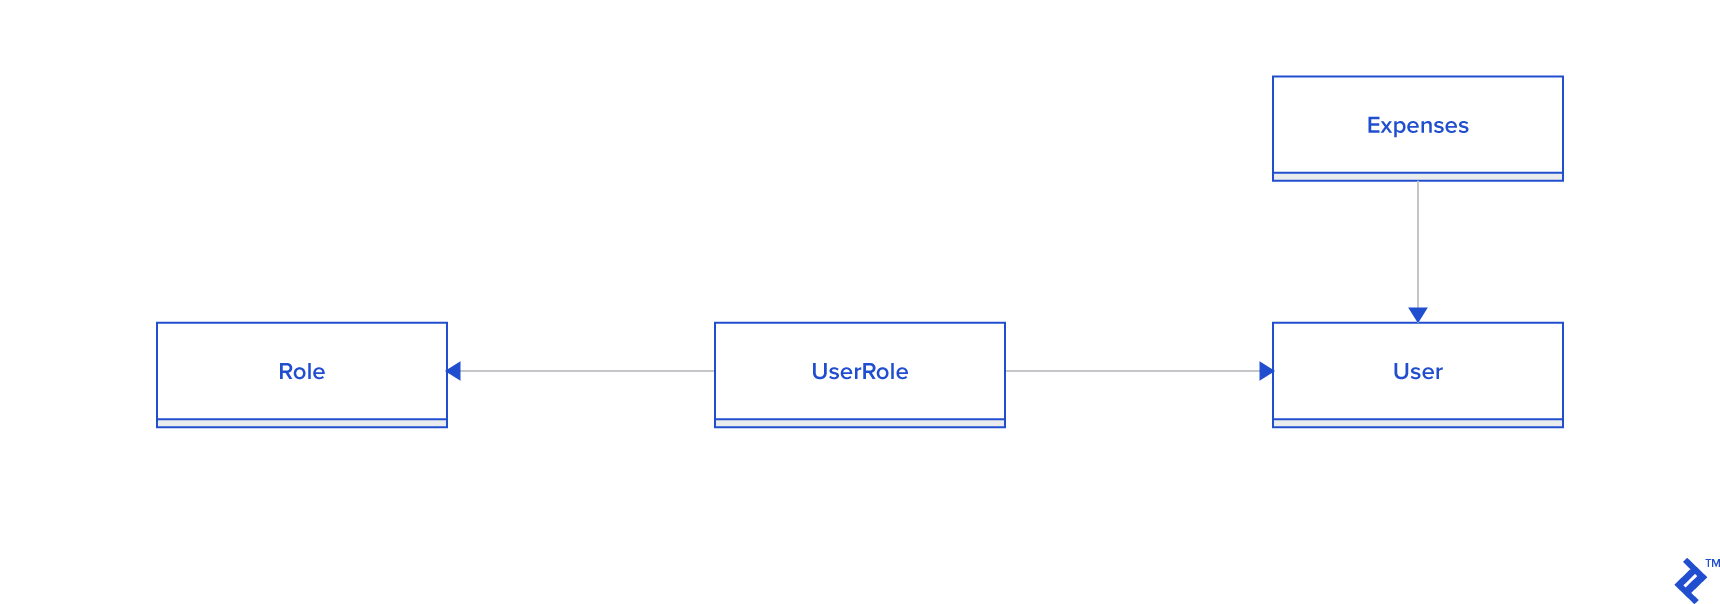
The Expense class contains the following attributes:
public class Expense
    {
        public int Id { get; set; }

        public DateTime Date { get; set; }
        public string Description { get; set; }
        public decimal Amount { get; set; }
        public string Comment { get; set; }

        public int UserId { get; set; }
        public virtual User User { get; set; }

        public bool IsDeleted { get; set; }
}
This class supports “soft deletion” by means of the IsDeleted attribute and contains all the data for one expense of a particular user that will be useful to us in the future.
The User, Role, and UserRole classes refer to the access subsystem; this system does not pretend to be the system of the year and the description of this subsystem is not the purpose of this article; therefore, the data model and some details of the implementation will be omitted. The system of access organization can be replaced by a more perfect one without changing the business logic.
Next, the Unit of Work template was implemented in the Expenses.Data.Access assembly, the structure of this project is shown:
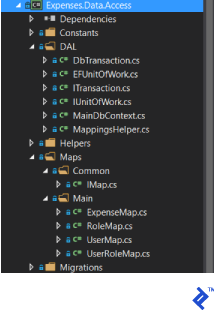
The following libraries are required for assembly:
Microsoft.EntityFrameworkCore.SqlServer
It is necessary to implement an EF context that will automatically find the mappings in a specific folder:
public class MainDbContext : DbContext
    {
        public MainDbContext(DbContextOptions<MainDbContext> options)
            : base(options)
        {
        }

        protected override void OnModelCreating(ModelBuilder modelBuilder)
        {
            var mappings = MappingsHelper.GetMainMappings();

            foreach (var mapping in mappings)
            {
                mapping.Visit(modelBuilder);
            }
        }
}
Mapping is done through the MappingsHelper class:
public static class MappingsHelper
    {
        public static IEnumerable<IMap> GetMainMappings()
        {
            var assemblyTypes = typeof(UserMap).GetTypeInfo().Assembly.DefinedTypes;
            var mappings = assemblyTypes
                // ReSharper disable once AssignNullToNotNullAttribute
                .Where(t => t.Namespace != null && t.Namespace.Contains(typeof(UserMap).Namespace))
                .Where(t => typeof(IMap).GetTypeInfo().IsAssignableFrom(t));
            mappings = mappings.Where(x => !x.IsAbstract);
            return mappings.Select(m => (IMap) Activator.CreateInstance(m.AsType())).ToArray();
        }
}
The mapping to the classes is in the Maps folder, and mapping for Expenses:
public class ExpenseMap : IMap
    {
        public void Visit(ModelBuilder builder)
        {
            builder.Entity<Expense>()
                .ToTable("Expenses")
                .HasKey(x => x.Id);
        }
}
Interface IUnitOfWork:
public interface IUnitOfWork : IDisposable
    {
        ITransaction BeginTransaction(IsolationLevel isolationLevel = IsolationLevel.Snapshot);

        void Add<T>(T obj) where T: class ;
        void Update<T>(T obj) where T : class;
        void Remove<T>(T obj) where T : class;
        IQueryable<T> Query<T>() where T : class;
        void Commit();
        Task CommitAsync();
        void Attach<T>(T obj) where T : class;
}
Its implementation is a wrapper for EF DbContext:
public class EFUnitOfWork : IUnitOfWork
    {
        private DbContext _context;

        public EFUnitOfWork(DbContext context)
        {
            _context = context;
        }

        public DbContext Context => _context;

        public ITransaction BeginTransaction(IsolationLevel isolationLevel = IsolationLevel.Snapshot)
        {
            return new DbTransaction(_context.Database.BeginTransaction(isolationLevel));
        }

        public void Add<T>(T obj)
            where T : class
        {
            var set = _context.Set<T>();
            set.Add(obj);
        }

        public void Update<T>(T obj)
            where T : class
        {
            var set = _context.Set<T>();
            set.Attach(obj);
            _context.Entry(obj).State = EntityState.Modified;
        }

        void IUnitOfWork.Remove<T>(T obj)
        {
            var set = _context.Set<T>();
            set.Remove(obj);
        }

        public IQueryable<T> Query<T>()
            where T : class
        {
            return _context.Set<T>();
        }

        public void Commit()
        {
            _context.SaveChanges();
        }

        public async Task CommitAsync()
        {
            await _context.SaveChangesAsync();
        }

        public void Attach<T>(T newUser) where T : class
        {
            var set = _context.Set<T>();
            set.Attach(newUser);
        }

        public void Dispose()
        {
            _context = null;
        }
}
The interface ITransaction implemented in this application will not be used:
public interface ITransaction : IDisposable
    {
        void Commit();
        void Rollback();
    }
Its implementation simply wraps the EF transaction:
public class DbTransaction : ITransaction
    {
        private readonly IDbContextTransaction _efTransaction;

        public DbTransaction(IDbContextTransaction efTransaction)
        {
            _efTransaction = efTransaction;
        }

        public void Commit()
        {
            _efTransaction.Commit();
        }

        public void Rollback()
        {
            _efTransaction.Rollback();
        }

        public void Dispose()
        {
            _efTransaction.Dispose();
        }
}
Also at this stage, for the unit tests, the ISecurityContext interface is needed, which defines the current user of the API (the project is Expenses.Security):
public interface ISecurityContext
{
        User User { get; }

        bool IsAdministrator { get; }
}
Next, you need to define the interface and implementation of the query processor, which will contain all the business logic for working with costs—in our case, IExpensesQueryProcessor and ExpensesQueryProcessor:
public interface IExpensesQueryProcessor
{
        IQueryable<Expense> Get();
        Expense Get(int id);
        Task<Expense> Create(CreateExpenseModel model);
        Task<Expense> Update(int id, UpdateExpenseModel model);
        Task Delete(int id);
}

public class ExpensesQueryProcessor : IExpensesQueryProcessor
    {
        public IQueryable<Expense> Get()
        {
            throw new NotImplementedException();
        }

        public Expense Get(int id)
        {
            throw new NotImplementedException();
        }

        public Task<Expense> Create(CreateExpenseModel model)
        {
            throw new NotImplementedException();
        }

        public Task<Expense> Update(int id, UpdateExpenseModel model)
        {
            throw new NotImplementedException();
        }

        public Task Delete(int id)
        {
            throw new NotImplementedException();
        }
}
The next step is to configure the Expenses.Queries.Tests assembly. I installed the following libraries:
- Moq
- FluentAssertions
Then in the Expenses.Queries.Tests assembly, we define the fixture for unit tests and describe our unit tests:
public class ExpensesQueryProcessorTests
{
        private Mock<IUnitOfWork> _uow;
        private List<Expense> _expenseList;
        private IExpensesQueryProcessor _query;
        private Random _random;
        private User _currentUser;
        private Mock<ISecurityContext> _securityContext;

        public ExpensesQueryProcessorTests()
        {
            _random = new Random();
            _uow = new Mock<IUnitOfWork>();

            _expenseList = new List<Expense>();
            _uow.Setup(x => x.Query<Expense>()).Returns(() => _expenseList.AsQueryable());

            _currentUser = new User{Id = _random.Next()};
            _securityContext = new Mock<ISecurityContext>(MockBehavior.Strict);
            _securityContext.Setup(x => x.User).Returns(_currentUser);
            _securityContext.Setup(x => x.IsAdministrator).Returns(false);

            _query = new ExpensesQueryProcessor(_uow.Object, _securityContext.Object);
        }

        [Fact]
        public void GetShouldReturnAll()
        {
            _expenseList.Add(new Expense{UserId = _currentUser.Id});

            var result = _query.Get().ToList();
            result.Count.Should().Be(1);
        }

        [Fact]
        public void GetShouldReturnOnlyUserExpenses()
        {
            _expenseList.Add(new Expense { UserId = _random.Next() });
            _expenseList.Add(new Expense { UserId = _currentUser.Id });

            var result = _query.Get().ToList();
            result.Count().Should().Be(1);
            result[0].UserId.Should().Be(_currentUser.Id);
        }

        [Fact]
        public void GetShouldReturnAllExpensesForAdministrator()
        {
            _securityContext.Setup(x => x.IsAdministrator).Returns(true);

            _expenseList.Add(new Expense { UserId = _random.Next() });
            _expenseList.Add(new Expense { UserId = _currentUser.Id });

            var result = _query.Get();
            result.Count().Should().Be(2);
        }

        [Fact]
        public void GetShouldReturnAllExceptDeleted()
        {
            _expenseList.Add(new Expense { UserId = _currentUser.Id });
            _expenseList.Add(new Expense { UserId = _currentUser.Id, IsDeleted = true});

            var result = _query.Get();
            result.Count().Should().Be(1);
        }

        [Fact]
        public void GetShouldReturnById()
        {
            var expense = new Expense { Id = _random.Next(), UserId = _currentUser.Id };
            _expenseList.Add(expense);

            var result = _query.Get(expense.Id);
            result.Should().Be(expense);
        }

        [Fact]
        public void GetShouldThrowExceptionIfExpenseOfOtherUser()
        {
            var expense = new Expense { Id = _random.Next(), UserId = _random.Next() };
            _expenseList.Add(expense);

            Action get = () =>
            {
                _query.Get(expense.Id);
            };

            get.ShouldThrow<NotFoundException>();
        }

        [Fact]
        public void GetShouldThrowExceptionIfItemIsNotFoundById()
        {
            var expense = new Expense { Id = _random.Next(), UserId = _currentUser.Id };
            _expenseList.Add(expense);

            Action get = () =>
            {
                _query.Get(_random.Next());
            };

            get.ShouldThrow<NotFoundException>();
        }

        [Fact]
        public void GetShouldThrowExceptionIfUserIsDeleted()
        {
            var expense = new Expense { Id = _random.Next(), UserId = _currentUser.Id, IsDeleted = true};
            _expenseList.Add(expense);

            Action get = () =>
            {
                _query.Get(expense.Id);
            };

            get.ShouldThrow<NotFoundException>();
        }

        [Fact]
        public async Task CreateShouldSaveNew()
        {
            var model = new CreateExpenseModel
            {
                Description = _random.Next().ToString(),
                Amount = _random.Next(),
                Comment = _random.Next().ToString(),
                Date = DateTime.Now
            };

            var result = await _query.Create(model);

            result.Description.Should().Be(model.Description);
            result.Amount.Should().Be(model.Amount);
            result.Comment.Should().Be(model.Comment);
            result.Date.Should().BeCloseTo(model.Date);
            result.UserId.Should().Be(_currentUser.Id);

            _uow.Verify(x => x.Add(result));
            _uow.Verify(x => x.CommitAsync());
        }

        [Fact]
        public async Task UpdateShouldUpdateFields()
        {
            var user = new Expense {Id = _random.Next(), UserId = _currentUser.Id};
            _expenseList.Add(user);

            var model = new UpdateExpenseModel
            {
                Comment = _random.Next().ToString(),
                Description = _random.Next().ToString(),
                Amount = _random.Next(),
                Date = DateTime.Now
            };

            var result = await _query.Update(user.Id, model);

            result.Should().Be(user);
            result.Description.Should().Be(model.Description);
            result.Amount.Should().Be(model.Amount);
            result.Comment.Should().Be(model.Comment);
            result.Date.Should().BeCloseTo(model.Date);

            _uow.Verify(x => x.CommitAsync());
        }

        [Fact]
        public void UpdateShoudlThrowExceptionIfItemIsNotFound()
        {
            Action create = () =>
            {
                var result = _query.Update(_random.Next(), new UpdateExpenseModel()).Result;
            };

            create.ShouldThrow<NotFoundException>();
        }

        [Fact]
        public async Task DeleteShouldMarkAsDeleted()
        {
            var user = new Expense() { Id = _random.Next(), UserId = _currentUser.Id};
            _expenseList.Add(user);

            await _query.Delete(user.Id);

            user.IsDeleted.Should().BeTrue();

            _uow.Verify(x => x.CommitAsync());
        }

        [Fact]
        public async Task DeleteShoudlThrowExceptionIfItemIsNotBelongTheUser()
        {
            var expense = new Expense() { Id = _random.Next(), UserId = _random.Next() };
            _expenseList.Add(expense);

            Action execute = () =>
            {
                _query.Delete(expense.Id).Wait();
            };

            execute.ShouldThrow<NotFoundException>();
        }

        [Fact]
        public void DeleteShoudlThrowExceptionIfItemIsNotFound()
        {
            Action execute = () =>
            {
                _query.Delete(_random.Next()).Wait();
            };

            execute.ShouldThrow<NotFoundException>();
}
After the unit tests are described, the implementation of a query processor is described:
public class ExpensesQueryProcessor : IExpensesQueryProcessor
{
        private readonly IUnitOfWork _uow;
        private readonly ISecurityContext _securityContext;

        public ExpensesQueryProcessor(IUnitOfWork uow, ISecurityContext securityContext)
        {
            _uow = uow;
            _securityContext = securityContext;
        }

        public IQueryable<Expense> Get()
        {
            var query = GetQuery();
            return query;
        }

        private IQueryable<Expense> GetQuery()
        {
            var q = _uow.Query<Expense>()
                .Where(x => !x.IsDeleted);

            if (!_securityContext.IsAdministrator)
            {
                var userId = _securityContext.User.Id;
                q = q.Where(x => x.UserId == userId);
            }

            return q;
        }

        public Expense Get(int id)
        {
            var user = GetQuery().FirstOrDefault(x => x.Id == id);

            if (user == null)
            {
                throw new NotFoundException("Expense is not found");
            }

            return user;
        }

        public async Task<Expense> Create(CreateExpenseModel model)
        {
            var item = new Expense
            {
                UserId = _securityContext.User.Id,
                Amount = model.Amount,
                Comment = model.Comment,
                Date = model.Date,
                Description = model.Description,
            };

            _uow.Add(item);
            await _uow.CommitAsync();

            return item;
        }

        public async Task<Expense> Update(int id, UpdateExpenseModel model)
        {
            var expense = GetQuery().FirstOrDefault(x => x.Id == id);

            if (expense == null)
            {
                throw new NotFoundException("Expense is not found");
            }

            expense.Amount = model.Amount;
            expense.Comment = model.Comment;
            expense.Description = model.Description;
            expense.Date = model.Date;

            await _uow.CommitAsync();
            return expense;
        }

        public async Task Delete(int id)
        {
            var user = GetQuery().FirstOrDefault(u => u.Id == id);

            if (user == null)
            {
                throw new NotFoundException("Expense is not found");
            }

            if (user.IsDeleted) return;

            user.IsDeleted = true;
            await _uow.CommitAsync();
    }
}
Once the business logic is ready, I start writing the API integration tests to determine the API contract.
The first step is to prepare a project Expenses.Api.IntegrationTests
- Install nuget packages:
- FluentAssertions
- Moq
- Microsoft.AspNetCore.TestHost
- Set up a project structure
- Create a CollectionDefinition with the help of which we determine the resource that will be created at the start of each test run and will be destroyed at the end of each test run.
[CollectionDefinition("ApiCollection")]
    public class DbCollection : ICollectionFixture<ApiServer>
    {   }
 ~~~

And define our test server and the client to it with the already authenticated user by default:
public class ApiServer : IDisposable
{
public const string Username = “admin”;
public const string Password = “admin”;
    private IConfigurationRoot _config;

    public ApiServer()
    {
        _config = new ConfigurationBuilder()
            .SetBasePath(Directory.GetCurrentDirectory())
            .AddJsonFile("appsettings.json")
            .Build();

        Server = new TestServer(new WebHostBuilder().UseStartup<Startup>());
        Client = GetAuthenticatedClient(Username, Password);
    }

    public HttpClient GetAuthenticatedClient(string username, string password)
    {
        var client = Server.CreateClient();
        var response = client.PostAsync("/api/Login/Authenticate",
            new JsonContent(new LoginModel {Password = password, Username = username})).Result;

        response.EnsureSuccessStatusCode();

        var data = JsonConvert.DeserializeObject<UserWithTokenModel>(response.Content.ReadAsStringAsync().Result);
        client.DefaultRequestHeaders.Add("Authorization", "Bearer " + data.Token);
        return client;
    }

    public HttpClient Client { get; private set; }

    public TestServer Server { get; private set; }

    public void Dispose()
    {
        if (Client != null)
        {
            Client.Dispose();
            Client = null;
        }

        if (Server != null)
        {
            Server.Dispose();
          Server = null;
        }
    }
}  ~~~
For the convenience of working with HTTP requests in integration tests, I wrote a helper:
public class HttpClientWrapper
    {
        private readonly HttpClient _client;

        public HttpClientWrapper(HttpClient client)
        {
            _client = client;
        }

        public HttpClient Client => _client;

        public async Task<T> PostAsync<T>(string url, object body)
        {
            var response = await _client.PostAsync(url, new JsonContent(body));

            response.EnsureSuccessStatusCode();

            var responseText = await response.Content.ReadAsStringAsync();
            var data = JsonConvert.DeserializeObject<T>(responseText);
            return data;
        }

        public async Task PostAsync(string url, object body)
        {
            var response = await _client.PostAsync(url, new JsonContent(body));

            response.EnsureSuccessStatusCode();
        }

        public async Task<T> PutAsync<T>(string url, object body)
        {
            var response = await _client.PutAsync(url, new JsonContent(body));

            response.EnsureSuccessStatusCode();

            var responseText = await response.Content.ReadAsStringAsync();
            var data = JsonConvert.DeserializeObject<T>(responseText);
            return data;
        }
}
At this stage, I need to define a REST API contract for each entity, I’ll write it for REST API expenses:
| URL | Method | Body type | Result type | Description |
|---|---|---|---|---|
| Expense | GET | — | DataResult<ExpenseModel> | Get all expenses with possible usage of filters and sorters in a query parameter «commands» |
| Expenses/{id} | GET | — | ExpenseModel | Get an expense by id |
| Expenses | POST | CreateExpenseModel | ExpenseModel | Create new expense record |
| Expenses/{id} | PUT | UpdateExpenseModel | ExpenseModel | Update an existing expense |
When you request a list of costs, you can apply various filtering and sorting commands using the AutoQueryable library. An example query with filtering and sorting:
/expenses?commands=take=25%26amount%3E=12%26orderbydesc=date
A decode commands parameter value is take=25&amount>=12&orderbydesc=date. So we can find paging, filtering, and sorting parts in the query. All the query options are very similar to OData syntax, but unfortunately, OData is not yet ready for .NET Core, so I’m using another helpful library.
The bottom shows all the models used in this API:
public class DataResult<T>
{
        public T[] Data { get; set; }
        public int Total { get; set; }
}

public class ExpenseModel
{
        public int Id { get; set; }
        public DateTime Date { get; set; }
        public string Description { get; set; }
        public decimal Amount { get; set; }
        public string Comment { get; set; }

        public int UserId { get; set; }
        public string Username { get; set; }
}

public class CreateExpenseModel
{
        [Required]
        public DateTime Date { get; set; }
        [Required]
        public string Description { get; set; }
        [Required]
        [Range(0.01, int.MaxValue)]
        public decimal Amount { get; set; }
        [Required]
        public string Comment { get; set; }
}

public class UpdateExpenseModel
{
        [Required]
        public DateTime Date { get; set; }
        [Required]
        public string Description { get; set; }
        [Required]
        [Range(0.01, int.MaxValue)]
        public decimal Amount { get; set; }
        [Required]
        public string Comment { get; set; }
}
Models CreateExpenseModel and UpdateExpenseModel use data annotation attributes to perform simple checks at the REST API level through attributes.
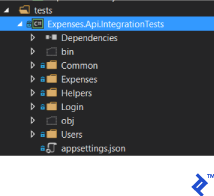
Next, for each HTTP method, a separate folder is created in the project and files in it are created by fixture for each HTTP method that is supported by the resource:
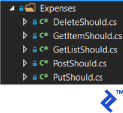
Implementation of the integration test for getting a list of expenses:
[Collection("ApiCollection")]
public class GetListShould
{
        private readonly ApiServer _server;
        private readonly HttpClient _client;

        public GetListShould(ApiServer server)
        {
            _server = server;
            _client = server.Client;
        }

        public static async Task<DataResult<ExpenseModel>> Get(HttpClient client)
        {
            var response = await client.GetAsync($"api/Expenses");
            response.EnsureSuccessStatusCode();
            var responseText = await response.Content.ReadAsStringAsync();
            var items = JsonConvert.DeserializeObject<DataResult<ExpenseModel>>(responseText);
            return items;
        }

        [Fact]
        public async Task ReturnAnyList()
        {
            var items = await Get(_client);
            items.Should().NotBeNull();
        }
 }
Implementation of the integration test for getting the expense data by id:
[Collection("ApiCollection")]
public class GetItemShould
{
        private readonly ApiServer _server;
        private readonly HttpClient _client;
        private Random _random;

        public GetItemShould(ApiServer server)
        {
            _server = server;
            _client = _server.Client;
            _random = new Random();
        }

        [Fact]
        public async Task ReturnItemById()
        {
            var item = await new PostShould(_server).CreateNew();

          var result = await GetById(_client, item.Id);

            result.Should().NotBeNull();
        }

        public static async Task<ExpenseModel> GetById(HttpClient client, int id)
        {
            var response = await client.GetAsync(new Uri($"api/Expenses/{id}", UriKind.Relative));
            response.EnsureSuccessStatusCode();

            var result = await response.Content.ReadAsStringAsync();
            return JsonConvert.DeserializeObject<ExpenseModel>(result);
        }

        [Fact]
        public async Task ShouldReturn404StatusIfNotFound()
        {
            var response = await _client.GetAsync(new Uri($"api/Expenses/-1", UriKind.Relative));

            response.StatusCode.ShouldBeEquivalentTo(HttpStatusCode.NotFound);
        }
}
Implementation of the integration test for creating an expense:
[Collection("ApiCollection")]
public class PostShould
{
        private readonly ApiServer _server;
        private readonly HttpClientWrapper _client;
        private Random _random;

        public PostShould(ApiServer server)
        {
            _server = server;
            _client = new HttpClientWrapper(_server.Client);
            _random = new Random();
        }

        [Fact]
        public async Task<ExpenseModel> CreateNew()
        {
            var requestItem = new CreateExpenseModel()
            {
                Amount = _random.Next(),
                Comment = _random.Next().ToString(),
                Date = DateTime.Now.AddMinutes(-15),
                Description = _random.Next().ToString()
            };

            var createdItem = await _client.PostAsync<ExpenseModel>("api/Expenses", requestItem);

            createdItem.Id.Should().BeGreaterThan(0);
            createdItem.Amount.Should().Be(requestItem.Amount);
            createdItem.Comment.Should().Be(requestItem.Comment);
            createdItem.Date.Should().Be(requestItem.Date);
            createdItem.Description.Should().Be(requestItem.Description);
            createdItem.Username.Should().Be("admin admin");

            return createdItem;
    }
}
Implementation of the integration test for changing an expense:
[Collection("ApiCollection")]
public class PutShould
{
        private readonly ApiServer _server;
        private readonly HttpClientWrapper _client;
        private readonly Random _random;

        public PutShould(ApiServer server)
        {
            _server = server;
            _client = new HttpClientWrapper(_server.Client);
            _random = new Random();
        }

        [Fact]
        public async Task UpdateExistingItem()
        {
         var item = await new PostShould(_server).CreateNew();

            var requestItem = new UpdateExpenseModel
            {
                Date = DateTime.Now,
                Description = _random.Next().ToString(),
                Amount = _random.Next(),
                Comment = _random.Next().ToString()
            };

            await _client.PutAsync<ExpenseModel>($"api/Expenses/{item.Id}", requestItem);

            var updatedItem = await GetItemShould.GetById(_client.Client, item.Id);

            updatedItem.Date.Should().Be(requestItem.Date);
            updatedItem.Description.Should().Be(requestItem.Description);

            updatedItem.Amount.Should().Be(requestItem.Amount);
            updatedItem.Comment.Should().Contain(requestItem.Comment);
    }
}
Implementation of the integration test for the removal of an expense:
[Collection("ApiCollection")]
public class DeleteShould
    {
        private readonly ApiServer _server;
        private readonly HttpClient _client;

        public DeleteShould(ApiServer server)
        {
            _server = server;
            _client = server.Client;
        }

        [Fact]
        public async Task DeleteExistingItem()
        {
            var item = await new PostShould(_server).CreateNew();

            var response = await _client.DeleteAsync(new Uri($"api/Expenses/{item.Id}", UriKind.Relative));
            response.EnsureSuccessStatusCode();
    }
}
At this point, we have fully defined the REST API contract and now I can start implementing it on the basis of ASP.NET Core.
API Implementation
Prepare the project Expenses. For this, I need to install the following libraries:
- AutoMapper
- AutoQueryable.AspNetCore.Filter
- Microsoft.ApplicationInsights.AspNetCore
- Microsoft.EntityFrameworkCore.SqlServer
- Microsoft.EntityFrameworkCore.SqlServer.Design
- Microsoft.EntityFrameworkCore.Tools
- Swashbuckle.AspNetCore
After that, you need to start creating the initial migration for the database by opening the Package Manager Console, switching to the Expenses.Data.Access project (because the EF context lies there) and running the Add-Migration InitialCreate command:

In the next step, prepare the configuration file appsettings.json in advance, which after the preparation will still need to be copied into the project Expenses.Api.IntegrationTests because from there, we will run the test instance API.
{
  "Logging": {
    "IncludeScopes": false,
    "LogLevel": {
      "Default": "Debug",
      "System": "Information",
      "Microsoft": "Information"
    }
  },
  "Data": {
    "main": "Data Source=.; Initial Catalog=expenses.main; Integrated Security=true; Max Pool Size=1000; Min Pool Size=12; Pooling=True;"
  },
  "ApplicationInsights": {
    "InstrumentationKey": "Your ApplicationInsights key"
  }
}
The logging section is created automatically. I added the Data section to store the connection string to the database and my ApplicationInsights key.
Application Configuration
You must configure different services available in our application:
Turning on of ApplicationInsights: services.AddApplicationInsightsTelemetry(Configuration);
Register your services through a call: ContainerSetup.Setup(services, Configuration);
ContainerSetup is a class created so we don’t have to store all service registrations in the Startup class. The class is located in the IoC folder of the Expenses project:
public static class ContainerSetup
    {
        public static void Setup(IServiceCollection services, IConfigurationRoot configuration)
        {
            AddUow(services, configuration);
            AddQueries(services);
            ConfigureAutoMapper(services);
            ConfigureAuth(services);
        }

        private static void ConfigureAuth(IServiceCollection services)
        {
            services.AddSingleton<IHttpContextAccessor, HttpContextAccessor>();
            services.AddScoped<ITokenBuilder, TokenBuilder>();
            services.AddScoped<ISecurityContext, SecurityContext>();
        }

        private static void ConfigureAutoMapper(IServiceCollection services)
        {
            var mapperConfig = AutoMapperConfigurator.Configure();
            var mapper = mapperConfig.CreateMapper();
            services.AddSingleton(x => mapper);
            services.AddTransient<IAutoMapper, AutoMapperAdapter>();
        }

        private static void AddUow(IServiceCollection services, IConfigurationRoot configuration)
        {
            var connectionString = configuration["Data:main"];

            services.AddEntityFrameworkSqlServer();

            services.AddDbContext<MainDbContext>(options =>
                options.UseSqlServer(connectionString));

            services.AddScoped<IUnitOfWork>(ctx => new EFUnitOfWork(ctx.GetRequiredService<MainDbContext>()));

            services.AddScoped<IActionTransactionHelper, ActionTransactionHelper>();
            services.AddScoped<UnitOfWorkFilterAttribute>();
        }

        private static void AddQueries(IServiceCollection services)
        {
            var exampleProcessorType = typeof(UsersQueryProcessor);
            var types = (from t in exampleProcessorType.GetTypeInfo().Assembly.GetTypes()
                where t.Namespace == exampleProcessorType.Namespace
                    && t.GetTypeInfo().IsClass
                    && t.GetTypeInfo().GetCustomAttribute<CompilerGeneratedAttribute>() == null
                select t).ToArray();

            foreach (var type in types)
            {
                var interfaceQ = type.GetTypeInfo().GetInterfaces().First();
                services.AddScoped(interfaceQ, type);
            }
        }
    }
Almost all the code in this class speaks for itself, but I would like to go into the ConfigureAutoMapper method a little more.
private static void ConfigureAutoMapper(IServiceCollection services)
        {
            var mapperConfig = AutoMapperConfigurator.Configure();
            var mapper = mapperConfig.CreateMapper();
            services.AddSingleton(x => mapper);
            services.AddTransient<IAutoMapper, AutoMapperAdapter>();
        }
This method uses the helper class to find all mappings between models and entities and vice versa and gets the IMapper interface to create the IAutoMapper wrapper that will be used in controllers. There is nothing special about this wrapper—it just provides a convenient interface to the AutoMapper methods.
public class AutoMapperAdapter : IAutoMapper
    {
        private readonly IMapper _mapper;

        public AutoMapperAdapter(IMapper mapper)
        {
            _mapper = mapper;
        }

        public IConfigurationProvider Configuration => _mapper.ConfigurationProvider;

        public T Map<T>(object objectToMap)
        {
            return _mapper.Map<T>(objectToMap);
        }

        public TResult[] Map<TSource, TResult>(IEnumerable<TSource> sourceQuery)
        {
            return sourceQuery.Select(x => _mapper.Map<TResult>(x)).ToArray();
        }

        public IQueryable<TResult> Map<TSource, TResult>(IQueryable<TSource> sourceQuery)
        {
            return sourceQuery.ProjectTo<TResult>(_mapper.ConfigurationProvider);
        }

        public void Map<TSource, TDestination>(TSource source, TDestination destination)
        {
            _mapper.Map(source, destination);
        }
}
To configure AutoMapper, the helper class is used, whose task is to search for mappings for specific namespace classes. All mappings are located in the folder Expenses/Maps:
public static class AutoMapperConfigurator
    {
        private static readonly object Lock = new object();
        private static MapperConfiguration _configuration;

        public static MapperConfiguration Configure()
        {
            lock (Lock)
            {
                if (_configuration != null) return _configuration;

                var thisType = typeof(AutoMapperConfigurator);

                var configInterfaceType = typeof(IAutoMapperTypeConfigurator);
                var configurators = thisType.GetTypeInfo().Assembly.GetTypes()
                    .Where(x => !string.IsNullOrWhiteSpace(x.Namespace))
                    // ReSharper disable once AssignNullToNotNullAttribute
                    .Where(x => x.Namespace.Contains(thisType.Namespace))
                    .Where(x => x.GetTypeInfo().GetInterface(configInterfaceType.Name) != null)
                    .Select(x => (IAutoMapperTypeConfigurator)Activator.CreateInstance(x))
                    .ToArray();

                void AggregatedConfigurator(IMapperConfigurationExpression config)
                {
                    foreach (var configurator in configurators)
                    {
                                configurator.Configure(config);
                    }
                }

                _configuration = new MapperConfiguration(AggregatedConfigurator);
                return _configuration;
            }
    }
}
All mappings must implement a specific interface:
public interface IAutoMapperTypeConfigurator
{
        void Configure(IMapperConfigurationExpression configuration);
}
An example of mapping from entity to model:
public class ExpenseMap : IAutoMapperTypeConfigurator
    {
        public void Configure(IMapperConfigurationExpression configuration)
        {
            var map = configuration.CreateMap<Expense, ExpenseModel>();
            map.ForMember(x => x.Username, x => x.MapFrom(y => y.User.FirstName + " " + y.User.LastName));
        }
}
Also, in the Startup.ConfigureServices method, authentication through JWT Bearer tokens is configured:
services.AddAuthorization(auth =>
            {
                auth.AddPolicy("Bearer", new AuthorizationPolicyBuilder()
                    .AddAuthenticationSchemes(JwtBearerDefaults.AuthenticationScheme)
                    .RequireAuthenticatedUser().Build());
            });
And the services registered the implementation of ISecurityContext, which will actually be used to determine the current user:
public class SecurityContext : ISecurityContext
{
        private readonly IHttpContextAccessor _contextAccessor;
        private readonly IUnitOfWork _uow;
        private User _user;

        public SecurityContext(IHttpContextAccessor contextAccessor, IUnitOfWork uow)
        {
            _contextAccessor = contextAccessor;
            _uow = uow;
        }

        public User User
        {
            get
            {
                if (_user != null) return _user;

                var username = _contextAccessor.HttpContext.User.Identity.Name;
                _user = _uow.Query<User>()
                    .Where(x => x.Username == username)
                    .Include(x => x.Roles)
                    .ThenInclude(x => x.Role)
                    .FirstOrDefault();

                if (_user == null)
                {
                    throw new UnauthorizedAccessException("User is not found");
                }

                return _user;
                }
        }

        public bool IsAdministrator
        {
                get { return User.Roles.Any(x => x.Role.Name == Roles.Administrator); }
        }
}
Also, we changed the default MVC registration a little in order to use a custom error filter to convert exceptions to the right error codes:
services.AddMvc(options => { options.Filters.Add(new ApiExceptionFilter()); });
Implementing the ApiExceptionFilter filter:
public class ApiExceptionFilter : ExceptionFilterAttribute
    {
        public override void OnException(ExceptionContext context)
        {
            if (context.Exception is NotFoundException)
            {
                // handle explicit 'known' API errors
                var ex = context.Exception as NotFoundException;
                context.Exception = null;

                context.Result = new JsonResult(ex.Message);
                context.HttpContext.Response.StatusCode = (int)HttpStatusCode.NotFound;
            }
            else if (context.Exception is BadRequestException)
            {
                // handle explicit 'known' API errors
                var ex = context.Exception as BadRequestException;
                context.Exception = null;

                context.Result = new JsonResult(ex.Message);
                context.HttpContext.Response.StatusCode = (int)HttpStatusCode.BadRequest;
            }
            else if (context.Exception is UnauthorizedAccessException)
            {
                context.Result = new JsonResult(context.Exception.Message);
                context.HttpContext.Response.StatusCode = (int)HttpStatusCode.Unauthorized;
            }
            else if (context.Exception is ForbiddenException)
            {
                context.Result = new JsonResult(context.Exception.Message);
                context.HttpContext.Response.StatusCode = (int)HttpStatusCode.Forbidden;
            }


            base.OnException(context);
        }
}
It’s important not to forget about Swagger, in order to get an excellent API description for other ASP.net developers:
services.AddSwaggerGen(c =>
            {
                c.SwaggerDoc("v1", new Info {Title = "Expenses", Version = "v1"});
                c.OperationFilter<AuthorizationHeaderParameterOperationFilter>();
            });
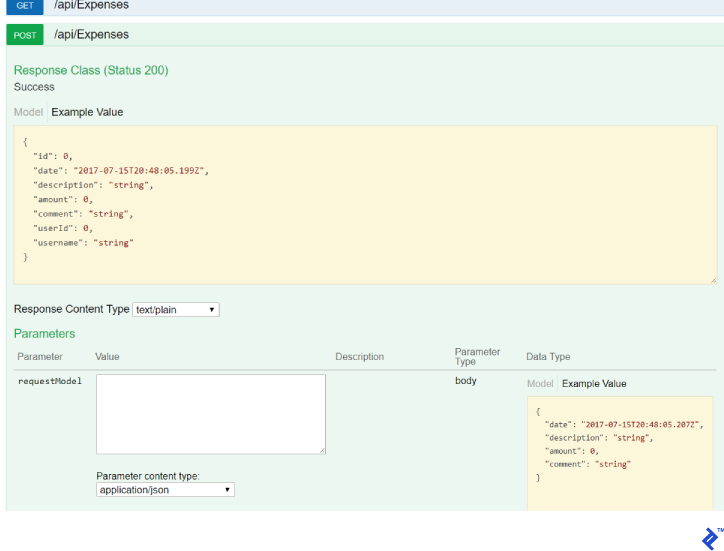
The Startup.Configure method adds a call to the InitDatabase method, which automatically migrates the database until the last migration:
private void InitDatabase(IApplicationBuilder app)
        {
            using (var serviceScope = app.ApplicationServices.GetRequiredService<IServiceScopeFactory>().CreateScope())
            {
                var context = serviceScope.ServiceProvider.GetService<MainDbContext>();
                context.Database.Migrate();
            }
   }
Swagger is turned on only if the application runs in the development environment and does not require authentication to access it:
app.UseSwagger();
app.UseSwaggerUI(c => { c.SwaggerEndpoint("/swagger/v1/swagger.json", "My API V1"); });
Next, we connect authentication (details can be found in the repository):
ConfigureAuthentication(app);
At this point, you can run integration tests and make sure that everything is compiled but nothing works and go to the controller ExpensesController.
Note: All controllers are located in the Expenses/Server folder and are conditionally divided into two folders: Controllers and RestApi. In the folder, controllers are controllers that work as controllers in the old good MVC—i.e., return the markup, and in RestApi, REST controllers.
You must create the Expenses/Server/RestApi/ExpensesController class and inherit it from the Controller class:
public class ExpensesController : Controller
{
}
Next, configure the routing of the ~ / api / Expenses type by marking the class with the attribute [Route ("api / [controller]")].
To access the business logic and mapper, you need to inject the following services:
private readonly IExpensesQueryProcessor _query;
private readonly IAutoMapper _mapper;

public ExpensesController(IExpensesQueryProcessor query, IAutoMapper mapper)
{
_query = query;
_mapper = mapper;
}
At this stage, you can start implementing methods. The first method is to obtain a list of expenses:
[HttpGet]
        [QueryableResult]
        public IQueryable<ExpenseModel> Get()
        {
            var result = _query.Get();
            var models = _mapper.Map<Expense, ExpenseModel>(result);
            return models;
        }
The implementation of the method is very simple, we get a query to the database which is mapped in the IQueryable <ExpenseModel> from ExpensesQueryProcessor, which in turn returns as a result.
The custom attribute here is QueryableResult, which uses the AutoQueryable library to handle paging, filtering, and sorting on the server side. The attribute is located in the folder Expenses/Filters. As a result, this filter returns data of type DataResult <ExpenseModel> to the API client.
public class QueryableResult : ActionFilterAttribute
    {
        public override void OnActionExecuted(ActionExecutedContext context)
        {
            if (context.Exception != null) return;

            dynamic query = ((ObjectResult)context.Result).Value;
            if (query == null) throw new Exception("Unable to retrieve value of IQueryable from context result.");
            Type entityType = query.GetType().GenericTypeArguments[0];

            var commands = context.HttpContext.Request.Query.ContainsKey("commands") ? context.HttpContext.Request.Query["commands"] : new StringValues();

            var data = QueryableHelper.GetAutoQuery(commands, entityType, query,
                new AutoQueryableProfile {UnselectableProperties = new string[0]});
            var total = System.Linq.Queryable.Count(query);
            context.Result = new OkObjectResult(new DataResult{Data = data, Total = total});
        }
}
Also, let’s look at the implementation of the Post method, creating a flow:
[HttpPost]
        [ValidateModel]
        public async Task<ExpenseModel> Post([FromBody]CreateExpenseModel requestModel)
        {
            var item = await _query.Create(requestModel);
            var model = _mapper.Map<ExpenseModel>(item);
            return model;
        }
Here, you should pay attention to the attribute ValidateModel, which performs simple validation of the input data in accordance with the data annotation attributes and this is done through the built-in MVC checks.
public class ValidateModelAttribute : ActionFilterAttribute
    {
        public override void OnActionExecuting(ActionExecutingContext context)
        {
            if (!context.ModelState.IsValid)
            {
                context.Result = new BadRequestObjectResult(context.ModelState);
            }
    }
}
Full code of ExpensesController:
[Route("api/[controller]")]
public class ExpensesController : Controller
{
        private readonly IExpensesQueryProcessor _query;
        private readonly IAutoMapper _mapper;

        public ExpensesController(IExpensesQueryProcessor query, IAutoMapper mapper)
        {
            _query = query;
            _mapper = mapper;
        }

        [HttpGet]
        [QueryableResult]
        public IQueryable<ExpenseModel> Get()
        {
            var result = _query.Get();
            var models = _mapper.Map<Expense, ExpenseModel>(result);
            return models;
        }

        [HttpGet("{id}")]
        public ExpenseModel Get(int id)
        {
            var item = _query.Get(id);
            var model = _mapper.Map<ExpenseModel>(item);
            return model;
        }

        [HttpPost]
        [ValidateModel]
        public async Task<ExpenseModel> Post([FromBody]CreateExpenseModel requestModel)
        {
            var item = await _query.Create(requestModel);
            var model = _mapper.Map<ExpenseModel>(item);
            return model;
        }

        [HttpPut("{id}")]
        [ValidateModel]
        public async Task<ExpenseModel> Put(int id, [FromBody]UpdateExpenseModel requestModel)
        {
            var item = await _query.Update(id, requestModel);
            var model = _mapper.Map<ExpenseModel>(item);
            return model;
        }

        [HttpDelete("{id}")]
        public async Task Delete(int id)
        {
                await _query.Delete(id);
        }
}
Conclusion
I’ll start with problems: The main problem is the complexity of the initial configuration of the solution and understanding the layers of the application, but with the increasing complexity of the application, the complexity of the system is almost unchanged, which is a big plus when accompanying such a system.
And it’s very important that we have an API for which there is a set of integration tests and a complete set of unit tests for business logic. Business logic is completely separated from the server technology used and can be fully tested. This solution is well suited for systems with a complex API and complex business logic.
If you’re looking to build an Angular app that consumes your API, check out Angular 5 and ASP.NET Core by fellow Toptaler Pablo Albella. Toptal also now supports mission-critical Blazor development projects.
Understanding the basics
-
What is a Data Transfer Object?
A Data Transfer Object (DTO) is a representation of one or more objects in a database. A single database entity can be represented with or without any number of DTOs
-
What is a web API?
A web API provides an interface to a system’s business logic access to the database and underlying logic are encapsulated in the API.
-
What is a REST API?
The actual interface through which clients can work with a Web API. It works over HTTP(s) protocol only.
-
What is unit testing?
Unit testing is a set of small, specific, very fast tests covering a small unit of code, e.g. classes. Unlike integration testing, unit testing ensures that all aspects of the unit are tested in isolation from other components of the overall application.
-
What is Web API integration testing?
Integration testing is a set of tests against a specific API endpoint. Unlike unit testing, integration testing checks that all units of code that power the API work as expected. These tests may be slower than unit-tests.
-
What is ASP.NET Core?
ASP.NET Core is a rewrite and the next generation of ASP.NET 4.x. It is cross-platform and compatible with Windows, Linux, and Docker containers.
-
What is a JWT Bearer token?
A JWT (JSON Web Token) Bearer token is a stateless and signed JSON object that is widely used in modern Web & Mobile applications to provide access to an API. These tokens contain their own claims and are accepted as long as the signature is valid.
-
What is Swagger?
Swagger is a library used document a REST API. The documentation itself can also be used to generate a client for the API for different platforms, automatically.
Models
/Models/ is the “M” in MVC. The /Models/ folder contains all of your model classes. By default, this folder only has the ErrorViewModel.cs file which is a default file that handles exceptions.
Model classes allow you to map data to your database. A model class usually consists of attributes along with their “getter” and “setters”. Attributes are essentially the data that any instance of this model class should have values for.
The number of model classes and types of attributes in those model classes depends on your application requirements. For example, an app that manages employee data could have a model class Employee with attributes name, department, and rank because these attributes apply to all employees.
public class User
{
    public int ID { get; set; } //ID attributes are recognized as keys for the object by Entity
    public string Name { get; set; }
    public string Email { get; set; }
    public string Password { get; set; }
    public string PhoneNumber { get; set; }
    public bool IsActive { get; set; }
}
Controllers
/Controllers/ is the “C” in MVC. The /Controllers/ folder consists of all of your controller classes. By default, it has the HomeController.cs file in it.
Controller classes are where your application logic resides. .NET requires every controller class to implement the IController interface as it contains essential support for views.
public class UsersController : Controller
Controllers are also where you implement dependency injection, which establishes a connection between controllers and your database context. This allows you to use _context throughout your controller class to access your database without having to initialize any object.
Methods inside a controller are called “action methods” as they return an “action result”. The name of an action method is used to map its URL endpoint. For example, if the controller name is UserController and the name of an action method is Details, then there is a URL endpoint /Users/Details/ that can be accessed and that will trigger the Details action method.
This ability to access different pages under the same domain name is called Routing. Incoming HTTP requests are matched with the corresponding URL endpoint (often an action method), which then returns your programmed response. Similar to routes in computer filing systems, different parts of the route are differentiated by slashes: Domain/Model/method
The framework extracts the route from the name of the controller. For example, if a controller’s name is UsersController, your route will be /Users.
A URL of the form Controller1/Method1 maps to a method named Method1 in the Controller1 class. If the name of the Users class method is SignUp(), then the route will be /Users/SignUp/.
The default action method triggered when a user accesses the controller URL is Index(). This executes the behavior set in the Index.cshtml file in the views folder.
// GET: Users
public async Task<IActionResult> Index()
{
    return View(await _context.Users.ToListAsync());
}


