-
Contents
-
Table of Contents
-
Troubleshooting
-
Bookmarks
Quick Links
D
B
P
ESKTOP
ARCODE
RINTER
OS-214plus/OS-2140D/
OS-2140/OS-2140Z/
OS-2140DZ
User’s Manual
Ribbon & Media Installation video
Website: http://www.argox.com
Related Manuals for Argox OS-214 plus
Summary of Contents for Argox OS-214 plus
-
Page 1
ESKTOP ARCODE RINTER OS-214plus/OS-2140D/ OS-2140/OS-2140Z/ OS-2140DZ User’s Manual Ribbon & Media Installation video Website: http://www.argox.com… -
Page 2: Fcc Compliance Statement
Argox Information Co., Ltd. Product Improvements Continuous improvement of products is a policy of Argox Information Co., Ltd. All specifications and signs are subject to change without notice. FCC Compliance Statement This equipment has been tested and found to comply with the limits for a Class A digital device, pursuant to Part 15 of the FCC Rules.
-
Page 3: Safety
Argox Information Co., Ltd. has been advised of the possibility of such damages. CAUTION: Any changes or modifications not expressly approved by the party responsible for compliance could void the user’s authority to operate the equipment.
-
Page 4: Table Of Contents
Table of Contents Safety ………………II Getting Started …………..5 Unpacking ……………… 5 Package Contents …………..6 Connecting the Power Supply………… 7 Getting to Know Your Printer ……….. 9 Parts and Features …………..9 Controls and Indicators …………12 Loading Ribbon and Media ……….14 Loading Ribbon ……………
-
Page 5
Recovery ……………… 51 Caring for Your Printer ……….. 52 Cleaning ………………. 52 Media Sensor …………… 52 Thermal Print Head ………….. 52 Replacing the Thermal Print Head ……..55 Important notice during TPH replacement ….56 Technical Reference …………58 General Specifications …………. 58 Fonts, Bar Codes and Graphics Specification …… -
Page 6: Getting Started
Getting Started Congratulations on choosing the Argox OS-214plus/OS-2140D/OS-2140/OS-2140Z/OS-2140DZ desktop barcode printers. This manual will help you get to know your new printer. There are two parts to this manual, an operation guide and related information. The operation guide is illustrated to help you quickly become familiar with the printer.
-
Page 7: Package Contents
Package Contents Printer Power Supply Power Cord Quick Installation Guide USB Cable 0.5” ID Core for Ribbon Media Holder …
-
Page 8: Connecting The Power Supply
Connecting the Power Supply Connect the power supply as below. WARNING! Do not operate the printer and power supply in an area where they can get wet. Make sure the power switch is in the «O» position. 1. Insert the barrel connector of the power supply into the power jack on the back of the printer.
-
Page 9
OS-214plus… -
Page 10: Getting To Know Your Printer
Getting to Know Your Printer The illustrations that follow describe the printer’s parts, features, controls, and indicators. Parts and Features Top Cover H Cover Power Switch Power Indicator Ready Indicator Feed Button OS-214plus/OS-2140D/OS-2140/OS-2140Z/OS-2140DZ…
-
Page 11
Ribbon Pick-up Holder Media Hanger Ribbon module Release Levers (not included with OS-2140D) -
Page 12
Ribbon Supply Holder Thermal Print head Platen Roller Power Switch… -
Page 13: Controls And Indicators
Controls and Indicators The printer’s controls and indicators are shown in the diagram below. The following table explains control and indicator functions. Top Cover Power Indicator Power Switch Ready Indicator Feed Button…
-
Page 14
Control / Function Indicator On: turns on normal operation Off: turns off power Power Switch Note: Turn power off before connecting or disconnecting cables Green light shows the power-on Power Indicator Light off shows the power-off Blinking light indicates error has occurred … -
Page 15: Loading Ribbon And Media
Loading Ribbon and Media This section describes how to load ribbon and media in the OS Series printer. Loading Ribbon Note: This section does not apply to direct thermal printing. 1. Lift the top cover to expose the media compartment. 2.
-
Page 16
Media Compartment Print Head Module Release Lever Release Lever Ribbon Supply Holder… -
Page 17
4. Unwrap the ribbon roll pack and separate the ribbon roll and the bare core. 5. Attach the edge of the ribbon on the bare core and wind it a little bit onto the core. 6. Insert the ribbon roll into the supply holder. (First snap in the left side and then the right side.) Ribbon Supply Holder Ribbon Roll… -
Page 18
7. Turn back the print head module and then insert the bare core into the pick-up holder. (First snap in the left side, and then the right side.) Ribbon Pick-up Holder Bare Core… -
Page 19
8. Turn the wheel of the print head module to ensure the ribbon is tightly wound. 9. Press down the print head module firmly until you hear a snap. Wheel Print Head Module… -
Page 20: Loading Media
Loading Media The OS-214plus/OS-2140D/OS-2140/OS-2140Z/OS-2140DZ printers offer Two different loading modes: standard or with a cutter. Standard mode allows you to collect each label freely. Cutter mode automatically cuts the label after it prints. Standard Mode 1. Lift the top cover to expose the media compartment.
-
Page 21
2. Remove the media hanger. Media Compartment Media Hanger 3. Load the media roll onto the hanger from left to right. Media Roll Media Hanger… -
Page 22
4. Click the media hanger back into the media compartment. 5. Align the media roll to the left end. 6. Move the shield from right to left until it leans against the media. Media Compartment Media Roll Shield… -
Page 23
7. Unlatch the print head module. 8. Hold the print head module upright with one hand to allow the media to pass under it. Lead the media through the media guides with the other hand. 9. Lead the media over the platen roller. Print Head Module Media Guides… -
Page 24
10. Put the print head module down and press down firmly until you hear a snap. 11. Close the top cover and turn on the printer or press the «FEED» button if the printer is already on. Print Head Module Feed Button… -
Page 25: Cutter Mode
Cutter Mode Note: For Cutter mode you must first install the cutter and add the cutter baby board to J16 on the main board. Please refer to Appendix I. Follow Steps 1 to 8 listed in Standard Mode above. 9. Thread the media over the platen roller, then route the media through the slot of the cutter module.
-
Page 26
11. Close the top cover and turn on the printer or press the «FEED» button if the printer is already on. Note: The «FEED» button does not make the printer cut. Cutting occurs only when the software is properly set. -
Page 27: Calibration And Configuration
Calibration and Configuration This section discusses calibration, printing configuration and resetting the printer to factory defaults. Performing Calibration and Configuration Make sure the media is properly loaded and the top cover of the printer is closed. Turn off the printer power. Press and hold the feed button while turning on the power, until the printing motor is activated.
-
Page 28: Sensor Detection
Sensor Detection Detection Area of the Reflective Sensor The reflective Sensor is positioned at 7mm from the left edge of media. The black mark minimum width (horizontal) should be 14mm on the left edge of media. The detection area, as illustrated below.
-
Page 29: Resetting Printer To Factory Defaults
Resetting Printer to Factory Defaults 1. Turn on the printer and wait till both «Ready» indicator and «Power» indicator stay solid green. 2. Press the «Feed» button for 5 seconds, and the «Ready» indicator and «Power» indicator will go off in order. (at this step, if the “FEED”…
-
Page 30
FEED button. 4. «Ready» indicator will then become lit, too. At this moment, the printer has resumed its factory default settings Note: Revise the factory default settings that stored in flash, even if turn off the power source cannot be eliminated. -
Page 31: Computer Connections
Computer Connections Note: You must insert the power supply’s barrel connector into the power jack on the back of the printer before connecting communication cables. This printer comes with a nine-pin Electronics Industries Association (EIA) RS-232 serial data interface and a USB interface.
-
Page 32: Serial (Rs-232) Interface Requirements
Serial (RS-232) Interface Requirements The required cable must have a nine-pin «D» type male connector on one end, which is plugged into the mating serial port located on the back of the printer. The other end of the signal interface cable connects to a serial port on the host computer.
-
Page 33: Serial Cabling Requirements
Serial Cabling Requirements Data cables must be of fully shielded construction and fitted with metal or metalized connector shells. Shielded cables and connectors are required to prevent radiation and reception of electrical noise. To minimize electrical noise pickup in the cable: Keep data cables short (6 ft or 1.83m recommended).
-
Page 34: Parallel Interface Requirements
Parallel Interface Requirements The required cable (IEEE 1284-compliant is recommended) must have a standard 36-pin parallel connector on one end, which is plugged into the parallel port located on the back of the printer. The other end of the parallel interface cable connects to the printer connector at the host computer.
-
Page 35: Communicating With The Printer
Windows software applications including Argox Bartender UL label editing software or MS Word, etc., to print to this printer. Drivers can be downloaded from Argox website >> Technical Support >> Download Center >> select product model to access: http://www.argox.com/content.php?sno=0000033…
-
Page 36: Installing A Plug And Play Printer Driver (For Usb Only)
Installing a Plug and Play printer driver (for USB only) Note: We strongly recommend that you use the Seagull Driver Wizard instead of the Microsoft Windows Add Printer Wizard when installing and updating your Drivers by Seagull. (Even though the «Add Printer Wizard» is from Microsoft, it too easily performs a number of tasks incorrectly when updating existing drivers.
-
Page 37
3. Run the driver from Argox website. On the prompt, Windows Printer Driver, select “I accept…” and click «Next». 4. Assign the directory to keep Seagull driver, (for example: C:\Seagull) and click «Next». -
Page 38
5. Click «Finish». 6. Select Install printer drivers and Click «Next» Installation Directory where the Seagull driver files are located. -
Page 39
7. On the Seagull Driver Wizard prompt, select the first radio button to “Install a driver for a Plug and Play printer”: Argox OS-2140 PPLA Then click “Next.” 8. Enter Printer name (i.e. Argox OS-2140 PPLA) and select «do not share this printer”, and click «Next». Argox OS-2140 PPLA… -
Page 40
9. Check all the data on the showing screen, if it is correct, click «Finish». Argox OS-2140 PPLA USB002 Argox OS-2140 PPLA 7.1.9_M-5 10. After the related files have been copied to your system, click «Finish». Installing printer ‘Argox OS-2140 PPLA’…… -
Page 41
11. After driver installation is complete, click «Close». The driver should now be installed. Installed printer Argox OS-2140 PPLA… -
Page 42: Installing The Printer Driver
Connect the USB cable, Serial cable to the proper port on the printer and on your computer. 2. Run the driver from Argox website. On the prompt, Windows Printer Driver, select “I accept…” and click «Next».
-
Page 43
3. Assign the directory to keep Seagull driver, (for example: C:\Seagull) and click «Next». 4. Click «Finish». -
Page 44
5. Select Install printer drivers and Click «Next» 6. Make sure printer is connected to PC, select “Other” and click “Next”:… -
Page 45
7. Select model & emulation — the following examples are based on model OS-2140 PPLA: A rgox OS-2140 PPLA 8. Select the port of the printer and click «Next». -
Page 46
9. Enter Printer name (i.e. Argox OS-2140 PPLA) and select «do not share this printer”, and click «Next». Argox OS-2140 PPLA 10. Check all the data on the showing screen, if it is correct, click «Finish». Argox OS-2140 PPLA USB001 Argox OS-2140 PPLA 7.1.9_M-5… -
Page 47
11. After the related files have been copied to your system, click «Finish». Installing printer ‘Argox OS-2140 PPLA’… 12. After driver installation is complete, click «Close». The driver should now be installed. Installed printer Argox OS-2140 PPLA… -
Page 48: Troubleshooting
Troubleshooting Normally, when the printer is in not working properly, the «Power» LED blinks continuously; while printing and communication between the host and printer stops. LED Diagnosis Power and Ready LEDs blinking continuously indicates printer errors. To understand the problem, please observe the Power and Ready LEDs and refer to the following solutions: LED Indicators: Power and Ready LEDs blink at the same tempo Power LED…
-
Page 49
Label jam Recover the jam LED Indicators: Power and Ready LEDs blink alternately Power LED Ready LED Possible Problems Solutions Remarks Ribbon out Supply the ribbon roll Not applicable to direct thermal Ribbon jam Recover the jam type. Ribbon sensor error Replace ribbon sensor LED Indicators: Only the Power LED blinks Power LED Ready LED Possible Problems… -
Page 50
LED Indicators: Only the Ready LED blinks Power LED Ready LED Possible Problems Solutions Remarks Print head too hot Printing will stop until the print head cools to an acceptable printing temperature. When it does, the printer will automatically resume operation. -
Page 51: Miscellaneous
Miscellaneous If the host shows «Printer Time out» 1. Check if the communication cable (parallel or serial) is connected securely to your parallel or serial port on the PC and to the connector on the printer at the other end. 2.
-
Page 52: Recovery
Poor printout quality: The ribbon may not be qualified. The media may not be qualified. Adjust the Darkness (heat temperature). Slow down the print speed. Refer to the next chapter and clean the related spare …
-
Page 53: Caring For Your Printer
Caring for Your Printer Adhesives and coatings of media can over time transfer onto the printer components along the media path including the thermal print head and media sensor. This build-up can accumulate dust and debris. Failure to clean the print head, media path, and media sensor could result in inadvertent loss off labels, label jams and possible damage to the printer.
-
Page 54
TPH Cleaning Interval: It’s strongly recommended to regularly clean print heads at least when changing every one ribbon roll (in thermal transfer printing mode), or every one label roll (in direct thermal printing mode). In addition, if printers are operated under critical applications and environments, or it’s found print quality is degraded, please clean print heads more frequently. -
Page 55
Special Caution: Warranty of print heads will be void if print head serial number is removed, altered, defected, or made illegible, under every circumstance. -
Page 56: Replacing The Thermal Print Head
Replacing the Thermal Print Head 1. Switch off the power and wait for both LEDs to go off. 2. Unlatch the print head module. 3. Remove the ribbon. 4. Push the print head firmly into the casing and shift it to the left.
-
Page 57: Important Notice During Tph Replacement
6. Disassemble the print head and the mounting bracket by releasing screws. 7. Replace with a new print head. Reassemble the print head module in reverse order. Be careful not to touch the print head elements. Important notice during TPH…
-
Page 58
replacement 1. Heater line should NOT be touched by bare hands to prevent any damage caused by ESD or corrosion. 2. Surface of heaters should NOT be hit or scratched by sharp or hard things to prevent any damage by scratch. 3. -
Page 59: Technical Reference
Technical Reference General Specifications Specificatio OS-2140D OS-2140 OS-214plus Printing method Direct Transfer Direct Transfer/Thermal Transfer Printing 203 dpi (8dots/mm) resolution Printing speed Up to 5ips (127mm/s) Up to 4ips(102mm/s) Printing length Max 100” (2540mm) Max 43”(1092mm) Printing width Max 4.16” (105mm) 8MB DRAM(6MB user available) Memory 4MB Flash ROM(2MB user available)
-
Page 60
OS-2140 & OS-2140D: PPLA: Code 39 (standard/with checksum digit), Code 93 Interleaved 2of 5 (standard/with checksum digit/with human readable check digit), EAN-8, EAN-13,UPC-A, UPC-E, Postnet, Codabar, Code subset A/B/C, UCC/EAN-128, UCC/EAN-128 K-MART, UCC/EAN-128 , Random Weight, Plessey, HBIC, Telepen, FIM, UPC2, UPC5, GS1 Data Bar PPLB: Code 39 (standard/with checksum digit),Code 93 Interleaved 2 of 5 (standard/with checksum digit/with human readable check digit), EAN-8 (standard/2 digit add-on/5 digit… -
Page 61
OS-2140 & OS-2140D: PPLA/PPLB/PPLZ: MaxiCode, PDF417, Data Matrix (ECC 200 only), QR code, Composite codes, Aztec PPLA/PPLZ: Micro PDF417 2D Barcodes OS-214plus: PPLA: PDF-417, MaxiCode, Data Matrix (ECC200 only) ,QR Code, Composite codes PPLB: MaxiCode, PDF-417, QR Code, Composite codes OS-2140 &… -
Page 62
Cutter, Stacker, RTC Card, ArgoKee, 2MB Asian Font Card Optional Items (Traditional Chinese, Simplified Chinese, Korean and Japanese) Agency Listing CE, FCC, cTUVus, CCC,… -
Page 63: Fonts, Bar Codes And Graphics Specification
Fonts, Bar Codes and Graphics Specification The specifications of fonts, bar codes and graphics depends on the printer emulation. The emulations PPLA, PPLB and PPLZ are printer programming languages, through which the host can communicate with your printer. Printer Programming Language A, PPLA Programming PPLA Language…
-
Page 64: Printer Programming Language B, Pplb
Data Bar, MaxiCode, PDF417, Data Matrix (ECC 200 only), QR code, Composite Codes Printer Programming Language B, PPLB Programming PPLB Language Internal fonts 5 fonts with different point size 8 bits code page : 437, 850, 852, 860, 863, 865, 857, 861, 862, 855, 866, 737,851,869, 1252, 1250, 1251, Symbol sets…
-
Page 65: Printer Programming Language Z, Pplz
UPC Interleaved 2 of 5, GS1 Data Bar, MaxiCode ,PDF417, Data Matrix (ECC 200 only), QR code, Composite Codes Printer Programming Language Z, PPLZ Programming PPLZ Language 8 (A~H) fonts with different point size. 8 AGFA fonts: 7 (P~V) fonts with fixed different Internal fonts point size (can’t scale).
-
Page 66
Notes: 1. The bare core for the ribbon must be 11 cm in length. It should have two opposite slits at two ends. If the ribbon itself is less than 11 cm, it must be aligned with the bare core in the left side when you install it. -
Page 67: Interface Specifications
Interface Specifications USB Interface This is port complies with USB 2.0 Full Speed. Connector Terminal Pin Assignment Signal Description VBUS Differential data signaling pair — Differential data signaling pair + Ground USB series “B” Receptacle Interface…
-
Page 68: Serial
Serial The RS232 connector on the printer side is a female, DB-9. Direction Definition Shorted to Pin 6 RxData TxData N.C. Ground Shorted to Pin 1 Note : Pin 9 are reserved for KDU (keyboard device unit), therefore do not connect these pins if you are using a general host like a PC.
-
Page 69: Parallel (Centronics)
Parallel (Centronics) The parallel port is a standard 36-pin Centronics, which complies with IEEE 1284 standard (compatibility mode). Pin assignments are as follows: Direction Definition Direction Definition n/STROBE Ground Chassis Data 1~8 Ground Peripheral nACK High Signal BUSY 19~30 Ground nINIT SELECT nFAULT…
-
Page 70: Connection With Host
Connection with host Host 25S Printer 9P Host 9S Printer 9P (PC or compatible) (PC or compatible) DTR 20 …… 1 DSR DTR 4 …… 1 DSR DSR 6 …… 6 DTR DSR 6 …… 6 DTR TX 2 …… 2 RX TX 3 ………
-
Page 71
Printer Terminal/Host Pin 2- RxData ……… TxData Pin 3- TxData ……… RxData Pin 5- Ground ……… Ground In general, as long as the data quantity is not too large and you use Xon/Xoff as flow control, it will be problem free. 2400, 4800, 9600(default), 19200, 38400, Baud rate: 57600, 115200 bauds… -
Page 72: Appendix I — Installing The Cutter
Appendix I — Installing the Cutter 1. Turn off the printer power and unplug the power cable and Serial / USB cable. 2. Remove the top cover. 3. Remove the two screws under the base housing.
-
Page 73
4. Remove the whole print head assembly by releasing the 4 screws at its feet. Print Head Assembly 5. Add the cutter baby board to J16 on the main board. -
Page 74
6. Secure the four screws attaching the cutter. Cutter 7. Plug the cutter’s connector into the PCB’s header connector (J9). 8. Reattach the print head assembly by securing the 4 screws. 9. Click back the middle cover. 10. Secure the two screws for the base housing. 11. -
Page 75: Appendix Ii — Installing The Extension Card
Appendix II — Installing the Extension Card Extension Card designated for all optional extension modules. For example, RTC card and Add-on card. Install the extension card into the printer as follows: 1. Turn off the printer power. 2. Remove the top cover. 3.
-
Page 76
4. Remove the middle cover. Slot for Extension card… -
Page 77
5. Mount the extension card to J14 on the main board. 6. Click back the middle cover. 7. Secure the two screws for the base housing. 8. Click the top cover into place.
![]()
Не готовы сразу приобрести банковский терминал?
Банковский терминал в аренду
Аренда
- 936visibility

share
Руководство пользователя принтера Argox OS-214 plus (v2.0.0)
Это может быть интересно
more_vert
210000Тг
star_borderstar_borderstar_borderstar_borderstar_border
подробнее
more_vert PB22 без блока питания Bluetooth")
308660Тг
star_borderstar_borderstar_borderstar_borderstar_border
подробнее
more_vert
510620Тг
star_borderstar_borderstar_borderstar_borderstar_border
подробнее
more_vert
70400Тг
star_borderstar_borderstar_borderstar_borderstar_border
подробнее
more_vert
82940Тг
star_borderstar_borderstar_borderstar_borderstar_border
подробнее
more_vert
121000Тг
star_borderstar_borderstar_borderstar_borderstar_border
подробнее
Bartender UL Form-making

Argox Bartender UL Form-making User Manual,
30 pages
Ethernet printer
Argox Ethernet printer User Manual,
51 pages
Ethernet printer

Argox Ethernet printer Manual del usuario,
52 pages
Ethernet printer

Argox Ethernet printer Manuale d’uso,
51 pages
A Series
Argox A Series User Manual,
47 pages
AME-3230 Series
Argox AME-3230 Series User Manual,
23 pages
AME-3230 Series
Argox AME-3230 Series Manuale d’uso,
27 pages
A Series
Argox A Series Manual del usuario,
46 pages
AME-3230 Series
Argox AME-3230 Series Manual del usuario,
27 pages
CP Series
Argox CP Series Manual del usuario,
84 pages
F1
Argox F1 User Manual,
81 pages
CP Series
Argox CP Series User Manual,
84 pages
CP Series

Инструкция по эксплуатации Argox CP Series,
85 pages
OS Series
Argox OS Series User Manual,
43 pages
G-6000
Argox G-6000 User Manual,
36 pages
F1
Argox F1 Manual del usuario,
100 pages
R Series
Argox R Series User Manual,
72 pages
X Series
Argox X Series Manuale d’uso,
115 pages
X Series
Argox X Series Manual del usuario,
114 pages
X Series
Argox X Series User Manual,
126 pages
Размеры
- 186 × 278 × 153 мм
Метод печати
- прямая термопечать
- термотрансферная
Скорость печати
- 102 мм/сек
Доставка
![]()
Доставка по городу — 500 руб
![]()
Доставка по России по тарифам компании «Деловые линии»
![]()
Самовывоз — Бесплатно
Оплата
![]()
Наличными курьеру
![]()
Безналичный расчет
![]()
Банковской картой
![]()
Разрешение печати 203 dpi
![]()
Поддерживается система «Честный знак»
![]()
Интерфейс подключения по LPT
![]()
Интерфейс подключения по RS‑232
![]()
Интерфейс подключения по USB
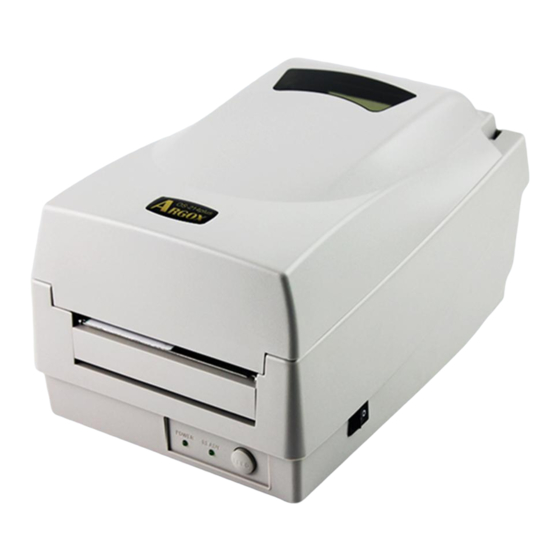
Argox OS-214 Plus относится к новому поколению принтеров этикеток. Полноскоростной интерфейс USB позволяет работать с любым из современных ноутбуков и других компьютеров. Также модель поддерживает работу без подключения к ПК, работая под управлением внешней клавиатуры ArgoKee. Термотрансферный принтер Argox OS-214 Plus имеет привлекательный и стильный дизайн.
Особенности модели:
Принтер относится к настольным моделям. Скорость печати — до 76 мм/сек. Разрешение печати — 203 dpi. Печатает небольшие объемы этикеток (до 5 000 штук) шириной до 105 мм. Устройство дает возможность использования разнообразных опций: отрезчика, отделителя этикеток. Модель работает с программой по программированию этикеток BarTender. Удобство эксплуатации, простая смена расходного материала позволяет установить принтер в офисах.
Данная модель снята с производства, её заменяет Argox O4-250.

Разрешение печати:
203 dpi

Скорость печати:
102 мм/сек

Ширина печати:
105 мм

Длина печати:
1092 мм

Интерфейс:
USB, RS-232, параллельный Centronics®

Память:
8 Мб DRAM, 4 Мб Flash

Размеры:
186 × 278 × 153 мм

Вес:
2.1 кг
Сфера применения:
- магазины розничной торговли — приём товара, складской учёт, инвентаризация;
- склады — приём, маркировка, отгрузка продукции;
- поликлиники, медицинские центры — печать рецептов;
- театральные и кассы кинотеатров — печать билетов
- типографии.
Дополнительно:
- Печатающая головка 203 dpi для принтеров Argox OS-214 Plus/OS-2140D
- Отделитель для принтера Argox OS-214 Plus
- Нож для принтеров Argox OS-214 Plus, OS-2140
- Внешний держатель рулона носителя
- Внешняя управляющая клавиатура ArgoKee
Расходные материалы:
- TTR CKT 33 мм × 74 м WAX, OUT, втулка Ø12.7 × 57 мм
- TTR CKT 33 мм × 74 м WAX/RESIN, OUT, втулка Ø12.7 × 57 мм
- TTR CKT 57 мм × 74 м WAX, OUT, втулка 12.7 мм
- TTR CKT 57 мм × 74 м WAX/RESIN, OUT, втулка 12.7 мм
- TTR CKT 57 мм × 74 м RESIN, OUT, втулка 12.7 мм
- TTR CKT 64 мм × 74 м RESIN, OUT, втулка Ø12.7 мм
- TTR CKT 84 мм × 74 м RESIN, OUT, втулка Ø12.7 мм
- TTR CKT 102 мм × 74 м RESIN, OUT, втулка Ø12.7 мм
Как заказать?
Чтобы купить принтер этикеток Argox OS-214 Plus, сообщите менеджеру количество устройств. Также с этим товаром покупают риббоны, термоголовки для принтеров и термоэтикетки.
| Сравнительные характеристики Argox OS-214 Plus | |||||
|---|---|---|---|---|---|
| Модель | OS-214 | OS-314 | OS-2140 | OS-214 Plus | OS-314 Plus |
| Параметры печати | |||||
| Метод |
|
||||
| Разрешение | 203 dpi | 300 dpi | 203 dpi | 203 dpi | 300 dpi |
| Скорость | 76 мм/сек | 51 мм/сек | 102 мм/сек | 76 мм/сек | 102 мм/сек |
| Ширина | 105 мм | 103 мм | 105 мм | 105 мм | 105 мм |
| Длина | 203 мм | 355 мм | 2540 мм | 1092 мм | 1270 мм |
| Параметры носителя | |||||
| Толщина | 0.06 — 0.254 мм | ||||
| Ширина этикетки | 25.4 — 110 мм | ||||
| Тип | фальцованная или в рулонах; непрерывная или отрезная; бирки, этикетки, билеты (Argox OS-2140D) | ||||
| Диаметр рулона (максимум) | 109 мм | ||||
| Диаметр втулки |
|
||||
| Параметры риббона | |||||
| Ширина | 25.4 — 102 мм | ||||
| Длина | 92 м | ||||
| Диаметр рулона | 37 мм | ||||
| Диаметр втулки | 12.7 мм | ||||
| Тип намотки | OUT (внешняя) | ||||
| Программные параметры | |||||
| Языки программирования | PPLA, PPLB | PPLA, PPLB, PPLZ | PPLA, PPLB | ||
| Процессор | 16-битный RISC-процессор | 32-битный RISC-процессор | |||
| Память | 512 Кб DRAM, 512 Кб Flash | 2 Мб DRAM, 512 Кб Flash | 8 Мб SDRAM, 4 Мб Flash | ||
| Интерфейсы | RS-232, параллельный Centronics® | RS-232, USB (2.0), Ethernet (опция) | RS-232, USB (2.0), параллельный Centronics® | ||
| Температура эксплуатации | +4° ~ +38° C | ||||
| Влажность при эксплуатации | 0% — 90% (без конденсации) | ||||
| Температура хранения | -20° ~ +50° C | ||||
| Размеры | 186 × 278 × 165 мм | ||||
| Вес | 2.1 кг | 2.0 кг |
| Технические характеристики принтера Argox OS-214 Plus | |
|---|---|
| Класс принтера | начальный |
| Параметры печати | |
| Метод |
|
| Разрешение | 203 dpi |
| Скорость | 102 мм/сек |
| Ширина | 105 мм |
| Длина | 1092 мм |
| Параметры носителя | |
| Толщина | 0.06 — 0.254 мм |
| Ширина этикетки | 25.4 — 110 мм |
| Тип | фальцованная или в рулонах; непрерывная или отрезная; бирки, этикетки, билеты |
| Диаметр рулона (максимум) | 109 мм |
| Диаметр втулки |
|
| Параметры риббона | |
| Ширина | 25.4 — 102 мм |
| Длина | 92 м |
| Диаметр рулона | 37 мм |
| Диаметр втулки | 12.7 мм |
| Тип намотки | OUT (внешняя) |
| Программные параметры | |
| Языки программирования | PPLA, PPLB |
| Линейные штрихкоды |
|
| Двухмерные штрихкоды |
|
| Шрифты и графика | Internal character sets standard 5 alpha-numeric fonts from 1.25 — 6.0 мм Internal fonts are expandable up to 24 × 24 4 direction 0° — 270° rotation Soft fonts are downloadable Ability to print any Windows True Type font easily |
| Процессор | 32-битный RISC-процессор |
| Память | 8 Мб DRAM, 4 Мб Flash |
| Датчики |
|
| Питание | 100 — 240 В, 47 — 63 Гц |
| Интерфейсы | USB, RS-232, параллельный Centronics® |
| Температура эксплуатации | +4° ~ +38° C |
| Влажность при эксплуатации | 0% — 90% (без конденсации) |
| Температура хранения | -20° ~ +50° C |
| Размеры | 186 × 278 × 165 мм |
| Вес | 2.0 кг |
| Модификации принтера этикеток Argox OS-214 Plus | |||||
|---|---|---|---|---|---|
| Наименование | Артикул | USB | Ethernet | Wi-Fi | Цена |
| OS-214 Plus | 0905000005 | да | нет | нет |
13900 ₽ |
| OS-214 Plus, нож | 0905000003 | да | нет | нет |
48450 ₽ |
| Аксессуары для принтера этикеток Argox OS-214 Plus | ||
|---|---|---|
| Наименование | Артикул | Цена |
| Печатающая головка 203 dpi для принтеров Argox OS-214 Plus/OS-2140D | 0556100035 |
13843 ₽ |
| Отделитель для принтера Argox OS-214 Plus | 0556100011 |
18457 ₽ |
| Нож для принтеров Argox OS-214 Plus, OS-2140 |
Уточняйте цену у менеджера |
|
| Внешний держатель рулона носителя |
Уточняйте цену у менеджера |
|
| Внешняя управляющая клавиатура ArgoKee |
Уточняйте цену у менеджера |
|
| Расходные материалы для | ||
| TTR CKT 33 мм × 74 м WAX, OUT, втулка Ø12.7 × 57 мм | 0309000053 |
Уточняйте цену у менеджера |
| TTR CKT 33 мм × 74 м WAX/RESIN, OUT, втулка Ø12.7 × 57 мм | 0309000054 |
Уточняйте цену у менеджера |
| TTR CKT 57 мм × 74 м WAX, OUT, втулка 12.7 мм | 0308000001 |
22 ₽ |
| TTR CKT 57 мм × 74 м WAX/RESIN, OUT, втулка 12.7 мм | 0308000004 |
61 ₽ |
| TTR CKT 57 мм × 74 м RESIN, OUT, втулка 12.7 мм | 0308000007 |
124 ₽ |
| TTR CKT 64 мм × 74 м RESIN, OUT, втулка Ø12.7 мм | 0790000009 |
Уточняйте цену у менеджера |
| TTR CKT 84 мм × 74 м RESIN, OUT, втулка Ø12.7 мм | 0790000011 |
302 ₽ |
| TTR CKT 102 мм × 74 м RESIN, OUT, втулка Ø12.7 мм | 0790000005 |
367 ₽ |
Обзор принтера Argox OS-214 Plus
Услуги Shtrih.su
Сопутствующие товары
Хит продаж

Артикул: 0957000003
Принтер этикеток Zebra ZT230
Вес: 9.1 кг
Размеры: 242 × 432 × 277 мм
Метод печати: прямая термопечатьтермотрансферная печать
Скорость печати: 152 мм/сек
83 717
₽

Артикул: 0568000146

Принтер этикеток Атол TT41
Вес: 1.6 кг
Размеры: 240 × 178 × 198 мм
Метод печати: прямая термопечатьтермотрансферная
Скорость печати: 102 мм/сек


Артикул: 0766000014

Артикул: 0025000008

Артикул: 0715000023

Артикул: 0545000062
 E‑4205A / E‑4305A")
Артикул: 0279000008

Принтер этикеток Zebra ZT421
Вес: 18.14 кг
Размеры: 336 × 495 × 324 мм
Метод печати: прямая термопечатьтермотрансферная
Скорость печати: 305 мм/сек


Принтер снят с производства. Предлагаем вам замену Argox A-2240
Argox OS 214 TT – принтер с функциями как прямой термо-, так и термотрансферной печати. Разрешение – 203 dpi. Устройство позволяет печатать этикетки шириной 104 мм, длиной 1054 мм и более при использовании внешней стойки. Принтер используется на предприятиях торговли, на складах (учет, инвентаризация), транспортных компаниях, почтамтах.
Преимущества модели:
- Ширина печати – до 104 мм;
- Скорость печати – 76 мм/с;
- Наши специалисты подключат устройство к программе 1С;
- Благодаря использованию термотрансферной ленты, печатает этикетки с высококонтрастными штрихкодами – для маркировки замороженных продуктов, отличаются стойкостью к воздействию влаги, истиранию;
- Ширина ленты – до 110 мм;
- Интерфейсы – Parallel, RS232, USB;
- Оборудована датчиком расстояния между этикетками.
Принтер позволяет работать в автономном режиме при подключении внешней клавиатуры ArgoKee. Дополнительно можно установить отрезчик, отделитель этикеток. Минимальный тираж для заказа – 1 штука.