Руководство
Английский:
- Mega_Руководство_en
- Mega_S_Руководство_en
- Mega_X_Руководство_en
Слайсер: Cura_V15.04.6
Windows:
- Cura_v15.04.6.exe
OS X:
- Cura_15.04.6
Прошивка
- Mega X Прошивка V1.2.6
- i3 Mega S Прошивка V1.1.5
- i3 Mega Прошивка V1.1.5
- Обновление_Mega_к_Mega-S Прошивка V1.1.5
Водитель
- Mega X Водитель_CP2102
- i3_Mega_S Windows
- i3_Mega_S Mac OS
- i3_Mega Windows
- i3_Mega Mac OS
Видео:
2、Ручное выравнивание
3、Обновление Mega к MEGA-S
4、MEGA X Выравнивание
4、MEGA X Распаковка и установка
5、Очистка и уход за ультрабазой
Вернуться к Новости
Посмотреть инструкция для Anycubic i3 Mega S бесплатно. Руководство относится к категории 3D-принтеры, 2 человек(а) дали ему среднюю оценку 8.8. Руководство доступно на следующих языках: английский. У вас есть вопрос о Anycubic i3 Mega S или вам нужна помощь? Задайте свой вопрос здесь
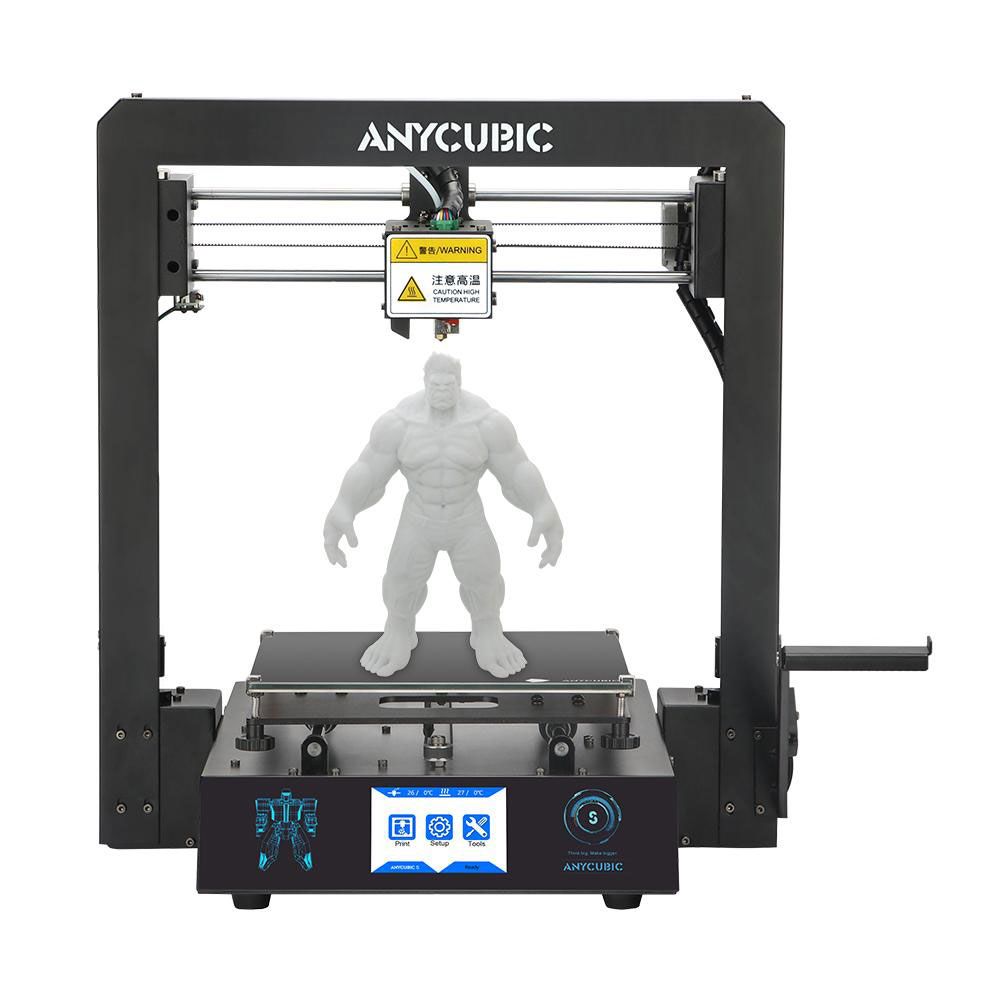
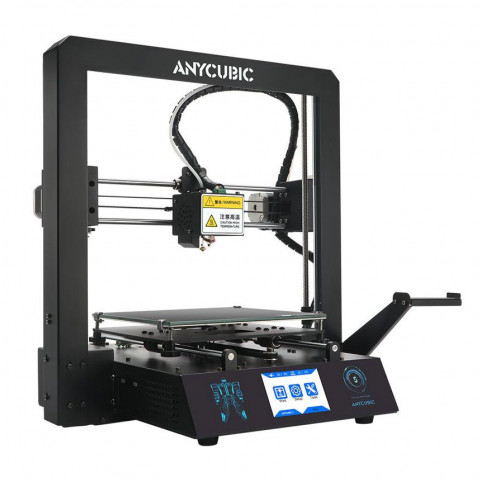
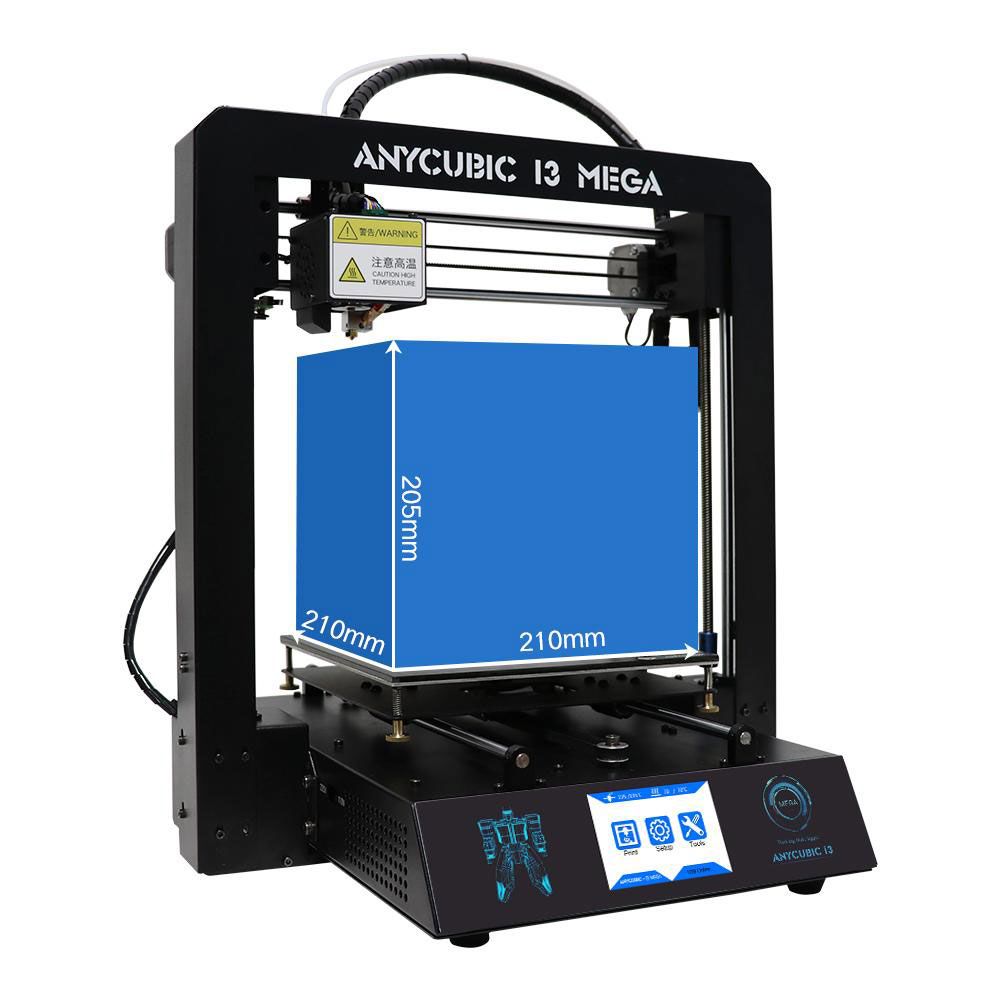
Принтер Anycubic i3 Mega S – это 3D-устройство, поддерживающее печать большинства типов пластика, таких как PLA, ABS, PETG, TPU и др. Размер печатной платформы составляет 210 x 210 x 205 мм, что позволяет создавать детали среднего размера. При этом принтер обеспечивает высокую точность печати в 0,05-миллиметровом разрешении. Устройство оборудовано сенсорным экраном и нагревательным столом, который улучшает сцепление детали с платформой. Anycubic i3 Mega S имеет возможность продолжения печати после сбоя питания, что позволяет избежать потери детали и материалов. Кроме того, принтер оснащен металлической рамой, которая обеспечивает устойчивость и прочность устройства. Anycubic i3 Mega S работает на основе технологии FDM-печати, которая является одной из самых популярных и доступных методов 3D-печати. Устройство может использоваться для создания различных предметов, таких как игрушки, ювелирные изделия, зубные протезы, прототипы новых изделий и многое другое.
Главная
Не можете найти ответ на свой вопрос в руководстве? Вы можете найти ответ на свой вопрос ниже, в разделе часто задаваемых вопросов о Anycubic i3 Mega S.
Инструкция Anycubic i3 Mega S доступно в русский?
К сожалению, у нас нет руководства для Anycubic i3 Mega S, доступного в русский. Это руководство доступно в английский.
Не нашли свой вопрос? Задайте свой вопрос здесь
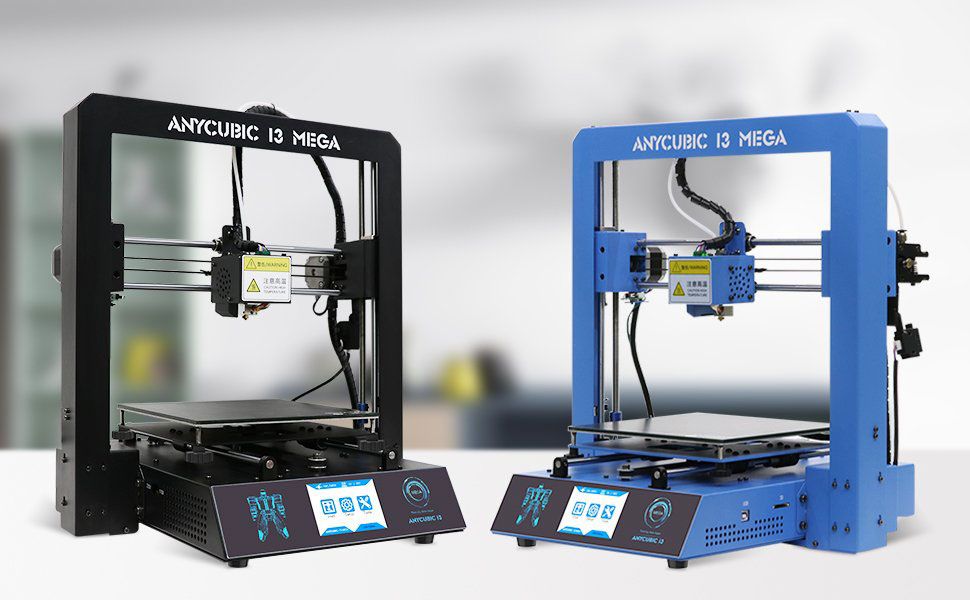
За последние несколько лет рынок 3D-принтеров настольного формата пополнился дешевым оборудованием, что сделало технологию печати FDM гораздо более доступной. Anycubic Mega-S – один из бюджетных 3D принтеров, который занял лидирующие позиции на рынке благодаря удивительно качественной печати и низкой стоимости. Anycubic Mega-S представляет собой флагман одного из китайских производителей и обновленную версию более старой модели принтера – Anycubic i3 Mega. С первого взгляда довольно сложно заметить разницу между оригинальной моделью и ее обновленной версией, поэтому в этой статье мы проведем подробный анализ Anycubic Mega-S, а также опишем реальный опыт пользователей принтера в вопросе его доработки и модернизации.
Обзор Anycubic Mega-S
Описание
Производитель поставляет оборудование в практически полностью собранном виде: принтер состоит из всего двух основных частей – управляющего блока, к которому уже прикреплен стол, и вертикальной рамы с экструдером, на которой уже закреплена вся ось Z. Для окончательной сборки пользователю потребуется всего лишь закрутить 8 болтов и подключить три провода к блоку управления. Основная часть сборки на этом заканчивается – принтер будет готов к работе сразу же после того, как к вертикальной раме будет прикручен держатель для катушки с пластиком.
Вертикальная рама принтера и управляющий блок характеризуются повышенной жесткостью за счет цельнометаллического корпуса. Снизу конструкция имеет прорезиненные ножки, которые исключают вероятность скольжения и срывов во время работы.
Данная модель характеризуется Prusa-подобной кинематикой, что фактически означает, что ось Y в данной конструкции представлена непосредственно столом, который во время печати движется вперед и назад, ось X – каретка экструдера, совершающая движение по горизонтальной траектории, а ось Z образуется за счет поднимания вверх всей оси X.
Данная модель характеризуется Prusa-подобной кинематикой, что фактически означает, что ось Y в данной конструкции представлена непосредственно столом, который во время печати движется вперед и назад, ось X – каретка экструдера, совершающая движение по горизонтальной траектории, а ось Z образуется за счет поднимания вверх всей оси X.
ВАЖНО! Все оси принтера перемещаются в пространстве на валах, размер которых составляет 8 мм, и линейных подшипниках.
Ось Y
Рама стола принтера является цельнометаллической, обладает высокой прочностью, а изгиб в ней отсутствует. Стол нагреваемый (его максимальная температура составляет 110 градусов) и состоит из двух частей:
- алюминиевой пластины;
- оригинального стекла «Ultrabase».
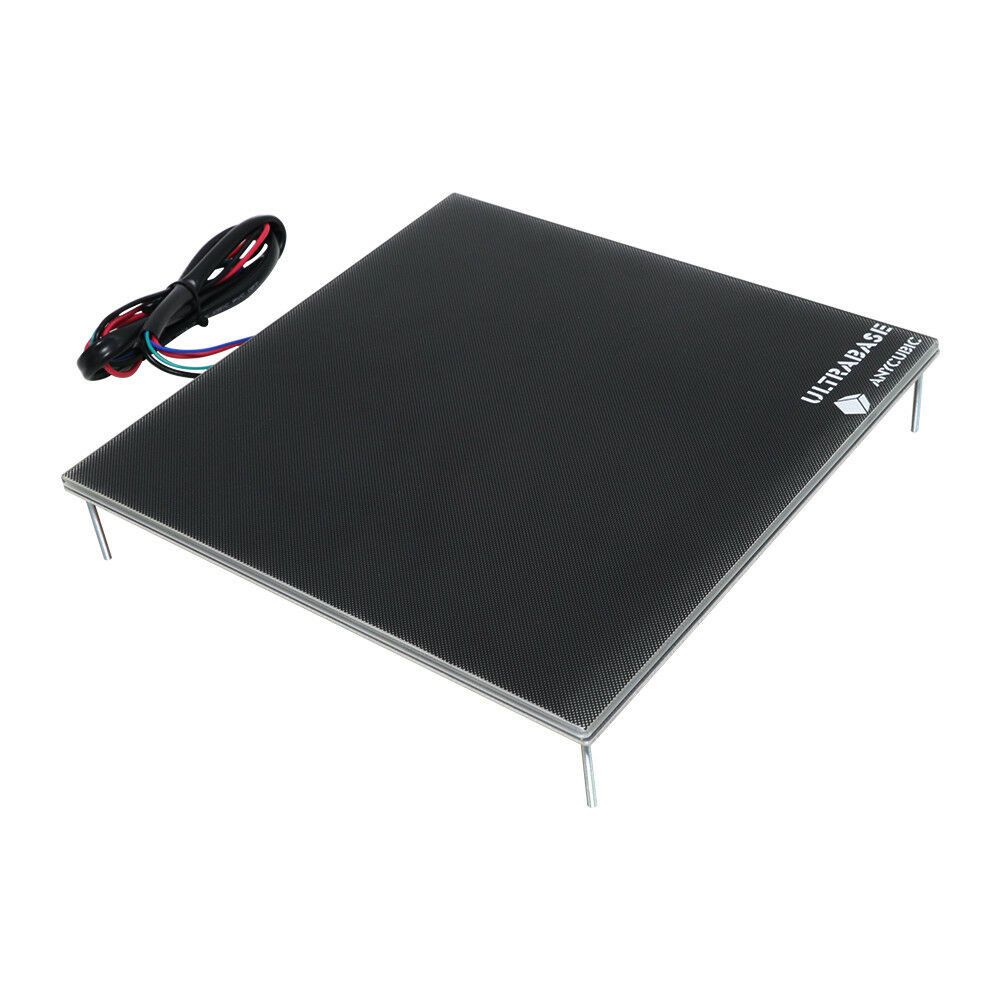
Стекло является фирменной разработкой компании производителя, поэтому, несмотря на обилие подражателей, именно стекло Anycubic является максимально качественным. На поверхность стекла нанесено специализированное покрытие с перфорацией, которое позволяет обеспечить высокий показатель сцепления с поверхностью детали во время печати. При нагревании детали на таком покрытии надежно прилипают к столу, а после остывания легко отклеиваются. Исключением является только печать с использованием пластика ABS.
Ось Z
Состоит из двух равнозначных моторов, двух валов и двух винтовых направляющих. При первой калибровке оборудования крайне важно добиться срабатывания каждого из концевиков, чтобы добиться горизонтали. В дальнейшем даже при возникновении перекоса после каждой парковки ось будет автоматически возвращаться в исходное горизонтальное положение.
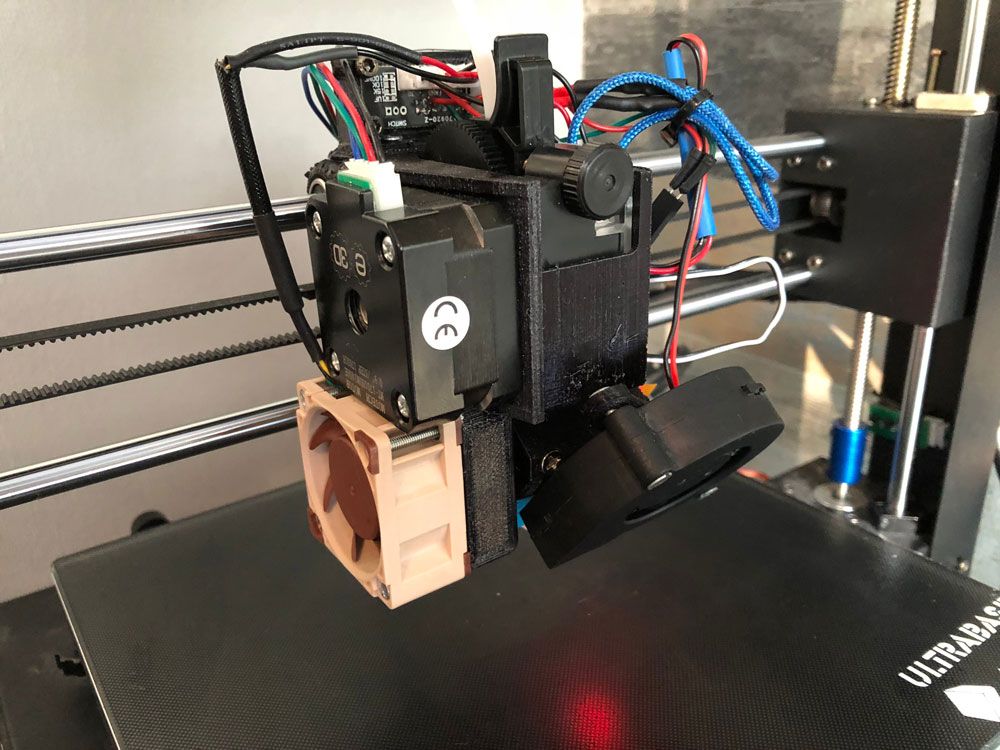
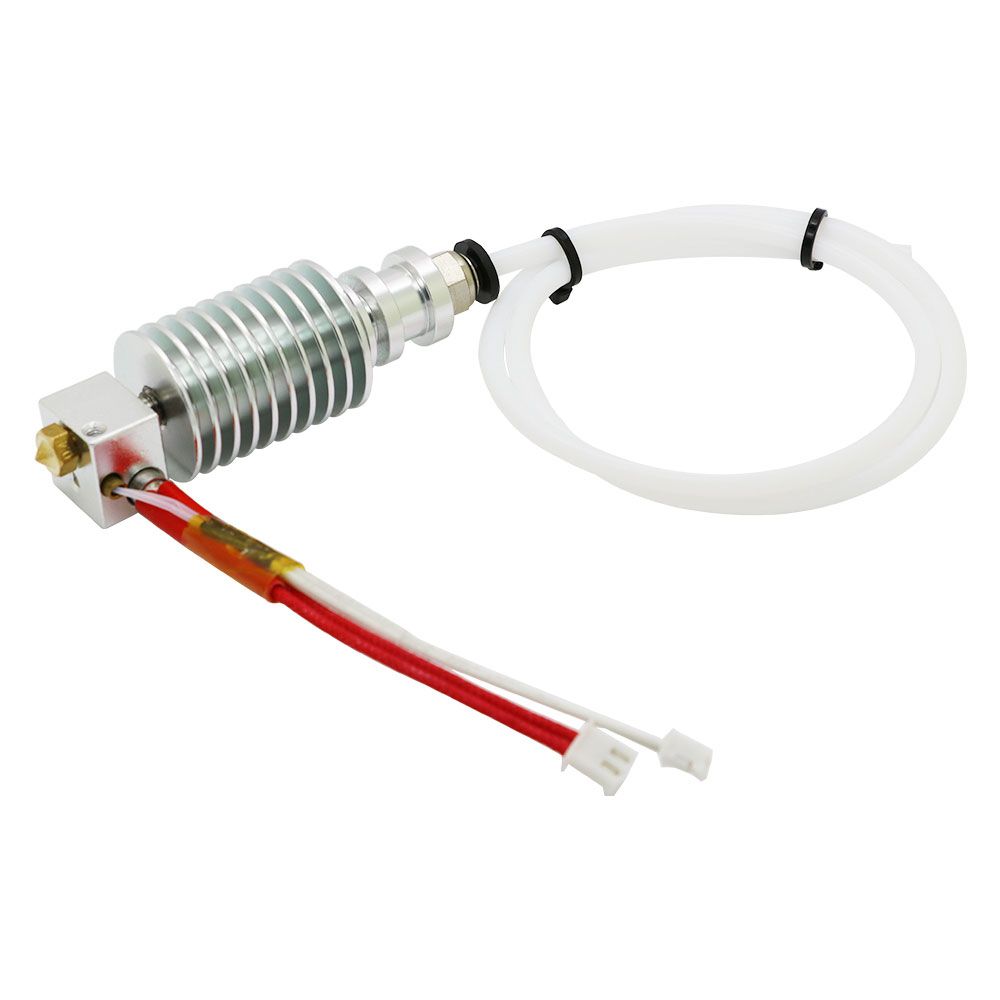
Экструдер
С внешней стороны каретка экструдера закрыта кожухом из металла, в котором прячется сам хотенд, вентиляторы и распределительная плата. Подающий механизм при этом является прямым аналогом Titan-a, что означает подачу пластика через шестеренку, а не напрямую. Все это позволяет достигнуть более высоких показателей крутящего момента и улучшить точность попадания филамента и прижим нити в механизме.
ВАЖНО! Если материал внезапно закончится, Anycubic Mega-S встанет на паузу и будет дожидаться заправки новой катушки.
Стекло является фирменной разработкой компании производителя, поэтому, несмотря на обилие подражателей, именно стекло Anycubic является максимально качественным. На поверхность стекла нанесено специализированное покрытие с перфорацией, которое позволяет обеспечить высокий показатель сцепления с поверхностью детали во время печати. При нагревании детали на таком покрытии надежно прилипают к столу, а после остывания легко отклеиваются. Исключением является только печать с использованием пластика ABS.
Ось Z
Состоит из двух равнозначных моторов, двух валов и двух винтовых направляющих. При первой калибровке оборудования крайне важно добиться срабатывания каждого из концевиков, чтобы добиться горизонтали. В дальнейшем даже при возникновении перекоса после каждой парковки ось будет автоматически возвращаться в исходное горизонтальное положение.
Экструдер
С внешней стороны каретка экструдера закрыта кожухом из металла, в котором прячется сам хотенд, вентиляторы и распределительная плата. Подающий механизм при этом является прямым аналогом Titan-a, что означает подачу пластика через шестеренку, а не напрямую. Все это позволяет достигнуть более высоких показателей крутящего момента и улучшить точность попадания филамента и прижим нити в механизме.
ВАЖНО! Если материал внезапно закончится, Anycubic Mega-S встанет на паузу и будет дожидаться заправки новой катушки.
Управление принтером при этом производится через отзывчивый сенсорный экран, расположенный на передней части принтера под небольшим углом. Печать можно осуществлять как с обычной карты памяти, так и подключившись к принтеру с помощью USB-шнура.
Для подготовки моделей к печати по умолчанию предлагается слайсер Cura 15.04.6, однако обновленные версии программы доступны для скачивания на сайте Ultimaker и также подходят к данной модели принтера.
Anycubic Mega-S характеризуется следующими параметрами:
- Технология печати – FDM/FFF/PJP.
- Может быть применен в домашних условиях или в небольших офисах.
- Особенности модели – стол с подогревом, наличие сенсорного дисплея, возможность регулировки скорости печати.
- Конструктивные особенности – открытый тип камеры.
- Подходящие материалы – ABS,PLA, Wood, HIPS.
- Размеры рабочего пространства – 210×205×210 мм.
Anycubic Mega-S отличается простотой настройки, наличием интеллектуальной системы контроля за температурой, а также возможностью продолжать работу после экстренного отключения от сети.
3D принтер Anycubic Mega-S (ANYCUBIC S)
-
Количество экструдеров
1 -
Максимальная температура экструдера
260°C -
Печать
FDM -
Разрешение печати
2560*1440 -
Скорость перемещения
100 мм/с -
Температура печатного стола
110°C -
Точность печати
XY: 12.5 мкм, Z: 0.2 мкм -
Область рабочей камеры
210x210x205 мм -
Скорость
20-100 мм/с -
Используемые материалы
PLA, ABS, TPU, HIPS, Wood -
Толщина слоя от
50 мкм -
Диаметр нити
1,75 -
Диаметр сопла, мм
0,4
Плюсы и минусы модели
Anycubic Mega-S обладает следующими достоинствами:
- Рама прибора обладает повышенной жесткостью.
- Оригинальное стекло, покрывающее стол, позволяет без усилий клеить и снимать детали.
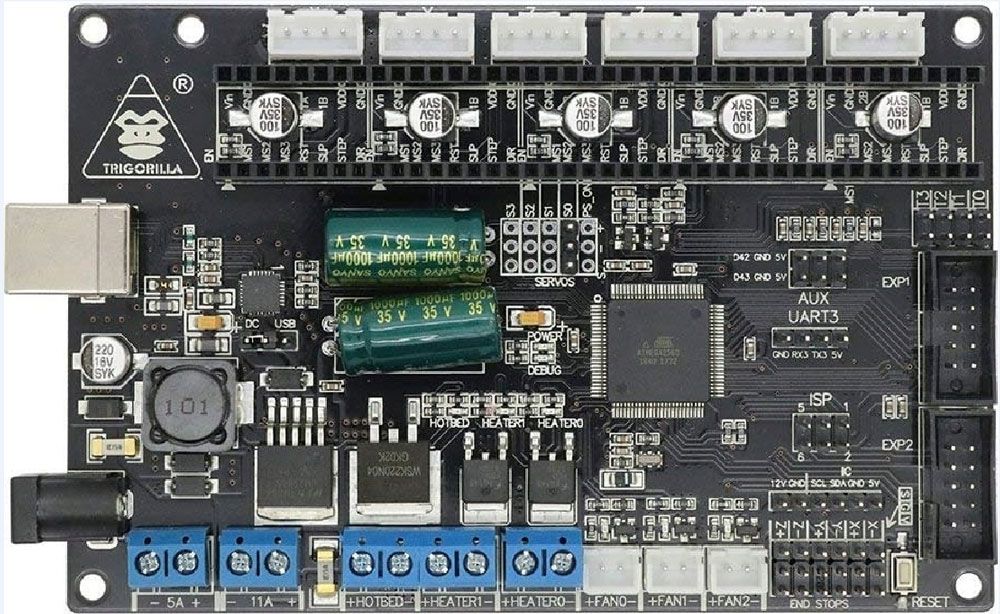
- Управляющая плата принтера оборудована съемными драйверами шаговых двигателей. Это означает, что в случае выхода из строя одного драйвера пользователю не придется менять конструкцию целиком, достаточно заменить испорченную деталь.
- Наличие сенсорного экрана, облегчающего управление.
- Наличие возможности восстановления программы печати после отключения от питания.
- Подающий механизм типа Titan.
- Кинематические элементы обладают высоким качеством и тщательно подогнаны друг к другу – люфт и закусывания исключены.
- Процедура сборки и установки максимально упрощена.
- Моторы оси Z синхронизированы.
Для подготовки моделей к печати по умолчанию предлагается слайсер Cura 15.04.6, однако обновленные версии программы доступны для скачивания на сайте Ultimaker и также подходят к данной модели принтера.
Anycubic Mega-S характеризуется следующими параметрами:
- Технология печати – FDM/FFF/PJP.
- Может быть применен в домашних условиях или в небольших офисах.
- Особенности модели – стол с подогревом, наличие сенсорного дисплея, возможность регулировки скорости печати.
- Конструктивные особенности – открытый тип камеры.
- Подходящие материалы – ABS,PLA, Wood, HIPS.
- Размеры рабочего пространства – 210×205×210 мм.
Anycubic Mega-S отличается простотой настройки, наличием интеллектуальной системы контроля за температурой, а также возможностью продолжать работу после экстренного отключения от сети.
3D принтер Anycubic Mega-S (ANYCUBIC S)
-
Количество экструдеров
1 -
Максимальная температура экструдера
260°C -
Печать
FDM -
Разрешение печати
2560*1440 -
Скорость перемещения
100 мм/с -
Температура печатного стола
110°C -
Точность печати
XY: 12.5 мкм, Z: 0.2 мкм -
Область рабочей камеры
210x210x205 мм -
Скорость
20-100 мм/с -
Используемые материалы
PLA, ABS, TPU, HIPS, Wood -
Толщина слоя от
50 мкм -
Диаметр нити
1,75 -
Диаметр сопла, мм
0,4
Плюсы и минусы модели
Anycubic Mega-S обладает следующими достоинствами:
- Рама прибора обладает повышенной жесткостью.
- Оригинальное стекло, покрывающее стол, позволяет без усилий клеить и снимать детали.
- Управляющая плата принтера оборудована съемными драйверами шаговых двигателей. Это означает, что в случае выхода из строя одного драйвера пользователю не придется менять конструкцию целиком, достаточно заменить испорченную деталь.
- Наличие сенсорного экрана, облегчающего управление.
- Наличие возможности восстановления программы печати после отключения от питания.
- Подающий механизм типа Titan.
- Кинематические элементы обладают высоким качеством и тщательно подогнаны друг к другу – люфт и закусывания исключены.
- Процедура сборки и установки максимально упрощена.
- Моторы оси Z синхронизированы.
Минусов модели немного:
- Недостаточный обдув детали, зачастую требующий доработки.
- Недостаточное качество печати при работе с флекс-пластиком.
- При неизменных настройках экструдера слои укладываются неравномерно.
Кому подойдет?
Данный 3D-принтер предназначен для использования в домашних условиях.
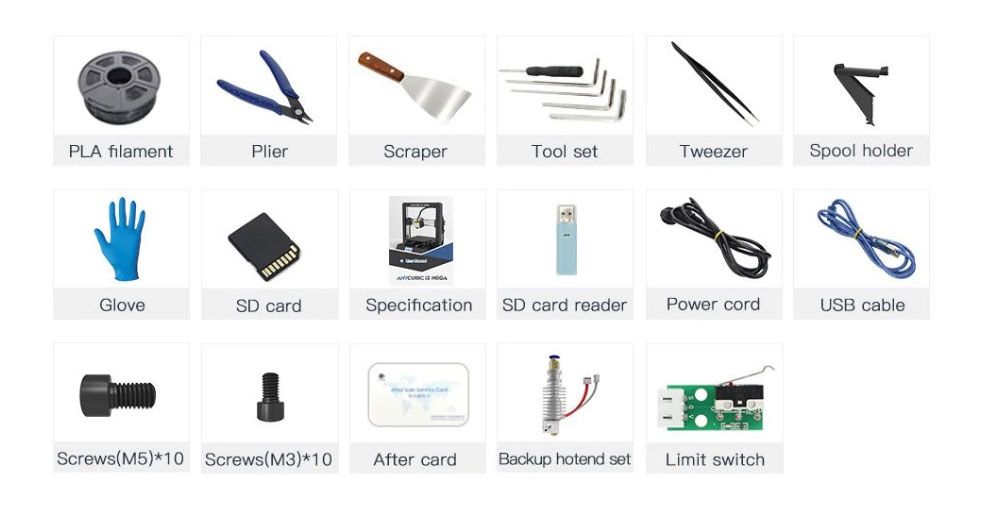
Комплектация
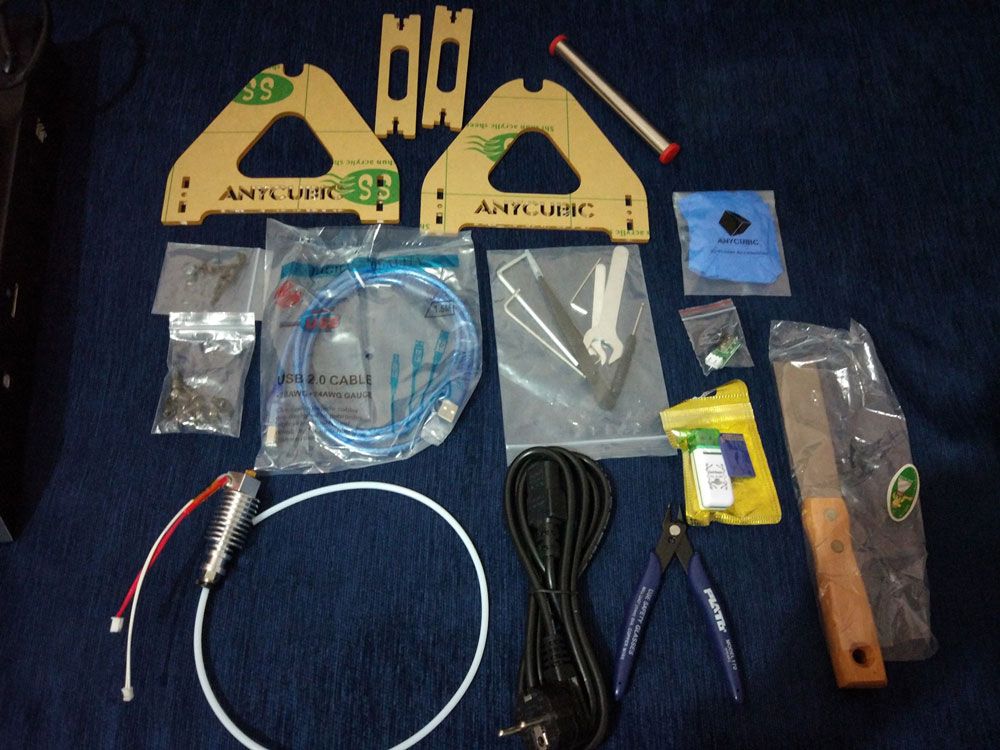
Комплектация Anycubic Mega-S включает в себя все необходимое для сборки и ремонта устройства. В комплект входит:
- Набор инструментов ( шестигранники, отвертка, ключ и игла для прочистки сопла).
- 8 винтов М5.
- SD-карта и картридер к ней.
- Перчатки из резины.
- Пинцет.
- Шпатель.
- Держатель для катушки.
- USB-кабель для подключения.
- Запасной экструдер.
- Скребок.
- Плоскогубцы.
К принтеру также прилагаются запасной концевик и катушка пластика весом 1 кг.
Комплектация
Комплектация Anycubic Mega-S включает в себя все необходимое для сборки и ремонта устройства. В комплект входит:
- Набор инструментов ( шестигранники, отвертка, ключ и игла для прочистки сопла).
- 8 винтов М5.
- SD-карта и картридер к ней.
- Перчатки из резины.
- Пинцет.
- Шпатель.
- Держатель для катушки.
- USB-кабель для подключения.
- Запасной экструдер.
- Скребок.
- Плоскогубцы.
К принтеру также прилагаются запасной концевик и катушка пластика весом 1 кг.
Качество печати и примеры изделий
По умолчанию в профиле настроек данной модели включено ускорение во время печати, равное 1800 мм/с, с рывками 8 мм/с.
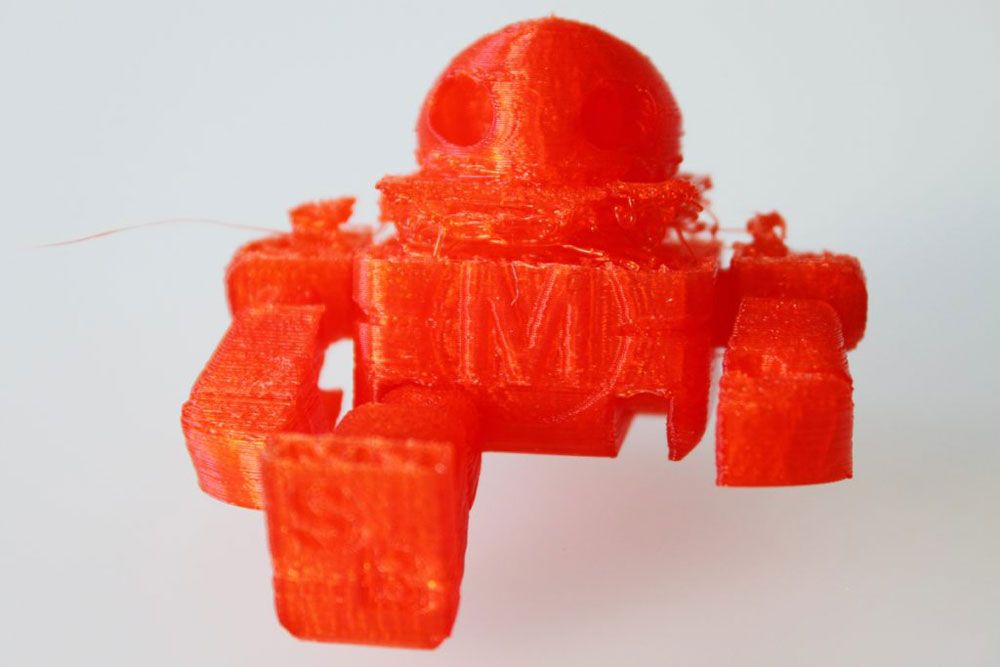
С использованием пластика PLA
При использовании пластика PLA и укладке слоем 0,2 мм при температуре 200/60 градусов изделие отпечатывается довольно качественно, несмотря на серьезные рывки. Углы не выступают, эхо полностью отсутствуют. Размеры готового изделия отличаются от размеров модели не более чем на несколько сотых миллиметра, т. е. погрешность несущественна.
Более сложные изделия из пластика этого типа также отпечатываются с высоким качеством, однако возможно возникновение дефектов, вызванное недостаточным обдувом детали. Обдув на Anycubic Mega-S расположен только с одной стороны и на значительном расстоянии от сопла. Именно поэтому сторона детали, которая была повернута к обдуву, печатается лучше, чем противоположная.
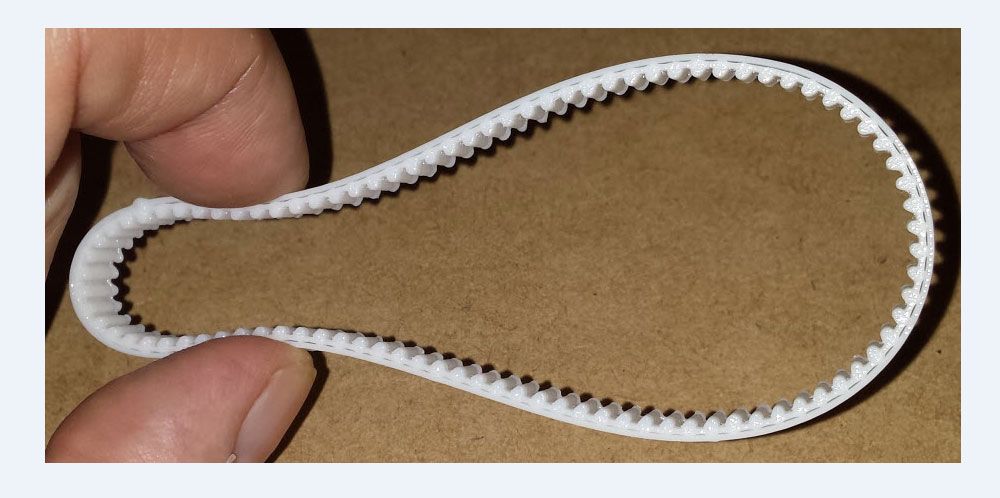
Тест CtrlV принтер также прошел успешно: мосты детали при печати не провисают, все изгибы пропечатываются достаточно ровно и с максимальной точностью.
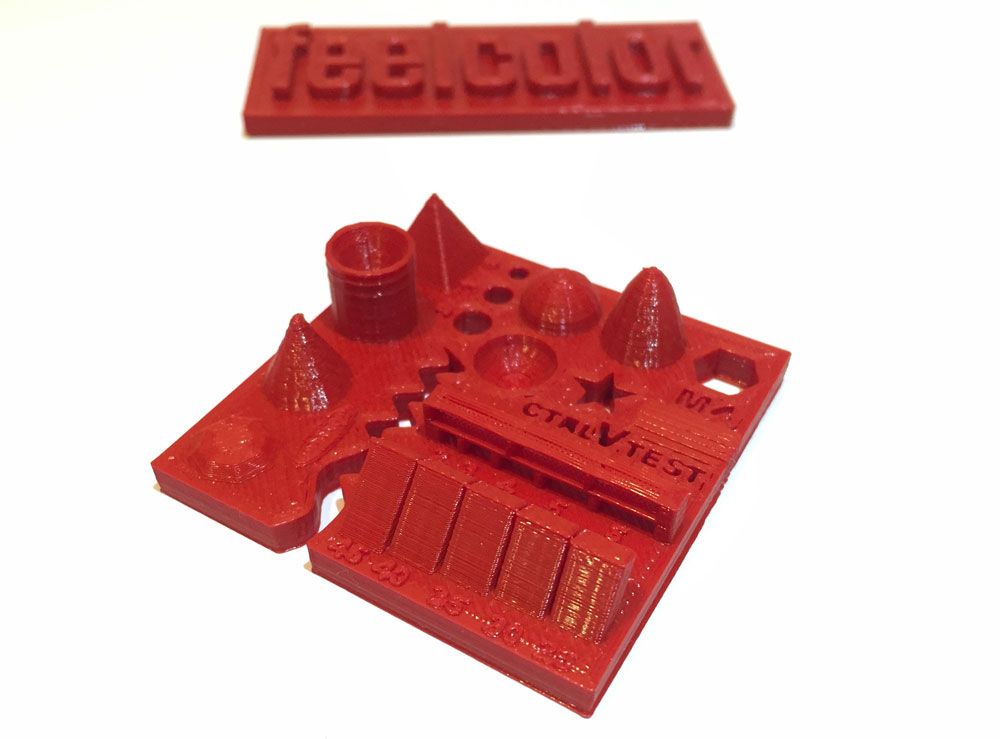
Тест CtrlV принтер также прошел успешно: мосты детали при печати не провисают, все изгибы пропечатываются достаточно ровно и с максимальной точностью.
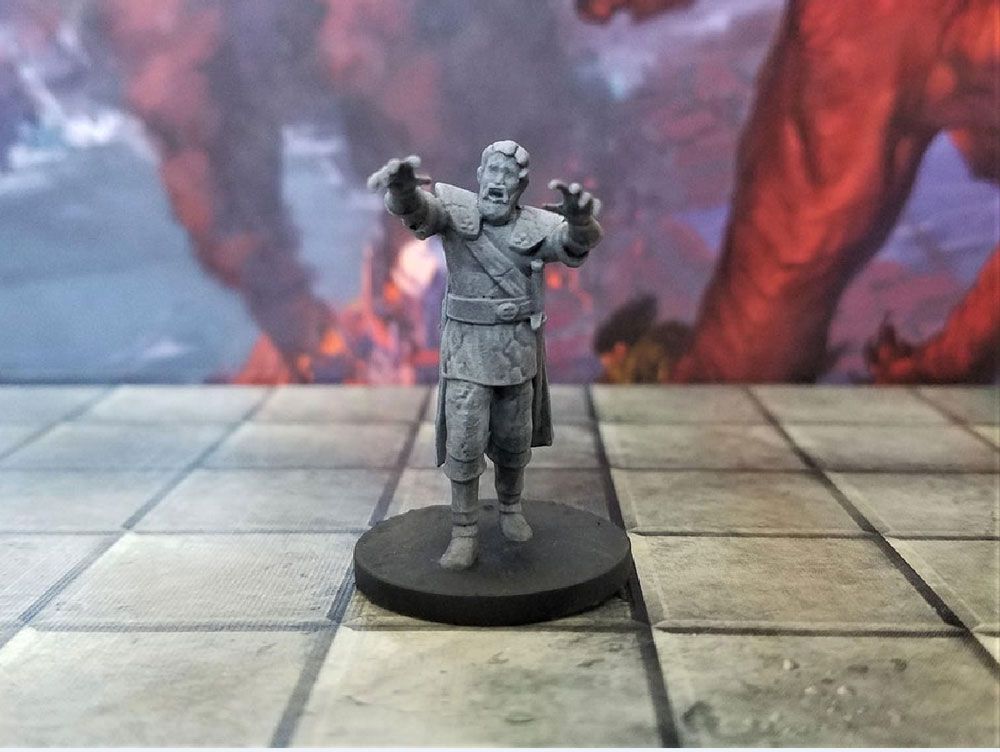
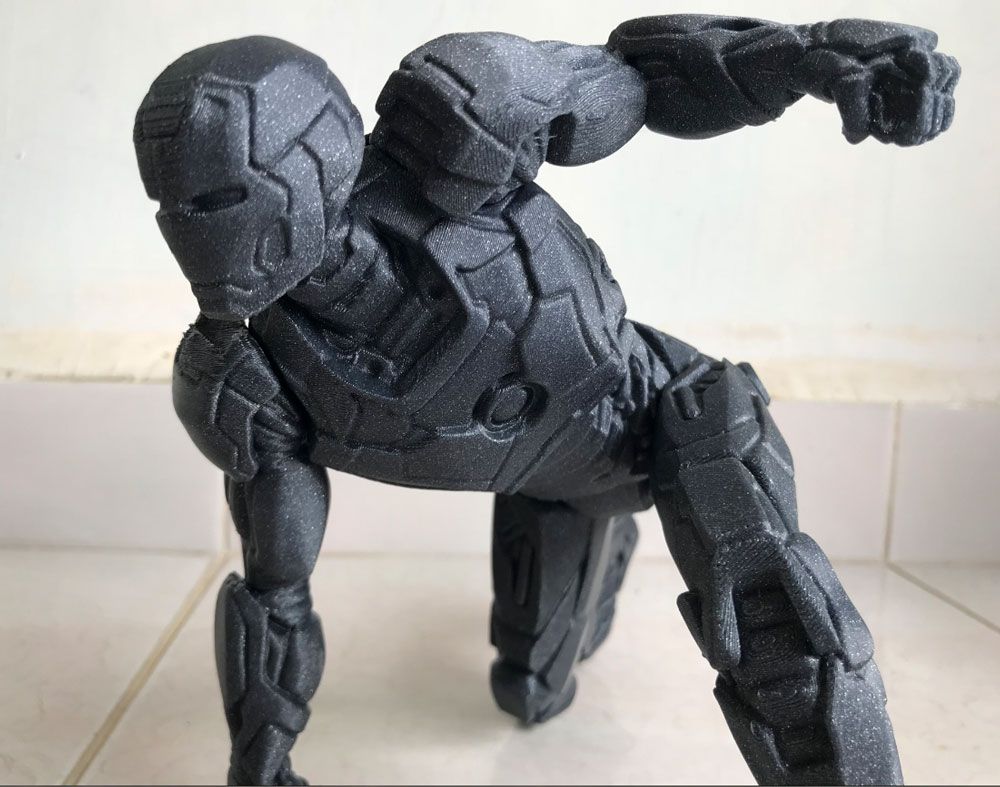
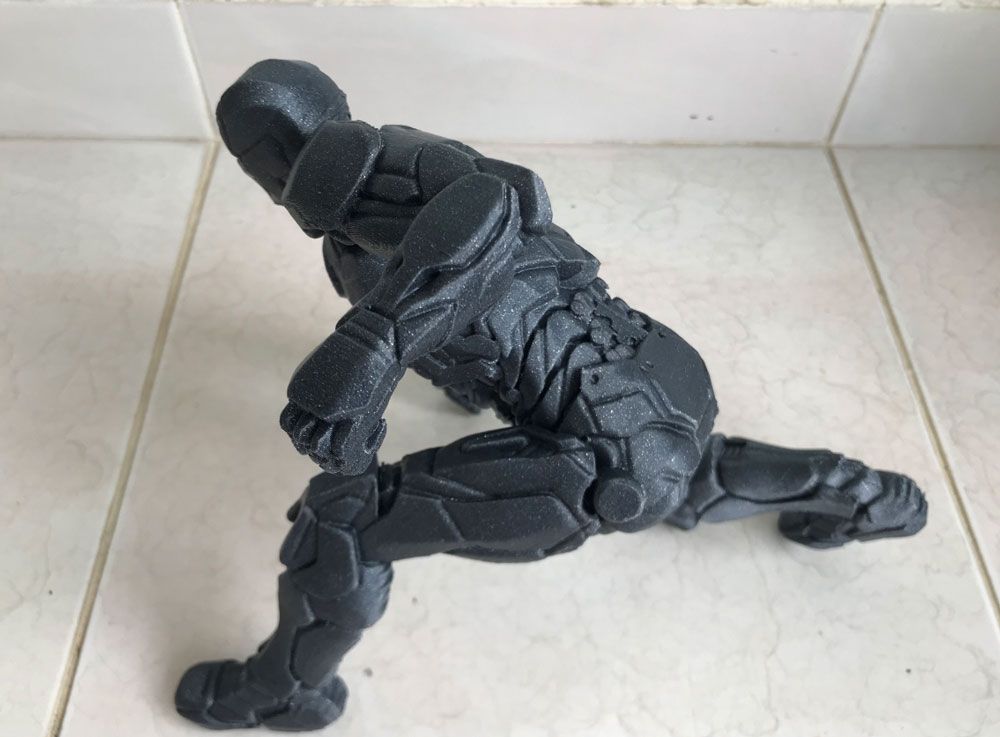
Печать PETG пластиком, слой 0,2 мм
Модель пропечатывается отлично, наклоны имеют ярко выраженный рельеф. Недостаточно ровно линии легли только на одном месте – подбородке железного человека.
Печать ABS пластиком, слой 0,2 мм
Данная модель 3D-принтера не слишком подходит для работы с таким материалом, поэтому полученный результат напрямую зависит от везения и соблюдения некоторых условий при проведении процедуры:
- Помещение должно быть хорошо прогрето.
- Сквозняки должны отсутствовать.
- Печать необходимо производить с использованием рафта и дополнительно использовать адгезив.
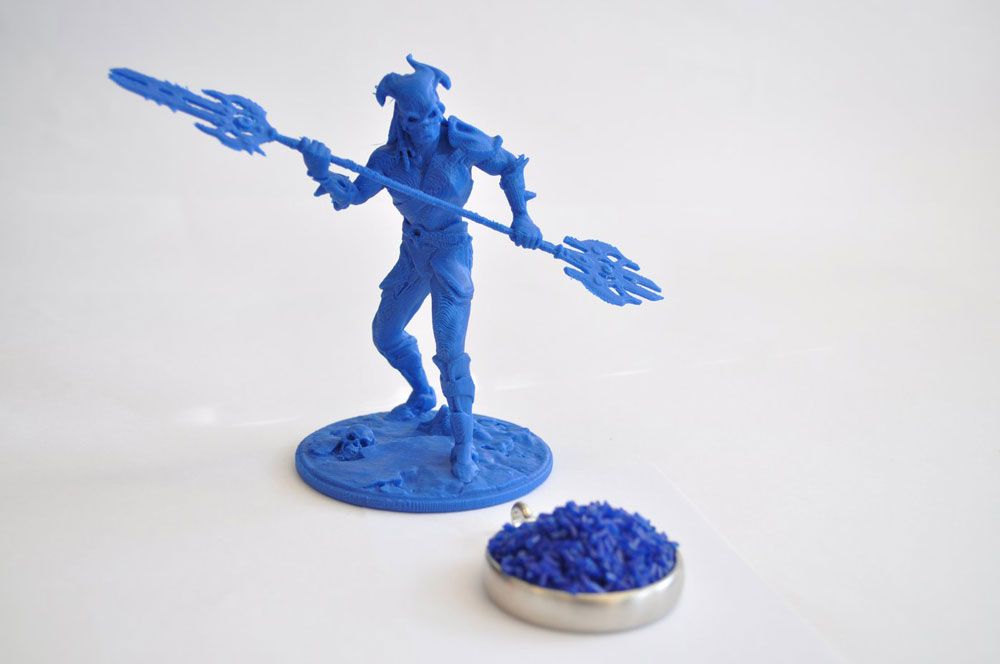
Хуже всего принтер показал себя при печати модели из Полифлекса – ровность укладки линий часто нарушалась, что привело к возникновению очевидных пропусков.
Хуже всего принтер показал себя при печати модели из Полифлекса – ровность укладки линий часто нарушалась, что привело к возникновению очевидных пропусков.
Первоначальная настройка и калибровка
Перед началом печати важно правильно настроить и откалибровать принтер.
В первую очередь потребуется установить уровень платформы устройства. Для этого потребуется:
- Собрать устройство и, убедившись в исправности проводов, подключить его к сети и запустить.
- Открыв главное меню, последовательно нажмите кнопки «Tools», «Home», «Home All».
- В разделе стартового меню нажмите кнопку «Setup», а затем «Motor». Это необходимо для отключения моторов и свободного перемещения оси.
- На платформу следует положить чистый бумажный лист, затем вручную переместить платформу к каждому углу стола, а потом – к центру платформы. На этом этапе важно не допускать трения сопла о платформу не укрытую слоем бумаги.
- После возвращения сопла в исходный угол следует затянуть или ослабить соответствующие гайки под печатной платформой. Отрегулировать расстояние следует таким образом, чтобы оно было равно толщине бумажного листа.
- После выравнивания 4 углов центральная часть, вероятно, отрегулируется самостоятельно, и вы сможете приступить к круговой тестовой печати на платформе.
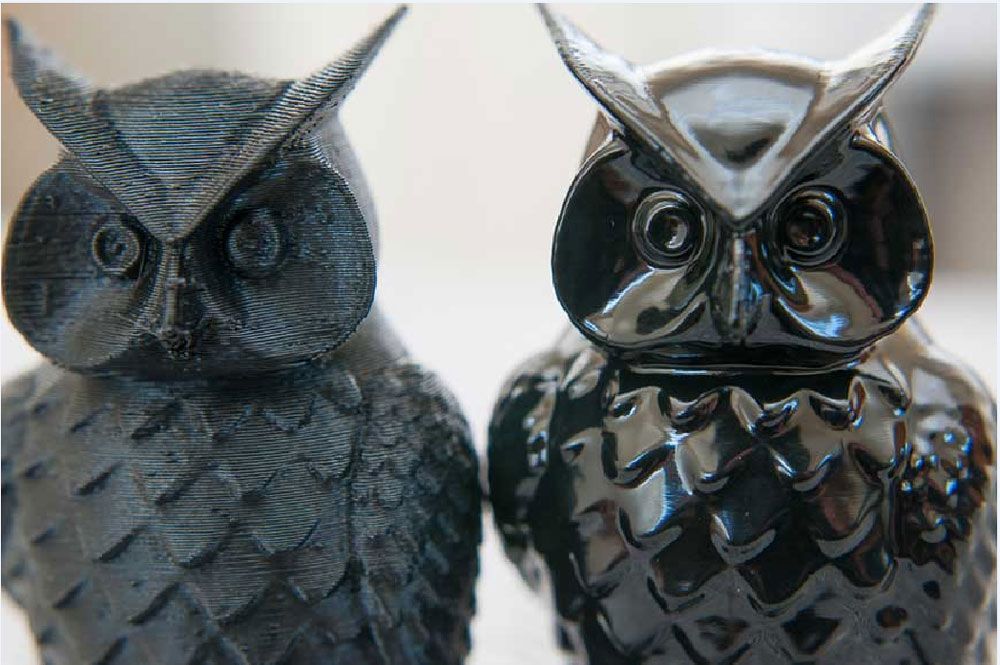
- Для тестовой печати необходимо вставить в устройство карту памяти, выбрать в меню кнопку «Print» и, выделив файл с названием «Owl_pair», отправить его на печать. После этого принтер начнет прогревать платформу и сопло.
- В этот момент следует вставить пластиковую нить в экструдер.
- Если тестовая печать показала, что сопло находится не на оптимальной высоте, следует нажать кнопку «Stop» в меню и вручную подкрутить соответствующие гайки под печатной платформой.
Настройки cura
Перед первым запуском системы необходимо через основное меню принтера установить язык и тип устройства.
Далее можно переходить непосредственно к этапу настройки. В первую очередь нужно установить скорость передачи данных – 250000. Это потребуется для подключения Cura к принтеру. Для этого нажмите кнопку «Machine» – «Machine settings» и выберите раздел «Port».
Обработка 3D-модели в системе Cura проводится в несколько этапов:
- Для увеличения или уменьшения моделей можно использовать колесико мыши.
- Сменить угол обзора можно, зажав левую клавишу мыши и перемещая курсор, удерживая при этом модель.
- Изменить положение модели можно, зажав ее кнопкой мыши и перетащив на нужное место.
- По умолчанию программа предлагает равномерное масштабирование модели относительно всех трех осей координат. Для отключения этой функции потребуется нажать на кнопку в виде замка в нижней части окна масштабирования.
Доработка и модернизация
Одним из главных преимуществ Anycubic Mega-S является возможность доработки этой модели 3D-принтера исходя из предпочтений и пожеланий пользователя.
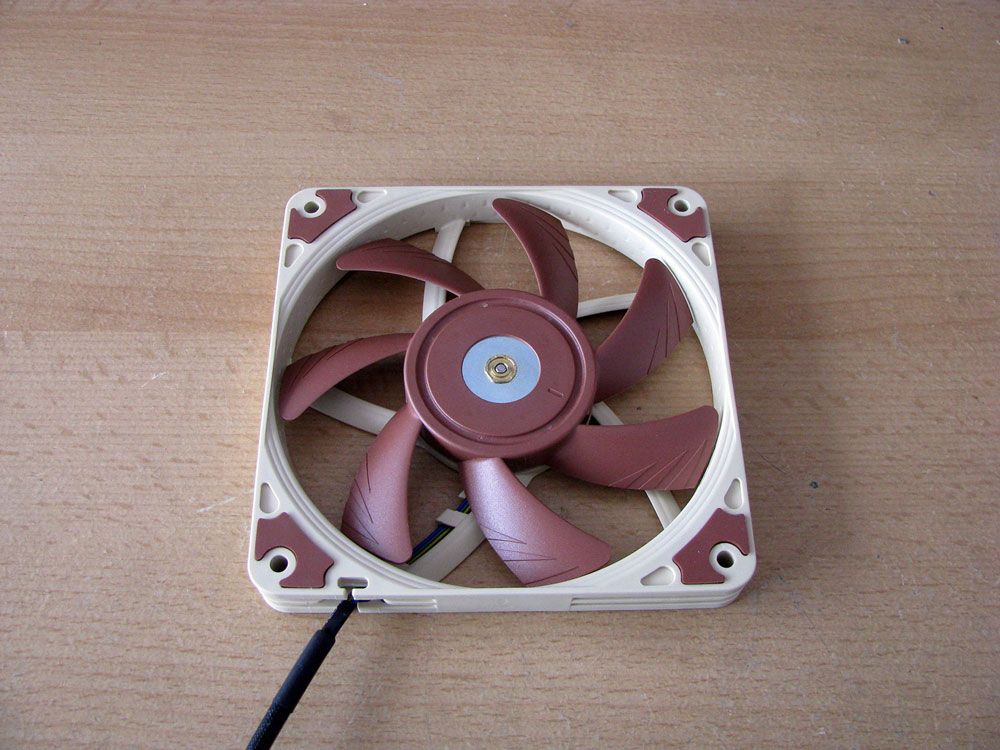
Вентилятор в блоке питания
Принтеры Anycubic Mega-S не могут похвастаться тихой работой, а источником шума, как правило, служит система охлаждения в блоке питания. Звук усиливается и за счет резонанса, возникающего из-за материала корпуса детали.
Решением проблемы в таком случае становится установка другого кулера. Наиболее подходящей для этих целей моделью является Noctua NF-A6x25 FLX, которую легко заказать на Alierxpress. Большинство пользователей при замене кулера также меняет и крышку блока питания, в которую впоследствии и устанавливается новый кулер.
Обработка 3D-модели в системе Cura проводится в несколько этапов:
- Для увеличения или уменьшения моделей можно использовать колесико мыши.
- Сменить угол обзора можно, зажав левую клавишу мыши и перемещая курсор, удерживая при этом модель.
- Изменить положение модели можно, зажав ее кнопкой мыши и перетащив на нужное место.
- По умолчанию программа предлагает равномерное масштабирование модели относительно всех трех осей координат. Для отключения этой функции потребуется нажать на кнопку в виде замка в нижней части окна масштабирования.
Доработка и модернизация
Одним из главных преимуществ Anycubic Mega-S является возможность доработки этой модели 3D-принтера исходя из предпочтений и пожеланий пользователя.
Вентилятор в блоке питания
Принтеры Anycubic Mega-S не могут похвастаться тихой работой, а источником шума, как правило, служит система охлаждения в блоке питания. Звук усиливается и за счет резонанса, возникающего из-за материала корпуса детали.
Решением проблемы в таком случае становится установка другого кулера. Наиболее подходящей для этих целей моделью является Noctua NF-A6x25 FLX, которую легко заказать на Alierxpress. Большинство пользователей при замене кулера также меняет и крышку блока питания, в которую впоследствии и устанавливается новый кулер.
Процедура замены проводится в несколько этапов:
- Вскрывается корпус устройства.
- Демонтируется блок питания. Деталь при этом должна быть отключена от всех имеющихся проводов.
- После отключения блок питания необходимо снять с принтера, для чего его потребуется вернуть в исходное положение и максимально отодвинуть в противоположную сторону стол. После этого откроются 4 винта, которые и отвечают за крепление блока питания к корпусу устройства.
- После демонтажа следует открыть крышку блока питания, присоединить новый кулер и собрать устройство заново.
Проведенная замена позволит:
- Избавиться от тактования в пограничных режимах.
- Улучшить систему охлаждения устройства.
- Вентилятор с большей производительностью можно использовать на более слабых режимах – это не ухудшит качество охлаждения, но заметно снизит уровень издаваемого шума.
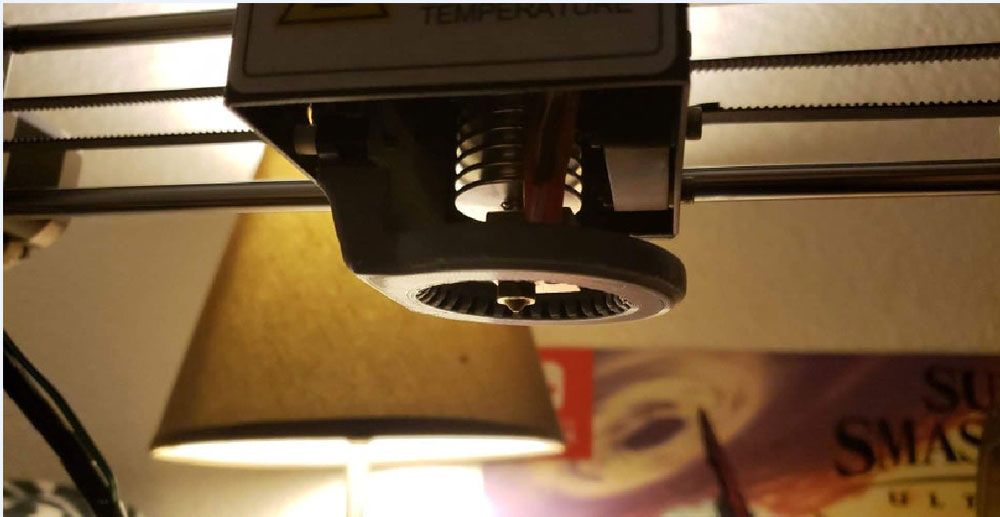
Обдув
Замена системы обдува позволит существенно повысить качество печати устройства. Процедура проводится следующим образом:
- Снимается старый воздуховод.
- На 3D-принтере с использованием ABS-пластика распечатывается круговой обдув. Рекомендуемая температура печати – 240 градусов, стола – 110 градусов. Для улучшения фиксации следует использовать адгезив.
- Новая деталь устанавливается взамен старой, и устройство собирается в обратном порядке.
Замена драйверов
Замена драйверов на Anycubic Mega-S также производится для снижения общего уровня шума. Отметим, что замене подлежат 4 драйвера, так как у принтера 3 оси, на одной из которых двигатели установлены в двойном размере. Проще и дешевле всего драйверы шаговых двигателей заказать на Alierxpress поштучно.
Для замены потребуется:
- Набор шестигранников.
- Мультиметр.
- Ацетон или другая обезжиривающая жидкость.
Процедура состоит из нескольких этапов:
- Разбор принтера и снятие обдува (если система была ранее доработана).
- Проводим замеры уровня VREF на установленных драйверах.
- Демонтируем старые драйверы и устанавливаем новые (подстроечным резистором вверх).
- Следующий этап – настройка. После сборки включаем устройство и устанавливаем верный ток для моторов. Напряжение должно равняться 0,85–0,86 вольт.
Переделка стандартного стола в трёхточечный
Данная модернизация устройства может потребоваться в том случае, если стандартный стол принтера не идеально ровный.
По ее завершении существенно упростится калибровка, полностью исчезнут выгибания и перекосы.
Модель рекомендуется печатать с добавлением ребер жёсткости, следя за тем, чтобы печать по всей поверхности оставалась максимально качественной. В качестве прокладки при этом может использоваться электротехническая бумага и дюраль.
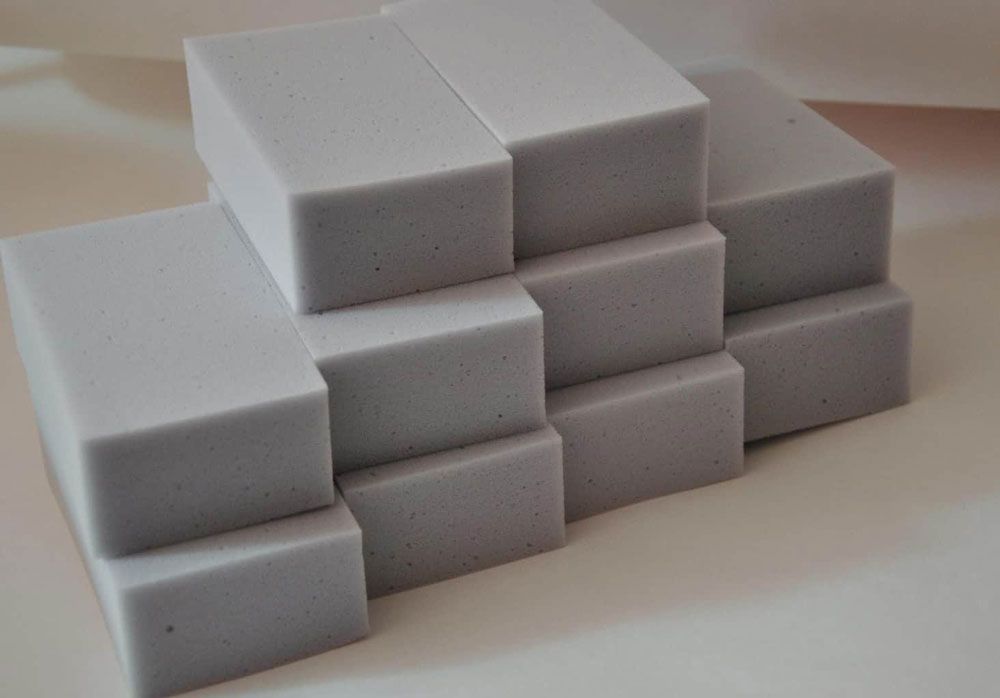
Утепление стола меламиновыми губками
От способности стола держать температуру во многом зависит итоговое качество печати. Именно поэтому многие владельцы 3D-принтеров прибегают к утеплению печатного стола, в том числе и меламиновыми губками.
Выбор объясняется качеством материала: меламиновые губки гораздо плотнее и легче поролоновых.
Обдув
Замена системы обдува позволит существенно повысить качество печати устройства. Процедура проводится следующим образом:
- Снимается старый воздуховод.
- На 3D-принтере с использованием ABS-пластика распечатывается круговой обдув. Рекомендуемая температура печати – 240 градусов, стола – 110 градусов. Для улучшения фиксации следует использовать адгезив.
- Новая деталь устанавливается взамен старой, и устройство собирается в обратном порядке.
Замена драйверов
Замена драйверов на Anycubic Mega-S также производится для снижения общего уровня шума. Отметим, что замене подлежат 4 драйвера, так как у принтера 3 оси, на одной из которых двигатели установлены в двойном размере. Проще и дешевле всего драйверы шаговых двигателей заказать на Alierxpress поштучно.
Для замены потребуется:
- Набор шестигранников.
- Мультиметр.
- Ацетон или другая обезжиривающая жидкость.
Процедура состоит из нескольких этапов:
- Разбор принтера и снятие обдува (если система была ранее доработана).
- Проводим замеры уровня VREF на установленных драйверах.
- Демонтируем старые драйверы и устанавливаем новые (подстроечным резистором вверх).
- Следующий этап – настройка. После сборки включаем устройство и устанавливаем верный ток для моторов. Напряжение должно равняться 0,85–0,86 вольт.
Переделка стандартного стола в трёхточечный
Данная модернизация устройства может потребоваться в том случае, если стандартный стол принтера не идеально ровный.
По ее завершении существенно упростится калибровка, полностью исчезнут выгибания и перекосы.
Модель рекомендуется печатать с добавлением ребер жёсткости, следя за тем, чтобы печать по всей поверхности оставалась максимально качественной. В качестве прокладки при этом может использоваться электротехническая бумага и дюраль.
Утепление стола меламиновыми губками
От способности стола держать температуру во многом зависит итоговое качество печати. Именно поэтому многие владельцы 3D-принтеров прибегают к утеплению печатного стола, в том числе и меламиновыми губками.
Выбор объясняется качеством материала: меламиновые губки гораздо плотнее и легче поролоновых.
Оклейка производится с нижней части стола, сверху на слой губок также рекомендуется приклеить слой фольги, в качестве клея используя силикон.
Результатом доработки становится улучшение способности печатного стола удерживать тепло – он быстрее нагревается, температура остается стабильной долгое время без включения систем подогрева. Стол при этом не охлаждается холодным воздухом при движении.
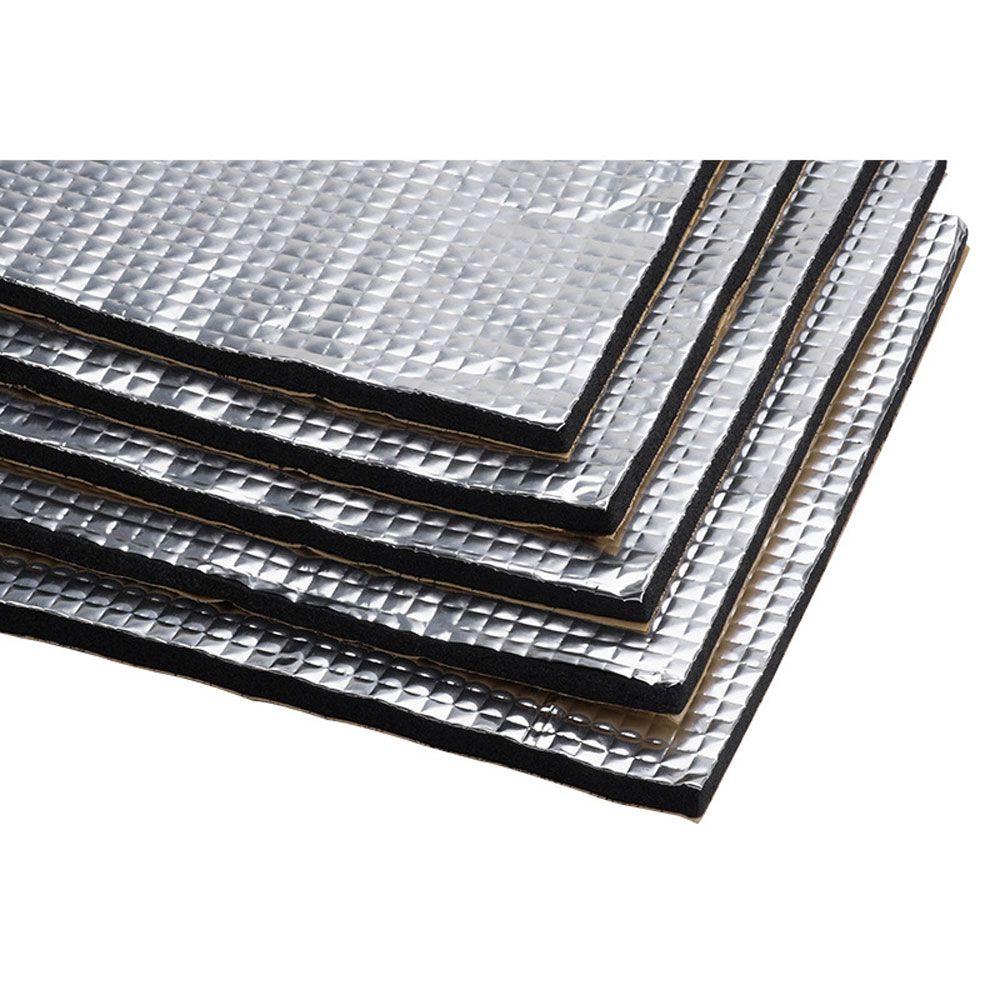
Утепление стола готовыми решениями из Китая
Утеплить стол можно и готовыми самоклеящимися ковриками из Китая. Достаточно всего одного слоя, чтобы повысить качество нагрева:
- Неутепленный стол прогревается до 100 градусов за 11 минут, после утепления – за 8.
- Максимальная температура до доработки – 105 градусов, после – 120.
- Без утепления печать становится некачественной уже при 105 градусах, с утеплением качество не страдает до 115.
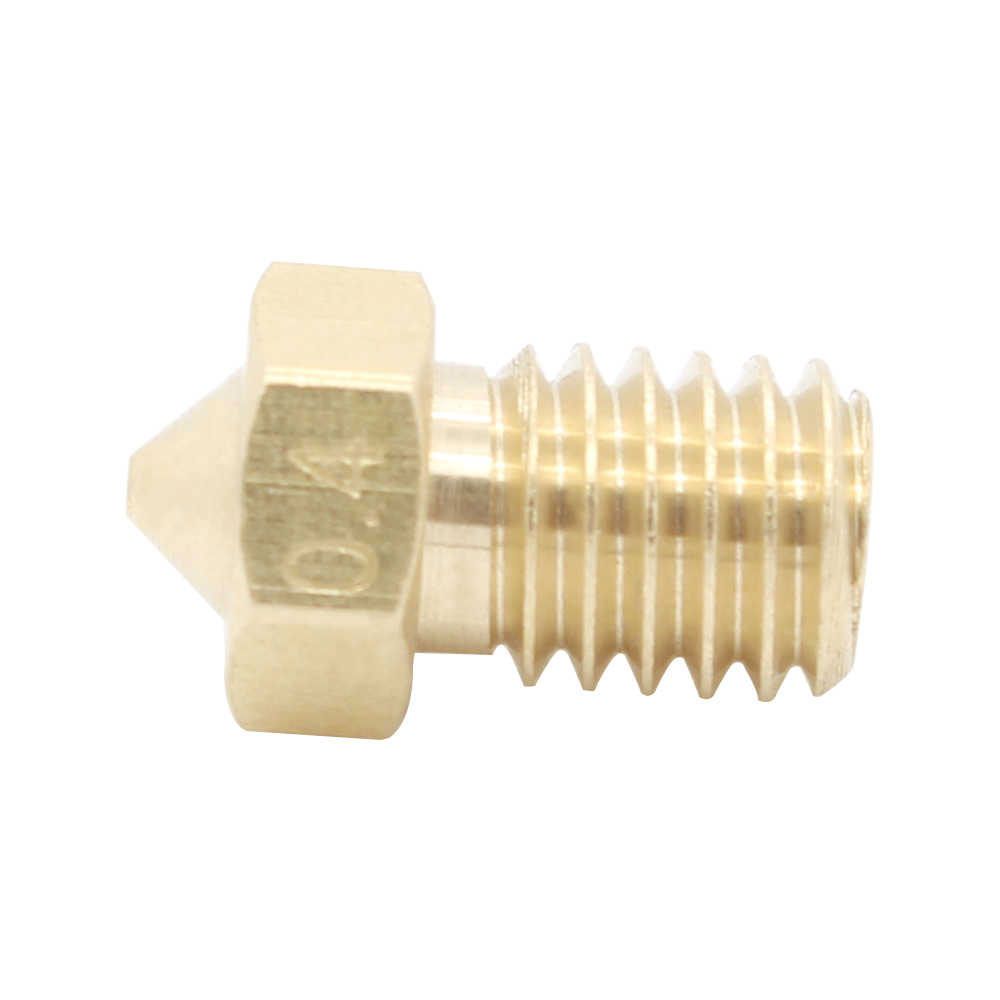
Замена сопел на более маленькие
В том случае, если при печати образуется множество лишних нитей, а четкость модели теряется, рекомендуется заменить сопло на деталь с меньшим диаметром выходного отверстия.
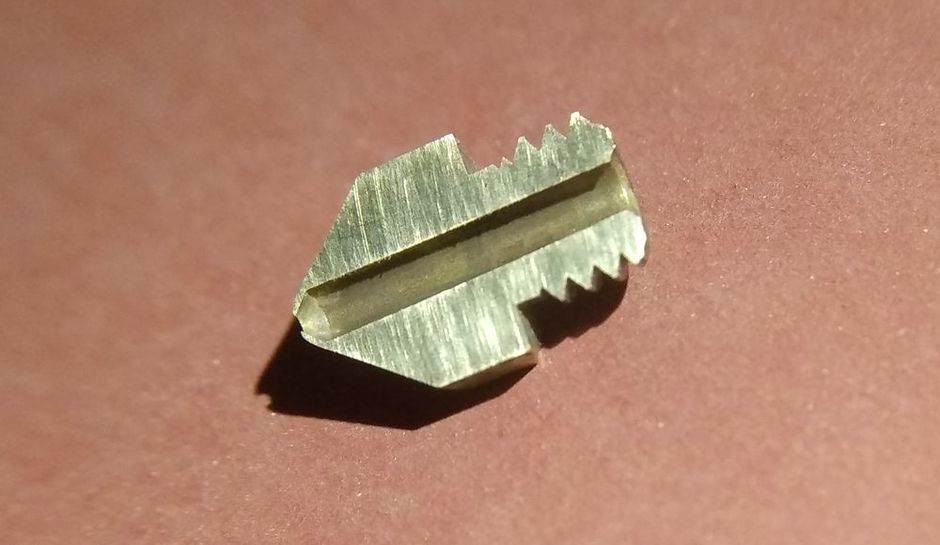
Замена сопел на более маленькие
В том случае, если при печати образуется множество лишних нитей, а четкость модели теряется, рекомендуется заменить сопло на деталь с меньшим диаметром выходного отверстия.
Это позволит увеличить качество печати и снизить вероятность подтекания пластика. Расходные части можно заказать напрямую от поставщика или обратиться к китайскому сайту.
ВАЖНО! Как правило, сопло не удается открутить без нагревания устройства, поэтому перед процедурой экструдер необходимо прогреть до температуры 220 градусов.
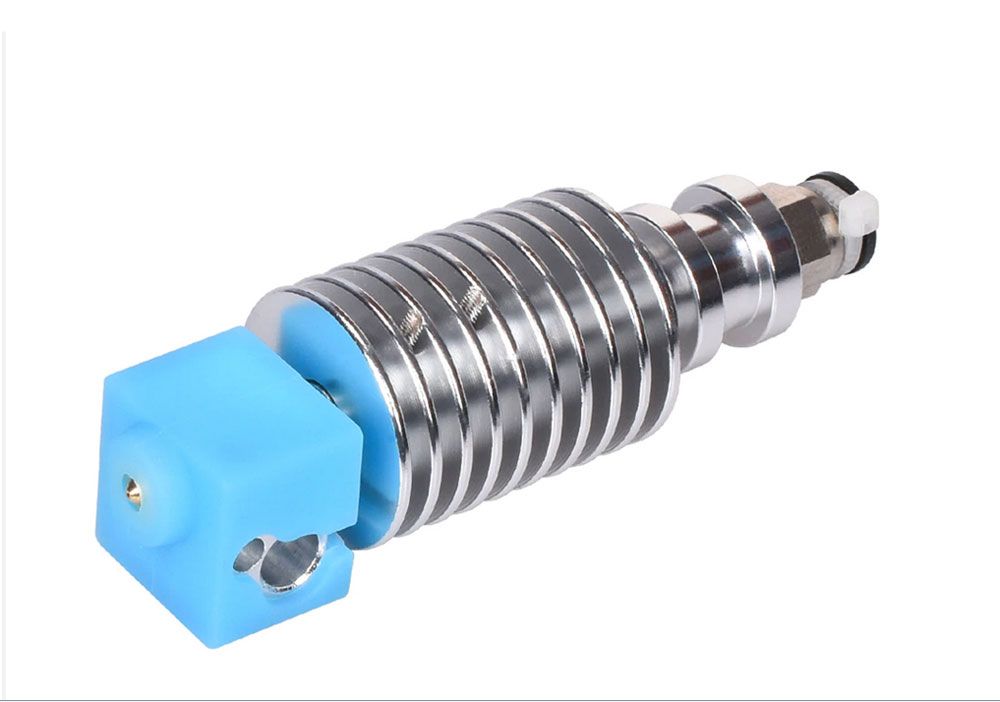
«Носок» для хотэнда
Силиконовый чехол, носок для хотэнда служит для дополнительной защиты сопла от сквозняков и термостатирования нагревательного блока.
«Носок» для хотэнда
Силиконовый чехол, носок для хотэнда служит для дополнительной защиты сопла от сквозняков и термостатирования нагревательного блока.
Применяется для следующих целей:
- Защита сопла и нагревательного блока от грязи и пыли.
- Защита экструдера от попадания частиц жженого пластика.
- Уменьшение температуры под соплом, что позволяет быстрее остужать слои и повышать качество печати.
- Снижает вероятность получения ожогов пользователем.
Сравнение и отличия от модели Anycubic i3 mega s
Основными отличиями можно назвать:
- Повышение точности подачи материала более чем в 4 раза за счет установки экструдера типа Titan.
- Наличие платформы с покрытием Ultrabase.
- Наличие датчика и держателя филамента.
- Более точная калибровка за счет установки двойных датчиков на оси Z.
Anycubic Mega-S – модель бюджетного 3D-принтера, которая по праву занимает лидирующие позиции на рынке. Устройство идеально подойдет для начинающих пользователей, которые не готовы держать катушку вручную и устанавливать датчики накаливания. Модель удобна и надежна, а ее цена значительно ниже, чем на устройства с аналогичными параметрами. Благодаря улучшенной платформе с покрытием Ultrabase, напечатанную деталь можно легко снять со стола после охлаждения, не боясь ее повредить. Печать может вестись как с карты памяти, так и через USB-кабель. Anycubic Mega-S предельно прост в настройке и пользовании, имеет высокотехнологичную систему контроля за температурой и может самостоятельно возобновить работу после экстренного отключения от источника питания.
View a manual of the Anycubic i3 Mega S below. All manuals on ManualsCat.com can be viewed completely free of charge. By using the ‘Select a language’ button, you can choose the language of the manual you want to view.
Page: 1
Thank you for choosing ANYcUBIC products.
Please read the user manual carefully.
Please visit www.anycubic3d.com for more information.
Email us on support@anycubic3d.com or james@anycubic3d.com for
technical support.
If you experience any issues with this product, or the performance is not what you
had expected, please contact us first. We are here to solve any problems for you.
Team ANYcUBIC
www.anycubic3d.com Facebook group Youtube channel
Page: 2
Safety Instructions
Please carefully read the safety instructions before get started.
ANYcUBIC 3D printer generates high temperature. Do not reach inside of the
printer during operation. Allow time for the printer to cool down after printing.
Contact with extruded materials may cause burns. Wait for printed objects to cool
before removing them from the build platform.
ANYcUBIC 3D printer includes moving parts that can cause injury.
Vapors or fumes may be irritating at operating temperature. Always use the
ANYcUBIC 3D printer in an open, well ventilated area.
Be cautious when using the scraper. Never direct the scraper towards your hand.
ANYcUBIC 3D printer MUST NOT be exposed to water or rain.
ANYcUBIC 3D printer is designed to be used within ambient temperature ranging
8ºC-40ºC, and humidity ranging 20%-50%. Working outside those limits may
result in low quality printing.
It is recommended to use protection glasses when cleaning/sanding the printed
models to avoid small particles contacting eyes.
In case of emergency, immediately turn off the ANYcUBIC 3D printer and contact
us or consult for professional advice.
Never leave the ANYcUBIC 3D printer unattended during operation.。
Page: 3
Contents
1. Product overview…………………………………………………………………………………………… 1
2. Part list ……………………………………………………………………………………………………………. 4
3. Assembly instruction…………………………………………………………………………………….. 5
4. Leveling…………………………………………………………………………………………………………… 9
5. Software installation …………………………………………………………………………………… 15
5.1 Driver installation…………………………………………………………………………………. 15
5.2 Cura Installation …………………………………………………………………………………… 17
6. Printing………………………………………………………………………………………………………….. 26
7. Manual filament change …………………………………………………………………………….. 28
8. Resume from outage…………………………………………………………………………………… 29
9. Trouble shooting………………………………………………………………………………………….. 32
Page: 4
Technical Specification
Printing
Technology: FDM (Fused Deposition Modeling)
Build Size: 210×210×205 (mm3)
Layer Resolution: 0.05-0.3 mm
Positioning Accuracy: X/Y 0.0125mm,Z 0.002mm
Extruder Quantity: Single
Nozzle/Filament Diameter: 0.4 mm/1.75mm
Print Speed: 20~100mm/s (suggested 60mm/s)
Travel Speed: 100mm/s
Supported Materials: PLA, ABS, HIPS, Wood
Temperature
Ambient Operating Temperature: 8°C — 40°C
Operational Extruder Temperature: max 260°C
Operational Print Bed Temperature: max 110°C
Software
Slicer Software: Cura
Software Input Formats: .STL, .OBJ, .DAE, .AMF
Software Output Formats: GCode
Connectivity: SD card; USB port(expert users only)
Electrical
Input rating: 110V/220V AC, 50/60Hz
Working Voltage: 12V DC
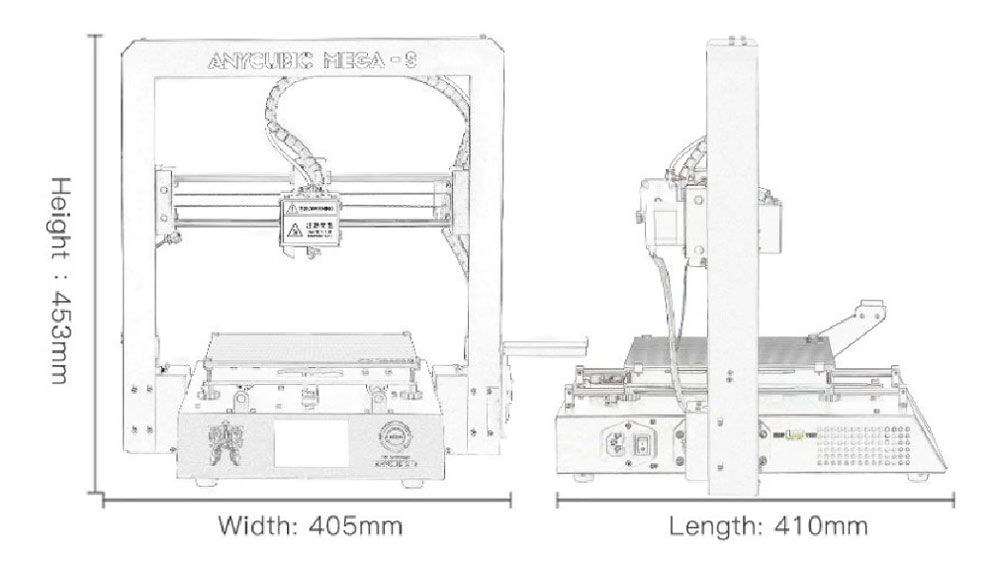
Physical Dimensions
Printer Dimensions: 405mm×410mm×453mm
Net Weight: ~11kg
Page: 5
1
1. Product overview
⑹
⑻
⑴
⑵
⑷
⑸
⑿
⒀
⑾
⑼
⑽
⑺
⒁
⒂
(22)
⒃
⑴Frame ⑵Print head ⑶Hotend cooling fan ⑷Nozzle ⑸Model cooling fan ⑹Base ⑺X smooth
rods ⑻X end stop ⑼Print platform ⑽Y smooth rods ⑾Touch screen ⑿Filament spool ⒀Spool
holder ⒁Z smooth rods ⒂Z lead screw ⒃X motor ⒄Z adjustable nut ⒅Z end stop ⒆Y end stop ⒇
Z motors (21)Teflon tubing (22) Extruder (23) Filament sensor
(21)
⒆
⒇
⒅
⑶
(23)
⒄
Page: 6
2
Home menu
Print: enter the print list
Setup: enter the setup menu
Tools: enter the tools menu
(Other information: ①nozzle temperature ②heated bed temperature ③printer status)
Print
Print: print the selected files in SD card
Resume: Resume from outage (only valid for offline print via SD card)
(Other information: ①Page up and down ②Refresh the list ③Return to the home menu)
Setup
En/中: Change language (English/Chinese)
Menu Directory
Home Menu
Print Tools
Setup
Page: 7
3
Temp: Enter the menu to adjust ① E0 (hotend) Temp (170-260°C) ②Bed Temp (0-120°C)
Motor: Disable all motors (only valid when machine is not printing)
Status: Enter the sub-menu with Print/Pause/Resume icon (only valid for offline print)
(Other information: ①Files ②Print Rate ③Time ④Progress ⑤E0 Temp ⑥Bed Temp ⑦
coordinates for X/Y/Z axis ⑧Return to previous menu)
Speed: Enter the menu to adjust ①Fan speed (0-100) ②Print Rate (50-999)
Return: Return to Home Menu
Tools
Home: ①Home X ②Home Y ③Home Z ④Home All ⑤Return (only valid when machine is not
printing)
Axis: ① Home all axis ②Move X/Y/Z axis by 0.1/1/10 ③Speed mode for axis move
Low/Medium/High (only valid when machine is not printing)
Preheat: ①Preheat PLA ②Preheat ABS (only valid when machine is not printing)
(Other information: ①E0 Temp ②Bed Temp)
Cooling: Cut off the power of hotend and heated bed (only valid when machine is not printing)
Filament: ①Filament In ②Filament Remove (will automatically heating to 200°C for filament in
or remove) ③ Stop (only valid when on print job)
Reset: Popup window to decide if reboot the mainboard
More: Enter the next page of Tools sub-menu
TP: Touch panel alignment(click on the cue points)
Help: Basic description of the Menu
Info: Information about the product
Return: Return to Home Menu
Page: 8
4
2. Packing list
Tool kit M5*8 screws SD card SD Card reader
ANYcUBIC 3D printer
Gloves Power cord Tweezer Spool holder
PLA filament (Random color) USB cable Extra hotend Scraper Plier
Page: 9
5
3. Assembly instruction
Step 1.Unpack and take out the printer and accessories.
Wear gloves because the smooth rods and lead screw may be greased in factory.
Step 2.Follow ① ② ③ in Fig. 1. Carefully lift the base to fit into the frame and fix them by
8 pieces of M5*8mm hex cap screws. The screw locations are indicated by red
squares in ③. The screws can be installed in diagonal order and can be tightened
after all screws installed in place.
Figure 1
Frame
Base
①
②
③
Page: 10
6
Step 3.Wiring
(1) Fig.2, select the correct voltage mode according to your local voltage ratings
(110V/220V). The switch is inside the bottom left of the base and 220V is default.
Allan keys can be used to move the switch inside.
(2) There are 3 ports with different color (Red/Green/Black) at the bottom right side of
the base, and there are 3 different color cable connectors respectively. Accordingly,
insert those connectors to the ports by the same color, as shown in Fig. 3.
> Make sure the connectors are well inserted, and no pins are bent inside.
> Wrong or loose connection would lead to malfunction of the machine.
(Figure 3)
(Figure 2)
Page: 11
7
(3) Fig. 4, customers may notice there is a ring of zip tie attached just below the plastic
ring of the quick connector. Do not cut it off.
Only cut this zip tie when swapping or repairing the hotend.
Step 4.Spool holder and filament sensor
(1) Assemble the spool holder as shown in Fig. 5, and tighten 4 pairs of screw and nuts
at the lower 4 corner. (Customers may firstly peel off the protective cover on the
acrylic plates)
(Figure 5)
(Figure 4)
Plastic ring
Zip tie
Do not cut
Page: 12
8
(2) As shown in Fig.6, manually install the filament spool to the spool holder. Pass the
filament through the filament sensor. Insert the filament into the extruder and Teflon
tubing, but do not fully reach it into the hotend (until preheat the hotend later).
Figure 6
> Only insert filament into the hotend after “Preheat” it later.
> It is suggested to cut off the bent tip of the filament, and rotate the filament if
feels any resistance during installation.
> It is important to make sure there is no tied or tangle on the spool.
① Extruder
② Filament sensor
Press
Insert filament in
Turn this holder out and hook the
filament sensor on by magnets
on the holder by magnets
Page: 13
9
4. Leveling
It is essential to level the platform for 3D printer. Please follow procedures below:
Step 1. Check and ensure all wirings are OK. Connect the machine to the power outlet
by power cord. Switch on the machine.
Step 2. As shown in Fig. 7, on Home Menu, click “Tools”—>“Home”—>“Home
All”.
(Figure 7)
Step 3.As shown in Fig. 8, return to the “Home Menu”, click “Setup”—>“Motor” to
disable the motors so the motors/axis could be moved freely.
(Figure
Page: 14
10
Step 4.Put a piece of paper onto the print platform, and then manually move the print head
and platform back and forth to let the print head travel to the 4 corners and center
one by one (①→②→③→④→⑤), as shown in Fig.9. (Avoid nozzle rub against the
platform directly without the paper in-between)
(Figure 9)
Step 5.When nozzle has been moved to corner ①, manually adjust (tighten or loose) the
corresponding nut underneath the print platform.
The purpose is to adjust the distance between nozzle and print platform to about
a piece of paper thin (~0.1-0.2mm). Therefore, when just feel the drag resistance as
pulling the paper, it means good leveling for this particular corner.
(Note: “just feel the drag resistance” means the paper can be moved, but with resistance)
Please do so to the rest of corners and center area. Perform double check to ensure
the results, and check the corners in diagonal order: ①→③, ②→④.
①
A4 paper
Nozzle
Nut
②
③ ④
⑤
Page: 15
11
Step 6.Ideally, after the 4 corners are leveled, the center should be spontaneously leveled,
and you may proceed to do a test print on the platform. (see details in Step 7)
However, please be mindful that in some cases, the platform may not be perfectly
flat (concave or convex) due to many factors in manufacture and usage.
ANYCUBIC promise that the flatness of the print platform is in the range of 0~0.2mm
variation, means every piece of the platforms has been tested by a 0.2mm feeler
gauge (**both sides of the platform have been respectively laid on a flat marble table and
the 0.2mm feeler gauge could not be inserted in-between the platform and marble table).
There will be more details for the fine adjustment of the leveling in Step 8.
Step 7.Test print: insert the SD card (back side facing up) into the SD card slot at the base.
Click on the Home Menu “Print” to enter the file list (Fig. 10). There is a printable
test file included — “owl_pair” (author: etotheipi, www.thingiverse.com).
(Figure 10)
Single click on “owl_pair”, and click “Print”. The machine will be automatically
heating the platform and nozzle before printing.
Now, as the temperature rises, please manually insert the filament through
the Teflon tubing all the way into the hotend. (Refer to previous Fig.6)
The filament should flow through when temperature reaching to over
~180-190°C, otherwise the filament has not been inserted properly.
Page: 16
12
Customers may use tweezers to carefully remove the extruded filament at the
nozzle tip before printing.
Step 8.There might be 3 kinds of results for the first layer of the test prints (Fig. 11).
(Figure 11)
In case of “nozzle too close” or “nozzle too high”(Fig. 11 A or C), please click
Nozzle too high
A
B
C
Nozzle too close
Lack of extrusion
Proper nozzle height
Good extrusion and adhesion
Poor adhesion
√
x
x
Page: 17
13
“Stop” on the screen, raise the nozzle (click “Tools”—>“Axis”—>“10”on +Z
column), and manually fine tune the corresponding nuts under the platform.
Particularly, when “nozzle too high” slowly loosen the corresponding nuts
underneath the platform by half circle, while “nozzle too close”, slowly tighten
the corresponding nuts underneath by half circle. After that, clean the platform with
scraper, and run test file again to verify.
It may need adjustment for few times until satisfying results such as Fig. 11 B.
Supplements to leveling:
In some rare cases, after “Home All”, the nozzle can be still much lower than the
platform, even after fully tighten the 4 nuts underneath. On the opposite, sometimes the
nozzle is still too high from the platform, even after fully loosen the 4 nuts underneath.
How to solve this:
(1) Raise the nozzle by click “Tools”—>“Axis”—>“10”on +Z column, adjust the
4 nuts under the platform, let the height in-between the support plate and the
heated bed is ~15mm for all the 4 corners.
(2) As shown in Fig. 13, at both ends of X axis, there is a Z adjustable nut. The lower
tip of Z adjustable nut can trigger the Z end stop when Home (going down), and
~15mm ~15mm
(Figure 12)
Page: 18
14
‘tell’ the machine Z axis is getting to zero and stop moving.
(3) Therefore, tighten Z adjustable nut by X mm if nozzle is lower than the platform
(X is defined by how much the nozzle is under the platform), while loosen it by Y mm if
nozzle is too high from the platform (Y is defined by how much the nozzle is above the
platform). It may need adjustment for few times.
(4) Click “Tools”—>
“Home”
—>
“Home all” to verify the results. After this, please
level the platform again from Step 3.
Tighten or loosen it
Z adjustable nut
(Figure 13)
(Figure 14)
Page: 19
15
5. Software installation
There are two operation mode for ANYCUBIC Mega 3D printer, print offline (via SD card)
and print online (controlled by PC via USB). Print offline: After leveling the platform,
insert SD card, click “Print” at the Home menu and select a file (gcode file) to print.
Print online: Install CP2102 driver to bridging PC and machine, and install Cura to
control the machine via USB.
Generally, it is suggested to use Print offline to minimize the noisy signal via USB. The
preparation steps for Print Online are shown as below.
5.1 Driver installation
ANYCUBIC Mega 3D printer uses CP2102 chip for communication. So, it is necessary to
install CP2102 driver so the printer could be recognized by PC.
Firstly, power on the machine and connect it to PC via USB cable.
CP2102 driver is copied in the SD card. “Files_Engish_Mega”—>
“Driver_CP2102”. There are two versions, Windows and Mac version.
For Windows, specifically, “CP210xVCPInstaller_x64” is for 64 bit system and
“CP210xVCPInstaller_x86” is for 32 bit system.
Here we take Windows 7-64 bit PC system for example, while there is
“Installation for Mac PC” in SD card for those who use Mac system.
On PC, right click on “Computer”—>
“Properties”
—->“Device Manger”, and
Page: 20
16
then follow the steps in Fig. 15 below.
(Figure 15)
After successfully installation, a COMx would appear in the Ports of Device Manager, x is
random (as here is COM3), customers will have their own COMx depends on their PC.
This COMx port will be used for communication between the printer and PC later.
Not installed Right click and
choose update
Find the directory
of CP2102
DesktopMega Files_Engish_MegaDriver_CP2102win
Click
COM3 appears in
Ports
① ②
③ ④
⑤ ⑥
Page: 21
17
If the PC has been installed CP2102 driver before, then there should be a COMx in
Ports of Device manager already.
Sometimes, even the driver is not installed properly, it may still show an abnormal
COMx in Ports, please just uninstall the COMx and try to install the driver again.
5.2 Cura Installation
ANYCUBIC Mega 3D printer reads Gcode file and prints. It is necessary to convert 3D files
(such as stl file) into Gcode files for machine to recognize. Software that convert 3D files
into Gcode files is called slicing software. Cura_15.04.6 is used for example here.
Location of Cura: SD card—>“Files_Engish_Mega”—>“Cura”—>“Windows”.
Double click “Cura_15.04.6”, and follow the procedures as shown in Fig. 16:
(Figure 16)
① ②
③ ④
Page: 22
18
Next, before start Cura for the first time, there will be more settings about the language
and machine types, as show in Fig. 17.
(Figure 17)
Upon finish, open Cura for the first time, there might be a default robot model appears,
customers may click “File”—>“Clear platform” to delete it.
① ②
③ ④
Page: 23
19
5.2.1 Load 3D model into Cura
(1) Clear the platform by clicking “File”—>“Clear platform”
(2) Load 3D files onto the platform by“File”
—>
“Load model file…”
. Files with extension
such as “STL”, “OBJ”, “DAE” and “AMF” can be loaded.
Model in grey means it is outside of the printable area and needs to be moved or scaled to fit in.
5.2.2 Manipulate 3D model in Cura
(1) Zoom in/out: scroll the mouse wheel
(2) Change viewing angle: right click the model, hold on and move the mouse
(3) Position change: left click on the model, hold on and drag the model to move.
(4) Rotate: single left click on the model and several icons will appear at the bottom left
of the window (Fig. 18). Click the rotate button, 3 circles will surround the model. Rotate
the model by moving the circle lines.
Lay flat: it is very impartant to ensure the flat portion of the model is well
attached to the platform. So, please use Lay Flat option everytime after rotating
the model, as it will minimize the adhesion issues during printing. (Fig. 18)
Reset: click it to return the model to the original orientation.
(Figure 18)
Lay flat
Reset
Page: 24
20
(5) Scale: to uniformly scale the model along X/Y/Z dimensions. To disable uniform
scaling, click the lock in the lower section of the scaling window. (Fig. 19)
(Figure 19)
(6) View mode (Fig. 20): to view the model in different ways and helps to spotting issues
before print starts. Such as “Layers” mode: to view the toolpath of the print head to
check if there are skipped layers or gaps.
(Figure 20)
Scroll at layers mode
Page: 25
21
5.2.3 Cura settings
(1) Machine settings
Refer to Fig. 21, click “Machine”—>“Machine settings” to input those suggested
parameters into the corresponding column. Please choose the Serial Port (COM) as
shown in your PC→Device Manager→Port (refer to Fig. 15 ⑥, customers may have a
different COMx other than the example COM3), and set the Baudrate to 250000. Those
two parameters are essential for Cura to connect to the printer.
(Figure 21)
(2) Basic and Advanced options
Suggested “Basic” and “Advanced” setting are shown in Fig. 22. Stay the mouse
upon each box and there will be explanation for it.
Those parameters are suggested for ANYCUBIC Mega 3D printer to print ANYCUBIC PLA
filament. Generally, those settings are also compatible with other brand of PLA, but
customers may need to fine tune the parameters to get the best results, for example,
customers could try different ‘printing temperature’ based on the suggestion from a
particular filament supplier. Especially, in order to get a good adhesion for the first layer,
the ‘Bottom layer speed’ should not be too fast (20mm/s suggested).
Page: 26
22
(Figure 22)
(3) Plugins
*It is recommended for new user to leave the plugins as default (i.e. no plugins enabled).
Plugins are custom settings which will active at specific point during printing. There are
two pre-loaded plugins with Cura: Pause at height and Tweak At Z. More plugins can be
found via: http://wiki.ultimaker.com/Category:CuraPlugin
As shown in Fig. 23, to enable one of the plugins, such as Pause at height, first click it
and then click the drop-down arrow to enter the setting interface.
“Pause at height” will allow the printing to pause at a specified height, as well as
where the print head would move to and how much filament to retract to prevent
extruded filament blobs. So, customers could do filament change during printing.
Page: 27
23
“Tweak at Z” would allow custom changes at specified Z height. Customers may
decide the Z height or layer counts at which to make a change. Then there are more
settings for how you would like to change, such as temperature, fan speed and print
speed. Fine tune those for specific model would produce better results.
If wish to delete the plugins, stay mouse at the edge, hold the left button and drag
mouse to show the Delete icon.
(Figure 23)
(4) Start/End-GCode
As shown in Fig. 24, custom Gcode allows for complex automatic printer movements
and operations. By adding custom Gcode into the start or end of the Gcode file,
customer could change how it prints. A detailed list of Gcode commands can be found
via: http://reprap.org/wiki/G-code
There will be explanation later about how to add command to start-gcode to achieve
the function of resume from outage.
Stay mouse here and drag
to show the delete button
Delete
Page: 28
24
(Figure 24)
5.2.4 Print online by Cura
After parameter settings, customer can print online by Cura with USB connection.
Click “File”—>“Print…” enter the printing popup window (Fig. 25). (If a simplified
version of printing window appears, please click “File” —>“Preferences…” to choose the
‘Pronterface UI’ in the “Printing window type” drop-down menu)
Click “Print” icon when it is available after auto connect with the printer. Then the
temperature would rise and it will start to print when reaching to the target temperature.
Page: 29
25
Use tweezers to carefully get rid of the pre-extruded filament.
Note: If it fails to connect the printer in the popup “Printing window” (in a case that the
“Print” icon is gray and unavailable), check with the COMx or Baudrate in “Machine
settings”, and re-open the printing window to proceed.
(Figure 25)
5.2.5 Save GCode in Cura
In Cura, click “File”—>“Save GCode…” to save the file to a desired directory. And it
is highly recommended to save the Gcode in a SD card for printing offline.
Re-open the Gcode file again in Cura to confirm that all slices of the model have
been included by check it in the “Layers view” (refer to previous Fig. 20).
The file name should only contain English letters, underscore and space. File
name contains special characters could not be recognized by the printer.
Approx printing time
Page: 30
26
6. Printing
Here shows the steps of printing offline (via SD card), print online please refer to 5.2.4.
1. Click “Tools”—>“Preheat”—>“Preheat PLA (for example)”, Fig. 26.
2. After the pre-heat is finished, please click on Home screen “Tools”—>“Filament”—>
“Filament in”(Fig. 27). The extruder motor will start to feed the filament into the
hotend. There might be some excessive filament melt through the nozzle at high
temperature, use tweezers to carefully remove it from the nozzle tip before print.
3. Insert the SD card into the SD card slot at the base. On Home Menu, Click “Print” to
enter the files list. Click a exist file (e.g. “owl_pair”), and click “Print”(Fig. 28). The
machine will be sequentially heating the heated bed and nozzle and then print.
①
② (Figure 28)
(Figure 27)
(Figure 26)
Page: 31
27
4. Upon finishing, the print head and heated bed will be automatically cooling down. Only
remove the printed object from the heated bed when it is cooled completely. Pull the
print platform to the front side, and use scraper to carefully remove the object as shown
in Fig. 29. Never direct scarper to your hands.
Please be mindful that the nozzle and heated bed are still hot after operation.
(Figure 29)
5. ANYCUBIC Mega 3D printer equipped with ANYCUBIC Ultra-base (a novel print platform)
which could be used for very long time without adding any masking tape, “hair spray”
or glue stick. Customers only have to clean it by alcohol or similar after every few prints.
Suggested nozzle (print) temperature for PLA: 190-210°C, ABS: 230-240°C,
Bed temperature for PLA: 60°C, ABS: 80-100°C. (it is suggested to disable
the model cooling fan for ABS in Advanced settings of Cura)
After operation, do not immediately switch off the printer. Only turn it off after
the nozzle cools to room temperature, because the heat sink still needs fan for
cooling to minimize the risk of nozzle clogging.
Page: 32
28
7. Manual filament change
1. Feed the filament: click via the Home menu: “Tools”—>
“Preheat”
—>
“Preheat PLA
(for example)”. After it reaches to the target temperature, press down the handle at
the extruder as shown in Fig. 30, and manually push the filament through the Teflon
tubing till the hotend and there should be filament melt through the nozzle.
Make sure the filament passes through the filament sensor first before reaching
into the extruder.
For easier feed in the filament, it is suggested to cut off the bent tip before insert.
2. Remove the filament: at the Home menu, click “Tools”—>“Preheat”—>“Preheat
PLA (for example)”. After it reaches to the target temperature, press down the
handle at the extruder as shown in Fig. 30, manually push in the filament firstly until
seeing the filament melt through the nozzle, then quickly draw out the filament. The
purpose of pushing in the filament is to minimize the risk of nozzle clogging.
(Figure 30)
Press
Manually insert or draw out
①
②
Page: 33
29
8. Resume from outage
ANYCUBIC Mega 3D printer allows resume print job after accidently power loss.
*This function only valid when print offline (via SD card only).
1. As shown in Fig. 31, in slicing software (i.e. Cura), it is required to place the model at the
rear of platform. Because during “Resume from outage”, machine will home first and
could touch/interfere with the unfinished object if the model was placed in the front
area (Fig. 32).
(Figure 31)
(Figure 32)
Rear area
Zero (Home position)
Front
Rear
OK
No
Page: 34
30
2. For the first time of using this function, customers are required to add “G5” to the
start.gcode, as shown in Fig. 33. Then, save the model as Gcode file to the SD card by
“File”—>“Save GCode…”.
3. Insert the SD card (back side facing up) into the SD card slot at base. Print the just saved
file (i.e.“owl_pair”). The machine will automatically heating on and print.
During this printing, if there is an accident power loss, the print will stop immediately.
But after power comes back, customers could just choose the unfinished file and click
“Resume” (Fig. 34). Machine will home first and continuing on the unfinished object.
(Figure 34)
Highlight
Type G5
①
②
(Figure 33)
Page: 35
31
Note:
In order to get smooth surface, use tweezers to carefully remove the excessive
filament at nozzle before continuing print upon the last point.
Do not move Z axis after power off otherwise resume will be invalid.
ANYCUBIC Mega 3D printer supports resume from outage only when print offline
This function is developed based on Cura. We could not guarantee this function
compatible with other slicing software.
Due to the differences of filaments, temperature, extrusion, etc…we could not
guarantee a perfect surface at the point of “Resume from outage”, especially
for small object.
Page: 36
32
9. Trouble shooting
1. Motor shaking or abnormal sound
① The corresponding end stop could not be triggered when Home, check the
wirings, and inspect any obstacles by manually moving the corresponding axis
② The motor cable are not connected properly, check each connection and then
inspect the cable routing for any faults
2. File not printing or SD card failure
① Remove the SD card and insert into PC. Open the Gcode files using text editor
(eg. Notepad), and inspect if Gcode is readable or not. If files contains of multiple
“ÿÿÿ” symbol, then file has been corrupted. Try reformatting the SD card to
FAT32 format and reloading the Gcode file
② SD card is not readable, ensure file name does not contain special characters or
Change SD card
③ Touch screen freeze, reboot the machine and try again
3. No extrusion or extrusion motor knocking
① Ensure that the nozzle temperature has been set to match the filament
② Filament tangled on spool
③ Not enough cooling for the hotend
④ Nozzle clogged please try to replace it or clean it
⑤ Teflon tubing has been tangled, squeezed or bent
4. Filament leaking
Nozzle or throat tube is tightened properly, try to fix/change it after cooling
5. No sticking to the bed
① Print too fast at the bottom layer speed, reduce it to ~20mm/s
② Ensure that the print platform is clean (use alcohol if necessary)
Page: 37
33
③ Check if the bed is proper leveled
④ add a brim or raft to the model in slicing software
⑤ Check the bed temperature matches the filament
6. Warping/curling of the printed object
① Check the bed temperature matches the filament
② Check the infill % of the Gcode. The higher the infill, the more likely to warp
③ add a brim or raft to the model in slicing software.
7. Layer shifting
① Print head moving too fast, slow down the print speed.
② Check X/Y belt and the driving wheel and ensure they are properly installed.
③ Grease the rods and check all nuts and bolts remain tightened.
8. Freezing screen
① Inspect if the touch screen has been pressed by the metal frame at the edge
② Check if screen has cracks, if so, please contact us at support@anycubic3d.com
9. T0 sensor abnormal
① Check the wiring of the hotend and ensure a good connection
② Check if there is any pins bent inside the connector
10. Print head move abnormal
① Check if choosing the right machine type in slicing software
② Check if any plugins in the slicing software
11. Print stopped halfway
① Check if the Gcode file is corrupted
② Delete plugins in the Gcode file
③ Use print offline mode (SD card) instead of print online via USB
These are the first steps you shoud do after receiving Anycubic i3 Mega S 3D printer.
Read these guides one by one and continue to Anycubic i3 mega upgrade section if you want to.
Anycubic i3 Mega S Introduction
24. 5. 2020
No Comments
After a successful Mega i3, Anycubic announced Mega S printer which is an upgraded standard Mega i3 with a Titan extruder. This extruder allows printing flexible materials such as TPU ANYCUBIC OFFICIAL PAGE AMAZON LINK Technical information FDM printing technology Build area of 210 x
Read More »
Anycubic i3 Mega S Assembly
24. 5. 2020
No Comments
Anycubic Mega S assembly tutorial for anyone struggling with assembling this 3D printer.Quick and easy steps with a lot of pictures how to do it. ANYCUBIC OFFICIAL PAGE AMAZON LINK 1. Unboxing The printer is packed very well and you do not need any special
Read More »
Anycubic i3 Mega S Cura installation
24. 5. 2020
No Comments
Anycubic Mega S Cura is recommended by manufacturer. Cura is powerful and open-source slicing engine which can be used with most of the FDM 3D printers. Download the latest Cura Anycubic delivers SD card with the printer which contains test files, manuals and Cura but
Read More »
Anycubic i3 Mega S Bed Calibration
28. 5. 2020
4 Comments
Correct bed leveling is a crucial step to start printing. Without proper leveling you can damage your bed surface and nozzle or you will start printing in the air. This method is called “paper method”. Home your printer Click on Tools Click on Home Click
Read More »
Anycubic i3 Mega S Test Print
29. 5. 2020
No Comments
After bed calibration it is time time to print something. Anycubic has prepared and sliced a model with two owls which you can find on the SD card from the printer package. This is how the test file looks like in the Cura slicer. Prepare your
Read More »
Anycubic i3 Mega S PrusaSlicer Installation
31. 5. 2020
No Comments
PrusaSlicer is a very good alternative to Cura for our Anycubic i3 Mega S printer. It offers awesome infill shapes and a “smart layer height” feature. Download the latest PrusaSlicer Choose Drivers and Apps. Install PrusaSlicer Do not forget to double check what parts you
Read More »
- Author
- Recent Posts

Martin has a M.Sc. in physics and has gained many years of experience in industry as a lab manager and quality assurance manager. He has now tested dozens of 3D printers and is happy to share the collected experience with each new article.
Disclosure: Links marked with * are Affiliate Links. I earn from qualifying purchases if you decide to make a purchase through these links – at no additional cost for you!
Among the most popular 3D printers for beginners, besides the Creality Ender 3* is the Anycubic Mega S* right at the top – and rightly so!
This entry-level printer is very easy to set up, you can do almost nothing wrong and you won’t have to wait long for the first print. The level of detail is also surprisingly good for this price range.
In this article, you will learn in detail what you need to consider when setting up the Anycubic Mega S and how to successfully complete your first test print.
Table of Contents:
- 1 Unboxing
- 2 Setup
- 3 Print Bed Leveling
- 4 Test Print
- 4.1 Install Cura
- 4.2 Slice the 3D Model
- 4.3 Save 3D model to SD card as GCode
- 4.4 Insert SD card into the 3D printer
- 4.5 Load filament into the 3D printer
- 4.6 Start print program
- 4.7 Result
- 5 Related Questions
- 5.1 Are there also 3D printers that automatically level the bed?
- 5.2 What do I do if PLA does not adhere to the print bed?
- 6 Conclusion
Unboxing
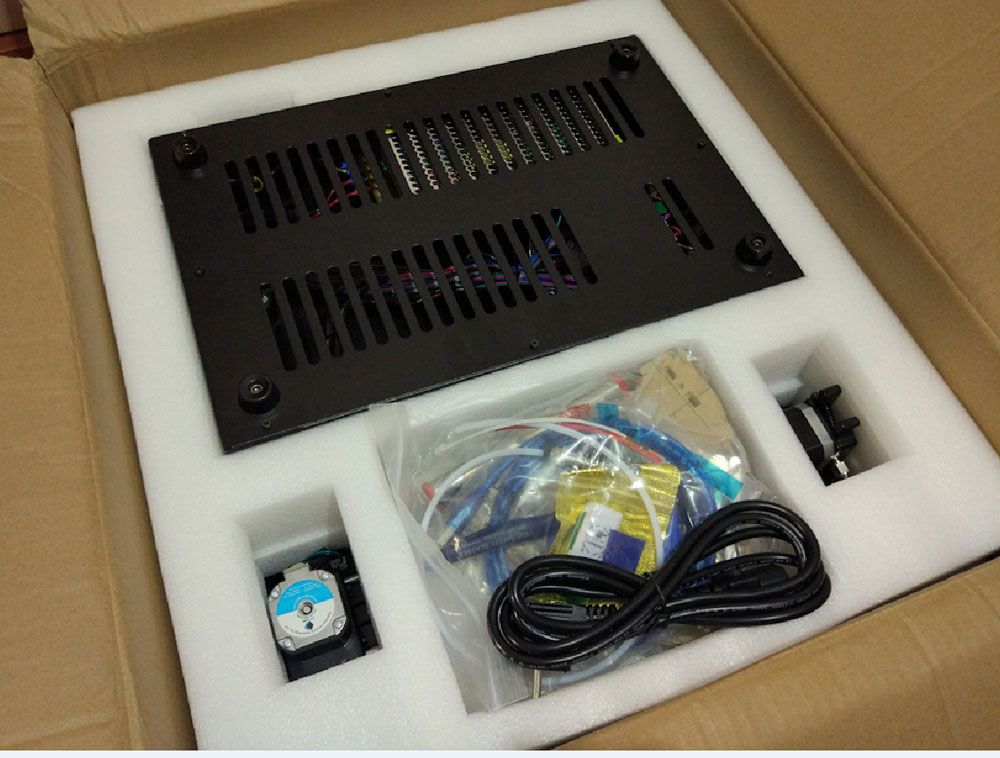
The Anycubic Mega S comes really well packed to your home. Inside the box, there are custom-made styrofoam inlays that perfectly protect all components of the 3D printer from shocks and other external impacts.
Anycubic has included everything you could need to set up and operate the 3D printer. The only thing I have replaced from the included tools is the screwdriver. The included screwdriver is really very small…
You’ll also need a caliper* or at least a good steel measure* to properly level the print bed – more on that later.

The scope of delivery includes the following things:
- 3D printer base with the already mounted print bed
- Frame with preassembled extruder
- Paper manual
- LAN cable
- Filament holder
- After-Sale Service Card
- Replacement limit switch
- Replacement extruder
- SD-USB adapter
- SD card (contents: detailed instructions in English and Japanese, print file for testing, Cura, driver)
- Side cutter
- Spatula
- All necessary screws
- All the allen wrenches you need
- A mini screwdriver
- A fine needle for cleaning the nozzle
- Vacuum packed PLA filament
- Power cable
However, what is immediately noticeable when unpacking is the stable frame. This allows the 3D printer to achieve high precision despite its low weight.
If you want to change the printer nozzle at some point, you will also need a suitable wrench. Changing the nozzle may sometimes be necessary if it is very dirty or if you want to use a different diameter.
CAUTION: Before you do anything with the printer, there is one thing you need to be aware of: on the side of the base of the 3D printer, there is a switch for the incoming voltage. The switch can be set to 220V or 110V. Depending on which dealer you get the 3D printer from, this may be preset to one value or the other. If the value does not match your local power grid, you will scrap the device right when you turn it on! You really need to pay attention here.
You can easily adjust the switch with the included mini screwdriver.

Now you can screw the frame to the base. Use the screws provided and tighten them loosely at first and then always opposite each other very tightly.
After the frame you can mount the filament holder.
Next up are the cables. These are color-coded and sized so that they cannot be plugged in incorrectly. This means that you have both color coding and mechanical protection. So it should not be possible at all to connect anything wrong.
If you don’t find the red cable immediately, you only have to look under or behind the stepper motor. There it is usually tucked behind so that it does not get in the way when mounting the frame.

Now all you have to do is plug in the power cord and you can start leveling the print bed!
Print Bed Leveling
When unpacking the 3D printer, you will have noticed that a paper is taped to the printing plate. This not only protects the print bed from scratches or other damage during transport, but it is also a very good aid for leveling the print bed.

One step that many people forget when leveling the print bed is to calibrate/adjust the Z-axis. For this, you need a caliper gauge or at least an accurate ruler. With it, you measure the distance of the stepper motors to a non-moving part. E.g. like in the picture below. Both stepper motors must have the same distance. You can adjust this with the Z stops.
The easiest way to do this is to move to the Z-Home position while the print bed is lowered quite a bit (but not all the way). By using the screws on top of the stepper motor, you can determine when the Z-axis limit switches are triggered. They will make a beeping sound.
This part of the print bed leveling is quite important, but can take quite a long time depending on how well the printer is already preset.
The aim of leveling the print bed is to ensure that all points on the print bed are the same distance from the nozzle. This is exactly what the paper is for. You adjust all four corners of the print bed so that the piece of paper just fits between the nozzle and the print bed. And by “just enough” I mean that the paper doesn’t get stuck between the nozzle and the print bed, but also that it can’t move completely loose underneath. There must be a little friction.

The process of leveling needs to be learned. In the beginning, you may need an hour or more until everything is perfectly adjusted. You have to get a feel for what changes when you turn a screw since all four corners are spring-loaded, the others also change slightly when you turn only one. Once you get the hang of it, leveling is done within a few minutes.

If you really manage to set the distance everywhere with the paper, you will get a good print. If the distance between the nozzle and the print bed is too small, it can rub against it in the worst case. If the distance is too big, the filament may not adhere properly to the printing plate.
So leveling also has a big impact on the print bed adhesion!
Test Print
Now that the printer is set up and the print bed is leveled, you are basically ready to make your first test print. The following steps are necessary:
- Install Cura
- Slice the 3D model
- Save 3D model to SD card as GCode
- Insert SD card into the 3D printer
- Load filament into the 3D printer
- Start printing program
Install Cura
You can either use the files on the SD card to install Cura or get the software directly online (it’s free – link).
After you have installed Cura, you need to select the Anycubic Mega S as your printer. You can do this easily via the menu because the profile for this printer is already available. Just click through the menu “Settings” -> “Printer” -> “Add Printer…” until you can select the Anycubic Mega S. The menu navigation is very self-explanatory.

Slice the 3D Model
On the SD card that is included, a 3D model is already available, the “Owl Pair”. This model is also very suitable for a first print.
You don’t have to worry about the print bed adhesion, e.g. by using a Raft or Brim, because the lowest layers of the model already act like a raft. In addition, you do not need any support structures, so that the model is ready immediately after printing without reworking.

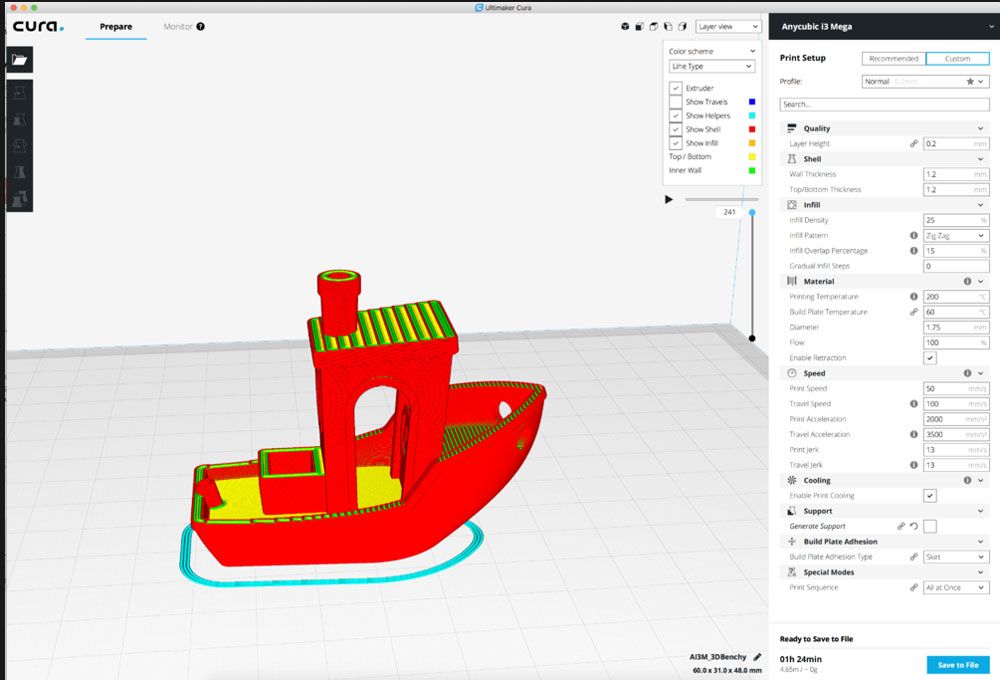
Once you have loaded the model, I would recommend you to go to the custom settings, because there you have many more options. For the beginning, however, it is sufficient that you decide between the preset profiles High, Normal or Draft. Since this is a test print, it is advisable to use the normal setting with 0.2 mm layer height for the time being.
Now all you have to do is press the “Slice” button and Cura will slice the 3D model into individual layers as required by the settings.
After it is done, it spits out an indication of how long the print will take and how much filament is needed where the “Slice” button used to be. You can also save the file to the SD card or preview it.

If the preset size of the model is much too large and Cura calculates a few hours, you can also reduce, enlarge or move the model with the tools on the left side of the screen.

Save 3D model to SD card as GCode
This step is quite self-explanatory. As already mentioned, after slicing you can save the finished model as GCode on the SD card.
Insert SD card into the 3D printer
This step is also fairly self-explanatory, although it should be noted once again that the position of the SD slot in the 3D printer is somewhat impractical. It is located directly behind the filament holder.
When the filament is loaded, it is very difficult to get to the SD card. However, you get used to it and with your index and middle finger together, you can eventually get the SD card out and in just as well as you normally would.
Load filament into the 3D printer
The first step in loading the filament is to place the filament on the filament holder so that the filament comes from the bottom of the spool. Then you push it through the filament sensor into the extruder. To do this you have to pull the lever on the extruder backward and push the filament in at the same time.
Do this until you can see through the white transparent tube that you have come to the nozzle and it goes no further.

To push the filament through the nozzle, it must be warm. To do this, go to “Tools” in the main menu and then to “Filament“. There you can let the filament slide in or out. The printer automatically checks whether the temperature is sufficient for this and regulates it accordingly if it is still too low.

As soon as the first ‘sausage’ comes out of the nozzle, you can press Stop.
Start print program
Now the moment has finally come when you can start the program! All you have to do is go to “Print” in the main menu and select your file (in this case it’s the pair of owls) and press “Print” again.
The printer will now start printing your model and show its progress on the display.

Result
If nothing went wrong, the model should print without any problems. For the first print without changing other settings in Cura, the result is not bad – you can build on that!
(By the way, if you’re wondering what that line is around the outside of the model, it’s a Skirt to test the filament flow before the actual printing).

Are there also 3D printers that automatically level the bed?
There are many 3D printers that level the print bed at the touch of a button. They are either equipped with it from the start or have been upgraded with a print bed sensor such as the BLTouch.

What do I do if PLA does not adhere to the print bed?
Poor print bed adhesion with PLA is a common phenomenon. There are many remedies for this, such as other print bed materials (for the Anycubic Mega S, I can only recommend the BuildTak surface*!), changing the temperatures or cleaning the print bed. There are also auxiliary prints such as the Raft or the Brim, which can significantly improve adhesion.

Conclusion
The Anycubic Mega S is an excellent printer for beginners. However, you will have to tinker here and there. For example, manual leveling of the print bed takes some getting used to at first.
The complete setup, the settings and the first test print can be done within a few hours. Sometimes it is also much faster if the printer is delivered already well adjusted – but that is a matter of luck.
For the price, the print results are pretty good! If you print in fine mode with a layer height of 0.1 mm and have the print bed adhesion under control, you can print really highly detailed models!
Disclosure: This website is the property of Martin Lütkemeyer and is operated by Martin Lütkemeyer. Martin Lütkemeyer is a member of the Amazon Services LLC and other Affiliate Programs. These are affiliate advertising programs designed to enable websites to earn advertising revenue through advertising and linking to Amazon.com and others. Links marked with * are affiliate links.