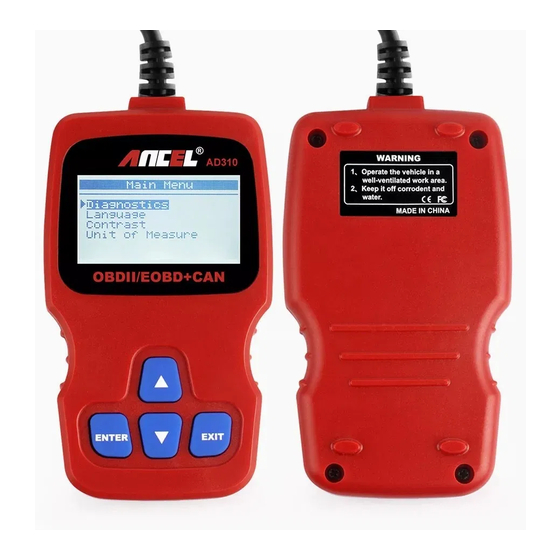
Автомобильный сканер AD310 – это считыватель ошибок, разработанный китайской компанией ANCEL. Мультипротокольное устройство предназначено для выявления ошибок, проверки двигателя и датчиков. Как заявлено и написано на самом сканере – имеется поддержка OBD2, EOBD, CAN.

- Поддержка европейских авто: Поддержка большей части с 2003 года по настоящее время.
- Поддержка азиатских автомобилей: Поддержка большей части с 2005 года по настоящее время.
- Для большинства автомобилей 1996 года и новее США с OBD2 разъемами.

Модель имеет компактные размеры, изготовлена из высокопрочного мягкого пластика. Результаты проверки выводятся на многострочный черно-белый графический монитор с подсветкой.,
1. Основные функции AD310:

AD310 позволяет провести следующие контрольные и измерительные операции:
- Считывает текущие (сохраненные) / ожидаемые (плавающие) коды ошибок, а также историю появления кодов и их определения.
- Выключает предупреждение «Check Engine» (MIL) на приборной панели, стирает коды ошибок и сбрасывает проверку готовности.
- Считывание показаний, расчетных режимов работы.
- Вывод на ЖК экран сохраненных параметров.
- Проверяет готовность к прохождению экологического теста I/M.
- Поддерживает CAN (Controller Area Network) и все другие используемые в настоящее время протоколы OBD-II.
- Считывание VIN, CIN и CVN кодов автомобиля.
- Возможность выбора языка, в том числе – русского.
- В память AD310 встроена библиотека всех основных описаний кодов OBD 2-стандарта.
- Эффективная поддержка всех действующих протоколов OBD II.
- Наличие дополнительного разъема mini USB, позволяющего подключить Ancel AD310 к персональному компьютеру для обновления прошивки.

2. На каком контроллере основан автомобильный сканер Ancel AD310
Для организации работы сканера используется микросхема ELM327. Она преобразует ряд протоколов, которые используются в диагностических шинах различных марок и моделей авто и переводит информацию в протокол RS-232 (разработан компанией Elm Electronics). В сканере предустановлен и используется микроконтроллер PIC18F2480 от Microchip Technology.
Технические характеристики *
|
№ пп. |
Параметр |
Показатель |
|---|---|---|
|
1 |
Тип устройства |
Диагностический автосканер |
|
2 |
Модель |
Ancel AD310 |
|
3 |
Страна производитель |
Китай |
|
4 |
Используемая микросхема |
ELM327 RS-232 |
|
5 |
Поддерживаемый протоколы |
OBD2, EOBD, CAN |
|
6 |
Поддержка |
OBD II |
|
7 |
Подключение к ПК |
mini USB |
|
8 |
Совместимость |
США, Европа, Азия (все модели, начиная с 1996 г). |
|
9 |
Размеры, см |
13х7х2 |
* Таблица с официального сайта поставщика.


Scan Tool Pro Black Edition — бюджетный мультисканер
Хороший выбор для начинающего диагноста. Новинка 2022
Сейчас в продаже имеются модели сканеров с различными версиями прошивок и чипов. Scan Tool Pro с прошивкой 2022 — пока что самая стабильная версия, а так же имеет максимальную совместимость с автомобилями с 2001 года выпуска (Россия, Азия, Европа, Штаты). Купить Bluetooth сканеры для автодиагностики марки Scan Tool Pro официального дилера, который дает гарантию 12 месяцев, можно по ссылке указанной справа. Удачной диагностики!
3. С какими авто можно работать Ancel AD310
Устройство совместимо практически со всеми марками и моделями автомобилей, которые оснащены специальными диагностическими разъемами (16 пин.). Следует запомнить, что для транспортных средств, оснащенных дизельным двигателем, данный прибор не подходит, независимо от места и года выпуска. Работа сканера возможна только с авто, укомплектованных бензиновыми ДВС.
Совместимость Ancel AD310:
- Автомобили Российского производства – все марки и модели ГАЗ, УАЗ, ЛАДА.
- Поддержка европейских авто: Поддержка большей части с 2003 года по настоящее время.
- Поддержка азиатских автомобилей: Поддержка большей части с 2005 года по настоящее время.
- Для большинства автомобилей 1996 года и новее США с OBD2 разъемами.

4. Преимущества и недостатки модели — анализ отзывов пользователей
Многие автовладельцы не только проверили свои машины с помощью автосканера, но и составили собственное мнение по данному вопросу. Большинство отзывов положительные. Пользователи оценили простоту управления сканером, а также его расширенные функциональные возможности.
Пусть некоторым не понравилось, что модель не подходит для работы с 24-вольтовыми АКБ, на это есть свои причины. Для грузовиков есть целый ряд диагностических устройств специального назначения.
Преимущества
Важнейшее преимущество изделия заключается в возможности сразу считывать коды ошибок, не прибегая к дополнительной расшифровке. Данные выводятся на многорядный ЖК экран, удобный для прочтения. В памяти устройства имеются данные на все существующие коды ошибок, так что проблемы с установлением причин неисправностей не будет.

Корпус Ancel AD310 изготовлен из прочного пластика, который поставляется в трёх цветах. Конструкция герметична, не боится перепадов температур и солнечного ультрафиолета. Микросхема, установлена внутри корпуса, собрана в заводских условиях, все контакты и провода надежно припаяны.

В комплекте поставки есть провод mini USB, с помощью которого устройство подключается к компьютеру для скачивания прошивок и обновлений.
5. Отзывы на автомобильный сканер Ансель AD310 OBD2
Разъем mini USB предусмотрели, молодцы, возможно в дальнейшем и потребуется для обновления ПО.
Считыватель ошибок, какие-то специфические данные, например pin иммобилайзера «доставать» не умеет.
После подключения к разъему машины автоматически начат проверять (предварительно я включил зажигание), подбирать протоколы для диагностики. Выдал – ошибку. А в меню она не отобразилась. Непонятно!
Протестировал на трех авто (Хонда, Форд и Ниссан). Все работает, прочет ошибки, сбросил. Замечаний нет.
Аналог ELM327, который стоит меньше, но данный сканер требуется телефона и приложений.
В соотношении цены и качества Ансель стоит того, чтобы положить его в бардачок и периодически проверять тех. состояние ДВС. Гасит Check Engine.
Плохо, что не подходит для дизельных «легковушек».
Модель удобна, информативна, проста в устройстве и использовании. Недостатков практически не имеет. Возможно несколько завышена цена. Прекрасно подходит для небольших автопредприятий.
6. Ancel AD310 инструкция на русском языке
Сканер имеет русский язык, что очень удобно. Но вот показания многие указываются на английском языке.

Порядок действий:
- Подключаем устройство к разъему OBD2;
- Экран засветится;
- Включаем зажигание, нажимаем Enter;
- Выбираем действие «Диагностика»;
- Проверяем «считывание ошибок»;
- Заводим двигатель;
- Считываем текущие параметры (всего 21 наименование);
- Первый показатель – количество ошибок.

Все остальные параметры расшифровываем с помощью таблицы расшифровки кодов неисправностей. Подробная информация содержится в инструкции по применению.
Инструкция с официального сайта производителя:


По мере прогрева двигателя некоторые параметры, такие, например, как температура ОЖ, будут меняться. Обороты ДВС также в первоначальный период времени будут увеличены, а после прогрева машины – снижаться.

Видео #2: Обзор и применение сканера
Видео #2: Обзор и применение сканера
7. Расшифровка параметров работы двигателя
- C.A.N. OBD2 или OBDII отображает правильность подключения к диагностическому разъему, Check Engine Mil.
- LINK ERROR – это ошибка подключения.
- Предупреждение Check Engine. Если появилось такое предупреждение, необходимо отсоединить сканер от разъема авто, выключить зажигание и подождать не менее 20 секунд. Затем вновь повторить процедуру подключения.
- DTC указывает на общее число выявленных ошибок.
- IM. YES говорит о готовности мониторов к работе.
- NO CODES стирает коды ошибок, показывает, что после проверки авто ни одной ошибки не обнаружено.
- FAULT, PEND – указание на общее число выявленных неисправностей (в верхнем столбце), а ниже – расшифровка логов, кодов ошибок.
- SCROLL – переход к отображению следующего параметра.


IamZevs
Я езжу на Ford Focus III Wagon
г. Москва

Написал про то как тестировал совместимость с некоторыми авто. Появилась возможность проверить работоспособность автосканера на 10 марках авто.
Покупил этот сканер ТУТ
В первую очередь автосканер просто проверялся на возможность подключения блока управления к адаптеру. Все марки машин из моего списка были..
Расшифровка OBD2 кодов автоматически высвечивается на приборе. Все остальные параметры, которые высвечиваются на ЖК экране, расшифровываются по прилагаемой к изделию инструкции.
8. Подведем итог обзора
ANCEL AD310 – компактный и максимально информативный адаптер, поддерживающий OBD2, EOBD, CAN.
Единственная серьёзная «недоработка» производителя – отсутствие в настоящее время обновлений. На официальном сайте есть версии только до 2017 года, а более новые прошивки требуется запрашивать дополнительно, и это возможно только при покупке адаптера у официального поставщика.

Так же имеются и другие минусы, которые описаны в разделе с отзывами данной статьи. В целом адаптер схож с недорогими читалками ошибок «ELM327», у которых не требуется обновление ПО, так как программная часть находится на смартфоне или ПК и устанавливается отдельно.
Впрочем, компания всегда находится в постоянном контакте со своими пользователями и дает исчерпывающие ответы, как обновить прошивку!
На все вопросы ответы можно получить на официальной страничке в интернет магазина www.amazon.com: https://www.amazon.com/ask/questions/asin/B01G5EA74I/
Илья Васильев
Автор сайта / Диагност

Автор всех статей на сайте. 7-ми летний опыт в автодиагностике и ремонте авто любой сложности и любых марок. Увлекаюсь программированием, чип-тюнингом.
Публикую статьи с обзорами диагностического оборудования, делюсь опытом, программами и инструкциями.
- Manuals
- Brands
- ANCEL Manuals
- Medical Equipment
- AD310
- User manual
-
Contents
-
Table of Contents
-
Bookmarks
Quick Links
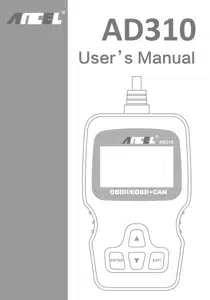
ANCEL AD310
User’s Manual
AD310
ENTER
EXIT
Summary of Contents for ANCEL AD310
-
Page 1
ANCEL AD310 User’s Manual AD310 ENTER EXIT… -
Page 2: Table Of Contents
2.3 Location of the Data Link Connector (DLC) 2.4 OBD II Readiness Monitors 2.5 OBD II Monitor Readiness Status 2.6 OBD II Definitions 3. Using the Scan Tool 3.1 Tool Description ANCEL AD310 3.2 Specifications 3.3 Included 3.4 Language 3.5 Contrast 3.6 U nit of M eas ure…
-
Page 3: Safety Precautions And Warnings
1. Safety Precautions and Warnings To prevent personal injury or damage to vehicles and/or the scan tool, read this instruction manual first and observe the following safety precautions at a minimum whenever working on a vehicle: Always perform automotive testing in a safe environment. Do not attempt to operate or observe the tool while driving a vehicle.
-
Page 4: General Information
2. General Information 2.1 On-Board Diagnostics (OBD) II The first generation of On-Board Diagnostics (called OBD I) was developed by the California Air Resources Board (CARB) and implemented in 1988 to monitor some of the emission control components on vehicles. As technology evolved and the desire to improve the On-Board Diagnostic system increased, a new generation of On-Board Diagnostic system was developed.
-
Page 5: Location Of The Data Link Connector (Dlc)
DTC Example P 0 5 2 0 Systems Last two digits identify individual component within the system B = Body C = Chassis P = Powertrain U = Network Sub -systems Code Type 1 = Fuel and air metering 2 = Ignition system or engine misfire Generic (SAE) : 3 = Auxiliary emissions controls 4 = Vehicle speed control and idle controls…
-
Page 6: Obd Ii Readiness Monitors
2.4 OBD II Readiness Monitors Readiness Monitors are indicators used to find out if all of the emissions components have been evaluated by the OBD II system. They are running periodic tests on specific systems and components to ensure that they are performing within allowable limits.
-
Page 7: Obd Ii Monitor Readiness Status
2.5 OBD II Monitor Readiness Status OBD II systems must indicate whether or not the vehicle’s PCM’s monitoring has completed testing on each emission component. Components that have been OBD II tested will be reported as “OK”. The purpose of recording readiness status is to allow inspectors to determine if the vehicle’…
-
Page 8: Using The Scan Tool
Freeze Frame Date and may include important engine parameters such as engine RPM, vehicle speed, air flow, engine load, fuel pressure, fuel trim value, engine coolant temperature, ignition timing advance, or closed loop status. 3. Using the Scan Tool 3.1 Tool Description — ANCEL AD310 OM 123…
-
Page 9
1. LCD DISPLAY — Indicates test results. Backlit, 128 x 64 pixel display with contrast adjustment. 2. ENTER BUTTON — Confirms a selection (or action) from a menu. 3. EXIT BUTTON — Cancels a selection (or action) from a menu or returns to the menu. -
Page 10: Specifications
Storage Temperature: -20 to 70 癈 (-4 to 158 F? External Power: 8.0 to 18.0 V power provided via vehicle battery Dimensions: Length Width Height 125 mm (5.00”) 70 mm (2.80”) 22 mm (0.90”) NW: 0.23kg (0.51lb), GW: 0.32kg (0.74lb) 3.3 Included AD310 Scan Tool main unit User’s Manual…
-
Page 11: Language
3.4 Language 1) From the Main Menu, use the UP/DOWN scroll button to select the Language and press the ENTER button. Main Menu D iagnos tic s Language Contrast U nit of M eas ure Contrast 1) From the Main Menu, use the UP/DOWN scroll button to select Contrast, and press ENTER.
-
Page 12: U Nit Of M Eas Ure
U nit of M eas ure 1) From the Main Menu, use the UP/DOWN scroll button to select U nit of M eas ure, and press ENTER. Main Menu D iagnos tic s Language Contrast U nit of M eas ure 2) From the Unit of Measure menu, use the UP/DOWN scroll button to select the desired Unit of Measure.
-
Page 13: Obd Ii Diagnostics
4. OBD II Diagnostics CAUTION: Don’t connect or disconnect any test equipment with ignition on or engine running. 1) Turn the ignition off. 2) Locate the vehicle’s 16-pin Data Link Connector (DLC). 3) Plug the scan tool cable connector into the vehicle’s DLC. 4) Turn the ignition on.
-
Page 14
Pending Codes are also referred to as «maturing codes» or «continuous monitor codes». They indicate problems that the control module has detected during the current or last driving cycle, but are not considered serious, yet. Pending Codes will not turn on the malfunction indicator serious, yet. Pending Codes will not turn on the malfunction indicator up cycles, the code clears from memory. -
Page 15: Erase Codes
The control module number, sequence of the DTCs, total number of codes detected and type of codes (Generic of Manufacturer specific) will be observed on the upper right hand corner of the display. 4) If more than one DTC is found, use the UP/DOWN scroll button, as necessary, until all the codes have been viewed.
-
Page 16
Diagnostic Menu R ead C odes Erase C odes Live D ata View F reez e F ram e I/M R eadines s Vehicle Info. 2) A warning message comes up asking for your confirmation. Erase codes Erase trouble codes! Are y ou s ure ? 3) Press ENTER to confirm. -
Page 17: Live Data
4.3 Live Data The OBD II Scan Tool is a special diagnostic tool that communicates with the vehicle’s computer. The Scan Tool lets you view «real-time» Live Data. This information includes values (volts, rpm, temperature, speed etc.) and system status information (open loop, closed loop, fuel system status, etc.) generated by the various vehicle sensors, switches and actuators.
-
Page 18: View Freeze Frame
4.4 View Freeze Frame When an emission-related fault occurs, certain vehicle conditions are recorded by the on-board computer. This information is referred to as freeze frame data. View Freeze Data is a snapshot of the operating conditions at the time of an emission-related fault. if DTCs were erased, View Freeze Data may not be stored in vehicle memory depending on vehicle.
-
Page 19: Vehicle Info
Select [I/M Readiness Test] and Press [ENTER], the screen will display the interface as shown below: Diagnostic Menu R ead C odes Erase C odes Live D ata View F reez e F ram e I/M R eadines s Vehicle Info. Press EXIT return to the Diagnostic Menu.
-
Page 20
3) Wait a few seconds while the scan tool reads vehicle information. 4) Press EXIT button to return Diagnostic Menu. -
Page 21: Warranty And Service
5.1 Limited One Year Warranty THIS WARRANTY EXPRESSLY LIMITED PERSONS WHO PURCHASE ANCEL AD310 PRODUCTS FOR PURPOSES OF RESALE OR USE IN THE ORDINARY COURSE OF THE BUYER’S BUSINESS. ANCEL AD310 electronic product is warranted against defects materials and workmanship for one year (12 months) from date of delivery user.
ANCEL AD310 Classic Enhanced Universal OBD II Scanner Car Engine Fault Code Reader — Use Manual — Use Guide PDF.
Documents: Go to download!
- Owner’s manual — (English)
- General Information
- Using the Scan Tool
- OBD II Diagnostics
Table of contents
Owner’s Guide Car Accessories
General Information
On-Board Diagnostics (OBD) II
The first generation of On-Board Diagnostics (called OBD I) was developed by the California Air Resources Board (CARB) and implemented in 1988 to monitor some of the emission control components on vehicles. As technology evolved and the desire to improve the On-Board Diagnostic system increased, a new generation of On-Board Diagnostic system was developed. This second generation of On-Board Diagnostic regulations is called «OBD II».
The OBD II system is designed to monitor emission control systems and key engine components by performing either continuous or periodic tests of specific components and vehicle conditions. When a problem is detected, the OBD II system turns on a warning lamp (MIL) on the vehicle instrument panel to alert the driver typically by the phrase «Check Engine» or «Service Engine Soon». The system will also store important information about the detected malfunction so that a technician can accurately find and fix the problem. Here below follow three pieces of such valuable Information:
- Whether the Malfunction Indicator Light (MIL) is commanded ‘on’ or ‘Off’
- Which, if any, Diagnostic Trouble Codes (DTCs) are stored;
- Readiness Monitor status.
Diagnostic Trouble Codes (DTCs)
OBD II Diagnostic Trouble Codes are codes that are stored by the on-board computer diagnostic system in response to a problem found in the vehicle. These codes identify a particular problem area and are intended to provide you with a guide as to where a fault might be occurring within a vehicle. OBD IIDiagnostic Trouble Codes consist of a five-digit alphanumeric code. The first character, a letter, identifies which control system sets the code. The other four characters, all numbers, provide additional information on where the DT Coriginated and the operating conditions that caused it to be set. Below is an example to illustrate the structure of the digits:

Figure 1-2: Explanation of a diagnostic trouble code.
Location of the Data Link Connector(DLC)
The DLC (Data Link Connector or Diagnostic Link Connector) is the standardized 16-cavity connector where diagnostic scan tools interface with the vehicle’s on-board computer. The DLC is usually located 12 inches from the center of the instrument panel (dash), under or around the driver’s side for most vehicles. If the Data Link Connector is not located under the dashboard, a label should be there revealing its location. For some Asian and European vehicles, the DLC is located behind the ashtray and the ashtray must be removed to access the connector. If the DLC cannot be found, refer to the vehicle’s service manual for the location.

Figure 1-3: The DLC connector (left) can be found in the area of the car interior seen at right (black arrow).
OBD Il Readiness Monitors
Readiness Monitors are indicators used to find out if all of the emissions components have been evaluated by the OBD II system. They are running periodic tests on specific systems and components to ensure that they are performing within allowable limits.
Currently, there are eleven OBD II Readiness Monitors (or I/M Monitors) defined by the U.S. Environmental Protection Agency (EPA). Not all monitors are supported by all vehicles and the exact number of monitors in any vehicle depends on the motor vehicle manufacturer’s emissions control strategy.
Comtinuous Monitors-Some of the vehicle components or systems are continuously tested by the vehicle’s OBD II system, while others are tested only under specific vehicle operating conditions.The continuously monitored components listed below are always ready:
- Misfire
- Fuel System
- Comprehensive Components (CCM)
Once the vehicle is running, the OBD II system is continuously checking the above components, monitoring key engine sensors, watching for engine misfire, and monitoring fuel demands.
Non-Continuous Monitors-Unlike the continuous monitors, many emissions and engine system components require the vehicle to be operated under specific conditions before the monitor is ready. These monitors are termed non-continuous monitors and are listed below:
- EGR System — exhaust Gas Recirculation for reducing green house gases.
- O2 Sensors — monitor and adjust air/fuel mixture.
- Catalyst — reduces exhaust emissions.
- Evaporative System — monitors the integrity of the fuel tank system.
- O2 Sensor Heater — brings O2 sensor to correct operating temperature.
- Secondary air — reduces exhaust emissions.
- Heated Catalyst — brings catalyst to correct operating temperature.
- A/C system — monitors system for freon leaks.
OBD II Monitor Readiness Status
OBD II systems must indicate whether or not the vehicle’s PCM’s monitoring has completed testing on each emission component. Components that have been OBD II tested will be reported as «OK”. The purpose of recording readiness status is to allow inspectors to determine if the vehicle’s OBD II system has tested all the emissions systems. This is handy to know before bringing vehicle to a state emissions testing facility.
The powertrain control module (PCM) sets a monitor to “OK” after an appropriate drive cycle has been performed. The drive cycle that enables a Monitor and sets readiness codes to “OK” varies for each individual monitor. Once a monitor is set as “OK”, it will remain in this state. A number of factors, including erasing of diagnostic trouble codes (DTCs) with a code reader or a disconnected battery, can result in Readiness Monitors being set to «INC» (incomplete). Since the three continuous monitors are constantly evaluating, they will be reported as “OK” all of the ime. As long as there are no DTCs stored in memory, the vehicle is running in accordance with the OBD II guidelines. If testing of a particular supportes non-continuous monitor has not been completed or not tested, the monitor status will be reported as «INC»(incomplete).
In order for the OBD monitor system to become ready, the vehicle should be driven under a variety of normal operating conditions. These operating conditions may include a mix of highway driving and stop and go, city type driving, and at least one overnight-off period. For specific information on getting your vehicle’s OBD monitor system ready, please consult your vehicle owner’s manual.
OBD II Definitions
Powertrain Control Module (PCM) — the OBD II terminology for the on-board computer that controls the engine and the drive train.
Malfunction Indicator Light (MIL) — Malfunction Indicator Light (Service Engine Soon, Check Engine) is a term used for the light on the instrument panel. It is to alert the driver and/or the repair technician that there is a problem with one or more of vehicle’s systems and may cause emissions to exceed federal standards. If the MIL illuminates with a steady light, it indicates that a problem has been detected and the vehicle should be serviced as soon as possible. Under certain conditions, the dashboard light will blink or flash. This indicates a severe problem and flashing is intended to discourage vehicle operation. The vehicle onboard diagnostic system can not turn the MIL off until necessary repairs are completed or the condition no longer exists.
DTC-Diagnostic Trouble Codes (DTC) these identify which section of the emission control system has malfunctioned.
Enabling Criteria — Also termed Enabling Conditions. They are the vehicle-specific events of conditions that must occur within the engine before the various monitors will set, or run. Some monitors require the vehicle to follow a prescribed “drive cycle» routine as part of the enabling criteria. Drive cycles vary among vehicles and for each monitor in any particular vehicle.
OBD II Drive Cycle — A specific mode of vehicle operation that provides conditions required to set all the readiness monitors applicable to the vehicle to the “ready» condition. The purpose of completing an OBD II drive cycle is to force the vehicle to run its onboard diagnostics. Some form of a drive cycle needs to be performed after DTCs have been erased from the PCM’s memory or after the battery has been disconnected. Running through a vehicle’s complete drive cycle will “set” the readiness monitors so that future faults can be detected. Drive cycles vary depending on the vehicle and the monitor that needs to be reset. For vehicle specific drive cycle, consult the vehicle’s Owner’s Manual.
Freeze Frame Data-When an emissions related fault occurs, the OBD II system not only sets a code, but also records a snapshot of the vehicle operating parameters to help in identifying the problem. This set of values operating parameters to help in identifying the problem. This set of values is referred to as Freeze Frame Date and may include important engine is referred to as Freeze Frame Date and may include important engine parameters such as engine RPM, vehicle speed, air flow, engine load, fuel pressure, fuel trim value, engine coolant temperature, ignition timing advance, or closed loop status.
Tool Description — ANCEL AD310

- LCD DISPLAY — Indicates test results. Backlit, 128 x 64 pixel display with contrast adjustment.
- ENTER BUTTON — Confirms a selection (or action) from a menu.
- EXIT BUTTON — Cancels a selection (or action) from a menu or returns to the menu. It is also used to exit DTC Lookup screen.
- UP SCROLL BUTTON — Moves up through menu and submenu items in menu mode. When more than one screen of data is retrieved, moves up through the current screen to the previous screens for additional data.
- DOWN SCROLL BUTTON — Moves down through menu and submenu items in menu mode. When more than one screen of data is retrieved, moves down through the current screen to next screens for additional data.
- OBD II CONNECTOR — Connects the scan tool to the vehicle’s Data Link Connector (DLC).
Included
- AD310 Scan Tool main unit
- User’s Manual
Language
- From the Main Menu, use the UP/DOWN scroll button to select the Language and press the ENTER button.

Contrast
- From the Main Menu, use the UP/DOWN scroll button to select Contrast, and press ENTER.

- From the Contrast menu, use the UP/DOWN scroll button to increase or decrease contrast.
- Press ENTER to save your settings and return to the previous menu.


Unit of Measure
- From the Main Menu, use the UP/DOWN scroll button to select Unit of Measure, and press ENTER.
- From the Unit of Measure menu, use the UP/DOWN scroll button to select the desired Unit of Measure.
- Press the ENTER button to save your selection and return to the previous menu.


OBD II Diagnostics
CAUTION: Don’t connect or disconnect any test equipment with ignition on or engine running.
- Turn the ignition off.
- Locate the vehicle’s 16-pin Data Link Connector (DLC).
- Plug the scan tool cable connector into the vehicle’s DLC.
- Turn the ignition on.
- Press ENTER to enter Main Menu. Use the UP/DOWN scroll button to select Diagnostics from the menu.
See other models: BM700 13 VD700 FX2000 8542040151
- Press ENTER to confirm. A sequence of messages displaying the OBD II protocols will be observed on the display until the vehicle protocol is detected.

If the scan tool fails to communicate with the vehicle’s ECU (Engine Control Unit), a «LINKING ERROR!» message shows up on the display.
- Verify that the ignition is ON;
- Check if the scan tool’s OBD II connector is securely connected to the vehicle’s DLC;
- Verify that the vehicle is OBD II compliant;
- Turn the ignition ‘off’ and wait for about 10 seconds. Turn the ignition back to ‘on’ and repeat the procedure from step 5.
Read Codes
- Stored codes are also known as «hard codes» or «permanent codes». These codes cause the control module to illuminate the malfunction indicator lamp (MIL) when an emission-related fault occurs.
- Pending Codes are also referred to as «maturing codes» or «continuous monitor codes». They indicate problems that the control module has detected during the current or last driving cycle, but are not considered serious, yet. Pending Codes will not turn on the malfunction indicator serious, yet. Pending Codes will not turn on the malfunction indicator up cycles, the code clears from memory.
- Use the UP/DOWN scroll button to select Read Codes from the Diagnostic Menu and press ENTER.
- Use the UP/DOWN scroll button to select Stored Codes or Pending Codes from the Trouble Codes menu and press ENTER.
If there are no Diagnostic Trouble Codes present, the display indicates «No (pending) codes are stored in the module!» Wait a few seconds or press any key to return to the Diagnostic Menu. - View DTCs and their definitions on screen.
The control module number, sequence of the DTCs, total number of codes detected and type of codes (Generic of Manufacturer specific) will be observed on the upper right hand corner of the display. - If more than one DTC is found, use the UP/DOWN scroll button, as necessary, until all the codes have been viewed.
If retrieved DTCs contain any manufacturer specific or enhanced codes, a «Manufacturer specific codes are found! Press any key to select vehicle make!» message comes up prompting you to select vehicle manufacturer to view DTC definitions. Use the UP/DOWN scroll button to select manufacturer and then press ENTER to confirm.
If the manufacturer for your vehicle is not listed, use the UP/DOWN scroll button to select «Other» and press ENTER.


Erase Codes
Notes:
- This function is performed with key on engine off. Do not start the engine.
- Before performing this function, make sure to retrieve and record the trouble codes.
- After clearing, you should retrieve trouble codes once more or turn ignition on and retrieve codes again. If there is still some trouble codes for hard troubles, please find the reason caused the trouble code firstly, and then solve the problem. Now, the trouble codes can be erased.
- Use the UP/DOWN scroll buttons to select Erase Codes from the Diagnostic Menu and press ENTER.
- A warning message comes up asking for your confirmation.
- Press ENTER to confirm
If the codes are cleared successfully, an «Erase Done!» confirmation message is displayed.
If the codes are not cleared, then an «Erase Failure. Turn Key on with Engine off!» message is displayed.


Содержание:
Так же имеются и другие минусы, которые описаны в разделе с отзывами данной статьи. В целом адаптер схож с недорогими читалками ошибок «ELM327», у которых не требуется обновление ПО, так как программная часть находится на смартфоне или ПК и устанавливается отдельно.
Впрочем, компания всегда находится в постоянном контакте со своими пользователями и дает исчерпывающие ответы, как обновить прошивку!
На все вопросы ответы можно получить на официальной страничке в интернет магазина www.amazon.com: https://www.amazon.com/ask/questions/asin/B01G5EA74I/
АВТОР МАТЕРИАЛА:
Илья ВасильевАвтор сайта / Диагност

Автор всех статей на сайте. 7-ми летний опыт в автодиагностике и ремонте авто любой сложности и любых марок. Увлекаюсь программированием, чип-тюнингом.
Публикую статьи с обзорами диагностического оборудования, делюсь опытом, программами и инструкциями.
Контакты для связи:
Почта: Этот адрес электронной почты защищён от спам-ботов. У вас должен быть включен JavaScript для просмотра.
Бортожурнал на DRIVE2.RU: Перейти
Канал на Яндекс.Дзен: Перейти
Группа ВКонтакте: Перейти
ПОДДЕРЖИТЕ НАШ САЙТ:Добавить страницу в закладки Другие статьи на эту тему Задать вопрос авторуПОЛЕЗНЫЕ СТАТЬИ И ОБЗОРЫ НА ЭТУ ТЕМУ: Совместимость ELM327 с различными марками авто
64301 4.59 05-05-2018 Илья Васильев 66 комментариев
Лучшие автосканеры для диагностики авто любой марки
20590 4.89 08-07-2019 Илья Васильев 6 комментариев
Обзор OBD2 ELM327 Bluetooth адаптеров для автодиагностики
16595 4.68 08-02-2018 Илья Васильев 7 комментариев
Диагностический сканер Delphi DS150E
10893 4.33 02-01-2019 Илья Васильев 13 комментариев
Автосканер ELM 327 Mini Bluetooth — всё ещё популярен!
9914 5.00 16-07-2018 Илья Васильев 3 комментариев
Какие бывают адаптеры ELM327
9619 4.67 25-01-2019 Илья Васильев 6 комментариев
Виды диагностических сканеров и преимущества мультисканеров
8127 4.72 26-07-2019 Илья Васильев 6 комментариев
ELM327 автосканеры для диагностики авто
7967 4.91 19-05-2018 Илья Васильев 4 комментариев
Адаптеры для автодиагностики — с чем их едят?
7781 5.00 06-10-2018 Илья Васильев 3 комментариев
Launch x431 PRO — автосканер для профессионалов
6674 4.53 08-12-2018 Илья Васильев 11 комментариев
Микроконтроллер PIC18F25K80 для ELM327 адаптеров
6563 4.50 09-01-2019 Илья Васильев 3 комментариев
K-LINE адаптеры и шина
2047 4.75 18-12-2019 Илья Васильев 3 комментариев
(Ocr-Read Summary of Contents of some pages of the ANCEL AD310 Document (Main Content), UPD: 04 March 2023)
-
10, 4. UP SCROLL BUTTON — Moves up through menu and submenu items in menu mode. When more than one screen of data is retrieved, moves up through the current screen to the previous screens for additional data. 5. DOWN SCROLL BUTTON — Moves down through menu and submenu items in menu mode. When more than one screen of data is retrieved, moves down through the current screen to next screens for additional data. 6. OBD II CONNECTOR — Connects the scan tool to the vehicl…
-
17, 4.3 Live Data The OBD II Scan Tool is a special diagnostic tool that communicates with the vehicle’s computer. The Scan Tool lets you view «real-time» Live Data. This information includes values (volts, rpm, temperature, speed etc.) and system status information (open loop, closed loop, fuel system status, etc.) generated by the various vehicle sensors, switches and actuators. Press ENTER 1) To …
-
11, ANCEL AD310 3.4 Language 1) From the Main Menu, use the UP/DOWN scroll button to select the Language and press the ENTER button. Main Menu D iagnos tic s Language Contrast U nit of M eas ure 3.5 Contrast 1) From the Main Menu, use the UP/DOWN scroll button to select Contrast, and press ENTER. Main Menu D iagnos tic s Language Contrast U nit of M eas ure 2) From the Contrast menu, use the UP/DOWN scroll button to increase or decrease contrast. C o n tr a s t ( 40 % ) Use or to change …
-
6, ANCEL AD310 2.4 OBD II Readiness Monitors Readiness Monitors are indicators used to find out if all of the emissions components have been evaluated by the OBD II system. They are running periodic tests on specific systems and components to ensure that they are performing within allowable limits. currently, there are eleven OBD II Readiness Monitors (or l/M Monitors) defined by the U.S. Environmental Protection Agency (EPA). Not all monitors are supported by all vehicle…
-
14, Pending Codes are also referred to as «maturing codes» or «continuous monitor codes». They indicate problems that the control module has detected during the current or last driving cycle, but are not considered serious, yet. Pending Codes will not turn on the malfunction indicator serious, yet. Pending Codes will not turn on the malfunction indicator up cycles, the code clears from memory. 1) Use the UP/DOWN scroll button to select Read…
-
7, 2.5 OBD II Monitor Readiness Status OBD II systems must indicate whether or not the vehicle’s PCM’s monitoring has completed testing on each emission component. Components that have been OBD II tested will be reported as “OK”. The purpose of recording readiness status is to allow inspectors to determine if the vehicle ’ s OBDII system has tested all the emissions systems. This is handy to know…
-
8, DTC — Diagnostic Trouble Codes (DTC) these identify which section of the emission control system has malfunctioned. Enabling Criteria — Also termed Enabling Conditions. They are the vehicle-specific events of conditions that must occur within the engine before the various monitors will set, or run. Some monitors require the vehicle to follow a prescribed “drive cycle” routine as part of the enabling criteria. Drive cycles va…
-
3, 1. Safety Precautions and Warnings To prevent personal injury or damage to vehicles and/or the scan tool, read this instruction manual first and observe the following safety precautions at a minimum whenever working on a vehicle: Always perform automotive testing in a safe environment. Do not attempt to operate or observe the tool while driving a vehicle. Operating or observing the tool will cause driver distraction and could cause a fatal acciden…
-
15, The control module number, sequence of the DTCs, total number of codes detected and type of codes (Generic of Manufacturer specific) will be observed on the upper right hand corner of the display. 4) If more than one DTC is found, use the UP/DOWN scroll button, as necessary, until all the codes have been viewed. If retrieved DTCs contain any manufacturer specific or enhanced codes, a «Manufacturer specific codes are found! Press any key to select vehicle make!» message co…
-
20, 3) Wait a few seconds while the scan tool reads vehicle information. 4) Press EXIT button to return Diagnostic Menu. 19
… -
18, 4.4 View Freeze Frame When an emission-related fault occurs, certain vehicle conditions are recorded by the on-board computer. This information is referred to as freeze frame data. View Freeze Data is a snapshot of the operating conditions at the time of an emission-related fault. if DTCs were erased, View Freeze Data may not be stored in vehicle memory depending on vehicle. Select [View Freeze Frame], the screen will display …
-
13, ANCEL AD310 4. OBD II Diagnostics CAUTION: Don’t connect or disconnect any test equipment with ignition on or engine running. 1) Turn the ignition off. 2) Locate the vehicle’s 16-pin Data Link Connector (DLC). 3) Plug the scan tool cable connector into the vehicle’s DLC. 4) Turn the ignition on. 5) Press ENTER to enter Main Menu. Use the UP/DOWN scroll button to select Diagnostics from …
-
16, Diagnostic Menu R ead C odes Erase C odes Live D ata View F reez e F ram e I/M R eadines s Vehicle Info. 2) A warning message comes up asking for your confirmation. Erase codes Erase trouble codes! Are y ou s ure ? YES N O 3) Press ENTER to confirm. If the codes are cleared successfully, an «Erase Done!» confirmation message is displayed. Erase codes Eras e D one ! Press …
-
5, DTC Example P 0 5 2 0 Systems B = Body C = Chas s is P = Powertrain U = Netw ork Code Type Generic (SAE) : P0 B0 C0 U0 P1, P2 Manufacturer Specific: B1, B2 C1, C2 U1, U2 Last two digits identify individual component within the system Sub -systems 1 = Fuel and air metering 2 = Ignition system or engine misfire 3 = Auxiliary emissions controls 4 = Vehicle speed control and idle controls 5 = Computer output circuits 6 = Transmission controls Figure 1-2: Explanation of a d…