-
Contents
-
Table of Contents
-
Bookmarks
Quick Links
V1.5
For firmware
Check www.allen-heath.com for the latest firmware available
Publication AP9372
Related Manuals for ALLEN & HEATH Qu-32
Summary of Contents for ALLEN & HEATH Qu-32
-
Page 1
V1.5 For firmware Check www.allen-heath.com for the latest firmware available Publication AP9372… -
Page 2
Limited One Year Manufacturer’s Warranty This product is warranted to be free from defects in materials or workmanship for period of one year from the date of purchase by the original owner. To ensure a high level of performance and reliability for which this equipment has been designed and manufactured, read this User Guide before operating. -
Page 3: Safety Instructions
IMPORTANT — Read these instructions before starting: Safety instructions Before starting, read the Important Safety Instructions printed on the sheets supplied with the equipment. For your own safety and that of the operator, technical crew and performers, follow all instructions and heed all warnings printed on the sheet and on the equipment panels. System operating firmware The function of the Qu mixer is determined by the firmware (operating software) that runs it.
-
Page 4: Packed Contents
LED lamp with built-in dimmer Part: QU-16-RK19 Part: LEDlampX Soft cover AP9262 Qu-16 AP9458 Qu-24 AP9639 Qu-32 Cat5 cables For use with dSNAKE remote Qu-Pad app for iPad audio Available from the Apple Store AH8822 2m (6.6’) short patch AH9651 20m (66’) coil AH9650 100m (330’) drum…
-
Page 5: Table Of Contents
2. Contents Packed contents ……………………..4 Contents ………………………… 5 Introduction ……………………….7 Overview and Features ………………….7 System Architecture and Processing ………………8 Differences between the Qu models ………………9 …
-
Page 6
12.4 System Specifications ………………….68 About this guide This is the User Guide for the Allen & Heath Qu-16, Qu-24 and Qu-32 digital mixers. Please Note V1.5 This guide refers to Qu firmware . Please refer to the Allen &… -
Page 7: Introduction
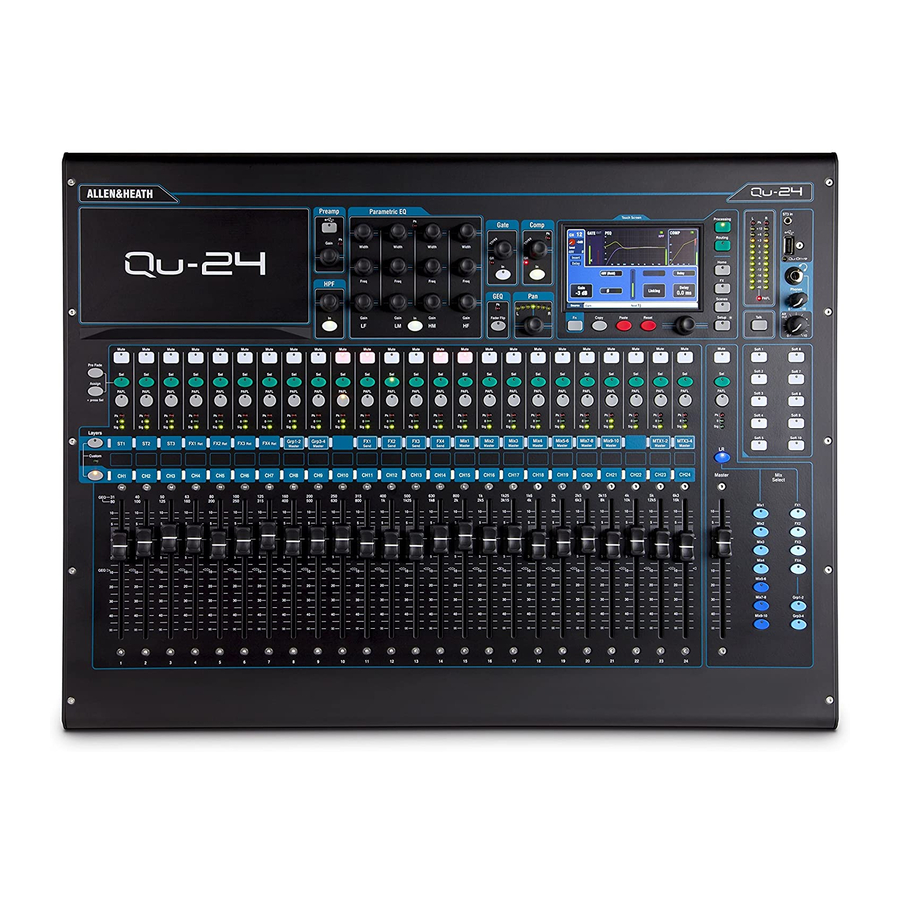
Qu-24 – Larger model with 24 mic and 3 stereo inputs. Adds stereo Groups, Matrix and more SoftKeys. Qu-24 – Largest model with 32 mic and 3 stereo inputs. Adds 2 more stereo Groups. Qu-16 Qu-24 Qu-32 16 Mic/Line channels 24 Mic/Line channels 32 Mic/Line channels …
-
Page 8: System Architecture And Processing
3.2 System Architecture and Processing The following diagrams show the Qu-16, Qu-24 and Qu-32 I/O (inputs and outputs), audio architecture and processing available. The differences between the models and the routing capability of each processing section is illustrated. Refer also to the more detailed System Block Diagrams at the rear of this guide.
-
Page 9: Differences Between The Qu Models
3.3 Differences between the Qu models All three models operate in the same way and have a similar touch screen menu structure. The larger models add Groups and Matrix. Other differences are shown here: 4 SoftKeys Shelf for iPad 2 Group masters 2 Matrix masters 10 SoftKeys 16 fader strips…
-
Page 10
Qu-16 is 24 out / 22 in, the Qu-24 is 32 out / 30 in, and the Qu-32 is 32 out / 32 in. Firmware — Different firmware is needed for each model. Choose either the Qu-16, Qu-24 or Qu-32 file when downloading firmware from the Allen &… -
Page 11: Connection Overview
4. Connection Overview The following connections are available on the rear panel of the Qu mixer. The Qu-16 is shown here. AES digital out Alt out Lamp 2Trk out LR main out Analogue Mix outputs Mic and Line inputs Talkback Mic in ST1 and ST2 Kensington…
-
Page 12: Local Output Connections
4.2 Local Output Connections Group, Mix, Matrix outputs – Balanced XLR line level outputs for the mono and stereo mixes, for example to feed monitor amplifiers, external processing devices, delay fill speaker systems and recording devices. These use low impedance, high quality differential driver circuits for connection to +4 or 0dBu equipment.
-
Page 13: Powering Up The Mixer
4.4 Powering up the mixer The Qu mixer has an internal universal voltage power supply unit. This means you can use your mixer in most parts of the world without the need to modify the unit as long the local mains supply is within the range: Mains Voltage = 100 to 240 V.AC…
-
Page 14: Connecting Dsnake Remote Audio
5. Connecting dSNAKE Remote Audio The Qu mixer provides local sockets on its rear panel for all audio inputs and outputs. It can also work with remote audio by connecting over a single cable ‘digital snake’ to an Allen & Heath AudioRack, or to the Allen &…
-
Page 15
Available AudioRacks: AB168 16 Mic/Line in, 8 Line out — Floor, shelf or rack mount The AB168 AudioRack can be used as a stage box on the floor or a surface, or mounted in a 19” rack using the optional rack ears. EXPANDER –… -
Page 16: Qu Systems
5.2 Qu Systems The Qu mixer has sockets for all its inputs and outputs on its rear panel and can therefore be used without any additional rack. However, if you wish to use a digital snake to connect remote stage audio to the mixer using a single Cat5 cable then there are several rack options available.
-
Page 17
Qu-32 Qu-32+AR84 – 8 remote inputs. Qu-32+AR2412 – Access to 24 – All inputs and outputs Provides 4 outputs mic inputs near the stage. are available locally. Qu-32 Qu-32 Qu-32 dSNAKE dSNAKE CH1-24 Out1-12 CH1-8 Out1-4 AR84 AR2412 Qu-32+AB168 – Digital snake Qu-32+2x AB168 –… -
Page 18: The Me Personal Mixing System
5.3 The ME Personal Mixing System The Allen & Heath ME Personal Mixing System can be used with the Qu mixer. This provides customisable personal monitor control for individual musicians and performers on stage. ME-1 personal mixer – A compact personal mixer able to work with up to 40 channels.
-
Page 19: Operational Overview
6. Operational Overview This section provides an overview of the Qu layout and operation to help you get started quickly. The Qu- 16 mixer is shown here. Touch Screen Screen select TouchChannel SuperStrip Qu-Drive Fader Flip Engineer’s monitor Copy/Paste/reset Function key ( Mix assign SoftKeys Layer select…
-
Page 20
Mute key – Press to turn off the channel audio signal. This affects the send to all mixes including LR, groups, effects and stage monitors. The key lights red when muted. It flashes when muted by a Mute or DCA Group master. Sel key (select) –… -
Page 21: Channel Naming
6.2 Channel Naming Qu channels, FX, mixes and groups can be named using the screen keypad. The following can be named: Mono input channels Stereo input channels FX Returns FX Sends Groups Matrix Mute Groups DCA Groups Channel names The name is displayed at the top left of the Processing Routing screens.
-
Page 22: Channel Processing
6.3 Channel Processing The SuperStrip provides familiar, analogue feel, one function per knob control of channel and mix master processing such as equalisers and dynamics. The Touch Screen displays the parameter values and provides additional related controls while in the Processing screen.
-
Page 23
Preamp An analogue preamplifier (‘head amp’) matches each connected microphone or line signal to the operating level of the console before it gets converted to digital to be processed and mixed with the other channels. Source lets you choose one of four sources as the input to the channel: Local –… -
Page 24
Gain Peak Turn up Gain so that the average loud signal reads into the yellow of the meter. Turn down if any red peak light flashes. Polarity Touch Ø to reverse the polarity of the input signal, for example that of the lower mic when working with two microphones on a snare drum. -
Page 25
(high pass filter) The HPF is used to reduce unwanted low frequency sounds such as vocal popping, wind noise and stage rumble. Switch the HPF in using the In key. Use the panel rotary or screen button and rotary to sweep the cut-off frequency until you have reduced the unwanted sound. -
Page 26
Use the In key to switch the compressor in and out and turn up Gain so that the average volume is similar. Attack sets how fast the compressor starts to work when the threshold is reached. Release sets how fast it stops compressing when the signal drops below the threshold. -
Page 27: Processing Libraries
Press the GEQ Fader Flip key to view and adjust the GEQ on the faders while a mono or the LR mix is selected. The screen highlights the active range of frequencies. Press the switch again to change range or return to normal mix mode. The faders toggle between the lower and higher ranges of frequencies with a useful overlap.
-
Page 28: Channel Routing
6.7 Channel Routing The Touch Screen presents tabs to access the channel assignments and send levels when its fader strip key is selected and the Touch Screen Routing screen is active. The Channel Block Pan control provides quick access to the related mix pan setting for the channel. The key is used to access the Mute Group masters while in any Routing screen.
-
Page 29: Working With The Groups (Not Qu-16)
Channel Audio Group Assign screen The Qu-24 includes two stereo Group mixes, and the Qu-32 has four. Groups are not available on the Qu-16. This screen lets you assign one channel to all groups. To work with the assignments from all channels to one…
-
Page 30: Working With The Matrix (Not Qu-16)
Choose Post-All processing for FX sends. Mix to Matrix Sends (not Qu-16) The Qu-24 and Qu-32 include two stereo Matrix mixes. These are not available on the Qu-16. The Groups, Mixes and LR can be sent to the Matrix.
-
Page 31: Mute And Dca Groups
6.11 Mute and DCA Groups The Qu mixer provides 4 Mute Groups and 4 DCA Groups. These let you control the levels of groups of channels or mixes. Mute Group – Provides a single master Mute key to mute or unmute all channels assigned to the group.
-
Page 32: Using Mute Groups
To assign Mute Groups — Select the Mute Group Assign tab, then touch the tab for the Mute Group you wish to assign. To assign DCA Groups — Select the DCA Group Assign tab, then touch the tab for the DCA Group you wish to assign.
-
Page 33: Using Dca Groups
Touch a DCA Level box and use the screen rotary to adjust its level. Its value is shown in the box. 2. The Qu-32 provides dedicated DCA fader control strips on its Master layer. These provide direct access to the 4 DCA groups.
-
Page 34: The Master Strip
LR mix. This is the normal selection for mixing the FOH (main PA) sound. sets the strip to control the FX internal effects send master. The Qu-16 has 2 FX buses. The Qu-24 and Qu-32 have 4 FX buses. Mix, Grp sets the strip to control one of the mono or stereo mix or Group masters.
-
Page 35: Working With The Sends On Faders
6.15 Working with the sends on faders: Select a Mix — Press a key. The master strip presents the mix fader and controls. The channel faders move to present Qu-16 the sends to that mix. Adjust Send levels – For Mix and FX sends. Move the channel faders.
-
Page 36: Touch Screen Mixing Functions
7. Touch Screen Mixing Functions The Qu features an 800×480 pixel, colour touch screen for quick and intuitive setup and control of the mix. The Qu-16 and Qu-24 have 5” screens. The Qu-32 has a larger 7” screen. screens TouchChannel…
-
Page 37: Copy, Paste, Reset Keys
Status Bar – This lower screen toolbar shows useful system information and is always visible. key function — for example to show that the key is available to select a Library or Options page. Scene information – Shows the number and name of the current (Curr:) and next (Next:) scenes.
-
Page 38: The Sel Screens — Processing And Routing
7.2 The screens – Processing and Routing Processing Screen – When selected this screen presents the processing including Preamp, Gate, EQ, Compressor for the channel or master currently selected using its strip key. Touch the top part of the screen to select the processing block you wish to view or adjust, for example Preamp or PEQ.
-
Page 39: Home Screen — User
7.4 Home Screen – User Three User Profiles are available to protect selected functions and restrict user access, for example for volunteer operators in houses of worship, or guest engineers visiting venues. The Admin user has access to all functions and can set permissions and allocate passwords if required for the other users. This screen lets you log in as one of 3 Users with different permissions: …
-
Page 40: Home Screen — Meters
Increase levels if the meter readings are consistently low. The Qu-24 meters screen is shown here. Qu-32 provides two pages of meters. The Qu-16 does not include Group and Matrix meters.
-
Page 41
Patch the source to be recorded using the Setup / Output Patch / USB Audio screen. Touch the track 17 box and turn the rotary to select the left source. Press the ‘+1’ key to increment the right source to track 18, or use the rotary to select an unrelated source. -
Page 42
Qu-Drive Multitrack page – This screen presents the controls for multitrack recording to and playback from a USB storage device plugged into the top panel Qu-Drive port. The blue Stop button lights if the USB device is recognised by the mixer. The controls are disabled if not plugged in or recognised. -
Page 43: The Fx
7.8 The FX Qu features 4 internal stereo FX (effects) processors. Each can be loaded from a library of different effects types and presets. These are the same as found in the flagship Allen & Heath iLive digital mix system and are based on emulations of popular industry standard effects.
-
Page 44
Symphonic Chorus — A faithful emulation of the 80’s classic chorus effect. Simple to use and frequently requested. The unit has just two controls, Frequency and Depth controlling the rate and delay range of the stereo modulator. The unit produces a rich, lively and wide chorus sound with a suggestion of very mild phasing / flanging. -
Page 45: Working With Fx — Adding Vocal Reverb
7.9 Working with FX – Adding vocal reverb: Press the FX key to open the screen. Touch to select FX1. Press the key to open the Library page. Touch ‘Factory’. Recall a Reverb into the FX1 slot if one is not already loaded. Open the Back Panel view and check that FX1 is set for Mix>Return with FX1 as its input.
-
Page 46: Scene Memories
7.10 Scene Memories Qu provides 100 Scene memories. These store and recall a snapshot of all live mixing parameters. Scenes have many applications. They can be used to store settings for bands during sound check for recall before they take to the stage during the show. Scenes can also be used for cue recall during theatre shows, or to provide a known starting point for different events or users in a multi-purpose venue.
-
Page 47: Scene Contents
Scene contents A Scene stores the following: A Scene is a ‘snapshot’ of the Qu mixer settings. It Preamp settings stores the current layout and patch, and parameters Channel processing and linking associated with live mixing. It does not store user …
-
Page 48
The Filter screen Filter parameters: A Recall Filter protects one or more parameter types for all channels. Inputs/FX (All CH, ST, FX Ret, Groups) A scene stores all live mixing parameters. A Recall Input patch (Local, dSNAKE, USB) Filter can be set to protect (block) chosen parameters … -
Page 49: Touch Screen Setup Functions
8. Touch Screen Setup Functions Press the Setup key next to the Touch Screen to open the Setup screens. Touch the top tabs to access the different categories of setup function. Touch the tabs below to open up the related options available. Dimmer –…
-
Page 50: Audio Setup -Signal Generator
8.3 Audio Setup –Signal Generator Set up and assign the Signal Generator to test loudspeakers and align levels between equipment. Source – Touch to open the list of sources available: Sine – Pure tone with adjustable frequency. Set to 1kHz and use meters to match equipment levels.
-
Page 51: Control Setup — Softkeys
Layer keys together. Use the space provided to label the custom strips. 8.5 Control Setup — SoftKeys Qu-16 provides 4 SoftKeys. The Qu-24 and Qu-32 Qu-24 shown provide 10 SoftKeys. These are called ‘Soft’ because they can be assigned to different functions by the user.
-
Page 52: Control Setup — Network
8.6 Control Setup — Network Use this screen set the TCP/IP address for the Network port and the name used to identify the Qu mixer on the network. It is important that the network address is compatible with the addresses of equipment connected to the port, for example a laptop providing MIDI control of mixer parameters, or a wireless router providing remote control using the Qu-Pad iPad app.
-
Page 53: Usb Data — Scene Transfer
8.8 USB Data – Scene Transfer Individual Scenes can be transferred between Qu mixers via a USB device (key or drive) plugged into the Qu-Drive port. This provides a quick way to transfer settings without overwriting the current scenes and preferences.
-
Page 54: Usb Data — Show Transfer
8.10 USB Data – Show transfer Qu mixer settings can be stored to a USB device (key or drive) plugged into the Qu-Drive port. Data can be archived to computer and transferred between Qu mixers. A ‘Show’ stores all the Qu mixer settings and memories.
-
Page 55: Output Patch Setup — Surface
Mix 6 none Matrix post-fader Mix 7 none Mix 8 none PAFL Stereo PAFL monitor Qu-24 and Qu-32 Reset dSNAKE Patch dSNAKE Qu out Qu out Qu out Mix 1 Mix 9 MTX1 L Mix 2 Mix 10 MTX2 R…
-
Page 56: Output Patch Setup — Monitor
CH14 CH22 ST3 R Mix8 R CH15 CH23 FX1ret L Mix9 L CH16 CH24 FX1ret R Mix10 R Qu-32 Reset Default Monitor Patch Qu out Qu out Qu out Qu out Qu out CH17 CH25 Grp1 L CH10 CH18 CH26…
-
Page 57: Output Patch Setup — Usb Audio
This includes the Qu-Drive Stereo, Qu-Drive Multitrack and the USB B audio streaming. Note — The Qu-16 provides 24 patchable USB outputs. The Qu-24 and Qu-32 provide 32 USB outputs. Qu-Drive and USB B streaming share the same block of patchable tracks: …
-
Page 58: Utility — Calibration
8.15 Utility — Calibration Use the routines here to calibrate the touch accuracy of the Touch Screen and positional accuracy of the Motor Faders. Follow the on-screen instructions. 8.16 Utility – Qu-Drive This screen lets you check and format a USB device (key or hard drive) for use with Qu-Drive.
-
Page 59: Utility — Firmware Update
8.17 Utility – Firmware Update The Qu mixer operating firmware can be easily updated using a USB device (key or drive). Make sure the USB device has been previously checked and formatted to work with the Qu mixer. If you need to format the device then use the Format facility in Setup / Utility / Qu-Drive screen.
-
Page 60: Working With Audio Streaming And A Daw
9. Working with Audio Streaming and a DAW The Qu mixer can stream audio and send MIDI messages to and from an Apple ® Mac or Windows ® computer via the rear panel USB B port. This lets you work with a DAW (Digital Audio Workstation) running on your computer.
-
Page 61
1 and 2. You can change this manually on the Mac, Qu-16 and Qu-24 ST3 channel, or to CH31- and use the latest version of the Qu Windows Driver on 32 for the Qu-32. Download the latest driver the PC. from the Allen & Heath web site. -
Page 62: Qu-Pad Ipad App
10. Qu-Pad iPad app Qu-Pad is an engineer’s mixing tool providing wireless mobile control for the Qu mixer. It gives you the freedom to walk the room or stage and control the sound right where it is needed. Qu-Pad is intended for live mixing control, not for system setup or memory access.
-
Page 63: Resetting The Mixer
11.Resetting the Mixer There are two ways to reset the Qu settings: 11.1 Reset Mix Settings – A starting point for mixing This button in the Scenes screen resets the mixer to a known starting point for mixing. It provides a quick way to reset the processing, mixes and patching before a show or after another user has finished with it.
-
Page 64: System Hard Reset
11.2 System Hard Reset A power up reset is available if you need to fully reset the Qu mixer settings and memories. This could be done to clear the system out before sending the mixer to a client, or if you suspect a system problem. To reset mix parameters before starting a show or sound check, use a Scene or the Reset Mix Setting function described earlier in this guide.
-
Page 65: Specifications
– Blocking or obstructing the ventilation slots may cause damage to the mixer through overheating. Qu-16 = 440 Qu-24 = 632 Qu-32 = 850mm 20 degrees Qu-16 Rack Mount Option A kit of parts is available from Allen & Heath to mount the Qu-16 in a standard 19”…
-
Page 66: Qu-16 System Block Diagram
12.2 Qu-16 System Block Diagram Qu Mixer User Guide AP9372 iss.4…
-
Page 67: Qu-24 And Qu-32 System Block Diagram
12.3 Qu-24 and Qu-32 System Block Diagram Qu Mixer User Guide AP9372 iss.4…
-
Page 68: System Specifications
100-240V AC, 50/60Hz Attack / Release 300us – 300ms / 100ms — 2s Mains Power Maximum Power Consumption Knee Soft/Hard Qu-16= 82W, Qu-24= 120W, Qu-32= 150W Types Peak Manual, RMS Manual, SlowOpto, PunchBag Qu-Drive USB Audio USB A Device Use a USB hard drive (not a USB key) FX …
-
Page 1
V1.5 For firmware Check www.allen-heath.com for the latest firmware available Publication AP9372… -
Page 2
Limited One Year Manufacturer’s Warranty This product is warranted to be free from defects in materials or workmanship for period of one year from the date of purchase by the original owner. To ensure a high level of performance and reliability for which this equipment has been designed and manufactured, read this User Guide before operating. -
Page 3: Safety Instructions
IMPORTANT — Read these instructions before starting: Safety instructions Before starting, read the Important Safety Instructions printed on the sheets supplied with the equipment. For your own safety and that of the operator, technical crew and performers, follow all instructions and heed all warnings printed on the sheet and on the equipment panels. System operating firmware The function of the Qu mixer is determined by the firmware (operating software) that runs it.
-
Page 4: Packed Contents
LED lamp with built-in dimmer Part: QU-16-RK19 Part: LEDlampX Soft cover AP9262 Qu-16 AP9458 Qu-24 AP9639 Qu-32 Cat5 cables For use with dSNAKE remote Qu-Pad app for iPad audio Available from the Apple Store AH8822 2m (6.6’) short patch AH9651 20m (66’) coil AH9650 100m (330’) drum…
-
Page 5: Table Of Contents
2. Contents Packed contents ……………………..4 Contents ………………………… 5 Introduction ……………………….7 Overview and Features ………………….7 System Architecture and Processing ………………8 Differences between the Qu models ………………9 …
-
Page 6
12.4 System Specifications ………………….68 About this guide This is the User Guide for the Allen & Heath Qu-16, Qu-24 and Qu-32 digital mixers. Please Note V1.5 This guide refers to Qu firmware . Please refer to the Allen &… -
Page 7: Introduction
Qu-24 – Larger model with 24 mic and 3 stereo inputs. Adds stereo Groups, Matrix and more SoftKeys. Qu-24 – Largest model with 32 mic and 3 stereo inputs. Adds 2 more stereo Groups. Qu-16 Qu-24 Qu-32 16 Mic/Line channels 24 Mic/Line channels 32 Mic/Line channels …
-
Page 8: System Architecture And Processing
3.2 System Architecture and Processing The following diagrams show the Qu-16, Qu-24 and Qu-32 I/O (inputs and outputs), audio architecture and processing available. The differences between the models and the routing capability of each processing section is illustrated. Refer also to the more detailed System Block Diagrams at the rear of this guide.
-
Page 9: Differences Between The Qu Models
3.3 Differences between the Qu models All three models operate in the same way and have a similar touch screen menu structure. The larger models add Groups and Matrix. Other differences are shown here: 4 SoftKeys Shelf for iPad 2 Group masters 2 Matrix masters 10 SoftKeys 16 fader strips…
-
Page 10
Qu-16 is 24 out / 22 in, the Qu-24 is 32 out / 30 in, and the Qu-32 is 32 out / 32 in. Firmware — Different firmware is needed for each model. Choose either the Qu-16, Qu-24 or Qu-32 file when downloading firmware from the Allen &… -
Page 11: Connection Overview
4. Connection Overview The following connections are available on the rear panel of the Qu mixer. The Qu-16 is shown here. AES digital out Alt out Lamp 2Trk out LR main out Analogue Mix outputs Mic and Line inputs Talkback Mic in ST1 and ST2 Kensington…
-
Page 12: Local Output Connections
4.2 Local Output Connections Group, Mix, Matrix outputs – Balanced XLR line level outputs for the mono and stereo mixes, for example to feed monitor amplifiers, external processing devices, delay fill speaker systems and recording devices. These use low impedance, high quality differential driver circuits for connection to +4 or 0dBu equipment.
-
Page 13: Powering Up The Mixer
4.4 Powering up the mixer The Qu mixer has an internal universal voltage power supply unit. This means you can use your mixer in most parts of the world without the need to modify the unit as long the local mains supply is within the range: Mains Voltage = 100 to 240 V.AC…
-
Page 14: Connecting Dsnake Remote Audio
5. Connecting dSNAKE Remote Audio The Qu mixer provides local sockets on its rear panel for all audio inputs and outputs. It can also work with remote audio by connecting over a single cable ‘digital snake’ to an Allen & Heath AudioRack, or to the Allen &…
-
Page 15
Available AudioRacks: AB168 16 Mic/Line in, 8 Line out — Floor, shelf or rack mount The AB168 AudioRack can be used as a stage box on the floor or a surface, or mounted in a 19” rack using the optional rack ears. EXPANDER –… -
Page 16: Qu Systems
5.2 Qu Systems The Qu mixer has sockets for all its inputs and outputs on its rear panel and can therefore be used without any additional rack. However, if you wish to use a digital snake to connect remote stage audio to the mixer using a single Cat5 cable then there are several rack options available.
-
Page 17
Qu-32 Qu-32+AR84 – 8 remote inputs. Qu-32+AR2412 – Access to 24 – All inputs and outputs Provides 4 outputs mic inputs near the stage. are available locally. Qu-32 Qu-32 Qu-32 dSNAKE dSNAKE CH1-24 Out1-12 CH1-8 Out1-4 AR84 AR2412 Qu-32+AB168 – Digital snake Qu-32+2x AB168 –… -
Page 18: The Me Personal Mixing System
5.3 The ME Personal Mixing System The Allen & Heath ME Personal Mixing System can be used with the Qu mixer. This provides customisable personal monitor control for individual musicians and performers on stage. ME-1 personal mixer – A compact personal mixer able to work with up to 40 channels.
-
Page 19: Operational Overview
6. Operational Overview This section provides an overview of the Qu layout and operation to help you get started quickly. The Qu- 16 mixer is shown here. Touch Screen Screen select TouchChannel SuperStrip Qu-Drive Fader Flip Engineer’s monitor Copy/Paste/reset Function key ( Mix assign SoftKeys Layer select…
-
Page 20
Mute key – Press to turn off the channel audio signal. This affects the send to all mixes including LR, groups, effects and stage monitors. The key lights red when muted. It flashes when muted by a Mute or DCA Group master. Sel key (select) –… -
Page 21: Channel Naming
6.2 Channel Naming Qu channels, FX, mixes and groups can be named using the screen keypad. The following can be named: Mono input channels Stereo input channels FX Returns FX Sends Groups Matrix Mute Groups DCA Groups Channel names The name is displayed at the top left of the Processing Routing screens.
-
Page 22: Channel Processing
6.3 Channel Processing The SuperStrip provides familiar, analogue feel, one function per knob control of channel and mix master processing such as equalisers and dynamics. The Touch Screen displays the parameter values and provides additional related controls while in the Processing screen.
-
Page 23
Preamp An analogue preamplifier (‘head amp’) matches each connected microphone or line signal to the operating level of the console before it gets converted to digital to be processed and mixed with the other channels. Source lets you choose one of four sources as the input to the channel: Local –… -
Page 24
Gain Peak Turn up Gain so that the average loud signal reads into the yellow of the meter. Turn down if any red peak light flashes. Polarity Touch Ø to reverse the polarity of the input signal, for example that of the lower mic when working with two microphones on a snare drum. -
Page 25
(high pass filter) The HPF is used to reduce unwanted low frequency sounds such as vocal popping, wind noise and stage rumble. Switch the HPF in using the In key. Use the panel rotary or screen button and rotary to sweep the cut-off frequency until you have reduced the unwanted sound. -
Page 26
Use the In key to switch the compressor in and out and turn up Gain so that the average volume is similar. Attack sets how fast the compressor starts to work when the threshold is reached. Release sets how fast it stops compressing when the signal drops below the threshold. -
Page 27: Processing Libraries
Press the GEQ Fader Flip key to view and adjust the GEQ on the faders while a mono or the LR mix is selected. The screen highlights the active range of frequencies. Press the switch again to change range or return to normal mix mode. The faders toggle between the lower and higher ranges of frequencies with a useful overlap.
-
Page 28: Channel Routing
6.7 Channel Routing The Touch Screen presents tabs to access the channel assignments and send levels when its fader strip key is selected and the Touch Screen Routing screen is active. The Channel Block Pan control provides quick access to the related mix pan setting for the channel. The key is used to access the Mute Group masters while in any Routing screen.
-
Page 29: Working With The Groups (Not Qu-16)
Channel Audio Group Assign screen The Qu-24 includes two stereo Group mixes, and the Qu-32 has four. Groups are not available on the Qu-16. This screen lets you assign one channel to all groups. To work with the assignments from all channels to one…
-
Page 30: Working With The Matrix (Not Qu-16)
Choose Post-All processing for FX sends. Mix to Matrix Sends (not Qu-16) The Qu-24 and Qu-32 include two stereo Matrix mixes. These are not available on the Qu-16. The Groups, Mixes and LR can be sent to the Matrix.
-
Page 31: Mute And Dca Groups
6.11 Mute and DCA Groups The Qu mixer provides 4 Mute Groups and 4 DCA Groups. These let you control the levels of groups of channels or mixes. Mute Group – Provides a single master Mute key to mute or unmute all channels assigned to the group.
-
Page 32: Using Mute Groups
To assign Mute Groups — Select the Mute Group Assign tab, then touch the tab for the Mute Group you wish to assign. To assign DCA Groups — Select the DCA Group Assign tab, then touch the tab for the DCA Group you wish to assign.
-
Page 33: Using Dca Groups
Touch a DCA Level box and use the screen rotary to adjust its level. Its value is shown in the box. 2. The Qu-32 provides dedicated DCA fader control strips on its Master layer. These provide direct access to the 4 DCA groups.
-
Page 34: The Master Strip
LR mix. This is the normal selection for mixing the FOH (main PA) sound. sets the strip to control the FX internal effects send master. The Qu-16 has 2 FX buses. The Qu-24 and Qu-32 have 4 FX buses. Mix, Grp sets the strip to control one of the mono or stereo mix or Group masters.
-
Page 35: Working With The Sends On Faders
6.15 Working with the sends on faders: Select a Mix — Press a key. The master strip presents the mix fader and controls. The channel faders move to present Qu-16 the sends to that mix. Adjust Send levels – For Mix and FX sends. Move the channel faders.
-
Page 36: Touch Screen Mixing Functions
7. Touch Screen Mixing Functions The Qu features an 800×480 pixel, colour touch screen for quick and intuitive setup and control of the mix. The Qu-16 and Qu-24 have 5” screens. The Qu-32 has a larger 7” screen. screens TouchChannel…
-
Page 37: Copy, Paste, Reset Keys
Status Bar – This lower screen toolbar shows useful system information and is always visible. key function — for example to show that the key is available to select a Library or Options page. Scene information – Shows the number and name of the current (Curr:) and next (Next:) scenes.
-
Page 38: The Sel Screens — Processing And Routing
7.2 The screens – Processing and Routing Processing Screen – When selected this screen presents the processing including Preamp, Gate, EQ, Compressor for the channel or master currently selected using its strip key. Touch the top part of the screen to select the processing block you wish to view or adjust, for example Preamp or PEQ.
-
Page 39: Home Screen — User
7.4 Home Screen – User Three User Profiles are available to protect selected functions and restrict user access, for example for volunteer operators in houses of worship, or guest engineers visiting venues. The Admin user has access to all functions and can set permissions and allocate passwords if required for the other users. This screen lets you log in as one of 3 Users with different permissions: …
-
Page 40: Home Screen — Meters
Increase levels if the meter readings are consistently low. The Qu-24 meters screen is shown here. Qu-32 provides two pages of meters. The Qu-16 does not include Group and Matrix meters.
-
Page 41
Patch the source to be recorded using the Setup / Output Patch / USB Audio screen. Touch the track 17 box and turn the rotary to select the left source. Press the ‘+1’ key to increment the right source to track 18, or use the rotary to select an unrelated source. -
Page 42
Qu-Drive Multitrack page – This screen presents the controls for multitrack recording to and playback from a USB storage device plugged into the top panel Qu-Drive port. The blue Stop button lights if the USB device is recognised by the mixer. The controls are disabled if not plugged in or recognised. -
Page 43: The Fx
7.8 The FX Qu features 4 internal stereo FX (effects) processors. Each can be loaded from a library of different effects types and presets. These are the same as found in the flagship Allen & Heath iLive digital mix system and are based on emulations of popular industry standard effects.
-
Page 44
Symphonic Chorus — A faithful emulation of the 80’s classic chorus effect. Simple to use and frequently requested. The unit has just two controls, Frequency and Depth controlling the rate and delay range of the stereo modulator. The unit produces a rich, lively and wide chorus sound with a suggestion of very mild phasing / flanging. -
Page 45: Working With Fx — Adding Vocal Reverb
7.9 Working with FX – Adding vocal reverb: Press the FX key to open the screen. Touch to select FX1. Press the key to open the Library page. Touch ‘Factory’. Recall a Reverb into the FX1 slot if one is not already loaded. Open the Back Panel view and check that FX1 is set for Mix>Return with FX1 as its input.
-
Page 46: Scene Memories
7.10 Scene Memories Qu provides 100 Scene memories. These store and recall a snapshot of all live mixing parameters. Scenes have many applications. They can be used to store settings for bands during sound check for recall before they take to the stage during the show. Scenes can also be used for cue recall during theatre shows, or to provide a known starting point for different events or users in a multi-purpose venue.
-
Page 47: Scene Contents
Scene contents A Scene stores the following: A Scene is a ‘snapshot’ of the Qu mixer settings. It Preamp settings stores the current layout and patch, and parameters Channel processing and linking associated with live mixing. It does not store user …
-
Page 48
The Filter screen Filter parameters: A Recall Filter protects one or more parameter types for all channels. Inputs/FX (All CH, ST, FX Ret, Groups) A scene stores all live mixing parameters. A Recall Input patch (Local, dSNAKE, USB) Filter can be set to protect (block) chosen parameters … -
Page 49: Touch Screen Setup Functions
8. Touch Screen Setup Functions Press the Setup key next to the Touch Screen to open the Setup screens. Touch the top tabs to access the different categories of setup function. Touch the tabs below to open up the related options available. Dimmer –…
-
Page 50: Audio Setup -Signal Generator
8.3 Audio Setup –Signal Generator Set up and assign the Signal Generator to test loudspeakers and align levels between equipment. Source – Touch to open the list of sources available: Sine – Pure tone with adjustable frequency. Set to 1kHz and use meters to match equipment levels.
-
Page 51: Control Setup — Softkeys
Layer keys together. Use the space provided to label the custom strips. 8.5 Control Setup — SoftKeys Qu-16 provides 4 SoftKeys. The Qu-24 and Qu-32 Qu-24 shown provide 10 SoftKeys. These are called ‘Soft’ because they can be assigned to different functions by the user.
-
Page 52: Control Setup — Network
8.6 Control Setup — Network Use this screen set the TCP/IP address for the Network port and the name used to identify the Qu mixer on the network. It is important that the network address is compatible with the addresses of equipment connected to the port, for example a laptop providing MIDI control of mixer parameters, or a wireless router providing remote control using the Qu-Pad iPad app.
-
Page 53: Usb Data — Scene Transfer
8.8 USB Data – Scene Transfer Individual Scenes can be transferred between Qu mixers via a USB device (key or drive) plugged into the Qu-Drive port. This provides a quick way to transfer settings without overwriting the current scenes and preferences.
-
Page 54: Usb Data — Show Transfer
8.10 USB Data – Show transfer Qu mixer settings can be stored to a USB device (key or drive) plugged into the Qu-Drive port. Data can be archived to computer and transferred between Qu mixers. A ‘Show’ stores all the Qu mixer settings and memories.
-
Page 55: Output Patch Setup — Surface
Mix 6 none Matrix post-fader Mix 7 none Mix 8 none PAFL Stereo PAFL monitor Qu-24 and Qu-32 Reset dSNAKE Patch dSNAKE Qu out Qu out Qu out Mix 1 Mix 9 MTX1 L Mix 2 Mix 10 MTX2 R…
-
Page 56: Output Patch Setup — Monitor
CH14 CH22 ST3 R Mix8 R CH15 CH23 FX1ret L Mix9 L CH16 CH24 FX1ret R Mix10 R Qu-32 Reset Default Monitor Patch Qu out Qu out Qu out Qu out Qu out CH17 CH25 Grp1 L CH10 CH18 CH26…
-
Page 57: Output Patch Setup — Usb Audio
This includes the Qu-Drive Stereo, Qu-Drive Multitrack and the USB B audio streaming. Note — The Qu-16 provides 24 patchable USB outputs. The Qu-24 and Qu-32 provide 32 USB outputs. Qu-Drive and USB B streaming share the same block of patchable tracks: …
-
Page 58: Utility — Calibration
8.15 Utility — Calibration Use the routines here to calibrate the touch accuracy of the Touch Screen and positional accuracy of the Motor Faders. Follow the on-screen instructions. 8.16 Utility – Qu-Drive This screen lets you check and format a USB device (key or hard drive) for use with Qu-Drive.
-
Page 59: Utility — Firmware Update
8.17 Utility – Firmware Update The Qu mixer operating firmware can be easily updated using a USB device (key or drive). Make sure the USB device has been previously checked and formatted to work with the Qu mixer. If you need to format the device then use the Format facility in Setup / Utility / Qu-Drive screen.
-
Page 60: Working With Audio Streaming And A Daw
9. Working with Audio Streaming and a DAW The Qu mixer can stream audio and send MIDI messages to and from an Apple ® Mac or Windows ® computer via the rear panel USB B port. This lets you work with a DAW (Digital Audio Workstation) running on your computer.
-
Page 61
1 and 2. You can change this manually on the Mac, Qu-16 and Qu-24 ST3 channel, or to CH31- and use the latest version of the Qu Windows Driver on 32 for the Qu-32. Download the latest driver the PC. from the Allen & Heath web site. -
Page 62: Qu-Pad Ipad App
10. Qu-Pad iPad app Qu-Pad is an engineer’s mixing tool providing wireless mobile control for the Qu mixer. It gives you the freedom to walk the room or stage and control the sound right where it is needed. Qu-Pad is intended for live mixing control, not for system setup or memory access.
-
Page 63: Resetting The Mixer
11.Resetting the Mixer There are two ways to reset the Qu settings: 11.1 Reset Mix Settings – A starting point for mixing This button in the Scenes screen resets the mixer to a known starting point for mixing. It provides a quick way to reset the processing, mixes and patching before a show or after another user has finished with it.
-
Page 64: System Hard Reset
11.2 System Hard Reset A power up reset is available if you need to fully reset the Qu mixer settings and memories. This could be done to clear the system out before sending the mixer to a client, or if you suspect a system problem. To reset mix parameters before starting a show or sound check, use a Scene or the Reset Mix Setting function described earlier in this guide.
-
Page 65: Specifications
– Blocking or obstructing the ventilation slots may cause damage to the mixer through overheating. Qu-16 = 440 Qu-24 = 632 Qu-32 = 850mm 20 degrees Qu-16 Rack Mount Option A kit of parts is available from Allen & Heath to mount the Qu-16 in a standard 19”…
-
Page 66: Qu-16 System Block Diagram
12.2 Qu-16 System Block Diagram Qu Mixer User Guide AP9372 iss.4…
-
Page 67: Qu-24 And Qu-32 System Block Diagram
12.3 Qu-24 and Qu-32 System Block Diagram Qu Mixer User Guide AP9372 iss.4…
-
Page 68: System Specifications
100-240V AC, 50/60Hz Attack / Release 300us – 300ms / 100ms — 2s Mains Power Maximum Power Consumption Knee Soft/Hard Qu-16= 82W, Qu-24= 120W, Qu-32= 150W Types Peak Manual, RMS Manual, SlowOpto, PunchBag Qu-Drive USB Audio USB A Device Use a USB hard drive (not a USB key) FX …

1.
Qu-Pac
AP10025
|
AP9240/CL-1 |
||
|
• |
• |
|
AR2412 24 Mic/Line in, 12 Line out
: GLD -AR2412
AB 168 16 Mic/Line in, 8 Line out
: AB 1608
19” •• • • Qu -16
• • Qu-16 19” • .
: QU-16-RK19
dSNAKE Cat5. AR84 8 Mic/Line in, 4 Line out
: GLD -AR 0804
LEDlamp
4-pin XLR LED
(
)
: LEDlampX
Qu-16
: 9931
|
• C at5 |
• • |
||||
|
AP9262 Qu-16 |
|||||
|
• • |
dSNAKE |
||||
|
AP9548 Qu-24 |
|||||
|
AP9639 Qu-32 |
|||||
|
AH8823 2m (6.6’) |
|||||
|
AH9651 20m (66’) |
|||||
|
AH9981 50m (165’) |
Qu -Pa d app iPa d |
||||
|
AH9650 100m (330’) |
|||||
|
Qu -Yo u app iOS • |
|||||
|
ME |
Android |
||||
|
ME -1 |
Qu -C ontrol iOS • |
||||
|
ME-U 10-port PoE hub |
Apple Store / Google Play |

2.
|
1. |
. …………………………………………………………………………………………………….. |
.4 |
||
|
2. |
. …………………………………………………………………………………………………………………. |
.5 |
||
|
3. |
Qu ……………………………………………………………………………………………………. |
.6 |
||
|
3.1 |
Qu . ……………………………………………………………………………….. |
.7 |
||
|
4. |
………………………………………………………………………………………………………………………. |
.9 |
||
|
5. |
……………………………………………………………………………………………………………… |
.10 |
||
|
5.1 |
. ………………………………………………………………….. |
.10 |
||
|
6. |
. ………………………………………………………………………………………………………… |
.11 |
||
|
7. |
. …………………………………………………………………………………………….. |
.12 |
||
|
8. |
• . ………………………………………………………………………………………….. |
.13 |
||
|
9. |
Qu- . |
…………………………………………………………………………………………………………………….. |
.14 |
|
|
9.1 |
……………………………………………………………………………………… |
.14 |
||
|
9.2 |
. ………………………………………………………………………………………… |
.14 |
||
|
9.3 |
• . ……………………………………………………………………. |
.15 |
||
|
9.4 |
• . …………………………….. |
.17 |
||
|
9.5 |
• . …………………………………………………………………………………………. |
.18 |
||
|
9.6 |
• Qu-16, Qu-24 and Qu-32. ……………………………………………………………… |
.19 |
||
|
9.7 |
• • . …………………………………………………………….. |
.20 |
||
|
9.8 |
USB |
. ……………………………………………………………………………. |
.21 |
|
|
9.9 |
•• |
-• . ……………………………………………………………………………………….. |
.22 |
|
|
10. |
. …………………………………………………………………………………………………. |
.23 |
||
|
10.1 |
– . ……………….. |
.23 |
||
|
10.2 |
ۥ |
– ……………………………………………………………………………… |
.23 |
‚
|
ƒ Allen & Heath Qu-16, |
||||
|
Qu-24 |
Qu-32 . |
|||
|
„ |
• |
— |
||
|
Qu |
-• |
, • , |
Mixer |
|
|
Reference Guide, |
-• Allen & |
|||
|
Heath: |
www.allen-heath.com

3. Qu
|
GLD |
iLive, Qu Series |
||||||||||||||||||||||
|
, |
, |
||||||||||||||||||||||
|
, |
, |
FX |
, |
||||||||||||||||||||
|
, |
USB, |
||||||||||||||||||||||
|
, |
, |
iPad. |
|||||||||||||||||||||
|
• |
Qu |
: |
|||||||||||||||||||||
|
Qu -16 – • |
, |
16 |
3 . |
||||||||||||||||||||
|
Qu -24 – • 24 |
3 |
. • |
, |
||||||||||||||||||||
|
. |
|||||||||||||||||||||||
|
Qu -32 – • |
32 |
3 |
. • • 2 . |
||||||||||||||||||||
|
Qu -Pac – • |
Qu-32 |
, iPad |
. |
||||||||||||||||||||
|
Qu -S B – • |
Qu-32 |
, |
|||||||||||||||||||||
|
iPad. |
|||||||||||||||||||||||
|
Qu-16 |
Qu-24 |
Qu-32 |
|||||||||||||||||||||
|
16 • ./ |
. |
|
24 • ./ |
. |
32 • ./ |
. |
|||||||||||||||||
|
3 • |
|
3 • |
3 • |
||||||||||||||||||||
|
24 — |
|
32 — |
40 — |
||||||||||||||||||||
|
12 (4 |
, 3 , LR) |
|
12 |
(4 |
, 3(5) , LR) |
12 (4 |
, 3(7) , LR) |
||||||||||||||||
|
|
4 FX (2 |
) |
|
4 FX (4 ) |
|
4 FX (4 |
) |
||||||||||||||||
|
|
4 € |
|
10 € |
10 € |
|||||||||||||||||||
|
|
24 . , 22 . USB |
|
32 ., 30 . USB |
32 ., 32 . USB |
|||||||||||||||||||
|
|
2 ‚ |
|
‚ |
||||||||||||||||||||
|
|
2 • |
2 • |
|||||||||||||||||||||
|
|
AES |
, Alt • . 2TRK |
|||||||||||||||||||||
|
Talkback |
. |
||||||||||||||||||||||
|
|
dSNAKE Cat5 snake |
AudioRack •ƒ 1 |
|||||||||||||||||||||
|
|
4 Mute ‚ |
4 DCA |
‚ |
||||||||||||||||||||
|
4 |
|||||||||||||||||||||||
|
|
100 „ |
(AMM) |
|||||||||||||||||||||
|
|
… |
||||||||||||||||||||||
|
|
„ |
Qu Mixer G etting S tarted Guide

3.1 Qu
|
Qu |
||||||||||
|
. . : |
||||||||||
|
Qu-16 |
Qu-24 |
|||||||||
|
4 • |
• iPad |
2 • |
2 Matrix masters 10 SoftKeys |
|||||||
|
• |
||||||||||
|
16 • |
2 , |
24 • |
4 |
, |
|
|
• |
/ |
2 |
• • |
||
|
4 • • |
• |
2 • • |
4 • DCA |

|
Qu-16 |
16 ƒ./„ . |
Qu-24 24 ƒ./„ . |
||||
24 . , 22 . USB
Qu-32 32 ƒ./„ .
Au dio R ac ks —
Allen & Heath AB 1680 AR 2412 AR8 6.
, ,
Cat5 100 .
AudioRacks, .
AR 2412 •
Qu. S cene, L ibrary S how —
Qu . • , • ,
Qu-16. •
• • • Qu-16.
• , ,
• . • — Allen & Heath .
USB Audio — • USB, ,
• . •
. USB B ,
, Qu16 — 24 ./22 ., Qu24 — 32 ./30 ., Qu32QuPac — 32 ./32 .
– , .
Qu-16, Qu-24 Qu-32 • — Allen & Heath
. • .
Qu -Pa d Qu -C ontrol and Qu -Yo u apps — —
Qu . •
€ .
|
Qu-P ad Qu-C ontrol iOS. |
Qu-Y ou |
|
iOS • Android. |
|
|
‚ |
. |
Перед вами файл pdf, где представлена инструкция (руководство) на русском для ALLEN & HEATH QU-32C. Вы можете скачать ее либо изучить в онлайн режиме.
Подробные сведения об инструкции:
Устройство из раздела: цифровой микшерный пульт
Бренд-производитель: ALLEN & HEATH
Наименование модели: ALLEN & HEATH QU-32C
Язык: Руководство на русском языке
Файл: pdf
Размер файла: 2,01 MB

Скачать инструкцию к HARPER HDT2-1110
ЗАГРУЗИТЬ
Просмотр инструкции онлайн
инструкцияAllen & Heath Qu-32

Getting Started Guide
For Firmware Version V1.9
Before starting please check www.allen-heath.com for the latest Qu
mixer firmware and documentation.
Publication AP10025
Посмотреть инструкция для Allen & Heath Qu-32 бесплатно. Руководство относится к категории смесители, 35 человек(а) дали ему среднюю оценку 8.4. Руководство доступно на следующих языках: английский. У вас есть вопрос о Allen & Heath Qu-32 или вам нужна помощь? Задайте свой вопрос здесь
- 1. Packed contents
- 2. Contents
- 3. Introduction to the Qu Series
- 3.1 Differences between the Qu models
- 4. Installation
- 5. Rear Panel
- 5.1 Connecting and powering up the mixer
- 6. Front Panel
- 7. Audio Signal Processing
- 8. Wireless Control
- 9. Qu-Start
- 9.1 Things to check before starting
- 9.2 Set a known starting point
- 9.3 Prepare the mixer for your session
- 9.4 Set a starting point for processing and mix parameters
- 9.5 Save the settings
- 9.6 Mixing with Qu-16, Qu-24 and Qu-32
- 9.7 Security and user access
- 9.8 USB recording and playback
- 9.9 A few more functions
- 10. Resetting the Mixer
- 10.1 Reset Mix Settings – A starting point for mixing
- 10.2 System Hard Reset – Clear everything
Микшер Allen & Heath Qu-32 — это профессиональный микшерный пульт, имеющий 32 канала. Он имеет невероятно компактный дизайн, со следующими измерениями: шириной 849 мм, глубиной 471 мм и высотой 190 мм при весе 20000 г. Благодаря встроенному дисплею, оператор может легко контролировать весь процесс микширования. Он также имеет USB-порт, что обеспечивает надежный цифровой сигнал. Выходные разъемы Master (XLR) обеспечивают профессиональное качество звука на выходе. Общий вес пакета составляет 24000 г.
Allen & Heath Qu-32 является идеальной опцией для концертных выступлений, студийной работы и театральных представлений. Он способен обрабатывать обширный массив звуковых дорожек. Микшер имеет чистый и теплый звук благодаря высококачественным материалам, использованным в его конструкции. Благодаря широкому набору функций на борту, профессиональный звукорежиссер сможет легко работать с микшером.
В целом, Allen & Heath Qu-32 — это мощный и надежный микшер, который может воссоздавать звук в высоком качестве. Он легко управляется и позволяет оператору создавать уникальный звук без ущерба для качества. Данный микшер объединяет в себе передовые технологии и профессиональную функциональность, обеспечивая идеальный выбор для звукоинженеров любого уровня.

Главная
Вес и размеры
| Ширина | 849 mm |
| Глубина | 471 mm |
| Высота | 190 mm |
| Вес | 20000 g |
| Масса брутто | 24000 g |
| Ширина упаковки | 1000 mm |
| Глубина упаковки | 680 mm |
| Высота упаковки | 350 mm |
| Тип упаковки | Коробочная версия |
Аудио
| Количество каналов | 32 канала |
| Цифровая обработка звука | — бит |
Технические характеристики
| DJ микшер | — |
| Монтаж в стойку | — |
| Цвет товара | Черный |
| Функция видео | — |
| USB порт | Да |
| Тип USB коннектора | USB тип B |
| Вкл/Выкл переключатель | Да |
Порты и интерфейсы
| Master выходы (XLR) | 24 |
| MIDI выход | Да |
| Линейный вход микрофона | Да |
| Количество портов RJ-45 | 1 |
Экран
| Встроенный экран | Да |
| Сенсорный экран | Да |
Энергопитание
| Потребляемая мощность (в обычном режиме) | — W |
Содержимое упаковки
показать больше
Не можете найти ответ на свой вопрос в руководстве? Вы можете найти ответ на свой вопрос ниже, в разделе часто задаваемых вопросов о Allen & Heath Qu-32.
Какой вес Allen & Heath Qu-32?
Allen & Heath Qu-32 имеет вес 20000 g.
Как лучше всего выполнять чистку смеситель?
Для удаления отпечатков пальцев лучше всего использовать слегка влажную салфетку для уборки или мягкую чистую ткань. Пыль в труднодоступных местах лучше всего удаляется потоком сжатого воздуха.
Какая высота Allen & Heath Qu-32?
Allen & Heath Qu-32 имеет высоту 190 mm.
Какая ширина Allen & Heath Qu-32?
Allen & Heath Qu-32 имеет ширину 849 mm.
Какая толщина Allen & Heath Qu-32?
Allen & Heath Qu-32 имеет толщину 471 mm.
Какой тип USB-подключения Allen & Heath Qu-32 имеет?
Allen & Heath Qu-32 имеет USB тип B подключение.
Инструкция Allen & Heath Qu-32 доступно в русский?
К сожалению, у нас нет руководства для Allen & Heath Qu-32, доступного в русский. Это руководство доступно в английский.
Не нашли свой вопрос? Задайте свой вопрос здесь